
As you likely discovered as soon as you starting exploring the controls, features, menus, and Custom Settings of your 36.3 MP, full-frame Nikon D810, it is a powerful, highly customizable, and versatile camera. There are numerous Menu options and Custom Settings that you can make use of in order to fine-tune the camera to perfectly fit your needs, shooting style, and scene or situation. The autofocus system and exposure metering system can be adjusted according to your preferences, the camera controls can be customized and assigned to a variety of functions, the displays, White Balance, and Auto ISO can be tweaked according to your needs. Plus several new features have been added to the D810 compared to its predecessor the D800/D800E, and all of them enhance the shooting experience. Many of them will be explained throughout this article.
I’ve spent some dedicated time with the D810 as I’ve researched and written my e-book user’s guide to the camera called Nikon D810 Experience, and below are the some of the top “tips and tricks” I’ve discovered for setting up and photographing with this powerful dSLR. And be sure to read to the end of the article to learn about my free, detailed, and comprehensive Nikon D810 Setup Guide spreadsheet, which covers recommended Menu settings, Custom Settings, and exposure settings for various types of shooting situations!
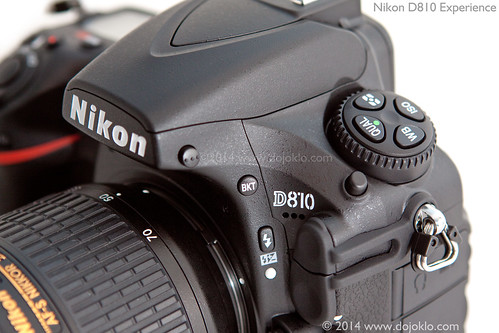
Detail of the Nikon D810 dSLR camera – photo by author
1. Take Control of the D810 Autofocus System: Before getting into some of the tips regarding features and functions specific to the D810, one first needs to take control of the basic functions of the camera, including the autofocus system and exposure metering settings. The D810 boasts the 51 point autofocus system of its predecessor the D800, with 15 centrally-located cross-type points. The large number of focus points and their positions in the Viewfinder will allow you to focus exactly where you wish – with minimal recomposing (when working in Single-Servo AF-S mode), plus will better enable you to track moving subjects throughout the frame when working in Continuous-Servo (AF-C) autofocus mode. The different autofocus modes (AF-S, AF-C) and the various autofocus area modes (Single Point, Dynamic Area, etc. plus the new Group Area AF) may be intimidating at first, but once they are understood, it is easy to determine which combinations fit your shooting needs. I wrote an entire post introducing the use of the Nikon autofocus system, its AF and AF-Area modes, and its controls. (Despite the larger number of AF points in the D810, the system works nearly the same as explained in the article.) If you have not used one of the more current Nikon dSLR models such as the D800, D7100/D7000, or D610/D600, you may at first be confused by the autofocus controls with the AF switch / button near the base of the lens (used in conjunction with the Command Dials), but you should quickly find that it is a quick and convenient way to change the AF modes and AF area modes.
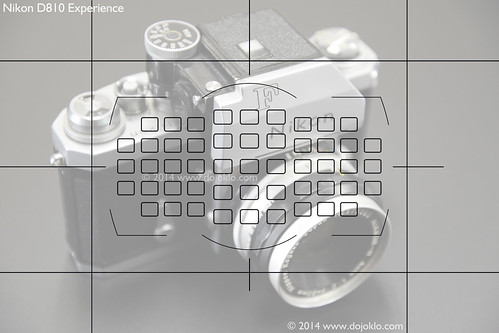
Simulated view of the Nikon D810 Viewfinder, with all 51 AF points shown for reference.
In addition, the D810 offers several Custom Settings to customize various aspect of the autofocus system, namely the ones in the a: Autofocus category. You can use these to tell the camera if achieving exact focus takes priority over maintaining the fastest continuous frame rate, how long the AF system continues to track a specific subject (distance) even if the subject momentarily moves away from the active AF point, and if the active AF point is illuminated in the Viewfinder. Using Custom Setting a5: Focus Point Illumination, you can now choose to display the cluster of all of the AF Points of a Dynamic-Area (such as 9-Point or 21-Point), rather than just the active middle point of the cluster. And you can even limit the number of selectable AF points to 11 if that helps you to more quickly or easily select your desired AF point. Most of these options are explained in my previous Nikon AF system post mentioned above.
The D810 also offers the ability to remember a specific AF Point so that the camera will automatically jump to the last point used when the camera is held in a specific orientation. For example, if you last used an upper-right AF Point when holding the camera in the grip-up position, then returned to shooting with the camera in landscape orientation, when you next hold the camera in the grip-up position, the camera will automatically jump back to that upper-right point. This is done through Custom Setting a9: Store by Orientation. You can register different points for each of the camera orientations. Similarly, you can assign the center Multi Selector Button to be used to jump to a Preset Focus Point of your choice, when the button is pressed during shooting.
2. Make Use of the new Group Area AF Autofocus Mode: The D810 borrows a new focus mode from the flagship Nikon D4s – Group Area AF, which makes use of a group of five AF Points arranged in a cross-shaped pattern. Instead of selecting a primary point with the surrounding points acting as “helper” points as with the Dynamic-Area AF modes, you will actually be selecting the group of five points which will all be used to attempt to focus on the subject. The Viewfinder will display the four outer points of the Group Area AF group of points, but not display the central point – perhaps so that you can better view the subject. Or you can use Using Custom Setting a5: Focus Point Illumination to display four surrounding dots rather than larger squares.
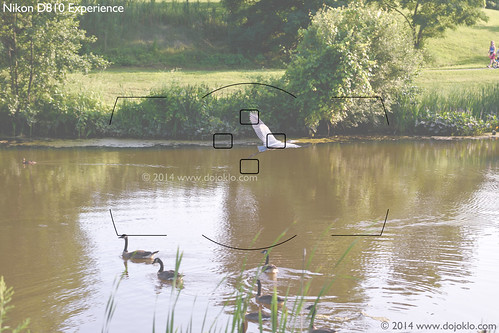
Nikon D810 – Group Area AF – Simulated view of the D810 Viewfinder, showing what you will see in the viewfinder when making use of Group Area AF, with the cross-shaped pattern of the four outer AF Points of the Group visible. Background image shown at 65% opacity to better view Focus Points.
Keep in mind that with the other somewhat similar Dynamic-Area AF modes, you choose a primary point and attempt to keep the subject located at that point, and the surrounding points act as “helper” points if the subject happens to move away from the primary point. But with Group Area AF you select the entire group of AF Points, and they all work equally to focus on the subject. This mode can be used similar to Single Point AF but when it might be challenging to locate the subject under an individual point, which might cause you to accidentally focus on the background. When working in AF-S Focus Mode and using Group Area AF, the selected AF Points will give priority to faces if they are present, otherwise they will focus on the closest subject.
3. Take Advantage of the new [i] Button, and the “Hidden” Features it will Access: The D810 adds the [i] Button (on the rear of the camera) which gives you immediate access to the Information Display screen, where many shooting settings and functions can be viewed and changed. You can press this button to turn on the Information Display on the Monitor and immediately access these settings with the use of the Multi Selector and OK Button or the center touch-pad button. Press the [i] Button a second time or the Info button to “de-activate” the settings and simply view the camera settings on the Information Display Screen. Or, after the Info Button is pushed to display the camera settings of the Information Display screen on the rear Monitor, this [i] Button is pressed to “activate” the screen to enable changing the settings. In addition to the readily accessible camera buttons on the body of the D810, this [i] Button and Information Display screen can be a quick and easy way to change many of the camera settings without having to dig into the menus, such as Active D-Lighting, High ISO Noise Reduction, Color Space (sRGB vs Adobe RGB), and Long Exposure Noise Reduction. Plus you can use this screen to quickly access and customize the Preview (Pv) Button, AE-L / AF-L Button, and Fn Button Assignments.
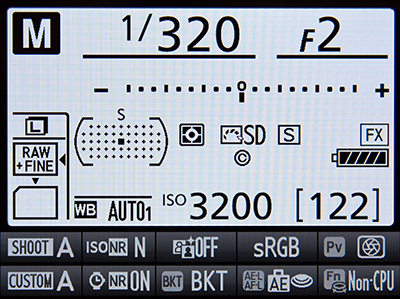
The Information Display of the D810, accessed with the Info Button or i Button, and “activated” with the i Button.
The [i] Button can also be used during Live View shooting, Movie shooting, and Image Playback – to quickly access a number of applicable functions, some of them are sort-of hidden unless accessed this way, such as the LCD Monitor White Balance adjustment, and the Highlight Display for showing “zebra stripes” at potentially over-exposed areas of the scene during Movie Live View.
During Live View shooting, the [i] Button can be pressed to access settings including Image Area, Active-D Lighting, the new Electronic Front-Curtain Shutter, Monitor Brightness, Photo Live View Display White Balance (explained just below), or Split-Screen Display Zoom to compare two magnified areas of the scene in order to confirm that the image is level (as will be described in Tip 5 below). The Photo Live View Display White Balance feature allows you to set the white balance of the Live View screen differently than the current white balance of the scene. This may sound odd, until you realize it can come in handy when setting up a shot that will actually be taken with different lighting, such as a Speedlight or studio strobes. So using this feature you can set the LCD Monitor WB to better match how the final image will appear.
During Movie shooting, the [i] Button will access Image Area, Frame Size and Frame Rate, Movie Quality, Microphone Sensitivity and Frequency Response, Wind Noise Reduction, Destination to select the active memory card, Monitor Brightness, Highlight Display to view “zebra-stripes” at overexposed areas of the scene, and Headphone Volume. Plus during video playback, the [i] Button is also used to display movie edit options.
When reviewing images during Image Playback, the [i] Button will access the Retouch Menu, which will allow you to apply various image edits such as Color Balance, Filter Effects, and Distortion Control. Be sure to take advantage of the [i] Button in these various mode, rather than digging into the menus, to easily access some of the most often used features as well as a couple of the “hidden” features. I have written a separate post about the “Hidden” Features of the D810 so that you can explore them further.
Nikon D810 Retouch Menu – Using the Cross Screen item of the Retouch Menu to create a cheesy starburst pattern!
4. Improve Exposures with the new Highlight Weighted Metering Mode: The D810 adds a brand new metering mode, Highlight Weighted Metering. This mode is designed for certain challenging lighting situations, in order to help retain detail in bright areas and avoid the overexposure of highlights. It does this by measuring the brightness in a scene then determining the best exposure level which will prevent the highlights from being overexposed (“blown-out”). It should prove to be a useful metering mode for those who shoot theater and live music performances where the lighting can suddenly and dramatically change, or even remain consistent but be prone to include bright “hot-spots” of illumination on a subject. It can also be used in other scenes that include a well lit subject against a dark background, particularly one that is moving and thus prevents the use of Spot Metering. And it can be used at a wedding reception where the bride may be under a spot light, and you wish to properly expose the scene and the subjects yet retain all the subtle details in the highlights of the wedding dress. Also take advantage of the quieter Quiet Shutter Release (Q) and Quiet Continuous Shutter Release (Qc) release modes when in theater, performance, or wedding situations, in order to reduce shutter noise as you take your shots.
With Highlight Weighted Metering Mode when the camera’s exposure settings are biased to avoid the overexposure of highlights, they may result in some of the other areas of the scene, such as the midtones, being slightly underexposed. However, with the excellent sensor performance of the D810, even at higher ISO settings, you should be able to easily adjust the midtone and shadow areas of an image without increasing the appearance of digital noise. Shooting in the RAW file format rather than JPEG format will allow you more post-processing flexibility for these adjustments than will images in the JPEG format. Note that when using a lens other than a Nikon G, E, or D lens (typical current lenses) with the D810 set for Highlight-Weighted Metering, the camera will actually use Center-Weighted Metering.

The Highlight-Weighted Metering Mode of the D810 is designed for theater / performance scenes such as this, where a brightly lit subject is against a dark background, and is prone to overexposed hot-spots due to theater lighting.
5. New Features Ideal for Landscape Photographers: The D810 includes several new features that landscape photographers will want to make use of, as well as those shooting in other types of controlled situations such as macro and studio still-life shooting. While the 36.3 megapixel sensor of the D810 has the potential to create images with incredible resolution, the high megapixel count can also call attention to less-than-sharp images. You will need a high quality lens to take full advantage of the resolution, plus make use of some features that will help reduce camera shake and thus image blur. In addition to the redesigned mirror/ shutter mechanism that is quieter and smoother, you can also make use of the new Electronic Front-Curtain Shutter to help reduce camera vibrations. When working in Mirror-up (Mup) Release Mode, this uses the sensor itself as the front curtain of the shutter, rather than a mechanical curtain. You can enable this with Custom Setting d5, as well as use it in Live View (press the i Button in Live View to access it). For maximum vibration reduction, you can also make use of:
-the Mirror Up release mode, which performs the jarring mirror-raising action prior to shutter release, requiring a second Shutter Button press to take the image. Use this with or without the Electronic Front-Curtain Shutter feature
-the Exposure Delay Mode (Custom Setting d4) to delay the shutter release for a couple seconds after you press the Shutter Button.
-and of course a tripod and a remote shutter release.
Landscape and architectural photographers can also make use of the new Split Screen Display Zoom during Live View, where you can simultaneously zoom in on two different areas of the frame (on the same horizontal plane) to help determine if they are level. Press the i Button when in Live View to access this feature, then navigate to the desired area of the scene, and zoom in or out. Press the Protect (key icon) Button to select the other half of the screen and navigate to the desired area of that side of the scene. Since this feature is used to determine if the framing is level, both sides of the screen will move up and down simultaneously when you navigate either side. Press the i Button again to exit the Split-Screen.

The Split-Screen Display Zoom of the D810, accessible during Live View shooting, to check if the framing of the scene is level.
You can also make use of the Electronic Level on the rear LCD Monitor, the Live View Electronic Level, or the Virtual Viewfinder Horizon level which is seen in the Viewfinder. Assign the Fn or Pv Button to display the Virtual Viewfinder Horizon level, via Custom Setting f4 or f5. And landscape photographers will also want to take advantage of the new, lower 64 ISO setting. This is a “native” ISO setting, not an artificial one created by processing. Landscape photographers (and videographers) often need to use dark ND filters in order to block some light so that they can take advantage of wide apertures settings, such as f/2.8. Or they are used so that you can obtain slower shutter speeds when desired, such as when you wish to blur the motion of water. By enabling you to lower the ISO below 100, it will reduce the need for an ND filter in some situations.
This article continues with Nikon D810 Tips and Tricks – Part 2, which can be read here:
http://blog.dojoklo.com/2014/08/29/nikon-d810-tips-and-tricks-part-2/
Remember, I also explain these features and functions in even more detail, as well as explain all the other aspects of the D810 in my e-book guide Nikon D810 Experience, available on my Full Stop website. The guide not only explains the features, functions, and controls of the camera, but more importantly explains when and why you will want to use them in your photography. Take control of your D810 and the images you create! Click the link below to learn more, preview, and purchase the guide:
http://www.dojoklo.com/Full_Stop/Nikon_D810_Experience.htm
And, in conjunction with the book, I have created a detailed and comprehensive Nikon D810 Setup Guide spreadsheet, which has recommended Menu settings, Custom Settings, and exposure settings for various shooting situations such as Landscape, Performance, Sports, and Travel, in order to help you set up your camera. You can learn about and download this free “cheat sheet” spreadsheet here:
http://blog.dojoklo.com/2014/06/30/nikon-d800800e-nikon-d810-setup-guide-with-recommended-settings/
If you have found this helpful and plan to purchase a Nikon D810 or some lenses or accessories for it, please consider using my affiliate links for Amazon or for B and H, found at the left side of this page. Your price will be the same, but they will give me a small referral fee – thanks! And please feel free to spread the word if this blog has been helpful.
Hi, after using this camera a few times and reading about it, I can not get the monitor on it to show me the photo I have just taken. What button do I push?? Thanks, Peter
Hello, You need to enable the “Image Review” item in the Playback Menu, and then the images will be automatically shown. Else press the…Playback Button to view the images!
hi there I have looked everywhere for the info on how to switch the nikond810 to the higher pixels to the lower ? Can you help ? Thanks
Hello, do you mean the FX vs. DX Image Area? You can find this in the Shooting Menu, under Image Area, which you can change to 1.2x, DX, or 5:4, each of which use a smaller portion of the sensor, and thus capture images with fewer megapixels.
Hi thanks very much for that. I’ve not looked yet so the 1.2x is the biggest file with the most megapixels? Brilliant site
Hello – yes, after the full size FX Image Area that uses the entire sensor, the 1.2x is the next largest. You can see the approximate print sizes for the L, M, and S settings for the different FX, 1.2x. DX, and 5:4 Image Areas on page 83 of the D810 User’s Manual, and the approximate file size (MB) on page 489-490.
Brilliant going to be studying your manual. Thank you
Hi l have found with the 810 it does not lock on to a bird in flight as well as its predecessor the 800, any advice on settings would be good. l use the Nikon 300mm f/2.8 with both 1.4 and 2 times TC (not at the same time)Thanks.
Make sure you are using AF-C focus mode, and an appropriate AF Area Mode for the size and motion of the bird. Make sure you fully understand which AF point or points you need to use to initially lock focus, and how the other surrounding points might act as temporary helper points. For example, with Dynamic Area 9 Point you need to lock on with the selected point, and then the immediate surrounding points with keep focus on the subject briefly, as you relocate the subject back under the selected point. Of course this can be a challenge with a moving bird. Also, if you have successfully initially locked onto the bird, Custom Setting a3 will determine how long the camera keeps focusing at that distance (and not suddenly refocus on the background) as you half-press or fully press the Shutter Button, even if you temporarily lose the bird (more on this below).
You may wish to try Group Area AF, where all 5 points in the group act together to focus on the subject, and you don’t need to initially locate the subject at a single center point of the group. Whichever point in the group locates the closest part of the subject will be used to focus. This it is like using a very large AF point. The downside is that the AF group may focus on a closer wing tip, rather than on the body or head of the bird where you might wish to focus.
Also, make sure Custom Setting a1 is set for Focus, and that you set Custom Setting a3 according to how well you are able to keep the selected focus point located at the moving subject. For example, if you set it for 1 or 2, the camera will quickly refocus on the background if you lose the subject (so typically not recommended!). If you set it for 4 or 5, it will remain locked at the initial focus distance (ideally your subject) for a longer period. However, if you initially focused on the wrong thing or the background as you start to track a moving bird, as you continue to half-press or press the Shutter Button thinking you are tracking the bird, it will then actually take the camera a while to refocus on the bird once you have actually located the bird at the selected AF point, and the moment will be gone.
Be sure to see my guide, Nikon D810 Experience, for much more info on the Nikon D810 AF system:
http://www.fullstopbooks.com/nikon-d810-experience/
Make sure you are using AF-C focus mode, and an appropriate AF Area Mode for the size and motion of the bird. Make sure you fully understand which AF point or points you need to use to initially lock focus, and how the other surrounding points might act as temporary helper points. For example, with Dynamic Area 9 Point you need to lock on with the selected point, and then the immediate surrounding points with keep focus on the subject briefly, as you relocate the subject at the selected point. Of course this can be a challenge with a moving bird. Also, if you have successfully initially locked onto the bird, Custom Setting a3 will determine how long the camera keeps focusing at that distance (and not suddenly refocus on the background) as you half-press or fully press the Shutter Button, even if you temporarily lose the bird (more on this below).
Also, make sure Custom Setting a1 is set for Focus, and that you set Custom Setting a3 according to how well you are able to keep the selected focus point located at the moving subject. For example, if you set it for 1 or 2, the camera will quickly refocus on the background if you lose the subject (so typically not recommended!). If you set it for 4 or 5, it will remain locked at the initial focus distance (ideally your subject) for a longer period. However, if you initially focused on the wrong thing or the background as you start to track a moving bird, as you continue to half-press or press the Shutter Button thinking you are tracking the bird, it will then actually take the camera a while to refocus on the bird once you have actually located the bird at the selected AF point, and the moment will be gone.
Be sure to see my guide, Nikon D810 Experience, for much more info on the Nikon D810 AF system:
http://www.fullstopbooks.com/nikon-d810-experience/