This post is the first in an occasional series in which I will describe the making of a photograph, from both a technical and artistic standpoint. I’ll go through the camera settings and why they were chosen, as well as the thought processes going through my head regarding composition and the creation of the image. These types of posts will be concrete examples of a previous post of mine called How Pros Photograph, which describes the various decisions that may be going through a photographer’s head as they work a scene and make photos.

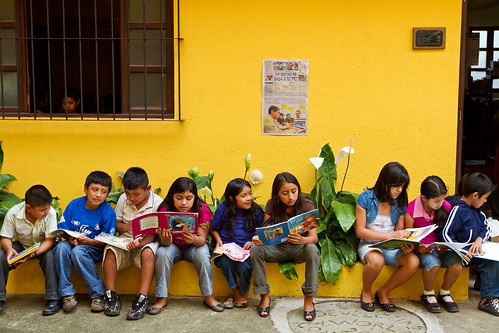
Ventanas Abiertas – San Miguel Dueñas, Guatemala – Canon 7D, 16-35mm f.2.8L II at 35mm, ISO 200, f/5, 1/100s
The Photo: As the first example photo, I’ve chosen the full, original version of the current header image of this blog (also seen just above), a line of kids reading in the courtyard of Ventanas Abiertas, an after-school learning center in San Miguel Dueñas, Guatemala. I traveled to this NGO near Antigua in November of 2009 to photograph the center, its founder, teachers and students, and its work in the community. I created this strip of images showing select photos from the series as I worked towards finding and making this image:
The Process: As I roamed the center taking photos, I spotted the kids all lined up on a curb in the courtyard, reading. The linear composition and the striking yellow wall made for a pretty obvious opportunity. I had a Canon 16-35mm f/2.8L II lens on a Canon 7D, with a protective UV filter on the lens. I first took a shot from a standing position, composing the image with the kids across the center of the frame. The focal length of the lens was at 23mm, a wide shot to capture the whole scene. That shot has a bit of a snapshot look, and didn’t take full advantage of the yellow wall, had far too much of the grey concrete patio, and created too static of a composition which did not make use of the opportunity to apply the rule of thirds for a more dynamic composition. I re-framed to move the line of kids to the bottom third of the frame, and still had the lens wide and was standing. To better fill the frame with just the kids and to create a better point of view, more on the level of the kids, I crouched down and zoomed in to 35mm. Although the 35mm focal length is a wide angle and thus prone to distortion, due to my camera to subject distance there is only a slight amount of distortion in the image. If I had moved closer to the subjects, more distortion would have been obvious. At this point I checked my settings and saw I was at ISO 400 from the previous shots in the shade, so I lowered it to ISO 200 since the late afternoon light was still pretty bright. The lowest ISO possible for the given situation will typically create a higher quality image file. For all the shots I was using Aperture Priority mode. I almost always use Av mode unless i am dealing with motion or blur that needs to be controlled (then I use Tv mode), or am using the flash in a controlled situation (and then I often use Manual, M mode). The aperture was set at f/5.0 to give me a relatively shallow depth of field, but enough so that the kids and the wall behind them were all in focus, but anything inside the doorway and window would be a bit blurry and thus less distracting. Unlike most of my images, the aperture setting wasn’t critical here, as the depth of the entire image is mostly all within a couple feet, from the kids’ toes to the wall behind them. So f/4.0 or f/8 would have given me virtually the same image. At ISO 200, the shutter speed was at 1/80 or 1/100, which was fast enough for handholding. A little faster would have been better to ensure there was no blurring if a child moved their head or hands during a shot, so leaving the camera set on ISO 400 would not have been a mistake.
As you can see in the first several photos, many of the kids were aware of me taking their photo, and were posing, goofing, or self conscious. I continued to take a few shots and waited for them to begin to ignore me. I liked the composition, and the window and the doorway to anchor the sides of the frame, so I continued to take the same shot, attempting to get the best moment of poses and facial expressions. I attempted to keep the image straight, aided by the lines visible in the viewfinder of the 7D. For all of the shots, I manually selected an auto-focus point, using a point below the central focus point which would line up on or near the face of one of the central kids. This would take advantage of the nice contrast between the dark hair and the lighter face to ensure proper auto-focus. By selecting an AF point exactly where I wanted to focus, I didn’t have to worry about focusing or have to re-frame each subsequent shot. The exposure metering was set on evaluative. The bright yellow wall could have easily messed with the metering, and I’m sure another camera like my 50D would have miscalculated the exposure based on the wall, but the 7D performed nicely on this mode. I checked my histogram a couple times to make sure I wasn’t blowing out any highlights and thus needing to use exposure compensation to adjust for that.

The Final Image: Canon 7D, 16-35mm f.2.8L II at 35mm, ISO 200, f/5, 1/100s
I took a series of 19 images of this same scene, over 1 minute and 12 seconds. As you can see, it didn’t take long for the kids to begin to ignore my presence. My chosen shot was from the middle of this series, IMG_3068. It stood out among all the others in the poses, positions, groupings, and facial expressions of all the kids. Throughout the time of the series, a head appeared in the window, and people moved around inside the doorway. Luckily with my chosen shot, the head was in the window, as I like this subtle, almost hidden detail. I liked the bit of green from the plant on the left, but my chosen shot unfortunately doesn’t show much of it.
The Post-Process: To create the final image, I adjusted the color and contrast in Adobe Camera RAW (ACR). I had shot the image in RAW for maximum quality and processing latitude. Due to the available light of the scene and the proper exposure, it required little processing. I set the Temperature at 4600 and the Tint to 8. I adjusted Recovery to 5 to bring back some of the detail of the yellow wall which was very slightly blown out, Fill to 15 to lighten up the children’s clothes, Brightness stayed at the standard 50, I set Contrast to 20 with plans to increase it a bit more in Photoshop. Clarity 20, Vibrance 15, and Saturation 0. I like a bit of color saturation, vibrance, and contrast in my images, but I prefer not to overprocess or to make the adjustments obvious. While the yellow of these images is definitely vibrant, especially compared to the dull, neutral RAW images, it is a realistic representation of the actual color. Typically I straighten and maybe crop a bit in ACR, but miraculously this shot was very level, and also left no room for cropping. In Photoshop I used Curves to adjust the contrast somewhere between the Linear and Medium presets, and used Unsharpen Mask to sharpen. I don’t know what my exact settings were, but I had to use aggressive sharpening because the Canon 7D I used had a severe front-focusing problem. The settings were probably Amount: 175 or 200, Radius: 1.8, and Threshold: 4.
The Lesson: We should always learn from our photos, so that next time we are in a similar situation, we can create an even better image. Some improvements I could have made to this image include possibly crouching or sitting even lower to be more on level with the kids faces (although this would have caused keystoning of the vertical lines), eliminating the doorway at right by either re-framing or moving slightly to the left (which would cut out a child or two on the right) or moving to my right and shooting back towards them at a slight angle, but this would have affected the straight-on view which I feel is important to this composition. I would not have minded a little more of the green plant on the left in the frame. The image demonstrates the importance of keeping the camera level and the sensor parallel to the subject to avoid unwanted distortion. The best way to keep the horizontal and verticals straight while taking the photo is to make sure the camera is not tilted up or down and that the sensor is parallel to the wall. This involves moving yourself and the camera up or down to get the framing you desire. Also, in post-processing, I could have used the lens correction menus in ACR or Photoshop to perfectly straighten all the verticals and horizontals. Finally, although the color looks good, now I would have paid more attention to adjusting the Temperture and Tint, or adjusting the white balance using Curves in Photoshop because I have experimented and learned a bit more about these settings since then. Also, now that I see IMG_3074 again, (the last one in the strip above) I like it a lot, and should probably process that one and add it to my collection of final images.
So hopefully you can see from this explanation and from my previous post that photographs don’t necessarily just happen. They are created through a combination of thought processes, a series of decisions, and the application of camera settings based on these decisions and on the situation at hand.
See the Related Posts section just below for links to parts 2 and 3 in this series.
And learn more about how to take control of your camera and the images you create with my Full Stop e-book camera and photography guides.


