Camera users are often curious about “hidden” features that their camera may have, though typically most advanced models really don’t have many, as long as one carefully goes through all of the Menu and Custom Settings items, and reads through the manual or a guide. However, with so many options and functions, there are a few items that are actually a bit hidden away on the Nikon Z7II and the Nikon Z6II. It’s not that the Z 7II and Z 6II manuals don’t mention them, or that they can’t be found with careful investigation of the camera, but you may need to have them called to your attention to learn how to locate them and how to take advantage of them. And there are a few button shortcuts to access features and settings that you simply need to learn if you wish to take advantage of, because once you are using your camera, they are not indicated in any menus or button icons.
These article is adapted from a section in my in my comprehensive Nikon Z 7II / Z 6II Experience user guide to the Nikon Z7II and Nikon Z6II. All of these “hidden” features, as well as all of the other features, functions, settings, and controls of the Z 7II and Z 6II are discussed in detail, in the guide. Many of these features were included on the original Z 7 and Z 6 models, but they may still be new for those coming from older dSLR models.
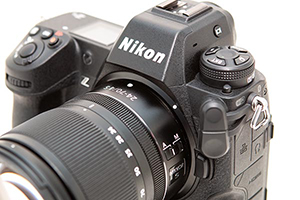
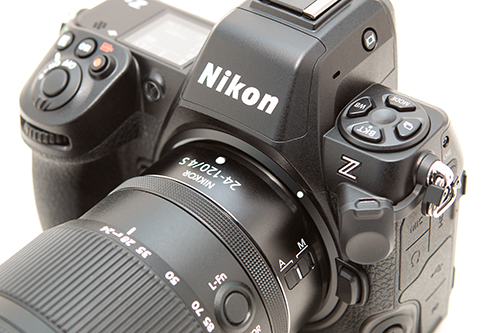
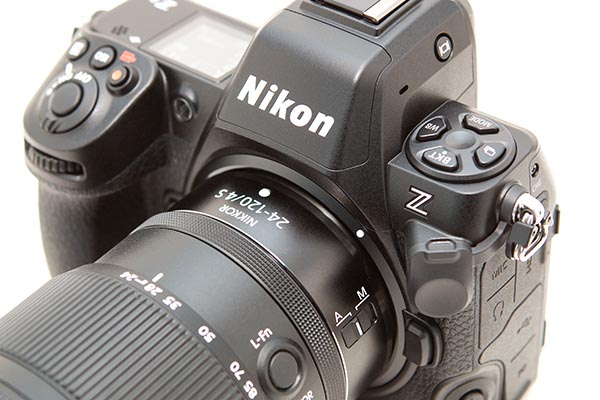
Figure 1 – Detail of the controls of the Nikon Z7II
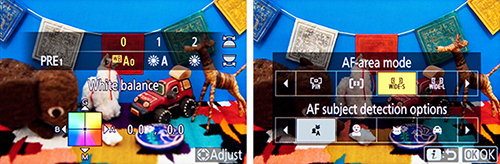
Displays and Button Settings – When the Information Display or the Live View scene is active on the rear Monitor, you can press some of the camera buttons to change the corresponding settings as you view them on the rear Monitor. Or you can also view and change them in the electronic Viewfinder, while shooting. For example, by default, the Fn1 Button is assigned to White Balance and the Fn2 Button is assigned to Focus Mode/AF-Area Mode. When you press these buttons, you can view and change those settings, and the screen will even indicate which Command Dial to use for each setting (see Figure 2 – left). If you customize those buttons for another setting such as Auto Bracketing or HDR, you will be able to view and change those settings on the displays, as you press the assigned button and turn the Command Dials.
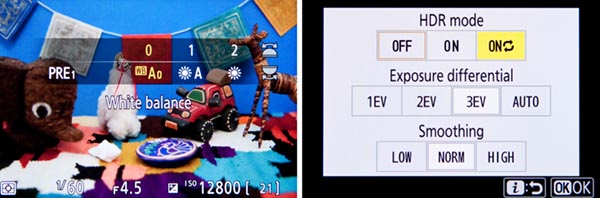
Figure 2 – Left: Using a Fn Button and the Command Dials to change the White Balance setting on the rear Monitor. Right: Changing the HDR options via the Photo-Mode i Menu.
The Z 7II and Z 6II also have a new display option, where you can view the scene on the rear Monitor without any of the shooting information or icons cluttering up the display. But setting up or making use of this feature is a bit hidden. You will need to assign one of the buttons to the Live view info display off setting. By default the Movie Record Button is set to this option.
i Button Features – You can press the i Button to access different contextual i Menus during photo shooting, video, and image playback. The Z7II and Z6II also add the ability to change additional sub-options of various settings, via the i Menu, without having to dig into the menus to set those options. For example, when using the WB item on the Photo-Mode i Menu to select Auto White Balance, you will also be able to select which of the three Auto White Balance sub-options you would like. And you will be able to directly fine-tune a White Balance setting using the adjustment grid. If you replace some of the default i Menu items with options such as HDR, Auto Bracketing, or Multiple Exposure, you will be able to directly access and change the various settings for those features (see Figure 2 – right).
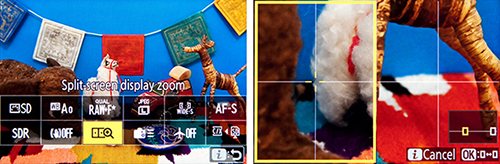
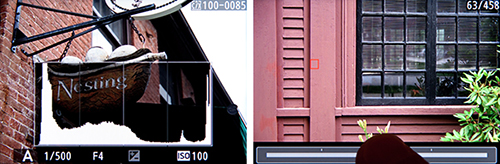
In some situations, the i Menu it is the only way to access and change certain of these hidden features. For example, the Photo-Mode i Menu will allow you to access the Split-screen display zoom feature. You will first need to use Custom Setting f1 – Customize i Menu and assign Split-screen display zoom to the Photo-Mode i Menu. Then when you are composing an image, you can access this feature which allows you to simultaneously zoom-in at two different areas of the scene, to help verify focus and to ensure that the composition is level across the scene (see Figure 3). This can come in handy for landscape and architectural photographers.
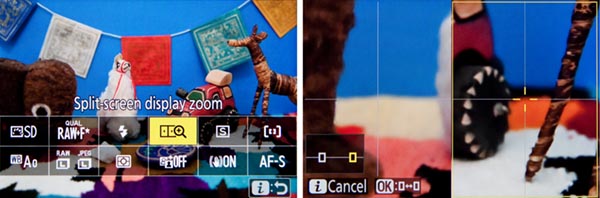
Figure 3 – Left: Press the i Button to access the i Menu screen with various shooting settings. You can use f1 to customize this menu, and add items such as Split-Screen Display Zoom. Right: Split-Screen Display Zoom shown in use, to compare two areas of the same scene to help determine if the framing is level.
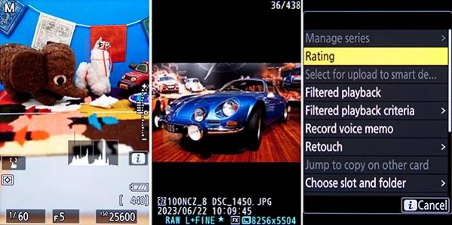
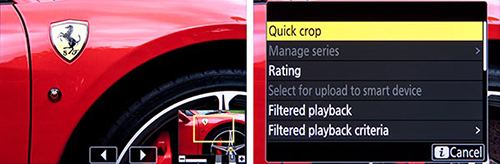
The Playback i Menu will allow you to access a hidden feature, the Quick Crop option. During image playback, you can magnify an image and adjust the framing as desired. If you then press the i Button to access the Playback i Menu, and select the Quick Crop option, you can automatically crop the image and save a new image with the crop that is currently seen on the display (see Figure 4 – left).
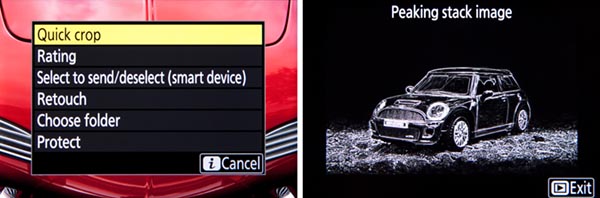
Figure 4 – Left: Accessing the Quick Crop feature via the image Playback i Menu. Right: The Peaking Stack Image preview was available on the original Z7 and Z6, but not on the Z7II or Z6II.
And when a Multiple Exposure series is in progress, you can press the Playback Button to view the last image. If you then press the i Button, you will access a menu that allows you to view the Multiple Exposure progress, as well as edit the series by retaking or discarding the last exposure if desired.
There are a couple different ways to change the settings on the i Menu. You can highlight the desired icon (see Figure 5 – left) then press the OK Button and view all the options. This method will even allow you to access and change various applicable sub-options. Or you can highlight the desired icon, and turn the rear Main Command Dial to directly change the setting on that screen. If a setting option includes sub-options, such as the three available Auto White Balance options, or the Continuous Low frame rates (see Figure 5- right), you will use the front Sub-Command Dial to change the sub-options.

Figure 5 – Left: Photo-Mode i Menu, accessed by pressing the i Button. After highlighting the desired setting, either press the OK Button, or use the Command Dials to change the settings. Right: The rear Main Command Dial will select the setting, and the front Sub-Command Dial can be used for any available sub-options, such as the Continuous Low frame rate.
Monitor Mode Button – This button isn’t hidden, but it is causing some users a bit of confusion when they are not able to see any menus or playback images on their rear Monitor screen. In order to select if the Monitor or the Viewfinder will be in use, you will need to press the Monitor Mode Button, which is located on the side of the Viewfinder “bump.” Press it repeatedly until you see the Prioritize viewfinder option, as you look on the rear Monitor or in the Viewfinder. Set it for this option for now, so that you can make use of both the Viewfinder and the rear Monitor. If you are pressing the Playback Button or the Menu Button and not seeing anything appear on the rear Monitor, be sure to look in the Viewfinder and set the Monitor Mode to Prioritize viewfinder.
Live View Exposure Preview – An important function to make note of is that you need to enable Custom Setting d9 – Apply Settings to Live View in order to view the scene, in the Viewfinder and on the rear Monitor, with the current camera and exposure settings applied. This will allow you to better preview the resulting image and make exposure adjustments, and will also enable you to access the Live View Histogram of the scene by pressing the DISP Button.
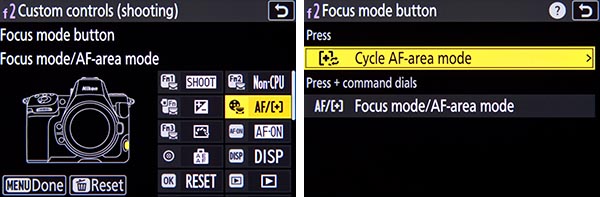
Custom Control Assignments – A few other hidden features of the Nikon Z7II and Z6II can only be accessed by customizing one of the camera buttons to assign it to that function, using Custom Setting f2. As mentioned above, you can assign a button to the Live view info display off option, for the uncluttered view of your scene on the rear Monitor display. A customization will allow you to press a hold one of the Fn Buttons to temporarily switch to a different Metering Mode, such as Spot Metering (see Figure 6 – left). If you will be using non-CPU, F-mount lenses with the Z7II or Z6II, you can register the lens to the camera, and thus gain additional functions such as in-camera Vibration Reduction. You will need to use f2 to assign the Choose non-CPU lens number option to one of the buttons, so that you can tell the camera which lens number is in use.
If you are making use of an optional wireless remote to trigger multiple cameras, there is also a “hidden” setting for this in the Custom Setting f2 button assignments. You can choose to assign the Fn1 Button, Fn2 Button, or Sub-Selector Center press to the Sync. Release selection option, which is used in conjunction with Custom Setting d3 – Sync. Release Mode Options. You can set up the camera so that, for example, when using the Z7II or Z6II as a master camera to remotely trigger other cameras, you can press the Fn1 (or Fn2) Button while taking the shot, and then just the master camera will shoot, or just the remote cameras and not the master, based on your settings.
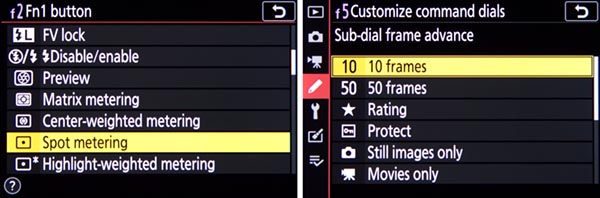
Figure 6 – Custom Control Assignments – Left: Assigning the Fn1 Button to the Spot Metering function, to temporarily switch to a different Metering Mode with the press of the button. Right: The Customize Command Dials, Sub-Dial Frame Advance options, to use a dial to jump ahead 10 images during image playback.
Sub-Dial Frame Advance during Playback – If you wish to quickly scroll through your images as you view them on the rear Monitor during playback, you can use the rear Main Dial to advance one image at a time, and use the front Sub-Command Dial to advance 10 or 50 images. To set this up, access Custom Setting f5 – Customize Command Dials, and set the Menus and playback option for On. The Sub-Command Dial will then be used to jump 10 or 50 images at a time, based on the Sub-dial frame advance setting. Set the Sub-dial frame advance item for 10 images or 50 images, or you can also choose to jump to protected images, still images or movies only, or to a different folder (see Figure 6 – right).
One Button Playback Zoom / Histogram – Using Custom Setting f3 – OK Button, you can assign the OK Button so that during image playback it will immediately zoom-in, at the magnification level of your choice, centered at the area of the active focus point so that you can closely inspect your image. Or you can instead assign the button press to display a large histogram with the image, so that you can evaluate your exposure (see Figure 7 – left).
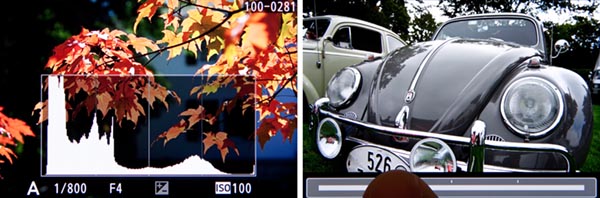
Figure 7 – Left: Use Custom Setting f3 – OK Button, Playback Mode to set the OK Button to show a magnified view or to show a large histogram. Right: Touch the bottom of the screen during full-image playback in order to access the “Frame Advance Bar” touch screen feature.
Frame Advance Bar – This image playback feature enables you to use the touch screen to quickly scroll through images without having to swipe one-by-one (see Figure 7 – right). And when viewing a magnified detail of an image, use the touch screen arrows to view the same magnified area of previous or following images.
Interval Timer Shooting vs. Time-Lapse Movie – The Nikon Z7II and Z6II include both the Interval Timer Shooting and the Time-Lapse Movie functions. In general, Interval Timer Shooting is used to create a series of images, taken at a specific time interval, which can later be combined into a time-lapse movie using software. Interval Timer also allows you to take a burst of multiple images at each interval, if desired. Time-Lapse Movie is used to take a series of individual images at a specified interval, that are automatically combined into a movie, by the camera, and saved to the desired memory card.
Due to a new addition to these cameras, these two functions now overlap a bit more. With the Z7II and Z6II, the the Interval Timer Shooting menu now has an Options item which will enable you to shoot a series of bracketed images, or to automatically create a time-lapse movie from the interval timer images. The advantage of doing this is that the camera will save all of the individual interval timer images, as well as create and save the time-lapse movie.
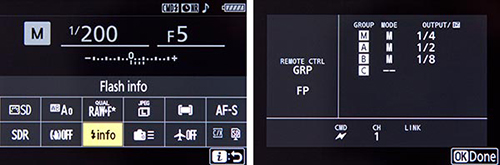
Flash Information Screen – With a compatible optional Speedlight flash attached and turned on, such as the SB-5000 or SB-500, press the DISP Button repeatedly to access the Flash Information Screen showing the current flash settings, and then press the i Button to view and change the various settings and options, including Wireless Flash Options (see Figure 8).
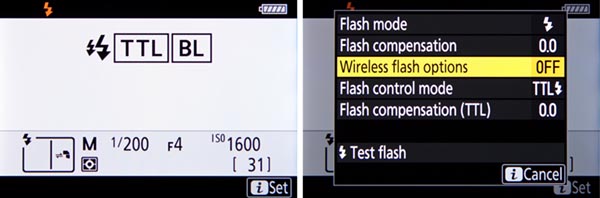
Figure 8 – Left: When using an optional Speedlight flash, press the DISP Button to access the Flash Information Screen showing the current flash settings. Right: Then press the i Button to view and change the various settings and options.
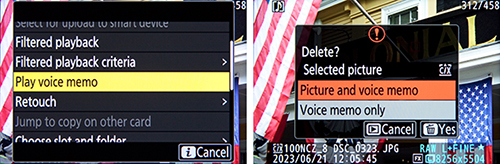
Voice Memo (Z 6II only) – With the firmware 1.30 upgrade to the Z 6II, you can add a voice memo to an image. In order to do this, you will first need to use Custom Setting f2 to assign the Movie Record Button to the Voice Memo option. Then during image playback, select the desired image, and press and hold the Movie Record Button to record the voice memo, which can be played back when viewing the image, and will be saved as a WAV file to the memory card.
Nikon Z7II / Nikon Z6II Menu Setup Guide
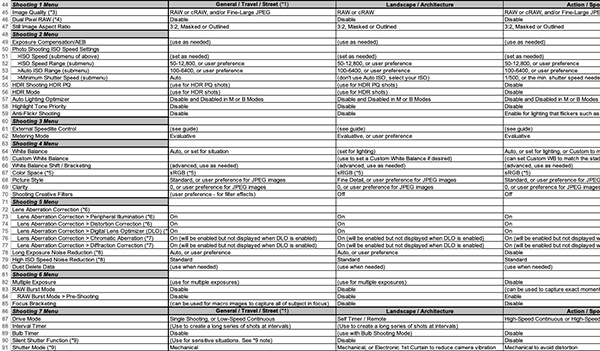
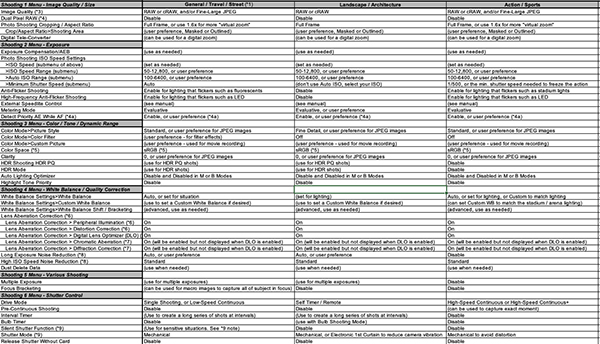
In addition to my Nikon Z 7II / Z 6II Experience user guide., I also offer a Z7II / Z6II Menu Setup Spreadsheet, with suggested settings and starting points for most all of the camera menu settings and Custom Settings. The Excel spreadsheet includes separate listings for different shooting situations including Landscape, Studio, Action, etc. You can download the spreadsheet here:
http://www.fullstopbooks.com/setup-guides/
Again, all of these hidden features and settings, and other unique features, as well as all of the other features, functions, settings, and controls of the Z7II and Z6II are discussed in detail, in my comprehensive Nikon Z 7II / Z 6II Experience user guide.
Be sure to share your portraits and other photos on my Nikon Z Experience Facebook page, covering all the Nikon Z models:
https://www.facebook.com/groups/nikonz7z6z5


 .
. 
 .
.