Setting Up the Nikon Z8 Menus

Nikon Z8 book manual guide how to learn use tips tricks quick start setup use learn

The powerful mirrorless Nikon Z8 offers far more menu items and customization options than most previous cameras in the Z line-up. In fact, most of the menu items and options are the same as the professional Z9 model. In order to take full advantage of this sophisticated camera, you are going to need to dig into the Menus and Custom Settings, and set up the camera to work best for how you shoot and for the type of situations you are shooting.

To assist you with this, I have created a detailed and comprehensive Nikon Z8 Menu Setup Spreadsheet, which lists suggested settings and starting points for the Photo Shooting Menu and the Custom Settings. It has complete and separate camera setup recommendations for different types of shooting, including:

General / Travel / Street
Landscape / Architecture
Action / Sports
Moving Wildlife / Birds
Studio / Portraits
Concert / Performance

Detail of the Nikon Z8 Menu Setup Spreadsheet

The Nikon Z8 Setup Spreadsheet can be downloaded from my website here. Printing instructions are also included on that page.

http://www.fullstopbooks.com/setup-guides/

For explanations of all the menu items, controls, features, functions, and autofocus system of the Z8, have a look at my clear and comprehensive Nikon Z8 Experience e-book guide. This user-friendly guide will help you to take control of your camera, and the images you create. Learn more about it and purchase it at my website here:

http://www.fullstopbooks.com/nikon-z-8-experience/

Setting Up the Canon EOS R8 Menus

The Canon EOS R8 mirrorless camera offers numerous menu items and customization options. In order to take full advantage of this camera, you are going to need to dig into the Menus and Custom Functions, and set up the camera to work best for how you shoot and for the type of situations you are shooting. To assist you with this, I have created a detailed and comprehensive Canon EOS R8 Menu Setup Spreadsheet, which lists suggested settings and starting points for the various Menus and the Custom Functions. It has complete and separate camera setup recommendations for different types of shooting, including:

General / Travel / Street
Landscape / Architecture
Action / Sports
Moving Wildlife / Birds
Studio / Portraits
Concert / Performance

A detail from the Canon EOS R8 Menu Spreadsheet

The Canon EOS R8 Menu Setup Spreadsheet can be downloaded from my website here. Printing instructions are also included on that page.

http://www.fullstopbooks.com/setup-guides/

The EOS R8 Menus are similar to the Canon EOS R7 menus, and I have also created a Canon EOS R7 Menu Setup video, which walks through all the items and settings of the Photo Menu, with explanations and suggested settings. Watch it on YouTube here, and be sure to subscribe to my channel to be notified when additional EOS R7 Menu Setup videos are posted.

To take full control of your EOS R, be sure to download my Canon EOS R8 Experience e-book, a comprehensive guide to the camera and all of its features and functions, including the powerful autofocus system with subject detection and subject tracking, available at http://www.fullstopbooks.com/canon-eos-r8-experience/

Setting Up the Nikon Z9 Menus

Nikon Z9 Menu Setup Settings

The pro-level mirrorless Nikon Z9 offers far more menu items and customization options than the previous cameras in the Z line-up. In order to take full advantage of this powerful camera, you are going to need to dig into the Menus and Custom Settings, and set up the camera to work best for how you shoot and for the type of situations you are shooting. To assist you with this, I have created a detailed and comprehensive Nikon Z9 Menu Setup Spreadsheet, which lists suggested settings and starting points for the Photo Shooting Menu and the Custom Settings. It has complete and separate camera setup recommendations for different types of shooting, including:

General / Travel / Street
Landscape / Architecture
Action / Sports
Moving Wildlife / Birds
Studio / Portraits
Concert / Performance

Detail of the Nikon Z9 Menu Setup Spreadsheet

The Nikon Z9 Setup Spreadsheet can be downloaded from my website here. Printing instructions are also included on that page.

http://www.fullstopbooks.com/setup-guides/

Setting up the Sony a7R IV Menus

Sony’s full-frame mirrorless cameras, including the 61 megapixel Sony a7R IV, are notorious for having complicated and difficult to navigate menu systems. This is made worse by having to go back and forth between the camera manual and the a7R IV Help Guide when looking for information on each of the 250+ menu items and sub-items, as well as the other camera functions.

Sony a7R IV Menu Setup Guide

To help you get up and running with the camera, I have created a Sony a7R IV Quick Start Menu Setup Guide book, which explains each of the menu items, along with menu screen shots and suggested settings. In conjunction with the text guide, I have also created a Sony a7R IV Menu Setup Spreadsheetwhich lists the suggested settings or starting points for all of the menu items, including separate listing for various shooting situations, such as:

General / Travel / Street
Landscape / Architecture
Action / Sports
Moving Wildlife / Birds
Studio / Portraits
Concert / Performance

Detail of the Sony a7R IV Menu Setup Spreadsheet

In order to take full advantage of the powerful Sony a7R IV, you will want to take control of many of these menu items and camera customizations. The spreadsheet also includes listings of shooting settings that can be used for the various types of shooting situations. The Sony a7R IV Menu Setup Spreadsheet can be downloaded from my website. Printing instructions are also included on this page.

http://www.fullstopbooks.com/setup-guides/

As mentioned above, my companion book, Sony a7R IV Quick Start Menu Setup Guide, goes into detail of all of the menu settings, with descriptions, explanations, and screen shots. It is designed to help you set up your camera, begin to learn and understand its features and options, and start to take control of your powerful and customizable a7R IV. You can learn about the guide, preview it, and purchase it here:

http://www.fullstopbooks.com/sony-a7r-iv-menu-setup-guide/

If you still need to purchase the Sony a7R IV, or any lenses or accessories, please consider using my Amazon affiliate link. Your price will be the same, and they will pay me a small commission – thanks!

Purchase the Sony a7R IV mirrorless camera at Amazon:
https://amzn.to/2EfIfat


Nikon Z 7 / Z 6 – Exploring the Menu Settings

As with all new mirrorless and dSLR cameras, the lists of specifications don’t tell the entire story. Many of the important functions, options, and additions of a new camera can be found in the menus and Custom Settings. These are the types of options that can really differentiate a camera, from a user-experience perspective, and yet these options are often over-looked by reviewers and spec comparison posts. For example, two cameras may share the same autofocus AF Modes and AF Area Modes, and thus look equal on a spec comparison sheet. But one will be much better suited for photographing action and movement because it has additional menu options and Custom Settings which allow the user to tweak and customize the AF system for their specific needs and shooting style.

Nikon Z 7 Nikon Z 6 Custom Settings

Some of the Custom Settings options of the Nikon Z 7

A video of all the Nikon Z 7 menu items has been posted on YouTube by Jeff Curtner. You can find the video here. It is simply a video of someone navigating all the Z 7 menu items, the i Menu, and the Live View display, but lots of information can be gathered from this, including a few menu options that have not been mentioned in Nikon’s materials or by other reviews of the Nikon Z 7 and Nikon Z 6. All of the screenshots in this post have been taken from this video.

Despite being a mirrorless camera, and thus differing from a Nikon dSLR, a large number of the menu items and options are similar to the Nikon D850 and other recent Nikon models. I will not go into detail about any of those items, since if you are currently using a D850, D500, D7500, D750, etc, you will already be familiar with those menu items and their options. You can consult one of my Menu Setup Spreadsheets to learn about suggested settings for those menu items, or have a look at my comprehensive user-guides for these cameras, such as Nikon D850 Experience. A comprehensive user-guide for the Z 7 and Z 6, Nikon Z 7 / Z 6 Experience, will be available in November or December 2018. You can learn more about it here:

http://www.fullstopbooks.com/nikon-z-7-z-6-experience/

Menu Setup Spreadsheets:

http://www.fullstopbooks.com/setup-guides/

Comprehensive User Guides for most Nikon dSLR models:

http://www.fullstopbooks.com

And now a look at some of the Menu and Custom Setting options of the Nikon Z 7 and Nikon Z 6 that have not been discussed in many recent Z 7 and Z 6 camera reviews. Some of the most important ones are in the Custom Settings items, but we will start at the top of the Menu tabs, with the Photo Shooting Menu:

Photo Shooting Menu

The Expeed 6 processor of the Nikon Z 7 and Z 6 offers processing speed that allows for some new features, including Diffraction Compensation, a Mid-Range Sharpening Picture Control parameter in addition to the Sharpening and Clarity parameters, and the new Creative Picture Controls. As an in-camera processing feature, Diffraction Compensation may potentially slow down the maximum continuous frame rate a tiny bit, though perhaps not – we will have to read the fine-print of the Nikon Z 7 User’s Manual when it is available. The Creative Picture Controls are found in the Set Picture Control menu, and listed after all the typical Picture Controls. If you don’t wish to separately set the three Picture Control sharpening parameters, you can use the new Quick Sharp option to adjust these sharpening-related parameters together.

Nikon Z 7 Z 6 menu

Diffraction Compensation menu item (left), and the Creative Picture Controls as found in the Set Picture Control menu (right). The Movie Picture Control option is shown here, but a similar menu is also found in the Photo Shooting Menu, for still image shooting.

The White Balance menu item is located in the Photo Shooting Menu, though for quick access it can also be assigned to one of the Function Buttons, or changed via the i Button Menu on the rear Monitor or in the Viewfinder. As with recent Nikon models, the Z 7 and Z 6 offer three different Auto White Balance options, Keep White, Normal, and Keep Warm Lighting Colors. The cameras also offer the recently added Natural Light Auto option, designed to reproduce colors as the eye sees them in natural light. And there are the other standard Nikon WB options, including multiple Fluorescent sub-options such as Day White and Cool-White. To access these options quickly while shooting, you can assign WB to one of the customizable buttons, and then press that button and change the WB setting as you view it in the electronic Viewfinder or on the rear Monitor, as shown in the figure below.

Nikon Z 7 Z 6 menu setup

Left: Photo Shooting Menu – White Balance options, including three Auto WB options, and the Natural Light Auto option. Right: If WB is assigned to one of the camera  buttons, you can also quickly access and change this setting in the Viewfinder or on the rear Monitor.

The Z 7 and Z 6 offer in-camera, 5-axis Vibration Reduction, for both still image and video shooting. This image stabilization also works with F-mount lenses, including non-VR lenses, via the Nikon FTZ Adapter. (Image stabilization will be limited to 3-axis VR with non-VR lenses.) I’m not sure if this menu item shown below is for enabling the in-body electronic image stabilization, or if it is an option that is used with newer Nikon lenses that have VR, but don’t have the VR and VR Mode switches on the lens itself. I will update when more information is known.

Nikon Z 7 Z 6 menu settings setup

Left: Vibration Reduction menu item, to enable VR and to set the VR Mode. It is possible that this is not the in-camera Electronic Vibration Reduction menu item, but rather it is possibly for enabling VR on newer lenses that don’t have the VR and VR Mode switches on the lens itself. Right: Focus Shift Shooting options (Focus stacking), including the Peaking Stack Image preview image option.

The focus stacking feature of the Z 7 and Z 6 is called Focus Shift Shooting, and is accessed in the Photo Shooting Menu. You will use this menu to set the Number of Shots, Focus Step Width, and Interval between shots. It will also allow you to lock the exposure on the first frame, enable completely Silent Photography for the process, and create a new storage folder to save the focus stack images where you can quickly locate them. The new Peaking Stack Image option will display a monochrome preview of the final focus-stacked images, which can be viewed after the focus stacking function is performed. Beware that the Silent Photography option can result in banding in the images, particularly under artificial lighting that cycles. So if you are using this option, it is best to verify that your images are clean before initiating the Focus Shift process.

Custom Settings Menu

Many of the importation functions, options, and customizations for the Z 7 and Z 6 can be found in the Custom Settings Menu. These menu items are often where the important, powerful functions of a Nikon camera are found. For example, the on-camera, phase-detection aspect of the hybrid autofocus system of the Z 7 and Z 6 allows for Face-Detection autofocusing, with both Viewfinder shooting and Live View shooting. This feature can only be used with the Auto-Area AF area mode, and is enabled with Custom Setting a4. The Custom Setting a5 – Focus Points Used, can be used to limit the number of selectable focus points. The Z 7 has 493 AF Points, and the the Z 6 has 273 AF Points, so that is a ridiculous number of focus points to have to click across in order to locate the active AF Point where you want it to be. I will have to confirm this, but I believe that this menu item will be used to limit the number of selectable points, so that you can more quickly and easily select the AF Point you desire. I am going to speculate that all the the AF Points will actually be used by the camera when automatically tracking a moving subject.

Nikon Z 7 Z 6 Custom Setting menu setup

Left: Custom Setting a4, to enable AF Face Detection when working in Auto-Area AF area mode. Right: Custom Setting a5, to limit the number of selectable AF Points.

The Z 7 and Z 6 also offer a Dynamic Area AF area mode, where the selected AF Point is used to focus on the subject, but the immediate surrounding points will help retain focus on the subject if it momentarily strays from the initial point. This is similar to the 9-Point Dynamic-Area AF of previous Nikon dSLR models. The Custom Setting a10 – Focus Point Options offers the Dynamic-Area AF Assist item, which applies to this area mode. If enabled, you will be able to also view the active surrounding AF Points, in the Viewfinder when shooting, and not just see the single selected AF Point. The Custom Setting a11 – Low-Light AF is a new option for the Z 7 and Z 6, and is used to make the autofocusing system even more sensitive when working in low light. However, enabling this option may cause a slight lag in autofocusing.

Nikon Z 7 Z 6 Custom Settings menu setup

Left: Custom Setting a10, to enable the Dynamic-Area AF Assist option in order to view all the active AF Points when using that AF Area Mode. Right: Low-Light AF, to assist with focusing in low light situations.

The Z 7 and Z 6 offer an Electronic Front-Curtain Shutter option, found in Custom Setting d5. This feature makes use of an electronic shutter, using the sensor itself as the shutter, and thus eliminates the sound and the motion of the first curtain of the mechanical shutter. This can help to eliminate slight internal camera movements and vibrations when capturing an image, and is useful for tripod shooting such as landscape and macro shots. The cameras also offer a Silent Shutter option, which will be completely silent. However, that can cause banding when used with artificial lighting that cycles. When Custom Setting d8 – Apply Settings to Live View is enabled, all of the various camera settings and exposure settings will be applied to the scene as viewed on the rear Monitor during Live View. This will include the White Balance setting, Picture Control, and Exposure Compensation amount. Thus you will better be able to preview the appearance of the final image.

Nikon Z 7 Z 6 Custom Settings menu setup options

Left: Custom Setting d5, to enable the Electronic Front-Curtain Shutter. Right: Custom Setting d8 – Apply Settings to Live View, where the scene on the rear Monitor will reflect the current camera settings and exposure settings.

The cameras offer a newly designed i Menu, which will allow you to quickly access and change various settings. This menu can be accessed on the rear Monitor, and also in the electronic Viewfinder. This offers the advantage of changing various camera settings, while shooting, without taking the camera down from your eye. Custom Setting f1 enables you to Customize i Menu, so that you will be able to access the settings and functions you use most frequently. For example, if you often use the in-camera HDR or Bracketing features, you can add them to this menu. Custom Setting f2 – Custom Control Assignment allows you to customize various buttons and controls on the camera, including the Fn1 and Fn2 Button, and the Movie-Record Button. For example, you can assign WB or AF Modes to the Fn Buttons, and then press the button and turn the dials to quickly adjust those settings. The Multi-Selector Center Press can be assigned to a function such as AE/AF Lock, or I believe it will be able to be used to quickly, temporarily switch to a different AF Mode / AF Area Mode. This is useful if you need to quickly switch between shooting a still subject and a moving subject, while shooting.

Nikon Z 7 Z 6 Custom Settings menu suggested setting setup

Left: Custom Setting f1, used to customize the functions available on the i Menu. Right: Custom Setting f2 – Custom Control Assignment, to customize the various camera buttons.

Setup Menu

There are a few additional notable new features located in the Setup Menu, including the ability to adjust the Brightness and the Color Balance of both the rear Monitor and the electronic Viewfinder. The HDMI menu item allows you to adjust the video settings when recording to an optional external device, including 8-bit or 10-bit, and enabling N-Log, and View Assist to preview the appearance of the final image.

Nikon Z 7 Z 6 Custom Setting menu setup options

Setup Menu options for adjusting Monitor Color Balance (left), and the advanced HDMI settings for recording video to an optional external device (right).

Of course there are additional menu items and functions that have not been discussed here, including many of the features found on previous models such as the D850. You can learn more about many of the new features and functions of the Nikon Z 7 and Nikon Z 6 in my previous blog post Nikon Z 7 and Z 6 – Beyond the Specifications:

http://blog.dojoklo.com/2018/08/24/nikon-z-7-and-z-6-specifications/

And be sure to join the Nikon Z6 and Z7 Setup and User Tips Facebook page, to learn, share, and ask more about using your Z 6 / Z 7.

~ ~ ~

To learn about all the features, functions, controls, and customizations of the Nikon Z 7 and Nikon Z 6, be sure to have a look at my Nikon Z 7 / Z 6 Experience user guide, to be available in November or December 2018. It is a comprehensive 350+ page guide, to help you take control of your camera, and the images you create.

Nikon, Nikon Z7, Nikon Z6, Z7, Z6, book, menu, guide, tips, tricks, how to

My Nikon Z 7 / Z 6 Menu Setup Spreadsheet Excel document will be available in October 2018. It will be free for a limited time after the introduction of the camera, and will be available for download here:

http://www.fullstopbooks.com/setup-guides/

If you want to pre-order or order the Nikon Z 7 or Nikon Z 6, please consider using my affiliate links below. Your price will be the same, but they will give me a small commission – thanks!

Nikon Z 7 at Amazon: https://amzn.to/2MPaiU5 – $3396.95

Nikon Z 7 at B and H:
https://www.bhphotovideo.com/c/buy/Mirrorless_System_Cameras/ci/16158/N/4288586281/BI/7364/KBID/7886/kwid/000/DFF/d10-v1-t3-z4288586281

Nikon Z 6 at Amazon: https://amzn.to/2MKHSe0$1996.95

Nikon Z 6 at B and H:
https://www.bhphotovideo.com/c/buy/Mirrorless_System_Cameras/ci/16158/N/4288586281/BI/7364/KBID/7886/kwid/000/DFF/d10-v1-t3-z4288586281

Sony a7R III / a7 III Tips, Tricks, and Hidden Features

Both the Sony a7R III and the Sony a7 III mirrorless cameras have provided exciting upgrades to their predecessors. Important improvements and new features included improved hybrid autofocus systems with AF points positioned widely across the entire frame, faster continuous shooting frame rates, and the addition of the Multi Selector joystick to quickly select the desired AF Point while shooting.

Sony a7R III tips tricks recommended settings

Detail of the Sony a7R III Mirrorless Camera

However, they both make use of a complex menu system that can be a challenge to navigate. While the numerous menu options allow for a tremendous amount of control and customization of the cameras, they can also cause confusion with similarly named items, or with items whose functions are unclear at first. To help you better understand all of the menu items and functions of the camera, I have created quick-start Menu Setup Guides, which explain every menu item along with suggested starting points. There are the two separate books, Sony Alpha a7R III Menu Setup Guide and Sony Alpha a7 III Menu Setup Guide, both of which can be purchased at my FullStopBooks.com website. I have also created a Menu Setup Spreadsheet for these cameras, which list suggested settings for each menu item, with different listing for various shooting situations such as Landscape, Portrait, Action, Studio, Birds, etc. The spreadsheets can be downloaded from my website here: www.fullstopbooks.com/setup-guides/.

Information from these guides is excerpted here, to explain some of the tips, tricks, and “hidden” features of the cameras. While none of the camera features are actually hidden if you read through the manual or help guide, or explore the menu items, some of them can be a bit challenging to find or to make use of if you don’t know they exist, and so I will explain them here.

Attach the Spot Metering Point to the Active AF Point

When making use of Spot Metering Mode, the actual spot that is used to determine the exposure settings can either be located in the center of the frame, or it can surround the active AF Point. Often it is more useful to have this point surround the active AF Point, because for example, you may be focusing on a specific face, and you would also like that face to be used to determine the exposure settings. If the Spot Metering circle is located in the center of the frame, you would have to first meter on the face using the center of the frame, lock the exposure settings (AEL), and then recompose, focus, and capture the image. If the Spot Metering circle is located surrounding the active AF Point, then you simply need to autofocus and capture the image, and the camera will simultaneously use the area of the active AF Point to also determine the exposure.

If this is how you wish to work, I suggest setting the Spot Metering Point item of the Camera Settings 1 Menu to “Focus Point Link” in order to have the spot metering point surround the active AF Point.

Know that you can also select the size of the Spot Metering point. When selecting Spot Metering in the Metering Mode menu item of the Camera Settings 1 Menu, or via the Fn Button and Function Menu, be sure to press left or right to choose Spot Large, Medium, or Small.

You can also use the Custom Key settings of the Camera Settings 2 Menu to assign a button to temporarily make use of Spot Metering when that button is pressed, so that you can quickly meter for a precise or specific area without having to take your eye from the Viewfinder as you change the Metering Mode.

Take Advantage of Face Priority and Eye Priority Autofocus

The a7R III and the a7 III both have excellent autofocus systems, which are able to identify and lock onto faces and subject’s eyes found in the scene. In the Camera Settings 1 Menu, you will want to access the Set Face Priority in AF menu item, where you will enable the Face Priority in AF sub-option, in order to take advantage of the autofocusing face detection feature. If the camera detects a face at or near the area of the active AF Point or Zone, the camera will automatically detect, track, and focus on the face. You will still need to use the Multi-Selector to position the active AF Point or Zone at the desired face before focusing, so that the camera knows which part of the scene to look at and locate your desired subject. Then half-press the Shutter Button, and the active face detection frame will turn white.

When working in Single-shot AF (AF-S) Focus Mode, the camera will also automatically detect and focus on the subject’s eyes. When working in Continuous AF (AF-C) Focus Mode, the camera will only detect, focus, and track faces unless you press the center button of the Control Wheel, and then eye detection and tracking will become active as well.

This Face Priority and eye detection feature works extremely well, and thus you may wish to take advantage of it for various shooting situations that involve faces, whether for still subjects or moving subjects. You are even able to register and rank specific faces (in the Face Registration setting later in the Camera Settings 1 Menu), so that the camera will prioritize them in a scene with multiple faces.

Sony a7R III tips tricks recommended settings

Detail of the Sony a7R III Mirrorless Camera

Quickly Switch to a Different Group of Shooting Settings with the Press of a Button

The Register Custom Shooting Settings of the Camera Settings 1 Menu is a powerful option that will let you assign a group of exposure, shooting, and autofocus settings to one of the camera’s custom buttons (C1, C2, or C3 Button). You can then press and hold that button while shooting to temporarily switch to an entirely different group of camera settings.

To make use of this feature, access this menu item, then select which button you wish to register (such as Recall Custom hold 1), then go through the next menu screen and select and set all of the available settings, such as Shooting Mode, Aperture, Drive Mode, Metering Mode, Focus Mode, and Focus Area. Then select Register. Or if you wish, you can set your camera in advance to all of your desired settings, access this menu, and then select Import Current Setting.

In this menu, you can enable or disable the check-mark next to the settings to choose if they will be registered or not. For example, you may wish to register various autofocus and camera settings, but not register specific exposure settings. Then when you make use of this feature during shooting by pressing and holding the C1, C2, or C3 Button, the enabled settings will temporarily change, but the camera’s exposure settings will remain as you currently have them set.

This customization might be used if you are shooting a still situation that might suddenly change to an action situation, such as a standing bird suddenly taking flight. Or it can be used in an action type of situation where you immediately wish to switch to different shooting parameters for a completely different type of action, such as a baseball batting situation vs. a running situation. Or if you are shooting a subject that is actively moving between sun and shade, the various shooting settings (such as the ISO, Metering Mode, and White Balance) can be set up to instantly accommodate the shade situation.

Use the Focus Magnifier to Zoom in on the Live View Scene

The Sony a7 cameras don’t have the same zoom-in and zoom-out buttons for viewing the Live View scene that you may be used to with a Canon or Nikon camera. Instead you will need to make use of the Focus Magnifier of the Camera Settings 1 Menu. You can also assign the Focus Magnifier to a button of your choice, such as the down button on the Control Wheel. The menu items that come after Focus Magnifier are used to customize exactly how the feature will work.

Focus MagnifierAccess this menu item, then press the center of the Multi-Selector to zoom-in on the scene while viewing either the rear Monitor or the Viewfinder. Use the Multi-Selector to move the magnified area about the screen, or press the Delete Button to move it to the center of the screen. You can continue to press the Multi-Selector Center to zoom-in closer. If using manual focus, this can assist you in focusing more precisely on the desired detail. Turn the manual focus ring on the lens to focus. If Touch Operation is set for On, then you can double-tap on the rear Monitor to magnify the desired area. Note that you cannot access this function when using AF-C Focus Mode.

If set for autofocus, you will need to set the AF in Focus Magnification item, just below, to determine how autofocus works with focus magnification. If set for On, the camera will autofocus when half-pressing the Shutter Button. If set for Off, the Focus Magnifier is cancelled and the view returns to the full scene, when the Shutter Button is half-pressed. The next two menu items will determine the time that the Focus Magnifier remains active, and the amount of magnification of the focus magnifier.

Focus Magnifier TimeWhen making use of the Focus Magnifier, this setting will determine how long the magnification remains active, so that you can view and focus on the desired detail. You can select 2 seconds, 5 seconds, or No Limit. With the No Limit setting, magnification will end when you half-press or fully-press the Shutter Button (based on the AF in Focus Magnification setting below). I suggest you set this for No Limit, so that you can examine the area and make your manual focus or autofocus adjustments.

Initial Focus Magnification (still image) – When making use of the Focus Magnifier, this setting will specify the initial amount of magnification. The x1.0 setting will activate the Focus Magnifier, but you will still view the entire scene. Continue to press the Multi-Selector Center to zoom-in closer. The x6.2 (a7R III) or x5.9 (a7 III) setting will immediately enlarge the image by about 6 times, when Focus Magnifier is used. I suggest you set if for x1.0, then activate the Focus Magnifier, adjust the area of focus with the Multi-Selector, then continue to zoom, by pressing the Multi-Selector Center or the Control Wheel Center Button.

AF in Focus Magnification (still image) – This setting determines how autofocus works with the Focus Magnifier. If set for On, the camera will retain the magnification of the screen and autofocus when half-pressing the Shutter Button. The camera will focus at the “+” symbol seen in the center of the screen. The camera will return to the full view of the scene once the image is captured. If set for Off, the Focus Magnifier is cancelled and the view returns to the full scene, when the Shutter Button is half-pressed. I suggest setting this for On so that you can make use of the magnified view to precisely autofocus.

Know the Difference Between AEL Hold and AEL Toggle

When using the Custom Key options of the Camera Settings 2 Menu to customize the function of various camera buttons, you can choose to assign Auto Exposure Lock (AEL) to the button of your choice. Typically you will assign the AEL Button to be used to lock the current exposure settings. For example, if you are using Center Metering or Spot Metering, you would half-press the Shutter Button to begin metering, aim the camera to position the metering area over the desired part of the scene, then press the AEL Button to lock the exposure settings that the camera determined. You will see an asterisk icon (*) on the screen to indicate that exposure lock is active. You can then recompose and fully press the Shutter Button to capture the image.

There are a few different Auto Exposure Lock options. The AEL hold option means that exposure is locked only as you hold down the button. The AEL toggle options means that you can press and release the button to activate exposure lock. The options with the Spot Metering icon, [.] AEL hold and [.] AEL toggle means that Spot Metering will temporarily be activated to determine the exposure settings, and those settings will simultaneously be locked, with either the “hold” option or the “toggle” option that was just explained. This can be a very useful option if you are shooting in a situation where you are not using Spot Metering, but you may temporarily wish to use Spot Metering to determine the exposure settings such as for a portrait.

Choose the Best Refresh Rate for the Electronic Viewfinder

The a7R III offers the Finder Frame Rate option in the Camera Settings 2 Menu. This adjusts the frame rate of the electronic Viewfinder display. The High setting will display moving subjects more smoothly, however the Viewfinder resolution will be reduced. The Standard setting will make use of the normal frame rate, and will be used automatically when the camera’s internal temperature becomes high. However with its higher resolution, you will want to use the Standard setting for situations such as still subjects, studio use, macro, and landscapes. It is recommended that you set for High for general use and moving subjects, and Standard for still subjects.

Assign the C3 Button to Rating or Protect

The Custom C3 Button, located at the upper-left on the rear of the camera, is labeled for the Protect function. This will protect an image from accidental deletion. However, know that reformatting a memory card will delete all images, including protected images. You can also use the Custom Key options of the Camera Setting 2 Menu to assign this button to another function, such as Rating. This may be a more useful feature, as you can mark an image with 1 to 5 stars. This can be used to quickly locate specific images when you later view them on your computer.

The Rating Set item of the Playback Menu can be used in conjunction with this button assignment. If you assign a Custom Button to the Rating feature, then you can select which rating amounts are available to choose from, with each subsequent button press. For example, you may only wish to make use of the 1, 3, and 5 star ratings, and thus you can disable the other rating values so that you don’t have to click through them every time. Then you would press the button one time for 1-star, two times for 3-stars, and three times for 5-stars.

There are numerous other menu options, features, and functions that are discussed in my quick-start menu guides for these cameras, Sony Alpha a7R III Menu Setup Guide and Sony Alpha a7 III Menu Setup Guide, both of which can be purchased at my FullStopBooks.com website. I have also created a Menu Setup Spreadsheet for these cameras, which list suggested settings for each menu item, with different listing for various shooting situations such as Landscape, Portrait, Action, Studio, Birds, etc. The spreadsheets can be downloaded from my website here: www.fullstopbooks.com/setup-guides/.

Sony Alpha a7R III Menu Setup Guide – Updates Page

Updates and corrections for Sony Alpha a7R III Menu Setup Guide.

All guides available at my Full Stop website – http://www.fullstopbooks.com/

Sony Alpha a7R III menu setup guide manual tips tricks how to

2018-05-24 – Version 1.0 published in PDF, EPUB, and MOBI formats – No updates

2018-06-01 – Version 1.1b published in PDF, EPUB, and MOBI (Amazon Kindle) formats, including FullStopBooks, Kobo, iTunes, Amazon, Apple, Barnes and Noble.

There were a few mentions of “dSLR” or “digital SLR” in the guide. As the a7R III is a mirrorless camera and not an SLR, there errors have been corrected to say “mirrorless” camera.

“Future Updates to the Text” chapter, information, and links added to the guide.

2018-06-04 – Version 1.2 published in PDF, EPUB, and MOBI (Amazon Kindle) formats, including FullStopBooks, Kobo, iTunes, Amazon, Apple, Barnes and Noble.

To my great embarrassment, there was a typo (extra word) on the very first page of the text. That has been corrected.


Firmware Update: A Firmware update was made available for the a7R III, Firmware Version 1.10. You can download the firmware at the Sony Support site, under the Drivers and Software tab:

https://esupport.sony.com/US/p/model-home.pl?mdl=ILCE7RM3&template_id=1&region_id=1&tab=download#/downloadTab

The firmware update provides the following benefits:

-Adds the menu option to select Pixel Shift Multi Shooting (On: Shooting Interval 0.5sec)

Notes:

When using an A-mount lens via an adaptor (LA-EA1/ LA-EA2/ LA-EA3/ LA-EA4), the interval might be slightly longer

When the camera is connected to PC, please use the latest version of the Imaging Edge software

-Adds support for bracketing during silent shooting with uncompressed RAW

-Adds support for tuning of the peaking display level for S-Log shooting

-Makes improvements for a condition where the Eye AF does not work with certain camera settings

-Makes improvements for a condition where Viewfinder Brightness is not reflected correctly in the Manualsetting

-Improves overall stability of camera

~ ~ ~


Sign up to receive notices of updates to the text of Sony Alpha a7R III Menu Setup Guide, as well as to be eligible to receive free copies of the updated e-book file (for major updates):

http://blog.dojoklo.com/ebooks/sign-up-for-full-stop-e-book-updates/

New and Hidden Features of the Nikon D7500

Introduction to the New and Hidden Features of the Nikon D7500

If you are a user of a previous Nikon dSLR and upgraded to the Nikon D7500, and you are already familiar with the typical features, functions, and controls, you will want to become familiar with the various new and improved features of the camera. Here is a summary of what has been added, changed, or improved with the D7500 compared to the D7200 and other previous Nikon models. Some of these features were included on the D7200, but may be unfamiliar to those coming from an earlier or different Nikon model.

The D7500 also contains a few “hidden” features. It is not that they aren’t explained in the Nikon manual, however then can be difficult to locate when using the camera since they aren’t directly accessed with a button or with a menu item. Several of them are accessed via the i Button and i Button Menus, which vary with the current camera function (viewfinder shooting, Live View shooting, image playback, etc.). Or some of these items must be assigned to a specific button using the Custom Settings.

All of these new and hidden features and items are explained in more detail in my Nikon D7500 Experience user guide to the camera, from which this material is based on.

Nikon D7500 body controls buttons touch screen monitor tilting dial

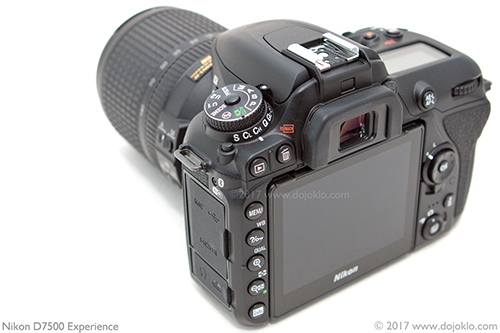
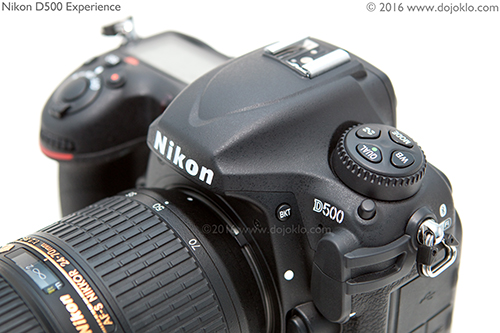
Figure 1 – The Nikon D7500 dSLR.

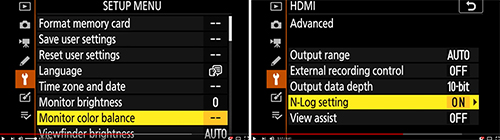
-Articulating Touch Screen Monitor – The large 3.2” high-resolution (922K-dot), tilting, touch-screen LCD Monitor can be color customized with the Monitor Color Balance item of the Setup Menu. The touch screen capability allows you to view, zoom, and scroll through playback images, enter text with the on-screen keyboard, as well as select an autofocus area and Spot White Balance area when working in Live View, and to release the shutter in Live View (Touch Shutter). The “Frame Advance Bar” for image review enables you to use the touch screen to quickly scroll through images without having to swipe one-by-one.

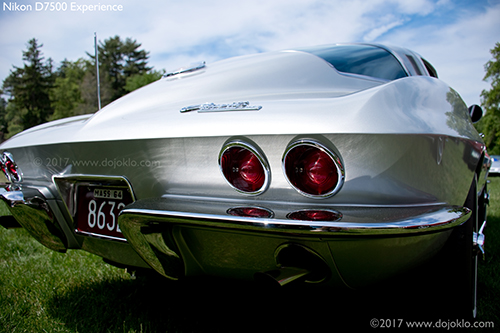
Figure 2 – Use the tilting rear monitor to help take photos from low or high vantage points.

-Expanded Native ISO Sensitivity Range – The ISO range is expanded to include ISO 100 to 51,200. This can assist photographers with decreased noise at higher ISO settings. Additional ISO settings down to 50 and up to the excessively noisy 1,640,000 can also be used.

Figure 3 – Left: The ISO Sensitivity Settings and Auto ISO options. Right: Selecting the Minimum Shutter Speed the camera will use with Auto ISO, including the “Auto” option which will be based on the lens focal length.

-Auto ISO – As with other current Nikon models, the D7500 offers a powerful Auto ISO option, which will change the ISO setting if necessary in order to obtain a proper exposure. You can set the parameters of Auto ISO, including the Maximum Sensitivity and Minimum Shutter Speed that the camera will use for Auto ISO, as well as the new Maximum sensitivity with flash option (see Figure 3 – left). One powerful option is that if you set the Minimum Shutter Speed to its Auto setting, the camera will select a minimum shutter speed based on the focal length of the lens (see Figure 3 – right). For example, a longer telephoto lens requires a faster shutter speed to avoid blur from camera movement. But, if you are unhappy with the settings that the camera is choosing, you can continue to press right in the Minimum Shutter Speed > Auto setting, and access the option to fine-tune this setting so that the camera selects a faster or slower Auto shutter speed. And in the new Movie Shooting Menu, you can also set the Auto ISO parameters separately for movie shooting.

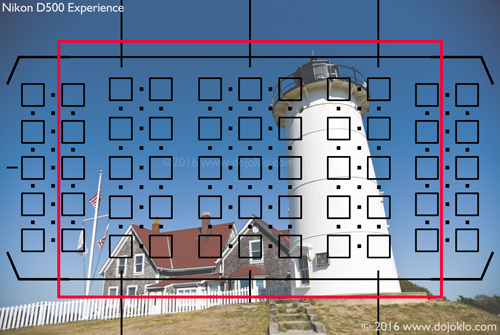
-Group-Area AF Area Mode – A group of five AF Points, configured in a cross-shaped pattern, can all be used together to help focus on a subject, in situations where using a single AF Point may not work as well (see Figure 4).

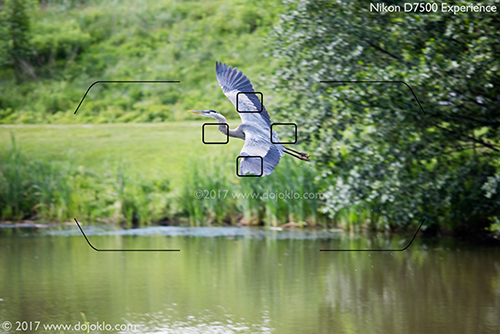
Figure 4 – Group Area AF Area Mode, where five AF Points work together to focus on a subject. The central point of the group is also active, but not seen in the Viewfinder. 

-Highlight-Weighted Metering Mode – This Metering Mode helps to prevent the overexposure of highlights, such as a subject under bright stage lighting, particularly in situations with moving subject where Spot Metering becomes impractical.

Flicker Reduction – With this new anti-flicker option, the camera will detect the flickering of certain types of lighting often found in stadiums and arenas, and will adjust the timing of the shutter release in order to maintain more consistent exposures.

Electronic Front-Curtain Shutter – This feature, found in Custom Setting d4, can help to reduce camera vibrations and thus potential blur in controlled situations such as landscape and macro shots (see Figure 5 – left). It is used with the Mirror Up (Mup) Release Mode during either Viewfinder or Live View shooting. With the high resolution 20.9 megapixel sensor of the D7500, these slight movements can become more apparent in images.

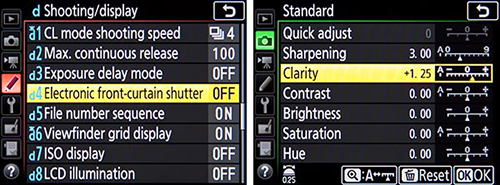
Figure 5 – Left: Custom Setting d4, to enable the Electronic Front Curtain Shutter feature used with Mirror-Up release mode. Right: Picture Controls menu, including the new Clarity setting as well as the ability to adjust the settings in 0.25 increments.

Picture Controls – The D7500 offers the Auto Picture Control where the camera will determine the best settings, though the Auto setting can also be slightly adjusted by the user. The camera also includes the recent Flat Picture Control, which is desired by videographers as it provides the greatest latitude for post-processing, by helping to retain details in both highlights and shadows. It can also be used for still images that are going to be heavily processed. Also, the Picture Control options include a Clarity parameter, and the Brightness adjustment allows a wider range. The parameters allow finer (0.25 step) adjustment increments, as well as an Auto option for each parameter (see Figure 5 – right).

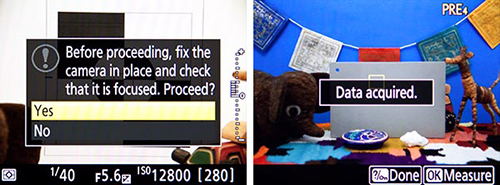
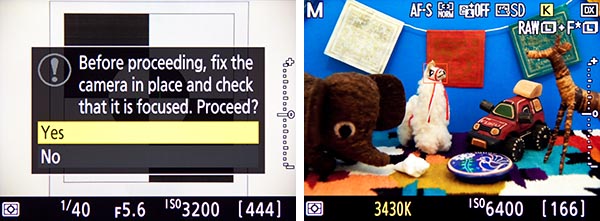
Figure 6 – Left: Simultaneously press the AF Mode Button and Movie Record Button to perform the Autofocus Auto Fine-Tune procedure when in Live View. Right: The Live View Spot White Balance feature, in use.

Auto AF Fine-Tune – The Autofocus Auto Fine-Tune feature will enable you to use Live View focusing to automatically fine tune the autofocusing of individual lenses, to correct for back-focus or front-focus issues. The data acquired by the process is entered into the AF fine-tune item of the Setup Menu, and registered for the attached lens. The procedure involves autofocusing in Live View and then simultaneously pressing the AF Mode Button and Movie Record Button to perform the process (see Figure 6 – left).
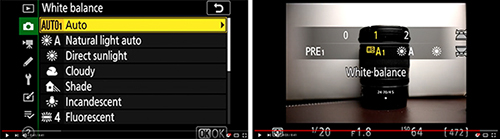
White Balance Improvements – The D7500 offers two Auto White Balance options, including Normal and Keep warm lighting colors which will preserve the warm glow created by incandescent bulbs and add a warmer touch to outdoor photos. You can now store up to six Preset (PRE) White Balance settings, as well as make use of the Live View Spot White Balance measurement feature (which was also available on the previous D7200), (see Figure 6 – right). The Live View Spot White Balance feature enables you to take a white balance measurement of a precise area of the scene when working in Live View.

White Balance Color Temperature Selection – When making use of the K – Choose Color Temp White Balance Setting, you can select the desired color temperature in the White Balance menu item, or you can quickly adjust this setting during shooting by pressing the WB Button and turning the front Sub-Command Dial while viewing the setting on the top Control Panel or on the Live View Screen. If you wish to directly enter a value, you can press the WB Button and use the Multi Selector to select and change the digits, again either on the top Control Panel or on the Live View screen.

Auto Exposure Bracketing – Either 2, 3, 5, 7, or up to 9 shots can be automatically taken when bracketing, at increments of 0.3 EV, or up to 3 EV increments.

Batch Processing for NEF (RAW) images – In-camera batch processing is now possible, using the new options in the NEF (RAW) Processing item of the Retouch Menu. These options give you the ability to select and simultaneously process multiple individual images, using the same processing settings. Or you can use the Select date option to process all images taken on a certain date, or Select all images to process all images on the memory card (see Figure 7 – left).

Figure 7 – Left: The NEF (RAW) Processing menu, including the options to batch process multiple images by selection, date, or all images. Right: Selecting images to be transferred to a smart device, as soon as a wireless connection is made between the camera and the device.

Bluetooth and Wi-Fi – Used in conjunction with Nikon’s SnapBridge app, these wireless connections between the camera and a smart device can be used to remotely control the camera, share GPS information from the phone to the camera, and to transfer images to the device (see Figure 7 – right).

New Menu and Custom Settings Options – In addition to the above improvements, the D7500 offers several new options in various menu items and Custom Settings. These include new Multiple Exposure overlay options of Add, Average, Lighten and Darken, which will allow you to further process multiple exposure images, and Exposure Smoothing options for Interval Timer and Time-Lapse shooting to help maintain consistency among the individual exposures.

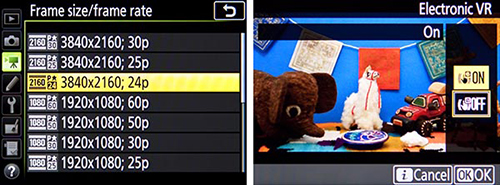
Figure 8 – Left: Selecting one of the Ultra High Definition, 4K video Frame Size / Frame Rate options. Right: Enabling the Electronic Vibration Reduction feature for movie shooting.

Video – The D7500 now offers Ultra High Definition 4K video (3840 x 2160) at 30p, 25p, and 24p frame rates (see Figure 8 – left). Although note that when recording at 4K, the camera will make use of a smaller 1.5x cropped Image Area and not the entire width of the frame. The camera also offers Full HD video (1920 x 1080) at all the typical frame rates (60/50/30/25/24p). Plus the camera offers new Electronic Vibration Reduction to help stabilize the scene when hand-holding (see Figure 8 – right), and the Active D-Lighting option for full HD recording. The D7500 includes the Highlight Display “zebra stripes” feature for viewing highlights and potentially overexposed areas, a built-in stereo microphone, simultaneous recording to an internal memory card and external recorder, selectable audio frequency range (the standard Wide range or the narrower Voice range), and Auto ISO during Manual (M) Exposure Mode for smooth exposure transitions while retaining the desired aperture and shutter speed settings. The new Power Aperture feature will allow you to smoothly adjust the aperture setting while recording. There is also a new Movie Shooting Menu tab, where you can easily access most all of the movie settings, as well as set some of them independently from the similar settings used during still photography, such as the Picture Control and White Balance.
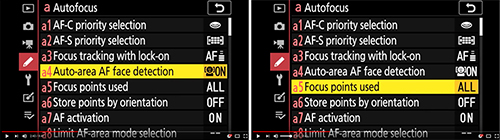
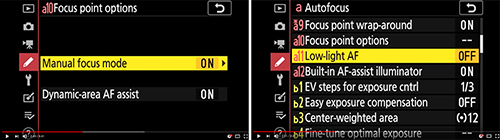
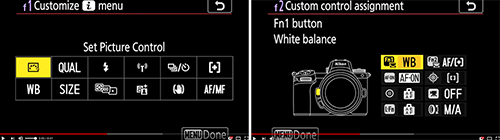
i Button – The D7500 also includes the i Button, (also present on the previous D7200), which is used to quickly access context-appropriate settings that will differ for Viewfinder shooting, Live View, Movie, and image playback. Pressing the i Button when shooting will allow you to access and change several settings via the i Button menu, such as Choose image area, Active D-Lighting, and High ISO Noise Reduction (see Figure 9 – left). The Custom control assignment option will allow you to assign your desired function to various camera buttons including the Fn1 Button, Fn2 Button, and AE-L/AF-L Button. When working in Live View, you can press the i Button to access and adjust settings such as the Image Area, Image Quality, Picture Controls, Exposure Preview, and Live View Monitor Brightness (see Figure 9 – right).

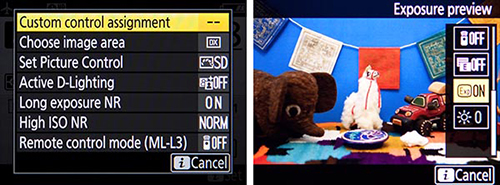
Figure 9 – Press the i Button during Viewfinder shooting (left), or when in Live View (right), to access the applicable i Button Menu screen.

Live View Exposure Preview – When working in Live View, press the i Button to enable the Exposure preview item (see Figure 9 – right), which will display the Exposure Indicator scale on the screen, and the brightness of the screen will reflect the current exposure settings rather than simply showing the scene at an optimal brightness level. This will allow you to better preview the resulting image and make exposure adjustments.

i Button in Movie Live View – Some “hidden” features can be accessed with the i Button when working in Movie Live View. The “zebra stripes” feature is accessed with the Highlight Display item of the i Button menu (see Figure 10). This will display diagonal lines on the screen at potentially over-exposed areas of the scene, thus helping you to adjust to the proper exposure. You will also need to press the i Button if you wish to adjust the Movie Live View Monitor Brightness and the Headphone Volume if monitoring the audio with optional headphones. The i Button will also access the Multi-selector power aperture feature, where you can press up or down on the Multi Selector to smoothly adjust the aperture setting while recording. Power aperture can also be assigned to the Fn1 and Fn2 Buttons using Custom Setting g1. The new Electronic Vibration Reduction can also be accessed via the i Button, or by using the Movie Shooting Menu.

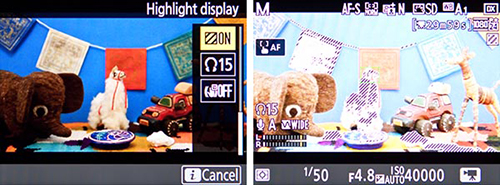
Figure 10 – The Highlight Display (zebra stripes) video feature, to check for overexposure, is accessed via the Movie Shooting i Button Menu.

Flash Information Screen – With the built-in flash, or with an optional Speedlight flash attached and turned on, press the Info Button twice to access the Flash Information Screen showing the current flash settings, and then press the i Button to view and change the various settings and options, including Wireless Flash Options (see Figure 11).

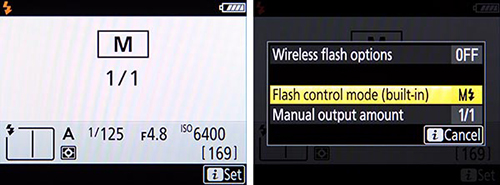
Figure 11 – When using the built-in flash or an optional Speedlight flash, press the Info Button twice to access the Flash Information Screen showing the current flash settings (left), then press the i Button to view and change the various settings and options (right).

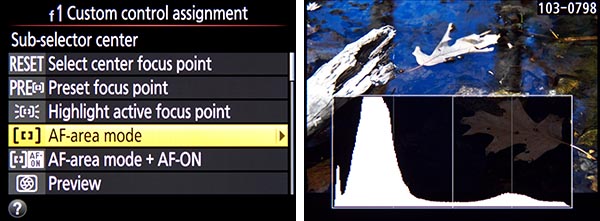
Camera Controls Assignments – A few other “hidden” features of the Nikon D7500 can only be accessed by customizing one of the camera buttons to assign it to that function. For example, you can make use of the Viewfinder Virtual Horizon, which is a camera level that you can display in the Viewfinder. It will show an electronic level along the bottom of the screen as well as one on the right side, so that you can see both pitch and roll of the camera body. In order to use this feature, you need to use Custom Setting f1 to assign either the Fn1 Button or Fn2 Button to the Viewfinder Virtual Horizon option. You can also assign the Fn1 or Fn2 Button to the 1 Step Speed / Aperture setting, which will allow you to quickly change the shutter speed or the aperture setting in 1 EV (full stop) increments, rather than the typical 1/3 EV adjustments that are made when you turn Command Dials. Another handy customization will allow you to press and hold the Fn1 Button or Fn2 Button to temporarily switch to a different Metering Mode (see Figure 12 – left).

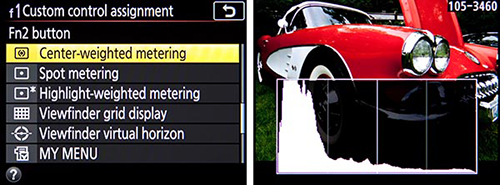
Figure 12 – Left: Assigning the Fn2 Button to temporarily switch to a different Metering Mode. Right: The OK Button has been customized to display a large histogram, when pressed during image playback.

One Button Playback Zoom / Histogram – Using Custom Setting f2, you can assign the OK Button so that during image playback it will immediately zoom-in, at the magnification level of your choice (including 100% zoom), centered at the area of the active focus point so that you can closely inspect your image. Or you can instead assign the button press to display a large histogram with the image, so that you can evaluate your exposure (see Figure 12 – right).

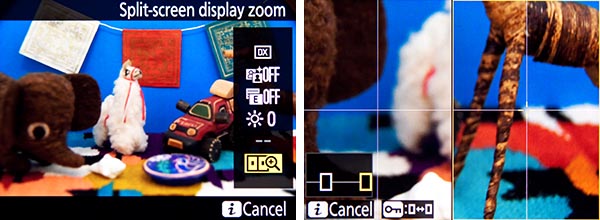
Figure 13 – Left: Frame Advance Bar – Touch the bottom of the Monitor touch screen during image playback, and use the Frame Advance Bar to quickly scroll through multiple images. Right: Quick Crop – Magnify an image during playback and adjust to the desired framing, then press the i Button and select the Quick Crop option to crop the image and create a new image that is cropped to the framing shown on the Monitor.

Playback Scroll and Playback Zoom Cropping – Other “hidden” playback features include the ability to quickly scroll through multiple images using the touch screen, and a Quick crop feature. When viewing an image during playback, touch the bottom of the Monitor and the Frame Advance Bar will appear. Move your finger left and right to quickly scroll trough multiple images (see Figure 20 – left). To make use of the Quick crop feature, zoom-in on an image during playback, use the Multi Selector or touch screen to adjust the framing of the image as desired, and then press the i Button (see Figure 13 – right). Choose the Quick crop option, which will crop the image and create a new image that will be cropped to the framing currently shown on the Monitor.

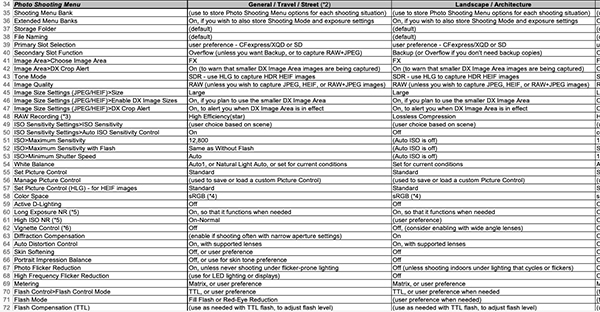
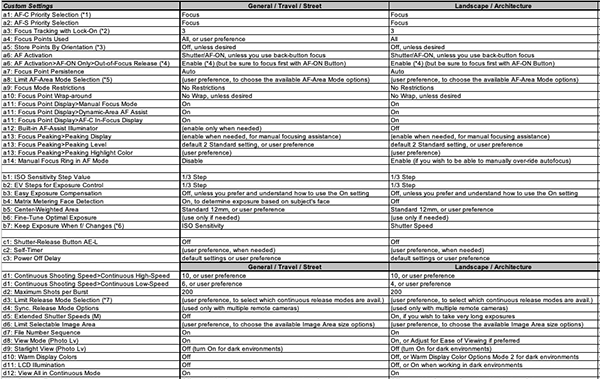
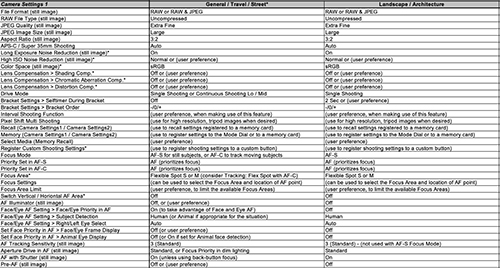
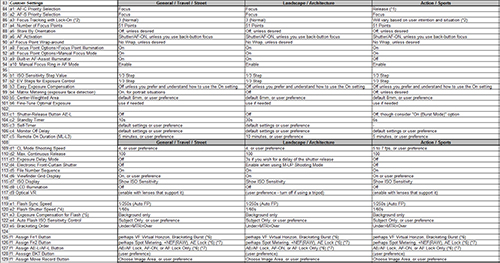
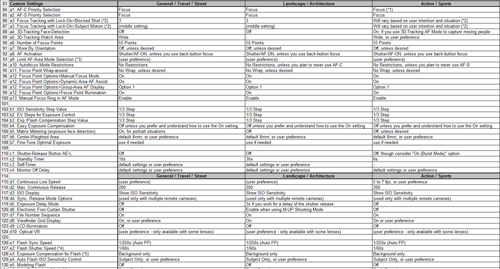
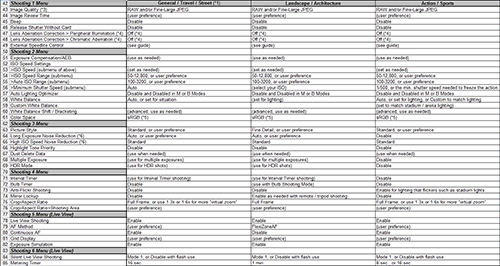
All of the other features, menu items, Custom Settings, and controls of the Nikon D7500 are explained in my clear and comprehensive guide to the camera, Nikon D7500 Experience. Also be sure to have a look at my free D7500 Setup Guide Spreadsheet, to help you set up the Photo Shooting Menu items and the Custom Settings of the camera.

Nikon D7500 book manual guide how to use learn tips tricks setup setting quick start

Setting up the Menus and Custom Settings of the Nikon D7500

In conjunction with my camera guide for the new Nikon D7500, Nikon D7500 Experience, I have created a free Nikon D7500 Setup Guide – a comprehensive spreadsheet with suggested settings for the Shooting Menus, all of the Custom Settings, plus some shooting and exposure settings. It has separate camera setup recommendations for different types of shooting, including:

General / Travel / Street
Landscape / Architecture
Action / Sports
Moving Wildlife / Birds
Studio / Portraits
Concert / Performance

Here is an example detail of just a small part of the Setup Guide spreadsheet:

Nikon D7500 dslr menu menus custom setting setup guide tips tricks quick start recommend setting

The direct link to download the Excel spreadsheet is:

http://docs.fullstopbooks.com/forms/Nikon-D7500-Experience-Setup-Guide.xls

The setup guide spreadsheets can also be found here:

www.fullstopbooks.com/setup-guides/

To print the spreadsheet guide, you may wish to print it across several pages and then tape them together, so that the data is legible:

-First, be sure to set the print area, to avoid all the blank pages. Do this by manually selecting all the cells with data in them (drag the cursor from cell A1 to G171 and they will all appear blue.) Then access the menu for File > Print Area > Set Print Area.

-Then go to File > Print Preview and select the Setup button.

-Then set the page for “Landscape” and “Fit To” 2 pages wide by 3 pages tall.

This should result in 6 pages to be printed (as long as you have set the print area first).

Be sure to check the Print Preview to see that the data will print at a reasonable size, and that there are only 6 or so pages that will print.

Nikon D7500 book manual guide quick start setup tips tricks how to autofocus af
Example image from Nikon D7500 Experience.

In the past I have resisted requests for these types of quick-start “cheat sheets,” because I prefer that readers of my Full Stop camera guides read through all of the Menu and Custom Settings options, and determine which settings suit their shooting situations and preferences. This is one of the best ways to really learn the ins-and-outs of one’s new camera, so I still encourage you to do so. But I can appreciate the value and the handy reference features of this type of recommendation guide.

Please feel free to take the advice of dedicated Wildlife or Concert photographers, for example, above mine if it differs! And for further information, explanations, justifications, and caveats for the settings I specify, please have a look at my clear and comprehensive guide Nikon D7500 Experience.

Nikon D7500 book manual guide how to use learn tips tricks setup setting quick start


Version History of Spreadsheet

2017-06-30 – v1.0 – First version released

Setting up the Menus and Custom Functions of the Canon 5D Mark IV

Canon 5D Mark IV setup guide book manual how to tips tricks quick start

In conjunction with my camera guide for the new Canon 5D Mark IV, Canon 5D Mark IV Experience, I have created a free Canon 5D Mark IV Setup Guide – a comprehensive spreadsheet with suggested settings for the applicable Menus, all of the Custom Functions, plus some shooting and exposure settings. It has complete and separate camera setup recommendations for different types of shooting, including:

General / Travel / Street
Landscape / Architecture
Action / Sports
Moving Wildlife / Birds
Studio / Portraits

Concert / Performance

Here is an example detail of just a small part of the Setup Guide spreadsheet:

Canon 5D Mark IV menu setup guide

The link to download the free Excel spreadsheet is:

https://www.e-junkie.com/ecom/gb.php?c=cart&ejc=2&cl=136239&i=1568892

To print the spreadsheet guide, you may wish to print it across several pages and then tape them together, so that the data is legible:

-First, be sure to set the print area, to avoid all the blank pages. Do this by manually selecting all the cells with data in them (drag the cursor from cell A1 to G200 and they will all appear blue.) Then access the menu for File > Print Area > Set Print Area.

-Then go to File > Print Preview and select the Setup button.

-Then set the page for “Landscape” and “Fit To” 2 pages wide by 3 pages tall.

This should result in 6 pages to be printed (as long as you have set the print area first).

Be sure to check the Print Preview to see that the data will print at a reasonable size, and that there are only 6 or so pages that will print.

In the past I have resisted requests for these types of quick-start “cheat sheets,” because I prefer that readers of my Full Stop camera guides read through all of the Menu and Custom Settings options, and determine which settings suit their shooting situations and preferences. This is one of the best ways to really learn the ins-and-outs of one’s new camera, so I still encourage you to do so. But I can appreciate the value and the handy reference features of this type of recommendation guide. And the guide can be updated with your own settings if you wish. Just be sure to send or link to the original spreadsheet if you wish to share the guide!

Please feel free to take the advice of dedicated Wildlife or Concert photographers, for example, above mine if it differs. And for further information, explanations, justifications, and caveats for the settings I specify, please have a look at my clear and comprehensive guide Canon 5D Mark IV Experience.

Canon 5D Mark IV setup guide book manual how to tips tricks quick start

Canon 5D Mark IV setup guide book manual how to tips tricks quick start

Canon 5D Mark IV setup guide book manual how to tips tricks quick start

Tips and Tricks, Hidden Features of the Nikon D500

Nikon D500 Tips and Tricks

Users are often curious about “hidden” features that their camera may have, though typically most dSLR models really don’t have many, as long as one carefully goes through all of the Menu and Custom Settings items, and reads through the manual or a user’s guide. However, with so many options and functions, there are a few items that truly are actually a bit hidden away on the Nikon D500. It’s not that the D500 manual doesn’t mention them, or that they can’t be found with careful investigation of the camera, but you may need to have them called to your attention to learn how to locate them and how to take advantage of them. And there are a few button shortcuts to access features and settings that you simply need to learn if you wish to take advantage of, because once you are using your camera, they are not indicated in any menus or with any button icons.

IMG_5466-01s-SM

Several of these “hidden” features are accessed with the i Button when working in the appropriate mode (Shooting, Live View, Movie, or Playback). Others are accessible in the menus but may require an understanding of the options as they are listed, or might require extra steps of sub-menu navigation to locate them. All of these features are discussed in more detail in my 400 page comprehensive e-book guide Nikon D500 Experience, but here is an introduction to these “hidden” features of the Nikon D500.

Illuminated Buttons – Hopefully you are already aware that your D500 has the cool new feature of illuminated buttons, in order to help you change your settings when working in low light conditions. To make use of this, simply rotate the camera’s Power Switch to the light bulb icon.

IMG_5296-01s

Detail of the illuminated buttons of the Nikon D500.

Information Display and Button Settings – If you first press the Info Button to display the Information Display on the rear Monitor, you can then press most of the camera buttons to change the corresponding settings as you view them on the larger rear screen, rather than on the smaller top Control Panel. For example, you can press the AF Mode Button, and turn the appropriate Command Dial to change the AF-Area Mode and the Focus Mode. The screen will even indicate which Command Dial to use for each setting. This can also be used for the buttons on the top of the camera such as White Balance and ISO, as well at the BKT (Bracketing) Button.

IMG_1100-1127 copy

Left: First press the Info Button to display the Information Display, then press most any of the camera buttons to view and change those settings as you view them on the rear Monitor, such as the AF Mode Button for the autofocus settings. Right: Press the i Button during shooting to access the Photo Shooting i Button menu.

i Button Features – The D500 includes the i Button, which is on most other current Nikon dSLR models. Pressing the i Button when shooting will allow you to access and change several settings using the Photo Shooting i Button Menu on the rear LCD Monitor, such as Active D-Lighting, Image Area, Long Exposure Noise Reduction, and High ISO Noise Reduction. It will also allow you to access the Custom Control Assignment menu where you assign the function of various camera buttons including the Pv, Fn1, and BKT Buttons, and the Sub-selector joystick. When working in Live View, Movie Live View, image playback, and movie playback, the i Button will access a contextual menu for each mode, and in some situations it is the only way to access and change certain of these “hidden” features.

i Button in Live View – For example, when working in Live View, you can press the i Button to adjust the Live View Monitor Brightness. This is a different adjustment from the Monitor Brightness adjustment of the Setup Menu which affects the brightness of the screen for menus and image playback. The Live View Monitor Brightness adjustment, obviously, adjusts the screen brightness for Live View, but will not affect the exposure of the actual image. The Live View i Button menu will also allow you to access the Photo Live View Display White Balance feature. This feature allows you to set the white balance of the Live View screen separately than the current white balance of the camera. While this may sound odd, it can come in handy when setting up a shot that will actually be taken with different lighting, such as with a Speedlight or studio strobes. So using this feature, you can set the white balance of the LCD Monitor to better set up the scene in the current lighting.

IMG_1942-1955

Left: Live View i Button Menu, where Split-Screen Display Zoom can be accessed. Right: Making use of this feature, to see if the left and right sides of the frame are level.

The i Button is also the only way to access the Split Screen Display Zoom during Live View, where you can simultaneously zoom in on two different areas of the frame to help determine if they are level. This can come in handy for landscape and architectural photographers. Although the Electronic Front-Curtain Shutter is accessible with Custom Setting d6, and thus isn’t hidden, I will mention it here because it can also be accessed with the i Button during Live View. What you need to know is that this feature must be used in conjunction with Mirror Up (Mup) Release Mode.

i Button in Movie Live View – Just as with Live View, some “hidden” features can be accessed with the i Button when working in Movie Live View. The “zebra stripes” feature is accessed with the Highlight Display item of the i Button menu. This will display diagonal lines on the screen at potentially over-exposed areas of the scene, thus helping you to adjust to the proper exposure. You will also need to press the i Button if you wish to adjust the Movie Live View Monitor Brightness and the Headphone Volume if monitoring the audio with optional headphones. The i Button will also access the Multi-selector power aperture feature, where you can press up or down on the Multi Selector to smoothly adjust the aperture setting while recording. Power aperture can also be assigned to the Pv and Fn1 Buttons using Custom Setting g1. The new Electronic Vibration Reduction can also be accessed via the i Button, or by using the Movie Shooting Menu.

IMG_1937-2168

Left: Press the i Button when in Live View or in Movie Live View to access the applicable i Button Menu screen. Right: The Highlight Display “zebra stripes” feature for movie shooting, to indicate overexposed areas of the scene.

Live View Exposure Preview – Pressing the OK Button when in Live View will display the Exposure Indicator scale on the screen, and the brightness of the screen will reflect the current exposure settings rather than simply showing the scene at an optimal brightness level. This will allow you to better preview the resulting image and make exposure adjustments.

Camera Controls Assignments – A few other “hidden” features of the Nikon D500 can only be accessed by customizing one of the camera buttons to assign it to that function. For example, you can make use of the Viewfinder Virtual Horizon, which is a camera level that you can display in the Viewfinder. It will show an electronic level along the bottom of the screen as well as one on the right side, so that you can see both pitch and roll of the camera body. In order to use this feature, you need to use Custom Setting f1 to assign either the Fn1 Button, Pv Button, or Sub Selector Center press to the Viewfinder Virtual Horizon option. You can also assign the Pv Button or Fn1 Button to the 1 Step Speed / Aperture setting, which will allow you to quickly change the shutter speed or the aperture setting in 1 EV (full stop) increments, rather than the typical 1/3 EV adjustments that are made when you turn Command Dials.

Another handy customization will allow you to press and hold a button to temporarily switch to a different AF-Area Mode. For example, if you have set up the camera to capture a bird in flight using Dynamic-Area 25 Point AF-Area Mode, you can customize the camera to press the Pv Button, Fn1 Button, AF-ON Button, or Sub-Selector Center to temporarily switch to Single-Point AF to better capture a still subject. You can set up the camera in a similar manner to temporarily switch to a different Metering Mode.

IMG_0678-0717

Left: Using Custom Setting f1 to customize one of the buttons (such as the Pv or Fn1 Button) so that it can be used to temporarily switch to a different AF-Area Mode. Press right on the Multi-Selector here to set the desired AF-Area Mode. Right: The Multi-Selector Center Button can be assigned to display a large histogram during image playback.

One Button Playback Zoom / Histogram – Using Custom Setting f2, you can assign the Multi Selector Center Button so that during image playback it will immediately zoom-in, at the magnification level of your choice (50%, 100%, 200%), centered at the area of the active focus point so that you can closely inspect your image. Or you can instead assign the button press to display a large histogram with the image, so that you can evaluate your exposure.

OK Button and Multi Selector Shortcuts – During image playback, you can press the OK Button and simultaneously press the up arrow on the Multi Selector to access the Playback slot and folder options. This allows you to quickly choose which memory card (SD or XQD) and folder is being accessed during image playback. You can also simply scroll through the images from one card to the next, or you can press the Zoom-out Button repeatedly to access this Playback slot and folder screen (rather than the calendar view screen of other Nikon models). You can also press the OK Button plus the right arrow of the Multi Selector to access the Retouch Menu, and press the OK plus down arrow to select an IPTC Preset, which is metadata attached to an image for publication purposes.

Autofocus Auto Fine-Tune – The Autofocus Auto Fine-Tune feature will enable you to use Live View focusing to automatically fine tune the autofocusing of individual lenses. The procedure for this is fully explained in the Nikon D500 Experience guide, and it involves simultaneously pressing the AF Mode Button and Movie Record Button. There is also an excellent description and tutorial for it on this site:

http://www.reikan.co.uk/focalweb/index.php/2016/04/nikon-d500-automatic-af-fine-tune/

I recommended that you read their instructions for the process, in order to achieve the best results with this feature.

IMG_2459-1813 copy

Left: Simultaneously press the AF Mode Button and Movie Record Button to begin the Autofocus Auto Fine-Tune procedure. Right: You can directly enter a K-Color Temperature value by pressing the WB Button and using the Multi-Controller to select and change the digits, as displayed at the lower-left of the Live View display as highlighted here in yellow.

White Balance Color Temperature Selection – When making use of the K – Choose Color Temp White Balance Setting, you can select the desired color temperature in the White Balance menu item, or you can quickly adjust this setting by pressing the WB Button and turning the front Sub-Command Dial while viewing the setting on the top Control Panel or on the Live View Screen. If you wish to directly enter a value, you can press the WB Button and use the Multi-Controller to select and change the digits.

Live View Spot White Balance – This feature enables you to take a white balance measurement of a precise area of the scene when working in Live View. This is accessed by setting the white balance to Preset Manual (PRE), then pressing the WB Button until the PRE icon flashes. You can then tap on the Touch Screen to select the area used for the Spot White Balance Measurement.

Synchronized Release of Remote Cameras – If you are making use of an optional wireless remote to trigger multiple cameras, there is also a “hidden” setting for this in the Custom Setting f1 button assignments. You can choose to assign the Pv Button, Fn1 Button, or Sub-Selector Center press to the Sync. Release selection option, which is used in conjunction with the Custom Setting d4 Sync. Release Mode Options. You can set up the camera so that, for example, when using the D500 as a master camera to remotely trigger other cameras, you can press the Fn1 (or Pv) Button while taking the shot, and then just the master camera will shoot, or just the remote cameras and not the master, based on your settings.

Flash Information Screen – With an optional Speedlight flash attached and turned on, press the Info Button twice to access the Flash Information Screen showing the current flash settings, and then press the i Button to view and change the various settings and options.

IMG_2736-2734 copy

When using a Speedlight flash, press the Info Button twice to access the Flash Information Screen showing the current flash settings (left), and then press the i Button to view and change the various settings and options (right).

To learn much more about the D500, including all the Menu options, Custom Settings, camera controls, features, and functions – plus how, when, and why to use them in your photography, have a look at my guide, Nikon D500 Experience.

Nikon D500 Experience book manual guide how to use set up quick start setting recommend menu custom setting setup guide

~ ~ ~

If you haven’t yet purchased your Nikon D500, please consider using one of my affiliate links! You pay the usual price, and they will give me a small referral bonus – thanks!

Nikon D500 body only or with 16-80mm kit lens, on Amazon

Nikon D500 body only, at B and H Photo

Nikon D500 with 16-80mm kit lens, at B and H Photo

Nikon D500 Setup Guide Spreadsheet

In conjunction with my camera guide for the new Nikon D500, Nikon D500 Experience, I have created a free Nikon D500 Setup Guide – a comprehensive spreadsheet with suggested settings for the applicable Menus, all of the Custom Settings, plus some shooting and exposure settings. It has complete and separate camera setup recommendations for different types of shooting, including:

General / Travel / Street
Landscape / Architecture
Action / Sports
Moving Wildlife / Birds
Studio / Portraits
Concert / Performance

Here is an example detail of just a small part of the Setup Guide spreadsheet:

 Nikon D500 Setup Guide Spreadsheet Experience Full Stop tips tricks recommend suggested setting menu Custom Setting

The direct link to download the Excel spreadsheet is:

http://docs.fullstopbooks.com/forms/Nikon_D500_Experience-Setup_Guide.xls

To print the spreadsheet guide, you may wish to print it across several pages and then tape them together, so that the data is legible:

-First, be sure to set the print area, to avoid all the blank pages. Do this by manually selecting all the cells with data in them (drag the cursor from cell A1 to G190 and they will all appear blue.) Then access the menu for File > Print Area > Set Print Area.

-Then go to File > Print Preview and select the Setup button.

-Then set the page for “Landscape” and “Fit To” 2 pages wide by 3 pages tall.

This should result in 6 pages to be printed (as long as you have set the print area first).

Be sure to check the Print Preview to see that the data will print at a reasonable size, and that there are only 6 or so pages that will print.

Nikon D500 viewfinder autofocus AF points crop 1.3x grid

In the past I have resisted requests for these types of quick-start “cheat sheets,” because I prefer that readers of my Full Stop camera guides read through all of the Menu and Custom Settings options, and determine which settings suit their shooting situations and preferences. This is one of the best ways to really learn the ins-and-outs of one’s new camera, so I still encourage you to do so. But I can appreciate the value and the handy reference features of this type of recommendation guide.

Please feel free to take the advice of dedicated Wildlife or Concert photographers, for example, above mine if it differs! And for further information, explanations, justifications, and caveats for the settings I specify, please have a look at my clear and comprehensive guide Nikon D500 Experience.

Nikon D500 Experience book manual guide how to use set up quick start setting recommend menu custom setting setup guide

Version History of Spreadsheet

2016-05-22 – v1.0 – First version released

2016-05-24 – v1.1 – Minor formatting corrections

Canon 5DS / 5DS R Setup Guide with Recommended Settings

In conjunction with my camera guide for the new Canon EOS 5DS and 5DS R,
Canon 5DS / 5DS R Experience, I have created a Canon 5DS / 5DS R Setup Guide – a comprehensive spreadsheet with recommended settings for the applicable Menus, all of the Custom Functions, plus some shooting and exposure settings. It has complete and separate camera setup recommendations for different types of shooting, including:

General / Travel / Street
Landscape / Architecture
Action / Sports
Moving Wildlife / Birds
Studio / Portraits
Concert / Performance

Here is a detail of just a small part of the Setup Guide spreadsheet:

Canon 5DS 5DSR Setup Guide Spreadsheet Experience Full Stop

The direct link to download the Excel spreadsheet is:

http://docs.fullstopbooks.com/forms/Canon-5DS-5DSR-Experience-Setup-Guide.xls

To print the spreadsheet guide, you may wish to print it across several pages and then tape them together, so that the data is legible:

-First, be sure to set the print area, to avoid all the blank pages. Do this by manually selecting all the cells with data in them (drag the cursor from cell A1 to G188 and they will all appear blue.) Then access the menu for File > Print Area > Set Print Area.

-Then go to File > Print Preview and select the Setup button.

-Then set the page for “Landscape” and “Fit To” 2 pages wide by 3 pages tall. Alternately, you can set for “Adjust to 58% Normal Size.”

Either of those options should result in 6 pages to be printed (as long as you have set the print area first).

Be sure to check the Print Preview to see that the data will print at a reasonable size, and that there are only 6 or so pages that will print.

Canon 5DS 5DSR setup book manual guide how to menu Custom Function quick start recommend

In the past I have resisted requests for these types of quick-start “cheat sheets,” because I prefer that readers of my Full Stop camera guides read through all of the Menu and Custom Function options, and determine which settings suit their shooting situations and preferences. This is one of the best ways to really learn the ins-and-outs of one’s new camera, so I still encourage you to do so. But I can appreciate the value and the handy reference features of this type of recommendation guide.

Canon 5DS 5DSR setup book manual guide how to menu Custom Function quick start recommend

Please know that I am in no way an experienced expert in all of the different photography categories I have included, so take the advice of dedicated Wildlife or Concert photographers, for example, above mine if it differs! And for further information, explanations, justifications, and caveats for the settings I specify, please have a look at my clear and comprehensive guide Canon 5DS / 5DS R Experience.

Canon 5DS 5DSR book manual guide master how to use learn quick start tips tricks setup setting menu custom function recommend


Version History of Spreadsheet

2015-06-18 – v1.0 – First version released

Nikon D7200 Setup Guide with Recommended Settings

In conjunction with my camera guide for the new Nikon D7200, Nikon D7200 Experience, I have created the free and comprehensive Nikon D7200 Setup Guide, with recommended settings for the applicable Menus, all of the Custom Settings, plus some shooting and exposure settings. It has complete and separate camera setup recommendations for different types of shooting, including:

General / Travel / Street
Landscape / Architecture
Action / Sports
Moving Wildlife / Birds
Studio / Portraits
Concert / Performance

Here is a detail of just a small part of the Setup Guide spreadsheet:

Nikon D7200 Setup Guide spreadsheet menu custom settings setup quick start tips tricks

The direct link to download the Excel spreadsheet is:

http://docs.fullstopbooks.com/forms/Nikon_D7200_Experience-Setup_Guide-UL.xls

alternate link:

http://www.dojoklo.com/Full_Stop/forms/Nikon_D7200_Experience-Setup_Guide-UL.xls

To print the spreadsheet guide, you may wish to print it across several pages and then tape them together, so that the data is legible:

-First, be sure to set the print area, to avoid all the blank pages. Do this by manually selecting all the cells with data in them (drag the cursor from cell A1 to G151 and they will all appear blue.) Then access the menu for File > Print Area > Set Print Area.

-Then go to File > Print Preview and select the Setup button.

-Then set the page for “Landscape” and “Fit To” 2 pages wide by 3 pages tall. Alternately, you can set for “Adjust to 60% Normal Size.”

Either of those options should result in 6 pages to be printed (as long as you have set the print area first).

Be sure to check the preview to see that the data will print at a reasonable size, and that there are only 6 or so pages that will print.

Nikon D7200 Experience book manual guide set up spreadsheet menu custom setting tips tricks shooting exposure


In the past I have resisted requests for these types of quick-start “cheat sheets,” because I prefer that readers of my Full Stop camera guides read through all of the Menu and Custom Settings options, and determine which settings suit their shooting situations and preferences. This is one of the best ways to really learn the ins-and-outs of one’s new camera, so I still encourage you to do so. But I can appreciate the value and the handy reference features of this type of recommendation guide.

Please know that I am not an expert in all of the different photography categories I have included, so feel free to follow the advice of dedicated Bird or Concert photographers, for example, if it differs from mine. Or follow your own preferences as they develop with experience. And for further information, explanations, justifications, and caveats for the settings I specify, please have a look at my clear and comprehensive guide Nikon D7200 Experience.

Nikon D7200 Experience book manual guide quick start master tips tricks recommend autofocus metering


Version History of Spreadsheet

2015-03-24 – v1.0 – First version released

Canon 7D Mark II Setup Guide with Recommended Settings

In conjunction with my camera guide for the new Canon 7D Mark II, Canon 7D Mark II Experience, I have created a Canon 7D Mark II Setup Guide – a comprehensive spreadsheet with recommended settings for the applicable Menus, Custom Function settings, plus some shooting and exposure settings. It has complete and separate camera setup recommendations for different types of shooting, including:

General / Travel / Street
Landscape / Architecture
Action / Sports
Moving Wildlife / Birds
Studio / Portraits
Concert / Performance

Here is a detail of just a small part of the Setup Guide spreadsheet:

Canon-7D-MarkII-setup-guide-02
Canon 7D Mark II Experience, Setup Guide Spreadsheet – a detail of the spreadsheet


Excel Version – The direct link to the Excel spreadsheet is:

http://docs.fullstopbooks.com/forms/Canon_7D_Mark_II_Experience-Setup_Guide.xls

alternate link:

http://www.dojoklo.com/Full_Stop/forms/Canon_7D_Mark_II_Experience-Setup_Guide.xls

To print the guide, you may wish to print it across several pages and then tape them together, so that the data is legible:

First, be sure to set the print area, to avoid all the blank pages. Do this by manually selecting all the cells with data in them (drag the cursor from cell A1 to G185 and they will all appear blue.) Then access the menu for File > Print Area > Set Print Area.

Then go to File > Print Preview and select the Setup button,

Then set the page for “Landscape” and “Fit To” 2 pages wide by 3 pages tall. Alternately, you can set for “Adjust to 60% Normal Size.”

Either of those options should result in 6 pages to be printed (as long as you have set the print area first).

Be sure to check the preview to see that the data will print at a reasonable size, and that there are only 6 or so pages that will print.

PDF Version – You can download a PDF version below, which is divided into 2 pages, and can be perhaps more easily navigated on a tablet or phone with some panning and zooming. However for printing it may prove to be too tiny, and you may wish to print the XLS version instead.

http://www.dojoklo.com/Full_Stop/forms/Canon_7D_Mark_II_Experience-Setup_Guide.pdf

Canon 7D Mark II book manual guide setup how to tips tricks spreadsheet menu custom function setting

In the past I have resisted requests for these types of quick-start “cheat sheets,” because I prefer that readers of my Full Stop camera guides read through all of the Menu and Custom Settings options, and determine which settings suit their shooting situations and preferences. This is one of the best ways to really learn the ins-and-outs of one’s new camera, so I still encourage you to do so. But I can appreciate the value and the handy reference features of this type of recommendation guide.

Please know that I am in no way an experienced expert in all of the different photography categories I have included, so take the advice of dedicated Bird or Concert photographers, for example, above mine if it differs! And for further information, explanations, justifications, and caveats for the settings I specify, please have a look at my clear and comprehensive guide Canon 7D Mark II Experience.

Canon 7D Mark II book manual guide setup tips tricks spreadsheet menu custom function setting

Version History
v1.0 – First version released – 2015-12-23

Use this Setup Guide in conjunction with Canon 7D Mark II Experience:

Canon 7D Mark II Experience book manual guide master how to tips tricks learn use setup quick start setting recommend menu custom function

If you have purchased my Canon 7D Mark II Experience e-book guide, be sure to sign up on the updates page, so that I can inform you of any updates made to the guide or to this spreadsheet, and well be able to provide you with a free updated guide, should there be any major updates or corrections.

If you have found this blog helpful and plan to purchase a Canon 7D Mark II or some lenses or accessories for it, please consider using my affiliate links for Amazon or for B and H, found at the left side of this page. Your price will be the same, but they will give me a small referral fee – thanks! And please feel free to spread the word if this blog has been helpful.

Nikon D750 Heads to the Cape – Hands On Review

The Nikon D750 has just been released, so I headed to the Falmouth Car Show on Cape Cod for some hands-on time to test it out, as I researched and worked on my guide to the camera, Nikon D750 Experience.

Falmouth Cape Cod lighthouse Nobska Nikon D750 review hands on
Nobska Lighthouse on Cape Cod – Woods Hole, Falmouth, Mass.

The camera performed great, and was used here with the 24-120mm f/4G lens. The handling and feel is similar to previous cameras such as the D610 and D7100, the autofocusing is quick and precise, and the Matrix Metering Mode did a great job in a wide variety of lighting and color conditions, as you can see below. The images below are all JPEG images, straight from the camera, with Auto1 WB, Standard Picture Control, and I don’t believe that Exposure Compensation was even used on any of these images. (The above image was processed.) While they could still use a little post processing tweaking, you can inspect the larger versions of these images in this Flickr Set:

https://www.flickr.com/photos/dojoklo/sets/72157647479004672.

I’ll let the other sites discuss the image quality, sharpness, and noise of the D750 sensor, and instead share some user-oriented thoughts about the camera, along with some of my favorite images from the trip.

Nikon D750 JPEG test hands on tips tricks noise image quality book manual guide AF autofocus tips tricks quick start menu custom setting
1966 Ford Mustang GT Fastback – Falmouth, Mass., Cape Cod.

I made use of both the Viewfinder Grid and the Viewfinder Level (assign the Fn Button to the Level option) to help keep the compositions straight and level – though you can’t use both at once. I mostly worked in Aperture Priority Mode, typically with the aperture set at f/4 for dramatic depth of field. I assigned the Movie Record button to ISO so that I could more easily change it on the fly while shooting, even keeping the camera to my eye as my finger located the proper button. Although there is an ISO Button on the rear of the camera, I find it quicker and easier to use a top button near the Shutter Button for this.

Nikon D750 JPEG test hands on tips tricks noise image quality book manual guide AF autofocus tips tricks quick start menu custom setting
1962 Chevrolet Corvette in Honduras Maroon – Falmouth, Mass., Cape Cod.

I pulled out the articulating Monitor for a few overhead shots (not shown here). While some have said its framework seems sturdy and durable, it feels a bit delicate to me. The extended screen certainly wouldn’t survive an accidental drop, and the exposed ribbon cable seems like trouble in the making. Though if you are just using the movable screen while working on a tripod or carefully shooting, it should work and hold up just fine.

Nikon D750 JPEG test hands on tips tricks noise image quality book manual guide AF autofocus tips tricks quick start menu custom setting
1963 Chevrolet Corvette Sting Ray, Split-Window Fastback. (Notice the split-window shadow in the back of the car) – Falmouth, Mass., Cape Cod.

The Command Dials have a nice rubber texture to them, which is much more comfortable for extended use than other lower-end cameras with dials of a harder material. All the controls are pretty standard Nikon controls for the current models, and are easy to locate and use. The D750 has the handy i Button, and a new Information Display screen which works a bit differently than other current Nikon models. The i Button calls up the i Button menu during Viewfinder shooting (and Live View shooting), rather than directly changing the settings along the bottom of the screen. This is a handy way to change settings such as Image Area, Picture Control, button assignments, and Noise Reduction.

Nikon D750 JPEG test hands on tips tricks noise image quality book manual guide AF autofocus tips tricks quick start menu custom setting
1958 Chevrolet Impala – Falmouth, Mass., Cape Cod.

And when you press the Info Button to show the Information Display, you can directly change many of the camera settings as your view them on the screen. Rather than simply seeing an icon on the Information Display as you do with other Nikon models, the screen now says what the option is, and which dial to turn to change which setting. This is much more helpful than simply having to remember what dial to turn, or having to go with trial-and-error every time. For example, if you press the Info Button to illuminate the display, then press the AF-Mode button (located near the base of the lens), the screen will indicate that you turn the front Sub-Command Dial to change the AF-Area Mode, and the rear Main Dial to change the Focus Mode. A similar helpful screen appears for the other button settings such as WB, ISO, QUAL, Metering Mode, Flash, and BKT.

Nikon D750 JPEG test hands on tips tricks noise image quality book manual guide AF autofocus tips tricks quick start menu custom setting
1965 Ford Mustang Shelby GT 350 Fastback – Falmouth, Mass., Cape Cod.

It is disappointing that Nikon did not include the AF-ON Button on the rear of the camera, which is used for autofocusing and back-button focusing on other models. You can still set up the AE-L/AF-L Button to be used to lock focus with or without also locking exposure, or you can set it up to perform AF-ON back-button focusing, it is not as versatile as other cameras because you don’t have separate rear buttons for exposure lock and focus lock.

As far as setting up all the the Menu and Custom Settings of the Nikon D750, I have created a comprehensive D750 Setup Guide Spreadsheet, with suggested settings for various shooting situations such as Travel, Landscape, Concert, etc. You can learn about and download the free Setup Guide Spreadsheet here:

http://blog.dojoklo.com/2014/09/25/nikon-d750-setup-guide-with-recommended-settings/

Nikon D750 JPEG test hands on tips tricks noise image quality book manual guide AF autofocus tips tricks quick start menu custom setting

1941 Oldsmobile – Falmouth, Mass., Cape Cod.

If you are considering purchasing a Nikon D750, or any lenses or accessories, please consider using my Amazon or B and H Affiliate Links, found on the left side of the page. And if you like this post and this blog, be sure to share it on forums or social media – thanks!

Learn how to take control of your D750 and the images you create, with my guide Nikon D750 Experience.

Nikon D750 JPEG test hands on tips tricks noise image quality book manual guide AF autofocus tips tricks quick start menu custom setting
1957 Dodge Custom Royal – Falmouth, Mass., Cape Cod.

Nikon D750 Setup Guide with Recommended Settings

In conjunction with my camera guide for the new Nikon D750, Nikon D750 Experience, I have created a Nikon D750 Setup Guide – a comprehensive spreadsheet with recommended settings for the applicable Menus, all of the Custom Settings, plus some shooting and exposure settings. It has complete and separate camera setup recommendations for different types of shooting, including:

General / Travel / Street
Landscape / Architecture
Action / Sports
Moving Wildlife / Birds
Studio / Portraits
Concert / Performance

Here is a detail of just a small part of the Setup Guide spreadsheet:

Nikon D750 Menu Custom Setting setup guide quick start tips tricks cheat sheet book manual guide recommend
Nikon D750 Experience, Setup Guide Spreadsheet – a detail of the spreadsheet


Excel Version – The direct link to the Excel spreadsheet is:

http://docs.fullstopbooks.com/forms/Nikon_D750_Experience-Setup_Guide.xls

alternate link:

http://www.dojoklo.com/Full_Stop/forms/Nikon_D750_Experience-Setup_Guide.xls

To print the guide, you may wish to print it across several pages and then tape them together, so that the data is legible:

First, be sure to set the print area, to avoid all the blank pages. Do this by manually selecting all the cells with data in them (drag the cursor from cell A1 to G155 and they will all appear blue.) Then access the menu for File > Print Area > Set Print Area.

Then go to File > Print Preview and select the Setup button,

Then set the page for “Landscape” and “Fit To” 2 pages wide by 3 pages tall. Alternately, you can set for “Adjust to 60% Normal Size.”

Either of those options should result in 6 pages to be printed (as long as you have set the print area first).

Be sure to check the preview to see that the data will print at a reasonable size, and that there are only 6 or so pages that will print.

PDF Version – You can download a PDF version below, which is divided into 2 pages, and can be perhaps more easily read and navigated on a tablet or phone with some panning and zooming. However for printing it may prove to be too tiny, and you may wish to print the XLS version instead.

http://www.dojoklo.com/Full_Stop/forms/Nikon_D750_Experience-Setup_Guide.pdf

Nikon D750 setup menu custom setting guick start how to book manual guide viewfinder autofocus

In the past I have resisted requests for these types of quick-start “cheat sheets,” because I prefer that readers of my Full Stop camera guides read through all of the Menu and Custom Settings options, and determine which settings suit their shooting situations and preferences. This is one of the best ways to really learn the ins-and-outs of one’s new camera, so I still encourage you to do so. But I can appreciate the value and the handy reference features of this type of recommendation guide.

Please know that I am in no way an experienced expert in all of the different photography categories I have included, so take the advice of dedicated Bird or Concert photographers, for example, above mine if it differs! And for further information, explanations, justifications, and caveats for the settings I specify, please have a look at my clear and comprehensive guide Nikon D750 Experience.

Nikon D750 setup menu custom setting guick start how to book manual guide viewfinder autofocus

Version History
v1.0 – First version released

If you have purchased my Nikon D750 Experience e-book guide, be sure to sign up on the updates page, so that I can inform you of any updates made to the guide or to this spreadsheet, and well be able to provide you with a free updated guide, should there be any major updates or corrections.

If you have found this blog helpful and plan to purchase a Nikon D750 or some lenses or accessories for it, please consider using my affiliate links for Amazon or for B and H, found at the left side of this page. Your price will be the same, but they will give me a small referral fee – thanks! And please feel free to spread the word if this blog has been helpful.

The First Nikon D810 guide, Now Available!

Nikon D810 Experience, my latest Full Stop e book and the first D810 user’s guide, is now available! This e book goes beyond the manual to help you learn the features, settings, and controls of the powerful and highly customizable Nikon D810. Plus most importantly it explains how, when, and why to use the functions, settings, menu options, and controls in your photography – including the sophisticated autofocus system with its new Group-Area AF mode, and the new Highlight-Weighted metering mode.

Nikon D810 Experience book manual guide master field how to learn use tutorial tips tricks setup quick start

Written in the clear, concise, and comprehensive style of all Full Stop dSLR guides, Nikon D810 Experience will help you learn to use your full-frame D810 quickly and competently, to consistently make the types of images you desire. This e-book is available in either PDF or EPUB format for reading on your computer, tablet, iPad, e-reader, etc.

Learn more about it, view a preview, and purchase it here:

http://www.dojoklo.com/Full_Stop/Nikon_D810_Experience.htm

As one reader has said about Full Stop guides, “I don’t know how I could fully take advantage of all the features the camera has to offer without this publication! It’s well-organized, easy to understand, and succinct enough to keep your attention while still containing a wealth of information to get the most out of your camera.”

Nikon D810 book manual guide learn how to use setup recommend setting tips tricks quick startNikon D810 book manual guide learn how to use setup recommend setting tips tricks quick start

Take control of your Nikon D810, the image taking process, and the photos you create!

For Intermediate and Enthusiast Photographers:
This instant download Nikon D810 e book is designed for intermediate and enthusiast dSLR photographers who wish to take fuller advantage of the capabilities of their camera and shoot competently in A, S, and M shooting modes; take control of the sophisticated 51 point autofocus system and its multiple AF-Area Modes including the new Group-Area AF mode; and learn how, when, and why to use and customize the various controls, buttons, and features of the D810.

To help you set up your camera, it includes explanations and recommended settings for all Menu options and Custom Settings of the D810.  It explains camera functions and exposure concepts for those learning digital SLR photography, and explains more advanced camera controls and operation, such using the various metering modes and exposure compensation for correct exposure of every image, and taking advantage of other features of the D810 such as working in Live View, and the in-camera HDR, Multiple Exposure Mode, and editing features.

For Experienced Photographers to get up and running with the D810:
For experienced photographers coming to the D810 from previous Nikon models, this guide explains the new and advanced features in order to quickly get you up and running and taking advantage of these capabilities, including the advanced Autofocus System and all its AF Modes, AF-Area Modes, and Custom Settings, for capturing both still and moving subjects. It also covers back-button focusing and trap focus techniques with the D810. Plus it explains the camera controls and how to customize them, new features such as Highlight-Weighted Metering, RAW S, the Electronic Front-Curtain Shutter feature, and the HDR, Multiple Exposure, and Time-Lapse Shooting features.

The guide also introduces the HD video features and settings, and guides you through all the Playback, Shooting, and Setup Menus, Custom Settings, and Movie Mode Menu settings of the D810 in order to help you best set up the camera and its controls for your specific shooting needs, including the helpful, comprehensive Nikon D810 Set-Up Guide spreadsheet created by the author.

Nikon D810 book manual guide learn how to use setup recommend setting tips tricks quick startNikon D810 book manual guide learn how to use setup recommend setting tips tricks quick start

Nikon D810 Experience not only covers the various settings, functions and controls of the Nikon D810, but most importantly it also explains when and why to use them for your photography. The guide focuses on still-photography with an introduction to the movie functions, settings, and menus to get you up and running with HD video. Sections include:

  • Setting Up Your D810 – All of the D810 Custom Settings and Playback, Shooting, and Setup Menus, including Movie Mode Menus, with explanations and recommended settings for practical, everyday use. Set up and customize the advanced features of your dSLR to work best for the way you photograph.
  • Aperture Priority (A), Shutter Priority (S), and Manual (M) Modes – How and when to use them to create dramatic depth of field, freeze or express motion, or take total control over exposure settings.
  • Auto Focusing Modes and Area Modes and Release (Drive) Modes – The 51 point D810 autofocus system is a powerful tool, and taking control of it will enable you to successfully capture more sharp images, in both still and action situations.  Learn the AF Modes, AF Area Modes, and AF Custom Settings, how they differ, how and when to take advantage of them to capture both still and moving subjects. Plus how and when to use focus lock and back-button focusing.
  • Exposure Metering Modes of the Nikon D810 – How they differ, including the new Highlight-Weighted Metering mode, how and when to use them for correct exposures in every situation, and how to customize them for your needs. Plus how to make use of exposure lock.
  • Histograms, Exposure Compensation, Bracketing, and White Balance – Understanding and using these features for adjusting to the proper exposure in challenging lighting situations, customizing the controls for easy access to these features, and setting custom white balance.
  • The Image Taking Process – Descriptive tutorials for using the settings and controls you just learned to take photos of both still and moving subjects.
  • Introduction to Video Settings – Settings and explanations to get you started shooting HD video.
  • Photography Accessories – The most useful accessories for day-to-day and travel photography including accessories specific to the D810.
  • Lenses – Nikon (Nikkor) lenses compatibility with the D810, and explanations of lens notations.
  • Composition – Tips, techniques, and explanations, including the creative use of depth of field.

Nikon D810 book manual guide learn how to use setup recommend setting tips tricks quick startNikon D810 book manual guide learn how to use setup recommend setting tips tricks quick start

This 375 page digital guide to the Nikon D810 is an illustrated e-book that goes beyond the manual to clearly explain how, when, and why to use the features, settings, and controls of the Nikon D810 to help you get the most from your camera.

Learn more about Nikon D810 Experience, view a preview, and purchase it on my Full Stop website here:

http://www.dojoklo.com/Full_Stop/Nikon_D810_Experience.htm

Nikon D810 Tips and Tricks – Part 2

Here is the second part of my Nikon D810 Tips and Tricks article. You can find the first part here:

http://blog.dojoklo.com/2014/07/28/nikon-d810-tips-and-tricks-part-1/

~

6. Extend Your Telephoto Reach with the DX, 1.2x, and 5:4 Image Area “Crop” Modes: The Image Area menu item of the D810 can be used to capture images of smaller dimensions and different image area ratios, such as having your full-frame FX format sensor act as an APS-C sized DX format sensor. You can choose full-frame FX (36×24), 1.2x (30×20), DX (1.5x, 24×16) or 5:4 (30×24). You can see which portion of the sensor each setting will use in the image below, and the Viewfinder of the D810 will also display the crop lines to show you the active area. By enabling the 1.2x, DX, or 5:4 image areas, it will change the aspect ratio (very slightly for 1.2x and DX) and angle of view (somewhat with 1.2x or 5:4, dramatically with DX) of your resulting images. The camera is basically cropping your photos from full-frame images to smaller sized images, so note that rather than capturing 36.3 MP full-frame FX images, you will be capturing 15.4 MP images with DX crop, and 25.1 MP images with 1.2x crop.

Nikon D810 image area viewfinder virtual crop zoom telephoto FX DX 1.2x 5:4
D810 Image Areas – Simulated view of the D810 Viewfinder, showing the full size FX image area, the location of all AF Points, the Grid, and superimposed sizes of the Image Area options. Note that the DX area approximately aligns with the Grid. The cropped Image Areas will, in effect, allow you to “virtually” extend the reach of your lens and get closer to the action, but you will not be using the full 36.3 MP resolution of your camera, so it is basically like cropping your full-frame images in Photoshop.

The first advantage of DX and 1.2x crop is that they will allow you to “get closer” to the action by virtually extending the reach of your lenses. This can be particularly helpful when using a telephoto lens to capture sports, wildlife, or bird images where the subject is at a significant distance from you. DX image area will allow, for example, your 200mm focal length lens to act as a 300mm focal length. (Since the DX frame provides a 1.5x crop factor in relation to a full-frame FX sized sensor)

The second advantage is that with the DX crop, the area of the autofocus points as seen in the Viewfinder reaches much closer to the sides of the effective frame. This will allow you to track and capture a moving subject throughout almost the entire width of the active frame (when using continuous AF-C Focus Mode), or enable you to focus on and capture a still subject most anywhere in the frame without having to lock focus and reframe (when using single-shot AF-S Focus Mode).

A third advantage of working in the DX and 1.2x crop modes is that the Continuous High shooting speed goes from 5 fps to 6 fps, allowing you to capture slightly more images in a quick burst.

Nikon D810 tips tricks how to use learn book manual guide recommend setting setup autofocus af meter metering focus
Nikon D810 – 1957 Chevrolet Corvette – 2014 Annual Antique Auto Show – Codman Estate, Lincoln, Mass. 

As mentioned above, the disadvantage of the smaller Image Area crops is that you will be using a smaller area of your sensor, and thus capturing images with reduced resolution and not the full 36.3 MP. The end result will be as if you cropped the image in post-processing. However, 15 MP and 25 MP are still very high resolutions, and for some shooting situations and image needs this may be more than sufficient.

You can set the Depth-of-Field Preview Button, Fn Button, or AE-L/AF-L Button to quickly change the Image Area. If any of these buttons are assigned this function, you can press the button and turn the Main Command Dial to change the Image Area while viewing the setting on the top Control Panel, in the Viewfinder, or on the rear Information Display.

7. Take Advantage of New Features for Videographers: While the predecessors to the D810, the D800/800E, are great cameras for HD video, this new model adds even more helpful features. The D810 can record full HD 1080 video at 60p/30p/24p, including simultaneous recording to a memory card and an external recorder, and outputting 60p video to an external recorder under certain conditions. The D810 has also added “zebra stripes” which enable you to preview potentially overexposed areas of the scene, and a Flat Picture Control which is a setting preferred by videographers because it helps to preserve details in the shadow and highlight areas of a scene, and allows one to capture videos (or images) with the widest tonal range. This can help to provide the greatest amount of flexibility for making adjustments in post-processing. Not to mention that, for both video and still photography, there is a new Clarity adjustment for Picture Controls, a broader Brightness range, and increased control over the Picture Control adjustments with more precise 0.25 EV increments.

Nikon D810 video HD movie zebra stripes highlight overexpose overexposure live view film
D810 and Zebra Stripes – The Highlight Display feature will show zebra stripes, to indicate potentially overexposed areas of the scene.

The D810 now also allows you to set the frequency range for audio recording, either Wide to capture all sounds, or Voice to capture a more limited range and thus reduce unwanted sounds. And the Power Aperture setting found on the D800/D800E can now be used not only when recording video to an external recorder, but also when recording to a memory card. Power Aperture is a feature that allows you to more smoothly and continuously change the aperture opening while recording a video, rather than change it step-by-step where you might see the depth of field change as you jump from f/4 to f/ 4.5 to f/5 to f/5.6 for example. This feature, available in A or M shooting mode, actually changes the aperture in 1/8 EV steps, rather than the 1/3 EV steps you can choose with the command dial, so it gives the appearance of a smooth transition. Power Aperture can thus allow dramatic visual changes in the depth of field of a scene, or allow you to smoothly adjust the exposure settings to accommodate changing lighting levels.

8. Set up your Dual SD / CF Memory Card Slots: The two memory card slots of the D810 – the SD slot and the CF slot – can function in a couple different ways, including using one for saving RAW files and the other for JPEG files, saving all your images to both cards simultaneously, using the second card as overflow when the first one fills up, or saving still images to one and movies to the other. You can set this up in the Shooting Menu under Primary Slot Selection to choose which is the primary card, and Secondary Slot Function to determine the role played by the second slot. To set how the cards function for saving videos, use the Shooting Menu > Movie Settings > Destination.

Nikon D810 sd cf memory card body use tips tricks how to learn manual guide book


Detail of the Nikon D810, showing the SD and CF card slots.

9. Customize the Exposure Compensation Controls: Exposure Compensation can be used to adjust the camera’s exposure settings in order to achieve the final exposure that you desire. Explore the various options of Custom Setting b4: Easy Exposure Compensation to customize exactly how the exposure compensation (EC) controls works. You can set it so that you press the Exposure Compensation Button first before turning a dial to change EC, or have it set so that you can just turn a dial to quickly and directly change EC. You can even select which dial you use with Custom Setting f9: Customize Control Dials. And you can set it so that the EC amount that you dialed in stays set for the subsequent shots, or that it is automatically reset to zero, depending on which controls you choose to use to set EC. This last option is the most sophisticated and most flexible, and may be the best one to learn and take advantage of. Using this option, On (Auto reset), you can choose to turn a dial to directly adjust EC, but your EC setting will be reset when the camera or exposure meter turns off. This is because you can still continue to use the Exposure Compensation Button with a Command Dial to set EC, but by setting it this way, EC will not be reset when the camera or meter turns off. Exposure Compensation will only be automatically reset if you set it directly using the dial without the button. So if you wish to use EC for just one shot, you can adjust EC with just the dial. But if you wish to take a series of shots with the same adjusted EC, you can use the button/ dial combination to set it more “permanently.” Pretty powerful stuff! This is why you got the D810, right? So that you can take advantage of these sophisticated controls!

Nikon D810 menu custom setting how to quick start tips tricks
Making use of Easy Exposure Compensation to configure how the controls can be used to change exposure compensation

10. Matrix Metering Face Detect, and Fine-Tune the Exposure Metering Modes: Using Custom Setting b5, you can enable a face detection feature of Matrix Metering. This means that the exposure metering system will take faces into account when determining the exposure settings, to ensure that portrait subjects are better exposed. This can be an extremely useful setting to use when taking images of people where they may be moving to different lighting, or moving in and out of the shade – especially in a fast moving session where you don’t have time to inspect all your images and adjust the settings. For example, if you are taking wedding portraits in lighting that varies.

While the Matrix Metering Mode will do an excellent job of determining the proper exposure for your images the majority of the time, there are some situations where you may wish to use the other exposure modes – Center-Weighted Metering, Spot Metering, and Highlight Weighted Metering. This includes dramatically backlit situations, subjects with a dramatically dark background, scenes that contain a wide range of highlights and shadow areas, or other dramatic lighting situations.

If you find that you are consistently not quite happy with how the camera’s meter is determining the exposure settings when making use of any of these modes, you can make fine-tune adjustments to the metering system using Custom Setting b7: Fine-tune optimal exposure. This is not an exposure compensation adjustment, but rather a “behind the scenes” fine-tuning of how the camera’s meter will determine the exposure settings, independently for each of the different Exposure Metering Modes (Matrix, Center-Weighted Average, Spot, Highlight Weighted). If you find that your images are always typically being slightly underexposed or overexposed when using a specific metering mode, adjust this accordingly so that you don’t have to use exposure compensation every time you use that metering mode. For example, you may find that Center-Weighted Metering delivers great exposures, but you would prefer that the images taken with Spot Metering were 1/3 EV (1/3 step) underexposed all the time. If that is the case, you would adjust Spot metering to -2/6 using this menu. If you make use of this fine-tune adjustment, you can still use exposure compensation in any situation in addition to this fine-tune adjustment.

Nikon D810 menu custom setting meter metering face detect tips tricks
Left: Custom Setting b5: Matrix Metering face detection for exposure. Right – Custom Setting b7: Fine-Tune Optimal Exposure, used to adjust the exposures of each metering mode to your preference, “behind the scenes,” so that exposure compensation is not needed each time you use that metering mode.

~

I have previously written articles with tips and tricks for the Nikon D7100, and most all of those items will also apply to the D810. Some of the tips overlap, but many of them are different that the ones explained here. You can read the D7100 Tips and Tricks part 1 and 2 here:

http://blog.dojoklo.com/2013/05/06/top-ten-tips-and-tricks-for-the-nikon-d7100-part-1/

http://blog.dojoklo.com/2013/06/27/tips-and-tricks-for-the-nikon-d7100-part-2/

~

Remember, I also explain these features and functions in even more detail, as well as explain all the other aspects of the D810 in my e-book guide Nikon D810 Experience, available on my Full Stop website. The guide not only explains the features, functions, and controls of the camera, but more importantly explains when and why you will want to use them in your photography. Take control of your D810 and the images you create! Click the cover below to learn more, preview, and purchase the guide.

Nikon D810 Experience book manual guide how to learn use tutorial tips tricks setup quick start

And, in conjunction with the book, I have created a detailed and comprehensive Nikon D810 Setup Guide spreadsheet, which has recommended Menu settings, Custom Settings, and exposure settings for various shooting situations such as Landscape, Performance, Sports, and Travel, in order to help you set up your camera. You can learn about and download this free “cheat sheet” spreadsheet here:

http://blog.dojoklo.com/2014/06/30/nikon-d800800e-nikon-d810-setup-guide-with-recommended-settings/

Still looking to purchase your Nikon D810 or some lenses or accessories for it? Please consider using my affiliate links for Amazon or for B and H, found at the left side of this page – thanks! And please feel free to spread the word if this blog has been helpful.

Nikon D810 Tips and Tricks – Part 1

As you likely discovered as soon as you starting exploring the controls, features, menus, and Custom Settings of your 36.3 MP, full-frame Nikon D810, it is a powerful, highly customizable, and versatile camera. There are numerous Menu options and Custom Settings that you can make use of in order to fine-tune the camera to perfectly fit your needs, shooting style, and scene or situation. The autofocus system and exposure metering system can be adjusted according to your preferences, the camera controls can be customized and assigned to a variety of functions, the displays, White Balance, and Auto ISO can be tweaked according to your needs. Plus several new features have been added to the D810 compared to its predecessor the D800/D800E, and all of them enhance the shooting experience. Many of them will be explained throughout this article.

I’ve spent some dedicated time with the D810 as I’ve researched and written my e-book user’s guide to the camera called Nikon D810 Experience, and below are the some of the top “tips and tricks” I’ve discovered for setting up and photographing with this powerful dSLR. And be sure to read to the end of the article to learn about my free, detailed, and comprehensive Nikon D810 Setup Guide spreadsheet, which covers recommended Menu settings, Custom Settings, and exposure settings for various types of shooting situations!

Nikon D810 body detail tips tricks how to use manual guide book set up quick start
Detail of the Nikon D810 dSLR camera – photo by author

1. Take Control of the D810 Autofocus System: Before getting into some of the tips regarding features and functions specific to the D810, one first needs to take control of the basic functions of the camera, including the autofocus system and exposure metering settings. The D810 boasts the 51 point autofocus system of its predecessor the D800, with 15 centrally-located cross-type points. The large number of focus points and their positions in the Viewfinder will allow you to focus exactly where you wish – with minimal recomposing (when working in Single-Servo AF-S mode), plus will better enable you to track moving subjects throughout the frame when working in Continuous-Servo (AF-C) autofocus mode. The different autofocus modes (AF-S, AF-C) and the various autofocus area modes (Single Point, Dynamic Area, etc. plus the new Group Area AF) may be intimidating at first, but once they are understood, it is easy to determine which combinations fit your shooting needs. I wrote an entire post introducing the use of the Nikon autofocus system, its AF and AF-Area modes, and its controls. (Despite the larger number of AF points in the D810, the system works nearly the same as explained in the article.) If you have not used one of the more current Nikon dSLR models such as the D800, D7100/D7000, or D610/D600, you may at first be confused by the autofocus controls with the AF switch / button near the base of the lens (used in conjunction with the Command Dials), but you should quickly find that it is a quick and convenient way to change the AF modes and AF area modes.

Nikon D810 autofocus af system viewfinder book manual guide dummies how to tips tricks setting menu quick start
Simulated view of the Nikon D810 Viewfinder, with all 51 AF points shown for reference.

In addition, the D810 offers several Custom Settings to customize various aspect of the autofocus system, namely the ones in the a: Autofocus category. You can use these to tell the camera if achieving exact focus takes priority over maintaining the fastest continuous frame rate, how long the AF system continues to track a specific subject (distance) even if the subject momentarily moves away from the active AF point, and if the active AF point is illuminated in the Viewfinder. Using Custom Setting a5: Focus Point Illumination, you can now choose to display the cluster of all of the AF Points of a Dynamic-Area (such as 9-Point or 21-Point), rather than just the active middle point of the cluster. And you can even limit the number of selectable AF points to 11 if that helps you to more quickly or easily select your desired AF point. Most of these options are explained in my previous Nikon AF system post mentioned above.

The D810 also offers the ability to remember a specific AF Point so that the camera will automatically jump to the last point used when the camera is held in a specific orientation. For example, if you last used an upper-right AF Point when holding the camera in the grip-up position, then returned to shooting with the camera in landscape orientation, when you next hold the camera in the grip-up position, the camera will automatically jump back to that upper-right point. This is done through Custom Setting a9: Store by Orientation. You can register different points for each of the camera orientations. Similarly, you can assign the center Multi Selector Button to be used to jump to a Preset Focus Point of your choice, when the button is pressed during shooting.

2. Make Use of the new Group Area AF Autofocus Mode: The D810 borrows a new focus mode from the flagship Nikon D4s – Group Area AF, which makes use of a group of five AF Points arranged in a cross-shaped pattern. Instead of selecting a primary point with the surrounding points acting as “helper” points as with the Dynamic-Area AF modes, you will actually be selecting the group of five points which will all be used to attempt to focus on the subject. The Viewfinder will display the four outer points of the Group Area AF group of points, but not display the central point – perhaps so that you can better view the subject. Or you can use Using Custom Setting a5: Focus Point Illumination to display four surrounding dots rather than larger squares.

Nikon D810 autofocus af group area mode learn use setup quick start tips tricks viewfinder bif bird heron
Nikon D810 – Group Area AF – Simulated view of the D810 Viewfinder, showing what you will see in the viewfinder when making use of Group Area AF, with the cross-shaped pattern of the four outer AF Points of the Group visible. Background image shown at 65% opacity to better view Focus Points.

Keep in mind that with the other somewhat similar Dynamic-Area AF modes, you choose a primary point and attempt to keep the subject located at that point, and the surrounding points act as “helper” points if the subject happens to move away from the primary point. But with Group Area AF you select the entire group of AF Points, and they all work equally to focus on the subject. This mode can be used similar to Single Point AF but when it might be challenging to locate the subject under an individual point, which might cause you to accidentally focus on the background. When working in AF-S Focus Mode and using Group Area AF, the selected AF Points will give priority to faces if they are present, otherwise they will focus on the closest subject.

3. Take Advantage of the new [i] Button, and the “Hidden” Features it will Access: The D810 adds the [i] Button (on the rear of the camera) which gives you immediate access to the Information Display screen, where many shooting settings and functions can be viewed and changed. You can press this button to turn on the Information Display on the Monitor and immediately access these settings with the use of the Multi Selector and OK Button or the center touch-pad button. Press the [i] Button a second time or the Info button to “de-activate” the settings and simply view the camera settings on the Information Display Screen. Or, after the Info Button is pushed to display the camera settings of the Information Display screen on the rear Monitor, this [i] Button is pressed to “activate” the screen to enable changing the settings. In addition to the readily accessible camera buttons on the body of the D810, this [i] Button and Information Display screen can be a quick and easy way to change many of the camera settings without having to dig into the menus, such as Active D-Lighting, High ISO Noise Reduction, Color Space (sRGB vs Adobe RGB), and Long Exposure Noise Reduction. Plus you can use this screen to quickly access and customize the Preview (Pv) Button, AE-L / AF-L Button, and Fn Button Assignments.

Nikon D810 Information Display LCD monitor screen
The Information Display of the D810, accessed with the Info Button or i Button, and “activated” with the i Button.

The [i] Button can also be used during Live View shooting, Movie shooting, and Image Playback – to quickly access a number of applicable functions, some of them are sort-of hidden unless accessed this way, such as the LCD Monitor White Balance adjustment, and the Highlight Display for showing “zebra stripes” at potentially over-exposed areas of the scene during Movie Live View.

During Live View shooting, the [i] Button can be pressed to access settings including Image Area, Active-D Lighting, the new Electronic Front-Curtain Shutter, Monitor Brightness, Photo Live View Display White Balance (explained just below), or Split-Screen Display Zoom to compare two magnified areas of the scene in order to confirm that the image is level (as will be described in Tip 5 below). The Photo Live View Display White Balance feature allows you to set the white balance of the Live View screen differently than the current white balance of the scene. This may sound odd, until you realize it can come in handy when setting up a shot that will actually be taken with different lighting, such as a Speedlight or studio strobes. So using this feature you can set the LCD Monitor WB to better match how the final image will appear.

During Movie shooting, the [i] Button will access Image Area, Frame Size and Frame Rate, Movie Quality, Microphone Sensitivity and Frequency Response, Wind Noise Reduction, Destination to select the active memory card, Monitor Brightness, Highlight Display to view “zebra-stripes” at overexposed areas of the scene, and Headphone Volume. Plus during video playback, the [i] Button is also used to display movie edit options.

When reviewing images during Image Playback, the [i] Button will access the Retouch Menu, which will allow you to apply various image edits such as Color Balance, Filter Effects, and Distortion Control. Be sure to take advantage of the [i] Button in these various mode, rather than digging into the menus, to easily access some of the most often used features as well as a couple of the “hidden” features. I have written a separate post about the “Hidden” Features of the D810 so that you can explore them further.

Nikon D810 Retouch Menu cross screen starburst
Nikon D810 Retouch Menu – Using the Cross Screen item of the Retouch Menu to create a cheesy starburst pattern!

4. Improve Exposures with the new Highlight Weighted Metering Mode: The D810 adds a brand new metering mode, Highlight Weighted Metering. This mode is designed for certain challenging lighting situations, in order to help retain detail in bright areas and avoid the overexposure of highlights. It does this by measuring the brightness in a scene then determining the best exposure level which will prevent the highlights from being overexposed (“blown-out”). It should prove to be a useful metering mode for those who shoot theater and live music performances where the lighting can suddenly and dramatically change, or even remain consistent but be prone to include bright “hot-spots” of illumination on a subject. It can also be used in other scenes that include a well lit subject against a dark background, particularly one that is moving and thus prevents the use of Spot Metering. And it can be used at a wedding reception where the bride may be under a spot light, and you wish to properly expose the scene and the subjects yet retain all the subtle details in the highlights of the wedding dress. Also take advantage of the quieter Quiet Shutter Release (Q) and Quiet Continuous Shutter Release (Qc) release modes when in theater, performance, or wedding situations, in order to reduce shutter noise as you take your shots.

With Highlight Weighted Metering Mode when the camera’s exposure settings are biased  to avoid the overexposure of highlights, they may result in some of the other areas of the scene, such as the midtones, being slightly underexposed. However, with the excellent sensor performance of the D810, even at higher ISO settings, you should be able to easily adjust the midtone and shadow areas of an image without increasing the appearance of digital noise. Shooting in the RAW file format rather than JPEG format will allow you more post-processing flexibility for these adjustments than will images in the JPEG format. Note that when using a lens other than a Nikon G, E, or D lens (typical current lenses) with the D810 set for Highlight-Weighted Metering, the camera will actually use Center-Weighted Metering.


The Highlight-Weighted Metering Mode of the D810 is designed for theater / performance scenes such as this, where a brightly lit subject is against a dark background, and is prone to overexposed hot-spots due to theater lighting.

5. New Features Ideal for Landscape Photographers: The D810 includes several new features that landscape photographers will want to make use of, as well as those shooting in other types of controlled situations such as macro and studio still-life shooting. While the 36.3 megapixel sensor of the D810 has the potential to create images with incredible resolution, the high megapixel count can also call attention to less-than-sharp images. You will need a high quality lens to take full advantage of the resolution, plus make use of some features that will help reduce camera shake and thus image blur.  In addition to the redesigned mirror/ shutter mechanism that is quieter and smoother, you can also make use of the new Electronic Front-Curtain Shutter to help reduce camera vibrations. When working in Mirror-up (Mup) Release Mode, this uses the sensor itself as the front curtain of the shutter, rather than a mechanical curtain. You can enable this with Custom Setting d5, as well as use it in Live View (press the i Button in Live View to access it). For maximum vibration reduction, you can also make use of:

-the Mirror Up release mode, which performs the jarring mirror-raising action prior to shutter release, requiring a second Shutter Button press to take the image. Use this with or without the Electronic Front-Curtain Shutter feature

-the Exposure Delay Mode (Custom Setting d4) to delay the shutter release for a couple seconds after you press the Shutter Button.

-and of course a tripod and a remote shutter release.

Landscape and architectural photographers can also make use of the new Split Screen Display Zoom during Live View, where you can simultaneously zoom in on two different areas of the frame (on the same horizontal plane) to help determine if they are level. Press the i Button when in Live View to access this feature, then navigate to the desired area of the scene, and zoom in or out. Press the Protect (key icon) Button to select the other half of the screen and navigate to the desired area of that side of the scene. Since this feature is used to determine if the framing is level, both sides of the screen will move up and down simultaneously when you navigate either side. Press the i Button again to exit the Split-Screen.

Nikon D810 Split Screen Display Zoom LCD monitor screen Live View
The Split-Screen Display Zoom of the D810, accessible during Live View shooting, to check if the framing of the scene is level.

You can also make use of the Electronic Level on the rear LCD Monitor, the Live View Electronic Level, or the Virtual Viewfinder Horizon level which is seen in the Viewfinder. Assign the Fn or Pv Button to display the Virtual Viewfinder Horizon level, via Custom Setting f4 or f5. And landscape photographers will also want to take advantage of the new, lower 64 ISO setting. This is a “native” ISO setting, not an artificial one created by processing. Landscape photographers (and videographers) often need to use dark ND filters in order to block some light so that they can take advantage of wide apertures settings, such as f/2.8. Or they are used so that you can obtain slower shutter speeds when desired, such as when you wish to blur the motion of water. By enabling you to lower the ISO below 100, it will reduce the need for an ND filter in some situations.

This article continues with Nikon D810 Tips and Tricks – Part 2, which can be read here:

http://blog.dojoklo.com/2014/08/29/nikon-d810-tips-and-tricks-part-2/

Remember, I also explain these features and functions in even more detail, as well as explain all the other aspects of the D810 in my e-book guide Nikon D810 Experience, available on my Full Stop website. The guide not only explains the features, functions, and controls of the camera, but more importantly explains when and why you will want to use them in your photography. Take control of your D810 and the images you create! Click the link below to learn more, preview, and purchase the guide:

http://www.dojoklo.com/Full_Stop/Nikon_D810_Experience.htm

And, in conjunction with the book, I have created a detailed and comprehensive Nikon D810 Setup Guide spreadsheet, which has recommended Menu settings, Custom Settings, and exposure settings for various shooting situations such as Landscape, Performance, Sports, and Travel, in order to help you set up your camera. You can learn about and download this free “cheat sheet” spreadsheet here:

http://blog.dojoklo.com/2014/06/30/nikon-d800800e-nikon-d810-setup-guide-with-recommended-settings/

If you have found this helpful and plan to purchase a Nikon D810 or some lenses or accessories for it, please consider using my affiliate links for Amazon or for B and H, found at the left side of this page. Your price will be the same, but they will give me a small referral fee – thanks! And please feel free to spread the word if this blog has been helpful.