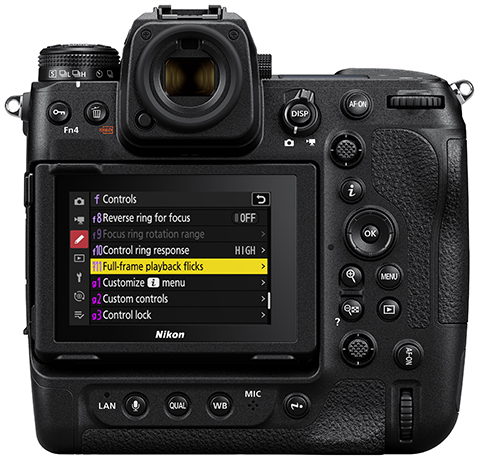
The mirrorless Nikon Z5II offers a significant number of menu items and customization options. In order to take full advantage of this versatile camera, you are going to need to dig into the Menus and Custom Settings, and set up the camera to work best for how you shoot and for the type of situations you are shooting.
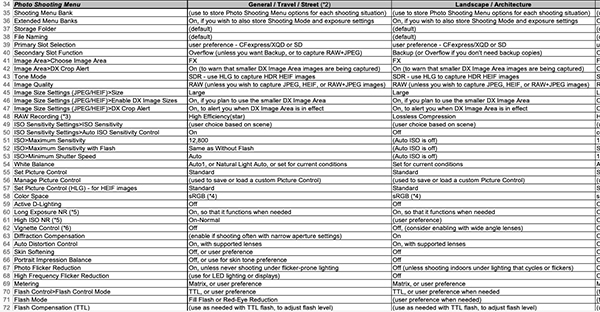
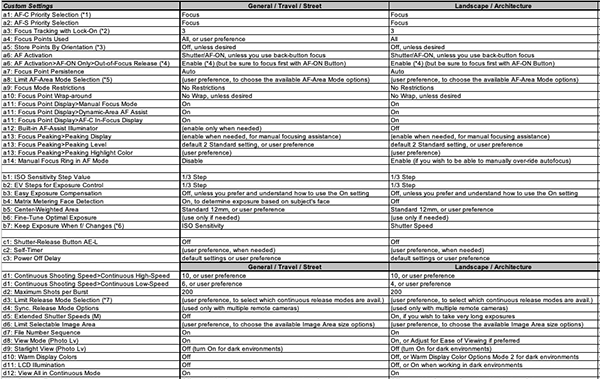
To assist you with setting up the Z5II Menus, I have created a detailed and comprehensive Nikon Z5II Menu Setup Spreadsheet, which lists suggested settings and starting points for the Photo Shooting Menu and the Custom Settings. It has complete and separate camera setup recommendations for different types of shooting, including:
General / Travel / Street Landscape / Architecture Action / Sports Moving Wildlife / Birds Studio / Portraits Concert / Performance
Nikon Z5II Menu Setup Spreadsheet detail
The Nikon Z5II Setup Spreadsheet can be downloaded from my website here. Printing instructions are also included on that page.
The mirrorless Nikon Z50II offers a significant number of menu items and customization options. In order to take full advantage of this versatile camera, you are going to need to dig into the Menus and Custom Settings, and set up the camera to work best for how you shoot and for the type of situations you are shooting.
To assist you with setting up the Z50II Menus, I have created a detailed and comprehensive Nikon Z50II Menu Setup Spreadsheet, which lists suggested settings and starting points for the Photo Shooting Menu and the Custom Settings. It has complete and separate camera setup recommendations for different types of shooting, including:
General / Travel / Street Landscape / Architecture Action / Sports Moving Wildlife / Birds Studio / Portraits Concert / Performance
Nikon Z50II Menu Setup Spreadsheet detail
The Nikon Z50II Setup Spreadsheet can be downloaded from my website here. Printing instructions are also included on that page.
The Canon EOS R5 Mark II mirrorless camera offers numerous menu items and customization options. In order to take full advantage of the Canon R5II, you are going to need to dig into the Menus and Custom Functions, and set up the camera to work best for how you shoot and for the type of situations you are shooting. To assist you with this, I have created a detailed and comprehensive Canon EOS R5II Menu Setup Spreadsheet, which lists suggested settings and starting points for the various Menus and the Custom Functions. It has complete and separate camera setup recommendations for different types of shooting, including:
General / Travel / Street Landscape / Architecture Action / Sports Moving Wildlife / Birds Studio / Portraits Concert / Performance
A detail from the Canon EOS R5II Menu Spreadsheet
The Canon EOS R5II MenuSetup Spreadsheet can be downloaded from my website here. Printing instructions are also included on that page.
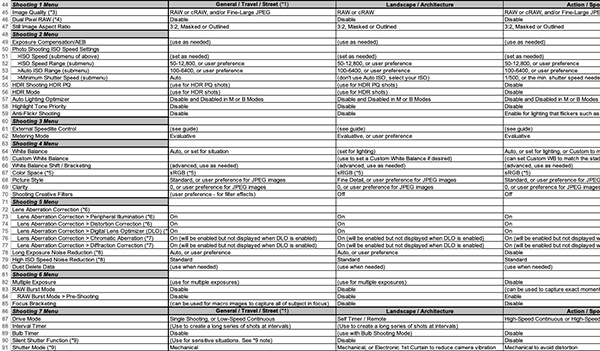
Many of the EOS R5II menu items and options are similar to the Canon EOS R7 menus, and I have also created a Canon EOS R7 Menu Setup video, which walks through all the items and settings of the Photo Menu, with explanations and suggested settings. Watch it on YouTube here, and be sure to subscribe to my channel to be notified when additional EOS R7 Menu Setup videos are posted.
Take control of your EOS R5II with this detailed and comprehensive R5II Menu Setup Spreadsheet.
If you have come across this article, you may have just been invited to join Amazon Vine, or recently started using it daily. If so, there is a lot you will want to learn and know before you start going crazy ordering stuff. And there are a lot of tips and tricks for searching and finding worthwhile items, even completely tax free items.
In this post I am going to introduce and explain much about getting started with and using Amazon Vine daily. Be sure to check out the companion video of The Best Tax Free Items on Amazon Vine. There are a lot of them, and many of these items will be worthwhile for a lot of users. Here is the link to that video:
I am a long time Amazon Associate, which is the affiliate program, and a longtime, successful Amazon KDP Author, offering Canon and Nikon e-book camera guides (which you can find here: https://amzn.to/3CL1fz9). Though I don’t believe those programs had anything to do with me being invited to Vine. For many years, I have often written detailed reviews, both good and bad, sometimes with photos and videos. Some of my detailed reviews have been liked dozens or hundreds of times. So eventually, I must have hit a threshold where Amazon noticed, and I was invited to join Amazon Vine.
Amazon Vine Intro Page.
Unfortunately I jumped right in without reading much and knowing about the three item per day limit or the ETV taxable amounts. But luckily I discovered these things quickly. A couple things I suggest is to fully read the Vine agreement and resources page, join some Vine Facebook Groups, and join the Vine Discord page. And read through this article to learn all the ins and outs, potential pitfalls and errors, and tips and tricks!
FINDING ITEMS:
As you probably know, you will get to select three items a day, at least as long as you are a Silver status member. As you continue, you will need to order and review a certain number of items in order to remain a Vine member, and to get promoted to the next Gold tier where you can order 8 items, including items over $100 value.
Use the search bar at the Additional Items tab.
As you may have discovered, searching through each page and each category will eat up way too much of your time, so you will quickly need to develop a strategy that limits the daily cost of time, effort, and distraction. You may first want to search through some of the categories you are interested in under the Additional Items group, to first get a feel for what kinds of items are available. Or for an item you are planning to buy, do a search for it in the Additional Items group. Once you have a list of items or keywords that you are interested in, do a search for each one, on the Additional Items page, and then save all those searches in one bookmark folder. Then you can “open all tabs” from that folder, and quickly click through each tab with your search terms, to see if anything new has appeared.
On the Vine Discord page, you can view the feed to get a feel for what kinds of items are available, or to grab things as they become available. Scroll though the recent items a couple times throughout the day, and order the items you want if they are still available, or make note of what you might want if you missed it and add it to your search terms.
To help you locate and choose items, there is also a Amazon Vine Helper extension for Google Chrome, which enables one to highlight new items, display the ETV, and hide items that one doesn’t want to keep seeing.
Amazon Vine Helper extension for Google Chrome, which adds various tools to the Vine pages.
In order not to have a huge tax burden at the end of the year, you may want to focus on $0 ETV items, which are tax free, and thus truly free, and will not count in your annual taxable amount. There are numerous worthwhile $0 ETV items, and I have created a separate video that goes through all of the free, $0 ETV items that I have ordered or discovered:
These items include lots of medical items, food related items, makeup and body related items, knee, ankle, and elbow braces, equipment for elderly people like toilet rails and walkers, baby items including carriers, baby gates, and car seat covers, and some pet items like poop bags, brushes, and nail trimmers. And believe it or not, there are a lot of adult items and sex toys on Vine, and many of them are $0 ETV, including vibrators, dildos, lube, and bondage gear. There are many, many more $0 ETV items that I cover In my $0 ETV Free Vine Items video. You can find many of these types of $0 ETV items in the Health and Household, and the Beauty and Personal Care categories of the Additional Items tab.
Be careful, though – for some items that are typically $0 ETV, sometimes a similar item is not $0, and it may have a very expensive ETV. So be very careful and check the ETV amount before ordering. For example, some of the arm braces, or bathroom scales, or elderly equipment, or baby items that look like ones you may have ordered for free before, are not actually $0 ETV, and they can be very pricey. If you accidentally order one, cancel it right away.
PRODUCTS to AVOID:
Based on user experience, there are some products that it may be best to avoid on Vine, for safety reasons. These include products that plug in and use electricity, such as power strips, charging blocks, cords or cables, and even lamps and such. These types of products are often not UL Listed, or properly certified to be safe, and people have found that these types of items become excessively hot and possibly dangerous when plugged in. You may also want to avoid certain types of off-brand supplements, herbal products, balms, teas, food, or items such as kid’s makeup kits. These items often don’t list the ingredients, so you have no idea what you are ingesting or putting on your skin. There are also many baby products such as swings, slings, seat belt adjusters, etc. that are not certified in any way to be safe. These types of products are probably not worth the risk to the safety of an infant or child. I’ve made the mistake of ordering these types of products in the heat of excitement, only to soon regret it, especially when they arrive and no ingredients or safety standards are listed. So they will just end up in the trash.
ORDERING:
So to continue describing the ordering process, when you click on the “See Details” icon to view and order a specific item, be sure and check the size, the color, and most importantly the ETV tax value. Some items are grossly overpriced as far as the ETV, and you may not want to order it. Some items may be of only one size, and you cannot select the size. Be sure to check in the description, as the size may be an XXL.
Be sure and always click See More and scroll down, because some items, even ones you may not expect, offer you a size, color, or variation choice. You will want to select the desired size or color, otherwise you will get the default one, which may be extra large or small, or an undesirable color. Sometimes an item has several variations, and they may be listed by a code or number, and you may need to go to the product page and confirm which variation or which item you want to order. For example, a Vine ordering page for a wig or a tattoo set may actually have a pull down menu to select from many different wigs or tattoo sets. Once when I ordered ear plugs, there was an option to order 10 or to order 100, either one for $0 ETV, so why not get 100!
Be sure to scroll down in the product details, to view the ETV and to check for size and color option pull-down menus.
As soon as you order, click on your order tab, and confirm the ETV amount, to make sure you got a $0 ETV if that is what you expect, or make sure the ETV is not absurdly high. It will be shown under the Fair Market Value column.
And once you have ordered your three items for the day, try to close all the Vine windows and Discord page, and avoid looking at it for the rest of the day. It is tempting to see what you may have missed, but that just leads to frustration and regret. It is always a risk to pass up a certain item in order to wait for something better that may or may not appear later in the day, so you need to carefully weigh the personal value of an item now vs. possibly missing out on a better, more desired item later in the day. For example, you should probably pass on a tempting item that is only worth $6 or $9, if you are really waiting for a $50 item that you can get for $0 ETV. The desired item may not appear that day or the next day, but on the day that it does appear, you will want to be ready for it.
REVIEWS:
You will need to order 80 items, and review 90% of them, in order to be upgraded to Gold status after six months. You will be writing numerous reviews, perhaps some of very personal or potentially embarrassing items, so you can edit your profile name to anything you want, and you can make sure your reviews and information are not shown on your public profile page. This will not affect your Amazon name for ordering, etc, just the name associated with your reviews and ratings.
Edit your review profile to remain incognito.
Vine encourages you to write thorough, honest reviews, as well as to include photos and videos. You will see that some members do this, and other just write a quick but informative review. I’m not sure if Vine actually checks up on the length and content of your reviews. They do approve each review, and some have complained about how their reviews get rejected. I believe that it could be an automated review process, as I can’t imagine an actual person is reading and approving each review. I have written over 400 Vine reviews, and haven’t yet had a single one rejected.
Once you start ordering three items a day, your review list will start to get long, so you need to stay on top of the reviews. Some items may require you to use it over time to give an honest review, but since you need to stay on top of the reviews, this isn’t always feasible. If you aren’t using it over time, you can still honestly review an item by describing its components, options, material, quality, comfort, etc. I suggest keeping your pending review list down to 2 or 3 pages, otherwise you will have a lot of work to catch up.
Keep on top of your reviews.
Sometimes when you go to write a review, you will see that you have already written one for a variation of that item and that you are not able to submit the new review. For example, you ordered the same brand of knee braces in different sizes or colors. When this happens, just contact Vine to remove the item from your review list. Use the Contact Us icon on the Vine page. Do not contact regular Amazon Customer service, always contact Vine Customer Service for Vine related issues. Explain in a clear and simple email that this item is a size or color variation of an item you already reviewed, so please remove it from your review list. You should usually get a response and have it removed in a day or two. These items will still be in your order list, but they will be listed as Cancelled in your tax spreadsheet. Vine asks that you not order multiple variations of an item. However, I have ordered items that unknowingly turned out to be variations of a previous item. I then contacted Amazon Vine support and they have removed it from my review list, without causing me any issues. But this leads us to cancelled items.
CANCELLED ITEMS:
With many desirable items, you have to move quickly and order it right away. You barely have time to go check the size chart on the product page, or verify exactly what it is. When you come back to the Vine page to order it, it may be gone. So that may cause you to order things quickly without fully knowing the details. Or sometimes you may order an item and immediately discover it wasn’t really what you thought it would be, or it was the wrong size, or it won’t fit your computer or your car, or it was a mistake on your part. When this happens, you can contact Vine right away and cancel it before it ships. Or you may be able to quickly go to your Amazon order page and cancel the order. If the item is in the shipping process, you may not be able to cancel it, and once it has shipped, you will not be able to cancel it. When you cancel a Vine item, even immediately after ordering it, it will not be available for other Vine members, so that is one reason Vine discourages you from cancelling Vine orders.
The item will remain on your order list, even though it was cancelled and never shipped to you. If you check your tax spreadsheet, you should see that it is cancelled, and the amount removed. Be sure and check the spreadsheet and confirm. When you cancel an item, immediately or soon after ordering it, you will not get that pick back for the day. If that was your third pick of the day, you will not get that third selection back, and you will be done choosing items that day. Apparently if you repeatedly cancel too many items, you may get kicked off of Vine, so be careful about ordering and immediately cancelling.
Go to the product page to check the size charts, which are often in one of the product images.
In order to be ready to order any desirable item, perhaps make a handy list of your sizes, in inches, centimeters, shoe size, etc. For example, your waist and body measurement sizes for clothes, your arm or calf sizes for compression braces. Then quickly go to the product page and determine the size. The size chart is often one of the product images. You may want to be careful about buying expensive items that require the correct size, however, because you will not be able to return or exchange items ordered through Vine, and you cannot cancel an item once it has shipped. You can try contacting the seller for an exchange, but most often they will not respond or they will not exchange the item. If you contact Amazon Customer Service, they are not able to exchange the item or accept a return, since it is a Vine item.
DEFECTIVE or LOST ITEMS:
Sometimes items get lost in shipment, get damaged in shipment, or are defective or missing pieces in the box. Or sometimes the order simply gets cancelled because the seller really didn’t have enough of them in stock to send you. This can happen relatively often if you are ordering three (or later at Gold level, eight) items a day. When any of this happens, contact Vine and have them remove the item from your Tax list. DO NOT, under any circumstances, write a review of a lost, damaged, or defective item. Once you write a review, or once 30 days has passed I believe, Vine WILL NOT remove that item from your tax list, and you will be paying taxes on it. Be sure to check the Vine tax spreadsheet and make sure it was cancelled.
If an item is lost, damaged, or defective, Amazon will not replace it. It was a limited Vine item provided by the seller, and so Amazon will not do anything about it. Tough luck. It can happen more than you would like, and usually with something you really wanted or needed.
TAXES:
As I have been explaining, each item has an Estimated Taxable Value, or ETV. When you click on a product to order it, be sure and check the ETV amount. At the end of the year, Amazon will send you and the IRS a tax form that lists this amount as income. You will need to add this amount to your income amount on your tax return, and pay taxes on it. The amount of tax you pay may range from perhaps 15% to 25%, depending on your situation.
(Note that the Amazon Associates income and the Vine “income” are on the same IRS form that Amazon sends you. So if you had $400 of affiliate income and $300 of Vine “income,” the form will show a total of $700 income from Amazon. Be aware of this if you wish to keep the total number under the $600 limit that triggers the form being sent to you and the IRS.)
So every time you order an item on Vine, assume that you will be paying 25% of the ETV that is listed, as taxes. These items are not free. You are getting them for perhaps 75% off. That is why you need to be careful about what you order, and what the ETV amount is.
After ordering an item, immediately confirm the ETV or Fair Market Value, to make sure it is what you expect.
Be sure to consider that even if you are getting the item for 75% off, is the item really worth it? For example when I order anything that is electronics related, such as an Arduino board or accessory, I will be paying for it later with my taxes. But the 25% cost to me is approximately the same price or more, for that same item at AliExpress. So is it really worth it for me to buy this item from Vine? If I order it from AliExpress, I can carefully select the exact item I want, I can take my time and make sure it is what I want, and I can order the quantity I want. As tempting as it is to get these items from Vine, even with the 75% discount, it often isn’t really worth it.
This applies to a lot of other items. Everything under the sun is available on AliExpress, often with free shipping if you get more than $10 worth of stuff. For example, all the cheap lingerie that is shown on Vine, you can find the exact same thing on AliExpress for much less. Just copy the image of the item, do a Google image search, and you will see the exact item listed from 10 different sellers on AliExpress. Now, AliExpress items have about 2 weeks shipping time, but I have found them to be very dependable, and have never had any problem with refunds when there is an issue. Keep in mind, you don’t want to buy something from AliExpress that you may have to physically return, since that could cost a lot, so be sure of the size you need etc. But buying things like electronic components, various craft items, small kid’s items, or even some clothing or lingerie, all of which costs only a few dollars and aren’t a major loss if you accidentally ordered the wrong option or wrong size, can be worth it.
As with most all independent contractors, there is a $600 mark which triggers the tax form that Amazon will send to you and send to the IRS. If your ETV at the end of the year is under $600, Amazon will not send out that tax form. However, that means you are responsible for including the amount on your taxes.
There are several videos and articles explaining why and how Vine members should not have to be paying taxes on these items. There are many reasons given for that. One is that these items come from the sellers, not from Amazon. Amazon is the warehouse and shipping middle-man. So why are they sending you a tax form acting like it was their item? They are perhaps merely covering themselves, with some boilerplate words and forms. Also some argue that the item or the item’s value is used up in the review process. The whole point of the item is that it is sent to you in exchange for a review. So these items aren’t being sent to you in your everyday life, they are sent to you in your capacity as a reviewer. So the entire amount can be deducted as an expense, zeroing out the ETV amount.
Some of these people have discussed this with the IRS, and there is no clear answer, because this is such a weird, unique situation and relationship. But some have been advised by the IRS that they can zero out the amount as expenses. Take all of that advice at your own risk. It may be best just to pay the taxes on it, if you don’t want to argue about it with the IRS or get audited and possibly pay fines and interest. Here are a couple videos and an article which explain their approach to taxes:
When paying the annual taxes, some include the amount as business income, or personal income, or hobby income. It is up to your and your financial advisors to figure out how to do this.
Personally I agree that Amazon should not be sending Vine members a tax form, based on the fact that these items come from the sellers, not Amazon – among other reasons. But that is a matter for the IRS to determine, and I don’t expect that to ever happen.
A big issue I have with the Vine program is that Amazon passes all the cost, all the expense, to the sellers and the Vine reviewers. Amazon accepts none of the cost, and yet they profit from it. The Vine reviewer pays a cost of time, energy, stress, and taxes. The Vine sellers pay a couple hundred dollars to join Vine. Then they pay, I believe, when any individual item gets a review. You can look at the Vine Seller signup to see all the costs to the sellers. So Amazon takes money from the sellers, and they get the huge benefit of Vine member’s reviews, which cost members a lot of time and effort. And Amazon passes the tax expense to the Vine reviewers. As all good capitalists do, they have “socialized the costs, and privatized the profit.”
CONCLUSION:
In conclusion, is Amazon Vine worth it? Should I be wasting my time with this? Do I need any of this stuff? Yes, sort of. The heating pads and elbow braces and kinesiology tape could definitely come in handy some day. I use most the things that I ordered that have tax amounts, that I actually needed and searched for – like a dash cam, car sun screens, kitchen stuff, electronics stuff, hose repair, and other household things. Some of the tax free but valuable things like blood pressure monitors and electronic scales are nice to have.
Most of the items are not junk, as some claim they are. Sure, most of it comes from China, but most of it is decent quality. Except for the hair trimmers and Swiffer refills, which work but are pretty cheapo. However, many of the $0 ETV items turn out to be stuff that will just sit in the closet until I may or may not need it someday. And now I also have some items I can give away to friends and family, after the six month holding period that Vine requires, where you must keep the item. And my kid appreciates most all the various fun things I get for them.
But is it worth the time, the distraction, the stress, the daily hunting, the daily tracking of shipments and tax values, the emails to Vine to cancel lost or defective items, the infinite number of boxes and plastic bubble envelopes that must be recycled or discarded, the cost to the planet for every step of the process? Probably not.
Be sure to check the ETV. Is the item really worth the 25% tax expense?
And then there is the tax cost. Sure you intend to only order things which you really need. But nearly every Vine video on YouTube will attest to how that tax number gets quite large before they realize it. Since it counts as income, it will raise your annual income, which may cause a major issue for those getting benefits or applying for a loan, etc.
You can stick to the tax free items, but after about 6 months, you have likely grabbed most everything you wanted or needed. So I don’t know what to say. It can be a distracting addiction, and it probably would be best if I could just step away. I am up for my promotion to Gold level soon, so I will get that far, and then see how it goes…
Do you have any questions or comments? Be sure to leave them here. And be sure to check out the companion video of The Best Tax Free Items on Amazon Vine.
There are a lot of $0 ETV items that appear each day, and many of these items will be worthwhile for a lot of users. And with patience and searching and time, I assure you that you can eventually grab many of them.
July 2025 Note: Know that due likely to tariffs and cancelled shipments from China over the past couple months, the number of decent $0 ETV items has been dramatically reduced. Where it was once easy to find eight $0 ETV items a day, now I often don’t even find that many in a week. But over time, this may change back to how it used to be.
And be sure to check out my e-book camera guides for Canon and Nikon mirrorless cameras, available on Amazon: https://amzn.to/3CL1fz9
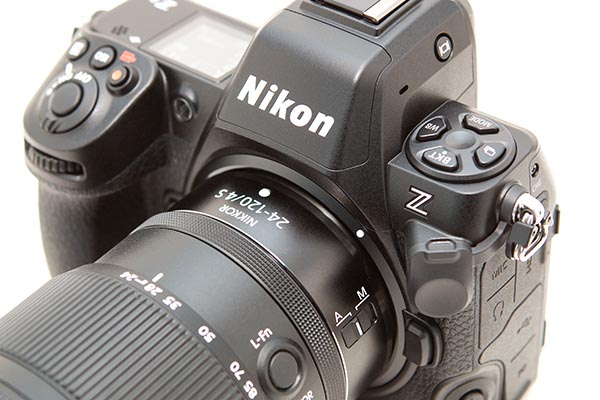
The powerful and highly customizable Nikon Z6III offers a large number of menu items and customization options. In order to take full advantage of this sophisticated camera, you are going to need to dig into the Menus and Custom Settings, and set up the camera to work best for how you shoot and for the type of situations you are shooting.
To assist you with this, I have created a detailed and comprehensive Nikon Z6III Menu Setup Spreadsheet, which lists suggested settings and starting points for the Photo Shooting Menu and the Custom Settings. It has complete and separate camera setup recommendations for different types of shooting, including:
General / Travel / Street Landscape / Architecture Action / Sports Moving Wildlife / Birds Studio / Portraits Concert / Performance
Screenshot
The Nikon Z6III Setup Spreadsheet can be downloaded from my website here. Printing instructions are also included on that page.
For explanations of all the menu items, controls, features, functions, and autofocus system of the Z6III, have a look at my clear and comprehensive guide for the Nikon Z 6III, Nikon Z6III Experience. This user-friendly guide will help you to take control of your camera, and the images you create. Learn more about it and purchase it at my website here:
My latest Full Stop e-book, Nikon Z6III Experience user guide to the Nikon Z6III mirrorless camera is now available!
This e-book goes beyond the manual to help you learn the features, settings, and controls of the powerful and highly customizable Nikon Z6III. Plus most importantly it explains how, when, and why to use the functions, settings, menu options, and controls in your photography.
Written in the clear, concise, and comprehensive style of all Full Stop guides, Nikon Z6III Experience will help you learn to use your Nikon Z 6III quickly and competently, to consistently make the types of images you desire. This e-book is available in either PDF or EPUB formatfor reading on your computer, tablet, iPad, e-reader, etc.
Learn more about this Nikon Z6 III guide, view a preview, and purchase it here:
“I don’t know how I could fully take advantage of all the features the camera has to offer without this publication! It’s well-organized, easy to understand, and succinct enough to keep your attention while still containing a wealth of information to get the most out of your camera.”
.
Nikon Z6III Experience is designed for users ranging from enthusiasts to experienced:
For Intermediate and Enthusiast Photographers: This instant download Nikon Z6III e-book is designed for enthusiast photographers who wish to take fuller advantage of the capabilities of their camera:
-Go beyondProgram mode and shoot competently in A, S, and M modes.
-Take full control of the powerful autofocus system to capture sharp images of still and moving subjects. Learn to take advantage of the face, eye, and subject detection, plus subject tracking features.
-Set up your camera with clear explanations and recommended settings for the numerous Menu options and Custom Settings of the Nikon Z6 III. The text of the book includes a link to a free download of my comprehensive Nikon Z6II Menu Setup Spreadsheet.
-Learn how, when, and why to use and customize the various controls, buttons, and features of the Z 6III.
-Understand the various metering modes, exposure compensation, and exposure lock for correct exposure of every image, even in challenging lighting situations.
.
For Experienced Photographers coming to the Z6III from previous models, this guide explains the new and advanced features in order to quickly have you taking advantage of these capabilities, including the AF System and its Focus Modes, AF-Area Modes, eye detection, subject detection / tracking, and Custom Settings. Attention is given to the new features including the customizable controls, Focus Shift Shooting, in-camera image stabilization, new menu items and options, 6K and 4K video, Time-Lapse and Interval Timer, plus using F-mount lenses with the FTZ II Adapter. And it covers using the Wi-Fi and Bluetooth capabilities with SnapBridge.
This 509 page digital guide to the Nikon Z6III is an illustrated e-book that goes beyond the Z6III manual to explain how, when, and why to use the features, settings, and controls of the Z6III to help you take control of your camera and the images you create.
Learn more about Nikon Z6III Experience, view a preview, and purchase it on my Full Stop website here:
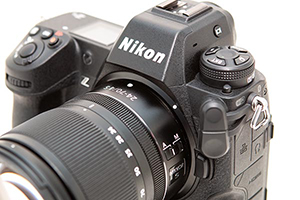
I recently had the opportunity to use the new Nikon Z6III mirrorless camera, in mid-June 2024 at a Nikon “Touch and Try” event at Hunt’s Camera in Melrose (Boston) Mass. The pre-release event was so notable that the president of Nikon USA, Naoki Onozato, was even in attendance!
Nikon swag from the Z 6III event.
The presentation from the Nikon reps boasted about many of the features of the Z6III, which are not just updated from the Z 6II, but some of which even surpass the Nikon Z 8 / Z 9. Many of the improved features are due to the “partially-stacked sensor,” a technology introduced for the first time on the Z6III. What this means is that the camera has speed and functionality approaching the stacked sensors of the Z 8 and Z 9, but at a lower cost. A “stacked sensor” such as on the Z 8 and Z 9 locates some of the electronics immediately behind the image sensor, which increases the speed of the sensor readout. This has advantages for the speed and operation of the AF system, reduces the rolling shutter effect, allows for faster continuous shooting speeds, as well as a smoother performance of the electronic viewfinder to reduce blackout during continuous shooting. The partially-stacked sensor of the Z6III locates some of the electronics directly above and below the image sensor. While the speeds and improvements are not as dramatic as with the Z 8 and Z 9, they are still a significant improvement over the sensor of the Z6II, including a smooth view of the scene when shooting at 20fps.
While the Z6III has similar subject detection choices as the Z 8 and Z 9, including people, eyes, animals, vehicles, and airplanes, the Z6III does not have a dedicated Birds choice. In order to make use of bird detection, you will need to set subject detection for Auto or Animal. The Z6III also does not have a sensor shield, but there is a mechanical shutter that will protect the sensor when a lens is removed. Also, the Z6III does not offer the Auto Capture option of the Z 8 and Z 9. However, it does have the Pre-Release Capture feature, which will buffer images for up to 300 seconds as the Shutter Button is half-pressed, and will save the previous 1 second of images when the Shutter Button is fully pressed. You will need to be using the C30, C60, or C120 release mode, which captures JPEG images only.
The Z6III also boasts 8-stop in-body image stabilization (vibration reduction), plus a Focus Point VR option which ensures that the image stabilization is working effectively at the location of the active focus point, which is where your main subject will be located.
Models at the Nikon Z6III event, shot with the Z 6III and NIKKOR Z 50mm f/1.2 S lens. 1/5000, f/1.2, 3200 ISO. Clearly I should have lowered the shutter speed and ISO, but I was handed the camera and a brief moment to make my adjustments and shots before handing the camera to the next user.
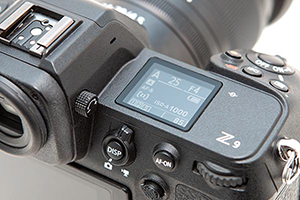
For continuous bursts, the Continuous Low (CL) option can be set for 1 to 7 fps. Nikon’s specs say that Continuous High (CH) ranges from 1 to 8.1 fps (up to 16 fps with electronic shutter, and that Continuous High Extended (CH+) ranges from 1 to 14 fps (up to 20 fps with electronic shutter. However in the Z6III menu does not offer the option to adjust the CH and CH+ settings, so perhaps they are fixed at a maximum of 8.1/16 and 14/20 fps, and may be lower based on shutter speed and pother camera settings. It is also important to note that the Z6III does not include a battery charger for the En-EL15c battery, in the box. You will need to use an older charger from a previous camera, a purchase a battery charger unit, or an AC charger and power delivery (PD) USB cable that connects to the camera and charges the batteries in-camera. The optional Nikon MB-N14 Power Battery Pack with Vertical Grip can also be plugged-in to charge the batteries in the grip.
Several of the buttons of the Z6III can be customized to your desired functions, such as the Fn1 and Fn2 Buttons. By default, The Fn1 button is set for White Balance. Press the button and turn the rear Command Dial to change the WB setting and the front Sub-Command Dial to change any sub-options, such as the Auto WB sub-options of A0, A1, and A2. The Fn2 Button is set to AF Mode / AF-Area Mode. This is handy for changing these settings, as the Z6III does not have the AF Mode Button that the Z 8 and Z 9 has. Part of the rear screen can also be used for a custom function, similar to assigning a function to one of the camera buttons. For example, you can tap the designated portion of the screen to display the level while shooting. The Z6III also includes an Illumination Button for the top LCD screen. Press it once to illuminate that top screen, then press it again to turn it off. With the Z 8 and Z 9, when accessing f2 and g2 to customize the buttons, you can press the Delete Button to reset the selected button back to its default, or press and hold the Delete Button to reset all the buttons. The Z6III does not appear to have this reset option.
Most notably, the word of the day at the Nikon Z6III presentation was “nits,” a term which describes brightness of the Electronic Viewfinder. (A nit is the unit of measurement that describes how bright a television, smartphone, computer monitor, laptop screen, or another type of display is. The higher the number of nits, the brighter the display.) While a screen such as the iPhone 15 can display at up to 2000 nits, the viewfinder of the Nikon Z6III is a blindingly bright 4000 nits! The viewfinder brightness can be adjusted with your eye at the viewfinder, by pressing the i Button and accessing the Monitor/Viewfinder Brightness options. It can be set for Auto, or for the brightness level of your choice.
When working in an extremely dark room, the viewfinder brightness can be increased to its maximum, and looking through the camera, the room will appear to be a bright at high noon. Not only is the scene in the viewfinder bright, but it retains a nice dynamic range, without appearing contrasty or washed out. And not only can you easily view any subject in this scene, the autofocus system and subject / eye detection works down to -10EV, which means the Z6II can quickly and easily find the subject’s eye, and follow it around the frame. These features, working together, can be incredibly helpful when shooting a wedding reception or event in a very dark space.
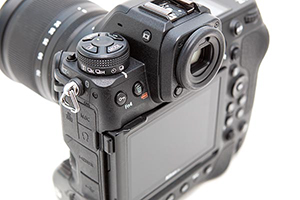
The Z6III uses a different style of articulating screen, similar to the one introduced on the Nikon Zf. While it does not extend and rotate as dramatically as the rear screen of the Z 8 and Z 9, it can now be opened outward to the side, and rotated up and down, similar to many Canon rear screens. This also allows the screen to be flipped around and closed, which will protect the screen when not in use. And as with the Z 8 and Z 9 , the view on the screen can be rotated when the camera is used in the vertical (portrait) orientation, for ease of viewing.
As with the Z 8 and Z9, the Z6III has the option for the vertical rotation of the information on the rear screen. This means that the text and icons on the shooting, playback ,and menu screens can be set to rotate when the camera is held in the vertical position.
Similar to the Z 8 screens shown here, the views on the rear screen of the Z6III can be rotated along with the vertical orientation of the camera. As you can see, the text and icons on the screen rotate, for ease of viewing.
The Z6III offers the Pixel Shift option, to create high-resolution images up to 96 MP. The camera will capture 4, 8, 16, or 32 images, which can be combined in Nikon’s NX Studio software to create the high megapixel image. Not only will this provide a high-resolution image, but it can significantly reduce moire and noise, and increase the dynamic range of an image. You will need to use a tripod to capture the images that will be combined. The 16 and 32 image setting will capture an image dedicated to noise reduction.
The Z6III includes the High-Frequency Flicker Reduction feature found on the Z 8 and Z 9. This enables you to set an exact shutter speed, such as 1/60.3, which can allow you to reduce or eliminate flicker in the images that can be caused by certain types of lighting, or when photographing illuminated screens such as TVs, computer monitors, or big-screens found in a sports stadium.
There are also a number of video improvements in the Nikon Z6III. It can record in-camera RAW video (ProRex / NRAW), including full-frame 6K at 60p, 5.4K at 60p and Full HD 240p, plus slow motion video options. There is a 125 minute video recording time limit, and the microphone jack now also performs as a line-in audio input, allowing for the use of additional audio equipment and mics such as a direct connection to a sound board or boom mic.
It is also notable that the name “Z6III” is now written without any space between the “Z” and the numbers, as it is with previous Z models such as the Z 9 and Z 7II.
My comprehensive guide to the mirrorless Z6III, Nikon Z6III Experience by Douglas Klostermann, will be available by Fall 2024. There will be a companion Menu Setup Spreadsheet as well, which includes detailed listings of suggested Menu Settings and Custom Settings for various types of shooting situations, including Travel/Street, Action/Sports, Wildlife/Birds, Studio/Portrait, and Performance/Concert.
You can learn about and purchase the book and the menu setup spreadsheet at my Full Stop website here:
The retro-styled mirrorless Nikon Zf offers far more menu items and customization options than many previous cameras in the Z line-up. In order to take full advantage of this sophisticated camera, you are going to need to dig into the Menus and Custom Settings, and set up the camera to work best for how you shoot and for the type of situations you are shooting.
To assist you with this, I have created a detailed and comprehensive Nikon Zf Menu Setup Spreadsheet, which lists suggested settings and starting points for the Photo Shooting Menu and the Custom Settings. The spreadsheet has been updated for Firmware 2.0! It has complete and separate camera setup recommendations for different types of shooting, including:
General / Travel / Street Landscape / Architecture Action / Sports Moving Wildlife / Birds Studio / Portraits Concert / Performance
Detail of the Nikon Zf Menu Setup Spreadsheet
The Nikon Zf Setup Spreadsheet can be downloaded from my website here. Printing instructions are also included on that page.
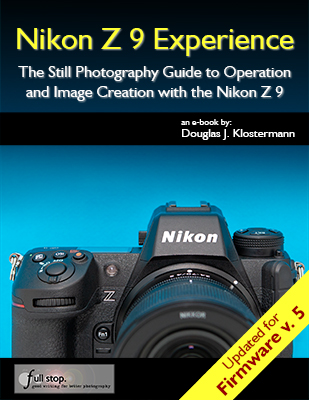
My latest Full Stop e-book, Nikon Z 9 Experience user guide to the Nikon Z9 mirrorless camera is now available!
And it has been updated for Firmware 5!
This e-book goes beyond the manual to help you learn the features, settings, and controls of the powerful and highly customizable Nikon Z 9. Plus most importantly it explains how, when, and why to use the functions, settings, menu options, and controls in your photography.
Written in the clear, concise, and comprehensive style of all Full Stop guides, Nikon Z 9 Experience will help you learn to use your Nikon Z9 quickly and competently, to consistently make the types of images you desire. This e-book is available in either PDF or EPUB formatfor reading on your computer, tablet, iPad, e-reader, etc.
Learn more about this Nikon Z9 guide, view a preview, and purchase it here:
“I don’t know how I could fully take advantage of all the features the camera has to offer without this publication! It’s well-organized, easy to understand, and succinct enough to keep your attention while still containing a wealth of information to get the most out of your camera.”
Nikon Z 9 Experience is designed for users ranging from enthusiasts to experienced:
For Experienced Photographers coming to the Z9 from previous models, this guide explains the new and advanced features in order to quickly have you taking advantage of these capabilities, including the AF System and its Focus Modes, AF-Area Modes, eye detection, subject detection / tracking, and Custom Settings. Attention is given to the new features including the customizable controls, Focus Shift Shooting, Auto Capture, in-camera image stabilization, new menu items and options, 8K and 4K video, Time-Lapse and Interval Timer, plus using F-mount lenses with the FTZ II Adapter. And it covers using the Wi-Fi and Bluetooth capabilities with SnapBridge.
For Intermediate and Enthusiast Photographers: This instant download Nikon Z9 e-book is designed for enthusiast photographers who wish to take fuller advantage of the capabilities of their camera:
-Go beyondProgram mode and shoot competently in A, S, and M modes.
-Take full control of the powerful autofocus system to capture sharp images of still and moving subjects. Learn to take advantage of the face, eye, and subject detection, plus subject tracking features.
-Set up your camera with clear explanations and recommended settings for the numerous Menu options and Custom Settings of the Nikon Z9. Includes a free download of my comprehensive Nikon Z9 Menu Setup Spreadsheet.
-Learn how, when, and why to use and customize the various controls, buttons, and features of the Z 9.
-Understand the various metering modes, exposure compensation, and exposure lock for correct exposure of every image, even in challenging lighting situations.
This 510 page digital guide to the Nikon Z9 is an illustrated e-book that goes beyond the Z9 manual to explain how, when, and why to use the features, settings, and controls of the Z9 to help you take control of your camera and the images you create.
Learn more about Nikon Z 9 Experience, view a preview, and purchase it on my Full Stop website here:
The flagship mirrorless Nikon Z9 offers far more menu items and customization options than most previous cameras in the Z line-up, and they continue to be updated and expanded with firmware updates. In order to take full advantage of this sophisticated camera, you are going to need to dig into the Menus and Custom Settings, and set up the camera to work best for how you shoot and for the type of situations you are shooting.
To assist you with this, I have created a detailed and comprehensive Nikon Z9 Menu Setup Spreadsheet, which lists suggested settings and starting points for the Photo Shooting Menu and the Custom Settings. It has complete and separate camera setup recommendations for different types of shooting, including:
General / Travel / Street Landscape / Architecture Action / Sports Moving Wildlife / Birds Studio / Portraits Concert / Performance
The Nikon Z9 Setup Spreadsheet has been updated for Firmware 5.0. It can be downloaded from my website here. Printing instructions are also included on that page.
For explanations of all the menu items, controls, features, functions, and autofocus system of the Z9, have a look at my clear and comprehensive guide for the camera, Nikon Z9 Experience. This user-friendly guide will help you to take control of your camera, and the images you create. Learn more about it and purchase it at my website here:
My latest Full Stop e-book, Nikon Z 8 Experience user guide to the Nikon Z8 mirrorless camera has been fully updated for the changes and additions of camera Firmware 2.00! This e-book goes beyond the manual to help you learn the features, settings, and controls of the powerful and highly customizable Nikon Z 8. Plus most importantly it explains how, when, and why to use the functions, settings, menu options, and controls in your photography.
You can learn more about this Nikon Z8 guide, view a preview, and purchase it here:
Here is a summary of the Firmware 2.00 updates, which have all been incorporated into the Nikon Z 8 Experience book:
In February of 2024, Nikon released a Firmware 2.00 update for the Z 8. This firmware includes significant additions and changes to the camera, and borrows features from the flagship Z 9 and the Z f models. These include bird subject detection, Auto Capture to set up the camera to automatically capture images based on specific parameters, and new Picture Controls for stills and video. The update also adds Pixel Shift Shooting to create up to a 180 MP image from several exposures, new shutter sound options, and more options for customizing the camera controls. The performance of 3D-Tracking AF-Area Mode has been improved for certain situations including small, fast-moving subjects. Additional video options include new Slow-Motion Video, Low ISO settings for N-Log video, and changes to Hi-Res Zoom speeds.
Nikon has created a Supplementary Firmware Update Manual that includes all these Firmware 2.00 changes. This document and the file with the latest firmware can be downloaded here:
The firmware changes have been incorporated into the text of this book in the appropriate sections.
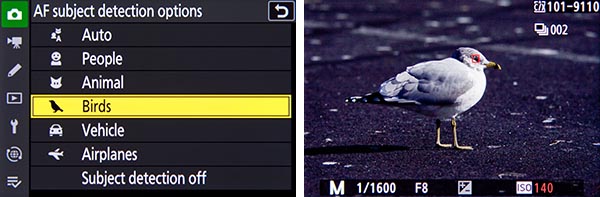
Left: The new Birds option in the AF Subject Detection Options. Right: The camera detected a bird, and placed the autofocusing frame at its eye.
Still Photography: Subject Detection now includes the Birds option. The camera has added new Bracketing increments such as 1.3 and 1.7, three new Picture Controls including Flat Monochrome, Deep Tone Monochrome, and Rich Tone Portrait, and the Large size option for the JPEG (HEIF) Primary – JPEG (HEIF) Secondary recording. Additions also include Pixel Shift Shooting for creating high resolution images, and Auto Capture where you can set up the camera to automatically capture an image based on subject type, motion, and distance. Pre-Release Capture will now buffer for up to 300 seconds when the shutter button is half-pressed, and new shutter sound options have been added.
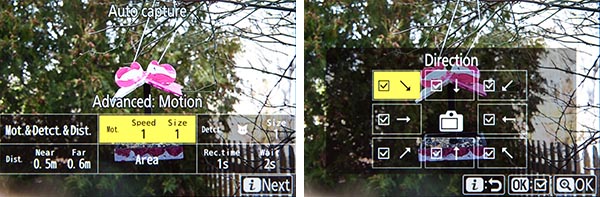
Left: The new Auto Capture feature and its various options. Right: Selecting the desired subject Direction for Auto Capture.
Video Recording: Subject Detection now includes the Birds option, and the camera has added three new Picture Controls, Auto Capture, Slow-Motion Videos, and a change in color for the Hi-Res Zoom in-focus display. Low ISO sensitivity settings for N-Log video have been added (down to 200 ISO equivalent), as well as changes to the Hi-Res Zoom speed options.
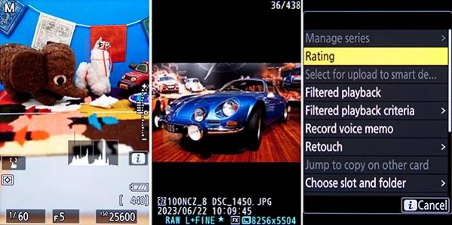
Playback: In the Playback i Menu the behavior of the Select for Upload option has changed. Select for upload will now mark an image for transfer and place it in the upload queue, and Select for Priority Upload will mark an image for immediate upload to a computer or FTP. Playback Speed has been added to the Video Playback i Menu. In the Playback Menu, Series Playback now includes Auto Series Playback Options such as loop, delay, and speed, and the Auto Image Rotation item has been added for playback.
Controls: Support for Power Zoom has been added for PZ lenses, including the ability to customize controls such as the Zoom-in and Zoom-out Buttons or the Fn1 and Fn2 Buttons to operate Power Zoom. The size of the Focus Point Border Width can be changed for the Focus Point Display, so that it can be more easily seen. Exposure Delay Mode has been added to delay shutter release up to 3 seconds after pressing the shutter. A Half-Press to Cancel Zoom (MF) option has been added so that a zoomed-in view of the displays will be cancelled by half-pressing the Shutter Button, and the full view of the frame can be seen before capturing an image when manually focusing. If a button has be assigned to the Recall Shooting Functions (Hold) option, exposure compensation and white balance can now be changed while shooting, and the new setting will be retained by the recall function.
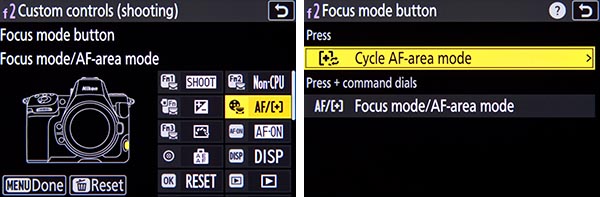
Left: Additional buttons can now be customized, including the Focus Mode Button, Playback Button, and BKT Button. Right: The new Cycle AF-Area Mode option, which can be assigned to the Focus Mode Button or various other buttons.
The Playback Button, BKT Button, WB Button, and Focus Mode Button can now be customized for shooting, and a few new options are available for the customizable controls including Switch Eyes, Cycle AF-Area Mode, Pixel Shift Shooting, Power Zoom, and Exposure Delay Mode. The Cycle AF-Area Mode option can be used to select, for example, three of your most commonly used AF-Area Modes, and then quickly cycle through them with the press of a button. For image playback, several controls can now be customized including the Playback Button, ISO Button, Exposure Compensation Button, BKT Button, WB Button, and Lens Fn and Fn2 Buttons. Some new roles are available for playback controls, including Frame Advance Zoom Position and Playback Zoom Face Selection. If a button has been customized for shooting, video, or playback, you can now reset it back to the default setting by pressing the delete button.
When formatting a CFexpress memory card using the Format Memory Card item of the Setup Menu, the procedure has changed for selecting a Quick Format or Full Format, with the Delete Button now used for a full format. The Non-CPU Lens Data menu item now allows you to add a name to a registered lens, as well as manually enter in a specific focal length and maximum aperture. When entering IPTC information, the character limit for the Category entry is increased to 256 characters, and new options have been added to the Setup Menu > Camera Sounds item, including 5 types of shutter sounds.
Displays: Previously the shooting display could be magnified up to 200%, and that has been increased to 400%. The Finder Display Size (Photo LV) menu item has been changed to Viewfinder Display Size, and applies to photo and video shooting. A Distance Units item has been added to the Setup Menu, to select Meters or Feet for the manual focus distance display.
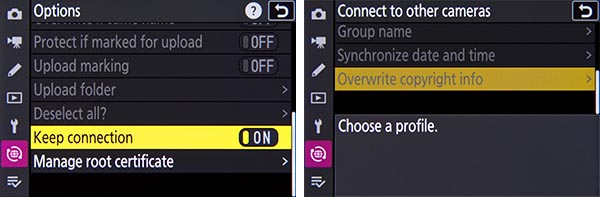
Left: The new Keep Connection option for the Connect to FTP Server function. Right: The new Overwrite Copyright Info option for the Connect to Other Cameras function.
Networks: Changes have been made to the Connect to FTP Server item of the Network Menu, including the number of available network profiles and an auto reconnect Keep Connection option. Changes have also been made to the Connect to Other Cameras item of the Network Menu, used for synchronized release of multiple Z 8 cameras, including the procedure to set up synchronized release and the ability to group cameras. Up to 16 other Z 8 cameras can be remotely controlled using the Nikon NX Field remote capture software. When connecting to other cameras, the Overwrite Copyright Info option has been added, so that the copyright info from the master camera can be applied to the images from the remote cameras. And when using an MC-N10 remote grip and AirGlu accessories, Bluetooth will no longer be disabled.
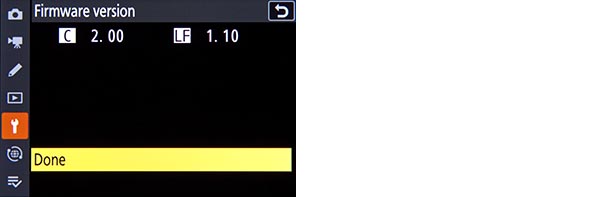
In addition, various issues have been corrected and performance improvements have been made to the Z 8, as listed on the firmware update page. The firmware update page on the Nikon website includes instructions for updating the firmware. You will download the new firmware file, and copy it to the root folder of a memory card that has been formatted in the camera. Insert the memory card with the new firmware into Slot 1, turn on the camera, and make sure the Photo Shooting Menu > Primary Slot Selection menu item is assigned to Slot 1, and that the other memory card slot is empty. Access Setup Menu > Firmware Version, and follow the instructions on the screen.
Learn more about Nikon Z 8 Experience, view a preview, and purchase it on my Full Stop website here:
Camera users are often curious about “hidden” features that their camera may have, though typically most advanced models really don’t have many, as long as one carefully goes through all of the Menu and Custom Settings items, and reads through the manual or a guide.
However, with so many options and functions, there are a few items that are actually a bit hidden away on the Nikon Z8. It’s not that the Z 8 manual doesn’t mention them, or that they can’t be found with careful investigation of the camera, but you may need to have them called to your attention to learn how to locate them and how to take advantage of them. And there are a few button shortcuts to access features and settings that you simply need to learn if you wish to take advantage of, because once you are using your camera, they are not indicated in any menus or button icons.
These article is adapted from a section in my comprehensive Nikon Z 8 Experience user guide to the Nikon Z8. All of these “hidden” features, as well as all of the other features, functions, settings, and controls of the Z 8 are discussed in detail, in the guide. Many of these features were included in previous Nikon Z models, but they may still be new for those coming from older dSLR models.
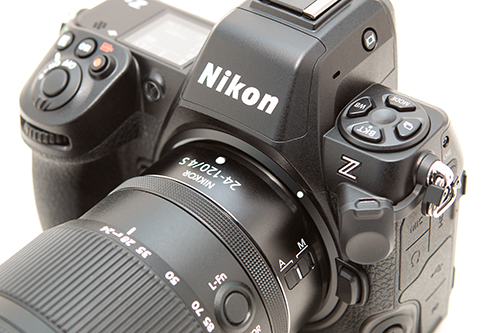
Figure 1 – Detail of the controls of the Nikon Z8
Several of these features are accessed with the i Button when working in the appropriate mode, or by assigning the function to a button. Others are accessible in the menus but may require an understanding of the options as they are listed, or might require additional steps of sub-menu navigation to locate them.
Displays and Button Settings – When the Information Display or the Live View scene is active on the rear Monitor, you can press some of the camera buttons to change the corresponding settings as you view them on the rear Monitor, including the top buttons, Fn Buttons, and the Focus Mode Button. Or you can also view and change them in the electronic Viewfinder, while shooting. For example, by default, the Fn1 Button is assigned to Shooting Menu Banks and the Fn2 Button is assigned to Choose Image Area. When you press the buttons, you can view and change those settings, and the screen will even indicate which Command Dial to use for each setting (see Figure 2 – left). If you customize buttons for another setting such as Multiple Exposure or HDR Overlay, you will be able to view and change those settings on the displays, as you press the assigned button and turn the Command Dials. If you would like to view the scene that you are shooting on the rear display without any shooting information or icons, you will need to assign one of the buttons to the Live view info display off setting. By default the Video Record Button is set to this option.
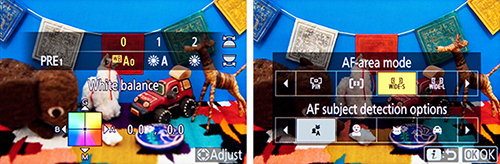
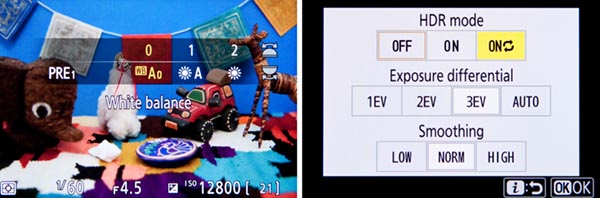
Figure 2 – Left: Using the WB Button and the Command Dials to change the White Balance setting on the rear Monitor. Right: Changing the AF Area Mode and Subject Detection Options via the Photo Shooting i Menu.
i Button Features – As noted above, you can press the i Button to access different contextual i Menus during photo shooting, video shooting, and image playback. The Z 8 also adds the ability to change additional sub-options of various settings, via the i Menu, without having to dig into the menus to set those options. For example, when using the WB item on the Photo-Mode i Menu to select Auto White Balance, you will also be able to select which of the three AutoWhite Balance sub-options you would like. And you will be able to directly fine-tune a White Balance setting using the adjustment grid. If you replace some of the default i Menu items with options such as HDR, Auto Bracketing, or Multiple Exposure, you will be able to directly access and change the various settings for those features (see Figure 2 – right).
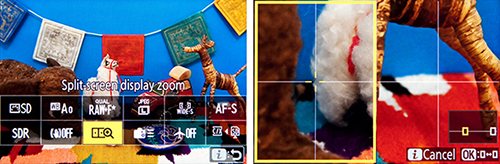
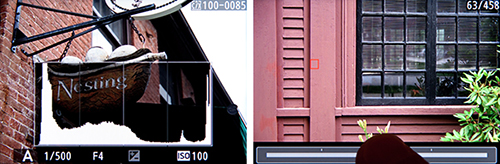
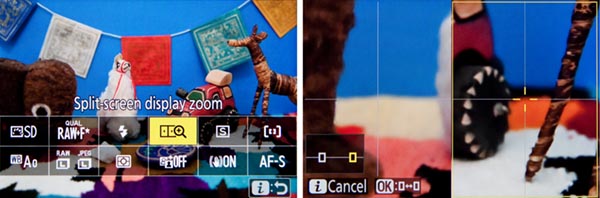
In some situations, the i Menu it is the only way to access and change certain of these “hidden” features. For example, the Photo Shooting i Menu will allow you to access the Split-screen display zoom feature. You will first need to use Custom Setting f1 – Customize i Menu and assign Split-screen display zoom to the Photo Shooting i Menu. Then when you are composing an image, you can access this feature which allows you to simultaneously zoom-in at two different areas of the scene, to help verify focus and to ensure that the composition is level across the scene (see Figure 3). This can come in handy for landscape and architectural photographers.
Figure 3 – Left: Press the i Button to access the i Menu screen with various shooting settings. You can use Custom Setting f1 to customize this menu, and add items such as Split-Screen Display Zoom. Right: Split-Screen Display Zoom shown in use, to compare two areas of the same scene to help determine if the framing is level.
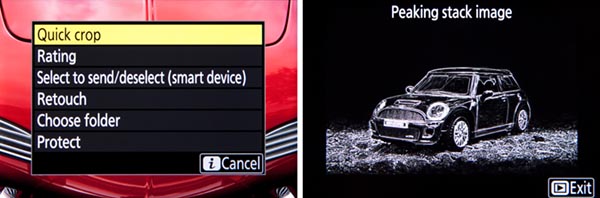
The Playback i Menu will allow you to access the Quick Crop feature. When you zoom-in on an image during playback, you can press the i Button to access the Playback i Menu, and select the Quick Crop option. This option will automatically crop the image and save a new image with the crop and framing that is currently seen on the display (see Figure 4).
Figure 4 – Quick Crop feature – Zoom in on an image during playback and frame as desired (left), then press the i Button to view the Playback i Menu and access the Quick Crop feature (right).
The Setup Menu contains a new Auto Rotate Info Display item. When the camera is rotated, the shooting and playback displays on the rear screen and in the Viewfinder can also rotate. This was not a feature of most previous Nikon models. It means that the text and icons on the display will rotate, so that they are in the same orientation of the camera, making them easier to read.
There is no longer a Retouch Menu tab, though Retouch can be accessed via the image playback i Menu. And as mentioned above, when a Multiple Exposure series is in progress, you can press the Playback Button to view the last image. If you then press the i Button, you will access a menu that allows you to view the Multiple Exposure progress, as well as edit the series by retaking or discarding the last exposure if desired.
Live View Exposure Preview – An important function to make note of is that you need to set Custom Setting d8 – View mode (Photo LV) to Show effects of settings in order to view the scene, in the Viewfinder and on the rear Monitor, with the current camera and exposure settings applied. This will allow you to better preview the resulting image and make exposure adjustments, and will also enable you to access the Live View Histogram of the scene by pressing the DISP Button.
Custom Control Assignments – A few other “hidden” features of the Nikon Z 8 can only be accessed by customizing one of the camera buttons to assign it to that function, using Custom Setting f2. As mentioned above, you can assign a button to the Live view info display off option, for the uncluttered view of your scene on the rear Monitor display. The Recall shooting functions customization will allow you to press a hold one of the Fn Buttons to temporarily switch to different shooting settings, such as a different Metering Mode, AF Area Mode, and exposure settings (see Figure 5 – left). If you will be using non-CPU, F-mount lenses with the Z 8, you can register the lens to the camera in the Non-CPU lens data menu, and thus gain additional functions such as in-camera Vibration Reduction. You will need to use f2 to assign the Choose non-CPU lens number option to one of the buttons, so that you can tell the camera which registered lens is in use.
If you are making use of an optional wireless remote to trigger multiple cameras, there is also a “hidden” setting for this in the Custom Setting f2 button assignments. You can choose to assign a button such as the Fn1 Button, Fn2 Button, or Sub-Selector Center press to the Sync. Release selection option, which is used in conjunction with Custom Setting d4 – Sync. Release Mode Options. You can set up the camera so that, for example, when using the Z 8 as a master camera to remotely trigger other cameras, you can press the Fn1 (or Fn2) Button while taking the shot, and then just the master camera will shoot, or just the remote cameras and not the master, based on your settings.
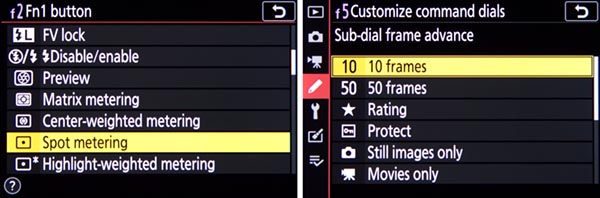
Figure 5 – Custom Control Assignments – Left: Assigning the Fn1 Button to the Recall Shooting Functions option, to temporarily switch to different shooting settings with the press of the button. Right: The Customize Command Dials, Sub-Dial Frame Advance options, to use a dial to jump ahead 10 images during image playback.
Sub-Dial Frame Advance during Playback – If you wish to quickly scroll through your images as you view them on the rear Monitor during playback, you can use the rear Main Dial to advance one image at a time, and use the front Sub-Command Dial to advance 10 or 50 images. To set this up, access Custom Setting f3 – Custom Controls (Playback) > Sub-Command Dial. The Sub-Command Dial can be used to jump 10 or 50 images at a time, based on the Frame advance setting, or you can also choose to jump to protected images, rated images, still images or movies only, or to a different folder (see Figure 5 – right).
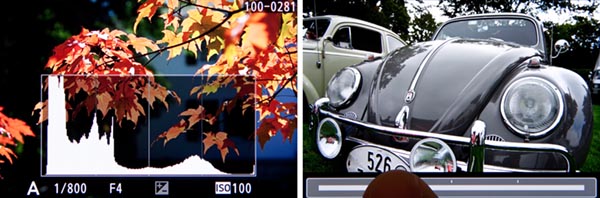
One Button Playback Zoom / Histogram – Using Custom Setting f3 – Custom Controls (Playback) > OK Button, you can assign the OK Button so that during image playback it will immediately zoom-in, at the magnification level of your choice, centered at the area of the active focus point so that you can closely inspect your image. Or you can instead assign the button press to display a large histogram with the image, so that you can evaluate your exposure (see Figure 6 – left).
Figure 6 – Left: Use Custom Setting f3 – Custom Controls (Playback) > OK Buttonto set the OK Button to show a magnified view or to show a large histogram. Right: Touch the bottom of the screen during full-image playback to access the “Frame Advance Bar” touch screen feature.
Frame Advance Bar – This image playback feature enables you to use the touch screen to quickly scroll through images without having to swipe one-by-one (see Figure 6 – right). And when viewing a magnified detail of an image, use the touch screen arrows to view the same magnified area of other images, so that you can compare details of similar images.
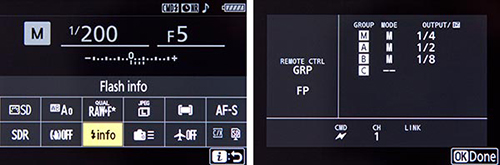
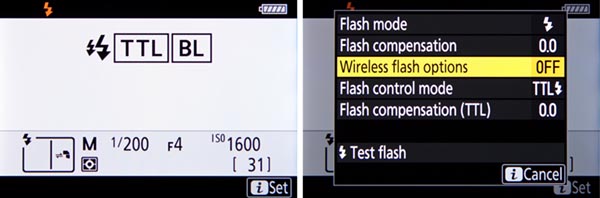
Flash Information Screen – You can use Custom Setting f1 to customize the i Menu and add the Flash info item. With a compatible optional Speedlight flash attached and turned on, such as the SB-5000, use the i Button to access this menu and view the current flash settings such as the Group Flash setting (see Figure 7).
Figure 7 – Left: Customize the i Menu for Flash Info (left), then access it to view the current flash settings such as the Group Flash setting (right).
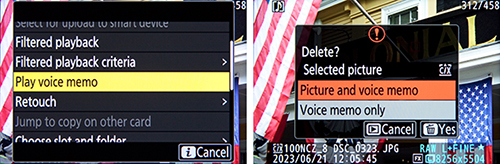
Voice Memo – You can add a voice memo to an image. In order to do this, you will first need to use Custom Setting f2 to assign a button such as the Video Record Button to the Voice Memo option. Then during image playback, select the desired image, and press and hold the assigned button to record the voice memo. The voice memo can be played back when viewing the image by accessing the Voice Memo item of the Playback i Menu (see Figure 8 – left). When deleting an image, you can delete just the voice memo (see Figure 8 – right). Voice Memos will be saved as a WAV files to the memory card.
Figure 8 – Left: Access the Playback i Menu to Play Voice Memo. Right: When deleting an image with a Voice Memo, choose what to delete.
Nikon Z8 Menu Setup Guide
In addition to my comprehensive Nikon Z 8 Experience user guide, I also offer a Z8 Menu Setup Spreadsheet, with suggested settings and starting points for most all of the camera menu settings and Custom Settings. The Excel spreadsheet includes separate listings for different shooting situations including Landscape, Studio, Action, etc. You can download the spreadsheet here:
Again, all of these hidden features and settings, and other unique features, as well as all of the other features, functions, settings, and controls of the Z8 are discussed in detail, in my comprehensive Nikon Z 8 Experience user guide.
Be sure to share your portraits and other photos on my Nikon Z Experience Facebook page, covering all the Nikon Z models:
My latest Full Stop e-book, Nikon Z 8 Experience user guide to the Nikon Z8 mirrorless camera is now available!
And it has been updated for Firmware 2.0!
This e-book goes beyond the manual to help you learn the features, settings, and controls of the powerful and highly customizable Nikon Z 8. Plus most importantly it explains how, when, and why to use the functions, settings, menu options, and controls in your photography.
Written in the clear, concise, and comprehensive style of all Full Stop guides, Nikon Z 8 Experience will help you learn to use your Nikon Z8 quickly and competently, to consistently make the types of images you desire. This e-book is available in either PDF or EPUB formatfor reading on your computer, tablet, iPad, e-reader, etc.
Learn more about this Nikon Z8 guide, view a preview, and purchase it here:
“I don’t know how I could fully take advantage of all the features the camera has to offer without this publication! It’s well-organized, easy to understand, and succinct enough to keep your attention while still containing a wealth of information to get the most out of your camera.”
Nikon Z 8 Experience is designed for users ranging from enthusiasts to experienced:
For Intermediate and Enthusiast Photographers: This instant download Nikon Z8 e-book is designed for enthusiast photographers who wish to take fuller advantage of the capabilities of their camera:
-Go beyondProgram mode and shoot competently in A, S, and M modes.
-Take full control of the powerful autofocus system to capture sharp images of still and moving subjects. Learn to take advantage of the face, eye, and subject detection, plus subject tracking features.
-Set up your camera with clear explanations and recommended settings for the numerous Menu options and Custom Settings of the Nikon Z8. Includes a free download of my comprehensive Nikon Z8 Menu Setup Spreadsheet.
-Learn how, when, and why to use and customize the various controls, buttons, and features of the Z8.
-Understand the various metering modes, exposure compensation, and exposure lock for correct exposure of every image, even in challenging lighting situations.
For Experienced Photographers coming to the Z8 from previous models, this guide explains the new and advanced features in order to quickly have you taking advantage of these capabilities, including the AF System and its Focus Modes, AF-Area Modes, eye detection, subject detection / tracking, and Custom Settings. Attention is given to the new features including the customizable controls, Focus Shift Shooting, in-camera image stabilization, new menu items and options, 8K and 4K video, Time-Lapse and Interval Timer, plus using F-mount lenses with the FTZ II Adapter. And it covers using the Wi-Fi and Bluetooth capabilities with SnapBridge.
This 480 page digital guide to the Nikon Z8 is an illustrated e-book that goes beyond the Z8 manual to explain how, when, and why to use the features, settings, and controls of the Z8 to help you take control of your camera and the images you create.
Learn more about Nikon Z 8 Experience, view a preview, and purchase it on my Full Stop website here:
The powerful mirrorless Nikon Z8 offers far more menu items and customization options than most previous cameras in the Z line-up. In fact, most of the menu items and options are the same as the professional Z9 model. In order to take full advantage of this sophisticated camera, you are going to need to dig into the Menus and Custom Settings, and set up the camera to work best for how you shoot and for the type of situations you are shooting.
To assist you with this, I have created a detailed and comprehensive Nikon Z8 Menu Setup Spreadsheet, which lists suggested settings and starting points for the Photo Shooting Menu and the Custom Settings. The spreadsheet has been updated for Firmware 2.0! It has complete and separate camera setup recommendations for different types of shooting, including:
General / Travel / Street Landscape / Architecture Action / Sports Moving Wildlife / Birds Studio / Portraits Concert / Performance
Detail of the Nikon Z8 Menu Setup Spreadsheet
The Nikon Z8 Setup Spreadsheet can be downloaded from my website here. Printing instructions are also included on that page.
For explanations of all the menu items, controls, features, functions, and autofocus system of the Z8, have a look at my clear and comprehensive Nikon Z8 Experience e-book guide. This user-friendly guide will help you to take control of your camera, and the images you create. Learn more about it and purchase it at my website here:
The Canon EOS R8 mirrorless camera offers numerous menu items and customization options. In order to take full advantage of this camera, you are going to need to dig into the Menus and Custom Functions, and set up the camera to work best for how you shoot and for the type of situations you are shooting. To assist you with this, I have created a detailed and comprehensive Canon EOS R8 Menu Setup Spreadsheet, which lists suggested settings and starting points for the various Menus and the Custom Functions. It has complete and separate camera setup recommendations for different types of shooting, including:
General / Travel / Street Landscape / Architecture Action / Sports Moving Wildlife / Birds Studio / Portraits Concert / Performance
A detail from the Canon EOS R8 Menu Spreadsheet
The Canon EOS R8 MenuSetup Spreadsheet can be downloaded from my website here. Printing instructions are also included on that page.
The EOS R8 Menus are similar to the Canon EOS R7 menus, and I have also created a Canon EOS R7 Menu Setup video, which walks through all the items and settings of the Photo Menu, with explanations and suggested settings. Watch it on YouTube here, and be sure to subscribe to my channel to be notified when additional EOS R7 Menu Setup videos are posted.
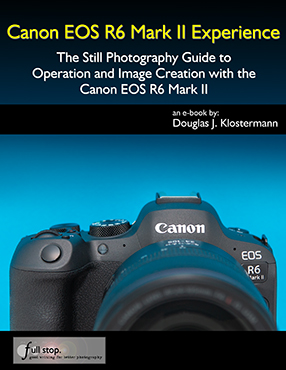
My latest Full Stop e-book, Canon EOS R6 Mark II Experience user guide to the Canon EOS R6 II is now available! This e-book goes beyond the manual to help you learn the features, settings, and controls of the powerful and customizable Canon EOS R6 Mk II. Plus most importantly it explains how, when, and why to use the functions, settings, menu options, and controls in your photography.
Written in the clear, concise, and comprehensive style of all Full Stop guides, Canon EOS R6 Mark II Experience will help you learn to use your EOS R6II quickly and competently, to consistently create the types of images you desire. This e-book is available in either PDF or EPUB formatfor reading on your computer, tablet, iPad, e-reader, etc.
Learn more about this EOS R6 Mark II guide, view a preview, and purchase it here:
As one Canon user has said about Full Stop guides:
“I don’t know how I could fully take advantage of all the features the camera has to offer without this publication! It’s well-organized, easy to understand, and succinct enough to keep your attention while still containing a wealth of information to get the most out of your camera.”
For Intermediate and Enthusiast Photographers: This instant download Canon EOS R6 Mark II e-book is designed for enthusiast dSLR photographers who wish to take fuller advantage of the capabilities of their camera:
-Go beyond Auto+ and Program modes and shoot competently in Av, Tv, Fv, and M modes.
-Take full control of the powerful autofocus system to capture sharp images of still and moving subjects. Learn to take advantage of the face, eye, and subject detection, plus powerful subject tracking features.
-Set up your camera with clear explanations and recommended settings for all Menu options and Custom Settings of the EOS R6II. Includes a free download of my comprehensive EOS R6II Menu Setup Spreadsheet.
-Learn how, when, and why to use and customize the various controls, buttons, and features of the EOS R6 Mk II, including the touchscreen and M-Fn Button.
-Understand the various metering modes, exposure compensation, and exposure lock for correct exposure of every image, even in challenging lighting situations.
For Experienced Photographers coming to the EOS R6II from previous models, this guide explains the new and advanced features and settings in order to quickly help you take advantage of these capabilities. Plus it explains the camera controls and how to customize them. You will learn how to take advantage of the new features including the autofocus system with face, eye, and subject detection and tracking, Fv shooting mode, Silent Shutter, in-camera image processing and editing, HDR, Multiple Exposure, cRAW file format, and manual focusing aids. It introduces the 4k, HD, High Frame Rate, and Time-Lapse video capabilities, and guides you through all the EOS R6 MkII Menu and Custom Function items in order to help you best set up your camera for your specific shooting needs.
This 518 page digital guide to the Canon EOS R6 Mark II is an illustrated e-book that goes beyond the EOS R6II manual to explain how, when, and why to use the features, settings, and controls of the EOS R6II to help you take control of your camera and the images you create.
Learn more about Canon EOS R6 Mark II Experience, view a preview, and purchase it on my Full Stop website here:
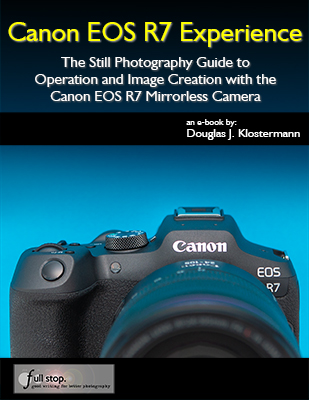
My latest Full Stop e-book, Canon EOS R7 Experience user guide to the Canon EOS R7 is now available! This e-book goes beyond the manual to help you learn the features, settings, and controls of the powerful and customizable Canon EOS R7. Plus most importantly it explains how, when, and why to use the functions, settings, menu options, and controls in your photography.
Written in the clear, concise, and comprehensive style of all Full Stop guides, Canon EOS R7 Experience will help you learn to use your EOS R7 quickly and competently, to consistently create the types of images you desire. This e-book is available in either PDF or EPUB formatfor reading on your computer, tablet, iPad, e-reader, etc.
Learn more about this EOS R7 guide, view a preview, and purchase it here:
As one Canon user has said about Full Stop guides:
“I don’t know how I could fully take advantage of all the features the camera has to offer without this publication! It’s well-organized, easy to understand, and succinct enough to keep your attention while still containing a wealth of information to get the most out of your camera.”
For Intermediate and Enthusiast Photographers: This instant download Canon EOS R7 e-book is designed for enthusiast dSLR photographers who wish to take fuller advantage of the capabilities of their camera:
-Go beyond Auto+ and Program modes and shoot competently in Av, Tv, Fv, and M modes.
-Take full control of the powerful autofocus system to capture sharp images of still and moving subjects. Learn to take advantage of the face, eye, and subject detection, plus subject tracking features.
-Set up your camera with clear explanations and recommended settings for all Menu options and Custom Settings of the EOS R7. Includes a free download of my comprehensive EOS R7 Menu Setup Spreadsheet.
-Learn how, when, and why to use and customize the various controls, buttons, and features of the EOS R7, including the touchscreen and M-Fn Button.
-Understand the various metering modes, exposure compensation, and exposure lock for correct exposure of every image, even in challenging lighting situations.
For Experienced Photographers coming to the EOS R7 from previous models, this guide explains the new and advanced features and settings in order to quickly help you take advantage of these capabilities. Plus it explains the camera controls and how to customize them. You will learn how to take advantage of the new features including the autofocus system with face, eye, and subject detection and tracking, Fv shooting mode, Silent Shutter, in-camera image processing and editing, HDR, Multiple Exposure, cRAW file format, and manual focusing aids. It introduces the 4k, HD, High Frame Rate, and Time-Lapse video capabilities, and guides you through all the EOS R7 Menu and Custom Function items in order to help you best set up your camera for your specific shooting needs.
This 490 page digital guide to the Canon EOS R7 is an illustrated e-book that goes beyond the EOS R7 manual to explain how, when, and why to use the features, settings, and controls of the EOS R7 to help you take control of your camera and the images you create.
Learn more about Canon EOS R7 Experience, view a preview, and purchase it on my Full Stop website here:
The Canon EOS R7 mirrorless camera offers numerous menu items and customization options. In order to take full advantage of this camera, you are going to need to dig into the Menus and Custom Functions, and set up the camera to work best for how you shoot and for the type of situations you are shooting. To assist you with this, I have created a detailed and comprehensive Canon EOS R7 Menu Setup Spreadsheet, which lists suggested settings and starting points for the various Menus and the Custom Functions. It has complete and separate camera setup recommendations for different types of shooting, including:
General / Travel / Street Landscape / Architecture Action / Sports Moving Wildlife / Birds Studio / Portraits Concert / Performance
A detail of the comprehensive EOS R7 Menu Setup Spreadsheet
The Canon EOS R7 MenuSetup Spreadsheet can be downloaded from my website here. Printing instructions are also included on that page.
I have also created a Canon EOS R7 Menu Setup video, which walks through all the items and settings of the Photo Menu, with explanations and suggested settings. Watch it on YouTube here, and be sure to subscribe to my channel to be notified when additional EOS R7 Menu Setup videos are posted.
Camera users are often curious about “hidden” features that their camera may have, though typically most advanced models really don’t have many, as long as one carefully goes through all of the Menu and Custom Settings items, and reads through the manual or a guide. However, with so many options and functions, there are a few items that are actually a bit hidden away on the Nikon Z7II and the Nikon Z6II. It’s not that the Z 7II and Z 6II manuals don’t mention them, or that they can’t be found with careful investigation of the camera, but you may need to have them called to your attention to learn how to locate them and how to take advantage of them. And there are a few button shortcuts to access features and settings that you simply need to learn if you wish to take advantage of, because once you are using your camera, they are not indicated in any menus or button icons.
These article is adapted from a section in my in my comprehensive Nikon Z 7II / Z 6II Experience user guide to the Nikon Z7II and Nikon Z6II. All of these “hidden” features, as well as all of the other features, functions, settings, and controls of the Z 7II and Z 6II are discussed in detail, in the guide. Many of these features were included on the original Z 7 and Z 6 models, but they may still be new for those coming from older dSLR models.
Figure 1 – Detail of the controls of the Nikon Z7II
Displays and Button Settings – When the Information Display or the Live View scene is active on the rear Monitor, you can press some of the camera buttons to change the corresponding settings as you view them on the rear Monitor. Or you can also view and change them in the electronic Viewfinder, while shooting. For example, by default, the Fn1 Button is assigned to White Balance and the Fn2 Button is assigned to Focus Mode/AF-Area Mode. When you press these buttons, you can view and change those settings, and the screen will even indicate which Command Dial to use for each setting (see Figure 2 – left). If you customize those buttons for another setting such as Auto Bracketing or HDR, you will be able to view and change those settings on the displays, as you press the assigned button and turn the Command Dials.
Figure 2 – Left: Using a Fn Button and the Command Dials to change the White Balance setting on the rear Monitor. Right: Changing the HDR options via the Photo-Mode i Menu.
The Z 7II and Z 6II also have a new display option, where you can view the scene on the rear Monitor without any of the shooting information or icons cluttering up the display. But setting up or making use of this feature is a bit hidden. You will need to assign one of the buttons to the Live view info display off setting. By default the Movie Record Button is set to this option.
i Button Features – You can press the i Button to access different contextual i Menus during photo shooting, video, and image playback. The Z7II and Z6II also add the ability to change additional sub-options of various settings, via the i Menu, without having to dig into the menus to set those options. For example, when using the WB item on the Photo-Mode i Menu to select Auto White Balance, you will also be able to select which of the three Auto White Balance sub-options you would like. And you will be able to directly fine-tune a White Balance setting using the adjustment grid. If you replace some of the default i Menu items with options such as HDR, Auto Bracketing, or Multiple Exposure, you will be able to directly access and change the various settings for those features (see Figure 2 – right).
In some situations, the i Menu it is the only way to access and change certain of these hidden features. For example, the Photo-Mode i Menu will allow you to access the Split-screen display zoom feature. You will first need to use Custom Setting f1 – Customize i Menu and assign Split-screen display zoom to the Photo-Mode i Menu. Then when you are composing an image, you can access this feature which allows you to simultaneously zoom-in at two different areas of the scene, to help verify focus and to ensure that the composition is level across the scene (see Figure 3). This can come in handy for landscape and architectural photographers.
Figure 3 – Left: Press the i Button to access the i Menu screen with various shooting settings. You can use f1 to customize this menu, and add items such as Split-Screen Display Zoom. Right: Split-Screen Display Zoom shown in use, to compare two areas of the same scene to help determine if the framing is level.
The Playback i Menu will allow you to access a hidden feature, the Quick Crop option. During image playback, you can magnify an image and adjust the framing as desired. If you then press the i Button to access the Playback i Menu, and select the Quick Crop option, you can automatically crop the image and save a new image with the crop that is currently seen on the display (see Figure 4 – left).
Figure 4 – Left: Accessing the Quick Crop feature via the image Playback i Menu. Right: The Peaking Stack Image preview was available on the original Z7 and Z6, but not on the Z7II or Z6II.
And when a Multiple Exposure series is in progress, you can press the Playback Button to view the last image. If you then press the i Button, you will access a menu that allows you to view the Multiple Exposure progress, as well as edit the series by retaking or discarding the last exposure if desired.
There are a couple different ways to change the settings on the i Menu. You can highlight the desired icon (see Figure 5 – left) then press the OK Button and view all the options. This method will even allow you to access and change various applicable sub-options. Or you can highlight the desired icon, and turn the rear Main Command Dial to directly change the setting on that screen. If a setting option includes sub-options, such as the three available Auto White Balance options, or the Continuous Low frame rates (see Figure 5- right), you will use the front Sub-Command Dial to change the sub-options.
Figure 5 – Left: Photo-Mode i Menu, accessed by pressing the i Button. After highlighting the desired setting, either press the OK Button, or use the Command Dials to change the settings. Right: The rear Main Command Dial will select the setting, and the front Sub-Command Dial can be used for any available sub-options, such as the Continuous Low frame rate.
Monitor Mode Button – This button isn’t hidden, but it is causing some users a bit of confusion when they are not able to see any menus or playback images on their rear Monitor screen. In order to select if the Monitor or the Viewfinder will be in use, you will need to press the Monitor Mode Button, which is located on the side of the Viewfinder “bump.” Press it repeatedly until you see the Prioritize viewfinder option, as you look on the rear Monitor or in the Viewfinder. Set it for this option for now, so that you can make use of both the Viewfinder and the rear Monitor. If you are pressing the Playback Button or the Menu Button and not seeing anything appear on the rear Monitor, be sure to look in the Viewfinder and set the Monitor Mode to Prioritize viewfinder.
Live View Exposure Preview – An important function to make note of is that you need to enable Custom Setting d9 – Apply Settings to Live View in order to view the scene, in the Viewfinder and on the rear Monitor, with the current camera and exposure settings applied. This will allow you to better preview the resulting image and make exposure adjustments, and will also enable you to access the Live View Histogram of the scene by pressing the DISP Button.
Custom Control Assignments – A few other hidden features of the Nikon Z7II and Z6II can only be accessed by customizing one of the camera buttons to assign it to that function, using Custom Setting f2. As mentioned above, you can assign a button to the Live view info display off option, for the uncluttered view of your scene on the rear Monitor display. A customization will allow you to press a hold one of the Fn Buttons to temporarily switch to a different Metering Mode, such as Spot Metering (see Figure 6 – left). If you will be using non-CPU, F-mount lenses with the Z7II or Z6II, you can register the lens to the camera, and thus gain additional functions such as in-camera Vibration Reduction. You will need to use f2 to assign the Choose non-CPU lens number option to one of the buttons, so that you can tell the camera which lens number is in use.
If you are making use of an optional wireless remote to trigger multiple cameras, there is also a “hidden” setting for this in the Custom Setting f2 button assignments. You can choose to assign the Fn1 Button, Fn2 Button, or Sub-Selector Center press to the Sync. Release selection option, which is used in conjunction with Custom Setting d3 – Sync. Release Mode Options. You can set up the camera so that, for example, when using the Z7II or Z6II as a master camera to remotely trigger other cameras, you can press the Fn1 (or Fn2) Button while taking the shot, and then just the master camera will shoot, or just the remote cameras and not the master, based on your settings.
Figure 6 – Custom Control Assignments – Left: Assigning the Fn1 Button to the Spot Metering function, to temporarily switch to a different Metering Mode with the press of the button. Right: The Customize Command Dials, Sub-Dial Frame Advance options, to use a dial to jump ahead 10 images during image playback.
Sub-Dial Frame Advance during Playback – If you wish to quickly scroll through your images as you view them on the rear Monitor during playback, you can use the rear Main Dial to advance one image at a time, and use the front Sub-Command Dial to advance 10 or 50 images. To set this up, access Custom Setting f5 – Customize Command Dials, and set the Menus and playback option for On. The Sub-Command Dial will then be used to jump 10 or 50 images at a time, based on the Sub-dial frame advance setting. Set the Sub-dial frame advance item for 10 images or 50 images, or you can also choose to jump to protected images, still images or movies only, or to a different folder (see Figure 6 – right).
One Button Playback Zoom / Histogram – Using Custom Setting f3 – OK Button, you can assign the OK Button so that during image playback it will immediately zoom-in, at the magnification level of your choice, centered at the area of the active focus point so that you can closely inspect your image. Or you can instead assign the button press to display a large histogram with the image, so that you can evaluate your exposure (see Figure 7 – left).
Figure 7 – Left: Use Custom Setting f3 – OK Button, Playback Mode to set the OK Button to show a magnified view or to show a large histogram. Right: Touch the bottom of the screen during full-image playback in order to access the “Frame Advance Bar” touch screen feature.
Frame Advance Bar – This image playback feature enables you to use the touch screen to quickly scroll through images without having to swipe one-by-one (see Figure 7 – right). And when viewing a magnified detail of an image, use the touch screen arrows to view the same magnified area of previous or following images.
Interval Timer Shooting vs. Time-Lapse Movie – The Nikon Z7II and Z6II include both the Interval Timer Shooting and the Time-Lapse Movie functions. In general, Interval Timer Shooting is used to create a series of images, taken at a specific time interval, which can later be combined into a time-lapse movie using software. Interval Timer also allows you to take a burst of multiple images at each interval, if desired. Time-Lapse Movie is used to take a series of individual images at a specified interval, that are automatically combined into a movie, by the camera, and saved to the desired memory card.
Due to a new addition to these cameras, these two functions now overlap a bit more. With the Z7II and Z6II, the the Interval Timer Shooting menu now has an Options item which will enable you to shoot a series of bracketed images, or to automatically create a time-lapse movie from the interval timer images. The advantage of doing this is that the camera will save all of the individual interval timer images, as well as create and save the time-lapse movie.
Flash Information Screen – With a compatible optional Speedlight flash attached and turned on, such as the SB-5000 or SB-500, press the DISP Button repeatedly to access the Flash Information Screen showing the current flash settings, and then press the i Button to view and change the various settings and options, including Wireless Flash Options (see Figure 8).
Figure 8 – Left: When using an optional Speedlight flash, press the DISP Button to access the Flash Information Screen showing the current flash settings. Right: Then press the i Button to view and change the various settings and options.
Voice Memo (Z 6II only) – With the firmware 1.30 upgrade to the Z 6II, you can add a voice memo to an image. In order to do this, you will first need to use Custom Setting f2 to assign the Movie Record Button to the Voice Memo option. Then during image playback, select the desired image, and press and hold the Movie Record Button to record the voice memo, which can be played back when viewing the image, and will be saved as a WAV file to the memory card.
Nikon Z7II / Nikon Z6II Menu Setup Guide
In addition to my Nikon Z 7II / Z 6II Experience user guide., I also offer a Z7II / Z6II Menu Setup Spreadsheet, with suggested settings and starting points for most all of the camera menu settings and Custom Settings. The Excel spreadsheet includes separate listings for different shooting situations including Landscape, Studio, Action, etc. You can download the spreadsheet here:
Again, all of these hidden features and settings, and other unique features, as well as all of the other features, functions, settings, and controls of the Z7II and Z6II are discussed in detail, in my comprehensive Nikon Z 7II / Z 6II Experience user guide.
Be sure to share your portraits and other photos on my Nikon Z Experience Facebook page, covering all the Nikon Z models:
The pro-level mirrorless Nikon Z9 offers far more menu items and customization options than the previous cameras in the Z line-up. In order to take full advantage of this powerful camera, you are going to need to dig into the Menus and Custom Settings, and set up the camera to work best for how you shoot and for the type of situations you are shooting. To assist you with this, I have created a detailed and comprehensive Nikon Z9 Menu Setup Spreadsheet, which lists suggested settings and starting points for the Photo Shooting Menu and the Custom Settings. It has complete and separate camera setup recommendations for different types of shooting, including:
General / Travel / Street Landscape / Architecture Action / Sports Moving Wildlife / Birds Studio / Portraits Concert / Performance
Detail of the Nikon Z9 Menu Setup Spreadsheet
The Nikon Z9 Setup Spreadsheet can be downloaded from my website here. Printing instructions are also included on that page.


 .
. 
 .
.