Canon 77D vs 80D Beyond the Specs – Hands On Differences

Since the introduction of the Canon EOS 77D, there have been numerous articles comparing the 77D to the Canon 80D. However, most of those articles merely compare the specifications of the two cameras, simply showing information that can be found on a spec sheet without ever having to actually touch the cameras. And most all of those articles completely fail to explain the actual, hands on differences between the 77D and 80D. In fact, based on the information they share (and fail to share), it becomes obvious that most of them have not actually used the new 77D!

Canon 77D body controls button dials

Detail of the Canon 77D body and controls.

While working on my guide for the 77D, Canon 77D Experience, I have found that the important differences between the two cameras lie in their Menus and the Custom Functions. These are the options which enable you to customize the camera for your needs and preferences, and for the different types of shooting situations in which you will be using the camera. (My guide for the 80D, Canon 80D Experience is available here.)

Canon 77D example sample image

Example image from Canon 77D Experience guide – non-cropped image of swan, taken with the 77D.

To review the more “superficial” comparisons, the Canon 77D and 80D share some important features such as the 45-point viewfinder autofocus system, which helps you to locate an AF point on your subject without necessarily having to first focus then recompose, as well as enables you to better track and retain focus on a moving subject. Then both have Canon’s revolutionary Dual Pixel live view autofocus system, which allows for fast autofocusing as well as much more accurate tracking of a moving subject in live view (for stills and video) than previous models. (What most of the comparison articles fail to point out is that the 77D includes a new Smooth Zone AF method in live view, which allows you to place the zone most anywhere on the screen, not just in 9 preset locations as with the 80D – a pretty significant upgrade to be overlooked.) They also both share a 24.3 megapixel sensor, 3″ articulating touch screen, and similar buttons and controls on the body of the camera including a top Main Dial as well as the rear Quick Control Dial. Being newer, the 77D has a faster Digic 7 processor (vs. the Digic 6 of the 80D), an expanded ISO range (up to the unusable 51,200) allowing for cleaner images in low light situations, a larger buffer for more shots during continuous shooting, and the addition of Bluetooth for connecting to a smart phone or tablet. (Interestingly, none of the comparison articles seem to have tried to use the Bluetooth connection with iOS, which will immediately ask you to switch to Wi-Fi in order to use any of the wireless functions. So it is a feature you can really only make use of with Android. Or else you can use it with the new Canon BR-E1 Bluetooth Wireless Remote Control.)

The 77D, however, lacks the weather-sealing and headphone jack of the 80D. The 80D also boasts a better pentaprism viewfinder, slightly faster maximum shooting speed of 7 fps vs 6 fps, faster maximum shutter speed of 1/8000 vs 1/4000, and a faster 1/250 flash sync speed vs. the 1/200 speed of the 77D. The larger battery of the 80D will allow for more shots or longer live view sessions. The 77D is also a few hundred dollars cheaper than the 80D.

These various pros and cons can make it difficult to choose between the two cameras, because they mainly present figures from a spec sheet, and for the most part these types of differences are not significant. They certainly don’t tell the full story.

Canon 77D example, sample image

Example image of great blue heron taken with the 77D, from Canon 77D Experience guide.

While the two cameras share the same 45-point viewfinder autofocus system, they do not have the autofocus capabilities because the 80D includes numerous autofocus customizations in the Custom Functions that are not on the 77D, particularly for how the camera responds to moving subjects as you are tracking them and trying to retain focus. The items on the 80D that are absent on the 77D include the options for adjusting Tracking Sensitivity, Acceleration/Deceleration Tracking, and AF Point Auto Switching. These options are adjusted in order to help the camera better retain focus on different types of moving subjects, such as one moving smoothly and consistently vs. one moving erratically and switching speed and direction. They allow you to adjust the camera differently to track the distinct types of movements of (for example) a runner, a race car, a tennis player, or a bird in flight. While the 77D is fully capable of capturing sharp images of moving subjects, as demonstrated in the image of the flying heron above, the 80D allows you the ability to adapt the camera to different types of subjects, to better ensure that you capture more in-focus shots of moving subjects when capturing a burst of images.

Some of the autofocus-related Custom Function options of the 80D that are not offered on the 77D.

The 80D also includes the 1st Image/2nd Image Priority options, which enable you to tell the camera to prioritize shutter release vs. focus. In other words, you can choose if you want the camera to capture all images in a burst in-focus, or if you just wish to maintain the rapid frame rate at the possible expense of missing focus on some of the images. And the 80D offers the option of Orientation Linked AF Point, where the camera can automatically switch AF Point / Zones as well as AF Area Modes (Single Point vs. Zone of multiple points) when you turn the camera to a different orientation. For example, if you are capturing a portrait subject and are using one of the upper-right AF Points, when you turn the camera to the vertical orientation, the camera can automatically select an upper-right AF Point so that you don’t have to move the active AF Point yourself. The 80D also has the AF Point Selection Movement option, which allows you to tell the camera how to address AF Point selection when you reach an outer point. The AF Point selection can stop at the edge, or it can “wrap around” to the other side. I believe that with the 77D, the AF Point selection will always just stop at the edge. Another autofocus-related Custom Function on the 80D that is missing from the 77D is AF Microadjustment, which allows you to adjust the focus of each lens in order to obtain (ideally) exact focus. With the 77D, you are going to have to accept any slight front-focus or back-focus issues with your various lenses.

AF Microadjustment options on the 80D that are not included on the 77D.

Example image from Canon 77D Experience guide – Cropped detail of great blue heron in-flight, with fish, taken with the 77D, showing the ability to capture a sharp, detailed image of a difficult moving subject. Cropped from a similar distance as the above heron image.

Some of these options you can live without and might never miss, but once you start taking advantage of them with a camera that offers them, you might never wish to do without them again! Other features of the 80D that are not included on the 77D are the Silent Shooting Drive Modes that allow for quieter shutter release. The 77D however, adds the Self-Timer Continuous option, which allows you to specify the number of continuous images to be taken with the self-timer. The 80D will only take one image with the self-timer. The 77D is also missing the in-camera HDR Mode, Multiple Exposure shooting, and in-camera RAW processing of images. During image playback, the 77D will display the blinking highlights only when you view the smaller thumbnail view of the image along with the histogram. With the 80D, you can choose to view the blinking highlights on the full-screen image playback. These “blinkies” allow you to see if you have over-exposed parts of an image. The 80D also offers a playback grid, which can help you to assess the composition.

Viewing the blinking highlights on the full-screen image on the 80D (left) or on the thumbnail (right). The 77D only offers the blinking highlights on the thumbnail / histogram view (right).

While both cameras offer Auto ISO, the 80D allows for additional Auto ISO options such as adjusting or specifying the minimum shutter speed that the camera can select when using Auto ISO. For example, if you are using Auto ISO and Aperture-Priority Shooting Mode, you may find that the camera is selecting a shutter speed that is slower than you may want, thus risking blur from camera movement. With the 80D, you can adjust this setting accordingly. The 80D will also allow you to select ISO speeds in 1/3 stop increments, rather than the full stops (100, 200, 400) of the 77D. The 80D also includes the Safety Shift option, where the camera will automatically adjust the exposure settings for you if the current settings are going to result in a poorly exposed image. For example, you may be taking images at a concert or performance using Aperture-Priority mode, and you have set your desired aperture setting. But if the lighting suddenly becomes much brighter, and your combination of exposure settings are going to result in a bad exposure, the camera will adjust that aperture setting to enable you to capture a proper exposure.

The additional Auto ISO adjustments of the 80D that are not included on the 77D.

Some additional features offered on the 80D but not on the 77D are the Custom C1 and C2 shooting modes on the Mode Dial, which allow you to register a pre-set selection of shooting settings and menu settings. For example, you might assign all your sports-related camera settings to the C1 mode, and all your landscape-related settings to the C2 mode, and thus be able to quickly switch to a different camera set-up. The 80D allows you to customize what is displayed on the various Live View display screens as you press the INFO Button (such as the shooting settings, grid, level, and histogram). The 77D offers these various information displays as you press the INFO Button, but you can’t customize what is shown with each click of the button. Both cameras offer Auto Exposure Bracketing, but the 80D allows you to customize the bracketing sequence as well as the number of bracketed shots up to 7 (only 3 shots with the 77D). And the 80D will allow you to set a precise Kelvin (K) White Balance temperature, while the 77D does not have this option. And while the 77D allows you to customize 4 major controls / buttons of the camera, the 80D provides the option of customizing several additional controls. These types of customizations enable you to set up the camera controls exactly how you want them, for quick access to various functions while shooting.

The Custom Controls of the 80D that can be customized. The 77D only enables you to customize the Shutter Button, AF-ON Button, AE-L (*) Button, and SET Button.

Regarding movie shooting, the 80D offers more format and compression options (MOV vs. MP4, ALL-I vs. IPB), while the 77D only records with MP4 and IPB. The 77D however offers the in-camera 5-axis electronic image stabilization for video.

Which Camera is Best for You?

While I’ve noted several of the functions and features of the of the 80D that are not included on the 77D, it is important to realize that you may never miss many of those features. Many shooters never really take advantage of some of these features, or they set them once and then forget they are there. And some of the features are the types of options you will start to realize you need only after using your camera for a while and then getting to the point where you say “I wish my camera would do ___.” At that point, you might be ready for an upgrade, and then choose a higher-end model.

As noted above, even without these added features of the 80D, the 77D is fully capable of capturing high-quality, sharp images, even of difficult moving subjects such as birds in flight. In fact, even without several of the AF customization options that the 80D offers, I was able to capture just as many bird in flight “keepers” with the 77D as I have with higher-end models! Some of this was due to luck and timing, but the 77D can obviously do it. As the 77D shares the same 24.3 MP sensor of the 80D, the 77D is a great camera for enthusiasts who desire great image quality, sharpness, clarity, and low-light performance, but don’t have the time or desire to dig into the menus, settings, and customizations to adjust the camera for different photo shoots. And the 77D has the necessary features and controls for those who wish to take more control of the camera and its settings. The 77D is also good for enthusiast or occasional videographers who don’t need all the movie file type options.

If you are interested in digging into the menus and Custom Functions of either camera, and learning to take full control, be sure to read my guides Canon 80D Experience and Canon 77D Experience!

But if your primary subjects are sports, action, wildlife, or birds, you will want to upgrade to the Canon 80D (or 7D Mark II), particularly for their additional autofocus settings and customizations for tracking different types of moving subjects. Plus those models offer faster continuous shooting rates. And for those who want to take full advantage of the camera controls in order to change and adjust settings on-the-fly, the 80D offers far more Custom Controls options.

If you are planning to purchase your Canon 77D or Canon 80D online, please consider using my affiliate links and help support this blog – thanks!

You can purchase the new Canon 77D from Amazon here. $899.00 body only.

And you can purchase the Canon 80D from Amazon here. $1099.00 body only.

My guides to the cameras, Canon 77D Experience and Canon 80D Experience are available at www.fullstopbooks.com

Canon 7D Mark II – Tips and Tricks, part 1

By now you may have read several of the reviews and “hands-on” articles about the long-awaited Canon 7D Mark II. The camera’s 65-point autofocus system, combined with its customizable controls and blazingly fast 10 frames per second continuous shooting speed, make it an ideal camera for sports, action, and wildlife. At the same time its Its 20.2 megapixel sensor and high image quality enable it to work great for portraits, landscapes, and more static subjects.


Canon 7D Mark II Experience Mk II book manual guide how to learn tips tricks hands on
Figure 1. Detail of the body and controls of the Canon 7D Mark II.

However, what many reviews and hands-on articles and videos about the 7D Mark II seem to miss is the incredible level of customization one can apply to the controls and features of the camera, in order to have it perform exactly how a user needs or desires, to better accommodate a specific shooting situation or a personal shooting style. These are the kinds of features that really differentiate a pro-sumer camera from a mid-level camera, yet are often overlooked in reviews and comparisons.

And while the original 7D and the full-frame 5D Mark III both offer a high level of customization, the 7DII takes it to an even higher level, adding options and button-combinations not available on previous models. This can allow the user an even more seamless photography experience, enabling you to concentrate on the scene and the subject while quickly changing to the desired settings or making use of certain features, with just a few button taps or dial turns, and often without your eye leaving the Viewfinder.

Canon 7D Mark II example image learn use manual guide how to master dummies tips tricks set up setting recommend
Figure 2. Fall Foliage at Whipple Hill, Lexington, Mass. with the Canon 7D Mark II.

Complete explanation for all of these tips and tricks, and well as clear, comprehensive instruction for the camera, plus descriptions and recommendations for all of the Menu and Custom Function settings, will be found in my camera guide Canon 7D Mark II Experience, which you can learn about and purchase on my Full Stop website. Learn to take control of your 7DII and the images you create with this helpful guide! I have also put together a free, comprehensive Canon 7DII Setup Guide Spreadsheet, which gives recommended settings for all of the Custom Functions and shooting-related Menu items.

1. Make Use of the New AF Area Selection Lever: One of the notable additions to the 7DII is the new AF Area Selection Lever, which surrounds the Multi-Controller thumb-joystick. This lever can be used to quickly change the AF Area Selection mode, such as Single Point, AF Point Expansion, or Zone AF. Do this by first pressing the AF Point Selection Button (at the upper-right on the rear of the camera), then flipping the lever repeatedly as you view the different AF Area configurations in the Viewfinder. Or since you can easily change the AF Area by pressing the AF Point Selection Button then the M-Fn Button, you may wish to customize the new lever to quickly change the ISO setting or the Exposure Compensation amount. In that case, you would turn and hold the lever with your thumb, then turn the top Main Dial to change the assigned setting. Generally you may wish to set it for the ISO option, but when shooting in Manual (M) Mode, for either stills of video, while also making use of Auto ISO, you may wish to set this for the Exposure Compensation option. This configuration will enable you to easily access this new capability of the 7DII, which I will explain below.

2. Take Advantage of Various Autofocus-Related Custom Controls Options: Many of the customization options of the Canon 7D Mark II revolve around the Custom Controls, which can be accessed with the Custom Controls item of the C.Fn3 Menu.

Canon 7D Mark II menu custom setting setup recommend tips tricks
Figure 3. Custom Controls menu item of the Canon 7D Mark II

While previous Canon dSLR models allowed you to assign various exposure and focusing functions to some of the back buttons, or perhaps to quickly switch between One-Shot and AI Servo with the push of a button, the 7DII will allow you to use various buttons to temporarily change the current AF Mode, Area Mode, and AF Case. For example, if you are taking images of a motionless bird using One Shot AF Mode and Single Point AF Area Selection mode, but then the bird takes flight, you can press and hold a button (that you have pre-assigned) and temporarily make use of AI Servo, with 8-Point AF-Point Expansion, and Case 2 AF Configuration for tracking the subject.

Or making use of another option, you can assign a button to temporarily change many of the subject-tracking settings (as you press and hold the button), such as the Tracking sensitivity, the AF point auto-switching setting, and the AI-Servo 2nd image priority. These changes are made, for example, by accessing the AF-ON Button option in the Custom Controls menu, selecting Metering and AF Start, and then pressing the INFO Button to make these further customizations (see Figure 4 – left). Or you can access the DOF Preview Button, select the Switch to registered AF function option, and press the INFO Button to set the desired AF tracking parameters (see Figure 4 – right).

While many users may not generally have the need for a sudden switch of autofocusing parameters, it can be incredibly useful for dedicated wildlife or sports photographers who can encounter dramatic changes in a scene or in the subject movement.

Canon 7D Mark II AF autofocus case customize button control tips tricks setting set up
Figure 4. Two of the different Custom Controls options for assigning various AF settings and operations to one of the camera buttons. Left: Details for the “Metering and AF Start” option of the AF-ON Button. Right: Details of the “Switch to registered AF function” option of the DOF Preview Button.

There is also the option to use a button to immediately switch to a different set of shooting settings in addition to the AF settings, including the shutter speed, aperture, ISO, white balance, metering mode, exposure compensation. This is shown in Figure 5, where the AF-ON Button is set to the Register/recall shooting function option, and then the INFO Button is pressed to set the specific parameters. As you can see, you can select which shooting settings will be included by adding the check-mark, and then you can set the desired setting or amount for each item, such as 3200 for the ISO Speed. Then when shooting, you can press and hold the AF-ON Button to immediately recall all those settings.

Canon 7D MArk II af autofocus button control custom customize setup setting tips tricks how to recommend
Figure 5. Assigning the AF-ON Button to the Register/recall shooting function option, then pressing the INFO Button to set the desired parameters.

3. Make Use of the Q Button and INFO Button to Quickly Change Shooting Settings: These buttons will also allow you to quickly access and change various camera settings and functions, rather than having to dig into the menus to find what you are looking for. The Q Button will access the Quick Control Screen (Figure 6 – left), which you can navigate using the Multi-Controller, and then either change the settings directly on the screen by turning one of the dials, or press the SET Button to view all the options and to select your desired setting. One handy new addition to this screen is the memory card selection icons. While you can press the SET Button here (or use the menus) to specify how the two cards are used (for example overflow, JPEG/RAW, or backup), you can highlight these icons and then turn one of the dials to directly and immediately choose which card is the the current primary card being used for recording and playback. This is especially handy during playback when you are looking for a specific image on one of the inserted memory cards, but then realize it is on the other inserted card, yet the 7DII will only playback the images from one card at a time.

Canon 7D Mark II menu custom function setting setup recommend guide how to tips tricks
Figure 6. Left: The Quick Control Screen, accessed with the Q Button, for quickly changing settings. Right: If you press the INFO Button and access the Shooting Function screen, and then press any of the top camera buttons, you can quickly view and change those settings using the rear LCD monitor.

If you first press the INFO Button a couple times and and access the Shooting Function Settings screen (which resembles the Q screen of Figure 6 – left), you can press any of the top camera buttons and quickly view and change those settings on the rear LCD Monitor. This will allow you to more easily view the settings than the smaller top screen, while also allowing you to see all the available options. For example, Figure 6 – right shows the INFO screen for the AF/Drive button, which allows you to see all the available options in both word and icon format, and also indicates which dial to turn to change which setting (the top Main Dial indicated by the half-circle, or the rear Quick Control Dial).

4. Take Advantage of the Creative Photo, Rate, and M-Fn Buttons: The Creative Photo Button, located at the upper-left of the rear of the camera, will allow you to quickly access the Picture Style settings, Multiple Exposure, and HDR Shooting, rather than having to go into the menus to find those features. The Rate Button, also on the left side of the rear of the camera, will enable you to quickly rate an image during image playback. You can choose from one to five stars, or if you find that you typically only use 1 star, 3 star, and 5 star ratings, a menu item will allow you to limit the selection to just those options (Setup 3 > Rate Button Function, then press Q to limit the ratings). So, for example, you would only need to press the button 3 times to cycle from 1 star, to 3 star, to 5 star, without wasting those precious seconds and button pushes for the 2 star and 4 star ratings you never use! If you prefer the Rate Button to act as the Protect Button, you can use the Rate Button Function menu item to instead assign it to that function.

Canon 7D Mark II button customize custom setting setup recommend quick start control tips tricks
Figure 7. Customize the M-Fn Button to shoot simultaneous RAW plus JPEG, or to cycle through the top button settings.

The M-Fn (Multi-Function) Button, located on the top of the camera near the Shutter Button, is used in conjunction with first pressing the AF Point Selection Button in order to select the desired AF Area Selection Mode. However, when simply pressed by itself, if is used for Flash Exposure Lock. If you don’t need it for that function, you can perhaps change it to one of the RAW+JPEG settings, so that you can temporarily or permanently switch to capturing images in both file formats. Or a handy option is to set it for the Cycle option, which allows you to cycle through the various top button settings such as White Balance, ISO, and Drive Mode, as you view the settings on the top LCD screen (see Figure 7). This can perhaps be quicker and easier than slowing down to first look and see which tiny button is used to access which setting. Press it one time and the WB/ Metering Mode options will be active on the top screen and available for you to change, as if you pressed the WB/Meter Button. Press it again and the Drive Mode/ AF Modes will be active, etc.

Canon 7D Mark II body controls buttons tips tricks how to learn use manual guide tutorial recommend setting set up quick start
Figure 8. Detail of the top controls of the Canon 7D Mark II.

5. Use Manual (M) Shooting Mode with Auto ISO plus Exposure Compensation: The Canon 7D Mark II allows you to perform a function which, if I recall correctly, cannot be done with the original 7D, 5DIII, or 70D – which is to simultaneously use M shooting mode (for either still photography or movie shooting) along with Auto ISO, while also making use of Exposure Compensation. This is a very powerful option for those shooting in Manual. Using Auto ISO with Manual Mode allows you to set your desired shutter speed and aperture settings, and the camera will then select the appropriate ISO setting in order to obtain the proper exposure. If you suddenly move to a brighter or darker settings, you can retain the same exposure settings, and the camera will automatically adjust the ISO setting to maintain the proper exposure. This allows you to concentrate on your subject and composition without having to worry about or adjust the exposure settings. It can also be incredibly useful during movie shooting in order to maintain a consistent exposure even if the scene or lighting levels change. However, if you are unhappy with the exposure results that the camera has determined, the 7DII now allows you to also apply Exposure Compensation in this situation, in order to make the subsequent images darker or lighter, to better suit your intentions or desires.

Since the dials are being used for the shutter speed and aperture settings when working in M shooting mode, they cannot be used for Exposure Compensation (EC), so you will need to access the Quick Control Screen to change the EC setting. However, as mentioned above, you can assign the AF Area Selection Lever to the Exposure Compensation option, and then you will simply need to hold the lever and turn the top Main Dial to change the EC amount, while viewing the setting in the Viewfinder or top Control Panel.

Canon 7D Mark II Manual Mode exposure compensation Auto ISO tips tricks how to use set up setting
Figure 9. Making use of Manual (M) Mode with Auto ISO and Exposure Compensation.

These tips will be continued in Part 2, coming soon!

Don’t forget about my free, comprehensive Canon 7D Mark II Setup Guide Spreadsheet, which provides recommended settings for all of the Custom Functions and shooting-related Menu items of the 7DII!

To learn more about using and taking control of your Canon 7D Mark II, please have a look at Canon 7D Mark II Experience, which you can learn about and purchase on my Full Stop website here. It not only covers the buttons, controls, menus, features, and functions of the camera, but more importantly explains when, why, and how to make use of them in your photography!

Canon 7D Mark II Experience book manual guide master how to tips tricks learn use setup quick start setting recommend menu custom function

And if you have enjoyed this post but have not yet purchased your 7DII, please use my affiliate links to make your purchase. Your price will be the same, and they will give me a small referral bonus – thanks! You can use the links below to go to Amazon, or the links at the side of the page for Amazon UK or Amazon Canada, or for B and H Photo.

Canon 7D Mark II body only – Amazon

Canon 7D Mark II with 18-135mm IS STM lens – Amazon

Nikon D750 Heads to the Cape – Hands On Review

The Nikon D750 has just been released, so I headed to the Falmouth Car Show on Cape Cod for some hands-on time to test it out, as I researched and worked on my guide to the camera, Nikon D750 Experience.

Falmouth Cape Cod lighthouse Nobska Nikon D750 review hands on
Nobska Lighthouse on Cape Cod – Woods Hole, Falmouth, Mass.

The camera performed great, and was used here with the 24-120mm f/4G lens. The handling and feel is similar to previous cameras such as the D610 and D7100, the autofocusing is quick and precise, and the Matrix Metering Mode did a great job in a wide variety of lighting and color conditions, as you can see below. The images below are all JPEG images, straight from the camera, with Auto1 WB, Standard Picture Control, and I don’t believe that Exposure Compensation was even used on any of these images. (The above image was processed.) While they could still use a little post processing tweaking, you can inspect the larger versions of these images in this Flickr Set:

https://www.flickr.com/photos/dojoklo/sets/72157647479004672.

I’ll let the other sites discuss the image quality, sharpness, and noise of the D750 sensor, and instead share some user-oriented thoughts about the camera, along with some of my favorite images from the trip.

Nikon D750 JPEG test hands on tips tricks noise image quality book manual guide AF autofocus tips tricks quick start menu custom setting
1966 Ford Mustang GT Fastback – Falmouth, Mass., Cape Cod.

I made use of both the Viewfinder Grid and the Viewfinder Level (assign the Fn Button to the Level option) to help keep the compositions straight and level – though you can’t use both at once. I mostly worked in Aperture Priority Mode, typically with the aperture set at f/4 for dramatic depth of field. I assigned the Movie Record button to ISO so that I could more easily change it on the fly while shooting, even keeping the camera to my eye as my finger located the proper button. Although there is an ISO Button on the rear of the camera, I find it quicker and easier to use a top button near the Shutter Button for this.

Nikon D750 JPEG test hands on tips tricks noise image quality book manual guide AF autofocus tips tricks quick start menu custom setting
1962 Chevrolet Corvette in Honduras Maroon – Falmouth, Mass., Cape Cod.

I pulled out the articulating Monitor for a few overhead shots (not shown here). While some have said its framework seems sturdy and durable, it feels a bit delicate to me. The extended screen certainly wouldn’t survive an accidental drop, and the exposed ribbon cable seems like trouble in the making. Though if you are just using the movable screen while working on a tripod or carefully shooting, it should work and hold up just fine.

Nikon D750 JPEG test hands on tips tricks noise image quality book manual guide AF autofocus tips tricks quick start menu custom setting
1963 Chevrolet Corvette Sting Ray, Split-Window Fastback. (Notice the split-window shadow in the back of the car) – Falmouth, Mass., Cape Cod.

The Command Dials have a nice rubber texture to them, which is much more comfortable for extended use than other lower-end cameras with dials of a harder material. All the controls are pretty standard Nikon controls for the current models, and are easy to locate and use. The D750 has the handy i Button, and a new Information Display screen which works a bit differently than other current Nikon models. The i Button calls up the i Button menu during Viewfinder shooting (and Live View shooting), rather than directly changing the settings along the bottom of the screen. This is a handy way to change settings such as Image Area, Picture Control, button assignments, and Noise Reduction.

Nikon D750 JPEG test hands on tips tricks noise image quality book manual guide AF autofocus tips tricks quick start menu custom setting
1958 Chevrolet Impala – Falmouth, Mass., Cape Cod.

And when you press the Info Button to show the Information Display, you can directly change many of the camera settings as your view them on the screen. Rather than simply seeing an icon on the Information Display as you do with other Nikon models, the screen now says what the option is, and which dial to turn to change which setting. This is much more helpful than simply having to remember what dial to turn, or having to go with trial-and-error every time. For example, if you press the Info Button to illuminate the display, then press the AF-Mode button (located near the base of the lens), the screen will indicate that you turn the front Sub-Command Dial to change the AF-Area Mode, and the rear Main Dial to change the Focus Mode. A similar helpful screen appears for the other button settings such as WB, ISO, QUAL, Metering Mode, Flash, and BKT.

Nikon D750 JPEG test hands on tips tricks noise image quality book manual guide AF autofocus tips tricks quick start menu custom setting
1965 Ford Mustang Shelby GT 350 Fastback – Falmouth, Mass., Cape Cod.

It is disappointing that Nikon did not include the AF-ON Button on the rear of the camera, which is used for autofocusing and back-button focusing on other models. You can still set up the AE-L/AF-L Button to be used to lock focus with or without also locking exposure, or you can set it up to perform AF-ON back-button focusing, it is not as versatile as other cameras because you don’t have separate rear buttons for exposure lock and focus lock.

As far as setting up all the the Menu and Custom Settings of the Nikon D750, I have created a comprehensive D750 Setup Guide Spreadsheet, with suggested settings for various shooting situations such as Travel, Landscape, Concert, etc. You can learn about and download the free Setup Guide Spreadsheet here:

http://blog.dojoklo.com/2014/09/25/nikon-d750-setup-guide-with-recommended-settings/

Nikon D750 JPEG test hands on tips tricks noise image quality book manual guide AF autofocus tips tricks quick start menu custom setting

1941 Oldsmobile – Falmouth, Mass., Cape Cod.

If you are considering purchasing a Nikon D750, or any lenses or accessories, please consider using my Amazon or B and H Affiliate Links, found on the left side of the page. And if you like this post and this blog, be sure to share it on forums or social media – thanks!

Learn how to take control of your D750 and the images you create, with my guide Nikon D750 Experience.

Nikon D750 JPEG test hands on tips tricks noise image quality book manual guide AF autofocus tips tricks quick start menu custom setting
1957 Dodge Custom Royal – Falmouth, Mass., Cape Cod.

Nikon Df – Hands On Review plus Tips and Tricks

Nikon Df – A Powerful, Fun, Nostalgia-Inducing Camera

The announcement of the retro-styled, full-frame Nikon Df caused plenty of interest and anticipation, though it is yet to be seen whether or not that is followed up with strong sales.  While they have quickly run out of stock in Japan, it sounds as if other potential users, such as in the US, are still taking a wait-and-see approach to learn how Df users feel about the controls, ergonomics, performance, etc. – or perhaps others are hoping that the price may go down a bit!

Nikon Df retro non ai pre ai lens how to use manual guide review hands on recommended setting dummies tutorial quick start tips tricks
Nikon Df with Nikkor 135mm f/3.5 non-AI (pre-AI) lens. Read below how to make use of non-CPU legacy Nikkor lenses (AI and pre-AI) with the Df. (All photos by the author, except where noted.)

From my hands-on experience so far, as I have been researching and writing my Nikon Df Experience guide to the camera, I can assure you that it is a highly capable, well featured dSLR, with extremely high image-quality. Its low-light performance has proven to be the best of any current dSLR. But in addition to all this, it is a beautifully styled camera (though with a couple functionality sacrifices made in the name of retro-styling), and it is a truly fun camera to admire, hold in your hands, and – most importantly – to use.

Before I get into this, I would like to extend a thanks and shout-out to LensProToGo for getting the Df into my hands so quickly, and to Newtonville Camera of Newton, Mass. for the non-CPU Nikkor lenses.

For those with past experience using a film SLR, it will at once feel familiar and likely bring back a few fond memories and emotions that you haven’t encountered in a long while, after becoming accustomed to the body and controls of a dSLR for the past many years. At the same time, it may cause you to be a bit off-balance for awhile, as you need to remind yourself to reach for a dial to change the ISO setting or exposure compensation amount, or to re-accustom yourself with the concept that shutter speed can be changed with a dial if you desire.


The retro-inspired Nikon Df  in silver (right), shown with one of its design inspirations, the Nikon F2S Photomic (left) (photo by Andrew Martin).

The retro, film-style controls help to encourage a slowing down, a more careful and exacting photo-taking process. You just may feel like a street photographer with the proper tool for the job – stalking your image, looking down to manually turn some dials to adjust your settings, carefully reviewing the information in the Viewfinder, lining up the shot and autofocusing. But the controls and various menu settings also allow you to take advantage of the “fusion” aspect of the Df (as Nikon says the “f” stands for). Fusion is indeed an accurate word, and the Df nicely combines the retro-dials with the digital LCD screens, the autofocus system, and the Command Dials which can be used as you are accustomed to for controlling shutter speed and aperture – if you wish.

Nikon Df Basic Specs

As you have likely already learned, the Df has a 16 MP full-frame sensor and Expeed 3 processor (borrowed from the high end D4) and has amazing low-light capabilities. While it can go up to 204,800 ISO, it is actually usable up to perhaps 6400 ISO or higher (for JPG, depending on your needs, expectations, and output). And of course you can apply noise reduction to NEF (RAW) files and determine where you achieve the right balance of clarity and detail retention. Have a look at the DPReview lab tests for some high ISO / low light samples and comparisons.

Nikon Df unboxing use learn tips tricks hands on review dummies how to manual guide book quick start use learn setup
Nikon Df unboxing, shown with Special Edition 50mm f/1.8 kit lens.

The Df can shoot at a maximum continuous shooting speed of 5.5 frames per second, boasts the 39-point autofocus system of the D600/ D610, has a nice large 3.2″ rear LCD monitor and smaller top info panel, and a single SD card slot which shares the bottom compartment with the EN-EL14A battery. While you can work in Live View, it does not have video capability. The Df can also use – and meter – with nearly all legacy Nikkor lenses including AI and pre-AI lenses dating back to 1959, which I will discuss below.

The Df is available in either Silver and Black, or all Black.  While the Silver and Black model is the standard US model and has a more retro-look to it, the Black version is sleeker and “sexier” but more subtle, IMHO. The Silver version will probably stand out more as you carry it around, initiating more looks and comments, if that appeals to you!

Nikon Df Controls and Ergonomics

The first thing most people will notice about the Df is its retro-styling and controls, inspired by some of the older Nikon F and FM models. This includes the form, colors, and finish, as well as the top dials for adjusting ISO, Exposure Compensation, Shutter Speed, and Shooting Modes (M, A, S, P). There is also a top switch for Release Modes and a rear switch for Metering Modes. Yet it also provides the large 3.2″ rear LCD Monitor for viewing images, menus, settings, and adjusting a limited number of settings – plus the Multi Controller thumb pad for navigating the screen and for selecting an autofocus point or group of points. The Df has the now-common Autofocus switch and AF button on the front of the camera (near the lens mount) for selecting the autofocus AF Area Mode and AF Mode (in conjunction with the appropriate Command Dial). Those who have used the D7000/D7100 or D600/D610 will feel right at home with these convenient AF controls.

Nikon Df retro use learn dummies tips tricks how to hands on review manual guide recommended setting book tips tricks quick start set up use learn
Detail of Nikon Df and some of its controls.

While you can use the dials and controls to emulate a manual film camera, the controls, menu settings, and Custom Settings of the Df also allow you to set up the camera so that you can use many of the controls just as you do now with your current Nikon dSLR. By placing the Shutter Speed dial on the 1/3 STEP setting when working in M or S shooting mode, you can then simply use the rear Main Command Dial to adjust the shutter speed as you view the setting in the Viewfinder, on the rear Information Screen, or on the top LCD panel – just as you may be doing now. This may be the easiest way to use the camera, though it will eliminate the need for the old-school dial adjusting that you may prefer on this retro camera. Or if you choose, you can select a specific shutter speed setting on the dial, and then by enabling Custom Setting f11: Easy Shutter-Speed Shift you can turn the rear Main Command Dial and adjust that shutter speed setting up or down 2/3-stop in 1/3-stop increments (as you view the settings in the Viewfinder, rear Monitor, or top Control Panel) so that you have a little adjustment lee-way as you work, without having to reach up and turn the Shutter Speed dial for minor adjustments.


Detail of the Nikon F2S Photomic, one of the design inspirations for the retro-styled Nikon Df (photo by Andrew Martin).

When working in M or A shooting mode, you will use the front Sub-Command Dial to adjust the aperture setting, unless of course you are using a non-CPU lens.  In that case you will need to register the Non-CPU lens with the camera (focal length, maximum aperture, AI or non-AI), then set the camera on that lens number when it is in use. Then turn the lens aperture ring to change the settings.  With an AI lens, the AI coupling tab on the lens mount with transfer the aperture setting to the camera and you will be able to view the aperture setting in the Viewfinder or on the camera screens.  With a pre-AI lens you will need to disengage the AI tab on the camera’s lens mount (so as not to damage the camera or lens), dial in the lens number that you registered, and then manually set the aperture ring on the lens.  You will also then have to match that aperture setting of the lens onto the camera yourself, by turning the from Sub-Command Dial. But in both cases (AI and non-AI) the camera will properly meter for the attached lens as long as it is registered in the camera menus.

Nikon Df low light digital noise high ISO learn use manual guide book how to dummies tips tricks hands on review
Nikon Df – Example Image in low light, 3200 ISO – click for EXIF data and larger version on Flickr. The AF system was quickly and accurately able to lock in on the darks eyes on the dark, furry face.

If you wish to have this same manual aperture ring experience with an newer CPU lens that also has an aperture ring, you can access Custom Setting f7: Customize Command Dials and enable the nearly-hidden Aperture Ring setting which will allow you to use the lens aperture ring rather than the Sub-Command Dial to change the aperture setting.

Speaking of the front Sub-Command Dial, that is one of my few but notable complaints about the Df. Unlike other Nikon dSLR models with this front dial, the one on the Df is aligned vertically. It is small, and has a hard surface rather than the nice rubberized surface of the rear dial, and can be a bit difficult to turn. You need to press your finger into it so that it turns without your finger slipping across it, which is uncomfortable due to its hard surface. It would have been much better if it was perhaps larger, tapered differently, and certainly needs the rubberized surface for comfort and ease of use. Not to mention that the camera strap attachment is sort of in the way of where your finger needs to be when using this dial.  These are some of the few physical faults with the camera, and while they are not make-or-break, they do affect regular use.

Others have complained about the height of the Shutter-Button, though that isn’t a major complaint for me. I really didn’t notice its placement being uncomfortable much at all, but perhaps it could be with extended use or in action-shooting situations. Some of the other buttons on the the rear of the camera are very flat (which looks cool), and some are more flush with the body and are thus a bit more difficult to press than they should be. And while I’m at it, the retro-styled latch to open the bottom battery / memory compartment is cool, but not as quick and practical to actually use as a typical latch. Plus the location of the SD card in this bottom compartment is not as convenient and with most dSLRs that have the memory card door on the side. But you will quickly get used to it.

Nikon Df example image sample how to use learn manual guide review hands on tips tricks quick start set up dummies recommended setting autofocus AF
Nikon Df Example Image – click image to see larger on Flickr. (To mangle the words of Brian Wilson, “I guess the Df just WAS made for these times!”)

As far as the ergonomics other than those issues, the Df has a smaller grip than the typical dSLR, yet I found it perfectly comfortable to use, and again it often brings back the feeling of a film SLR in one’s hands. And while one may at first need to look at the top dials and change the ISO and Exposure Compensation, with a little practice this can be done without taking your eye from the Viewfinder. While one finger presses the dial release button, another can turn the dial, and you can see the current setting change in the Viewfinder.  For the ISO setting, you will need to go into the Custom Settings menu and enable d3: ISO Display in order to display the ISO in the Viewfinder rather than the remaining frames.  If you have a large enough SD card, you won’t need to be worrying about the remaining frames, so this shouldn’t be an issue.

That being said, the Df may be a difficult camera to use for action situations or a wedding or event, where one will need to quickly change the settings on the fly. While I explained how to set up the camera in order to change the shutter speed and aperture in the typical dSLR manner, it is obviously slower and more awkward to have to change the ISO and E.C. settings using the dials, even if you can begin to do it without looking.

Regarding ISO, though, you can make use of the Auto ISO feature.  As with the other current Nikon models, you will set an ISO setting, but if the situation requires, the camera will automatically adjust it in order to obtain the proper exposure.  You can even use the Auto ISO menu settings to dictate the Maximum Sensitivity (ISO) and Minimum Shutter Speed that the camera will choose. Or if you set the Minimum Shutter Speed for Auto, the camera will make this selection based on the current lens focal length (for example, a long telephoto lens will require a faster shutter speed than a wide angle lens, to help prevent camera-shake blur). And this Auto Min. Shutter Speed can even be tweaked to always be faster or slower if you don’t agree with the camera’s Auto selections.

Nikon Df multiple exposure in camera example image sample quick start how to use guide manual set up tips tricks recommend setting
Nikon Df Example Image – in-camera Multiple Exposure

You can also use some of the rear camera buttons in conjunction with the appropriate Command Dial to change various settings, such as White Balance and Image Quality. The Df offers not only NEF (RAW) and JPEG, in various levels of size and compression, but it also offers TIFF image quality. However, TIFF files will be very large, 50MB files, about twice the size of the highest quality NEF (RAW) files.

And you can customize various buttons for a variety of functions, including the Fn (Function) and Pv (Preview) Buttons on the front, and the AE-L/AF-L and AF-ON Buttons on the rear. The front buttons can be set up to quickly access an often-used feature or setting, such as temporarily changing the metering mode, turning on the Viewfinder grid or level, or also capturing a RAW image if the image quality is set for JPEG. There is the “Press” vs. “Press+Dial” customization options for these buttons (set one option for pressing the button, and another option for pressing the button and turning a Command Dial). Though you will find that many of the options conflict, and you will often only be able to set either a “Press” or a “Press+Dial” option, not both. If you will be using non-CPU lenses, you will need to set one of these buttons to the Non-CPU Lens Number item so that you can select the number of the registered non-CPU lens when in use. The top-rear buttons (AE-L/AF-L and AF-ON) along with the Shutter Button can be set up for a variety of focus-lock and exposure-lock combinations, such as for back button focusing, or to better assist you when working in AF-C continuous mode where the camera will track a moving subject as long as you keep it located at the active AF point.


The retro-inspired Nikon Df in black (right), shown with one of its design inspirations, the Nikon F3 (photo by Andrew Martin).

While the Df does not offer customizable user shooting modes such as U1 and U2 – found on the mode dial of other Nikon dSLRs – it does offer Shooting Menu Banks and Custom Settings Banks where you can set and save groups of settings.  This prevents you from having to dig into the menus and change various settings when you switch from portrait shooting to action shooting, for example.  You can set up and assign Bank A to your portrait set up, and Bank B to your action set up (or landscape, etc.), and then quickly change the camera to those Banks.  Not quite as convenient as the U1, U2 settings, but still helpful. The Banks can be quickly accessed through the Information Display screen via the i Button. The i Button and rear screen will also allow you to quickly access settings such as High ISO NR, Active D-Lighting, HDR, Picture Controls, and Long Exposure NR.

Autofocus System

I won’t go into detail here about the Df autofocus system, as you can read about it in my post about using and customizing the Nikon Autofocus System. But as with the other current Nikon dSLR cameras, it offers AF-S and AF-C autofocus modes for either single shooting (locking focus on a still subject), or for continuously tracking a moving subject (but does not have AF-A auto mode). And it offers the various AF Area Modes such as Single Point, Dynamic Area Modes (for 9, 21, or 39 points to help you retain focus on a moving subject), 3D-Tracking for following moving subjects about the frame, and Auto (all) Af points where the camera selects where to focus. But I will say that even in low light, the Df was able to quickly find and lock focus, such as with the dark, furry face of the cat in the image earlier in this post.

Unfortunately, as with the Nikon D600 / D610, the autofocus points are clustered at the central areal of the Viewfinder, and do not reach towards the edges of the frame, which may make it challenging to track moving subjects or to compose your images as desired without dramatic re-composing and re-framing after locking focus. However, you can make use of the DX Image Area setting, which will basically “crop” your images, using a smaller portion of the sensor to emulate a non-full-frame DX camera, as shown by the inner rectangle in the Viewfinder when using DX mode:

Nikon Df FX vs DX image area full frame sensor use learn manual guide book settings setup
Nikon Df simulated viewfinder, showing full FX sensor area vs. DX Image Area (inner rectangle).

When using a DX lens on the Nikon Df, you will want to set the camera to Auto DX Image Area, so as not to suffer dramatic vignetting.

If you wish to emulate a manual film camera, you can make use of the Rangefinder feature of the Df. Simply place the camera and lens on manual focus, choose the desired AF Point as you look through the Viewfinder, then locate the AF point over your subject and adjust focus until the Focus Indicator light at the bottom-left of the Viewfinder lights up. While this is not quite the same as making use of a Viewfinder focus screen while you keep your eye on your subject, it is perhaps the best way to achieve accurate manual focus.

Nikon Df sample example image how to use learn manual guide book custom setting menus setting recommend set up quick start review hands on
Nikon Df Sample Image – Instruction in Photography by Abney. Fun fact: Did you know Abney possibly has the first recorded criticism of “spray and pray” shooting, back in…1886! http://bit.ly/1cJxppp

Manual Control

As I began to explain above, there are various settings for the menus and controls of the Df which will allow you to use it similar to a manual film camera, such as setting on M shooting mode and using the Shutter Speed Dial and the lens aperture ring to adjust your exposure settings, and manually focusing. You may also then wish to turn off the Beep, use the Monochrome Picture Control or perhaps a custom Tri-X or Kodachrome Picture Control, and perhaps set a high ISO to get a bit of “grain.” You can also use Center-Weighted Metering and set Custom Setting b1: Center-Weighted Area to Avg-Average, so that the camera averages the entire scene to determine exposure, similar to an older film camera (18% grey, although it is often really 12% grey). You should put the Release Mode on Single Shooting, and perhaps cover your LCD Monitor to prevent chimping!


A custom Nikon Picture Control, to recreate the look of Kodak Tri-X film (this image taken with the Nikon D610).

There are numerous other settings, menu items, features, and functions to take advantage of, and I explain all of them in my guide Nikon Df Experience, which not only covers the features, functions, and controls of the Nikon Df, but more importantly when and why to make use of them in order to take control of your camera and your images!

If you have found this helpful and plan to purchase a Nikon Df or photo accessories (or anything else) from Amazon or from B and H, please use my affiliate links (near the upper-left side of this page) to go to those sites and then make your purchase. Your price will be the same, but they will give me a small referral fee – thanks!

Canon 70D – Hands-on Review and Field Test

I’ve been waiting until I got my hands on the latest new dSLR, so that I could coordinate a camera “field test” with a visit to an exhibit I’ve been wanting to see. The Heritage Museum and Gardens is currently showing an exhibit of concept cars, called Driving Our Dreams, which will be there until October 27, 2013. They have gathered together one of the coolest collections of American concept cars from the 1950’s to the present, ranging from the “space-age” 1956 GM Firebird II turbine powered highway rocket to the solar powered 2009 Infinium – and what better place to try out a new camera?! So thanks to LensProToGo for putting a new Canon EOS 70D into my hands, just as it was hitting the stores at the end of August!

Canon 70D EOS hands on review field test book manual guide how to settings set up 1956 Buick Centurion concept
All images in this post taken with the Canon 70D at the Heritage Museum, Sandwich, Massachusetts. 1956 Buick Centurion concept car. (Learn about the over-saturated red channel below.)

I headed out to Sandwich, Mass., the oldest town on Cape Cod, to visit the museum. I’ve been researching and writing about the 70D since it was announced a few months ago, as I work on my latest camera guide Canon 70D Experience, so I was already extremely familiar with its features and controls.

You can read all about the camera’s new features, and some tips for customizing the settings and controls of your 70D, in some of my previous Canon 70D articles. And if you wish to learn not only the features, functions, and controls of the 70D, but more importantly when and why to use them, be sure to look at my guide Canon 70D Experience. It will help you to take control of your camera, and the images you create!

Canon 70D EOS book manual guide tutorial how to tips tricks recommended settings set up dummies use quick start

Controls and Touch Screen: If you have worked with a Canon 60D, 7D, or even a 50D (or earlier), you should find that the 70D feels very familiar. It has about the same weight and feel, and while some of the controls move around from model to model, most of them are similar. I found that I quickly learned which button to instinctively press for my needs, whether the Image Playback Button, Info Button, or Q Button, etc. Even more convenient is the new Touch Screen, first seen on the Canon Rebel T4i/ EOS 650D. For those who may be skeptical about using a touch screen because of either responsiveness concerns or due to the “purity” of using a camera’s controls, the Canon 70D Touch Screen may very well change your mind. As with the screen on the T4i/650D and T5i/700D, it is as responsive as you have come to expect with an iPhone, and even uses many of the same Multi-Touch gestures – particularly when reviewing images during Image Playback (swipe for the next image, spread and pinch for zooming in and out, etc.). Even though many of the menu tabs, menu items, and function icons of the 70D are tiny, I rarely ever have any problem immediately selecting the right one. And regarding the desire to use the actual camera buttons and controls to change settings, I have quickly gotten into the habit of just pressing the Q Button to access the Quick Control Screen, then using the Touch Screen to change my settings with a few taps. After I have reviewed an image and wish to change settings, I find that it is quicker and easier to do it this way and simply leave the camera in the same position in your hands as you look at the rear screen, than it is to tilt the camera up, locate your desired settings button, press it and look at the small top LCD screen. You can change all the shooting settings on the Quick Control Screen, jump around the menus for various other settings, review all your settings on the Shooting Function Settings screen, and go back into image review all with your right thumb and left index finger, while holding the camera in the same position. Though I still use the dials and controls to change the aperture / shutter speed settings and control the autofocus points as I work through the viewfinder.

Canon 70D EOS hands on review field test book manual guide how to settings set up 1954 Buick Wildcat II concept
1954 Buick Wildcat II concept car

The top Main Dial of the 70D, while solid, has that great “soft” rubber feel to it rather than the harder plastic feel of entry-level models.  And this softer material is much easier on your fingertip after a long day of shooting. I always gripe about the inclusion of the thumb-pad Multi-Controller on the 60D and 70D, rather than the joystick version of the 7D, 50D, and 5D Mark III. I prefer the joystick because of its location, which is much closer to the other buttons on the top rear of the camera that your thumb will also be using. However, I found that after some time with the 70D I eventually got used to the thumb-pad.  While I still dislike the location, it does make it a bit easier to select an autofocus point the diagonal directions. One of the Custom Controls that I found I like is to customize the SET Button for ISO selection. While there is a dedicated ISO Button on the top of the camera, or you can easily select it on the Quick Control Screen, I find that it is also quick and easy to press the SET Button as you turn the top Main Dial to make this adjustment. As described above, it helps you to make this adjustment while keeping the camera in the same “image review” position. Plus you can quickly use this method to change the setting while your eye stays in the Viewfinder. And while you can always use the top ISO button in the same manner, it is much more difficult to determine which top button is the ISO Button without looking at it. (While it has a little bump on it to help locate it by feel, it is not a big enough difference from the other buttons for me to locate it with confidence.)

Canon 70D EOS hands on review field test book manual guide how to settings set up Corvette 1962
1962 Corvette – production model

I decided with this photo shoot to use the 70D just as I would during any normal shoot, and thus concentrate on the controls, exposure issues, and autofocus system (rather than, say, playing with the Multiple Exposure or HDR features). I had earlier experimented with some of the other functions of the camera such as Auto Lighting Optimizer, in-camera HDR, Multi-Shot Noise Reduction, Multiple Exposures, Creative Filters, etc., and those can all be learned about in Canon 70D Experience. There will also be example images of all these features in my Canon 70D Flickr set.

Lighting, Exposure, White Balance, and Noise: One of the first things I discovered is that lighting at an indoor automobile exhibit is very challenging! While they allowed the use of flash, it would not have worked out well due to all the reflections and bright spots it would cause in the car body, glass, and chrome (which of course is well represented in the 50’s cars). Perhaps indirect flash would work well, but as I was going to be taking hundreds of shots, I didn’t wish to disrupt the other visitors with constant flashes. In addition, getting the right exposure was challenging because I was often taking close-up shots of a large area of a light tone or dark tone, which would fool the exposure meter and cause it to want to under- or over-expose the image. Plus some of the cars were bare metal, which is prone to very bright reflective areas and dark non-reflective areas depending on how the lights are hitting it and the angle of view. So the exposure level reading could change dramatically from the initial framing where I locked focus to the final framing when I took the shot. I had to carefully keep an eye on how the light changed based on what area of the car I was photographing, as well as how it changed based on my angle of view as I moved slightly side to side, or crouched down low. I needed to sometimes lock the exposure settings for my final framing or for an important area (using the AE Lock * Button on the rear of the camera), and I had to check the results and the histogram, and adjust the Exposure Compensation to lighten or darken the subsequent shots (while then remembering to set EC back to 0 when I moved on to the next shot!). (If you don’t yet fully understand what this all means, I discuss locking exposure settings, the Histogram, and Exposure Compensation in detail in my Canon 70D Experience guide.)

Canon 70D EOS hands on review field test book manual guide how to settings set up Corvette 1962
1962 Corvette – production model

There was relatively low lighting in the exhibition space, but I was able to make use of ISO 1600. I primarily worked in Aperture-Priority AE Shooting Mode (Av) so that I had control of the depth of field. Sometimes the shutter speed that the camera chose dropped below a desirable 1/100 or 1/125, so I often took a quick burst of images knowing that at least one would come out sharp. In truth, I just looked over my previous ISO tests of the 70D, and there is very little loss of quality between 1600 ISO and 3200 ISO, in the JPEG images straight from the camera.  Some excessive graininess definitely appear by 6400 ISO. So I could have safely increased the ISO well above 1600, perhaps even up to 3200. But it was simply an old habit of never going above 1600, drilled into me with older cameras such as the 50D – and I should have left that prejudice aside when working with the 70D. You can view JPEG test results at the various ISO settings, in my Canon 70D ISO Flickr set.

The images shown here and on Flickr were originally shot in RAW image quality, and converted to DNG using the Adobe DNG converter. They were then processed, sharpened, and saved as JPEG. Unfortunately, I did not apply any noise reduction during processing, and the results are excessively noisy. I am going to have to go back and apply noise reduction to these images, either using Photoshop or Canon Digital Photo Professional (DPP). Below are some details of the above image, showing the difference between:

  • the original JPEG
  • the original RAW converted with Adobe DNG and processed in Photoshop and output as a JEPG, no noise reduction
  • the original RAW processed in Canon DPP with noise reduction applied and output as a JPEG.

For any pixel peepers, please note that all of the processing was done relatively quickly, so as to illustrate the overall differences. This is not intended to show definitive lab-quality results that one could achieve with much more careful, patient processing and noise reduction application. Please view the results at DPReview to see their lab-quality tests of JPEG, RAW, image quality, and noise.

Click on these image details to see larger versions:

Canon 70D EOS hands on review field test noise high ISO JPEG vs RAW book manual guide how to settings set up
Detail of original JPEG straight from camera, 1600 ISO with “High ISO Speed NR” set for Standard – very little noise seen.

Canon 70D EOS hands on review field test noise high ISO JPEG vs RAW book manual guide how to settings set up
Detail of processed RAW>DNG (processed with Photoshop)>JPEG, with no noise reduction applied, and thus excessively noisy.

Canon 70D EOS hands on review field test noise high ISO JPEG vs RAW book manual guide how to settings set up
Detail of processed RAW (processed with Canon DPP)>JPEG with noise reduction applied, very little noise seen.

So the lesson of the above examples is that you can confidently shoot in JPEG, up to 1600 and even higher, and achieve clean, low-noise results. You can make use of the 70D in-camera High ISO Speed NR option to assist with this, setting it for Standard or High. View the tests on DPReview to see how high you are willing to raise the ISO before the noise is too much for your tastes or image-output needs. And, if you shoot in RAW, you are going to need to apply noise reduction (and contrast, sharpening, etc. as always) as you process the images, especially when you are shooting in high ISO settings (800, 1600, and higher). Apply noise reduction in Adobe Camera Raw, Photoshop, Lightroom, Aperture, Canon DPP, etc.

Regarding White Balance, I learned that I should not have forgotten to bring my digital grey card for creating some benchmark images or even for setting a Custom White Balance. Though my post-processing experiments, I discovered that the White Balance color temperature of the exhibit space was very close to the Incandescent setting, but it would have been helpful, and would have saved time, if I had simply taken a couple images with the grey card in the scene. The lighting also varied throughout the space, as some areas had a bit of daylight from large windows. With images like these, I feel it is very important to closely match the actual colors of the cars, as they are documentary images of sorts. While the artificial lighting of an exhibition space vs. natural lighting outside would make these cars, (and images of these cars) appear differently, I wanted to match as closely as possible what I saw. If you wish to create a Custom White Balance with the 70D, you can take an image of a white object or grey card, filling a large central area of the Viewfinder with the card (about the size of the AF Points diamond), then go into the Shooting 3 menu and select the Custom White Balance menu item. It will ask you to select the image of the grey card you just took. When that is set, simply set your White Balance setting to the Custom WB icon, by pressing the Q Button and using the Quick Control Screen.

Canon 70D EOS hands on review field test book manual guide how to settings set up 1956 Buick Centurion concept
1956 Buick Centurion concept car

As is common with many dSLR sensors, the red channel can have a tendency to be sensitive to over-saturation. I experienced this as well with the 70D, though as you can see in the above image there was a large expanse of brightly lit red. In this and other images of the red and white Buick Centurion, some of the brightest areas of red become over-saturated and lose all detail, variation, or shadow, and are simply “pure” red. This is most easily seen in the first image at the top of this post, where there is a large area of lighter red on the top of the rear fender, where all subtle detail of varying color tones and shadow gradation is lost. If you are only watching the Brightness Histogram you may not pick this up, as the overall image – according to the camera – is not over-exposed. In order to keep your eye on this as you work, you can make use of the RGB Histogram. As shown below, the red channel is cut off at the right edge of the graph, and thus all detail will be lost in those areas of the image where this occurs. The sensor has simply reached its limits of what it can capture. If you experience this, you can adjust the lighting and perhaps make use of reflectors or diffusers, or move the subject, or alter your angle of view. In a situation where you can’t control these elements, you will need to adjust the exposure (under expose) before retaking the image, then check the RGB Histogram to make sure the color channels are not cut off at the right side of the graph.  Then carefully work with the image in post-processing to “bring back” or raise the overall exposure while trying to keep the problematic color channel from becoming over-saturated.

Canon 70D RGB Histogram learn use how to book guide manual dummies
Canon 70D RGB and Brightness Histogram, showing that areas of red have been over-saturated.

Aperture-Priority, Lenses, Autofocusing: As I mentioned above, I primarily worked in Aperture-Priority AE Shooting Mode, where I controlled the aperture setting while the camera chose the appropriate shutter speed. This allowed me to control the depth of field of the images, since I was primarily aiming to achieve very shallow, dramatic depth of field in the detail images, as shown in the tail-fin image below:

Canon 70D EOS hands on review field test book manual guide how to settings set up aperture depth of field 1954 Buick Wildcat II concept car
1954 Buick Wildcat II concept car

By working with a Canon 70-200mm F/4L IS lens, I set the lens at or near the 200mm focal length, backed up several yards, and then focused on my area of interest while setting the aperture at f/4. This results in very shallow depth of field and calls attention to the area of detail.  For the images showing a larger area of the cars, I used either the 16-35mm f/2.8L wide angle lens or the Canon 24-70mm f/2.8L, with the aperture set around f/2.8 or f/4.

I primarily autofocused using One-Shot AF Focus Mode and Single-Point AF Autofocus Area Selection Mode. One-Shot AF is used for still (or relatively still) subjects. As with the Canon 7D, the 70D has an Autofocus Area Selection Button on the top of the camera near the Shutter Button, which allows you to choose between these modes as you look through the Viewfinder (Single-Point AF, Zone AF, or 19-Point Automatic Selection AF), and these modes determine how many AF Points are being used to try to find the subject to focus on. With Single Point AF, I am able to manually select my desired AF Point using the Multi-Controller as I look through the Viewfinder, place it over the exact area where I wish to focus, and then lock focus with a half-press of the Shutter Button or by pressing the rear AF-ON Button. I can then recompose the shot to get the framing I desire, and press the Shutter Button to take the shot. While the 70D has 19 AF Points to choose from, it is relatively quick and easy to select the one you wish. You can even customize the camera so that if you are selecting one of the edge points, you can choose to stop at the edge or “wrap-around” to the AF Point on the other side if you continue to click the Multi-Controller.  I always choose to have it stop at the edge.  That way if I am choosing an “edge” point, I can simply quickly “click, click, click” on the left Multi-Controller, and I know it will stop at the far left AF Point and not “wrap-around” to an AF Point on the other side of the frame.

As you may be aware, the Canon 70D has a brand new, potentially revolutionary Live View / Movie autofocus system. It is a phase-detection AF system called Dual Pixel CMOS AF, which can quickly and smoothly grab focus, and can also be used to very effectively track a moving subject.  Based on my tests and on many test videos found on the Internet, the system is living up to the hype and performs as well as promised. Previously, Live View focus was slow, and the camera often hunted for the subject.  With this new system, it achieves focus on the subject extremely quickly an accurately. I made use of both the rotating rear LCD screen of the 70D and the Live View AF system to take some shots looking down from the first level onto the lower level, as seen in this image:

Canon 70D EOS hands on review field test book manual guide how to settings set up 1956 GM Firebird II concept
1956 GM Firebird II concept car

I held the camera out at arms length, rotated the rear screen so that I could see it, and pressed the AF-ON Button to lock focus. Even in the low lighting, the camera immediately focused. With the Live View autofocusing system you can also select from different autofocusing methods that determine how large an area the camera looks at to find a subject. Again I used the smallest, most precise area, called FlexiZone-Single AF, which provides a small focus square that you can move around the screen and locate where you wish, either using the Multi-Controller or the Touch Screen.

Creative Filters:  In spite of what I said earlier, I did play around with the in-camera Creative Filters and applied them to some of these images. I used the the Art Bold Effect, which affects contrast and saturation, on an image of the Buick Centurion.  By setting it on the High setting, I totally blew out the red (over-exposed), but is also made the interior glow nicely and has a cool effect on the chrome. And I used the Fish-eye Effect on the Buick Wildcat II, which works well if you get in close while having receding lines, as I found at the corner of this bumper.

Canon 70D in camera creative filter art bold
Canon 70D In-camera Creative Filter – Art Bold Effect – High.

Canon 70D eos Creative Filter Fish-eye fisheye effect
Canon 70D In-camera Creative Filter – Fish-eye Effect – Low.

Conclusion: After spending a dedicated week with the Canon 70D, exploring every menu item and experimenting with every function and feature, I have grown tremendously fond of this camera. Part of this is the familiarity I feel from working so long with the 50D and the 7D. But it is also due to some of its new features, which would make going back to either of those cameras extremely difficult. The first is the Touch Screen, which is an extremely quick, easy, and convenient way to change settings on the fly, access menus, and review images. Second is the new Live View autofocus system, which works as well as promised. It mot only makes Live View shooting much less frustrating and much more viable for all kinds of shooting situations, but it also makes autofocusing during movie shooting a reality. In addition, you can now use the Touch Screen to immediately change the area of focus, while movie shooting, simply by touching the screen. And finally, there are some of the smaller features, but these little additions can make a big difference. For example, during image playback you can access the Playback Quick Control screen and quickly set an image Rating. When this first appeared on the 5DIII and Rebels, I thought it might be a bit frivolous. But I have come to make very effective use of it, and will miss it on other dSLRs that don’t have this feature.  It allows you to go through your images and the camera and quickly mark (rate) the best ones, as well as mark the bad ones (with one star) that you will likely be able to quickly delete after viewing them on your computer. It is a simple feature that can provide significant time savings in a busy workflow.

Another simple feature that I discovered I made use of more than expected is the electronic level in the viewfinder. Unlike previous cameras where you can use the AF Points, as seen in the Viewfinder, as a level, the 70D includes a small “level” icon at the bottom of the Viewfinder screen.  (You can also make use of the AF Points as a level, which is sort of a hidden feature I will explain in a moment.) This level icon is simply a camera icon surrounded by either straight or diagonal lines, which indicate if you are on or off level. Or if both the straight and diagonal lines are displayed, you are almost level. I have long had a tendency to hold the camera slightly off-level, so I always appreciate the Viewfinder grid, which can be enabled in the 70D. But this level icon helped even more to keep my images straight. I found that I could compose the image, take care of locking focus and exposure if necessary, and then take a peek at the level icon before pressing the Shutter Button to take the shot.  More often than not, it indicated I was slightly off, so I carefully leveled the camera and took the shot. Again, such a simple feature helped a great deal – by keeping my images straight and level, which eliminated the need to straighten (and thus slightly crop) numerous photos later in Photoshop.

Regarding the “hidden” Viewfinder level that uses the AF Points, you can use the Custom Controls to set the Depth of Field Preview Button to the Electronic Level option. You can then press this DOF Preview Button during shooting and activate a level that uses the AF Points in the Viewfinder to indicate if the camera is level or not. Press the Shutter Button to turn it off and return to shooting.  You can learn about several other Custom Controls and Custom Function settings in my post on the 70D Custom Controls.

Canon 70D EOS hands on review field test book manual guide how to settings set up 1956 Buick Centurion concept
1956 Buick Centurion concept car

Regarding image quality, while I failed to properly apply noise reduction to the RAW images used here as I processed them, my subsequent tests and inspections have confirmed that you can work in high ISO settings (approaching 3200) and achieve a low, acceptable amount of noise with JPEG images straight out of the camera, and with RAW images with noise reduction applied in post processing. This has been confirmed with test images on DPReview and other sites.

Additional concept cars and more images from this visit to the Heritage Museum can be seen on Flickr here.

Remember to check out my other Canon 70D blog posts to find out more about the camera. And if you wish to take control of your Canon 70D, and learn how, when, and why to use its controls, features, and settings, be sure to check out my e-book guide, Canon 70D Experience.

If you are planning to purchase your Canon 70D online, please consider using my affiliate links and help support this blog – thanks!

Order your Canon EOS 70D from Amazon or B and H Photo:

Amazon:

Canon 70D – Body or with choice of kit lenses – $1,199 to $1,549

B and H Photo:

Canon 70D – Body only – $1,199

Canon 70D – with 18-135mm STM lens – $1,549

Canon 70D – with 18-55mm STM lens – $1,349

~ ~ ~

Was this post helpful?  Please let others know about it by clicking the Facebook or Twitter sharing buttons below, linking to it from your blog or website, or mentioning it on a forum.  Thanks!  Want to help support this blog with no cost or effort?  Simply click on the AmazonB&H Photo, or Adorama logos on the left side of this page to go to those sites and make your purchases.  They will then give me a little referral bonus!

Canon 70D Unboxing and Hands-On Preview Images

The Canon 70D is hitting the stores today, and I was able to get my first hands-on experience with an actual production model.  As with most all of my posts, I will leave the “pixel peeping” to the other sites that do in-depth lab tests of image quality, noise, AF responsiveness, etc., and instead I will present some images and briefly offer some notes on the user experience. While numerous pre-production models of the EOS 70D have been on the loose (for reviewers, etc.) over the past few weeks, it does not appear that there are any major differences with the final, retail version (although the retail version is Firmware 1.1.1, so some menu bugs were likely fixed). Note that larger versions of all these images can be inspected on Flickr here.

Canon 70D  unbox unboxing book manual guide tutorial hands on tips tricks
Canon 70D Unboxing, at Newtonville Camera in Newton, Mass. (It was a body only kit, so I threw on the closest 18-135mm lens).

I’ve gotten to know the 70D very well over the past several weeks as I’ve been working on my latest Full Stop camera guide, Canon 70D Experience. This user’s guide goes beyond the manual to explain not only the functions, controls, and menus, but more importantly when and why to use them. Learn more about Canon 70D Experience at my Full Stop website here.

The Canon EOS 70D is the long-awaited upgrade to the EOS 60D. While the xxD line of Canon mid-level dSLR cameras has typically been updated every one-and-a-half years in the past, the 60D has been out for a full three years without an update! This hasn’t been a huge issue, as the 60D was very well-featured and has maintained its popularity, but none-the-less there are some welcomed improvements. I have recently written all about the camera’s specs, features, and new additions in this previous post Introducing the Canon EOS 70D, which you may wish to read first to learn about the camera’s specs, features, and improvements.

Canon 70D image quality detail sample focus autofocus hands on tips tricks
Canon 70D sample image – JPEG straight from camera. See enlarged detail below.

Canon 70D image quality detail sample focus autofocus hands on tips tricks
Canon 70D sample image – JPEG straight from camera. Enlarged detail of above image. If added sharpening is applied, the details will become even crisper.

Canon 70D image quality detail sample focus autofocus hands on tips tricks processed post-process, picture style
Canon 70D sample image – Processed version of above JPEG image.

In actual use, the 70D feels and functions great, as expected, both with a typical 18-135mm kit lens and with a bigger, heavier 24-70mm f/2.8L lens. The surface materials feel great, the camera is solid, the menus are well organized, and the controls are responsive and (for the most part) well-placed. There are a few changes in the controls from the 60D, including the relocation of a few buttons, the addition of the much more convenient Live View/ Movie Switch and button, and of course the addition of the top AF Area Selection Button to allow you to quickly change the AF Area Selection Mode (Single Point AF, Zone AF, 19-Point Automatic Selection). However, it is the addition of the Touch Screen that has the potential to make a significant difference in how you access the menus and settings. While you can still quickly change various settings using the buttons and dials on the camera body, you may soon find it is often easier to hit the [Q] Button or [Q] icon and access the settings and navigate the menus via the Quick Control Screen, using touch. The screen not only uses the multi-touch gestures that you are familiar with from your smart-phone or tablet, it is also an extremely responsive touch screen (which can even be set for more responsiveness if desired). The small menu tabs and options are easy to accurately tap, numerous settings can be changed directly from the shooting Quick Control Screen with taps and swipes, Live View and Movie autofocusing can be accomplished by touching the desired area of the screen (even during filming!), image playback can be done with multi-touch gestures just as on an iPhone, and image processing can be accomplished by making selections directly on the Playback Quick Control Screen.

Canon 70D image quality detail sample focus autofocus hands on tips tricks
Canon 70D sample image – JPEG straight from camera. See enlarged detail below.

Canon 70D image quality detail sample focus autofocus hands on tips tricks
Canon 70D sample image – JPEG straight from camera. Enlarged detail of above image. If added sharpening is applied, the details will become even crisper.

My one predicted gripe that I mentioned in the previous 70D post is indeed true – I’m a much bigger fan of the thumb-joystick Multi-Controller on the 7D and 5DIII rather than the Multi-Controller touch pad of the 60D and 70D. I find the joystick better positioned for selecting an AF Point while working through the viewfinder. Not to mention that you have to be careful when navigating menus with the 70D Multi-Controller thumb-pad and surrounding Quick Control Dial, as your finger may easily touch one or the other during an operation, and you may suddenly jump away from the menu item or settings option you were attempting to set.

What the manual fails to mention is that there are often several controls options that can be used to navigate menus, Quick Control Screens, and settings options. While the manual may tell you, for example, to press left and right on the Multi-Controller, often you can also use the top Main Dial and / or rear Quick Control Dial to accomplish the same thing. While there are some settings that require the use of one of these specific controls, you will find that with many other settings they can be used interchangeably. So be sure to try out the various options and use the controls that work most intuitively for you. There is also a nearly-hidden feature of the 70D that you may not pick up in the manual. There is a new Level icon in the Viewfinder that you can enable and then use with the camera in either the horizontal (landscape) or vertical (portrait) orientation, which you will likely come across. But what you may not realize is that you can use the Custom Controls to set the Depth of Field Button to enable a Level also – however, this level makes use of the autofocus points in the viewfinder rather than the Level icon. (There is also the Level on the rear LCD Monitor that can be viewed by pressing the INFO Button a couple times.)

Regarding some of the other customizations you can make to the camera’s controls, I’ve written a post called Tips and Tricks for the 70D about taking advantage of the camera’s Custom Controls. These will allow you to better set up the camera for your needs and shooting style.

Canon 70D image quality detail sample focus autofocus hands on tips tricks
Canon 70D sample image – JPEG straight from camera.

As with most current dSLR cameras, the 70D has a few menu settings “quirks” or conflicts that may drive you crazy if you are not aware why they are occurring. Most notably, some settings will be inaccessible or greyed-out in the menus, and you will not be able to select them if a “conflicting” setting is enabled. These are actually not arbitrary quirks, but are typically due to logical conflicts or camera limitations. Examples include certain functions like Multi-Shot Noise Reduction, Handheld Night Scene, HDR Backlight Control, or Live View Creative Filters, which are not accessible when the camera is set to capture files in the RAW or RAW+JPEG image format. You must then set the Image Quality to one of the JPEG-only settings. The use of Auto Exposure Bracketing, White Balance Bracketing, or Long Exposure Noise Reduction will also conflict with other settings including Multi-Shot Noise Reduction or the use of the Creative Filters. Similarly, the use of Auto Exposure Bracketing, White Balance Bracketing, Multi-Shot Noise Reduction, or Multiple Exposure will conflict with using the built-in HDR function. And Multiple Exposure cannot be set if White Balance Bracketing, Multi-Shot Noise Reduction, or HDR is set, or if Wi-Fi is enabled. In addition, Wi-Fi must be disabled in order to shoot a video.

While it is obviously not realistic for you to remember all of these conflicts, you can begin to see a pattern in the examples above. If you do encounter an inaccessible menu item, remember to check your Image Quality setting (RAW vs. JPEG), that Wi-Fi is disabled, and then make sure any of the above mentioned functions are disabled, as many of the same ones simply conflict with each other.

The 70D now offers a 3x-10x movie Digital Zoom feature, which will allow you to digitally extend the range of your lens and thus get closer to the action. However, when you enable this the framing will automatically jump to the 3X zoom. You can then use the controls or touch screen to zoom-in further. But it is important to remember that Movie Servo AF (automatic continuous focus) will not function when Digital Zoom is in use. And the camera will not make use of the advanced Dual Pixel CMOS AF phase-detection autofocusing during Digital Zoom, but rather will use the slower contrast-detection autofocusing. Also, for movie shooting, if you activate manual control of the audio level, you can adjust the level directly from the rear LCD screen via the [Q] Button or icon and then by pressing or selecting the Audio Level icon. This is an improvement over other recent models which required you to go into the menu to manually adjust the audio level.

Canon 70D  unbox unboxing book manual guide tutorial hands on tips tricks
Canon 70D Unboxing, at Newtonville Camera in Newton, Mass.

To learn more about using your Canon 70D and how to take full advantage of all its features, functions and controls – including back-button focusing, plus taking control of the autofocus system, making use of the various metering modes, and understanding the elements of exposure – have a look at my e-book guide called Canon 70D Experience. As with all my dSLR guides, Canon 70D Experience will help you to learn not only how but more importantly when and why to use the features, functions, and controls of the 70D. Learn more about the guide on my Full Stop website here.

PURCHASING: And if you are planning to purchase your Canon 70D online, please consider using my affiliate links and help support this blog – thanks!

Order your Canon EOS 70D from Amazon or B and H Photo:

Amazon:

Canon 70D – Body or with choice of kit lenses – $1,199 to $1,549

B and H Photo:

Canon 70D – Body only – $1,199

Canon 70D – with 18-135mm STM lens – $1,549

Canon 70D – with 18-55mm STM lens – $1,349

Hands On Review of the Nikon D5200 for dSLR Video

I was recently conversing with one of my readers – a Nikon D5200 user who was putting the camera through its paces for professional-level video shooting. He has given the camera a thorough field test, so I asked him to put together a review and a tutorial of the camera in regards to its video performance. So for today’s guest post, I introduce:

by Steve MacDonald of 5dhdvideo
I have recently put the Nikon D5200 through its video capability paces, in a couple of different shooting scenarios.  Scenario one was a bright sunny outdoor situation with mixtures of heavy sunlight and shaded areas, and the second was an indoor, controlled lighting situation.

Scenario one was tested with a Nikon 17-55mm f2.8 making use of a Schneider 4×4 polarizer and Schneider 4×4 1.6 graduated ND filters. Mind you, these are probably the harshest video acquisition lighting conditions.

Nikon D5200 video dslr manual movie mode
Still from dSLR video taken with the Nikon D5200, by Steve MacDonald

One of the biggest challenges of shooting with any dSLR camera is setting critical focus. One camera feature that can help is a really decent LCD screen. I found the Nikon D5200 screen to be less the stellar, but I suppose that is to be expected from a mid-level consumer camera. Using a Hoodman loupe on the back of this unit, at first, I thought the inability to see a somewhat sharp image was the kit lens. But even with a very expensive Nikon 17-55mm f2.8 zoom lens, manually achieving critical focus was challenging. Using the cameras focus assist the image never really seemed all that sharp, so it’s was a guessing game of finding what would be the sharpest focus point. I quickly abandoned using the LCD for critical focusing and used the cameras viewfinder with a right-angle viewer by Seagull. This worked much better, but it’s something I’m not used to, having come from shooting with many Canon DSLR models.

I decided to give auto-focusing a try, since, a lot of my shots that day were stationary subjects – and that feature seemed to be dead on. The only downside to using this is that in certain lighting situation, the Nikon will throw a beam of light from the AF-Assist Illuminator. Not a big deal, untill you realize the AF-Assist Illuminator is eating into your battery faster than you can imagine.  (Note – you can turn off the Built-in AF-Assist Illuminator using Custom Setting a3.) The battery life of the EN EL14 has already been documented as being less than adequate, which I can confirm.

Nikon D5200 video dslr manual movie mode
Still from dSLR video taken with the Nikon D5200, by Steve MacDonald

Another quirk I found with this Nikon is discrepancies between metering in the viewfinder then switching back to live view. Many times after setting a dead zero meter in the viewfinder and not moving anything, switching back to live view, could at times , show an almost full stop difference. Switching metering methods didn’t seem to change the situation.

We’re all familiar with the nagging Nikon situation of having to come out of live view to change aperture settings, which is indeed a pain, but what I didn’t realize is if you keep the camera pointed at your subject, it will meter that subject in live view. This brings me to the subject of trying to run and gun with this camera: in two words, very difficult. The reason being is having to come out of live view to change the aperture, making a moving subject next to impossible to keep properly exposed. The way around this is to buy manual lenses with the aperture on the barrel and not controlled by the camera. Or, one would think that is a viable work around – not so. Nikon has further limited video functions on this camera by not offering any metering with a manual lens attached, which in my opinion renders this camera far less than ideal from a professional video acquisition standpoint. (Note: the Nikon D7100 and D7000 offers the ability to register non-CPU lenses in the camera, thus allowing access to additional functions including color-matrix metering – though they suggest you make use of Center-Weighted or Spot Metering in these situations.  The D7100 and D7000 also offer the ability to assign aperture selection to the aperture ring on lenses which have this ring, thus allowing aperture change while shooting video.)

Nikon D5200 video dslr manual movie mode
Still from dSLR video taken with the Nikon D5200, by Steve MacDonald

It goes without saying, for professional use an EVF (electronic viewfinder / monitor), such as the SmallHD DP4 EVF, is pretty much a must with any DSLR. False color, peaking, and many other features they offer make for a better user experience.  Sure, you could rely on an EVF to set proper exposure levels with a manual lens attached to the D5200, but you’re going to pay a grand for a good one.

The indoor shooting scenario was a two camera interview situation, with the other camera being a Canon T3i. One feature I really liked was Nikon’s ability to tweak the White Balance presets in movie mode, in order to dial in a match between the two cameras. The picture quality of the Nikon looks very good, and the ability to output a clean HDMI will no doubt attract many. Shooting the indoor scenario was much easier, although none of the issues mentioned above disappeared.

At the end of the day, my take on this camera is that it just isn’t full equipped for demanding or professional-level videography. It takes fantastic still images, since as with any of these dSLRs, that is their main function. While its video capabilities and performance may fulfill the needs of a casual video user, there are just too many roadblocks with this camera to make it a sensible choice when it comes to professional video work. One should instead consider the additional video capabilities of the D7000 or D7100, which both improve upon some of these video shortcomings of the D5200.

Nikon D5200 video dslr manual movie mode
Still from dSLR video taken with the Nikon D5200, by Steve MacDonald

Manual exposure and white balance for the videographer with the Nikon D5200

Although the Nikon D5200 has the quirk of having to come out of live view to change aperture, and the fact it won’t meter a manual lens, this section of the article focuses on methods to help you gain proper exposure for shooting video.

Recently, I purchased two Rokinon Cine Lenses for the D5200, knowing full well the camera would not meter these lenses. If you don’t know what that means, basically, the built in light meter of the D5200 will not give you a reading with these lenses or any manual lens. My main reasons for buying these manual lenses was to avoid having to come out of live view to change the aperture, not to mention, for the price, these are great prime lenses!

So my quest after buying these Rokinon’s was to find a way to get a proper exposure, without having to resort to buying a light meter. Don’t get me wrong, having a light meter is well worth having,  but I just spent a chunk on these lenses, so that’ll have to wait. What I did buy was a Photovision one-shot target.  Targets are used to set 18% gray level, but with this particular target, it also has a white and black section outside the middle gray, so in essence, it sets your highlight and black level as well. The target works by first lighting your scene, then setting the target in front of that scene and taking a photo of the target.  You’ll want to make sure the white side of the target is towards the key light of your scene, and that the entire target is filling your screen with the white, gray, and black columns in sharp focus.  You’ll also want to make sure your shutter speed and ISO are set for your video shoot at hand. Next, set your D5200 play back display options by accessing the menu, highlighting the display icon, top icon on the left, then making sure all those options have a check mark beside them. Now, hit your playback button and bring up that photo of the target.

By clicking on the bottom portion of the multi-selector you can scroll through the various information provided for that particular photo. What you’re looking for is the histogram display. This histogram display will show you three distinct spikes. The left most spike being the black level, the middle gray, and the far right spike is your highlight. It’s this highlight we want to set so that it’s not clipping.  Clipping would have the far right spike at or very near the far right side of the histogram. Now, by adjusting your f-stop (aperture setting) for subtle changes in exposure, and taking a photo of the target after each f-stop adjustment, you’ll be able to view that photo in playback and determine if that exposure gives you the proper histogram.

After determining which histogram suits your best exposure, you’ll want to set that target photo as a custom white balance within your D5200.  Note: although by default the camera sets the last photo you’ve taken as your white balance, I choose to select the photo just to make sure its definitely the right one. You’ve now not only set a proper white balance, but you’ve also set an exposure level. One thing to keep in mind is that you need to light your scene for proper levels because the target has no idea how light or dark your subject is, it only reflects what lights you’ve set up for a particular scene.

Now, with all that being said, this target wouldn’t work in a run and gun situation, it would just take way to much time. For these types of situations, you can still utilize the histogram feature of the D5200 to get a proper exposure. To do that, set your f-stop (aperture), take a photo of your scene, review that photo and look at your histogram. If the highlights are slammed against the right side, lower your f-stop (aperture), take another photo and review it’s histogram reading.  The advantage of using the histogram in this manner, is that you’ll soon recognize what’s over exposed just by viewing it in the LCD, because you’ve been in these situations enough times and have looked at enough histograms to know what’s over exposed just from viewing your scene from the LCD.Utilizing the one-shot target, as well as, learning to read your histograms will give you a big advantage in gaining proper exposures with your Nikon D5200.

Nikon D7100 Hands On Review

I’ve had some hands-on time with the new Nikon D7100 as I research and write my latest camera guide Nikon D7100 Experience, and just as with the recently introduced Nikon D600 this new model does not disappoint. In fact, much of what I’ve said about the D600 will apply to the D7100, as in many ways the D7100 is basically a D600 but with a DX sensor (rather than the full frame FX sensor of the D600). Of course there are some important differences (in addition to the image sensor size) such as the 51 point autofocus system and slightly faster 6 frames per second shooting speed of the D7100, but the feel, performance, features, menu system, and Custom Settings of the two cameras are quite similar.

Nikon D7100 unbox unboxing hands on review preview book ebook learn manual use dummies field guide tutorial instruction setup tip recommend
The Nikon D7100 Unboxing – shown here with a Nikon 18-200mm f/3.5-5.6 lens attached, not the 18-105mm f/3.5-5.6 kit lens.

The D7100 is a worthwhile and timely upgrade to the popular and well-respected D7000. The new model boasts an improved 24.1 megapixel DX format image sensor (vs. 16MP of the D7000), a sophisticated 51 point autofocus system with 15 centrally positioned cross-type points (vs. the older 39 point system with 9 cross-type points), the rapid 6 (or even 7) frames per second continuous shooting speed, and a larger and higher resolution 3.2″ rear LCD screen. All of these features make it particularly well-equipped for action and movement situations including sports, wildlife, and bird photography.

With this new image sensor, Nikon has done away with the optical low pass filter – a choice which promises to deliver higher image resolution (though at the risk of increased moiré when capturing fine pattern details). And its high ISO capability will result in decreased digital noise in low-light situations. The new, optional 1.3x crop mode of the D7100 will allow you to use a 15 megapixel portion of the sensor to “extend” the reach of your telephoto lenses in order to get closer to the action as well as fill the active frame with the 51 Focus Points – in order to more accurately track moving subjects across nearly the full width of the frame. And the continuous shooting speed even increases from 6 frames per second (fps) to 7 fps when working in this 1.3x crop mode. Plus when capturing video using the 1.3x crop Image Area, you can choose from the additional 1080 frame size at 60i or 50i frame rates.

Nikon D7100 autofocus viewfinder 1.3x crop af autofocus points
Simulated view of the Nikon D7100 viewfinder, showing the location of the 51 autofocus points, the optional grid, and the area of the 1.3x crop mode.

As with its predecessor, the Nikon D7100 is aimed at intermediate and dedicated enthusiast photographers (and dSLR beginners willing to learn!), not only with its price and build, but also with its features and accessible controls and menus. It is obviously not quite as fully-featured as the professional-level D800 or D4, yet it contains nearly every feature that the majority of “non-pro” or even semi-pro photographers will need. And its low light performance and image quality can certainly deliver professional results in most every shooting situation.

As the author of dSLR user guides, my primary interest when reviewing a camera is more with the controls, features, functions, and “real world” use – as opposed to the image quality/ sensor issues (resolution, dynamic range, noise, etc.), which I leave up to DP Review, DXOMark, and other sites to examine in depth. Although I will discuss and give examples of some of these factors in this post, I direct you these other sites to view samples/ comparison images and read detailed discussions of sensor and image quality results.

Body: Weight and Size: The D7100 is nearly identical in size and weight (765 g / 1.7 lb w/ battery) to the D7000. It is of course bigger and heavier than the mid-level D5200, but is an excellent size for the serious shooter – and pairs excellently with a wide range of lenses from a 50mm f/1.4 prime to the hefty 70-200mm f/2.8.

Body: Controls and Feel: The controls of the D7100 are very similar to the D7000, and even more similar to the D600. If you have not yet used either of those previous cameras you may be initially confused by the autofocus controls at the base of the lens, including the AF-Mode Button and the Focus-Mode Selector Switch. However, once learned you will quickly discover that they are a convenient, well thought-out set of controls for rapidly accessing and changing the various autofocus settings – even without taking your eye from the Viewfinder.

Nikon D7100 autofocus mode area af control button switch body button learn use setup tip recomment focusing focus
Detail of the front controls of the Nikon D7100, including the autofocus mode and area mode controls at the base of the lens.

Compared to the D7000, the D7100 adds an i Button to the rear of the camera, which is used to quickly access a variety of settings and options – which will vary based on if you are shooting stills, reviewing images, working in Live View, or in movie shooting. During shooting it allows you to access the Information Display screen where you can change a number of settings that you otherwise would have had to dig into the menus to find. This is similar during Live View and movie shooting, but accesses settings appropriate to those modes.  During image playback, the i Button quickly brings up the Retouch Menu for editing and processing image files.

The placement of the zoom-in and zoom-out buttons on the rear of the D7100 has been swapped compared to the D7000, which may drive you crazy until your muscle memory is retrained.  But the new rear Live View / Movie switch, the relocation of the video record button to the top of the camera near the Shutter Button, and the locking Mode Dial are welcome conveniences (which I prefer as there have been many times my Mode Dial was accidentally turned when pulling the camera out of its bag). Other than that, D7000 users should feel right at home with the controls such as the Release Mode Dial for selecting the frame rate and the Playback and Delete Buttons. And the consistency of layout between the D7100 and the D600 is a welcome move from Nikon – which hopefully continues into future models. The Multi Controller thumb-pad is responsive and precise, which is necessary when using it to select among the 51 autofocus points or to quickly navigate and change a menu settings. And the rubberized feel of the Command Dials is much nicer to the touch than the plastic feel of lower-end models.

Nikon D7100 body buttons controls dials use learn review hands on preview book ebook guide manual dummies
Some of the top and rear controls of the Nikon D7100, including the Release Mode and locking Shooting Mode Dials, and new i Button.

A few of the buttons along the left side of the camera perform additional functions when pressed and used in conjunction with the Command Dials.  These are handy to learn and use so that you can quickly change these settings on the fly, though you will likely need to glance at the buttons to recall which function it performs. (And I would prefer that the WB, QUAL, and ISO text be a bit closer and adjacent to the appropriate button, as you can see one needs to often take a second look to see of ISO applies to the button below or above.) So, for example, the QUAL Button is pressed as the rear Main Command Dial is turned to select the Image Quality (JPEG / RAW), and it is press as the front Sub-Command Dial is turned to select the JPEG Image Size (S, M, L).

In addition to the previous customization options for the controls as found on the D7000 and D600, the D7100 offers even more custom controls. For example during image playback, the OK Button can be set up to instantly zoom in on the image at the area of focus, and you can even set the magnification level for high, medium, or low. You can set the OK Button to perform other functions during shooting and Live View, though I recommend that it be used to quickly select the center AF Point. The Fn Button and Depth of Field Preview Button can be customized to perform different functions when just pressed and when pressed and used with a Command Dial.  For example, you can set one of these buttons for quick, temporary access to Spot Metering Mode or to display the Virtual Horizon in the Viewfinder. Or you can press the button as you turn the Command Dials to quickly change to 1.3x crop Image Area Mode or to activate HDR shooting and set the HDR Mode with one dial and HDR Strength with the other.  Unfortunately, there are a lot of conflicts between the just Press and the Press+Dial settings which allow you to actually use only one of the options, so you will likely only be able to set each button for one function. I suggest setting the AE-L/AF-L Button to lock focus, the Fn Button to lock exposure, and the DOF Preview button to the function of your choice.

Nikon D7100 menu Function Fn Button customize assign
Example of one of the button customization options – assigning the Fn Button for use with a Command Dial.

The new Live View Selector switch is used to quickly choose between Live View and movie shooting, then the central LV Button is pressed to enter that mode. Again, the Movie-Record Button is now on the top near the Shutter Button.

I found the Shutter Button to be less sensitive than that of the D7100, which is a welcome change, as I often accidentally took a picture when simply trying to lock focus with the D7000 – though this change could simply indicate that I have gotten used to controlling the more sensitive button.

Overall, the body size, weight, and materials feel great and solid, and all the necessary and desired buttons and controls are in the right places. As with the D600, this results in a camera that I find a joy to use with the easy ability to access a wide variety of settings and functions.

Brief Commercial Interruption: I have written an e-book guide to the Nikon D7100, called Nikon D7100 Experience. The guide covers all the controls, functions, features, Menus options and Custom Settings (with recommended settings), autofocus system, exposure, metering, and more. Plus most importantly, it explains how, when, and why to use the various controls, features, and functions of the D7100. Click the link above or the cover to learn more, preview, and purchase the guide (available early April 2013).

Nikon D7100 book manual ebook field guide dummies how to use learn instruction tutorial

Use and Response: There really isn’t too much else I can say about the D7100 in action, as it performs excellently, as expected. The autofocus response is quick and accurate in normal use, and able to lock on quickly and accurately even in dim lighting. Note that the 15 central AF Points are cross-type points, which you will want to make use of in low light and challenging focusing situations. (This means that these points look for contrast in both the horizontal and vertical orientation, and thus can more easily and quickly find contrast to focus on.) In low light, night-time scenes – such as the in-camera Multiple Exposure image and the in-camera HDR image below – the camera locked right on and focused well.

Nikon D7100 preview review multiple exposure hands on
Multiple Exposure Mode of the Nikon D7100, where three images are automatically combined in-camera.

Nikon D7100 hands on review preview in camer HDR high dynamic resolution strength
HDR Mode of the Nikon D7100, where and over-exposed and under-exposed image are automatically combined and processed in-camera, at a user defined HDR Strength setting.

Autofocus System: As with the D7000, the autofocus system of the D7100 is one of its most important features, and you will need to learn to take control of it in order to get the most out of the camera. This means choosing the appropriate Autofocus Mode and Autofocus Area Mode, depending on if the subject is still or moving. I go into detail on this in an article about Taking Control of the  D7000 Autofocus System. While the D7100 of course offers 51 autofocus points rather than 39, the exact same principles apply – you simply have more AF points to help you compose the image exactly how you wish or to help you more accurately track a moving subject throughout the frame. And if 51 autofocus points are too many to deal with at first or in a specific situation, you can limit the number of selectable Focus Points to 11 in the Custom Settings menu.

I briefly did some testing of the AF system using AF-C Focus Mode for tracking moving subjects using 9-Point Dynamic Area AF Autofocus Area Mode, while shooting bursts of images in Continuous Shooting release mode. With the Dynamic Area AF modes, you select your desired AF Point to begin tracking the subject, and the surrounding points are used to help retain focus on the subject if it briefly leaves the active AF point.  You can choose from either 9 additional “helper” points, 21 points, or all of them.  Since I was tracking a relatively easy-to-keep-track-of running dog, I selected 9-Point. I placed the selected point on the dog, pressed the shutter button half-way to begin tracking the subject distance, then held it down as the camera took a continuous burst of shots. The camera had no trouble keeping focus on the dog as it ran about, even when it momentarily left the active point and was therefore picked up by a surrounding point.

Nikon D7100 autofocus af system af-c continuous track moving subject 9 point dynamic area af  setup tip recomment focusing focus
Image of running dog, making use of AF-C continuous focus mode and 9 point Dynamic Area AF to retain focus on a moving subject. (Some sharpening and exposure adjustment applied to JPEG.)

Nikon D7100 autofocus af system af-c continuous track moving subject 9 point dynamic area af
Crop of above image of running dog, making use of AF-C continuous focus and 9 point Dynamic Area AF to retain focus on a moving subject. (Some sharpening and exposure adjustment applied to JPEG.)

Functions and Features: The D7100 has all the features of the D7000, adds the newer features introduced on the D600, and offers a couple more. There is the in-camera HDR Mode, Multiple Exposure Mode, Interval Timer and Time-Lapse Photography shooting, AF Fine-Tune to microadjust the focusing of individual lenses, in-camera Noise Reduction features, and the in-camera image editing and processing features. The camera can auto bracket for exposure (or flash exposure, white balance, or Active D-Lighting) either 2, 3, or 5 shots, in EV steps from 0.3 to 2 EV – which can greatly assist those capturing shots to combine into a true HDR image. The bracketing variables are easily set with the BKT Button on the front of the camera and the Command Dials, and offers a wide range of options such as shooting all the exposures in a positive or in a negative exposure direction, rather than simply an underexposure and overexposure surrounding 0. For example, with the +3F setting, the first exposure is taken at 0 (the correct exposure), the second at +1 and the third at +2, rather than the typical bracketing sequence of 0, -1, +1.

The new addition to the D7100 is the 1.3x crop mode Image Area, which will allow you to virtually extend the reach of your telephoto lenses by using a smaller 15MP portion of the sensor. While it is basically the same as cropping your photo after the fact, it offers some advantages such as nearly filling the width of the frame with the autofocus points. This will allow you to more accurately track a moving subject throughout most of the active frame, as there will likely be an AF Point to focus on the subject no matter where in the frame the subject is located. Plus in this mode, you can increase the High Speed Continuous shooting speed to 7 frames per second. Since the APS-C sensor of the D7100 is a 1.5x crop of a full frame sensor, the additional 1.3x crop will basically double the focal length of your lens, meaning a 200mm lens will act as a 200 X 1.5 X 1.3 = 390mm lens.

Nikon D7100 autofocus viewfinder 1.3x crop image area af points system learn use how to manual guide  setup tip recomment focusing focus
Simulated view on the Nikon D7100 viewfinder, showing the area of the 1.3x crop mode, as well as the locations of the autofocus points.  Notice how the 1.3x crop extends the reach of your lens, and how the AF points then nearly fill the width of the frame when working in 1.3x crop Image Area.

As with previous models of this level, the D7100 allows you to use the built-in flash as a Commander flash, to wirelessly remotely control and trigger up to 2 groups of optional external Speedlights. The D7100 also works with a wide variety of optional accessories such as:

Nikon WU-1a Wireless Mobile Adapter which can be used to wirelessly transmit your images to a tablet or smart-phone as you shoot, share your images, or even use your smart phone or tablet to remotely release the camera’s shutter – all with Nikon’s Wireless Mobile Adapter Utility app.

Nikon GP-1 GPS Unit: Use this GPS receiver for automatic geotagging of your images including location, altitude data, and UTC time.

Nikon ML-L3 Wireless Remote Controller or WR-R10/ WR-T10 Wireless Remote Controller and Transceiver: These wireless remotes will allow you to trigger the shutter of the camera remotely, thus allowing either self-portraits or the ability to release the shutter without pressing the Shutter Button thus preventing possible camera shake. The WR set communicates via radio frequencies, and thus does not require direct line-of-sight between the camera and the remote. You can even use multiple WR-R10 receivers on multiple cameras and trigger them simultaneously with one WR-T10 remote transmitter. The new WR-1 Wireless Remote Controller will allow even greater wireless control over one or multiple cameras with their own WR-1 or WR-R10 unit.

Additional Nikon D7100 Accessories can be seen here.

Menus and Custom Settings: The Menus and Custom Settings of the D7100 allow you to personalize the camera controls and functions to work best for you and your needs and shooting style. They are a powerful set of options, and you should carefully set them up and then review them occasionally to see if they can be tweaked to better suit your current needs. For example, you can customize the size of the area metered by the camera when using Center-Weighted Metering. This can be the default 8mm circle, or else a 6mm, 10mm, or 13mm circle. You can modify the roles of the two memory card slots so that the second one acts as either overflow when the first card fills, simultaneous back-up of the first card, or JPEG on one and RAW on the other. And you can manually copy images from one card to the other. You can set the Continuous Low frame rate anywhere from 1 to 6 fps, though you may find that since Continuous High is 6 fps, 3 or 4 fps should work well. This is a wonderful option that Canon has yet to adopt on its cameras of this level. As mentioned earlier, you can customize the functions of various buttons, and there are numerous other adjustments to the controls and camera functions that you can make. I go though all of these Menu and Custom Setting options in my guide Nikon D7100 Experience, along with recommended settings for various uses.

Nikon D7100 autofocus viewfinder 1.3x crop metering spot center weighted af autofocus points
Simulated view of the Nikon D7100 viewfinder, showing the location of the 51 autofocus points, the optional grid, the area of the 1.3x crop mode, and the size of the Spot and Center-Weighted Metering circles (default 8mm with additional custom options shown in yellow).

A relatively new feature in Nikon dSLRs in the additional control over Auto ISO. If you do not wish to worry about the ISO setting and would prefer that the camera takes care of that, you can enable Auto ISO and then the camera will automatically change your selected ISO, without your expressed permission, in certain situations in order to obtain a proper exposure. For example, if you are working in Aperture-Priority Auto Mode (A) and set the ISO at 800, but based on your selected aperture and the lighting the camera does not believe there is enough light for the exposure and a realistic minimum shutter speed (that you can also set in this menu item), it will automatically raise the ISO so that the shutter speed does not become impossibly slow for hand-holding. You can tell the camera the Maximum Sensitivity or maximum ISO that the camera will use in these situations as well as the Minimum Shutter Speed that you would like the camera to automatically use. Alternately, you can choose to leave the Minimum Shutter Speed set for Auto. The great advantage of this setting is that the camera will now select an Auto ISO setting based on the focal length of the lens being used. This is helpful because longer telephoto lenses typically require faster shutter speeds to prevent hand-held camera shake (which will result in blur). In addition, if you find when using this Auto setting for the Minimum Shutter Speed that the camera is still selecting shutter speeds that are slower than you wish (and thus possibly causing blur due to camera shake), you can use this menu to fine-tune this setting and instruct the camera to select a faster Auto shutter speed. So as you can see, it becomes much more viable to make use of the Auto ISO setting of the D7100 and you can still rely on the camera to not alter the settings beyond your desired parameters.

There are a couple functions that will be greyed-out in your menus if you have a certain conflicting setting option set. For example, some features will not be available (like HDR Mode) if you have the image quality set for RAW or JPEG+RAW. You will have to switch to JPEG only in order to access these features. This is bound to aggravate you at first as you try to determine why the function is greyed-out and not accessible in the menus.

Image Quality: I am not a pixel peeper but rather more of the “just get out there and shoot” variety, and I believe that most all the current consumer cameras – including the D7100 – offer more than enough in terms of image quality and low noise for most every photography from enthusiast to semi-pro. So I will leave it up to DP Review, DXOMark, and other sites to evaluate the image quality and sensor performance. I have shot some informal ISO tests, which can be viewed on Flickr, such as the image below:

Nikon D7100 high ISO digital noise test review preview sample image photo NR noise reduction

Video: As noted above, the D7100 offers all the usual frame sizes and rates, including now 1080 frame size at 60i or 50i frame rates when working in the 1.3x crop mode. It has a built-in stereo microphone plus the ability to use an optional external mic, and offers manual audio control. As with all Nikons, there is manual control over the exposure settings, but you have to set the aperture before going into Live Mode movie shooting. The D7100 now offers a headphone jack for monitoring audio and you can control its volume. As noted above, you can use the new i Button to quickly access and change various video related settings before starting to record.

Conclusion: Overall I found the D7100 to be an excellent camera in all areas: handling and feel, build, features, use, controls, and image quality. It is an excellent value for the price, and offers all the controls and features (and then some) that most any enthusiast or semi-pro photographer would need in most any shooting situation.  There really aren’t any shortcomings to this camera (unless the lack of an anti-aliasing filter will affect the types of photos you take). My only minor gripes are the labeling of the left-rear buttons that I mentioned, and the long, scrolling menus that Nikon uses. I definitely prefer the additional menu tabs of the Canon menus that eliminate scrolling menus.

The D7100 should meet or exceed the needs of dedicated enthusiasts shooting any type of images – landscape, portraits, travel, low-light, etc., and is particularly well suited for action, wildlife, and sports photography due to its wide array of 51 autofocus points, fast shooting speed, and 1.3x crop ability to extend the reach of your telephoto lenses. Its sensor, image quality, and capabilities will certainly provide anyone with the potential to not only take professional quality images, but in most situations to capture exactly the image you intend. And that, in the end, is one of the top goals of photography!

Nikon D7100 sample example image low light sunset evening noise ISO
Weeks Bridge in Cambridge, Mass., taken with the Nikon D7100.

Sample Images: More of my sample images from the D7100 can be seen on Flickr here:

http://www.flickr.com/photos/dojoklo/sets/72157632977605494/

Manual: To quickly learn all the essential and important features of the camera, how to set up the menus and Custom Settings, how to take control of the autofocus system and metering modes, and learn how, when, and why to use the various controls, features, and functions of the Nikon D7100, have a look at my e-book guide Nikon D7100 Experience. Click the link or the cover to learn more, preview, and purchase the guide (available early April 2013).

Nikon D7100 book manual ebook field guide dummies how to use learn instruction tutorial

Purchasing the D7100: If you are going to be ordering your Nikon D7100 online, please consider using my affiliate links below or on the left side of the page (Amazon, B and H). Your camera (or other gear) will be the same price, but they will give me a small referral bonus – thanks!

Nikon D7100 on Amazon (body only or with 18-105mm f/3.5-5.6 kit lens)

Nikon D7100 on B and H (body only)

Nikon D7100 on B and H (with 18-105mm f/3.5-5.6 kit lens)


If you enjoyed this post, please be sure to share it, mention it, or link to it!

Canon 6D Hands On Review

Several weeks ago I wrote a post previewing the Canon EOS 6D, based on its specs and information available at its announcement. I’ve now had some hands-on time and have done significant research on the camera and its functions and features as I work on my latest e-book camera guide Canon 6D Experience. So now I am able to share some more insight into the body, controls, features, and handling of this very nice new full frame dSLR camera. And thanks to Newtonville Camera of Newton, Mass. for getting it into my hands so quickly!

Canon 6D EOS unbox unboxing new full frame dslr review preview hands on test how to use manual guide dummies
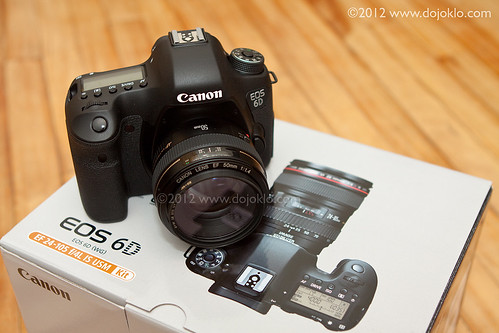
The Canon EOS 6D Unboxing – shown here with a Canon 50mm f/1.4 lens attached, not the EF 24-105mm f.4L kit lens.

The EOS 6D is first “affordable” full frame camera from Canon, priced at about $2,100. This means it is a consumer level camera that boasts an image sensor the same size as a frame 35mm film – rather than the smaller APS-C sized sensors that have been the necessary compromise for so many years in order to offer highly capable dSLRs which are still affordable to enthusiast photographers. With the availability of the 6D, many more photographers will now be able to gain the benefits of full frame photography, including the ability to use your lenses at their “intended” focal lengths (no more 1.6x crop factor) as well as obtain great image quality, resolution, and low noise at high ISO settings.

The Canon 6D is aimed at intermediate and dedicated enthusiast photographers (and dSLR beginners willing to learn!), not only with its price and body size, but also with its features and straightforward controls and menus. It is obviously not as fully-featured as the professional-level 5D Mark III, yet it contains nearly every feature that the majority of “non-pro” photographers will need. Besides the much more basic 11 point autofocus system (vs. the 61 AF points of the 5DIII), what the 6D leaves off are often very specific customization options that even some pros never get around to figuring out or using. Plus the 6D adds a couple new features previously not yet seen on a Canon dSLR such as built-in WiFi and GPS.  Most importantly, with its 20.2 megapixel sensor, the image quality of the 6D should prove to be nearly at the level of the 22.3 megapixel 5D MkIII.

As the author of dSLR user guides, my primary interest is more with the controls, features, functions, and “real world” use of any camera – as opposed to the image quality/ sensor issues (resolution, dynamic range, noise, etc.), which I leave up to DP Review, DXOMark, and other sites to examine in depth.  Although I will discuss and give examples of some of these issues in this post, I direct you these other sites to view sample/ comparison images and read detailed discussions of sensor and image quality issues.

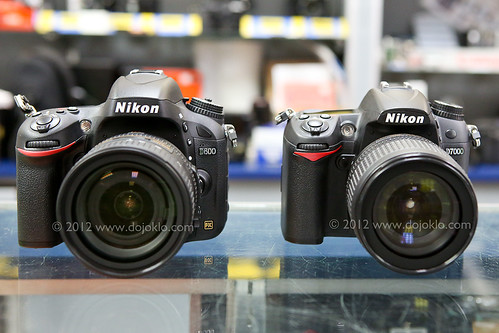
Body: Weight and Size: The very first thing I noticed when picking up the camera is how incredibly light it is.  Granted, it was just the body only without a lens attached yet, but I was pleasantly surprised at its light weight. The body only (w/o battery) weighs a mere 1.5 lb. (680g), much lighter (relatively) than the full frame 5D Mark III (1.9 lb./860g) and the APS-C sized 7D (1.8 lb./820g).  The EOS 6D is nearly the same weight – and size – as its closest sibling the (smaller APS-C sensor-sized) EOS 60D, and truly represents an important milestone in dSLR evolution where a full-frame sensor and several advanced features fit into a similar body as an mid/upper-level consumer camera.

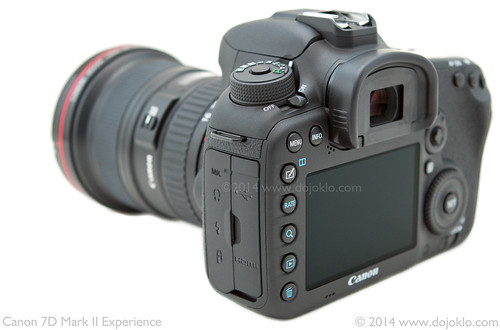
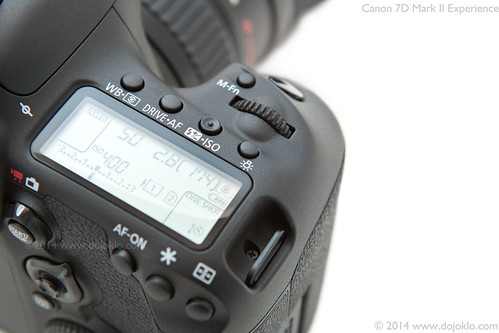
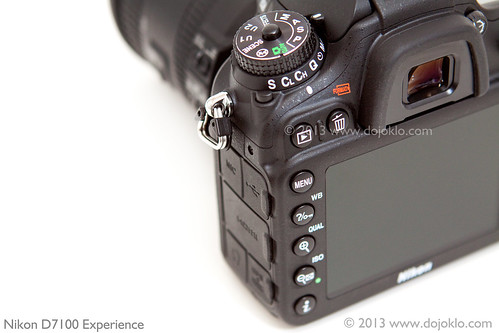
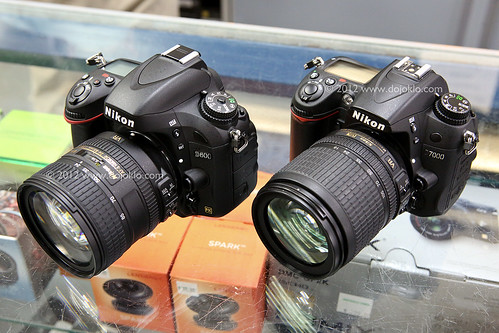
Body: Controls and Feel:  The controls of the 6D are similar to those of the 60D. It shares many of the same buttons (though some are relocated) as well as the thumb-pad Multi-Controller that sits inside the rear Quick Control Dial. This replaces the thumb-joystick version of this controller that was seen on all non-Rebel Canon dSLR cameras up until the 60D. Personally I am still not a fan of this thumb-pad, as the joystick is more comfortably located for autofocus selection, and I also find that I sometimes accidentally hit the thumb-pad while turning the Quick Control Dial when navigating menus, and thus suddenly jump to a different menu option. I also prefer to have the Playback and Delete buttons on the left side, so that I can access them with my left thumb, perhaps due to much more experience and muscle-memory with that set-up. However, these are simply a matter of getting use to the locations and sensitivity of the controls – after some use, muscle memory and habit typically allows one to easily use the controls they are provided with. The top Main Dial (for adjusting aperture and changing various settings) has a great “soft” feel as if made of firm rubber rather than the harder plastic of lower-end models. The rubber of the grip areas also feels great, no complaints regarding the over-all ergonomics of holding and carrying the camera, and the body feels perfectly solid.

Canon 6D EOS unbox unboxing new full frame dslr review preview controls button autofocus hands on test how to use manual guide dummies
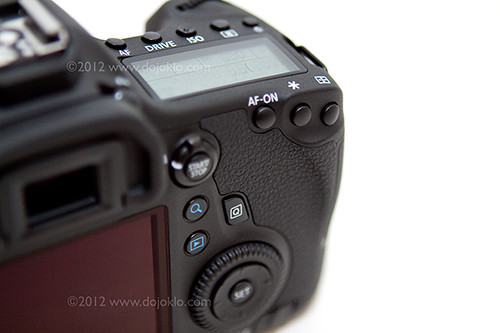
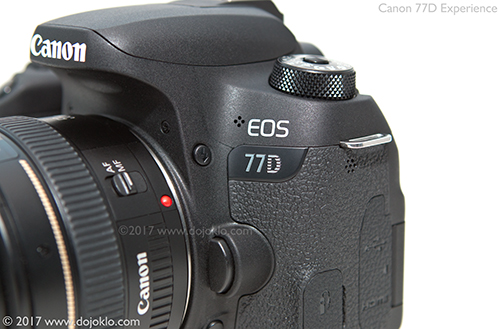
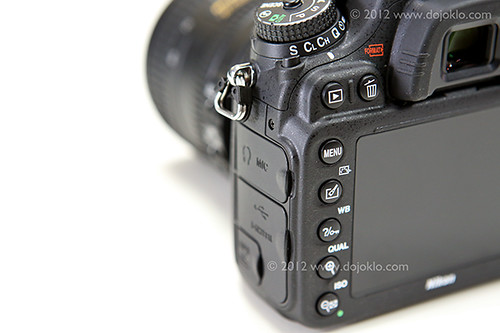
Detail of the Canon 6D, including some of the buttons and controls.

There are several “quirks” to get used to with the 6D if you are accustomed to working with a different Canon body such as a 50D, 7D, or one of the older 5D models. Primarily, the 6D has the new single Magnify Button introduced on the 5DIII, rather than the Zoom-in/ Zoom-out buttons of previous models. Your muscle memory will definitely cause you frustration with this one for awhile until you get used to reaching for this new button rather than using the top-right rear buttons for zooming in and out during image playback. Now during image playback, you press the Magnify Button located just above the Playback Button, and then use the top Main Dial to zoom in and out. One of the advantages of this Magnify Button is that its initial magnification level is customizable from 1x to “zoom-in immediately to pixel level on the area of the image where you focused” (Actual size from selected point). Instead of pressing the Playback Button and then zooming, you can simply press the Magnify Button and immediately view the image at your zoom-level of choice. I found that I actually prefer to set the Magnify Button for 1x zoom. Then after taking an image, I can press the Playback Button to view the thumbnail of the image with the histogram (since I leave this as my default Image Playback view), or press the Magnify Button to immediately see the image full-screen. Using the two buttons, I can easily toggle between these two views.  Others will enjoy immediately zooming in on the area where they focused to ensure that it is indeed in-focus.

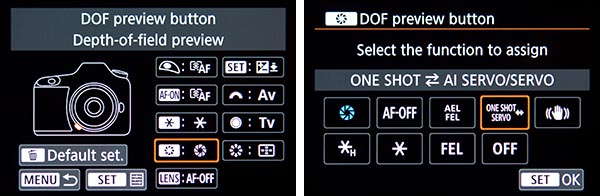
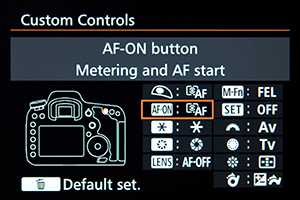
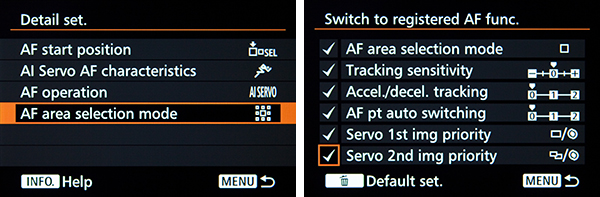
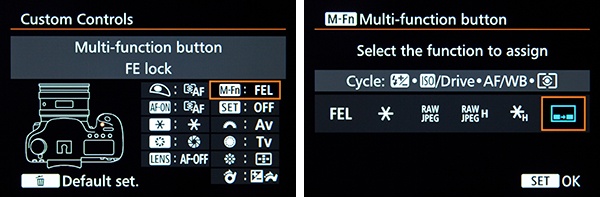
As with the 7D and 5DIII, the 6D has the ability to customize the various buttons and controls of the camera. I recommend that you use these Custom Functions to set the Multi-Controller to AF Point direct selection. That way you can simply use the Multi-Controller to manually select your desired AF Point instead of having to first press the AF Point Selection Button. However, if you do this, the SET Button will not select the center AF Point, as you may be used to from other cameras. Instead it will activate whichever function you set the SET Button for. But if you press the AF Point Selection Button first and then use the Multi-Controller, you can then still use the SET Button to select the center AF Point, which can be very convenient for quickly choosing this point.

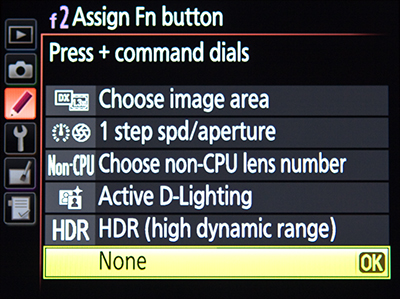
The 6D has the Live View/ Movie switch and START/STOP Button which makes it quick and easy to switch between the two, start Live View, or begin Movie recording. However, this may bring you to another “quirk” (ok, it is not really a “quirk,” more a necessity of design and function, but until you realize that you may feel like it is a quirk!).  There are a couple functions that will be greyed-out in your menus if you have a certain conflicting setting option set. For example, some features will not be available (like HDR Mode) if you have the image quality set for RAW or JPEG+RAW.  You will have to switch to JPEG only in order to access these features.  Or you cannot access the Multi Shot Noise Reduction feature if you have Long Exposure Noise Reduction enabled or if you are shooting in RAW. This is bound to aggravate you at first as you try to determine why the function is greyed-out and not accessible in the menus. So, back to the Movie function, you cannot begin movie shooting if you have WiFi enabled. Thankfully with this particular incompatibility, the camera will alert you to this on the rear LCD Monitor. With the other conflicting settings, you are simply going to have to learn and remember the conflicting option.

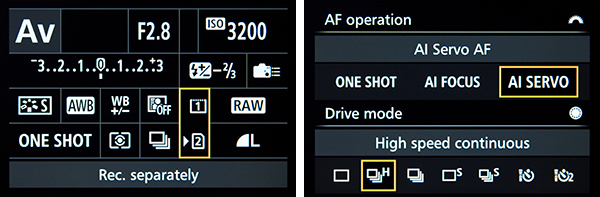
As with the 60D, the 6D has the top row of buttons that only access one function (such as ISO or Drive Mode) rather than two functions as with previous/ other Canon models. However, this means you can press the button and then use either the top Main Dial or the rear Quick Control Dial to change the function. Or you can always use the [Q] Button and Quick Control Screen to access these functions or other functions that there is not a dedicated button for, such as Image Quality, White Balance, or Flash Exposure Compensation. And Canon has continued the use of the locking Mode Dial, which I prefer as there have been many times my 50D Mode Dial was accidentally turned when pulling the camera out of its bag.

Brief Commercial Interruption: I have completed my e-book guide to the Canon 6D, called Canon 6D Experience. The guide covers all the controls, functions, features, Menus options and Custom Function settings (with recommended settings), autofocus system, exposure, metering, and more. Plus most importantly, it explains how, when, and why to use the various controls, features, and functions of the 6D. Click the link above or the cover to learn more, preview, and purchase the guide.

Canon 6D EOS book manual dummies field guide instruction tutorial how to use learn full frame autofocus system

Use and Response: There really isn’t too much I can say about the 6D in action, as it performs as expected.  Not really any complaints, aside from my personal issues with the controls issues I described above.  The autofocus response is quick and accurate in normal use. I realize now that I was paying more attention to my photographic tasks and wasn’t paying particular attention to the AF performance as I was out and about with the camera, and didn’t specifically test the center vs. outer points, so I need to get back out and do that.  But on the other hand I didn’t notice and wasn’t limited by any issues or shortcomings.  In low light, night-time scenes, such as the in-camera Multiple Exposure image below and the in-camera HDR image above, the camera locked right on and focused well with the center and outer points. In extremely low light when using the outer points, it did not seem to react as quick and instantaneous – in my experience so far – as the highly advanced AF system of the 5DIII. For example the 5DIII could immediately find focus on the black face of a cat in very low light, while the 6D needed me to find a slightly stronger area of contrast on the kitty’s face before it locked on. But you can see from the exposure settings and the lack of contrast in the focus area of the image below, it still performed rather admirably for the situation (I focused just above the eye and recomposed slightly).

Canon 6D eos in camera hdr mode autofocus af system low light high iso hand held
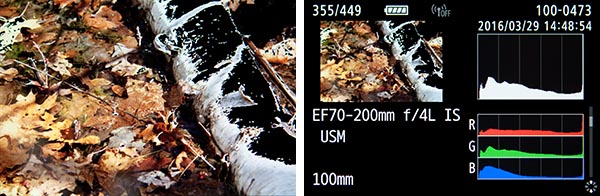
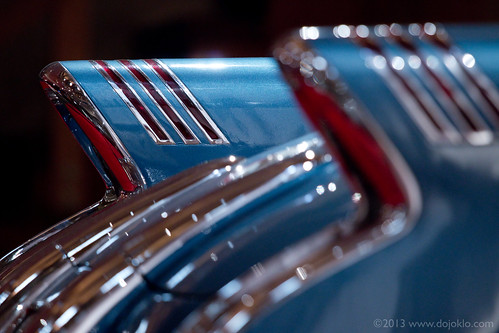
Canon 6D – In-camera HDR Mode, with three images automatically combined and processed in-camera. “Adjust Dynamic Range” setting +/-1, “Auto Align” enabled, hand-held. Resulting image 1/40, f/2.8, ISO 6400. This image was also automatically geotagged with the GPS, as can be seen on Flickr.


A closer look at the above image.  I focused at about the center of this image, where the white meets the blue dome, though it may have focused on the closer branches.  Keep in mind this was handheld, for 3 images that were aligned and combined in camera.

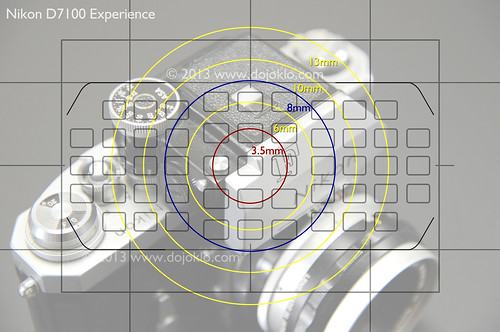
The center cross-type AF point of the 6D is said to be even more sensitive (both in specifications and by users in real life use) than that of the 5DIII (according to Canon, the 6D center point is EV -3 while the outer points are EV +0.5; 5DIII is EV -2 all points; 60D is EV 0 all points).  Unfortunately I now realize I did not test the center point in this situation, and I will have to go back and do that.  So, I acknowledge it is premature for me to take away any conclusions about the extreme low light AF performance of center vs. outer points before I re-examine this further. Others are already saying that the center AF Point is stellar in very low light. And I did not test the AF system for tracking moving subjects using AI Servo yet. What does all this EV info mean?  If you are a wedding photographer or a concert photographer and simply need to get the shot and capture a very precise moment with no delay, then you may prefer to work with the 5D Mk III. If you are not working on assignment and perhaps have 1 extra second to re-position an outer AF point on an area of slight contrast, or else use the center AF point and recompose in dark situations, then you will certainly still be able to capture great low light shots with the 6D.

Canon 6d autofocus af low light auto focus system sample image center outer af point
Canon 6D Autofocus in low light – I had to focus just above the eye where dark meets light, and then I slightly recomposed. But as you can see from the settings, it was very low light, and that type of performance is a major accomplishment for any camera: f/2.5 1/60 ISO 6400 (screenshot from DPP in order to show AF points.)


A closer look at the above image. I think due to the high ISO setting some sharpness was lost, but that could be recovered with sharpening.

WiFi: The Canon 6D is the first of their dSLR models to incorporate built-in WiFi and GPS capabilities. Neither of these is something I thought I needed – but I can already see the benefits. With the 6D you can wirelessly connect your camera to your computer, smart phone/ tablet, wireless network, printer, or TV to perform a variety of functions:

Computer: when wirelessly connected to your computer, you can make use of the included EOS Utility software to remotely control the camera (change settings and release the shutter) and save the images directly to your computer.  Previously you could do this only through the use of a USB cable.

Canon 6D wifi wireless tablet ipad iphone smartphone android share connect upload test review preview hands on
Canon 6D WiFi – Control the camera remotely with an iPhone, iPad, or tablet.  Here the aperture setting is being changed, and the focus area is positioned on the subject.

Smart Phone/ Tablet: You can also control your camera through your smart device (iPad, iPhone, Android phone or tablet) using the free EOS Remote app, and this takes it to a higher level than with EOS Utility. You can actually monitor on your device what the camera is seeing, as if you are seeing the camera’s Live View screen on your device.  You can change some settings (like aperture, shutter speed, ISO), move and resize the focus area to tell the camera where to focus, and release the shutter. You can also view the images that are on the camera’s memory card, and transfer images from your camera to the device, however they will be reduced size JPEGs.

Wireless Network – Internet Services: You can set up your camera with websites including Canon Image Gateway, Facebook, Flickr, Twitter, and YouTube, and directly send images or videos to these sites – straight from the camera! (Some instances like Twitter will merely share a link to the image on Canon Image Gateway, but with Facebook the actual image will appear.)

Canon 6D wifi wireless facebook share connect upload test review preview hands on
Canon 6D WiFi – Send your images directly to Facebook (or links to Twitter, or movies to YouTube) straight from the camera.

TV and Printer: You can wirelessly show a slideshow of the images on your camera with a compatible TV, or print images directly from the camera with a wireless compatible printer.

The great thing about these wireless functions is that they are actually easy to set up and use (at least in my experience). By following the simple instructions in the manuals and the prompts on the camera’s screen and the software and apps, you can just keep clicking OK (and enter your password and name your connections) as the camera finds the network or device and connects them together. The EOS Utility software also automatically installs a “device pairing” function on your computer that finds the camera and easily lets you connect. The biggest challenge was setting up the connections to the Internet sites (Facebook, Twitter)  since the instructions were not straightforward. But once you determine that you need to first connect the camera via USB to the computer then open EOS Utility, the right set-up screen is available on EOS Utility.  Then the Internet sites can be selected and registered with the camera, and it works great. There are lots of intimidating wireless set-up option screens on the camera that may have to be used if the connections to your wireless network or devices are not so straightforward.

GPS: The built-in GPS function can be enabled so that your images are automatically geotagged with data such as location and elevation. You can even log your camera’s journey – even when the camera is turned off (as long as it can “see” the satellites) – and then view the route on a Google map (with the included Map Utility software). You can set the camera to communicate with the satellites at anywhere from every 1 second to every 5 minutes, though note that this will drain the battery to some extent.

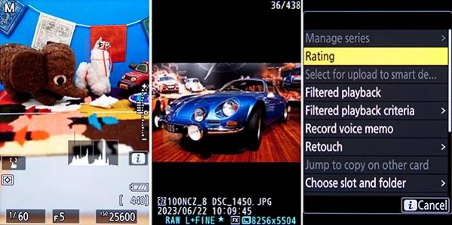
Functions and Features: The 6D has all of the features of the other current Canon dSLRs, such as in-camera HDR Mode, Multiple Exposure Mode, Handheld Night Scene mode, and various Noise Reduction features. In my standard camera use, I don’t typically have a need for many of these types of features, but they might come in handy or be fun to experiment with for many users. The image rating option is also included and can be quickly accessed during image playback. While initially this seemed unnecessary for me, I have found that it is a great time saver for marking either really good images or likely deletions, both of which require a quick review on a full size monitor once back at my computer – and now can be easily located with their 1 to 5 star rating.

Canon 6D EOS multiple exposure how to manual instruction use review preview hands on tutorial dummies guide book
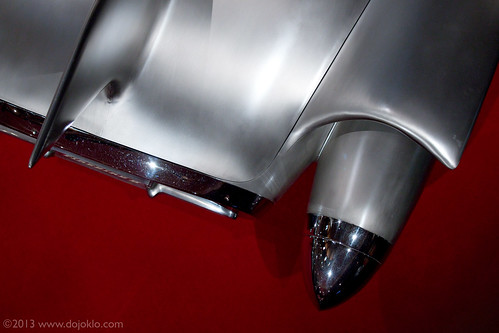
Canon 6D Multiple Exposure mode used to create a multiple exposure image in-camera, combining three images. Multiple Exposure Control setting: “Average” used here, as it works best for night/ dark scenes. This image was also automatically geotagged with the built-in GPS, as can be seen on Flickr.

The fast Digic 5+ processor of the 6D also allows for some lens correction features – Peripheral Illumination Correction and Chromatic Aberration Correction – to correct for issues introduced with some lenses, several of which are pre-registered in the camera. These types of corrections can also be done with specific lens profiles in Lightroom or Photoshop, so you will need to decide if you want to make these corrections with more control in post processing.  However, if you will be outputting JPEG files, you may want to take advantage of this in-camera.  You can even apply the corrections in-camera after the fact if you have shot in RAW. There are also several other in-camera RAW processing options which will allow you to fully process the image in camera (for brightness, Picture Style, White Balance, JPEG size, etc.) and output a JPEG file for immediate use.

One other nice feature is that not only does the 6D have lens autofocus microadjustment capability to correct for minor autofocusing distance issues, but (as with the 5D Mk III) you can adjust separately for the wide end and tele end of a zoom lens! Of course this means a lot more work in your AF microadjustment process. Also, through the Custom Functions you can choose the number of shots to take during bracketing, either 3, 2, 5, or 7. This is extremely desired by HDR shooters who were previously frustrated with the 3 shot limit.

On the down-side, the 6D has a relatively slow continuous shooting speed of 4.5 frames per second, and no Low-speed and High-speed Continuous settings – unless of course you use Silent Continuous Shooting at 3fps (though be aware that use of the Silent Drive Modes can result in slight shutter lag). This slower maximum rate, along with the less sophisticated 11 point AF system may limit the camera’s appeal to sports and action shooters who need to track moving subjects. (“Less sophisticated” = not as many AF Points as the 7D or 5DIII, only 1 cross-type AF Point, not as many options to customize how it tracks and responds to moving subjects.) Action photographers should look instead at the Canon 7D or 5D Mark III.) On an unrelated note, I should also mention that the 6D has a slower 1/180 flash sync speed.

Menus and Custom Functions: The 6D has the standard menu interface and options as the other current models. You can adjust and customize a few more settings than with the 60D, but the menus are reduced and simplified a bit from the 5DIII.  For an enthusiast photographer this is generally a good thing, as the 6D contains most all of the customization options that you will need, without overwhelming you with extremely specific or advanced items that are found on the 5D Mk III. After becoming familiar with the 5DIII however, it is interesting to note what options were left off, such as additional Multiple Exposure and in-camera HDR Mode processing options, no Auto level for LCD Brightness, and the elimination of some of the extremely precise, nearly “hidden” Custom Controls sub-sub-menus and options.

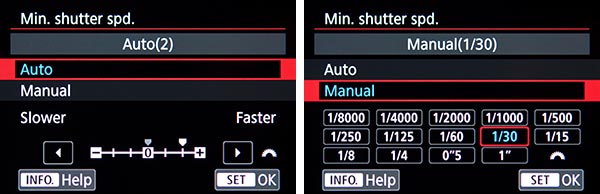
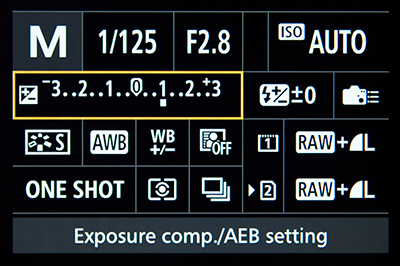
But the 6D does contain the additional ISO settings used to specify the minimum and maximum ISO available for you – or the camera in Auto ISO – to select, plus the minimum shutter speed for the camera to use in Auto ISO.  If you choose to use Auto Lighting Optimizer, you can tell the camera to turn it off when shooting in M (since you will want full control of your exposures and don’t want the camera to over-ride your careful settings).  A nice feature is the Safety Shift options, where instead of merely enabling the camera to over-ride your settings if it needs to in order to obtain the proper exposure, you can specifically tell it shift either the shutter speed/ aperture setting, or the ISO setting.  Generally, I believe, it will be better to shift the ISO setting in order to obtain the exposure, as you probably intentionally selected your aperture or shutter speed. The Custom Setting for autofocus Tracking Sensitivity now helpfully lists the options as “Locked On” and “Responsive” rather than the previous vague and confusing notations, so you can tell the camera to remain locked-on to your subject or to be more responsive and begin focusing on a new subject that enters the field of view of your active AF Point.

The Orientation Linked AF Point feature is much simplified from the 7D and 5DIII in that you do not need to pre-register the desired points, but rather the camera makes use of the current, manually selected AF points for each specific camera orientation, and then returns to them when you hold the camera in that orientation.

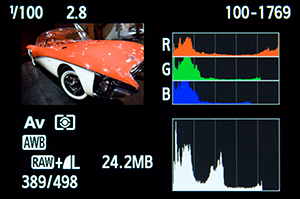
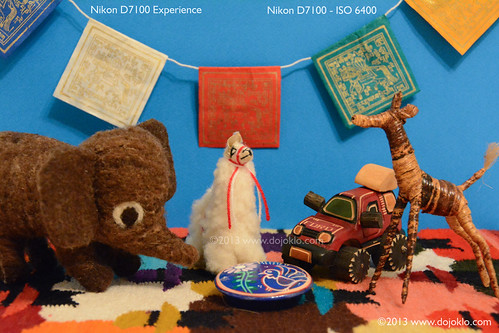
Image Quality: I am not a pixel peeper, I am more of the “just get out there and shoot” variety, and I believe that most all the current consumer cameras – including the 6D – offer more than enough in terms of image quality and low noise for most every photography from enthusiast to semi-pro. So I will leave it up to DP Review and other sites to evaluate the image quality and sensor performance. I have shot some informal ISO tests, which can be viewed on Flickr. For pixel peepers, here is a 6400 ISO, 100% crop detail of the scene below, with no in-camera Noise Reduction or White Balance correction.

Canon 6D high iso noise full frame test review preview hands on
Canon 6D full frame sensor – high ISO noise performance. Click image to see larger version with notes of all the settings.

Video: Oops, I just realized that I forgot to discuss this in the review!  I will come back to this, but it is interesting to note that while the 6D has manual audio input level control, the Wind Filter and Attenuator, it lacks a headphone jack for monitoring audio.

Manuals: Canon has unfortunately followed the trend of not including the full printed manuals with the camera.  While the camera comes with the printed version of the basic instruction manual and “pocket guide” for the camera, plus the basic WiFi/ GPS manual, you have to access the PDF files on the included disc for the full camera manual, the full detailed manual for WiFi, plus the instruction manuals for the software including Map Utility and EOS Utility. Of course you need the full manual to properly set up and learn all the features of the camera, plus you will need to look at some of the the other manuals in order to learn how to get your camera connected to Internet services.  It is a bit frustrating not to have these at hand to quickly refer to.  Fortunately if you have an iPad or tablet, you can download the PDF version of all the manuals from the Canon website and easily read and search through them and take them with you.

However, to quickly learn all the essential and important features of the camera, how to set up the menus and Custom Functions, and learn how, when, and why to use the various controls, features, and functions of the Canon 6D, have a look at my e-book guide Canon 6D Experience.

Canon 6D EOS book manual dummies field guide instruction tutorial how to use learn full frame autofocus system

Conclusion: Overall I think the Canon 6D is an excellent dSLR camera, a very good value for the price, and should easily meet or exceed the needs of most enthusiast and dedicated photographers. It provides the wonderful possibility for a non-pro or aspiring-pro to finally shoot with an affordable full-frame camera. Landscape photographers should enjoy this, as their wide angle lenses will once again act as true wide angle lenses, and be able to capture sweeping vistas.  It should provide general, portrait, and travel photographers with the controls, features, durability, and image quality they desire. Sports, wildlife, and action photographers may not find what they need, however, due to the limited 4.5 frames per second continuous shooting speed and the less sophisticated 11 point autofocus system with only one cross-type point. edit 12/13/12DXOMark summarized it well when they concluded that the 6D “is a high-end, full-frame camera ideal for enthusiast and advanced photographers, or professional photographers looking for a second camera body. Its resolution and AF system mark it out as a camera that is aimed at those shooting portraits or landscapes, where good resolution and a full-frame sensor are key, but where the fastest AF is not as important.”

Designed as a consumer-level camera, a few features (or lack of features) – such as those mentioned – obviously prevent it from being a full-fledged professional level body for highly demanding users (at least not the primary body), but its sensor, image quality, and capabilities will certainly provide anyone with the potential to take professional quality images – and in most situations capture exactly the image you intend. And that, in the end, is the number one goal of photography!

If you enjoyed this post, please be sure to share it, mention it, or link to it!

If you are going to be ordering your Canon 6D online, please consider using my affiliate links below or on the left side of the page (Amazon, B and H, Adorama). Your camera (or other gear) will be the same price, but they will give me a small referral bonus – thanks!

Canon 6D on Amazon (body only or 24-105mm f/4L kit)

Canon 6D at B and H Photo – body only

Canon 6D at B and H Photo – with the 24-105mm f/4L IS kit lens

Nikon D600 vs. D7000 vs. D300s

Comparing the Nikon D600 vs. D7000 vs. D300s:

I’ve written a previous post comparing the Nikon D7000 vs D90 vs D300s, as well as one comparing the current Nikon dSLR line-up of the Nikon D7000 vs. D5100 vs. D90 vs. D3100.   Now that the full frame Nikon D600 has been introduced (and almost immediately made available for sale), I need to revisit these comparisons to include this latest Nikon dSLR.  I am going to focus on the D600 vs D7000 vs D300s here, with some D90 specs thrown in, but leaving out the D5100 plus the more expensive D800 full frame (FX) model for now until I get the chance to incorporate them into the discussion.

Nikon D600 vs D700 vs D300s compare choose which one decide review full frame fx dx size body weight
Nikon D600 vs Nikon D7000 – comparison of body size and controls of the full frame FX vs the APS-C sized DX format dSLR cameras – image by author, courtesy of Newtonville camera of Newton, Mass.

The introduction of the full frame (a.k.a. FX format) sensor sized Nikon D600 has expanded the Nikon dSLR line-up, and perhaps made it even more challenging to determine which camera is right for you.  To get a sense of where the D600 sits, it is designed to be the first full frame dSLR aimed at the photography “enthusiast” – in both features and price (about $2100).  (Full frame or FX format means that the sensor is the same size as a frame of 35mm film.) It does not have quite all the features, continuous frame rate speed, larger and more rugged body, external controls, and customization options as a professional level dSLR like the Nikon D800, yet it still offers more than enough in terms of image quality, features, controls, and durable construction for most any serious enthusiast.  I would even contend that it is plenty capable as a semi-pro’s full frame body or second body, or even a smaller, lighter weight option for sometime-use by a pro.

Sitting Between the D7000 and D800: The D600 has been described by Nikon as sitting between the APS-C sensor sized (DX) D7000 and the full frame (FX) D800.  What that means is that, first, it has the approximate size, weight, and “feel” of the pro-sumer D7000.  This “FX camera in a DX body” is a desirable feature for a lot of photographers, especially those carrying and using their camera all day such as when traveling.  Plus it incorporates the sophisticated and customizable 39 point autofocus system of the D7000, along with that camera’s “user-friendly” interface and controls (the autofocus system has actually even been improved over the D7000 in terms of greater sensitivity).  This makes it an easy transition for D7000 users wanting to go full frame, or wanting to simultaneously work with both bodies.  Yet is also boasts some technology borrowed from the higher end D800 like the HDMI output, uncompressed video recording, and improved exposure metering.

Nikon D600 vs D700 vs D300s compare choose which one decide review full frame fx dx
Detail of the Nikon D600 full frame dSLR camera – image by author

The Second Highest Rated Sensor:  Previously, in order to offer a high-quality, fully featured yet affordable camera for enthusiasts and semi-pros, the compromise was a smaller sensor – the APS-C sized sensor (or what Nikon calls the DX format) which is about two-thirds of the size of a full frame sensor.  Larger sensors have always been desired for several reasons:  they typically deliver better performance in terms of improved resolution, increased dynamic range, and improved low light / high ISO performance.  In other words, the images have much better detail and can withstand serious cropping, display a fuller range of colors and tones, and are cleaner with less digital noise, especially in low light situations.  And indeed the sensor of the D600 lives up to these expectations – in fact it is the second highest rated sensor on DXOmark, behind only the Nikon D800E and D800 (the D800E is the D800 without the anti-aliasing filter in front of the sensor). So in terms of image quality for the price, the D600 really can’t be beat at this point.

The full frame sensor will also affect the field of view of your lenses. For those moving from an APS-C sized (DX) sensor camera to a full frame body, a 50mm lens will now act as a true 50mm lens – no more 1.5x crop factor to consider. This means that your wide angle lenses will now act as true wide angle lenses, but your telephoto lenses will no longer have quite as much reach as you may be used to.  But in the interest of lens compatibility, Nikon DX lenses can be used with the D600 and the camera will automatically crop the images as if using a DX sized sensor (so the sensor is reduced to 10.5 MP).

I first introduced the Nikon D600 in my post The First Affordable Full Frame dSLR, and there you can learn about a lot of the camera’s specifications and what they mean as far as real-life photographic use.  Here I will try to spell out the difference in specs and how that might affect your choice.  As I always like to point out, when you are trying to determine which camera to purchase or upgrade to, you need to first consider and determine your needs, and then see which camera fills those needs. Not the other way around where you look at the new features and speculate if you really need or will use them. The latest cameras almost always have more impressive features and specifications than the preceding models, but if your needs and shooting style don’t required those upgrades then it is possible that you can save some money and be completely happy with a less expensive or earlier model (and spend your money on better lenses!)

Nikon D600 vs D700 vs D300s compare choose which one decide review full frame fx dx size body weight
Nikon D600 vs Nikon D7000 – comparison of body size and controls of the full frame FX vs the APS-C sized DX format dSLR cameras – Click on this image to have a closer look.  Image by author, courtesy of Newtonville camera of Newton, Mass.

Sensor and Image Quality: The image sensor of the D7000 was greatly improved over both the D90 and the D300s, and now the sensor of the D600 is an even greater leap.  The D7000 has 16.2 megapixels, where the D90 and D300s each have 12.3 megapixels.  The D600 boasts 24.3 megapixels.  In addition to its dramatic improvement in resolution, I noted above the other image quality advantages of a full frame sensor, as well as how that will affect your lenses’ field of view.  This increase in resolution will also allow for more intrusive editing of the files in Photoshop, the ability to crop a picture and still obtain an image with high enough resolution for printing or display, and allow for larger prints.  You can have a look at dxomark.com to compare the sensors – run your mouse along the red-to-green color bar to the right of the Measurement graphs (such as Dynamic Range) to see how these differences affect images.  You can see from the charts that there are some significant improvements over the sensor of the D7000.

Exposure Metering: As with the D7000, the D600 has a 2016 pixel RGB metering sensor – although Nikon has stated that this latest version is improved over the D7000.  Both of these are certainly improved compared to the D90 and D300s, and will result in better TTL metering performance of straightforward and complex lighting scenes, such as back-lit situations.  All of these Nikon cameras offer Matrix metering, Center-weighted average metering, and Spot metering. With center-weighted metering, the D600 offers the option of an 8, 12, 15, or 20mm center circle for its weighting, or simply an old-fashioned Average reading.  The D90 makes use of your choice of a 6, 8, or 10mm center circle for its weighting, while the D7000 and D300s add a 13mm circle option to that.  A nice feature of Nikon dSLR cameras is that the Spot Metering is linked to the active AF Point, so in the image below, the AF Point was placed on the subject’s face, and the camera determined metering there (rather than requiring me to first meter where I wanted and then lock the exposure as Canon Spot Metering requires).

Nikon D600 full frame FX sensor backlit backlighting active d lighting exposure metering spot
Nikon D600 – Use of Spot Metering and Active-D Lighting in severe backlit situation.  As you can see, you still need to know how to make use of the metering modes and determine a proper exposure, as the camera can’t perform magic.  Use of fill flash in this situation resulted in better exposure and contrast on the subject.

Autofocus: The autofocus system of the D600 is similar to the D7000 AF system, with its 39 AF points and 9 more sensitive cross-type points (clustered in the center).  However, you can see that the AF points are spread much more widely across the viewfinder with the DX sized D7000:

Nikon D7000 vs D600 viewfinder DX FX compare choose vs which one af autofocus point 39
Simulated view of Nikon D7000 viewfinder, showing the location of all the autofocus AF points (and the viewfinder grid that can be turned on or off)- image by author.

Nikon D7000 vs D600 viewfinder DX FX compare choose vs which one af autofocus point 39
Simulated view of Nikon D600 viewfinder, showing the location of all the autofocus AF points (viewfinder grid not show but is available to view)- image by author.

Each of these above images show the full simulated framing as seen in the viewfinder, and you can clearly see how the 39 AF Points of the D600 are limited more to the central area of the frame.  This means that you are likely going to have to do some significant “focus-lock and recomposing” as you create interesting compositions where the subject is off-center.  This will also impact the use of the AF Points when using AF-C Continuous Autofocus Mode to track moving subjects.  The moving subject will have to remain within the area of the AF Points in order for the camera to continue tracking it, so you will have to move the camera around to follow the subject more closely.  This again is going to seriously limit your compositions when using AF-C and tracking a subject, as the subject is always going to have to be located in the central part of the frame.  If you are a serious action, sports, bird, or wildlife photographer, you are going to have to seriously consider if this AF Point arrangement of the D600 is going to work for you.  Or else consider using the camera in DX Crop “mode,” where you use just a DX-sized portion of the sensor to capture the image.  Although you will only be making use of 10 megapixels, the AF Points will in effect be spread out over more of the frame, more similar to what you see in the D7000 viewfinder.

As mentioned above, the 39 AF Points of the D600 are more sensitive than those of the D7000, with 33 of them sensitive down to f/8.  This means when you use a teleconverter (such as with a long lens in order to turn a 200mm lens into a 400mm lens) which reduces the effective maximum aperture of your lens by a stop or 2 or 3, you can sill make full use of most of the AF Points.  As with the D7000, you can limit the number of selectable AF Points to 11 if you prefer to manually select your AF Point (as you typically should) and you find 39 too many to contend with.  Since the AF system of the D600 as well as its controls and autofocus Custom Settings are so similar to the D7000, you can have a look at this post Taking Control of your D7000 Autofocus System to begin to learn how to get the most out of it.  The AF systems of the D600 and D7000 (and D300s) allow for you to use the numerous autofocus points in various ways to best capture still subjects (typically using AF-S autofocus mode) or track and capture moving subjects (using AF-C autofocus mode), including Automatic AF point selection, Single Point AF, and Dynamic Area AF using your choice of 9 points, 21 points, all points, or all points with 3D-Tracking.

Regarding the D90 and D300s, the autofocus system of the D90 has 11 autofocus (AF) points with only the center one being the more accurate cross type. The D300s offers 51 AF points with 15 being cross type, and thus is ideal for sports, action, and wildlife – although it has begun to become outdated and superseded by many of the other features of the D7000.

Nikon D600 book ebook guide manual tutorial how to dummies instruction fieldBrief commercial interruption: I would like to mention that I have written an e-book user’s guide for the D7000 called Nikon D7000 Experience, and will be offering an e-book guide for the D600Nikon D600 Experience. The guides discuss not only how to use the features, controls, autofocus systems, and various settings of the cameras, but more importantly when and why to make use of them in your photography.  They also explain the metering modes, aperture and shutter priority modes and manual shooting, focus lock, exposure lock, and more.  Plus they describe all of the Menu options and Custom Settings, with recommended settings.  Learn more about my Full Stop dSLR camera guides here!

Body, Construction and Size/ Weight: The D600 and D7000 (and even the older D90) appear very similar at first glance, and both have a rugged partial magnesium alloy body (top and rear) with a polycarbonate front.  However, the D600 is actually slightly lighter than the D7000: 1.68 lbs. vs 1.7 lbs.  The D300s is slightly larger than the other 2 bodies, and weighs in at 2.2 lbs, with full magnesium construction. The sturdier construction of the D600 and the D7000, including their nice rubber gripping surfaces, creates the feel of a more professional body. The D600, D7000, and D300s all have weather sealing at the memory card and battery doors.  The D600 has a slightly larger rear LCD Monitor at 3.2″ vs. the 3″ rear LCD screen of the D7000 and D300s.

ISO: As mentioned in the Sensor/ Image Quality section above, the high ISO performance of the D600 is improved over the D7000, which was already improved over both the D90 and the D300s. The tests at dxomark.com tell this story.  The native ISO range of the D600 and D7000 is 100-6400 expandable up to 25,600.  The D300s and D90 have a native ISO range of 200-3200 expandable to 6400. This means that with the D600 you can use high ISO settings when required, such as in low light situations, and not have any difficulty with digital noise, particularly in the shadow areas of images. You can view my informal ISO test images on this post of Nikon D600 ISO Test Sample Images to see the excellent high ISO performance when shooting JPEG images.

Controls: The controls of the D600 are very similar to the D7000, with some minor changes such as the locking Mode Dial switch (a nice touch), the different Live View / Movie switch and relocated Record Button, and in the “why did they do that?” category the reversing of the zoom in and zoom out buttons.  The Multi-Selector thumb pad size has also been reduced on the D600, which I find to be less comfortable than the larger D7000 Multi-Selector.  Overall, all of the controls are easily accessible, user friendly, and quick and easy to access and use for changing settings on the fly.  Many controls make use of a button press and then either of the Command Dials to change the setting.  For example, press the AF-Mode Button at the base of the lens and then turn the Main Command Dial to change the AF Mode or the Sub-Command Dial to change the AF Area Mode, as you look on the top LCD Control Panel to see your choices.  I found myself always intuitively turning the wrong dial in conjunction with the ISO Button, but that will just take some practice (one dial enables Auto ISO while the other changes the ISO setting).

Nikon D600 vs D7000 controls buttons size compare side by side
Nikon D600 vs Nikon D7000 – comparison of body size and controls of the full frame FX vs the APS-C sized DX format dSLR cameras – image by author, courtesy of Newtonville camera of Newton, Mass.

The D300s has entirely different switches, dials, and buttons than the D600 and D7000, however this allows for quicker and easier direct access to a few more features and settings on the D300s.  As with the D7000, the D600 offers two customizable user settings (U1, U2) on the mode dial for pre-setting a combination of camera settings and Custom Settings.  For example, you can set up your camera for landscape photography with all the settings you use for that and assign these settings to U1, and then configure your camera for studio/ portrait use and assign that combination of settings to the U2 mode.  You can also assign numerous functions of your choice to certain buttons such as the Fn Button, such as quickly and temporarily changing to Spot Metering Mode or turning on the built-in level display.

Wireless Flash: All of these Nikon cameras allow for advanced wireless lighting using the built in flash as a remote Commander for Nikon Speedlights, allowing you to make use of and remotely control simple or complex off-camera lighting set-ups.

Viewfinder: As with the D7000 and D300s, the D600 has a large, bright 100% optical viewfinder coverage.

Processor: The D90 and D300s have the Nikon Expeed Processor, the D7000 has the improved Expeed II processor, and the D600 boasts the speedier Expeed 3 processor. This allows for more video options including full 1080p HD at all the frame rates and overall faster processing of stills and video files especially when using in-camera processing features while shooting such as Vignetting Control or High ISO Noise Reduction.  The fast processor also allows for quick results when taking in-camera HDR or Multiple Exposure images.

Continuous Shooting Speed: The D600 can shoot at a maximum continuous frame rare of 5.5 frames per second (fps) up to 100 images when shooting JPEG or up to 16 images when shooting at the best RAW setting.  This allows you to capture exactly the right moment of an action situation, or a rapidly changing expression on a subject.  The D90 can shoot 4.5 frames per second (fps) up to 100 images, the D7000 shoots 6 fps up to 100 shots, and the D300s shoots 7 fps – or 8fps with the battery grip. If you often capture action and really need the highest frame rate, such as for sports or wildlife shooting, you are going to have to seriously consider the D300s or D800 over the D600.  Otherwise, 7 or 8 fps is often complete overkill in typical real-life use.

Memory Card: Like the D7000, the D600 accepts 2 SD cards, where the second card can be used in a variety of ways: overflow, JPEG on one / RAW on the other, or mirrored backup of the first card. The D300s uses 1 CF card and 1 SD card, which also can be configured in a variety of ways. The second card can definitely come in handy if one is shooting a lot of still and video files or wants instant back-up of all images.  There is a “trick” for choosing which memory card slot is viewed during image playback:  Press and hold the BKT Button and then press Up on the Multi-Selector and follow the prompts to make your choice.

Battery: The D600 and D7000 both use the high capacity EN-EL15 battery, which will last for over 1000 shots.  TheD600 accepts the optional, new MB-D14 battery grip for the use of two batteries – and to perhaps make the camera more comfortable for some users particularly when using larger lenses or working often in portrait orientation.  Similarly, the D7000 accepts the optional MB-D11 battery pack/ vertical grip,  and the D300s uses the EN-EL3e battery and the optional MB-D10 battery pack/ vertical grip. The D90 also uses the EN-EL3e battery and its optional battery pack/ vertical grip is the MB-D80.

Full HD video: The D600 offers full HD video with manual control and all the usual frame rates (1080p at 30/25/24 fps and 720p at 60/50/30 fps), for up to 20 minutes of recording at the highest settings. As with stills, you can switch to DX (as if you were using a smaller DX sized sensor) for a “telephoto boost,” and it is capable of full time autofocus, though most dedicated videographers still prefer manually focusing. The camera records mono audio but is compatible with optional stereo mics, and has a headphone jack for audio monitoring.  The D90 and D300s offer 720p video at 24 fps, with a 5 minute shooting time. The D7000 improved upon that with full 1080p HD video at 24 fps for up to 20 minutes with full-time continuous autofocus. Plus it offers 720p at 30, 24, and 25 fps.

Price: Just under $2100 – may vary slightly at different retailers.

Shooting Experience: The D600 feels and performs absolutely wonderfully. Its body and controls are comfortable and responsive in the hands, with the exception of what I think is a too-small Multi-Selector pad.   All controls are easily accessible for quickly changing all the essential settings such as autofocusing modes, ISO, white balance, metering modes, bracketing, etc. The Shutter Button is thankfully less sensitive than that of the D7000, thus allowing focus lock or exposure lock using a half-press, without accidentally taking the shot.  The Matrix Metering works great to properly determine exposure in a wide variety of situations, and the Auto White Balance even captures sunset colors nicely rather than turning them into less warm daylight colors as many previous cameras might have done.  The D600 has carried over all of the nice touches from the D7000 such as the optional grid in the viewfinder, the ability to limit the AF points to 11 – for quicker manual selection, the ability to change the continuous low shooting speed between 1 to 5 shots (which Canon has yet to do on their non-pro cameras), and the versatility to change the size of the central spot size for center weighted metering.

Choosing a Camera:  So which camera is best for your needs? At this point I would be hesitant to recommend to D300s to most users, simply due to the fact that it is an “older” model.  While it is still a highly capable camera, the image resolution and many of the features have been improved upon by the current models.  So if you plan to use your dSLR for several more years, just consider how “outdated” it will be in 4 more years.

The D600 and D7000 are similar in so many ways that a big part of the decision comes down to the full frame sensor vs. the APS-C sized sensor.  Of course the D600 has improved resolution, dynamic range, etc, but remember that all that is relative. You can still capture excellent, professional quality images on the D7000, or even the D90.  Pixel peepers will certainly find a difference, but it may not be significant enough for many users.  The full frame will also allow you to capture wider more sweeping views with your wide angle lenses, and indirectly more dramatically shallow depth of field.

This is because depth of field is affected by not only your aperture setting but also by the camera-to-subject distance.  So say that you were to use the full frame D600 to frame a shot with a 50mm focal length and f/2.0 aperture, from 10 feet away.  To “recreate” this same shot with the APS-C sensor-sized D7000 and a 50mm focal length, you would have to back up several feet to have the same field of view.  The full frame sensor will capture a wider field of view, while the APS-C “crops” the scene due to its smaller size.  Even though you use the same f/2.0 aperture setting, the depth of field does not appear as dramatically shallow because the camera-to-subject distance has increased.  So…indirectly…a full frame camera can contribute to more dramatic depth of field. (However, this all gets a bit more complicated and a lot of photographers, including myself until recently, misunderstand the role of the focal length in this – namely that it does not affect this issue: http://www.bluesky-web.com/dofmyth.htm)

However, since the autofocus points of the D600 are grouped more closely to the center of the frame, they are not as useful as the more widely spread AF points of the D7000 for tracking and capturing moving subjects when working in AF-C autofocus mode.  If you intend to shoot lots of sports, action, birds or other wildlife, the D7000 may work better.  The faster continuous frame rate of the D7000 will greatly assist with action photography as well.  Plus the D7000’s DX sensor will “extend” the reach of your telephoto lenses in these situations.  You can always use the D600 in DX Mode to “widen” you AF point spread and “extend” your telephoto reach, but the tradeoff is that you will only be using 10 megapixels of your sensor.

Purchasing these cameras: If you plan to buy any of these cameras, accessories, or anything else through Amazon.com or B and H Photo, I would appreciate it if you use my referral links. Your price will be the same, and they will give me a little commission for referring you, which will help support my blog.  Thank you for supporting my efforts!

Order your D600 today on Amazon or B and H – it is already available and shipping!

Nikon D600 on Amazon (body only or kit)

Nikon D600 at B and H Photo – body only

Nikon D600 at B and H Photo – with the 24-85mm f/3.5-4.5G ED VR Lens

Purchasing from the UK? Use my Amazon UK referral link here.


Nikon D600 book ebook guide manual tutorial how to dummies instruction fieldBrief commercial interruption: And don’t forget, I will be offering an e-book guide for the D600Nikon D600 Experience. The guide discusses not only how to use the features, controls, autofocus systems, and various settings of the cameras, but more importantly when and why to make use of them in your photography.  It also explains the metering modes, aperture and shutter priority modes and manual shooting, focus lock, exposure lock, and more.  Plus it goes over all of the Menu options and Custom Settings, with recommended settings.  Learn more about my Full Stop dSLR camera guides here!