Quick Start Setup for the Sony a7R III

The Sony Alpha a7R III mirrorless camera offers numerous improved features and updates from previous versions of the camera, including an improved autofocus system with more effective eye-detection, faster continuous shooting at up to 10 frames per second, better in-camera stabilization, and a faster processor. Boasting 42.2 megapixels, the image resolution is excellent enough to meet most any photographer’s needs.

The a7R III offers numerous menu options, features, and customizations, and you may have found that the menus can be challenging to navigate, and some options are confusing or difficult to understand. In fact there are over 180 menu items, spread across 35 menu pages, and organized under 5 separate tabs. However, it is important to properly set up the options to match your shooting needs, and essential to understand what the features are doing and how the camera is operating, so that you can take full advantage of all that that a7R III offers.

I have put together a comprehensive Sony a7R III Menu Setup Guide Spreadsheet to help walk you through all the Camera Settings and Setup Menus. The spreadsheet contains separate listings of suggested settings and starting points for various types of shooting situations, including:

General / Travel / Street
Landscape / Architecture
Action / Sports
Moving Wildlife / Birds
Studio / Portraits
Concert / Performance

Below is a small detail of the setup guide. You can download the Sony a7R III Menu Setup Guide Spreadsheet at the link below, where you will also find instructions for printing the spreadsheet. This spreadsheet is available for free for a limited time!

http://www.fullstopbooks.com/setup-guides/

Sony a7R III setup quick start guide how to manual

I also offer a companion text guide, which provides more detailed explanations of all the Sony a7R III menu items, recommendations for setting them up, and for making use of the various camera features and functions, along with some a7R III tips and tricks. This more detailed text guide, Sony a7R III Menu Setup Guide, will be available in May 2018. The text guide and the setup guide spreadsheet work hand-in-hand, to help you set up and get the most from your camera.

Take control of your a7R III and the images you create!

Sony a7R III manual menu setup guide how to use quick start

New and Hidden Features of the Nikon D7500

Introduction to the New and Hidden Features of the Nikon D7500

If you are a user of a previous Nikon dSLR and upgraded to the Nikon D7500, and you are already familiar with the typical features, functions, and controls, you will want to become familiar with the various new and improved features of the camera. Here is a summary of what has been added, changed, or improved with the D7500 compared to the D7200 and other previous Nikon models. Some of these features were included on the D7200, but may be unfamiliar to those coming from an earlier or different Nikon model.

The D7500 also contains a few “hidden” features. It is not that they aren’t explained in the Nikon manual, however then can be difficult to locate when using the camera since they aren’t directly accessed with a button or with a menu item. Several of them are accessed via the i Button and i Button Menus, which vary with the current camera function (viewfinder shooting, Live View shooting, image playback, etc.). Or some of these items must be assigned to a specific button using the Custom Settings.

All of these new and hidden features and items are explained in more detail in my Nikon D7500 Experience user guide to the camera, from which this material is based on.

Nikon D7500 body controls buttons touch screen monitor tilting dial

Figure 1 – The Nikon D7500 dSLR.

-Articulating Touch Screen Monitor – The large 3.2” high-resolution (922K-dot), tilting, touch-screen LCD Monitor can be color customized with the Monitor Color Balance item of the Setup Menu. The touch screen capability allows you to view, zoom, and scroll through playback images, enter text with the on-screen keyboard, as well as select an autofocus area and Spot White Balance area when working in Live View, and to release the shutter in Live View (Touch Shutter). The “Frame Advance Bar” for image review enables you to use the touch screen to quickly scroll through images without having to swipe one-by-one.

Figure 2 – Use the tilting rear monitor to help take photos from low or high vantage points.

-Expanded Native ISO Sensitivity Range – The ISO range is expanded to include ISO 100 to 51,200. This can assist photographers with decreased noise at higher ISO settings. Additional ISO settings down to 50 and up to the excessively noisy 1,640,000 can also be used.

Figure 3 – Left: The ISO Sensitivity Settings and Auto ISO options. Right: Selecting the Minimum Shutter Speed the camera will use with Auto ISO, including the “Auto” option which will be based on the lens focal length.

-Auto ISO – As with other current Nikon models, the D7500 offers a powerful Auto ISO option, which will change the ISO setting if necessary in order to obtain a proper exposure. You can set the parameters of Auto ISO, including the Maximum Sensitivity and Minimum Shutter Speed that the camera will use for Auto ISO, as well as the new Maximum sensitivity with flash option (see Figure 3 – left). One powerful option is that if you set the Minimum Shutter Speed to its Auto setting, the camera will select a minimum shutter speed based on the focal length of the lens (see Figure 3 – right). For example, a longer telephoto lens requires a faster shutter speed to avoid blur from camera movement. But, if you are unhappy with the settings that the camera is choosing, you can continue to press right in the Minimum Shutter Speed > Auto setting, and access the option to fine-tune this setting so that the camera selects a faster or slower Auto shutter speed. And in the new Movie Shooting Menu, you can also set the Auto ISO parameters separately for movie shooting.

-Group-Area AF Area Mode – A group of five AF Points, configured in a cross-shaped pattern, can all be used together to help focus on a subject, in situations where using a single AF Point may not work as well (see Figure 4).

Figure 4 – Group Area AF Area Mode, where five AF Points work together to focus on a subject. The central point of the group is also active, but not seen in the Viewfinder. 

-Highlight-Weighted Metering Mode – This Metering Mode helps to prevent the overexposure of highlights, such as a subject under bright stage lighting, particularly in situations with moving subject where Spot Metering becomes impractical.

Flicker Reduction – With this new anti-flicker option, the camera will detect the flickering of certain types of lighting often found in stadiums and arenas, and will adjust the timing of the shutter release in order to maintain more consistent exposures.

Electronic Front-Curtain Shutter – This feature, found in Custom Setting d4, can help to reduce camera vibrations and thus potential blur in controlled situations such as landscape and macro shots (see Figure 5 – left). It is used with the Mirror Up (Mup) Release Mode during either Viewfinder or Live View shooting. With the high resolution 20.9 megapixel sensor of the D7500, these slight movements can become more apparent in images.

Figure 5 – Left: Custom Setting d4, to enable the Electronic Front Curtain Shutter feature used with Mirror-Up release mode. Right: Picture Controls menu, including the new Clarity setting as well as the ability to adjust the settings in 0.25 increments.

Picture Controls – The D7500 offers the Auto Picture Control where the camera will determine the best settings, though the Auto setting can also be slightly adjusted by the user. The camera also includes the recent Flat Picture Control, which is desired by videographers as it provides the greatest latitude for post-processing, by helping to retain details in both highlights and shadows. It can also be used for still images that are going to be heavily processed. Also, the Picture Control options include a Clarity parameter, and the Brightness adjustment allows a wider range. The parameters allow finer (0.25 step) adjustment increments, as well as an Auto option for each parameter (see Figure 5 – right).

Figure 6 – Left: Simultaneously press the AF Mode Button and Movie Record Button to perform the Autofocus Auto Fine-Tune procedure when in Live View. Right: The Live View Spot White Balance feature, in use.

Auto AF Fine-Tune – The Autofocus Auto Fine-Tune feature will enable you to use Live View focusing to automatically fine tune the autofocusing of individual lenses, to correct for back-focus or front-focus issues. The data acquired by the process is entered into the AF fine-tune item of the Setup Menu, and registered for the attached lens. The procedure involves autofocusing in Live View and then simultaneously pressing the AF Mode Button and Movie Record Button to perform the process (see Figure 6 – left).

White Balance Improvements – The D7500 offers two Auto White Balance options, including Normal and Keep warm lighting colors which will preserve the warm glow created by incandescent bulbs and add a warmer touch to outdoor photos. You can now store up to six Preset (PRE) White Balance settings, as well as make use of the Live View Spot White Balance measurement feature (which was also available on the previous D7200), (see Figure 6 – right). The Live View Spot White Balance feature enables you to take a white balance measurement of a precise area of the scene when working in Live View.

White Balance Color Temperature Selection – When making use of the K – Choose Color Temp White Balance Setting, you can select the desired color temperature in the White Balance menu item, or you can quickly adjust this setting during shooting by pressing the WB Button and turning the front Sub-Command Dial while viewing the setting on the top Control Panel or on the Live View Screen. If you wish to directly enter a value, you can press the WB Button and use the Multi Selector to select and change the digits, again either on the top Control Panel or on the Live View screen.

Auto Exposure Bracketing – Either 2, 3, 5, 7, or up to 9 shots can be automatically taken when bracketing, at increments of 0.3 EV, or up to 3 EV increments.

Batch Processing for NEF (RAW) images – In-camera batch processing is now possible, using the new options in the NEF (RAW) Processing item of the Retouch Menu. These options give you the ability to select and simultaneously process multiple individual images, using the same processing settings. Or you can use the Select date option to process all images taken on a certain date, or Select all images to process all images on the memory card (see Figure 7 – left).

Figure 7 – Left: The NEF (RAW) Processing menu, including the options to batch process multiple images by selection, date, or all images. Right: Selecting images to be transferred to a smart device, as soon as a wireless connection is made between the camera and the device.

Bluetooth and Wi-Fi – Used in conjunction with Nikon’s SnapBridge app, these wireless connections between the camera and a smart device can be used to remotely control the camera, share GPS information from the phone to the camera, and to transfer images to the device (see Figure 7 – right).

New Menu and Custom Settings Options – In addition to the above improvements, the D7500 offers several new options in various menu items and Custom Settings. These include new Multiple Exposure overlay options of Add, Average, Lighten and Darken, which will allow you to further process multiple exposure images, and Exposure Smoothing options for Interval Timer and Time-Lapse shooting to help maintain consistency among the individual exposures.

Figure 8 – Left: Selecting one of the Ultra High Definition, 4K video Frame Size / Frame Rate options. Right: Enabling the Electronic Vibration Reduction feature for movie shooting.

Video – The D7500 now offers Ultra High Definition 4K video (3840 x 2160) at 30p, 25p, and 24p frame rates (see Figure 8 – left). Although note that when recording at 4K, the camera will make use of a smaller 1.5x cropped Image Area and not the entire width of the frame. The camera also offers Full HD video (1920 x 1080) at all the typical frame rates (60/50/30/25/24p). Plus the camera offers new Electronic Vibration Reduction to help stabilize the scene when hand-holding (see Figure 8 – right), and the Active D-Lighting option for full HD recording. The D7500 includes the Highlight Display “zebra stripes” feature for viewing highlights and potentially overexposed areas, a built-in stereo microphone, simultaneous recording to an internal memory card and external recorder, selectable audio frequency range (the standard Wide range or the narrower Voice range), and Auto ISO during Manual (M) Exposure Mode for smooth exposure transitions while retaining the desired aperture and shutter speed settings. The new Power Aperture feature will allow you to smoothly adjust the aperture setting while recording. There is also a new Movie Shooting Menu tab, where you can easily access most all of the movie settings, as well as set some of them independently from the similar settings used during still photography, such as the Picture Control and White Balance.

i Button – The D7500 also includes the i Button, (also present on the previous D7200), which is used to quickly access context-appropriate settings that will differ for Viewfinder shooting, Live View, Movie, and image playback. Pressing the i Button when shooting will allow you to access and change several settings via the i Button menu, such as Choose image area, Active D-Lighting, and High ISO Noise Reduction (see Figure 9 – left). The Custom control assignment option will allow you to assign your desired function to various camera buttons including the Fn1 Button, Fn2 Button, and AE-L/AF-L Button. When working in Live View, you can press the i Button to access and adjust settings such as the Image Area, Image Quality, Picture Controls, Exposure Preview, and Live View Monitor Brightness (see Figure 9 – right).

Figure 9 – Press the i Button during Viewfinder shooting (left), or when in Live View (right), to access the applicable i Button Menu screen.

Live View Exposure Preview – When working in Live View, press the i Button to enable the Exposure preview item (see Figure 9 – right), which will display the Exposure Indicator scale on the screen, and the brightness of the screen will reflect the current exposure settings rather than simply showing the scene at an optimal brightness level. This will allow you to better preview the resulting image and make exposure adjustments.

i Button in Movie Live View – Some “hidden” features can be accessed with the i Button when working in Movie Live View. The “zebra stripes” feature is accessed with the Highlight Display item of the i Button menu (see Figure 10). This will display diagonal lines on the screen at potentially over-exposed areas of the scene, thus helping you to adjust to the proper exposure. You will also need to press the i Button if you wish to adjust the Movie Live View Monitor Brightness and the Headphone Volume if monitoring the audio with optional headphones. The i Button will also access the Multi-selector power aperture feature, where you can press up or down on the Multi Selector to smoothly adjust the aperture setting while recording. Power aperture can also be assigned to the Fn1 and Fn2 Buttons using Custom Setting g1. The new Electronic Vibration Reduction can also be accessed via the i Button, or by using the Movie Shooting Menu.

Figure 10 – The Highlight Display (zebra stripes) video feature, to check for overexposure, is accessed via the Movie Shooting i Button Menu.

Flash Information Screen – With the built-in flash, or with an optional Speedlight flash attached and turned on, press the Info Button twice to access the Flash Information Screen showing the current flash settings, and then press the i Button to view and change the various settings and options, including Wireless Flash Options (see Figure 11).

Figure 11 – When using the built-in flash or an optional Speedlight flash, press the Info Button twice to access the Flash Information Screen showing the current flash settings (left), then press the i Button to view and change the various settings and options (right).

Camera Controls Assignments – A few other “hidden” features of the Nikon D7500 can only be accessed by customizing one of the camera buttons to assign it to that function. For example, you can make use of the Viewfinder Virtual Horizon, which is a camera level that you can display in the Viewfinder. It will show an electronic level along the bottom of the screen as well as one on the right side, so that you can see both pitch and roll of the camera body. In order to use this feature, you need to use Custom Setting f1 to assign either the Fn1 Button or Fn2 Button to the Viewfinder Virtual Horizon option. You can also assign the Fn1 or Fn2 Button to the 1 Step Speed / Aperture setting, which will allow you to quickly change the shutter speed or the aperture setting in 1 EV (full stop) increments, rather than the typical 1/3 EV adjustments that are made when you turn Command Dials. Another handy customization will allow you to press and hold the Fn1 Button or Fn2 Button to temporarily switch to a different Metering Mode (see Figure 12 – left).

Figure 12 – Left: Assigning the Fn2 Button to temporarily switch to a different Metering Mode. Right: The OK Button has been customized to display a large histogram, when pressed during image playback.

One Button Playback Zoom / Histogram – Using Custom Setting f2, you can assign the OK Button so that during image playback it will immediately zoom-in, at the magnification level of your choice (including 100% zoom), centered at the area of the active focus point so that you can closely inspect your image. Or you can instead assign the button press to display a large histogram with the image, so that you can evaluate your exposure (see Figure 12 – right).

Figure 13 – Left: Frame Advance Bar – Touch the bottom of the Monitor touch screen during image playback, and use the Frame Advance Bar to quickly scroll through multiple images. Right: Quick Crop – Magnify an image during playback and adjust to the desired framing, then press the i Button and select the Quick Crop option to crop the image and create a new image that is cropped to the framing shown on the Monitor.

Playback Scroll and Playback Zoom Cropping – Other “hidden” playback features include the ability to quickly scroll through multiple images using the touch screen, and a Quick crop feature. When viewing an image during playback, touch the bottom of the Monitor and the Frame Advance Bar will appear. Move your finger left and right to quickly scroll trough multiple images (see Figure 20 – left). To make use of the Quick crop feature, zoom-in on an image during playback, use the Multi Selector or touch screen to adjust the framing of the image as desired, and then press the i Button (see Figure 13 – right). Choose the Quick crop option, which will crop the image and create a new image that will be cropped to the framing currently shown on the Monitor.

All of the other features, menu items, Custom Settings, and controls of the Nikon D7500 are explained in my clear and comprehensive guide to the camera, Nikon D7500 Experience. Also be sure to have a look at my free D7500 Setup Guide Spreadsheet, to help you set up the Photo Shooting Menu items and the Custom Settings of the camera.

Nikon D7500 book manual guide how to use learn tips tricks setup setting quick start

Nikon D500 Setup Guide Spreadsheet

In conjunction with my camera guide for the new Nikon D500, Nikon D500 Experience, I have created a free Nikon D500 Setup Guide – a comprehensive spreadsheet with suggested settings for the applicable Menus, all of the Custom Settings, plus some shooting and exposure settings. It has complete and separate camera setup recommendations for different types of shooting, including:

General / Travel / Street
Landscape / Architecture
Action / Sports
Moving Wildlife / Birds
Studio / Portraits
Concert / Performance

Here is an example detail of just a small part of the Setup Guide spreadsheet:

 Nikon D500 Setup Guide Spreadsheet Experience Full Stop tips tricks recommend suggested setting menu Custom Setting

The direct link to download the Excel spreadsheet is:

http://docs.fullstopbooks.com/forms/Nikon_D500_Experience-Setup_Guide.xls

To print the spreadsheet guide, you may wish to print it across several pages and then tape them together, so that the data is legible:

-First, be sure to set the print area, to avoid all the blank pages. Do this by manually selecting all the cells with data in them (drag the cursor from cell A1 to G190 and they will all appear blue.) Then access the menu for File > Print Area > Set Print Area.

-Then go to File > Print Preview and select the Setup button.

-Then set the page for “Landscape” and “Fit To” 2 pages wide by 3 pages tall.

This should result in 6 pages to be printed (as long as you have set the print area first).

Be sure to check the Print Preview to see that the data will print at a reasonable size, and that there are only 6 or so pages that will print.

Nikon D500 viewfinder autofocus AF points crop 1.3x grid

In the past I have resisted requests for these types of quick-start “cheat sheets,” because I prefer that readers of my Full Stop camera guides read through all of the Menu and Custom Settings options, and determine which settings suit their shooting situations and preferences. This is one of the best ways to really learn the ins-and-outs of one’s new camera, so I still encourage you to do so. But I can appreciate the value and the handy reference features of this type of recommendation guide.

Please feel free to take the advice of dedicated Wildlife or Concert photographers, for example, above mine if it differs! And for further information, explanations, justifications, and caveats for the settings I specify, please have a look at my clear and comprehensive guide Nikon D500 Experience.

Nikon D500 Experience book manual guide how to use set up quick start setting recommend menu custom setting setup guide

Version History of Spreadsheet

2016-05-22 – v1.0 – First version released

2016-05-24 – v1.1 – Minor formatting corrections

Nikon D810 Tips and Tricks – Part 1

As you likely discovered as soon as you starting exploring the controls, features, menus, and Custom Settings of your 36.3 MP, full-frame Nikon D810, it is a powerful, highly customizable, and versatile camera. There are numerous Menu options and Custom Settings that you can make use of in order to fine-tune the camera to perfectly fit your needs, shooting style, and scene or situation. The autofocus system and exposure metering system can be adjusted according to your preferences, the camera controls can be customized and assigned to a variety of functions, the displays, White Balance, and Auto ISO can be tweaked according to your needs. Plus several new features have been added to the D810 compared to its predecessor the D800/D800E, and all of them enhance the shooting experience. Many of them will be explained throughout this article.

I’ve spent some dedicated time with the D810 as I’ve researched and written my e-book user’s guide to the camera called Nikon D810 Experience, and below are the some of the top “tips and tricks” I’ve discovered for setting up and photographing with this powerful dSLR. And be sure to read to the end of the article to learn about my free, detailed, and comprehensive Nikon D810 Setup Guide spreadsheet, which covers recommended Menu settings, Custom Settings, and exposure settings for various types of shooting situations!

Nikon D810 body detail tips tricks how to use manual guide book set up quick start
Detail of the Nikon D810 dSLR camera – photo by author

1. Take Control of the D810 Autofocus System: Before getting into some of the tips regarding features and functions specific to the D810, one first needs to take control of the basic functions of the camera, including the autofocus system and exposure metering settings. The D810 boasts the 51 point autofocus system of its predecessor the D800, with 15 centrally-located cross-type points. The large number of focus points and their positions in the Viewfinder will allow you to focus exactly where you wish – with minimal recomposing (when working in Single-Servo AF-S mode), plus will better enable you to track moving subjects throughout the frame when working in Continuous-Servo (AF-C) autofocus mode. The different autofocus modes (AF-S, AF-C) and the various autofocus area modes (Single Point, Dynamic Area, etc. plus the new Group Area AF) may be intimidating at first, but once they are understood, it is easy to determine which combinations fit your shooting needs. I wrote an entire post introducing the use of the Nikon autofocus system, its AF and AF-Area modes, and its controls. (Despite the larger number of AF points in the D810, the system works nearly the same as explained in the article.) If you have not used one of the more current Nikon dSLR models such as the D800, D7100/D7000, or D610/D600, you may at first be confused by the autofocus controls with the AF switch / button near the base of the lens (used in conjunction with the Command Dials), but you should quickly find that it is a quick and convenient way to change the AF modes and AF area modes.

Nikon D810 autofocus af system viewfinder book manual guide dummies how to tips tricks setting menu quick start
Simulated view of the Nikon D810 Viewfinder, with all 51 AF points shown for reference.

In addition, the D810 offers several Custom Settings to customize various aspect of the autofocus system, namely the ones in the a: Autofocus category. You can use these to tell the camera if achieving exact focus takes priority over maintaining the fastest continuous frame rate, how long the AF system continues to track a specific subject (distance) even if the subject momentarily moves away from the active AF point, and if the active AF point is illuminated in the Viewfinder. Using Custom Setting a5: Focus Point Illumination, you can now choose to display the cluster of all of the AF Points of a Dynamic-Area (such as 9-Point or 21-Point), rather than just the active middle point of the cluster. And you can even limit the number of selectable AF points to 11 if that helps you to more quickly or easily select your desired AF point. Most of these options are explained in my previous Nikon AF system post mentioned above.

The D810 also offers the ability to remember a specific AF Point so that the camera will automatically jump to the last point used when the camera is held in a specific orientation. For example, if you last used an upper-right AF Point when holding the camera in the grip-up position, then returned to shooting with the camera in landscape orientation, when you next hold the camera in the grip-up position, the camera will automatically jump back to that upper-right point. This is done through Custom Setting a9: Store by Orientation. You can register different points for each of the camera orientations. Similarly, you can assign the center Multi Selector Button to be used to jump to a Preset Focus Point of your choice, when the button is pressed during shooting.

2. Make Use of the new Group Area AF Autofocus Mode: The D810 borrows a new focus mode from the flagship Nikon D4s – Group Area AF, which makes use of a group of five AF Points arranged in a cross-shaped pattern. Instead of selecting a primary point with the surrounding points acting as “helper” points as with the Dynamic-Area AF modes, you will actually be selecting the group of five points which will all be used to attempt to focus on the subject. The Viewfinder will display the four outer points of the Group Area AF group of points, but not display the central point – perhaps so that you can better view the subject. Or you can use Using Custom Setting a5: Focus Point Illumination to display four surrounding dots rather than larger squares.

Nikon D810 autofocus af group area mode learn use setup quick start tips tricks viewfinder bif bird heron
Nikon D810 – Group Area AF – Simulated view of the D810 Viewfinder, showing what you will see in the viewfinder when making use of Group Area AF, with the cross-shaped pattern of the four outer AF Points of the Group visible. Background image shown at 65% opacity to better view Focus Points.

Keep in mind that with the other somewhat similar Dynamic-Area AF modes, you choose a primary point and attempt to keep the subject located at that point, and the surrounding points act as “helper” points if the subject happens to move away from the primary point. But with Group Area AF you select the entire group of AF Points, and they all work equally to focus on the subject. This mode can be used similar to Single Point AF but when it might be challenging to locate the subject under an individual point, which might cause you to accidentally focus on the background. When working in AF-S Focus Mode and using Group Area AF, the selected AF Points will give priority to faces if they are present, otherwise they will focus on the closest subject.

3. Take Advantage of the new [i] Button, and the “Hidden” Features it will Access: The D810 adds the [i] Button (on the rear of the camera) which gives you immediate access to the Information Display screen, where many shooting settings and functions can be viewed and changed. You can press this button to turn on the Information Display on the Monitor and immediately access these settings with the use of the Multi Selector and OK Button or the center touch-pad button. Press the [i] Button a second time or the Info button to “de-activate” the settings and simply view the camera settings on the Information Display Screen. Or, after the Info Button is pushed to display the camera settings of the Information Display screen on the rear Monitor, this [i] Button is pressed to “activate” the screen to enable changing the settings. In addition to the readily accessible camera buttons on the body of the D810, this [i] Button and Information Display screen can be a quick and easy way to change many of the camera settings without having to dig into the menus, such as Active D-Lighting, High ISO Noise Reduction, Color Space (sRGB vs Adobe RGB), and Long Exposure Noise Reduction. Plus you can use this screen to quickly access and customize the Preview (Pv) Button, AE-L / AF-L Button, and Fn Button Assignments.

Nikon D810 Information Display LCD monitor screen
The Information Display of the D810, accessed with the Info Button or i Button, and “activated” with the i Button.

The [i] Button can also be used during Live View shooting, Movie shooting, and Image Playback – to quickly access a number of applicable functions, some of them are sort-of hidden unless accessed this way, such as the LCD Monitor White Balance adjustment, and the Highlight Display for showing “zebra stripes” at potentially over-exposed areas of the scene during Movie Live View.

During Live View shooting, the [i] Button can be pressed to access settings including Image Area, Active-D Lighting, the new Electronic Front-Curtain Shutter, Monitor Brightness, Photo Live View Display White Balance (explained just below), or Split-Screen Display Zoom to compare two magnified areas of the scene in order to confirm that the image is level (as will be described in Tip 5 below). The Photo Live View Display White Balance feature allows you to set the white balance of the Live View screen differently than the current white balance of the scene. This may sound odd, until you realize it can come in handy when setting up a shot that will actually be taken with different lighting, such as a Speedlight or studio strobes. So using this feature you can set the LCD Monitor WB to better match how the final image will appear.

During Movie shooting, the [i] Button will access Image Area, Frame Size and Frame Rate, Movie Quality, Microphone Sensitivity and Frequency Response, Wind Noise Reduction, Destination to select the active memory card, Monitor Brightness, Highlight Display to view “zebra-stripes” at overexposed areas of the scene, and Headphone Volume. Plus during video playback, the [i] Button is also used to display movie edit options.

When reviewing images during Image Playback, the [i] Button will access the Retouch Menu, which will allow you to apply various image edits such as Color Balance, Filter Effects, and Distortion Control. Be sure to take advantage of the [i] Button in these various mode, rather than digging into the menus, to easily access some of the most often used features as well as a couple of the “hidden” features. I have written a separate post about the “Hidden” Features of the D810 so that you can explore them further.

Nikon D810 Retouch Menu cross screen starburst
Nikon D810 Retouch Menu – Using the Cross Screen item of the Retouch Menu to create a cheesy starburst pattern!

4. Improve Exposures with the new Highlight Weighted Metering Mode: The D810 adds a brand new metering mode, Highlight Weighted Metering. This mode is designed for certain challenging lighting situations, in order to help retain detail in bright areas and avoid the overexposure of highlights. It does this by measuring the brightness in a scene then determining the best exposure level which will prevent the highlights from being overexposed (“blown-out”). It should prove to be a useful metering mode for those who shoot theater and live music performances where the lighting can suddenly and dramatically change, or even remain consistent but be prone to include bright “hot-spots” of illumination on a subject. It can also be used in other scenes that include a well lit subject against a dark background, particularly one that is moving and thus prevents the use of Spot Metering. And it can be used at a wedding reception where the bride may be under a spot light, and you wish to properly expose the scene and the subjects yet retain all the subtle details in the highlights of the wedding dress. Also take advantage of the quieter Quiet Shutter Release (Q) and Quiet Continuous Shutter Release (Qc) release modes when in theater, performance, or wedding situations, in order to reduce shutter noise as you take your shots.

With Highlight Weighted Metering Mode when the camera’s exposure settings are biased  to avoid the overexposure of highlights, they may result in some of the other areas of the scene, such as the midtones, being slightly underexposed. However, with the excellent sensor performance of the D810, even at higher ISO settings, you should be able to easily adjust the midtone and shadow areas of an image without increasing the appearance of digital noise. Shooting in the RAW file format rather than JPEG format will allow you more post-processing flexibility for these adjustments than will images in the JPEG format. Note that when using a lens other than a Nikon G, E, or D lens (typical current lenses) with the D810 set for Highlight-Weighted Metering, the camera will actually use Center-Weighted Metering.


The Highlight-Weighted Metering Mode of the D810 is designed for theater / performance scenes such as this, where a brightly lit subject is against a dark background, and is prone to overexposed hot-spots due to theater lighting.

5. New Features Ideal for Landscape Photographers: The D810 includes several new features that landscape photographers will want to make use of, as well as those shooting in other types of controlled situations such as macro and studio still-life shooting. While the 36.3 megapixel sensor of the D810 has the potential to create images with incredible resolution, the high megapixel count can also call attention to less-than-sharp images. You will need a high quality lens to take full advantage of the resolution, plus make use of some features that will help reduce camera shake and thus image blur.  In addition to the redesigned mirror/ shutter mechanism that is quieter and smoother, you can also make use of the new Electronic Front-Curtain Shutter to help reduce camera vibrations. When working in Mirror-up (Mup) Release Mode, this uses the sensor itself as the front curtain of the shutter, rather than a mechanical curtain. You can enable this with Custom Setting d5, as well as use it in Live View (press the i Button in Live View to access it). For maximum vibration reduction, you can also make use of:

-the Mirror Up release mode, which performs the jarring mirror-raising action prior to shutter release, requiring a second Shutter Button press to take the image. Use this with or without the Electronic Front-Curtain Shutter feature

-the Exposure Delay Mode (Custom Setting d4) to delay the shutter release for a couple seconds after you press the Shutter Button.

-and of course a tripod and a remote shutter release.

Landscape and architectural photographers can also make use of the new Split Screen Display Zoom during Live View, where you can simultaneously zoom in on two different areas of the frame (on the same horizontal plane) to help determine if they are level. Press the i Button when in Live View to access this feature, then navigate to the desired area of the scene, and zoom in or out. Press the Protect (key icon) Button to select the other half of the screen and navigate to the desired area of that side of the scene. Since this feature is used to determine if the framing is level, both sides of the screen will move up and down simultaneously when you navigate either side. Press the i Button again to exit the Split-Screen.

Nikon D810 Split Screen Display Zoom LCD monitor screen Live View
The Split-Screen Display Zoom of the D810, accessible during Live View shooting, to check if the framing of the scene is level.

You can also make use of the Electronic Level on the rear LCD Monitor, the Live View Electronic Level, or the Virtual Viewfinder Horizon level which is seen in the Viewfinder. Assign the Fn or Pv Button to display the Virtual Viewfinder Horizon level, via Custom Setting f4 or f5. And landscape photographers will also want to take advantage of the new, lower 64 ISO setting. This is a “native” ISO setting, not an artificial one created by processing. Landscape photographers (and videographers) often need to use dark ND filters in order to block some light so that they can take advantage of wide apertures settings, such as f/2.8. Or they are used so that you can obtain slower shutter speeds when desired, such as when you wish to blur the motion of water. By enabling you to lower the ISO below 100, it will reduce the need for an ND filter in some situations.

This article continues with Nikon D810 Tips and Tricks – Part 2, which can be read here:

http://blog.dojoklo.com/2014/08/29/nikon-d810-tips-and-tricks-part-2/

Remember, I also explain these features and functions in even more detail, as well as explain all the other aspects of the D810 in my e-book guide Nikon D810 Experience, available on my Full Stop website. The guide not only explains the features, functions, and controls of the camera, but more importantly explains when and why you will want to use them in your photography. Take control of your D810 and the images you create! Click the link below to learn more, preview, and purchase the guide:

http://www.dojoklo.com/Full_Stop/Nikon_D810_Experience.htm

And, in conjunction with the book, I have created a detailed and comprehensive Nikon D810 Setup Guide spreadsheet, which has recommended Menu settings, Custom Settings, and exposure settings for various shooting situations such as Landscape, Performance, Sports, and Travel, in order to help you set up your camera. You can learn about and download this free “cheat sheet” spreadsheet here:

http://blog.dojoklo.com/2014/06/30/nikon-d800800e-nikon-d810-setup-guide-with-recommended-settings/

If you have found this helpful and plan to purchase a Nikon D810 or some lenses or accessories for it, please consider using my affiliate links for Amazon or for B and H, found at the left side of this page. Your price will be the same, but they will give me a small referral fee – thanks! And please feel free to spread the word if this blog has been helpful.

The First Nikon Df Guide – Now Available!

Nikon has recently introduced the Nikon Df, a unique, retro-inspired full frame dSLR. Its fusion of manual control dials and digital technology offers photographers a new (but perhaps familiar) way of shooting.

Nikon Df Experience, my latest Full Stop e book and the first Df user’s guide, is now available! This e book goes beyond the manual to help you learn the features, settings, and controls of the unique, powerful, and highly customizable Nikon Df. Plus most importantly it explains how, when, and why to use the functions, settings, menu options, and controls in your photography – including the new “manual” exposure controls, the sophisticated autofocus system, and the in-camera features such as Multiple Exposure, HDR, and Interval Timer Shooting.

Nikon Df Experience book guide manual how to dummies setup quick start tips tricks how to lens menu

Written in the clear, concise, and comprehensive style of all Full Stop dSLR guides, Nikon Df Experience will help you learn to use your full-frame Df quickly and competently, to consistently create the types of images you want to capture. This e-book is available in either PDF or EPUB format for reading on your computer, tablet, iPad, e-reader, etc.

Learn more about it, view a preview, and purchase it here:

http://www.dojoklo.com/Full_Stop/Nikon_Df_Experience.htm

As one reader has said about Full Stop guides, “I don’t know how I could fully take advantage of all the features the camera has to offer without this publication! It’s well-organized, easy to understand, and succinct enough to keep your attention while still containing a wealth of information to get the most out of your camera.”

Take control of your Nikon Df, the image taking process, and the photos you create!

Nikon Df book manual guide use learn controls dummies how to quick start tips tricks tutorial   Nikon Df book manual guide use learn controls dummies how to quick start tips tricks tutorial

For Intermediate and Enthusiast Photographers – This guide is designed for enthusiast dSLR photographers who wish to take fuller advantage of the capabilities of their Nikon Df and shoot competently in A, S, and M modes; take full control of the versatile 39-Point autofocus system; and learn how, when, and why to use and customize the unique controls, buttons, and features of the Df. It covers basic dSLR camera functions and exposure concepts for those learning digital SLR photography, and explains more advanced camera controls and operation such as Metering Modes, Exposure Compensation, and Histograms.

For Experienced Photographers – This guide explains the new and advanced features and settings in order to quickly get you up and running and taking advantage of these capabilities including the 39 point autofocus system and its Focus Modes and AF-Area Modes. Plus it explains the retro-styled camera controls and how to customize them, the in-camera HDR and Multiple Exposure features, in-camera image processing and editing, introduces back-button focusing, and guides you through all the Df Menu and Custom Setting items in order to help you best set up and customize the camera for your specific shooting needs. It also explains how to set up the Df to make full use of your legacy Nikkor lenses.

Nikon Df book manual guide use learn controls dummies how to quick start tips tricks tutorial   Nikon Df book manual guide use learn controls dummies how to quick start tips tricks tutorial

Sections include:

-Setting Up Your Df – All of the Df Custom Settings, Playback, Shooting, Setup, and Retouch Menus, with explanations and recommended settings to set up and customize the advanced features to work best for the way you photograph.

-Aperture Priority (A), Shutter Priority (S), and Manual (M) Modes – How and when to use them to create dramatic depth of field, freeze or express motion, or take total control over exposure settings.

-Auto Focusing Modes and Area Modes, and Release (Drive) Modes – Learn the AF Modes, AF Area Modes, and AF Custom Settings, how they differ, how and when to take advantage of them to capture both still and moving subjects.

-Exposure Metering Modes – How they differ, how and when to use them for correct exposures in every situation.

-Histograms, Exposure Compensation, Bracketing, and White Balance – Understanding and using these features for adjusting to the proper exposure in challenging lighting situations.

-The Image Taking Process – Descriptive tutorials for using the settings and controls to take photos of both still and moving subjects.

-Lenses – Setting up the camera to take advantage of older Nikkor lenses, including AF, AI, and Non-AI lenses.

-Composition – Brief tips, techniques, and explanations, including the creative use of depth of field.

-Photography Accessories and Books – The most useful accessories for digital photography including accessories specific to the Df.

This digital guide to the Nikon Df is an illustrated e-book that goes beyond the manual to explain how, when, and why to use the features, settings, and controls of the Df to help you get the most from your camera.

Nikon Df book manual guide use learn controls dummies how to quick start tips tricks tutorial   Nikon Df book manual guide use learn controls dummies how to quick start tips tricks tutorial

Learn more about Nikon Df Experience, view a preview, and purchase it on my Full Stop website here:

http://www.dojoklo.com/Full_Stop/Nikon_Df_Experience.htm

Nikon Df – Hands On Review plus Tips and Tricks

Nikon Df – A Powerful, Fun, Nostalgia-Inducing Camera

The announcement of the retro-styled, full-frame Nikon Df caused plenty of interest and anticipation, though it is yet to be seen whether or not that is followed up with strong sales.  While they have quickly run out of stock in Japan, it sounds as if other potential users, such as in the US, are still taking a wait-and-see approach to learn how Df users feel about the controls, ergonomics, performance, etc. – or perhaps others are hoping that the price may go down a bit!

Nikon Df retro non ai pre ai lens how to use manual guide review hands on recommended setting dummies tutorial quick start tips tricks
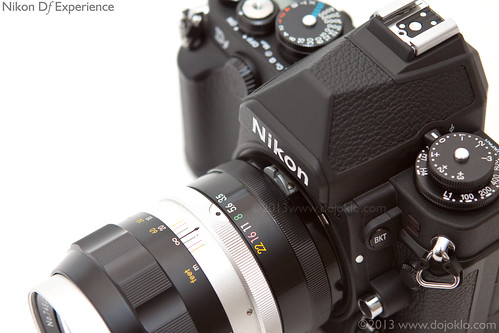
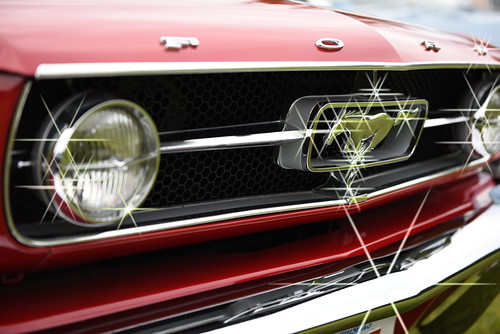
Nikon Df with Nikkor 135mm f/3.5 non-AI (pre-AI) lens. Read below how to make use of non-CPU legacy Nikkor lenses (AI and pre-AI) with the Df. (All photos by the author, except where noted.)

From my hands-on experience so far, as I have been researching and writing my Nikon Df Experience guide to the camera, I can assure you that it is a highly capable, well featured dSLR, with extremely high image-quality. Its low-light performance has proven to be the best of any current dSLR. But in addition to all this, it is a beautifully styled camera (though with a couple functionality sacrifices made in the name of retro-styling), and it is a truly fun camera to admire, hold in your hands, and – most importantly – to use.

Before I get into this, I would like to extend a thanks and shout-out to LensProToGo for getting the Df into my hands so quickly, and to Newtonville Camera of Newton, Mass. for the non-CPU Nikkor lenses.

For those with past experience using a film SLR, it will at once feel familiar and likely bring back a few fond memories and emotions that you haven’t encountered in a long while, after becoming accustomed to the body and controls of a dSLR for the past many years. At the same time, it may cause you to be a bit off-balance for awhile, as you need to remind yourself to reach for a dial to change the ISO setting or exposure compensation amount, or to re-accustom yourself with the concept that shutter speed can be changed with a dial if you desire.


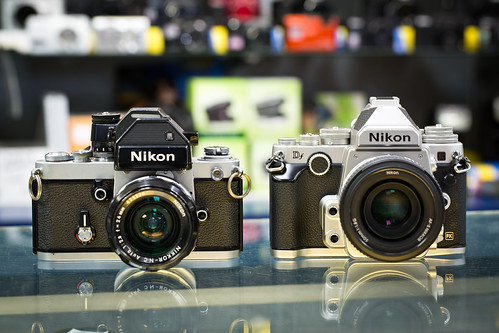
The retro-inspired Nikon Df  in silver (right), shown with one of its design inspirations, the Nikon F2S Photomic (left) (photo by Andrew Martin).

The retro, film-style controls help to encourage a slowing down, a more careful and exacting photo-taking process. You just may feel like a street photographer with the proper tool for the job – stalking your image, looking down to manually turn some dials to adjust your settings, carefully reviewing the information in the Viewfinder, lining up the shot and autofocusing. But the controls and various menu settings also allow you to take advantage of the “fusion” aspect of the Df (as Nikon says the “f” stands for). Fusion is indeed an accurate word, and the Df nicely combines the retro-dials with the digital LCD screens, the autofocus system, and the Command Dials which can be used as you are accustomed to for controlling shutter speed and aperture – if you wish.

Nikon Df Basic Specs

As you have likely already learned, the Df has a 16 MP full-frame sensor and Expeed 3 processor (borrowed from the high end D4) and has amazing low-light capabilities. While it can go up to 204,800 ISO, it is actually usable up to perhaps 6400 ISO or higher (for JPG, depending on your needs, expectations, and output). And of course you can apply noise reduction to NEF (RAW) files and determine where you achieve the right balance of clarity and detail retention. Have a look at the DPReview lab tests for some high ISO / low light samples and comparisons.

Nikon Df unboxing use learn tips tricks hands on review dummies how to manual guide book quick start use learn setup
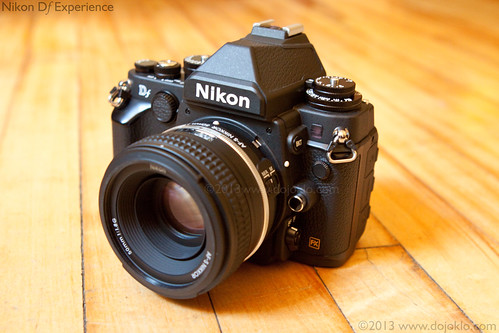
Nikon Df unboxing, shown with Special Edition 50mm f/1.8 kit lens.

The Df can shoot at a maximum continuous shooting speed of 5.5 frames per second, boasts the 39-point autofocus system of the D600/ D610, has a nice large 3.2″ rear LCD monitor and smaller top info panel, and a single SD card slot which shares the bottom compartment with the EN-EL14A battery. While you can work in Live View, it does not have video capability. The Df can also use – and meter – with nearly all legacy Nikkor lenses including AI and pre-AI lenses dating back to 1959, which I will discuss below.

The Df is available in either Silver and Black, or all Black.  While the Silver and Black model is the standard US model and has a more retro-look to it, the Black version is sleeker and “sexier” but more subtle, IMHO. The Silver version will probably stand out more as you carry it around, initiating more looks and comments, if that appeals to you!

Nikon Df Controls and Ergonomics

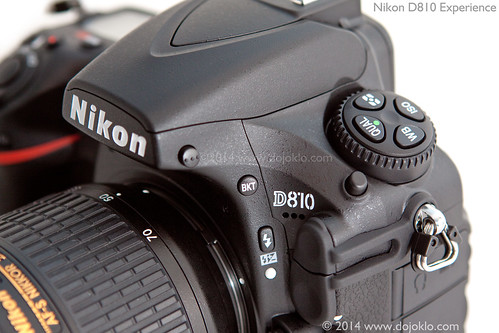
The first thing most people will notice about the Df is its retro-styling and controls, inspired by some of the older Nikon F and FM models. This includes the form, colors, and finish, as well as the top dials for adjusting ISO, Exposure Compensation, Shutter Speed, and Shooting Modes (M, A, S, P). There is also a top switch for Release Modes and a rear switch for Metering Modes. Yet it also provides the large 3.2″ rear LCD Monitor for viewing images, menus, settings, and adjusting a limited number of settings – plus the Multi Controller thumb pad for navigating the screen and for selecting an autofocus point or group of points. The Df has the now-common Autofocus switch and AF button on the front of the camera (near the lens mount) for selecting the autofocus AF Area Mode and AF Mode (in conjunction with the appropriate Command Dial). Those who have used the D7000/D7100 or D600/D610 will feel right at home with these convenient AF controls.

Nikon Df retro use learn dummies tips tricks how to hands on review manual guide recommended setting book tips tricks quick start set up use learn
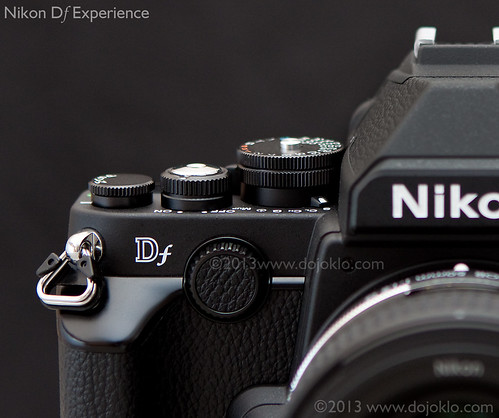
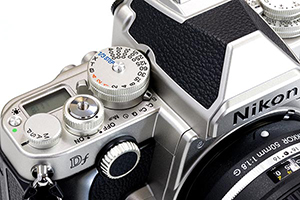
Detail of Nikon Df and some of its controls.

While you can use the dials and controls to emulate a manual film camera, the controls, menu settings, and Custom Settings of the Df also allow you to set up the camera so that you can use many of the controls just as you do now with your current Nikon dSLR. By placing the Shutter Speed dial on the 1/3 STEP setting when working in M or S shooting mode, you can then simply use the rear Main Command Dial to adjust the shutter speed as you view the setting in the Viewfinder, on the rear Information Screen, or on the top LCD panel – just as you may be doing now. This may be the easiest way to use the camera, though it will eliminate the need for the old-school dial adjusting that you may prefer on this retro camera. Or if you choose, you can select a specific shutter speed setting on the dial, and then by enabling Custom Setting f11: Easy Shutter-Speed Shift you can turn the rear Main Command Dial and adjust that shutter speed setting up or down 2/3-stop in 1/3-stop increments (as you view the settings in the Viewfinder, rear Monitor, or top Control Panel) so that you have a little adjustment lee-way as you work, without having to reach up and turn the Shutter Speed dial for minor adjustments.


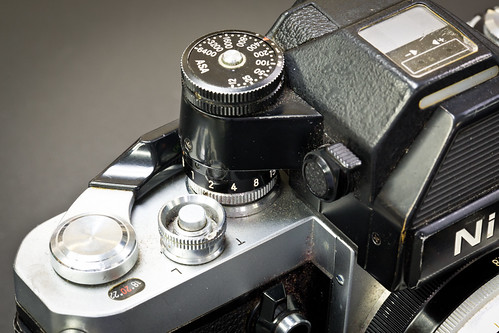
Detail of the Nikon F2S Photomic, one of the design inspirations for the retro-styled Nikon Df (photo by Andrew Martin).

When working in M or A shooting mode, you will use the front Sub-Command Dial to adjust the aperture setting, unless of course you are using a non-CPU lens.  In that case you will need to register the Non-CPU lens with the camera (focal length, maximum aperture, AI or non-AI), then set the camera on that lens number when it is in use. Then turn the lens aperture ring to change the settings.  With an AI lens, the AI coupling tab on the lens mount with transfer the aperture setting to the camera and you will be able to view the aperture setting in the Viewfinder or on the camera screens.  With a pre-AI lens you will need to disengage the AI tab on the camera’s lens mount (so as not to damage the camera or lens), dial in the lens number that you registered, and then manually set the aperture ring on the lens.  You will also then have to match that aperture setting of the lens onto the camera yourself, by turning the from Sub-Command Dial. But in both cases (AI and non-AI) the camera will properly meter for the attached lens as long as it is registered in the camera menus.

Nikon Df low light digital noise high ISO learn use manual guide book how to dummies tips tricks hands on review
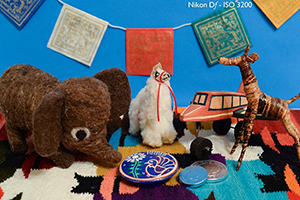
Nikon Df – Example Image in low light, 3200 ISO – click for EXIF data and larger version on Flickr. The AF system was quickly and accurately able to lock in on the darks eyes on the dark, furry face.

If you wish to have this same manual aperture ring experience with an newer CPU lens that also has an aperture ring, you can access Custom Setting f7: Customize Command Dials and enable the nearly-hidden Aperture Ring setting which will allow you to use the lens aperture ring rather than the Sub-Command Dial to change the aperture setting.

Speaking of the front Sub-Command Dial, that is one of my few but notable complaints about the Df. Unlike other Nikon dSLR models with this front dial, the one on the Df is aligned vertically. It is small, and has a hard surface rather than the nice rubberized surface of the rear dial, and can be a bit difficult to turn. You need to press your finger into it so that it turns without your finger slipping across it, which is uncomfortable due to its hard surface. It would have been much better if it was perhaps larger, tapered differently, and certainly needs the rubberized surface for comfort and ease of use. Not to mention that the camera strap attachment is sort of in the way of where your finger needs to be when using this dial.  These are some of the few physical faults with the camera, and while they are not make-or-break, they do affect regular use.

Others have complained about the height of the Shutter-Button, though that isn’t a major complaint for me. I really didn’t notice its placement being uncomfortable much at all, but perhaps it could be with extended use or in action-shooting situations. Some of the other buttons on the the rear of the camera are very flat (which looks cool), and some are more flush with the body and are thus a bit more difficult to press than they should be. And while I’m at it, the retro-styled latch to open the bottom battery / memory compartment is cool, but not as quick and practical to actually use as a typical latch. Plus the location of the SD card in this bottom compartment is not as convenient and with most dSLRs that have the memory card door on the side. But you will quickly get used to it.

Nikon Df example image sample how to use learn manual guide review hands on tips tricks quick start set up dummies recommended setting autofocus AF
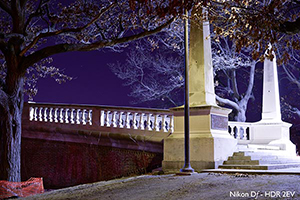
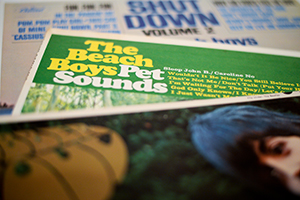
Nikon Df Example Image – click image to see larger on Flickr. (To mangle the words of Brian Wilson, “I guess the Df just WAS made for these times!”)

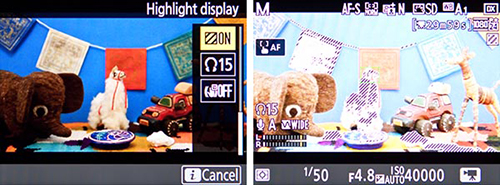
As far as the ergonomics other than those issues, the Df has a smaller grip than the typical dSLR, yet I found it perfectly comfortable to use, and again it often brings back the feeling of a film SLR in one’s hands. And while one may at first need to look at the top dials and change the ISO and Exposure Compensation, with a little practice this can be done without taking your eye from the Viewfinder. While one finger presses the dial release button, another can turn the dial, and you can see the current setting change in the Viewfinder.  For the ISO setting, you will need to go into the Custom Settings menu and enable d3: ISO Display in order to display the ISO in the Viewfinder rather than the remaining frames.  If you have a large enough SD card, you won’t need to be worrying about the remaining frames, so this shouldn’t be an issue.

That being said, the Df may be a difficult camera to use for action situations or a wedding or event, where one will need to quickly change the settings on the fly. While I explained how to set up the camera in order to change the shutter speed and aperture in the typical dSLR manner, it is obviously slower and more awkward to have to change the ISO and E.C. settings using the dials, even if you can begin to do it without looking.

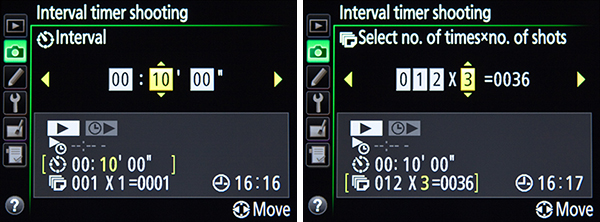
Regarding ISO, though, you can make use of the Auto ISO feature.  As with the other current Nikon models, you will set an ISO setting, but if the situation requires, the camera will automatically adjust it in order to obtain the proper exposure.  You can even use the Auto ISO menu settings to dictate the Maximum Sensitivity (ISO) and Minimum Shutter Speed that the camera will choose. Or if you set the Minimum Shutter Speed for Auto, the camera will make this selection based on the current lens focal length (for example, a long telephoto lens will require a faster shutter speed than a wide angle lens, to help prevent camera-shake blur). And this Auto Min. Shutter Speed can even be tweaked to always be faster or slower if you don’t agree with the camera’s Auto selections.

Nikon Df multiple exposure in camera example image sample quick start how to use guide manual set up tips tricks recommend setting
Nikon Df Example Image – in-camera Multiple Exposure

You can also use some of the rear camera buttons in conjunction with the appropriate Command Dial to change various settings, such as White Balance and Image Quality. The Df offers not only NEF (RAW) and JPEG, in various levels of size and compression, but it also offers TIFF image quality. However, TIFF files will be very large, 50MB files, about twice the size of the highest quality NEF (RAW) files.

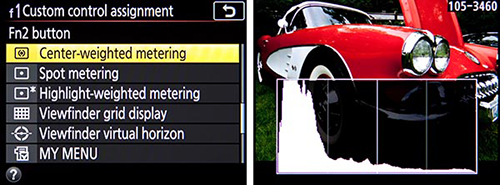
And you can customize various buttons for a variety of functions, including the Fn (Function) and Pv (Preview) Buttons on the front, and the AE-L/AF-L and AF-ON Buttons on the rear. The front buttons can be set up to quickly access an often-used feature or setting, such as temporarily changing the metering mode, turning on the Viewfinder grid or level, or also capturing a RAW image if the image quality is set for JPEG. There is the “Press” vs. “Press+Dial” customization options for these buttons (set one option for pressing the button, and another option for pressing the button and turning a Command Dial). Though you will find that many of the options conflict, and you will often only be able to set either a “Press” or a “Press+Dial” option, not both. If you will be using non-CPU lenses, you will need to set one of these buttons to the Non-CPU Lens Number item so that you can select the number of the registered non-CPU lens when in use. The top-rear buttons (AE-L/AF-L and AF-ON) along with the Shutter Button can be set up for a variety of focus-lock and exposure-lock combinations, such as for back button focusing, or to better assist you when working in AF-C continuous mode where the camera will track a moving subject as long as you keep it located at the active AF point.


The retro-inspired Nikon Df in black (right), shown with one of its design inspirations, the Nikon F3 (photo by Andrew Martin).

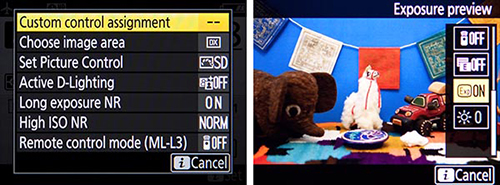
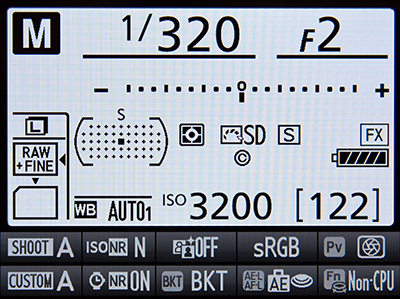
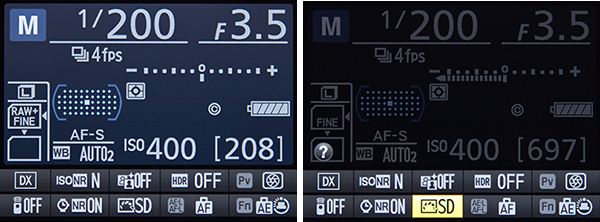
While the Df does not offer customizable user shooting modes such as U1 and U2 – found on the mode dial of other Nikon dSLRs – it does offer Shooting Menu Banks and Custom Settings Banks where you can set and save groups of settings.  This prevents you from having to dig into the menus and change various settings when you switch from portrait shooting to action shooting, for example.  You can set up and assign Bank A to your portrait set up, and Bank B to your action set up (or landscape, etc.), and then quickly change the camera to those Banks.  Not quite as convenient as the U1, U2 settings, but still helpful. The Banks can be quickly accessed through the Information Display screen via the i Button. The i Button and rear screen will also allow you to quickly access settings such as High ISO NR, Active D-Lighting, HDR, Picture Controls, and Long Exposure NR.

Autofocus System

I won’t go into detail here about the Df autofocus system, as you can read about it in my post about using and customizing the Nikon Autofocus System. But as with the other current Nikon dSLR cameras, it offers AF-S and AF-C autofocus modes for either single shooting (locking focus on a still subject), or for continuously tracking a moving subject (but does not have AF-A auto mode). And it offers the various AF Area Modes such as Single Point, Dynamic Area Modes (for 9, 21, or 39 points to help you retain focus on a moving subject), 3D-Tracking for following moving subjects about the frame, and Auto (all) Af points where the camera selects where to focus. But I will say that even in low light, the Df was able to quickly find and lock focus, such as with the dark, furry face of the cat in the image earlier in this post.

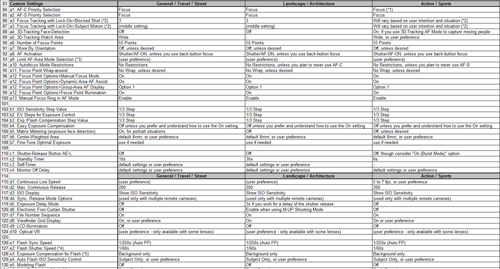
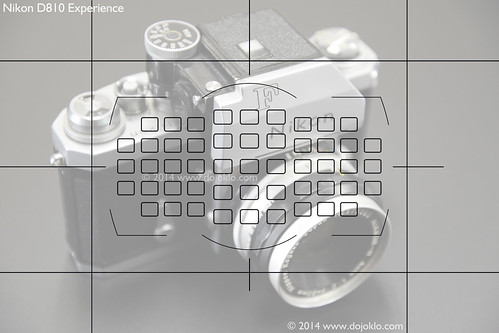
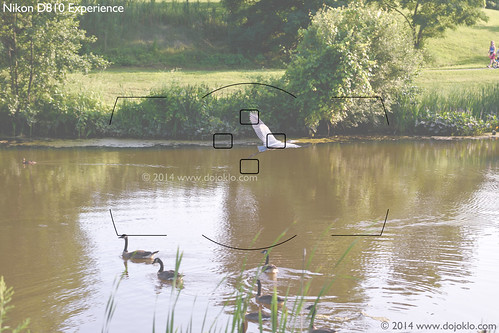
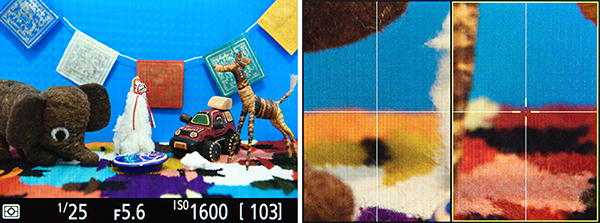
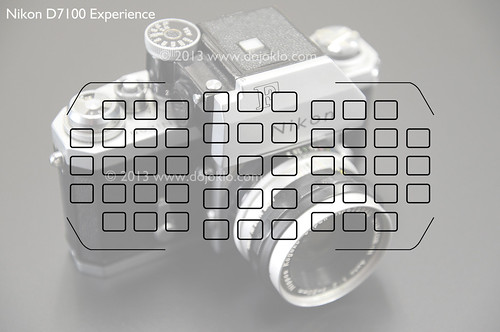
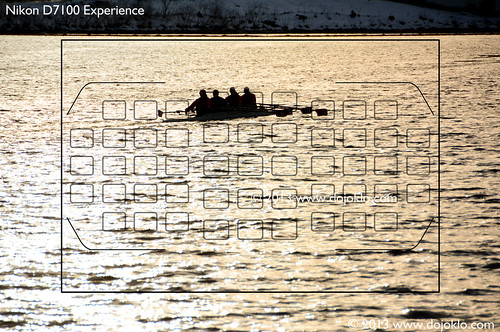
Unfortunately, as with the Nikon D600 / D610, the autofocus points are clustered at the central areal of the Viewfinder, and do not reach towards the edges of the frame, which may make it challenging to track moving subjects or to compose your images as desired without dramatic re-composing and re-framing after locking focus. However, you can make use of the DX Image Area setting, which will basically “crop” your images, using a smaller portion of the sensor to emulate a non-full-frame DX camera, as shown by the inner rectangle in the Viewfinder when using DX mode:

Nikon Df FX vs DX image area full frame sensor use learn manual guide book settings setup
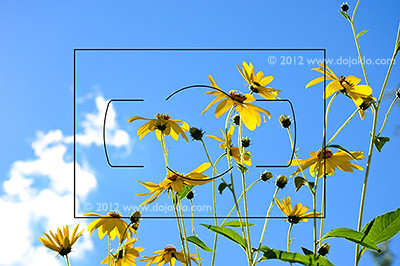
Nikon Df simulated viewfinder, showing full FX sensor area vs. DX Image Area (inner rectangle).

When using a DX lens on the Nikon Df, you will want to set the camera to Auto DX Image Area, so as not to suffer dramatic vignetting.

If you wish to emulate a manual film camera, you can make use of the Rangefinder feature of the Df. Simply place the camera and lens on manual focus, choose the desired AF Point as you look through the Viewfinder, then locate the AF point over your subject and adjust focus until the Focus Indicator light at the bottom-left of the Viewfinder lights up. While this is not quite the same as making use of a Viewfinder focus screen while you keep your eye on your subject, it is perhaps the best way to achieve accurate manual focus.

Nikon Df sample example image how to use learn manual guide book custom setting menus setting recommend set up quick start review hands on
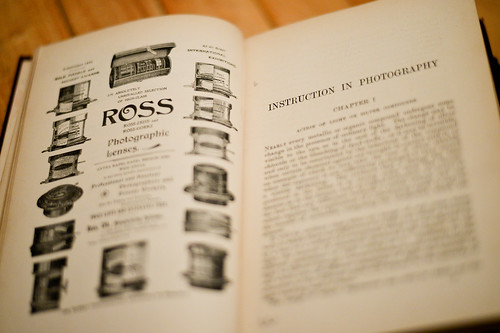
Nikon Df Sample Image – Instruction in Photography by Abney. Fun fact: Did you know Abney possibly has the first recorded criticism of “spray and pray” shooting, back in…1886! http://bit.ly/1cJxppp

Manual Control

As I began to explain above, there are various settings for the menus and controls of the Df which will allow you to use it similar to a manual film camera, such as setting on M shooting mode and using the Shutter Speed Dial and the lens aperture ring to adjust your exposure settings, and manually focusing. You may also then wish to turn off the Beep, use the Monochrome Picture Control or perhaps a custom Tri-X or Kodachrome Picture Control, and perhaps set a high ISO to get a bit of “grain.” You can also use Center-Weighted Metering and set Custom Setting b1: Center-Weighted Area to Avg-Average, so that the camera averages the entire scene to determine exposure, similar to an older film camera (18% grey, although it is often really 12% grey). You should put the Release Mode on Single Shooting, and perhaps cover your LCD Monitor to prevent chimping!


A custom Nikon Picture Control, to recreate the look of Kodak Tri-X film (this image taken with the Nikon D610).

There are numerous other settings, menu items, features, and functions to take advantage of, and I explain all of them in my guide Nikon Df Experience, which not only covers the features, functions, and controls of the Nikon Df, but more importantly when and why to make use of them in order to take control of your camera and your images!

If you have found this helpful and plan to purchase a Nikon Df or photo accessories (or anything else) from Amazon or from B and H, please use my affiliate links (near the upper-left side of this page) to go to those sites and then make your purchase. Your price will be the same, but they will give me a small referral fee – thanks!

Tips and Tricks for the Nikon D7100 – part 1

As you are likely discovering with your Nikon D7100, it is a highly customizable and versatile camera, and there are a lot of Menu options and Custom Settings that you can make use of in order to fine-tune the camera to perfectly fit your needs, shooting style, and scene or situation. The autofocus system and exposure metering system can be adjusted according to your needs and desires, the camera controls can be customized and assigned to a variety of functions, the displays, White Balance, and ISO can be tweaked according to your preferences. I’ve spent a considerable amount of time with the D7100 as I researched and wrote my e-book user’s guide to the D7100 called Nikon D7100 Experience, and below are the some of the top “tips and tricks” I’ve discovered for setting up and photographing with this powerful dSLR.  I previously put together a similar “D7000 Tips and Tricks” post for the Nikon D7000, and all of those tips apply to the D7100 as well.  I have repeated a couple of the important ones, and added several new ones here (in no particular order). Since this has turned into such a long post, I am dividing into two parts (Part 2 coming soon…)

Nikon D7100 body book manual guide dummies how to tips tricks setting menu quick start
Detail of the Nikon D7100 dSLR camera – photo by author

1. Take Control of the D7100 Autofocus System: Before getting into some of the tips regarding features and functions specific to the D7100, one needs to first take control of the basic functions of the camera, including the autofocus system and exposure metering settings. The D7100 boasts a 51 point autofocus system, upgraded from the 39 point system of the D7000. The large number of focus points and their positions in the Viewfinder will allow you to focus exactly where you wish – with minimal recomposing (when working in Single-Servo AF-S mode), plus will better enable you to track moving subjects throughout the frame when working in Continuous-Servo (AF-C) autofocus mode. The various autofocus modes (AF-S, AF-C, etc.) and the autofocus area modes (Single Point, Dynamic Area, etc.) may be intimidating at first, but once they are understood, it is easy to determine which combinations fit your shooting needs. Despite the increase in AF points, the system works nearly the same as that of the D7000, and I wrote an entire post introducing the use of the Nikon autofocus system, its AF and AF-Area modes, and its controls. If you have not previously used the D7000 or D600 you may at first be confused by the autofocus controls with the AF switch / button near the base of the lens (used in conjunction with the Command Dials), but you should quickly find that it is a quick and convenient way to change the AF modes and AF area modes.

Nikon D7100 autofocus, af, system, viewfinder, book manual guide dummies how to tips tricks setting menu quick start
Simulated view of the Nikon D7100 Viewfinder, with all 51 AF points shown for reference.

In addition, the D7100 offers several Custom Settings to customize various aspect of the autofocus system, namely Custom Settings a1-a6. You can use these to tell the camera if achieving exact focus takes priority over maintaining the fastest continuous frame rate, how long the AF system continues to track a specific subject (distance) even if the subject momentarily moves away from the active AF point, and if the active AF points are illuminated in the Viewfinder. You can even limit the number of selectable AF points to 11 if that helps you to more quickly or easily select your desired AF point. Each of these options are explained in my previous Nikon AF system post mentioned above.

2. Take Advantage of the new [i] Button: The D7100 adds the [i] Button (on the rear of the camera) which gives you immediate access to the Information Display screen, where many shooting settings and functions can be viewed and changed. You can press this button to turn on the Information Display on the Monitor and immediately access these settings with the use of the Multi Selector and OK Button. Press the [i] Button a second time or the Info button to “de-activate” the settings and simply view the camera settings on the Information Display Screen. Or, after the Info Button is pushed to display the camera settings of the Information Display screen on the rear Monitor, this [i] Button is pressed to “activate” the screen to enable changing the settings. In addition to the readily accessible camera buttons on the body of the D7100, this [i] Button and Information Display screen can be a quick and easy way to change many of the camera settings without having to dig into the menus, such as Image Area, Active D-Lighting, High ISO Noise Reduction, and Long Exposure Noise Reduction. Plus you can use this screen to quickly access and customize the DOF Preview Button, AE-L / AF-L Button, and Fn Button Assignments.

Nikon D7100 book manual guide dummies how to tips tricks setting menu quick start
Detail of the Nikon D7100 with [i] Button shown – photo by author

The [i] Button can also be used during Live View shooting, Movie shooting, and Image Playback – to quickly access a number of applicable functions.  During Live View shooting it can be pressed to access settings including Image Area, Image Quality, Image Size, Picture Control, Active D-Lighting, Remote Control Mode, and Monitor Brightness. During Movie shooting, the [i] Button will access Image Area, Picture Control, Monitor Brightness, Frame Size and Frame Rate, Movie Quality, Microphone sensitivity, Destination for which SD card slot movies will be saved to, and Headphone Volume. Plus during video playback, the [i] Button is also used to display movie edit options. When reviewing images during Image Playback, the [i] Button will access the Retouch Menu, which will allow you to apply various image edits such as Color Balance, Filter Effects, and Distortion Control.

Nikon D7100 menu display book manual guide dummies how to tips tricks setting menu quick start
Information Display shown on the rear LCD Monitor. Press the [i] Button to “activate” the screen and access/ change various settings. Select and change the settings along the bottom of the screen, such as the Picture Controls shown active and highlighted here.

3. Beware of Menu Conflicts: As with most current dSLR cameras, the D7100 has a couple menu settings and function “quirks” or conflicts that may drive you crazy if you are not aware why they are occurring. Most notably, some settings will be greyed-out or inaccessible in the menus and you will not be able to select them when working in one of the auto shooting modes, if not using an optional accessory, or if a “conflicting” setting is enabled. An example includes HDR shooting, which is not accessible when the camera is set to capture files in the (NEF) RAW or (NEF) RAW+JPEG image formats. Or, since White Balance Bracketing and RAW format are incompatible, if the camera is set for White Balance Bracketing and (NEF) RAW or (NEF) RAW+JPEG image formats, the BKT Button will not allow you to access bracketing. These are actually not arbitrary quirks, but are typically logical conflicts.

Nikon D7100 book manual guide dummies how to tips tricks setting menu quick start
Custom Setting f2: Assign Function (Fn) Button, with the “Press” and “Press+Command Dials” options. Some of the “Press” options shown at right.

Another set of conflicts involves the customization of some buttons (Fn Button, Preview Button, and AE-L/AF-L Button) where you have the option to set a separate Press function (where you simply press the button) and a Press+Dial function (where you press the button and turn a dial in order to change a setting). While it at first seems handy that the D7100 menus separated the Press from the Press+Dial functions thus allowing you more options, you will soon find that most of them conflict, and in reality you will likely only be able to set either a Press function or a Press+Dial function.

4. Extend Your Reach with the 1.3x Crop Mode: Just as the D600 allows you to shoot in either full-frame FX mode or in a cropped DX mode, the D7100 allows you to shoot in full-sensor DX mode or in a cropped 1.3x mode. Using the Image Area menu setting, you can set the D7100 APS-C sized DX format sensor to act as an even smaller sized sensor, with an additional 1.3x crop. While the default DX setting takes advantage of the entire sensor, by enabling the 1.3x crop setting you can change the aspect ratio (very slightly) and angle of view (dramatically) of your resulting images – basically cropping your photos from what you see in the full Viewfinder to what you see inside the 1.3x outline shown in the Viewfinder when this feature is enabled.

Nikon D7100 DX 1.3x crop sensor autofocus af viewfinder book manual guide dummies how to tips tricks setting menu quick start
Simulated D7100 Viewfinder view, showing the full size DX Image Area and the approximate size of the cropped 1.3x image indicated by the black rectangle surrounding the AF brackets. Location of all the Focus Points shown for reference. The 1.3x crop will, in effect, allow you to extend the reach of your lens and get closer to the action, as well as nearly fill the width of the active frame with the Focus Points.

The first advantage of the 1.3x crop is that it will allow you to “get closer” to the action by virtually extending the reach of your lenses. This can be particularly helpful when using a telephoto lens to capture sports, wildlife, or bird images where the subject is at a significant distance from you. It will allow, for example, your 200mm focal length lens to act as nearly a 400mm focal length. (Since the DX frame is already a 1.5x crop sensor in relation to a full-frame 35mm sized sensor, the additional 1.3x crop effectively doubles the focal length of the lens: 200mm X 1.5 X 1.3 = 390mm.)

The second advantage is that with the 1.3x crop, the area of the autofocus points as seen in the Viewfinder reaches nearly to the sides of the effective frame. This will allow you to track and capture a moving subject throughout almost the entire width of the active frame (when using continuous AF-C Focus Mode), or enable you to focus on and capture a still subject most anywhere in the frame without having to lock focus and reframe (when using single-shot AF-S Focus Mode).

A third advantage of working in 1.3x crop mode is that the Continuous High shooting speed goes from 6 fps to 7 fps (when shooting in JPEG or in 12-bit NEF-RAW), allowing you to capture slightly more images in a quick burst.

The disadvantage of the 1.3x crop is that you will only be using 15 megapixels of your 24.1 megapixel sensor, so you will have slightly reduced image resolution. The end result will be as if you cropped the image in post-processing. However, 15 MP is still a very high resolution, and for many shooting situations and image needs this may be more than sufficient.

5. Interval Timer and Time-Lapse Shooting: The Interval Timer Shooting function can be used to take a continuous series of photographs at each specified time interval, for a set number of intervals, with the intervals to begin either immediately or at a set time. It can be used to take these multiple series of shots over several minutes or hours – for example, 3 photos in a row every 10 minutes, for 12 intervals. This will result in a total of 36 photos, as the camera will calculate and show you. This Interval Timer Shooting menu can also be used for time-lapse photography by taking a series of individual photos over an extended period of minutes or hours, with just one photo per interval, which can then be combined into a time-lapse movie (using software designed for this such as Photoshop).

Nikon D7100 book manual guide how to tips tricks interval timer time lapse setting menu quick
Interval Timer Shooting menus. Left: Setting the Interval time period between shots, here set for 10 minutes. Right: Setting the number of intervals and the number of shots to be taken at the start of each interval. Here, 12 intervals are set, with 3 shots to be taken each interval, for a total of 36 shots. The intervals are to start immediately, with the time between intervals as 10 minutes. The current time is 16:17 (which is shown in case you wish to set the Start Time).

Use the Interval Timer Shooting menu to choose all of your desired settings. Ideally, set up your camera on a tripod for the duration of Interval Timer Shooting, and use the included Eyepiece Cap to cover the Viewfinder and prevent stray light from altering the exposure. The camera will need to focus before taking the shots, so it may be best to pre-focus the camera and then set the camera and lens to manual focus.

For time-lapse photography you will need to take images at short intervals, with just one image per interval, for numerous intervals, in order to create a long and effective movie. For example, a photo every 30 seconds, for 8 hours. Be sure to have a large memory card or cards in the camera, and set the Role Played by Card in Slot 2 for Overflow if necessary. In the software you will set the movie frame rate, and that setting (24fps, 30fps, etc.) will determine to total length of the movie. There are time-lapse formulas, as well as apps, which you can use to plug-in your variables and determine either the settings you will need to use, or the resulting length of the final movie.

Here is a link to a tutorial for creating a time lapse movie using Photoshop. There are also plug-ins/ templates for Lightroom which will allow you to assemble and export a time-lapse video using that software (direct link to presets zip file).

The second part of these top ten Nikon D7100 tips and tricks continues here. Also, I explain these features and functions in even more detail, as well as explain all the other aspects of the D7100 in my e-book guide Nikon D7100 Experience, available on my Full Stop website. The guide not only explains the features, functions, and controls of the camera, but more importantly explains when and why you will want to use them in your photography. Take control of your D7100 and the images you create! Click the cover below to learn more, preview, and purchase the guide.

Nikon D7100 book manual ebook field guide dummies how to use learn instruction tutorial

Still looking to purchase your D7100 or some lenses or accessories for it? Please consider using my affiliate links for Amazon or for B and H, found at the left side of this page – thanks! And please feel free to spread the word if this blog has been helpful.