DSLR camera users are often curious about “hidden features” that their camera may have, though typically there really aren’t many, as long as one carefully goes through all of the Menu and Custom Settings items, and reads through the manual. However, with so many options and functions, there are a few items that truly are a bit hidden away on the Nikon D810. It’s not that the D810 manual doesn’t mention them, or that they can’t be found with careful investigation of the camera, but you may need to have them called to your attention to learn how to locate them and how to take advantage of them.
Several of these features are accessed with the new i Button when working in the appropriate mode, and others are accessible in the menus but may require an understanding of the options, or several steps of sub-menu navigation to locate them.

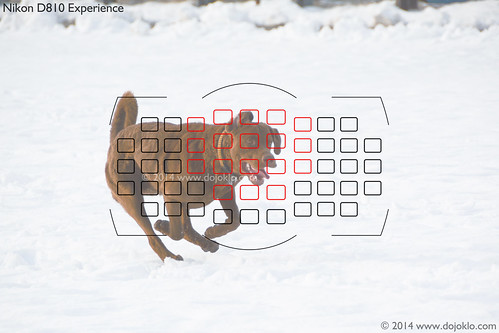
Simulated diagram of the Nikon D810 Viewfinder, showing the locations of all of the AF Points, with the active Dynamic Area 21 Point squares shown in red. (Image shown lighter to better see Viewfinder elements.) Please note that all AF Points will not be visible in the Viewfinder when shooting, only the active AF Point or Group.
i Button Features
Pressing the i Button when shooting will allow you to access and change several settings using the Information Display on the rear LCD Monitor, such as Active D-Lighting, Color Space (sRGB vs. Adobe RGB), High ISO Noise Reduction, and Long Exposure Noise Reduction. It will also allow you to assign the function of various camera buttons including the Pv, Fn, BKT, and AE-L/AF-L Buttons. However, when working in Live View, Movie Live View, image playback, and movie playback, the i Button will access a contextual menu for that mode, and in some situations it is the only way to access and change certain of these “hidden” features.
Live View
For example, when working in Live View, you can press the i Button to adjust the Monitor Brightness. This is a different adjustment from the Monitor Brightness adjustment of the Setup Menu which affects the brightness of the screen for menus and image playback. The Live View Monitor Brightness adjustment, obviously, adjusts the screen brightness for Live View, but will not affect the exposure of the actual image. The Live View i Button menu will also allow you to access the Photo Live View Display White Balance feature. This feature allows you to set the white balance of the Live View screen separately than the actual white balance that the image will be captured this. While this may sound odd, it can come in handy when setting up a shot that will actually be taken with different lighting, such as a Speedlight or studio strobes. So using this feature you can set the LCD Monitor WB to better match how the final image will appear.
The i Button is also the only way to access the new Split Screen Display Zoom during Live View, where you can simultaneously zoom in on two different areas of the frame (on the same horizontal plane) to help determine if they are level. This can come in handy for landscape and architectural photographers. Press the i Button when in Live View to access this feature, then navigate to the desired area of the scene, and zoom in or out. Press the Protect (key icon) Button to select the other half of the screen and navigate to the desired area of that side of the scene. Since this feature is used to determine if the framing is level, both sides of the screen will move up and down simultaneously when you navigate on either side of the split-screen. Press the i Button again to exit the Split-Screen.
Although the Electronic First-Curtain Shutter is accessible with Custom Setting d5, and thus isn’t hidden, I will mention it here because it can also be accessed with the i Button during Live View. This is a feature eliminates the mechanical movement of the front curtain and can help reduce camera shake, which can lead the slight blur and reduced sharpness in images. With the high resolution 36.3 megapixel sensor of the D810, these slight movements can become apparent in images. What you need to know is that this feature must be used in conjunction with Mirror Up (Mup) Release Mode.

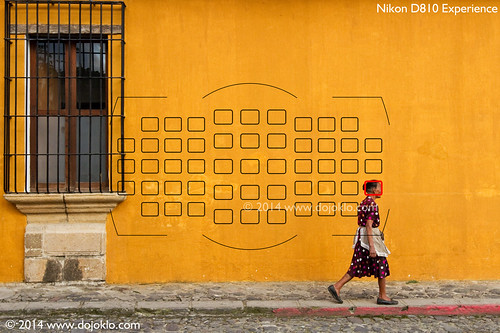
Simulated diagram of the Nikon D810 Viewfinder, showing the locations of all of the AF Points, with the active Single Point square shown in red. Please note that all AF Points will not be visible in the Viewfinder when shooting, only the active AF Point or Group.
Movie Live View
Just as with Live View, some “hidden” features can be accessed with the i Button when working in Movie Live View. The new “zebra stripes” feature is accessed with the Highlight Display item of the i Button menu. This will display lines on the screen at potentially over-exposed areas of the scene, thus helping you to adjust to the proper exposure. You can also press the i Button to adjust the Monitor Brightness and the Headphone Volume.
Camera Controls Assignments
A few other “hidden” features of the Nikon D810 can only be accessed by customizing one of the camera buttons to assign it to that function. For example, you can make use of the Viewfinder Virtual Horizon, which is a camera level that you can display in the Viewfinder. It will show an electronic level along the bottom of the screen as well as one on the right side, so that you can see both pitch and roll of the camera body. In order to use this feature, you need to assign either the Fn Button or the Pv Button to the Viewfinder Virtual Horizon option. You can also assign either of these buttons to the 1 Step Shutter Speed / Aperture setting, which will allow you to quickly change the shutter speed or the aperture setting in 1 EV full stops rather than the typical 1/3 EV adjustments that are made when you turn the Command Dials.
The Nikon D810 offers the Power Aperture feature, where you can smoothly open or close the aperture during movie shooting. While the previous D800/D800E only allowed use of this when recording to an external device, the D810 allows you to use Power Aperture when recording to a memory card. If you wish to use Power Aperture, you will need to assign Custom Settings g1 and g2 to Power aperture (open) and Power aperture (closed).

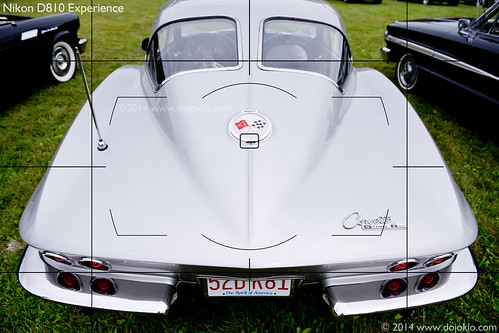
1963 Chevrolet Corvette Sting Ray, Split Window Fastback – 2014 Annual Antique Auto Show – Codman Estate, Lincoln, Mass. Use the Viewfinder grid or Viewfinder Virtual Horizon to keep your framing straight and level. Here I lined up the grid with the roof crease to both center the car and to keep the framing level.
Other Hidden Features
Another somewhat “hidden” feature is a method of changing which memory card and folder is being accessed during image playback. The D810 has both a CF and SD memory card slot, though you can only view images on one of them at a time. If you wish to switch over and view the images on the other card during image playback, simply press the Zoom-out Button repeatedly, and you will access the Playback slot and folder screen (rather than the calendar view screen of other Nikon models).
Finally, like all the current Nikon models, the D810 offers a powerful Auto ISO option, which will change the ISO setting if necessary in order to obtain a proper exposure. You can set the parameters of Auto ISO, including the Maximum Sensitivity and Minimum Shutter Speed that the camera will use for Auto ISO. One powerful option is that if you choose the Minimum Shutter Speed to be Auto, the camera will select a shutter speed based on the focal length of the lens. For example, a longer lens requires a faster shutter speed to avoid blur from camera movement. But, if you are unhappy with the choice that the camera is making, you can continue to press right from the Minimum Shutter Speed > Auto setting, and you can fine-tune this setting so that the camera selects a faster or slower Auto shutter speed.
If you wish to learn more about the Nikon D810, I explain these features and functions in even more detail, as well as explain all the other aspects of the D810 in my e-book guide Nikon D810 Experience, available on my Full Stop website. The guide not only explains the features, functions, and controls of the camera, but more importantly explains when and why you will want to use them in your photography. Take control of your D810 and the images you create! Click the link below to learn more, preview, and purchase the guide:
http://www.dojoklo.com/Full_Stop/Nikon_D810_Experience.htm
And, in conjunction with the book, I have created a detailed and comprehensive Nikon D810 Setup Guide spreadsheet, which has recommended Menu settings, Custom Settings, and exposure settings for various shooting situations such as Landscape, Performance, Sports, and Travel, in order to help you set up your camera. You can learn about and download this free “cheat sheet” spreadsheet here:
http://blog.dojoklo.com/2014/06/30/nikon-d800800e-nikon-d810-setup-guide-with-recommended-settings/
If you have found this helpful and plan to purchase a Nikon D810 or some lenses or accessories for it, please consider using my affiliate links for Amazon or for B and H, found at the left side of this page. Your price will be the same, but they will give me a small referral fee – thanks! And please feel free to spread the word if this blog has been helpful.


In both the d7100 and d800/e turning the sub command dial while holding the flash compensation button changes flash compensation. Turning the main command dial changes the flash mode – front curtain, rear curtain, red eye, etc. None of the choices turns the flash off. Each option is surrounded by a little box.
The d810 is different. The sixth choice turns the flash off completely. This is indicated by the disappearance of the little box and a 2mm circular icon with a line across. This is very hard to see, especially in dim light. And I did not know the choice existed, and turned off my flash accidentally.
It is in the manual, but after a page break and with no emphasis.
Hello, Thank you for pointing that out – I recently discovered this option too, and I will be sure to note it in my guide to the D810!
The D7100 also has the features of the viewfinder level, though only roll, not pitch, that can be assigned to the fn button. In addition, the feature to move between memory cards is also available on the D7100.