Nikon Z7 / Z6 Firmware Version 2.0 Update

In May of 2019, Nikon released Firmware Version 2.0 for the Z 7 and the Z 6, which added important features to these cameras. Most significantly, the cameras gained eye detection autofocus for still image shooting, which can be used when working in Auto-Area AF Autofocus Area Mode. This allows you to automatically locate and focus on a subject’s eye, as well as remain focused on it as the subject moves. A second major improvement is that the Z 7 and Z 6 can now update the exposure for each image in a burst when using Continuous High-Speed (Extended) Release Mode. Previously, the autofocus would be updated for each shot, however the exposure was locked at the first image. The third important change is that the autofocus has been improved for low-light shooting, with the detection range of the Z 7 now extended to -2EV, and the range of the Z 6 extended to -3.5EV. When using the a11 – Low-Light AF Custom Setting, the range is extended to -6EV for the Z 6, and remains at -4EV for the Z 7.

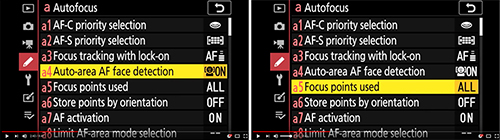
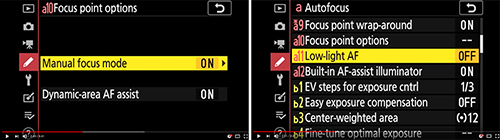
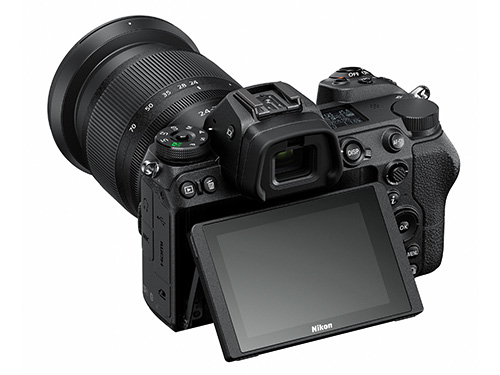
Left: The updated Custom Setting a4 – Auto-Area AF Face/Eye Detection menu item, now with the face and eye detection AF option. Right: You will notice a new icon near the lower-left of the shooting screen, indicating the Shutter Type that is in use. Here the “E” icon indicates the Electronic Front-Curtain Shutter.

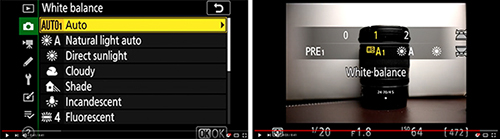
I have updated the text and images of my Nikon Z 7 / Z 6 Experience guide to incorporate these firmware Version 2.0 changes. The eye detection feature can be enabled with Custom Setting a4 – Auto-Area AF Face/Eye Detection. Custom Setting d5 has also changed, and is now called d5 – Shutter Type. Previously this menu item was used to enable the Electronic Front-Curtain Shutter, but it has now been updated to allow you to also select the Mechanical Shutter, or to choose the Auto option where the camera will choose the shutter type, based on the current shutter speed.

Various bug fixes and minor changes are also included in the firmware update, as listed on Nikon’s webpages. You can learn about the firmware and download it here:

Nikon Z 7:
https://downloadcenter.nikonimglib.com/en/products/492/Z_7.html

Nikon Z 6:
https://downloadcenter.nikonimglib.com/en/products/493/Z_6.html

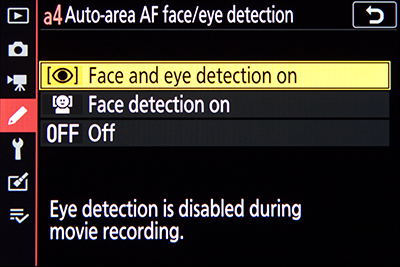
Auto-Area AF Face/Eye Detection item, to enable face and eye detection when using Auto-Area AF-Area Mode.

a4: Auto-Area AF Face/Eye Detection
This option applies when using the Auto-Area AF Area Mode, where the camera automatically selects the subject. When Face Detection is enabled and used with Auto-Area AF Area Mode and AF-S Focus Mode, the camera can locate a face to focus on, rather than simply locating the nearest subject or object. With the firmware Version 2.0 update to the Z 7 and Z 6, Custom Setting a4 now also offers the Face and Eye Detection option. If Face and Eye Detection is enabled, the camera will automatically locate one of the eyes, (typically the nearest eye), and a small focus point will surround that eye. If multiple eyes are detected, small triangles will surround the active AF Point. Press left or right on the Multi Selector or Sub-Selector to position the AF Point over another eye, if desired. When working in AF-S Focus Mode and the Shutter Button is half pressed or the AF-ON Button pressed, the focus point will turn green when focus is achieved. If a face is detected but the eyes are not, a larger focus point will surround the face of the nearest subject. Again, you can press left or right on the Multi Selector to reposition the AF Point over another face.

With Auto-Area AF Area Mode and AF-C Focus Mode, you can choose an initial AF Area to begin tracking a moving subject, and then the camera will retain focus on the subject as it moves about the frame. Press the OK Button to initiate the focus tracking square, locate it as desired, and press the OK Button again to begin tracking. When Face Detection or Face and Eye Detection are enabled, the camera will automatically locate and follow the nearest face or eye. Again, press left or right on the Multi Selector or Sub-Selector to position the AF Point over another face or eye, if desired. This feature can obviously be helpful if the subject you are focusing on or tracking is a person, and if their face or eye will remain visible to the camera. The Z 7 and Z 6 will also look at the upper body of the subject, so that it can ideally continue to track the subject even if the camera momentarily loses sight of the face if it turns or is obscured.

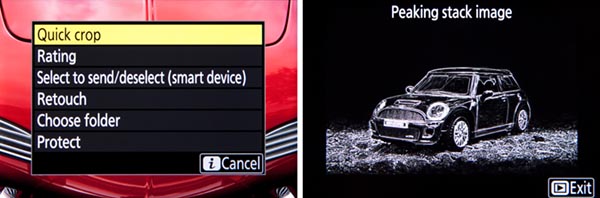
Face and Eye-Detection AF and Playback
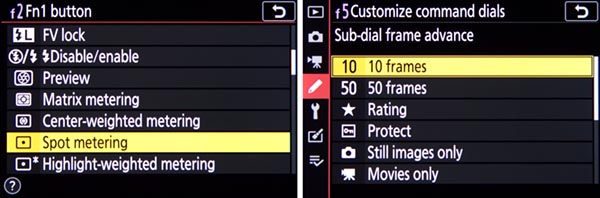
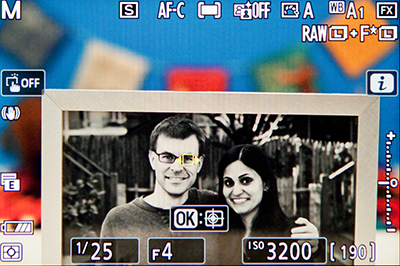
If the camera made use of face or eye detection autofocus when capturing an image, you can press the OK Button to quickly zoom in 100% at the face or eye, to inspect it for focus. As will be indicated by an icon on the playback screen, you can use the front Sub-Command Dial to quickly jump between faces in the image. 

Left: The camera made use of Eye-Detection AF when capturing this image, as indicated by the small red square on the subject’s right eye. Right: Press the OK Button to zoom in 100% at the area of focus.

d5: Shutter Type
This menu item was originally called Electronic Front-Curtain Shutter, and was used to enable that feature. However with the firmware Version 2.0 update the menu is now called Shutter Type, and offers additional options. The Electronic Front-Curtain Shutter of the Z 7 and Z 6 will help to reduce shutter movement, which can cause motion blur and thus reduce the sharpness of an image. The high resolution sensors, especially of the Z 7, can require careful shooting in order to obtain the sharpest images. Slight internal motion of the shutter mechanism can impact the results, such as with landscape, macro, and controlled studio shooting. So the Z 7 and Z 6 offer this Electronic Front-Curtain Shutter feature, which is used in both Viewfinder shooting and Live View on the rear Monitor. If the Electronic Front-Curtain Shutter is enabled, rather than the mechanical shutter’s front-curtain being used to expose the sensor as the image is captured, the sensor itself acts as the first curtain. (The mechanical front-curtain of the shutter goes up in advance in order to be out of the way and not move during actual shutter release.)

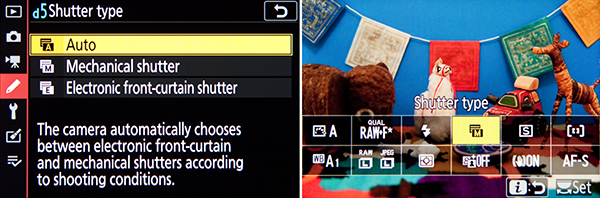
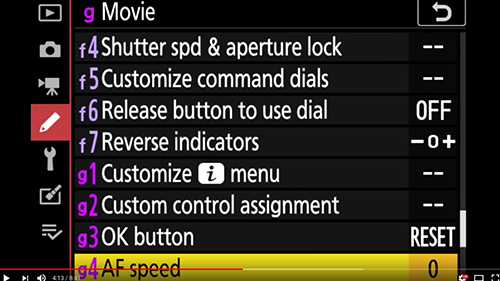
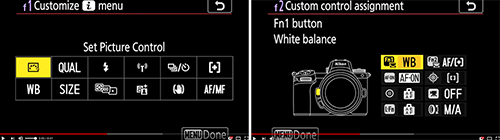
Left: Shutter Type, including the Electronic Front-Curtain Shutter to help eliminate the internal movement from the first shutter curtain, in order to reduce blur from small camera movements. Right: Add the “Shutter Type” item to the i Menu, for quick access during shooting.

You will not want to use the Electronic Front-Curtain Shutter for general shooting, but rather only for controlled shooting situations and when working on a tripod, ideally with a remote shutter release. It is recommended for tripod use with both slow shutter speeds (under 1/60) and with long telephoto lenses. You will not want to use this feature for capturing action and motion, as it may result in subject blur. Also note that the Electronic Front-Curtain Shutter can be used with shutter speeds up to 1/2000, and ISO settings up to 25,600 (Z 7) or 51,200 (Z 6). You can enable the Electronic Front-Curtain Shutter and make use of Exposure Delay at the same time, for when you are working on a tripod but do not have a remote shutter release.

If you will not be using the Electronic Front-Curtain Shutter, set this menu item for Mechanical Shutter, to make use of the mechanical shutter. With the Auto setting, the camera will automatically select which option to use, based on the shutter speed setting. The camera will use the Electronic Front-Curtain Shutter with slow shutter speeds, below 1/250, in order to help reduce blur caused by internal camera movement. You may wish to make use of one of the other shutter options of this menu, so that you know which shutter type your camera will be using at all times.

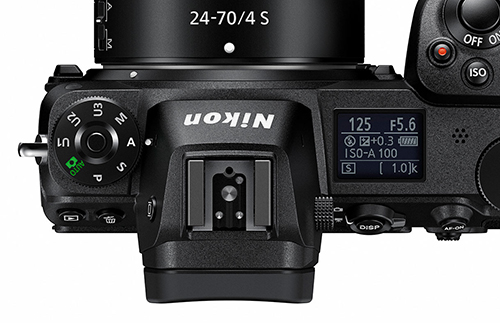
This new menu item also adds a new icon to the lower-left of the camera Monitor and Viewfinder during shooting. The A, M, or E icon indicates the Auto, Mechanical, or Electronic option as the current setting.

You can learn about all these new features, plus all the other features, functions, controls, and menu items of the Nikon Z7 and Nikon Z6 mirrorless cameras in my Nikon Z 7 / Z 6 Experience comprehensive guide, now updated for camera Firmware Version 2.0!

Hidden Features of the Nikon Z7 and Nikon Z6

Camera users are often curious about “hidden” features that their camera may have, though typically most advanced models really don’t have many, as long as one carefully goes through all of the Menu and Custom Settings items, and reads through the manual or a guide. However, with so many options and functions, there are a few items that are actually a bit hidden away on the Nikon Z7 and the Nikon Z6. It’s not that the Z7 and Z6 manuals doesn’t mention them, or that they can’t be found with careful investigation of the camera, but you may need to have them called to your attention to learn how to locate them and how to take advantage of them. And there are a few button shortcuts to access features and settings that you simply need to learn if you wish to take advantage of, because once you are using your camera, they are not indicated in any menus or button icons.

These article is adapted from a section in my in my comprehensive Nikon Z 7 / Z 6 Experience user guide to the Nikon Z7 and Nikon Z6. All of these “hidden” features, as well as all of the other features, functions, settings, and controls of the Z7 and Z6 are discussed in detail, in the guide.

Nikon Z7 Nikon Z6 body controls detail tips tricks

Figure 1 – Detail of the controls of the Nikon Z7

Displays and Button Settings – When the Information Display or the Live View scene is active on the rear Monitor, you can press some of the camera buttons to change the corresponding settings as you view them on the rear Monitor. Or you can also view and change them in the electronic Viewfinder, while shooting. For example, by default, the Fn1 Button is assigned to White Balance and the Fn2 Button is assigned to Focus Mode/AF-Area Mode. When you press these buttons, you can view and change those settings, and the screen will even indicate which Command Dial to use for each setting (see Figure 2 – left). If you customize those buttons for another setting such as Auto Bracketing or HDR, you will be able to view and change those settings on the displays, as you press the assigned button and turn the Command Dials.

Nikon Z7 Nikon Z6 tips and tricks

Figure 2 – Left: Using a Fn Button and the Command Dials to change the White Balance setting on the rear Monitor. Right: Changing the HDR options via the Photo-Mode i Menu.

i Button Features – You can press the i Button to access different contextual i Menus during photo shooting, video, and image playback. The Z7 and Z6 also add the ability to change additional sub-options of various settings, via the i Menu, without having to dig into the menus to set those options. For example, when using the WB item on the Photo-Mode i Menu to select Auto White Balance, you will also be able to select which of the three Auto White Balance sub-options you would like. And you will be able to directly fine-tune a White Balance setting using the adjustment grid. If you replace some of the default i Menu items with options such as HDR, Auto Bracketing, or Multiple Exposure, you will be able to directly access and change the various settings for those features (see Figure 2 – right).

In some situations, the i Menu it is the only way to access and change certain of these hidden features. For example, the Photo-Mode i Menu will allow you to access the Split-screen display zoom feature. You will first need to use Custom Setting f1 – Customize i Menu and assign Split-screen display zoom to the Photo-Mode i Menu. Then when you are composing an image, you can access this feature which allows you to simultaneously zoom-in at two different areas of the scene, to help verify focus and to ensure that the composition is level across the scene (see Figure 3). This can come in handy for landscape and architectural photographers.

Nikon Z7 Nikon Z6 tips and tricks

Figure 3 – Left: Press the i Button to access the i Menu screen with various shooting settings. You can use f1 to customize this menu, and add items such as Split-Screen Display Zoom. Right: Split-Screen Display Zoom shown in use, to compare two areas of the same scene to help determine if the framing is level.

The Playback i Menu will allow you to access two hidden features, the Quick Crop option and the Peaking Stack Image preview. During image playback, you can magnify an image and adjust the framing as desired. If you then press the i Button to access the Playback i Menu, and select the Quick Crop option, you can automatically crop the image and save a new image with the crop that is currently seen on the display (see Figure 4 – left). If you have used the Focus Shift Shooting feature to create a series of images that will later be combined into a focus-stacked image, you can view a monochrome preview of the final, stacked image. To view this preview, first use image playback to view any of the images from the Focus Shift Shooting series. Then press the i Button and select the Display peaking stack image option to view the preview image. Note that this preview image is only available when using certain lenses (see Figure 4 – right).

Nikon Z7 Nikon Z6 tips and tricks

Figure 4 – Left: Accessing the Quick Crop feature via the image Playback i Menu. Right: The Peaking Stack Image preview, accessed with the Playback i Menu when viewing one of the images from a Focus Shift Shooting series.

And when a Multiple Exposure series is in progress, you can press the Playback Button to view the last image. If you then press the i Button, you will access a menu that allows you to view the Multiple Exposure progress, as well as edit the series by retaking or discarding the last exposure if desired.

There are a couple different ways to change the settings on the i Menu. You can highlight the desired icon (see Figure 5 – left) then press the OK Button and view all the options. This method will even allow you to access and change various applicable sub-options. Or you can highlight the desired icon, and turn the rear Main Command Dial to directly change the setting on that screen. If a setting option includes sub-options, such as the three available Auto White Balance options, or the Continuous Low frame rates (see Figure 5- right), you will use the front Sub-Command Dial to change the sub-options.

Nikon Z7 Nikon Z6 tips and tricks

Figure 5 – Left: Photo-Mode i Menu, accessed by pressing the i Button. After highlighting the desired setting, either press the OK Button, or use the Command Dials to change the settings. Right: The rear Main Command Dial will select the setting, and the front Sub-Command Dial can be used for any available sub-options, such as the Continuous Low frame rate.

Monitor Mode Button – This button isn’t hidden, but it is causing some users a bit of confusion when they are not able to see any menus or playback images on their rear Monitor screen. In order to select if the Monitor or the Viewfinder will be in use, you will need to press the Monitor Mode Button, which is located on the side of the Viewfinder “bump.” Press it repeatedly until you see the Prioritize viewfinder option, as you look on the rear Monitor or in the Viewfinder. Set it for this option for now, so that you can make use of both the Viewfinder and the rear Monitor. If you are pressing the Playback Button or the Menu Button and not seeing anything appear on the rear Monitor, be sure to look in the Viewfinder and set the Monitor Mode to Prioritize viewfinder.

Live View Exposure Preview – An important function to make note of is that you need to enable Custom Setting d8 – Apply Settings to Live View in order to view the scene, in the Viewfinder and on the rear Monitor, with the current camera and exposure settings applied. This will allow you to better preview the resulting image and make exposure adjustments, and will also enable you to access the Live View Histogram of the scene by pressing the DISP Button.

Custom Control Assignments – A few other hidden features of the Nikon Z7 and Z6 can only be accessed by customizing one of the camera buttons to assign it to that function, using Custom Setting f2. For example, a customization will allow you to press a hold one of the Fn Buttons to temporarily switch to a different Metering Mode, such as Spot Metering (see Figure 6 – left). If you will be using non-CPU, F-mount lenses with the Z7 or Z6, you can register the lens to the camera, and thus gain additional functions such as in-camera Vibration Reduction. You will need to use f2 to assign the Choose non-CPU lens number option to one of the buttons, so that you can tell the camera which lens number is in use.

If you are making use of an optional wireless remote to trigger multiple cameras, there is also a “hidden” setting for this in the Custom Setting f2 button assignments. You can choose to assign the Fn1 Button, Fn2 Button, or Sub-Selector Center press to the Sync. Release selection option, which is used in conjunction with Custom Setting d3 – Sync. Release Mode Options. You can set up the camera so that, for example, when using the Z7 or Z6 as a master camera to remotely trigger other cameras, you can press the Fn1 (or Fn2) Button while taking the shot, and then just the master camera will shoot, or just the remote cameras and not the master, based on your settings.

Nikon Z7 Nikon Z6 tips and tricks

Figure 6 – Custom Control Assignments – Left: Assigning the Fn1 Button to the Spot Metering function, to temporarily switch to a different Metering Mode with the press of the button. Right: The Customize Command Dials, Sub-Dial Frame Advance options, to use a dial to jump ahead 10 images during image playback.

Sub-Dial Frame Advance during Playback – If you wish to quickly scroll through your images as you view them on the rear Monitor during playback, you can use the rear Main Dial to advance one image at a time, and use the front Sub-Command Dial to advance 10 or 50 images. To set this up, access Custom Setting f5 – Customize Command Dials, and set the Menus and playback option for On. The Sub-Command Dial will then be used to jump 10 or 50 images at a time, based on the Sub-dial frame advance setting. Set the Sub-dial frame advance item for 10 images or 50 images, or you can also choose to jump to protected images, still images or movies only, or to a different folder (see Figure 6 – right).

One Button Playback Zoom / Histogram – Using Custom Setting f3 – OK Button, you can assign the OK Button so that during image playback it will immediately zoom-in, at the magnification level of your choice, centered at the area of the active focus point so that you can closely inspect your image. Or you can instead assign the button press to display a large histogram with the image, so that you can evaluate your exposure (see Figure 7 – left).

Nikon Z7 Nikon Z6 tips and tricks

Figure 7 – Left: Use Custom Setting f3 – OK Button, Playback Mode to set the OK Button to show a magnified view or to show a large histogram. Right: Touch the bottom of the screen during full-image playback in order to access the “Frame Advance Bar” touch screen feature.

Frame Advance Bar – This image playback feature enables you to use the touch screen to quickly scroll through images without having to swipe one-by-one (see Figure 7 – right). And when viewing a magnified detail of an image, use the touch screen arrows to view the same magnified area of previous or following images.

Flash Information Screen – With a compatible optional Speedlight flash attached and turned on, such as the SB-5000 or SB-500, press the DISP Button repeatedly to access the Flash Information Screen showing the current flash settings, and then press the i Button to view and change the various settings and options, including Wireless Flash Options (see Figure 8).

Nikon Z7 Nikon Z6 tips and tricks

Figure 8 – Left: When using an optional Speedlight flash, press the DISP Button to access the Flash Information Screen showing the current flash settings. Right: Then press the i Button to view and change the various settings and options.

Nikon Z7 / Nikon Z6 Menu Setup Guide

In addition to my Nikon Z 7 / Z 6 Experience user guide, I also offer a Z7 / Z6 Menu Setup Guide, with suggested settings and starting points for most all of the camera menu settings and Custom Settings. The Excel spreadsheet includes separate listings for different shooting situations including Landscape, Studio, Action, etc. You can download the spreadsheet here:

http://www.fullstopbooks.com/setup-guides/

Again, all of these hidden features and settings, and other unique features, as well as all of the other features, functions, settings, and controls of the Z7 and Z6 are discussed in detail, in my comprehensive Nikon Z 7 / Z 6 Experience user guide.

Nikon, Nikon Z7, Nikon Z6, Z7, Z6, book, menu, guide, tips, tricks, how to

And for any portrait photographers using the Nikon Z7 / Z6, here is an interesting article I recently came across at the Pixpa.com blog, which discusses all the numerous aspects to consider when creating a portrait, including lighting, background, angles, and making the subject relaxed and natural. It is a helpful tutorial for new portrait photographers, and a nice refresher for those already making portraits.

https://www.pixpa.com/blog/master-portrait-photography

Be sure to share your portraits and other photos on my Nikon Z7 / Z6 Setup and User Tips Facebook page:

https://www.facebook.com/groups/285030165630126

Nikon Z 7 / Z 6 – Exploring the Menu Settings

As with all new mirrorless and dSLR cameras, the lists of specifications don’t tell the entire story. Many of the important functions, options, and additions of a new camera can be found in the menus and Custom Settings. These are the types of options that can really differentiate a camera, from a user-experience perspective, and yet these options are often over-looked by reviewers and spec comparison posts. For example, two cameras may share the same autofocus AF Modes and AF Area Modes, and thus look equal on a spec comparison sheet. But one will be much better suited for photographing action and movement because it has additional menu options and Custom Settings which allow the user to tweak and customize the AF system for their specific needs and shooting style.

Nikon Z 7 Nikon Z 6 Custom Settings

Some of the Custom Settings options of the Nikon Z 7

A video of all the Nikon Z 7 menu items has been posted on YouTube by Jeff Curtner. You can find the video here. It is simply a video of someone navigating all the Z 7 menu items, the i Menu, and the Live View display, but lots of information can be gathered from this, including a few menu options that have not been mentioned in Nikon’s materials or by other reviews of the Nikon Z 7 and Nikon Z 6. All of the screenshots in this post have been taken from this video.

Despite being a mirrorless camera, and thus differing from a Nikon dSLR, a large number of the menu items and options are similar to the Nikon D850 and other recent Nikon models. I will not go into detail about any of those items, since if you are currently using a D850, D500, D7500, D750, etc, you will already be familiar with those menu items and their options. You can consult one of my Menu Setup Spreadsheets to learn about suggested settings for those menu items, or have a look at my comprehensive user-guides for these cameras, such as Nikon D850 Experience. A comprehensive user-guide for the Z 7 and Z 6, Nikon Z 7 / Z 6 Experience, will be available in November or December 2018. You can learn more about it here:

http://www.fullstopbooks.com/nikon-z-7-z-6-experience/

Menu Setup Spreadsheets:

http://www.fullstopbooks.com/setup-guides/

Comprehensive User Guides for most Nikon dSLR models:

http://www.fullstopbooks.com

And now a look at some of the Menu and Custom Setting options of the Nikon Z 7 and Nikon Z 6 that have not been discussed in many recent Z 7 and Z 6 camera reviews. Some of the most important ones are in the Custom Settings items, but we will start at the top of the Menu tabs, with the Photo Shooting Menu:

Photo Shooting Menu

The Expeed 6 processor of the Nikon Z 7 and Z 6 offers processing speed that allows for some new features, including Diffraction Compensation, a Mid-Range Sharpening Picture Control parameter in addition to the Sharpening and Clarity parameters, and the new Creative Picture Controls. As an in-camera processing feature, Diffraction Compensation may potentially slow down the maximum continuous frame rate a tiny bit, though perhaps not – we will have to read the fine-print of the Nikon Z 7 User’s Manual when it is available. The Creative Picture Controls are found in the Set Picture Control menu, and listed after all the typical Picture Controls. If you don’t wish to separately set the three Picture Control sharpening parameters, you can use the new Quick Sharp option to adjust these sharpening-related parameters together.

Nikon Z 7 Z 6 menu

Diffraction Compensation menu item (left), and the Creative Picture Controls as found in the Set Picture Control menu (right). The Movie Picture Control option is shown here, but a similar menu is also found in the Photo Shooting Menu, for still image shooting.

The White Balance menu item is located in the Photo Shooting Menu, though for quick access it can also be assigned to one of the Function Buttons, or changed via the i Button Menu on the rear Monitor or in the Viewfinder. As with recent Nikon models, the Z 7 and Z 6 offer three different Auto White Balance options, Keep White, Normal, and Keep Warm Lighting Colors. The cameras also offer the recently added Natural Light Auto option, designed to reproduce colors as the eye sees them in natural light. And there are the other standard Nikon WB options, including multiple Fluorescent sub-options such as Day White and Cool-White. To access these options quickly while shooting, you can assign WB to one of the customizable buttons, and then press that button and change the WB setting as you view it in the electronic Viewfinder or on the rear Monitor, as shown in the figure below.

Nikon Z 7 Z 6 menu setup

Left: Photo Shooting Menu – White Balance options, including three Auto WB options, and the Natural Light Auto option. Right: If WB is assigned to one of the camera  buttons, you can also quickly access and change this setting in the Viewfinder or on the rear Monitor.

The Z 7 and Z 6 offer in-camera, 5-axis Vibration Reduction, for both still image and video shooting. This image stabilization also works with F-mount lenses, including non-VR lenses, via the Nikon FTZ Adapter. (Image stabilization will be limited to 3-axis VR with non-VR lenses.) I’m not sure if this menu item shown below is for enabling the in-body electronic image stabilization, or if it is an option that is used with newer Nikon lenses that have VR, but don’t have the VR and VR Mode switches on the lens itself. I will update when more information is known.

Nikon Z 7 Z 6 menu settings setup

Left: Vibration Reduction menu item, to enable VR and to set the VR Mode. It is possible that this is not the in-camera Electronic Vibration Reduction menu item, but rather it is possibly for enabling VR on newer lenses that don’t have the VR and VR Mode switches on the lens itself. Right: Focus Shift Shooting options (Focus stacking), including the Peaking Stack Image preview image option.

The focus stacking feature of the Z 7 and Z 6 is called Focus Shift Shooting, and is accessed in the Photo Shooting Menu. You will use this menu to set the Number of Shots, Focus Step Width, and Interval between shots. It will also allow you to lock the exposure on the first frame, enable completely Silent Photography for the process, and create a new storage folder to save the focus stack images where you can quickly locate them. The new Peaking Stack Image option will display a monochrome preview of the final focus-stacked images, which can be viewed after the focus stacking function is performed. Beware that the Silent Photography option can result in banding in the images, particularly under artificial lighting that cycles. So if you are using this option, it is best to verify that your images are clean before initiating the Focus Shift process.

Custom Settings Menu

Many of the importation functions, options, and customizations for the Z 7 and Z 6 can be found in the Custom Settings Menu. These menu items are often where the important, powerful functions of a Nikon camera are found. For example, the on-camera, phase-detection aspect of the hybrid autofocus system of the Z 7 and Z 6 allows for Face-Detection autofocusing, with both Viewfinder shooting and Live View shooting. This feature can only be used with the Auto-Area AF area mode, and is enabled with Custom Setting a4. The Custom Setting a5 – Focus Points Used, can be used to limit the number of selectable focus points. The Z 7 has 493 AF Points, and the the Z 6 has 273 AF Points, so that is a ridiculous number of focus points to have to click across in order to locate the active AF Point where you want it to be. I will have to confirm this, but I believe that this menu item will be used to limit the number of selectable points, so that you can more quickly and easily select the AF Point you desire. I am going to speculate that all the the AF Points will actually be used by the camera when automatically tracking a moving subject.

Nikon Z 7 Z 6 Custom Setting menu setup

Left: Custom Setting a4, to enable AF Face Detection when working in Auto-Area AF area mode. Right: Custom Setting a5, to limit the number of selectable AF Points.

The Z 7 and Z 6 also offer a Dynamic Area AF area mode, where the selected AF Point is used to focus on the subject, but the immediate surrounding points will help retain focus on the subject if it momentarily strays from the initial point. This is similar to the 9-Point Dynamic-Area AF of previous Nikon dSLR models. The Custom Setting a10 – Focus Point Options offers the Dynamic-Area AF Assist item, which applies to this area mode. If enabled, you will be able to also view the active surrounding AF Points, in the Viewfinder when shooting, and not just see the single selected AF Point. The Custom Setting a11 – Low-Light AF is a new option for the Z 7 and Z 6, and is used to make the autofocusing system even more sensitive when working in low light. However, enabling this option may cause a slight lag in autofocusing.

Nikon Z 7 Z 6 Custom Settings menu setup

Left: Custom Setting a10, to enable the Dynamic-Area AF Assist option in order to view all the active AF Points when using that AF Area Mode. Right: Low-Light AF, to assist with focusing in low light situations.

The Z 7 and Z 6 offer an Electronic Front-Curtain Shutter option, found in Custom Setting d5. This feature makes use of an electronic shutter, using the sensor itself as the shutter, and thus eliminates the sound and the motion of the first curtain of the mechanical shutter. This can help to eliminate slight internal camera movements and vibrations when capturing an image, and is useful for tripod shooting such as landscape and macro shots. The cameras also offer a Silent Shutter option, which will be completely silent. However, that can cause banding when used with artificial lighting that cycles. When Custom Setting d8 – Apply Settings to Live View is enabled, all of the various camera settings and exposure settings will be applied to the scene as viewed on the rear Monitor during Live View. This will include the White Balance setting, Picture Control, and Exposure Compensation amount. Thus you will better be able to preview the appearance of the final image.

Nikon Z 7 Z 6 Custom Settings menu setup options

Left: Custom Setting d5, to enable the Electronic Front-Curtain Shutter. Right: Custom Setting d8 – Apply Settings to Live View, where the scene on the rear Monitor will reflect the current camera settings and exposure settings.

The cameras offer a newly designed i Menu, which will allow you to quickly access and change various settings. This menu can be accessed on the rear Monitor, and also in the electronic Viewfinder. This offers the advantage of changing various camera settings, while shooting, without taking the camera down from your eye. Custom Setting f1 enables you to Customize i Menu, so that you will be able to access the settings and functions you use most frequently. For example, if you often use the in-camera HDR or Bracketing features, you can add them to this menu. Custom Setting f2 – Custom Control Assignment allows you to customize various buttons and controls on the camera, including the Fn1 and Fn2 Button, and the Movie-Record Button. For example, you can assign WB or AF Modes to the Fn Buttons, and then press the button and turn the dials to quickly adjust those settings. The Multi-Selector Center Press can be assigned to a function such as AE/AF Lock, or I believe it will be able to be used to quickly, temporarily switch to a different AF Mode / AF Area Mode. This is useful if you need to quickly switch between shooting a still subject and a moving subject, while shooting.

Nikon Z 7 Z 6 Custom Settings menu suggested setting setup

Left: Custom Setting f1, used to customize the functions available on the i Menu. Right: Custom Setting f2 – Custom Control Assignment, to customize the various camera buttons.

Setup Menu

There are a few additional notable new features located in the Setup Menu, including the ability to adjust the Brightness and the Color Balance of both the rear Monitor and the electronic Viewfinder. The HDMI menu item allows you to adjust the video settings when recording to an optional external device, including 8-bit or 10-bit, and enabling N-Log, and View Assist to preview the appearance of the final image.

Nikon Z 7 Z 6 Custom Setting menu setup options

Setup Menu options for adjusting Monitor Color Balance (left), and the advanced HDMI settings for recording video to an optional external device (right).

Of course there are additional menu items and functions that have not been discussed here, including many of the features found on previous models such as the D850. You can learn more about many of the new features and functions of the Nikon Z 7 and Nikon Z 6 in my previous blog post Nikon Z 7 and Z 6 – Beyond the Specifications:

http://blog.dojoklo.com/2018/08/24/nikon-z-7-and-z-6-specifications/

And be sure to join the Nikon Z6 and Z7 Setup and User Tips Facebook page, to learn, share, and ask more about using your Z 6 / Z 7.

~ ~ ~

To learn about all the features, functions, controls, and customizations of the Nikon Z 7 and Nikon Z 6, be sure to have a look at my Nikon Z 7 / Z 6 Experience user guide, to be available in November or December 2018. It is a comprehensive 350+ page guide, to help you take control of your camera, and the images you create.

Nikon, Nikon Z7, Nikon Z6, Z7, Z6, book, menu, guide, tips, tricks, how to

My Nikon Z 7 / Z 6 Menu Setup Spreadsheet Excel document will be available in October 2018. It will be free for a limited time after the introduction of the camera, and will be available for download here:

http://www.fullstopbooks.com/setup-guides/

If you want to pre-order or order the Nikon Z 7 or Nikon Z 6, please consider using my affiliate links below. Your price will be the same, but they will give me a small commission – thanks!

Nikon Z 7 at Amazon: https://amzn.to/2MPaiU5 – $3396.95

Nikon Z 7 at B and H:
https://www.bhphotovideo.com/c/buy/Mirrorless_System_Cameras/ci/16158/N/4288586281/BI/7364/KBID/7886/kwid/000/DFF/d10-v1-t3-z4288586281

Nikon Z 6 at Amazon: https://amzn.to/2MKHSe0$1996.95

Nikon Z 6 at B and H:
https://www.bhphotovideo.com/c/buy/Mirrorless_System_Cameras/ci/16158/N/4288586281/BI/7364/KBID/7886/kwid/000/DFF/d10-v1-t3-z4288586281

Why Nikon Isn’t Concerned about the Z 7 vs. a7R III

After years of speculation and anticipation, Nikon has finally introduced the new Nikon Z 7 and Nikon Z 6 full-frame mirrorless cameras. Initial reactions have been heated and emotional, as people debate whether or not the single XQD memory card slot will be its downfall, or whether the autofocusing system will be up to the needs and expectations of Nikon dSLR users. And of course there are endless comparisons of whether they live up to the offerings of the comparable Sony a7R III and a7 III full-frame mirrorless models.

Comparing the specifications, the two sets of cameras are similar on many points. The Z 7 and the a7R III are the high resolution models, while the Z 6 and the a7 III are the little brothers, with most all of the same features as their big brothers, but with a lower mega-pixel count. With some features, such as eye-detection autofocus, burst rates, and buffer rates, the Sonys appear to come out ahead, and with many other features the Nikons seem equal or better.

Detail of an official Nikon Press Photo of the Nikon Z7 body.

But I contend that, while Nikon certainly considered the Sony models when designing the new Z series, this Nikon vs. Sony comparison is not their primary concern. Nikon put that aside, and concentrated on Nikon. They designed a “future-proof” lens system with the new Z-mount, which will begin to make a large difference with the introduction of future wide-angle and fast lenses. There is already an f/0.95 lens that has been announced, the 58mm f/ 0.95 S Noct Lens. Most importantly, they designed a mirrorless camera that looks like a Nikon, feels like a Nikon, and functions like a Nikon. The camera buttons will all be familiar to a Nikon dSLR user, and just as important, the camera menus and navigation will be the same.

As anyone who has used a Sony a7 model will tell you, navigating the menus, finding the setting you are seeking, then interpreting a setting and its options can be painful. I can attest to that, I wrote the book on it! (Sony a7R III Menu Setup Guide and Sony a7 III Menu Setup Guide). It is a very different experience from using a Nikon or Canon menu, and it takes a bit of getting used to. Some of the Sony buttons, controls, and functions offer the same issue, and are not necessarily intuitive to either a new user or to a user coming from Nikon. And that is where Nikon wins… with existing Nikon users.

The Z cameras are not necessarily designed for camera users trying to decide between the Sony a7 and the Nikon Z. If a dedicated Nikon user wanted to try out or to jump to a mirrorless system, a Nikon user would have already bought a Sony a7 camera (or a Fuji or one of the other offerings). Instead, the Z cameras are designed for Nikon users trying to decide between buying a mirrorless camera or not buying a mirrorless camera. If they are going to buy a mirrorless camera, there is a high likelihood they will now be buying a Z 7 or Z 6. Nikon has greatly reduced the friction of converting to mirrorless, by offering a familiar camera. And in addition to the camera body, buttons, menus, options, functions, and features being similar to their current Nikon dSLR, Nikon users can painlessly bring along all their F-mount lenses, with the simple addition of the FTZ Lens Adapter. And Nikon users can expect that the image quality is going to be there.

Beyond the hype and chatter, the pre-orders for the Z cameras appear to be happening, and I believe that these cameras are going to be a success. Nikon has finally entered the full-frame mirrorless camera market, and they are here to stay.

If you want help setting up the Menus and Custom Settings of the Nikon Z 7, Nikon Z 6, Sony a7R III, or Sony a7 III, have a look at my comprehensive Menu Setup Spreadsheets, which are all free for a limited time after the introduction of each of the cameras. Or they are always free with a link included within the text guides for each of the cameras, which can be found at my FullStopBooks website, including the new Nikon Z 7 / Z 6 Experience comprehensive user guide to the Nikon Z 7 and Nikon Z 6.

And if you want to continue to learn, discuss, and ask questions about the settings, features, and functions of the Z 7 and Z 6 from a user-standpoint, please join the Nikon Z 7 / Z 6 Setup and User Tips Facebook group!

Nikon, Nikon Z7, Nikon Z6, Z7, Z6, book, menu, guide, tips, tricks, how to

If you want to learn more about some of the features and specifications of the Nikon Z 7 and Nikon Z 6, have a look at my blog post Nikon Z 7 and Z 6 – Beyond the Specifications.

If you want to pre-order or order the Nikon Z 7 or Nikon Z 6, please consider using my affiliate links below. Your price will be the same, but they will give me a small commission – thanks!

Nikon Z 7 at Amazon: https://amzn.to/2MPaiU5 – $3396.95

Nikon Z 7 at B and H:
https://www.bhphotovideo.com/c/buy/Mirrorless_System_Cameras/ci/16158/N/4288586281/BI/7364/KBID/7886/kwid/000/DFF/d10-v1-t3-z4288586281

Nikon Z 6 at Amazon: https://amzn.to/2MKHSe0$1996.95

Nikon Z 6 at B and H:
https://www.bhphotovideo.com/c/buy/Mirrorless_System_Cameras/ci/16158/N/4288586281/BI/7364/KBID/7886/kwid/000/DFF/d10-v1-t3-z4288586281

Nikon FTZ Lens Adapter

Nikon Z 7 and Z 6 – Beyond the Specifications

After several years of speculation and anticipation, Nikon has just introduced their first full-frame mirrorless cameras, the Nikon Z 7 and the Nikon Z 6. The Z 7 is a high-resolution model boasting 45.7 MP, and the Z 6 is nearly the same camera, but has 24.5 MP, and costs $1996 vs. $3396 for the Z 7. There are some additional differences such as the number of autofocus points, and the ISO ranges.

Nikon Z 7 body detail

Detail of the Nikon Z 7 full-frame mirrorless camera, including the 3.2″ tilting touch-screen monitor. Official Nikon image.

If you have been reading about these models, you have likely found numerous comparison posts between the two cameras, the Nikon D850 dSLR, plus the competing Sony a7R III and Sony a7 III mirrorless models. Simply comparing the specifications on the surface can be a helpful starting point, but we need to dig a little deeper in order to make true, user experience comparisons.

Continuous Frame Rate and Buffer

For example, the Nikon D850 dSLR lists a 9fps maximum burst rate, but users quickly discovered that this was based on the use of the optional MB-D18 battery grip and EN-EL18a/b battery. The maximum frame rate without the battery grip is 7 fps, and even then that rate is not achievable without the use of specific settings including AF-S, M or S shooting mode with a 1/250 or faster shutter speed, and various settings like VR and auto ISO turned off.

The Nikon Z 7 has a similar situation, with the maximum frame rate listed as 9 fps. However, this is rate can only be attained when capturing JPEG or 12-bit RAW files, and the exposure will be locked at the first frame of the burst. The camera will continue to update focus for each shot, when using AF-C focus mode, but not the exposure settings. When using Silent Mode, where shutter sound is completely eliminated, the maximum fps will be 8 fps. When capturing 14-bit RAW files, the maximum frame rate is reduced to 5.5 fps, however this will enable continuous focus, and exposure will be determined for each shot in the burst, and not just locked at the first shot. The maximum rate can be maintained for up to 18 continuous 14-bit compressed RAW images,or 23 12-bit lossless compressed images. Note that the Sony a7R III achieves up to 10 fps (with viewfinder blackout), or 8 fps without blackout, and exposure is not locked on the first exposure with either frame rate, unless desired. The Sony maximum rate can be attained for 40 RAW images, or 89 compressed RAW images. That is a significant difference, which Nikon will need to improve in future models.

Detail of the Nikon Z 7 full-frame mirrorless camera, including the new Z-mount lens mount. Official Nikon image.

Electronic Viewfinder and Touch Screen

Compared to a dSLR, mirrorless cameras such as the Z 7 and Z 6 make use of an electronic viewfinder (3690K dots) rather than an optical viewfinder. An electronic viewfinder can take a little bit to get accustomed to if you are used to working with the optical viewfinder of a dSLR, as there can be a little lag, the brightness changes with the scene and exposure, and it consumes battery life. However it has its advantages. An electronic viewfinder will reflect many of the actual camera settings, such as exposure, white balance, and Picture Control. This not only helps you envision the final image, but can save you in situations where you may have the wrong WB set. It also allows you to see and change certain camera settings, such as metering mode and autofocus modes, while looking through the viewfinder (by pressing the i Button to access a customizable settings screen). It also allows you to review images and movies in the viewfinder, without taking your eye away to view the rear screen.

The Z 7 and Z 6 provide a couple different ways to confirm focus, when manual focusing through the Viewfinder or on the rear Monitor. There is a Rangefinder feature, as found on many Nikon dSLR models, where you place the AF Point on your desired subject or detail, and as you manually focus, the AF Point will illuminate when that detail comes into focus. You can also enable Focus Peaking, where high-contrast edges of the actual subject or detail in the scene will illuminate when that distance is in focus. You can select which color is used to indicate focus. Focus Peaking is often used when manually focusing when shooting video, and still photographers have adapted the use of the feature as well.

The 3.2″ rear monitor has touch-screen capabilities for Live View, navigating menus, changing settings, and for locating your AF Point and autofocusing. This differs from the Sony a7R III, where the touch-screen is only used for Live View and for autofocusing.

Nikon Z 7 body

Detail of the Nikon Z 7 full-frame mirrorless camera, including the rear monitor and controls. Official Nikon image.

Autofocus System

The AF system of the Z 7 and Z 6 is going to be slightly different than you may be used to with a Nikon dSLR. The hybrid AF system (phase-detection and contrast-detection) of the Z 7 has 493 AF points, and the Z 6 has 273 points, both covering 90% of the frame. That means you will be able to focus on and track subjects throughout almost the entire frame, without necessarily having to lock focus and recompose. The on-sensor phase-detection AF system is similar to Live View autofocusing, and thus should be spot-on without having to calibrate lenses (except for lenses that can’t take full advantage of the hybrid AF system, and instead rely on the contrast-detection system).

You will be able to use AF-S Focus Mode for still subjects, and AF-C for tracking moving subjects. The AF Area Modes differ slightly from a Nikon dSLR. You will be able to choose from Pinpoint AF for very precise AF Point positioning (in AF-S mode only), Single-Point AF, 9-point Dynamic-Area AF (in AF-C mode), Wide-Area AF, and Auto-Area AF. If you wish to take advantage of face detection, you will have to set for Auto-Area AF, and enable the Auto-Area AF Face Detection item of the menu. Nikon says that the face-detection will also look at the upper body of the subject, and thus will continue to track it even if the face is momentarily out of view.

Tracking a subject throughout the frame, similar to Nikon’s 3D-Tracking on a dSLR, will be done in Auto-Area AF and AF-C. The implementation of it is a bit different, however, and DP Review goes into detail about the new process. It is a bit more cumbersome than how it is done on a dSLR:

https://www.dpreview.com/reviews/nikon-z7-first-impressions-review/5

Nikon Z 7 mirrorless autofocus AF 493 point

The 493 AF Points of the Nikon Z 7, covering 90% of the frame. Official Nikon image.

Other Features and Functions

The ISO range of the Z 7 is 64 – 25,600, expandable to 32 – 102,400. With its different sensor, the Z 6 has a wider ISO range on the high end, of 100 – 51,200, expandable to 50 – 204,800.

New Z-mount lens mount – Wider, which will allow for lenses such as the 52mm f/0.9 NOCT lens, coming from Nikon. Three lenses will be available at first, along with a Z to F ZTF Adapter to use Nikon F-mount lenses.

EXPEED 6 processor, new mid-range sharpening parameter, new Creative Picture Controls to create dramatically processed images, such as Dream, Bleached, and Graphite.

5-axis in-camera image stabilization, which will work with both lenses without VR, and lenses with VR.

~ ~ ~

To learn about all the features, functions, controls, and customizations of the Nikon Z 7 and Nikon Z 6, be sure to have a look at my Nikon Z 7 / Z 6 Experience. user guide, to be available in November or December 2018. It is a comprehensive 350+ page guide, to help you take control of your camera, and the images you create.

Nikon, Nikon Z7, Nikon Z6, Z7, Z6, book, menu, guide, tips, tricks, how to

If you want to pre-order or order the Nikon Z 7 or Nikon Z 6, please consider using my affiliate links below. Your price will be the same, but they will give me a small commission – thanks!

Nikon Z 7 at Amazon: https://amzn.to/2MPaiU5 – $3396.95

Nikon Z 7 at B and H:
https://www.bhphotovideo.com/c/buy/Mirrorless_System_Cameras/ci/16158/N/4288586281/BI/7364/KBID/7886/kwid/000/DFF/d10-v1-t3-z4288586281

Nikon Z 6 at Amazon: https://amzn.to/2MKHSe0$1996.95

Nikon Z 6 at B and H:
https://www.bhphotovideo.com/c/buy/Mirrorless_System_Cameras/ci/16158/N/4288586281/BI/7364/KBID/7886/kwid/000/DFF/d10-v1-t3-z4288586281