Deconstructing the Shot – Photo 3

This post is the third in an occasional series in which I describe the making of a photograph, from both a technical and artistic standpoint. I’ll go through the camera settings and why they were chosen, as well as the thought processes going through my head regarding composition and the creation of the image. These types of posts will be concrete examples of a previous post of mine called How Pros Photograph, which describes the various decisions that may be going through a photographer’s head as they work a scene and make photos. The first post in this series can be read here, and the second post is here.

This one can be called the Aperture Edition or Depth of Field Edition, as you will learn below.

Douglas J. Klostermann Photography
Men on Avenida el Sol – Cusco, Peru – 2008

The Photo: The photo I’ve selected for this example (seen just above) is one I took in Cusco, Peru in June 2008, called Men on Avenida el Sol. It was taken during the Cusco Week festivities, which is a series of events, dances, parades, and performances leading up to Inti Raymi, the Inca Festival of the Sun that occurs each year at the solstice. The wonderful thing about this week of activities is that it offers so many opportunities for a photographer to capture cultural, dance, and people photos. And because they are all public events where people expect, and even enjoy being photographed, it eliminates the difficulties and hesitations many photographers have about approaching individuals for photographs – although that is something any serious photographer needs to overcome, and it is actually quite easy. You approach the subject, make direct eye contact, and ask, “Do you mind if I take a photograph of you?” If they speak another language, hold up and nod towards your camera with a cheerful, inquisitive look on your face. They will either agree or not – problem solved!

Although I took hundreds of photos of the events over the week, I selected this one for this exercise because I learned something very definitively in the process of capturing it. More on that later. Although great subjects and action are directly in front of you during a parade or performance, there is a bit more to capturing good photos than just clicking away. I write a bit about that, with some tips and suggestions, in this post Cambridge Carnival.

This particular event was a parade down a main street of Cusco leading into the central plaza. I’ve created some strips of photos to show a selection of images as I worked this scene:

process01

The Process: I was heading back home after taking dance photos in the plaza, and made my way down Avenida el Sol looking for additional quick shots. Most of the people and groups were standing about, waiting to move forward to perform or parade through the plaza, where the spectators were, so there were not many interesting opportunities. However, this group of older men captured my attention due to their wonderful expressive faces and their colorful traditional outfits. My intention was merely to capture these faces and subjects. However, they were a bit bored, just standing around waiting, so you can see most of the images do not really stand out.

I was using a Canon Rebel XT with a 28-105mm f/3.5-4.5 II lens. I stood on the sidewalk near the group, and set my camera on Aperture Priority mode (Av on Canon, A on Nikon). This was so I could control the depth of field and call attention to single or multiple subjects and make the background a bit blurry and less distracting. I experimented with various aperture settings, ranging from f/4.5 to f/13 depending on if I wanted one of the men to be in focus or a row of two or three of them to be in focus. A wide open aperture such as f/4.5 will have a narrow depth of field so that just one of the men is in focus, where a narrower aperture such as f/8 or f/11 will have a deeper depth of field so that the entire row of men might be in focus. With the wide apertures, I focused on the eyes of the man I wanted in-focus, and with narrower apertures, I focused about 1/3 or 1/2 way into the area I wanted to be in focus, meaning if there was a row of three faces, I focused on the middle one. The ISO was set at 200 which allowed the camera to choose fast shutter speeds of around 1/1000 s. This is because I had been capturing dance and action scenes, and wanted to be ready for the same. The metering mode was set on the general Evaluative Metering, which did a decent job of capturing the proper exposures. A couple images were mysteriously overexposed, possibly due to where I locked exposure while I was locking focus – which is why I now use a back-button focusing technique and/or lock exposures separately from focus. White Balance was set on Auto, but would have worked on Sunny as well.

As you hopefully know by now, depth of field is controlled by the aperture setting. I write more about it in these posts Depth of Field Simplified and Mastering Depth of Field. Since your specific depth of field in any situation will vary based not only on the aperture setting but also on the lens focal length and your distance from the subject, it is often difficult to predetermine what exactly is going to be in focus in the resulting image. You can try using the depth of field preview button on your camera, but it is difficult to see in the tiny, dim viewfinder what the preview is showing. You can also use your rear LCD and trial and error to view a series of experiments. But again, this is only a small screen with relatively low resolution, so it is difficult to see the precise results. And in many situations you simply don’t have the time for these methods. You just have to get a feel for your lenses and their different apertures through experience and studying your results. But one thing is certain: to get minimum, shallow depth of field and thus maximum background blurriness with any lens, zoom in as close as you can, (for example, zoom to 200mm on a 70-200mm lens) situate yourself as close as you can to your subject while still obtaining the framing you want, and use the widest aperture possible (for example f/2.8 or f/4). Work back from that if you wish to increase the depth of field – for example to have a slightly deeper depth of field in focus, use an aperture of f/5 or f/5.6, or increase your distance away from the subject, or remain close but use a shorter focal length like 28mm or 50mm.

As you can see, most of the images are very “busy,” with a lot of extraneous and distracting background people and activity. I wasn’t very pleased with the images, but I continued to take basically the same image over and over. I knew the faces, outfits, and colors were interesting, and I hoped the resulting images would be as well. I zoomed in as close as I could with most of the images, working in the 75mm to 105mm range of my lens. However, without a lens that had the 100mm to 200mm range, I could not zoom closer and could not obtain the “compression” I was looking for, where the more distant faces would appear to be closer behind the closest subject.

process02

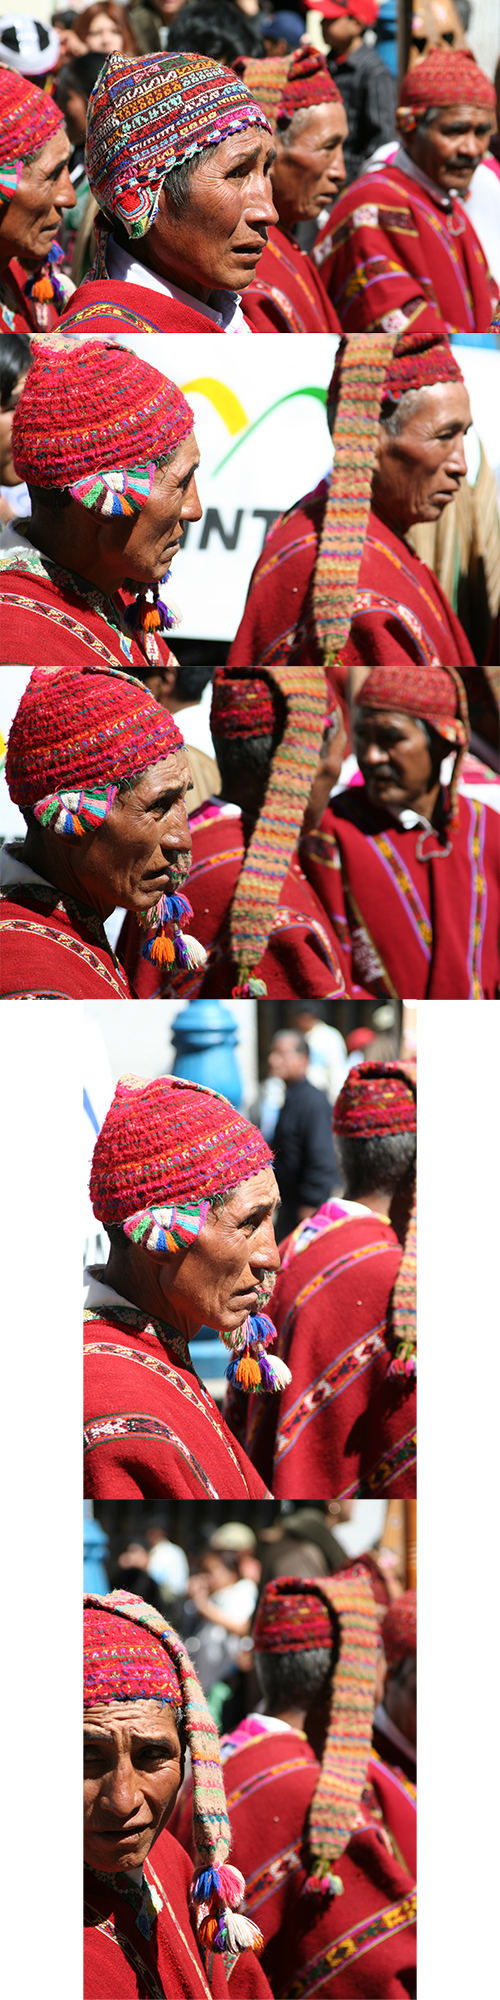
What I didn’t do that I should have been doing, instead of trying to take the same photo over and over, was to change my position and point of view. Doing so would change the backgrounds, perhaps make them less busy or distracting (such as the spectators and the white sign), and would allow for the camera to be on the same level or looking up towards the subjects rather than looking slightly down at them.

I took a series of 60 images over a period of 7.5 minutes. Besides the selected image, only a couple other ones are mildly interesting. I knew I wasn’t capturing what I wanted, my companion was becoming impatient, and eventually I decided to move on. But then I took a few final images. My point of view had slightly changed. I was directly to the side of the men and slightly closer. The last image finally got what I had wanted. It stands out dramatically among all the other ones. It is more simple and straightforward, less cluttered, and the subjects fill the frame.

process03

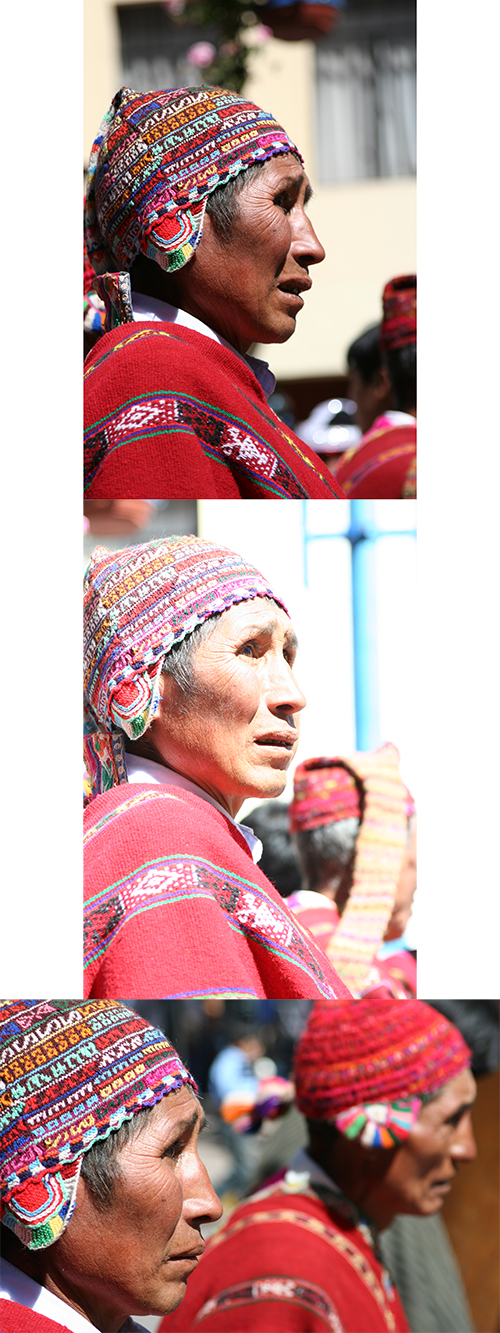
The Post Process: To create the final image, I adjusted the color and contrast in Adobe Camera Raw (ACR) and in Photoshop (PS). As you can see by the unprocessed images, the color and contrast is a little dull and lifeless straight out of the camera. The original file was a JPEG file, and the Picture Style was Standard (I hadn’t started using RAW yet). In ACR, the Blacks were increased to about 7 or 10 to give it the nice deep blacks, which helps to make the bright colors pop even more. Some Recovery was used to bring back the overexposed highlights on the man’s face. Clarity and Vibrance were used to give it some, well, clarity and vibrance. In Photoshop, the contrast was increased with Curves using the preset setting of Linear Contrast. In Levels, the midtones were darkened to .93 to give a deeper more realistic color to the faces. I did some additional burning on the faces to try to reduce the hot-spots. The image was sharpened using Unsharpen Mask, probably at Amount: 85 or 100, Radius: 1, and Threshold: 4. I may have used the Hue/Saturation to reduce the saturation and lightness of the red color, though I should have done that a little more, as you can see by the man’s face which appears too red and the rear hat where the red is blown out. The Rebel XT sensor, and other digital SLR sensors often overexpose the color red. It is similar to blowing out the highlights, where the color red is blown out and there is just red and not other detail in those areas. You can use the RGB histogram rather than the brightness histogram to monitor for this on the camera’s rear LCD screen while reviewing images. I didn’t crop the image at all, as you can see. It is best to try to get the framing you want when you capture the photo, especially when using an 8 megapixel camera that doesn’t allow for much cropping! (A cropped image would have much lower image quality because the resulting resolution would be much less – it would not allow for much manipulation, and would appear pixellated when enlarged.)

The Final Image:
Douglas J. Klostermann Photography
Canon Rebel XT, 28-105mm f/3.5-4.5 II at 93mm, ISO 200, f/5, 1/1000s

The Lesson: We should always learn from our photos, so that next time we are in a similar situation, we can create an even better image. The valuable lesson I learned in this situation, in addition to perhaps always grabbing one final frame, is to make a change when the composition is not working. Change your perspective, angle, or point of view. Zoom in or out to change the framing. Don’t continue to take the same image that isn’t working, over and over again. If the subject is interesting, there is an interesting composition that can be found to best express that subject. Mentally envision the scene from a variety of positions and angles, and move around the scene as much as possible to see the options. Some other improvements I could have made to this image include using a polarizing filter. Because I was working in the bright, harsh mid-day sun at a high altitude, this could have improved the exposure, color rendition, and contrast of the original image. Since it was overexposed a bit, causing hot-spots on the subject’s face, I should have paid more attention to my histogram and adjusted the exposure compensation accordingly, or used a different metering mode such as Partial or Spot to meter directly off the man’s face.

So hopefully you can see from this explanation and from my previous posts that photographs don’t necessarily just happen. They are created through a combination of thought processes, a series of decisions, and the application of camera settings based on these decisions and on the situation at hand.

See the Related Posts section just below for links to parts 1 and 2 in this series.  And learn more about how to take control of your camera and the images you create with my Full Stop e-book camera and photography guides.

Full Stop photography e book camera user guide Nikon Canon dSLR

Cambridge Carnival 2010

Cambridge Carnival 2010 in Cambridge, MA:  the music, dancing, and vibrant colors of the Caribbean, conveniently found down the street from me today.

All of these images were shot using a Canon 50D (60D is current version) with the 70-200mm f/4L IS lens.

Douglas J. Klostermann Photography

Douglas J. Klostermann Photography

There is a very recent and timely post on PhotoFocus about photographing parades.  It has some useful advice.  I would add to that a few more:

-Arrive early and work your way into the assembly area, where there is often a sense of tension and pent-up excitement.  Capture photos of participants getting ready and chatting, musicians practicing, and posed portraits of individuals or groups who are eager to have their photo taken in their outfits or costumes.

-During the parade, always be aware of your image backgrounds.  Position yourself so that you have light or dark backgrounds as appropriate, or crowds of faces.  Be sure you have clean, or at least not distracting backgrounds.  Use wide open apertures to make the backgrounds blurry and less distracting.  Some distracting backgrounds I had to avoid at this event included a bright yellow rental truck with the name across it and porta-potties.  Keep your eyes open for these types of things.  Changing your position and point of view can make the street, some trees, or the sky become your background.

-Be very aware of the light and where it is coming from.  Position yourself on the best side of the street so that you can capture the light on the participants’ faces.  Or backlight them if you want photos with sun-flare.  Position yourself near intersecting side streets where the sunlight is unobstructed by buildings and trees to avoid shadows across the parade route.  Look for mirrored, glass, or light colored buildings to act as natural reflectors which throw back and diffuse the light nicely onto all the participants.  Of find areas with light and dark shadow areas and try to highlight a participant as they step into the light.

-Bring ear plugs so you can concentrate of taking images even when the giant sound truck is stationed right in front of you.

-Experiment with slow shutter speeds to create blurs of motion and color.  Put your camera on shutter priority mode (Canon=Tv or Nikon=S).  Try starting with a shutter speed of 1/30 and adjust from there as necessary.

-If you are using a flash outdoors, do not use your flash diffuser (like a Sto-Fen Omni-Bounce) except for very close portraits.  All you are doing is reducing the light coming from your flash and causing your flash to work harder and take longer to recycle.  It does not change the “softness” or the “warmness” of the light from your flash.  A flash diffuser works by bouncing light and diffusing shadows because the light is then coming from various directions.  It does not magically “soften” light.  You can not bounce light off the sky.  It just doesn’t work.  Use your flash straight on, dial it down minus 1 or 2 so that it doesn’t blow out highlights, and use an orange or straw gel if you want more warmth.  It is much more efficient to reduce the light from your flash by dialing it to -1 and having it use less of its power than it is to put something in front of it and cause it to use more of its power, all for the same look.  If you wish to spread its light, use the built-in, flip-down wide angle screen.  I don’t care if you see the “pros” or the guys with the big cameras using one – they haven’t bothered to read the instructions.  They aren’t able to bounce light off clouds just because they have big cameras.

Fixed Aperture vs. Variable Aperture Lenses

I responded to a comment on one of my posts, and my response ended up being the size of a blog post, so I’m just going to turn it into one! Please note that the title of this post should actually, technically be “Fixed Maximum Aperture vs. Variable Maximum Aperture,” as I will explain in a second.

If you are getting into dSLR cameras and lenses, you may have noticed that some lenses have a fixed maximum aperture, while others have a variable maximum aperture.  This is spelled out in the name of the lens.  For example, the Canon EF-S 17-55mm f/2.8 IS USM lens has a fixed maximum aperture of f/2.8 at all focal lengths, while the Canon EF 28-135mm f/3.5-5.6 IS USM has a variable maximum aperture which ranges from f/3.5 to f/5.6, depending on which focal length you are using.  (the EF vs. EF-S means that EF lenses can be used on any Canon dSLR, while EF-S lenses are designed for, and can only be used on Canon dSLRs with 1.6x cropped sensors, including all Rebels, 50D, 60D, 7D, T2i/550D, but not the full frame 5D.  IS means image stabilization.  USM means ultrasonic motor, and means the lens has a high quality, rapid, and quiet motor for auto focusing.) The term fixed aperture usually does not mean that the lens only has one aperture setting you can use, but rather that is a common way of saying it has a fixed maximum aperture. So you can change the aperture of a “fixed aperture” lens and set it anywhere from its maximum aperture, possibly f/2.8, to its minimum aperture, perhaps f/32.

Barbes drummer face
Barbes, Brooklyn, NY

With variable aperture lenses, the largest, maximum aperture you can choose when you zoom to the telephoto end will not be as wide open as the largest aperture you can choose at the wide angle end. For example with the 28-135mm f/3.5-5.6, with the lens set at the focal length of 28mm (the wide end), you can use the f/3.5 aperture setting. But with the lens zoomed to 135mm, the widest aperture you can use is f/5.6. This will slightly affect the amount of background blurring – or foreground blurring in the image above, and will decrease the amount of light entering the lens.  Wider, larger apertures like f/2.8 or f/3.5 blur the background the most, which helps to create dramatic images.  The reason not all lenses have fixed apertures is that they require more sophisticated internal parts and mechanisms, such as more lens elements, which thus makes them very expensive (and heavy), so variable aperture is a compromise in order to offer more reasonably priced lenses.

Barbes sax hands
Barbes, Brooklyn, NY

Also, the wider apertures (f/2.8, f/4) are best for low light situations because they allow more light to enter the camera and thus allow you to select a fast shutter speed that won’t blur the image while hand-holding the camera. If you are typically working outside, this shouldn’t be too much of a concern, but if you work indoors or in low light, lenses with wide apertures like f/2.8 or f/1.4 are desirable.

Now, why is f/2.8 called a large aperture and f/22 a small aperture?  2.8 seems like a smaller number than 22, right?  No, f/2.8 and f/22 are fractions.  So if f were to equal 1, a slice of pie that is 1/2.8 of the pie is a bigger piece that a slice that is 1/22 of the pie, right?!  So f/2.8 is a large aperture, which means a large opening, which lets in lots of light all at once, but which then causes objects not in the plane of focus, such as the background, to be blurry.  f/22 is a small aperture, a small opening which lets in just a little light.  But everything from near to far is in focus, like when you squint to see a street sign clearer!  (The letter f in the fraction stands for the focal length of the lens.)

Please leave a comment, ask a question.  Let me know what has been helpful, and what you’d like to read more about.

For additional posts about lenses see Best Lenses for Travel and Humanitarian Photography and Why You Shouldn’t Buy the Kit Lens.

Purchasing: If you plan to purchase any of this equipment, I encourage you to do so by clicking on the links of the lenses listed above, which will take you to that page on Amazon.com. Or go directly to Amazon using this link or click on the Amazon logo below. If you purchase through these links, Amazon will give me a little something for the referral, which will help support my blog. Thanks, I appreciate your support!
Amazon.com

If you are in the UK, you can click here for the UK Amazon referral link.

For those interested in purchasing through B&H Photo, Adorama, or directly from Canon, I have set up affiliate links with them as well – find them on the left site of this page.

How Pros Photograph

or What Pros are Doing When it Looks Like
They are Just Pointing and Clicking

You’ve probably had the experience where you locate the right spot and attempt to take the same photo as one you admire, yet the outcome is never quite the same. Or maybe you’ve stood next to a photo tour leader, and think you are taking the same photos, yet your images don’t seem to look like theirs do. Why is this? What is an experienced or professional photographer doing differently? What’s the big secret, the trick to getting those images?

It’s not impossible, it’s not luck, and it is not dependent on tricks. It’s not necessarily equipment or Photoshop skill. But rather it is a number of decisions and accumulated experience, all happening in those brief moments when a photographer sees a scene, raises their camera to their eye, frames the shot, adjusts the settings, and clicks the shutter. Here’s what the pros are doing in those moments when all you think you see them doing is pointing and clicking:

Festival de Tinajani - Smiling Woman Dancer
Festival de Tinajani – Ayaviri, Peru

The Right Light: A photographer is always chasing the best light. Their eye is always looking for good lighting, interesting lighting, the interplay of light and shadows, silhouettes. They are always aware of the quality of light – the color, the warmth or coolness of the light. Ideally they shoot only at the best times: in the morning and evening. But that isn’t always possible, so they must seek out interesting lighting, make the best of the available light, use a flash or off-camera lighting, or work in shaded areas. If the great light is there, but the subject isn’t, they wait for a subject to come into the scene. They consider not only the lighting on the main subject but also the lighting on the background and how it might enhance or distract from the subject. They place themselves in the best position in relation to the light and the subject to ensure their subject is illuminated as they desire, they remain aware of the light/ subject relationship, and move around as necessary as it changes.

Pre-Visualizing: The photographer begins to see the composition of the image before they raise their camera to their eye. They look at the elements and decide how they want them to relate to each other in the final image. They consider how near and distant elements will relate when compressed into two dimensions. As with the lighting, they look at not only their main subject but also the background that will appear behind it. They look for strong lines, color, weight and balance of elements, symmetry or asymmetry of the elements. They consider their main subject and the environment around it and determine how much they want to include – if they want a wide shot or wish to zoom in or move in for a closer shot. They consider which point of view will best express their subject – high, low, eye-level? They determine if the image and relationships will work best in landscape or portrait orientation, and hold the camera accordingly. They scroll through their mental file of similar images they’ve taken, and consider what was and wasn’t successful and how to improve this shot.

Festival de Tinajani - Woman Dancers Practicing
Festival de Tinajani – Ayaviri, Peru

Metering: When they see that interesting or challenging light they know how to meter for it. They don’t count on their camera to know how they want the scene exposed and they don’t want to blow out their highlights, so they may use partial metering or spot metering directed at the right part of the scene to determine their exposure settings. They do this quickly and instinctively because they’ve practiced and experimented with numerous types of difficult lighting scenes, and…

Camera Settings: …they know their camera inside and out. They know which settings to change and how to change those settings. They’ve customized their buttons and menus to quickly get to the settings they use most frequently. Their eye is on the aperture, shutter speed and ISO numbers in the viewfinder, and their fingers know which dials to move to adjust them without taking the camera from their eye. They know how their camera tends to under-expose or over-expose in certain situations, and they change the exposure compensation accordingly. And they (hopefully) remember to reset these settings when they move into a different lighting or subject situation.

Aperture Priority Mode: The pros often work in aperture priority mode so that they can control their aperture and depth of field and thus establish relationships of near and distant elements, foreground and background. They blur the background to call more attention to the subject, or dramatically place just a narrow plane of the subject in focus. Or perhaps they bring everything from near to far into sharp focus. They select their depth of field based on the relationships they desire to create. They know how the lens they are using renders images at its various apertures, and perhaps use the depth of field preview button to verify.

Festival de Tinajani - Twirling Skirt
Festival de Tinajani – Ayaviri, Peru

Shutter Priority Mode: They turn their mode dial to shutter priority mode when freezing or blurring motion is key to the image. They use a high shutter speed to freeze action, or a slow one to blur or pan. They know the proper shutter speed is critical to this type of shot, and don’t let the camera choose it for them.

ISO: They check the setting that they are not controlling (the shutter speed in Aperture priority mode/ the aperture in Shutter priority mode) and adjust their ISO to bring that setting into the range they want or need. They know from experience which ISO range is appropriate for the amount of lighting they are shooting in, and change it in advance as they move between situations.

Manual Mode: They turn the mode dial to M when they have consistent lighting and a setting that they know is not going to change, or in challenging situations where both aperture and shutter speed are critical. They’ve determined their exposure by metering, and set the camera accordingly.

Auto or Program Modes: They never use these, as their lack of control scares them as much as Aperture Priority mode scares the new dSLR user.

Festival de Tinajani - Flag Dancers Posing
Festival de Tinajani – Ayaviri, Peru

Framing: As they look through the viewfinder, they frame the image based on their pre-visualization and composition decisions. They scan all parts of the frame and not just the subject, from edge to edge and each corner, from near to far, to determine if there are any unwanted elements, elements not essential to their image, or undesired relationships (i.e. the tree growing out of someone’s head.) They move slightly to the left or right, or slightly up or down to bring all the elements in the frame into the desired or most dramatic relationship.

Focusing: They manually choose their auto-focus point to ensure that the camera focuses on what they want it to focus on, not on what the camera chooses to focus on. They lock the focus setting if they need to slightly reframe or wish to hold that focus for a sequence of images. If there is going to be a dramatic shift between the framing seen while focusing and the final framing of the image, they lock the exposure setting on the final intended framing before or after locking in the focusing. They use the other auto-focus modes to capture action that moves across the scene or which is too fast for manually choosing a single point.

Waiting: They wait for the right facial expression and pose, or for the subject to relax, or the moving elements to fall into place, or the peak of action and then…

Clicking the Shutter: Finally! They press the shutter, slowly and smoothly. They have their camera set for single exposure or multiple exposure based on the situation. They fire off several quick shots, or slowly take a couple to ensure they got the shot or to take variations of the image.

Festival de Tinajani - Dancer with Rope
Festival de Tinajani – Ayaviri, Peru

Reviewing: “Chimping” is the somewhat derogatory term for looking at the rear LCD screen right after taking a photo to check out the image. When pros do it, they are not looking at the picture to see what they got. They know what they got. They know what the image looks like because they studied it when they framed and took the photo. They are looking at the histogram and looking for blinking highlights to ensure they did not blow out the highlights or in any way over- or under-expose the shot. If they did, they adjust the exposure compensation, or the aperture and shutter settings, and take it again.

Working the Scene: A pro continues to work the scene, looking for different perspectives, compositions, and points of view.  They look at how relationships of subjects and objects in the scene change, even with just a slight adjustment of the camera’s position or angle.  Even if they think they may have nailed the shot, they know from experience that there may be an even better image to be found or made if they continue to study and photograph the scene.  And they don’t accept “good enough” and continue on to the next scene or shot.  They strive to capture the best image they know they are capable of, sometimes even if it involves returning to the location at a different time of day or even a different season when the light might be better.

These are some of the things an experienced photographer is thinking and doing in those brief moments between the time they pause from scanning the scene around them, raise the camera to their eye, and take the shot. It’s not because they have a pro camera with pro lenses that they got a great image. It’s not some pro secret that was passed onto them when they read the right book and gained entry the right forum. It is the sum of an alert eye, numerous conscious decisions while visualizing and framing, knowing how to adjust their equipment and use its controls, as well as sub-conscious decisions based on taking countless images, experimenting, and learning from the results both good and bad.

To read about an actual example of this process in action in the creation of a photograph, see my post Deconstructing the Shot.

Depth of Field Simplified

I’ve noticed that a lot of searches regarding depth of field (and how to use your aperture to create a blurred or blurry background in your photos, or what is called bokeh) have led to my blog.  I’ve also received some good follow up questions from my previous post about depth of field.  Unfortunately, my post on Mastering Depth of Field may be a bit advanced for those who are still learning about how to use their digital SLR, as it is intended for more experienced photographers.

As I explained in that post:

“depth of field is…the range of distances in which the objects in the photograph will be acceptably sharp. For example, if I am using a 100mm lens, set my aperture at f/5.6, and focus on a subject 10 feet away, everything from 9.69′ to 10.3′ away from me will be acceptably sharp or in focus in the resulting image.”


Open Windows, San Miguel Duenas, Guatemala

Depth of field, then, can mean that everything is in focus from a few feet away to infinity (deep depth of field), or it can mean that a person’s eyes and nose are in focus, but their ears and hair and everything behind (and in front) of them is blurry (shallow depth of field).  One of the best ways to make use of depth of field is to create dramatic, shallow depth of field – the subject is in focus, but the background is blurry.  This technique helps to call attention to your intended subject and minimize distracting background elements, and to make your photos look much, much more like those of the pros.

All of the numbers and fractions and settings and seemingly reverse logic are intimidating at first, and most books add to the complication and confusion.  But it is really quite simple.  Depth of field is controlled by the aperture.  A small aperture size (which is an aperture number like f/16 or f/22) will create deep depth of field, with everything in focus.  A large aperture size (which is an aperture number like f/2.8 or f/4) will create a shallow, dramatic depth of field.  (Since “f/number” is a fraction, f/16 is a smaller number and size than f/4, so I’m avoiding using small number vs. large number terminology, as I said I would try to keep this from becoming too confusing…)   So here is the quick and simple way to create dramatic depth of field:


Open Windows, San Miguel Duenas, Guatemala

Set your camera on Aperture Priority Mode.  On a Canon, rotate the mode dial to Av, on Nikon set the dial to A.

Set your camera to Auto ISO.  Or else if you wish to control the ISO, if you are indoors or in dim light without a flash, set it to 800 or 1600 ISO.  If you are outside in bright sun, set it to 100 or 200 ISO.  If it is a bit cloudy or you are in the shade set it to 200 or 400 ISO.

Look in you manual for how to change the aperture setting of the lens.  For a Canon dSLR in Av mode, that means rotate the little finger dial up there by the shutter button.  On a Nikon it means rotate one of the dials at the top right front or back of the camera, depending on your camera and settings.)  Turn the dial until you see f/2.8 or f/4 or f/5.6 on your screen or in the viewfinder. Since you are in Aperture Priority Mode, the camera automatically selects an appropriate shutter speed.  If you’ve selected the ISO yourself, or even if you are using Auto ISO, you may want to verify that an appropriate shutter speed is being selected.  For example, I found that with the Canon 7D, Auto ISO often selects a much slower shutter speed than what is best for a situation.  Press the shutter button half way down and check the shutter speed.  If it is anywhere from 1/100 to 1/250 or higher, you are fine if your subject isn’t moving.  If the subject is moving, make sure the shutter speed is 1/250 to 1/1000.  If it is any higher or lower than the range you want, you should adjust the ISO until the shutter speed it falls into that range (raise the ISO, keep the aperture the same, and this should result in the camera selecting a faster shutter speed setting).

Focus on your subject using the focus mode of your choice, and take the photo.  Preferably, use single point focus mode and select the focus point you want, so that you have complete control over where the camera focuses.  If the subject is a person or animal, focus on the eyes or eyebrows.  If it is something else, focus on what you want to be sharpest in the photo.

A good book to read to continue learning about this is Understanding Exposure by Bryan Peterson (Third Edition).  Click on the link to see it on Amazon.  It is geared towards photographers just learning about apertures, shutter speeds, and ISO, and helps to explain the concepts better than most other guides.

Let me know how the photos come out! Note in the first photo above that dramatic depth of field can be used to make the foreground blurry as well, not just the background.

Continue reading Mastering Depth of Field.

Mastering Depth of Field

(for a related post, see Depth of Field Simplified)

I recently came across an excellent website regarding depth of field (dof), including a handy online calculator for determining dof based on the focal length of the lens, the aperture, and distance from the subject. It even takes into account different sensor sizes, including the APS-C size sensor of the Canon 7D. You can also view and print dof tables as well as create, print, and assemble a field dof calculator based on focal lengths of your choosing. And if you have an iPhone, there is an app for that!  Have a look at the DOFMaster depth of field app.


Chichicastenango Market, Guatemala – 200mm, f/4, subject distance 2.7m
One figurine in focus, surrounding figurines dramatically out of focus – achieved by standing close, zooming way in and choosing wide aperture

Why is this all important? Well first, if you aren’t familiar with what depth of field is, it is the range of distances in which the objects in the photograph will be acceptably sharp. For example, if I am using a 100mm lens, set my aperture at f/5.6, and focus on a subject 10 feet away, everything from 9.69′ to 10.3′ away from me will be acceptably sharp or in focus in the resulting image. If none of this is clear to you, or only partially understood, then go out and read Bryan Peterson’s Understanding Exposure first, and then come back to rejoin us. It is a bit complicated and difficult at first, but if explained properly – as he will do better than I could – it will soon click. Also, I have posted a simplified explanation and quick and easy lesson for using dramatic depth of field here.

So, according to George Schaub in Using Your Digital Camera (I have no idea who this is, but borrowed the quote from the above website) “(Depth of field) is one of the most creative and profound effects available to photographers.” I absolutely agree with this. My photography improved 2000%, virtually overnight, when I understood and began to use the creative and visual power of dof. And this is why I shoot on Aperture Priority Mode (Av) 98.5% of the time.

I don’t want to go into the technical aspects of dof, and it can get extremely technical, but I will touch on some of the practical aspects of it. The ability to control dof is one of the many advantages of a digital SLR vs. a digital compact camera. Due to the small focal length, small sensor, and limited aperture sizes, a compact can typically not create the dramatic dof available to a dSLR user. And if one has a super-zoom type camera that will allow better use of dof, the controls to utilize it may be more cumbersome that with a dSLR.


Chichicastenango Market, Guatemala – 200mm, f/4, subject distance 7.4m (image cropped)
Man in focus, surrounding people slightly out of focus – achieved by being a few dozen feet away, zooming all the way in with 200mm, wide aperture

So why does one utilize dof? One reason is to better call attention to, or even isolate the intended subject of your photograph. When looking at an image, the eye tends to first go to what is sharply in focus as well as to what is lighter. If it is a busy scene with lots of possible subjects, the eye wanders aimlessly around all parts of the photo, and won’t necessarily focus on the subject you intended them to look at. By placing your intended subject in sharp focus, and the background and other elements out of focus to a lesser or greater degree, the viewer zeros in on what you intended them to. It can also be used to create various relationships between your subject and their environment or between your subject and other subjects in the frame. For example, a person who is your subject could be in sharp focus, while the background or elements around them are very much out of focus. This visually draws the subject out and leads the viewer to see this person as the sole subject of the photo. However, if the background or surrounding elements were just slightly out of focus, the viewer then sees the person as well as their surroundings, and starts to consider the relationships between them. By manipulating dof, you can work towards suggesting, defining and creating these types of relationships in your compositions.


San Miguel Duenas, Guatemala – 97mm, f/4, subject distance 3.3m
Girl in focus, boy and background environment (their home) slightly out of focus – achieved by standing a dozen feet away or so, zooming in to 97mm, wide aperture

And why does one need the dof calculators? Since dof varies so widely depending on the lens being used, the distance to the subject, and the aperture, it is difficult to know precisely what distance range is going to be in focus. One can use the dof preview button on the camera, but it is often difficult to determine through the viewfinder what the dof will be. So with the dof calculator, you can plug in various numbers and learn how a certain lens is going to act in a particular situation. Then, by using your lenses often, and experimenting with various apertures and various camera-to-subject distances, one can begin to get an intuitive feel for how each lens works, and how dramatically different a 16mm at f/4 aperture is from a 200mm at f/4 aperture. And when you are in a situation that allows it, you can pull out your iPhone or your field calculator, and determine a precise dof in advance.


Antigua, Guatemala – 127mm, f/5, subject distance 5.3m
Woman in focus, statue on distant church facade out of focus yet recognizable – achieved by standing a few dozen feet away, zooming in to 127mm, wide but not widest aperture

I like using a very wide aperture (like f/4 or f/5.6) to create very shallow, dramatic dof in many of my images. However, I typically don’t want it to be so shallow that a person’s nose is in focus and their ear is out of focus (though this is a dramatic and sometimes desired portrait “trick”). Also, when photographing action, such as dance, I want a little leeway so that if I focus on a hat instead of a face, or if the person moves forward a bit, there is a enough dof that their face will still be in focus. And this is why I originally began to search for depth of field tables, so I could better understand how my lenses were going to respond in certain situations.

Now, as a little, technical side note, I was always taught in school to be aware of the 1/3 – 2/3 rule which says that 1/3 of the in-focus area will be in front of the spot where you focus, and 2/3 will be behind it. So if you were standing at the front of a row of people, and turned back around to look down the line and take a photo, and focused on the 8th guy in line, this rule says that perhaps (due to your particular lens/ aperture/ distance choice) one person in front of him will be in focus too, and 2 people behind him will be. It turns out, this really isn’t accurate at all. Most often it is closer to 1/2 the distance in front of the focus spot and 1/2 behind it. I have no idea why they taught us 1/3 – 2/3.