Taking Control of, and Possibly Understanding Exposure

Whenever a new photographer wishes to learn about exposure, shooting modes, and working in Manual or Aperture Priority Mode, most photographers recommend the Bryan Peterson book Understanding Exposure.  It has become the go to guide because it offers explanations that no other book seems to cover as well or as thoroughly.  However, many people aren’t the biggest fans of it and wish there was another guide with a slightly different approach – perhaps an easier, less confusing way to present some of the material.

Understanding Exposure has been updated for the current digital era, but it may be better to toss many of the old notions and methods that have been carried over from film, start from scratch, and approach the subject in a practical manner that applies fully to digital SLR cameras – cameras with histograms and instant feedback of the image and the exposure settings via the rear LCD screen, not to mention the ability to head straight to your computer and study and analyze your results and EXIF data.

While I contemplate writing an exposure book for the digital era, I will begin with a quick-start tutorial to exposure and metering with a dSLR:

First, don’t start with M mode yet. Start working in Av or A – aperture priority mode.

Set the camera on Av / A (aperture priority). Go into the menus and turn off Auto Lighting Optimizer and Highlight Tone Priority on a Canon and Active D-Lighting on a Nikon.

Set the ISO to an appropriate setting based on the lighting of the scene.
outdoors in sun: 100
less sun or shade: 200-400
more shade or darker: 800
indoors: 1600-3200

Set your aperture setting to whatever aperture setting you desire based on how much depth of field you want. Want a lot of depth of field with everything in focus from near to far? Set for f/16 or f/22. Want very shallow depth of field with just the subject in focus and cool background blurring? Set for f/2.8, f/4, or f/5.6.

Aim your camera at your subject, press the shutter button halfway, and see what Shutter Speed the camera selected. Is it slower than 1/125? (such as 1/80, 1/30) Then increase your ISO setting to a higher number. If you can’t or don’t want to increase ISO, use a wider aperture setting (a “lower” F number like f/4, f/5.6).

Is your shutter speed now about 1/125 or faster? (for still subjects – use perhaps 1/500 or 1/1000 for moving subjects). Take the photo.

Now, if the exposure is not coming out how you want, use exposure compensation to adjust it and then re-take the photo.  Adjust it to the positive side to make the exposure lighter, and to the negative side to make the exposure darker.

Sound easy? It is! But of course, it all gets more complicated from here. For example, how did the camera determine what the proper exposure was? You can learn more about that, and how to better control the camera’s determination of exposure with Exploring Metering Modes.

And then now that you have the basics, and can move on to learning more about controling your autofocus system, locking focus and exposure – independently, how focal length and distance affect depth of field, composition, white balance, etc, etc!

You can learn all about these settings and functions in my e-book camera guides for Nikon and Canon dSLRs, such as Nikon D5100 Experience and Canon T3i Experience.  Click the image below to see all the available guides and to learn more:

full stop dslr photo photography camera manual guide for dummies canon nikon


Depth of Field Simplified

I’ve noticed that a lot of searches regarding depth of field (and how to use your aperture to create a blurred or blurry background in your photos, or what is called bokeh) have led to my blog.  I’ve also received some good follow up questions from my previous post about depth of field.  Unfortunately, my post on Mastering Depth of Field may be a bit advanced for those who are still learning about how to use their digital SLR, as it is intended for more experienced photographers.

As I explained in that post:

“depth of field is…the range of distances in which the objects in the photograph will be acceptably sharp. For example, if I am using a 100mm lens, set my aperture at f/5.6, and focus on a subject 10 feet away, everything from 9.69′ to 10.3′ away from me will be acceptably sharp or in focus in the resulting image.”


Open Windows, San Miguel Duenas, Guatemala

Depth of field, then, can mean that everything is in focus from a few feet away to infinity (deep depth of field), or it can mean that a person’s eyes and nose are in focus, but their ears and hair and everything behind (and in front) of them is blurry (shallow depth of field).  One of the best ways to make use of depth of field is to create dramatic, shallow depth of field – the subject is in focus, but the background is blurry.  This technique helps to call attention to your intended subject and minimize distracting background elements, and to make your photos look much, much more like those of the pros.

All of the numbers and fractions and settings and seemingly reverse logic are intimidating at first, and most books add to the complication and confusion.  But it is really quite simple.  Depth of field is controlled by the aperture.  A small aperture size (which is an aperture number like f/16 or f/22) will create deep depth of field, with everything in focus.  A large aperture size (which is an aperture number like f/2.8 or f/4) will create a shallow, dramatic depth of field.  (Since “f/number” is a fraction, f/16 is a smaller number and size than f/4, so I’m avoiding using small number vs. large number terminology, as I said I would try to keep this from becoming too confusing…)   So here is the quick and simple way to create dramatic depth of field:


Open Windows, San Miguel Duenas, Guatemala

Set your camera on Aperture Priority Mode.  On a Canon, rotate the mode dial to Av, on Nikon set the dial to A.

Set your camera to Auto ISO.  Or else if you wish to control the ISO, if you are indoors or in dim light without a flash, set it to 800 or 1600 ISO.  If you are outside in bright sun, set it to 100 or 200 ISO.  If it is a bit cloudy or you are in the shade set it to 200 or 400 ISO.

Look in you manual for how to change the aperture setting of the lens.  For a Canon dSLR in Av mode, that means rotate the little finger dial up there by the shutter button.  On a Nikon it means rotate one of the dials at the top right front or back of the camera, depending on your camera and settings.)  Turn the dial until you see f/2.8 or f/4 or f/5.6 on your screen or in the viewfinder. Since you are in Aperture Priority Mode, the camera automatically selects an appropriate shutter speed.  If you’ve selected the ISO yourself, or even if you are using Auto ISO, you may want to verify that an appropriate shutter speed is being selected.  For example, I found that with the Canon 7D, Auto ISO often selects a much slower shutter speed than what is best for a situation.  Press the shutter button half way down and check the shutter speed.  If it is anywhere from 1/100 to 1/250 or higher, you are fine if your subject isn’t moving.  If the subject is moving, make sure the shutter speed is 1/250 to 1/1000.  If it is any higher or lower than the range you want, you should adjust the ISO until the shutter speed it falls into that range (raise the ISO, keep the aperture the same, and this should result in the camera selecting a faster shutter speed setting).

Focus on your subject using the focus mode of your choice, and take the photo.  Preferably, use single point focus mode and select the focus point you want, so that you have complete control over where the camera focuses.  If the subject is a person or animal, focus on the eyes or eyebrows.  If it is something else, focus on what you want to be sharpest in the photo.

A good book to read to continue learning about this is Understanding Exposure by Bryan Peterson (Third Edition).  Click on the link to see it on Amazon.  It is geared towards photographers just learning about apertures, shutter speeds, and ISO, and helps to explain the concepts better than most other guides.

Let me know how the photos come out! Note in the first photo above that dramatic depth of field can be used to make the foreground blurry as well, not just the background.

Continue reading Mastering Depth of Field.

Mastering Depth of Field

(for a related post, see Depth of Field Simplified)

I recently came across an excellent website regarding depth of field (dof), including a handy online calculator for determining dof based on the focal length of the lens, the aperture, and distance from the subject. It even takes into account different sensor sizes, including the APS-C size sensor of the Canon 7D. You can also view and print dof tables as well as create, print, and assemble a field dof calculator based on focal lengths of your choosing. And if you have an iPhone, there is an app for that!  Have a look at the DOFMaster depth of field app.
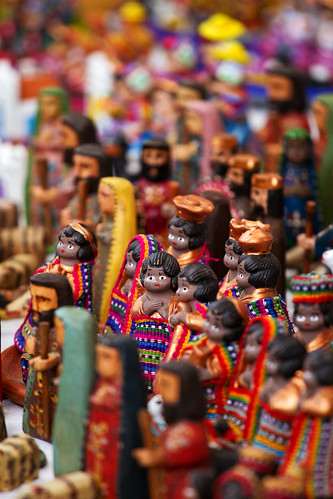

Chichicastenango Market, Guatemala – 200mm, f/4, subject distance 2.7m
One figurine in focus, surrounding figurines dramatically out of focus – achieved by standing close, zooming way in and choosing wide aperture

Why is this all important? Well first, if you aren’t familiar with what depth of field is, it is the range of distances in which the objects in the photograph will be acceptably sharp. For example, if I am using a 100mm lens, set my aperture at f/5.6, and focus on a subject 10 feet away, everything from 9.69′ to 10.3′ away from me will be acceptably sharp or in focus in the resulting image. If none of this is clear to you, or only partially understood, then go out and read Bryan Peterson’s Understanding Exposure first, and then come back to rejoin us. It is a bit complicated and difficult at first, but if explained properly – as he will do better than I could – it will soon click. Also, I have posted a simplified explanation and quick and easy lesson for using dramatic depth of field here.

So, according to George Schaub in Using Your Digital Camera (I have no idea who this is, but borrowed the quote from the above website) “(Depth of field) is one of the most creative and profound effects available to photographers.” I absolutely agree with this. My photography improved 2000%, virtually overnight, when I understood and began to use the creative and visual power of dof. And this is why I shoot on Aperture Priority Mode (Av) 98.5% of the time.

I don’t want to go into the technical aspects of dof, and it can get extremely technical, but I will touch on some of the practical aspects of it. The ability to control dof is one of the many advantages of a digital SLR vs. a digital compact camera. Due to the small focal length, small sensor, and limited aperture sizes, a compact can typically not create the dramatic dof available to a dSLR user. And if one has a super-zoom type camera that will allow better use of dof, the controls to utilize it may be more cumbersome that with a dSLR.


Chichicastenango Market, Guatemala – 200mm, f/4, subject distance 7.4m (image cropped)
Man in focus, surrounding people slightly out of focus – achieved by being a few dozen feet away, zooming all the way in with 200mm, wide aperture

So why does one utilize dof? One reason is to better call attention to, or even isolate the intended subject of your photograph. When looking at an image, the eye tends to first go to what is sharply in focus as well as to what is lighter. If it is a busy scene with lots of possible subjects, the eye wanders aimlessly around all parts of the photo, and won’t necessarily focus on the subject you intended them to look at. By placing your intended subject in sharp focus, and the background and other elements out of focus to a lesser or greater degree, the viewer zeros in on what you intended them to. It can also be used to create various relationships between your subject and their environment or between your subject and other subjects in the frame. For example, a person who is your subject could be in sharp focus, while the background or elements around them are very much out of focus. This visually draws the subject out and leads the viewer to see this person as the sole subject of the photo. However, if the background or surrounding elements were just slightly out of focus, the viewer then sees the person as well as their surroundings, and starts to consider the relationships between them. By manipulating dof, you can work towards suggesting, defining and creating these types of relationships in your compositions.
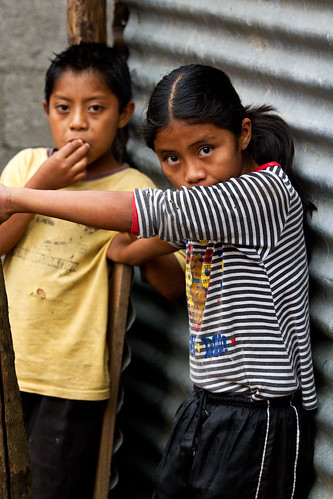

San Miguel Duenas, Guatemala – 97mm, f/4, subject distance 3.3m
Girl in focus, boy and background environment (their home) slightly out of focus – achieved by standing a dozen feet away or so, zooming in to 97mm, wide aperture

And why does one need the dof calculators? Since dof varies so widely depending on the lens being used, the distance to the subject, and the aperture, it is difficult to know precisely what distance range is going to be in focus. One can use the dof preview button on the camera, but it is often difficult to determine through the viewfinder what the dof will be. So with the dof calculator, you can plug in various numbers and learn how a certain lens is going to act in a particular situation. Then, by using your lenses often, and experimenting with various apertures and various camera-to-subject distances, one can begin to get an intuitive feel for how each lens works, and how dramatically different a 16mm at f/4 aperture is from a 200mm at f/4 aperture. And when you are in a situation that allows it, you can pull out your iPhone or your field calculator, and determine a precise dof in advance.


Antigua, Guatemala – 127mm, f/5, subject distance 5.3m
Woman in focus, statue on distant church facade out of focus yet recognizable – achieved by standing a few dozen feet away, zooming in to 127mm, wide but not widest aperture

I like using a very wide aperture (like f/4 or f/5.6) to create very shallow, dramatic dof in many of my images. However, I typically don’t want it to be so shallow that a person’s nose is in focus and their ear is out of focus (though this is a dramatic and sometimes desired portrait “trick”). Also, when photographing action, such as dance, I want a little leeway so that if I focus on a hat instead of a face, or if the person moves forward a bit, there is a enough dof that their face will still be in focus. And this is why I originally began to search for depth of field tables, so I could better understand how my lenses were going to respond in certain situations.

Now, as a little, technical side note, I was always taught in school to be aware of the 1/3 – 2/3 rule which says that 1/3 of the in-focus area will be in front of the spot where you focus, and 2/3 will be behind it. So if you were standing at the front of a row of people, and turned back around to look down the line and take a photo, and focused on the 8th guy in line, this rule says that perhaps (due to your particular lens/ aperture/ distance choice) one person in front of him will be in focus too, and 2 people behind him will be. It turns out, this really isn’t accurate at all. Most often it is closer to 1/2 the distance in front of the focus spot and 1/2 behind it. I have no idea why they taught us 1/3 – 2/3.