
I recently received some interesting questions from two different readers on my posts about the Nikon D5100, Nikon D5100 vs D7000 vs D90 etc. and Nikon D5100 vs. Canon T3i. Both questions point out interesting issues with the Nikon D5100 that may be important considerations if your shooting needs required these functions, or that might not affect you and your shooting at all if, like me, you never use manual exposure control in video and/ or you don’t use Live View (and M mode) when shooting stills.
Here is the first question and my reply:
Question 1:
I wanted to ask about a major differentiator, if its true and useful for someone trying to learn a bit of manual photography. Below link and video talks about D90 and D5100 not having the ability to do manual control in video. Is it true? Does it really matter. Please advise.
(video is no longer available on YouTube)
I would also like some instructions on how to use manual control – when, why, how.
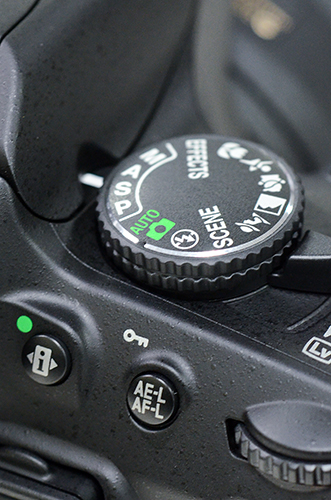
Mode dial of the Nikon D5100
My Answer:
Yes, the lack of full manual control in video mode is a very real deficiency of the of the Nikon D5100, especially for people who wish to seriously use it for video. To answer your question “does it really matter?”, yes, it really matters if you wish to have straightforward, full manual control while shooting video. I know that sounds like a smart-ass response to the question, but it is kind of like “if it isn’t an iPhone, it isn’t an iPhone,” blatantly stolen from “if you had invented Facebook, you would have invented Facebook.”
Wait a minute, I just realized that I was ahead of the curve and I wrote this similar smart-ass phrase before that movie even came out:
“If the 5D Mk II fits your expanding and demanding needs as a photographer, you would already pretty much know that you needed a 5D.”
See, look here, I said that earlier than August 26, 2010, and the movie came out Oct 1, 2010, and I didn’t even see it until a couple months ago!
Anyway, if you need full manual control in video, you know that you need full manual control in video based on your experience and needs, and then you need your camera to have full manual control in video. Simple, right? But…do you not know yet but wonder are you going to need it in the future if you grow and develop as a photographer/videographer? That is the big unknown that no one can answer but one needs to figure out on an individual basis!
However, there is a “work-around” for this shortcoming of no full manual exposure control with the Nikon D5100. To manually set your shutter speed, you must set the camera on Shutter-Priority Auto Mode (S) and set your desired shutter speed before going into Live View mode, use exposure compensation to obtain the aperture setting you want, and use the AE-L/AF-L Button to lock that exposure (set Custom Setting f2 for AE-Lock Hold). If you wish to first set the aperture setting, you must set the camera on Aperture-Priority Auto Mode (A) and set your desired aperture before going into Live View mode, use exposure compensation to obtain the shutter speed setting you want, and use the AE-L/AF-L Button to lock that exposure (set Custom Setting f2 for AE-Lock Hold).
See this video I came across on YouTube for a demonstration:
As far as instruction in manual control (for still photography), see my Full Stop dSLR camera guide e-books, of course! I don’t go into a lot of detail of full manual (M) because I don’t feel it is necessary for most beginner or intermediate photographers in most situations. I don’t believe in M for the sake of old-school, full control, “look, I’m a skilled photographer/ martyr ‘cuz I use full manual.” It just adds an extra step (setting BOTH aperture and shutter speed rather than just one) to each photo that isn’t necessary. Let the camera do it for you. Pick your priority: Aperture or Shutter Speed. Are you concerned with depth of field (aperture) or with freezing or blurring action (shutter speed)? Set your aperture in A (Av) mode or else set your shutter speed in S (Tv) mode, and let the camera take care of the other setting.
I know that many photographers like working in M mode, but if you are wondering if you need to use it: if you haven’t encountered a need for it, you don’t have a need for it. The aperture setting is typically my priority, hence I use Aperture Priority Mode. Here is a detailed explanation of how I use Aperture Priority in the real world: Deconstructing the Shot.
As my e-books say about possible situations for using M:
“There are times you may wish to use Manual Exposure Mode. For example, if you are taking several photos to stitch together into a panorama, you want them all to be taken with the same exposure so that the lighting is consistent across the entire scene. Or if you are working in a studio setting and the lighting will remain consistent, you can set the exposure once and then not worry about it. Or in any other situation where the lighting or your desired exposure will remain consistent such as an indoor performance or sunny day portrait session where the lighting does not change.”
And I know that other situations also demand or benefit from M mode, including macro situations, but many of those situations fall under the “any other situation where the lighting or your desired exposure will remain consistent” category. Readers, please defend M to me and tell me why you use it!
Question 2:
When I used the Nikon D5100 at a nearby camera store in Live View and Manual (M) mode, it never quite seemed to register ANY of the changes I made to shutter: the image is supposed to go dark as the shutter speed increases right? (I was in a moderately lit room). The weird part is that the actual image captured was dark (like it should be) but not the preview! Is there some setting on the Nikon that is wrong on the piece I tested? If the camera can’t display the changes it is making during Live View – leaving me to approximate the changes I’m making, then that is a deal breaker for me. I am wondering if this is a bug that was only on the piece that I saw at the showroom, or if you saw it too.
My Answer:
That is a really great question! These are the kinds of features one really has to dig into the camera, menus, or manual of a new dSLR model to determine if it is actually going to meet your needs.
It turns out that no, it is not possible to see actual exposure simulation with the Nikon D5100 in Live View while in Manual M shooting mode. However, in the P, A, or S shooting modes, the live view image will lighten or darken to simulate the exposure settings or the exp. compensation that you set. And to add insult to injury, there is no exposure meter displayed on the Live View screen, so to check your exposure you will need to temporarily leave Live View and switch to the control panel view by pressing the [i] Button.
The Canon 60D and Canon Rebel T3i both have Exposure Simulation in all modes during Live View. On the 60D you can turn this feature off and on. On the T3i it is on automatically while in Live View.
Conclusion:
Now, if you are thinking of buying a Nikon D5100 and after reading this you are suddenly concerned that it is lacking important features that you might need…be sure to first determine if you, indeed, really even need these features. They shouldn’t be anything to worry about if you are never going to use them and never going to encounter these issues. For example, I would never encounter the first issue, the lack of full manual control in video, because I don’t shoot video. If you plan to use the camera to shoot production quality, professional video, this is pretty important. If you plan to switch over to video and shoot a kid’s sporting event, it is unlikely you are going to shoot this in Manual and so it doesn’t matter.
Regarding the second issue, do you plan to use live mode AND manual shooting mode (M) AND need to preview your image exposure at the same time? I rarely use M mode and I rarely use Live View and I rarely preview my exposure in Live View if I do use it, so for me and my photography, it will be “rare x rare raised to the rare power” (or (rare x rare) rare or is it merely rare x (rare) rare ?) that I need to use Live View AND M mode AND preview what my exposure will be. If I needed to, I think I could get by with A mode instead, where the Exposure Simulation in Live View functions on the D5100. But, if you are like the reader who had this question and you have a real need for this, say shooting cool macro shots of flowers and insects, then you will need to consider the Nikon D7000, Canon T3i, or Canon 60D instead.

