New Features of the Canon EOS R

If you are coming to the Canon EOS R mirrorless camera from a previous dSLR model, such as the 5D Mark IV, one of the 7D models, the 80D (or any of their predecessors), you will likely already have a solid grasp of many of the features, functions, and controls of the EOS R. However there are some important changes, especially those related to the “mirrorless vs. dSLR” aspect of the camera, such as the electronic viewfinder and the autofocus system.

Figure 1 – Detail of the Canon EOS R with the RF 24-105mm F4 L IS USM lens. 

This article will briefly introduce many of the new, different, or upgraded features, options, and controls. My comprehensive guide to the camera, Canon EOS R Experience, goes into much more detail about all of these items, as well as all of the other features and settings of the Canon EOS R. You can learn about and preview the guide on my FullStopBooks.com website.

Camera Controls – There are some new, changed, or additional buttons and controls from what you are accustomed to, especially if coming from an older Canon model. For example, there is a Mode Button to change the shooting mode, rather than a Mode Dial. Press the Button and then use one of the dials to select the desired shooting mode, while viewing the options on the top LCD screen or on the rear Monitor. The Multi-Function (M-Fn) Bar on the rear of the camera can be customized to perform a wide variety of functions (see Figure 2 – left). For example, you can use the M-Fn Bar to quickly change the ISO setting, White Balance setting, or access some of the manual focusing aids or the movie shooting settings.

Figure 2 – Left: Detail of the camera controls, including the Multi-Function (M-Fn) Bar. Right: Using the touch screen during Live View to change the shutter speed setting by swiping the scale.

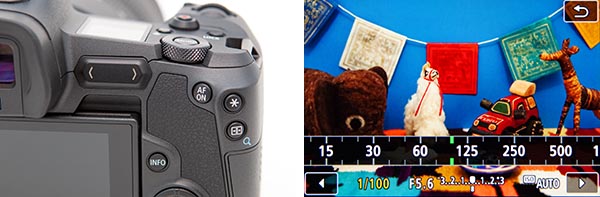
There is a different way to zoom in and out during image review due to the single Magnify Button. You will press the Magnify Button, then turn the top Main Dial to zoom in and out. The M-Fn Button, located on the top of the camera just behind the Shutter Button, is used to quickly access and change five shooting settings of your choice. While shooting, press the M-Fn Button to view the settings in the Viewfinder or on the rear Screen, turn the top-rear Quick Control Dial to select the desired setting, and then the top Main Dial to change it (see Figure 3). By default, the still image shooting options are ISO, Drive Mode, AF Operation, White Balance, and Flash Exposure Compensation, though you can change the options to Exposure Compensation, AF Method, Metering Mode, and Picture Style. Use the Customize buttons item of the C.Fn 4 Menu to assign this button to the Dial Functions Settings option, then select your desired five options.

Figure 3 – M-Fn Button in use, as shown on the rear Screen.

Touch Screen – In addition to the camera controls, you can use the touch screen to adjust camera settings (see Figure 2- right), navigate the menus, and for image playback using familiar tap, swipe, and pinch motions. And while some may feel that the touch screen is extraneous for these operations, you will soon find that it is very responsive, and can be a quick and useful way to review your images and to access numerous settings during Viewfinder and Live View shooting. The touch screen can also be used for Touch and Drag AF. This is a function where you use the touch screen, during shooting, to locate the AF Point to the desired position, while keeping your eye at the viewfinder.

Electronic Viewfinder – The electronic Viewfinder of the EOS R (and other mirrorless cameras) enables you to preview the exposure, white balance, Picture Style settings, and depth of field of the final image, as you shoot, as well as make use of a virtual horizon to keep your images level. You can also change numerous camera settings, access the menus, and review images without taking the camera from your eye. And you can utilize focus peaking, a rangefinder Focus Guide frame, and scene-magnification in the Viewfinder, to assist with manual focusing.

Quick Control Screens – When viewing the rear Screen, you can press the INFO Button repeatedly to display a shooting settings screen, with various exposure and camera settings. Press the Q / SET Button or touch screen icon to “activate” this shooting settings Quick Control Screen (see Figure 4 – left). It will allow you to quickly access and change applicable settings for whichever shooting mode you are currently working in. When viewing the Live View scene on the rear Screen or in the Viewfinder, you can press the Q / SET Button to access the Live View Quick Control screen, which offers access to various shooting settings (see Figure 4 – right). You can use the Cross Keys and Q / SET Button to navigate this screen, or else use the touch screen icons. Similar Quick Control Screens are accessible for movie shooting and for image playback.

Figure 4 – Left: Press the INFO Button to select the Shooting Settings Screen, then press the Q / SET Button to access the Quick Control Screen. Right: During shooting, press the Q / SET Button to access the Live View Quick Control Screen.

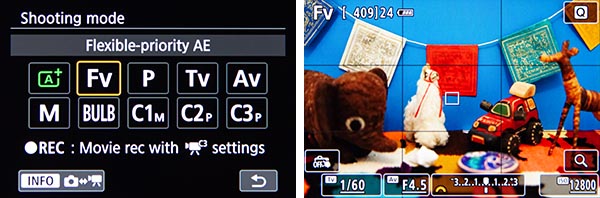
Flexible-Priority AE (Fv) Shooting Mode – Flexible-Priority AE Mode, or Fv Mode, is a new shooting mode introduced on the EOS R (see Figure 5 – left). It is an extremely versatile mode that allows you to control any of the exposure parameters, including the shutter speed, aperture setting, ISO setting, and exposure compensation, or to set any of the parameters on Auto and let the camera control them (see Figure 5 – right). You can choose to control all of the parameters yourself, or to control some of them and let the camera control the others, or allow the camera to control all of them by setting them all to Auto – all while remaining in the same Fv Shooting Mode. Fv Mode can act as either Auto+, Tv, Av, or M shooting mode, depending on which settings you control and which are set to Auto, but the advantage is that you can quickly change any of the exposure settings without having to actually change the shooting mode.

Figure 5 – Flexible-Priority AE (Fv) Shooting Mode – Left: Selecting Fv Shooting Mode. Right: Making use of Fv Shooting Mode during Live View or Viewfinder shooting.

Dual Pixel RAW – The Dual Pixel technology of the EOS R sensor, where each pixel contains two photodiodes, allows for some unique post-processing capabilities when using Canon’s Digital Photo Professional (DPP) software. You will need to enable this Dual Pixel RAW item in the Photo Shooting 1 Menu, and capture RAW images. This will then allow for three different post-processing options:  Image Micro-adjustment, to slightly adjust the focus of an image, Bokeh Shift, to slightly adjust the out-of-focus areas of an image, and Ghosting Reduction, to reduce the effects of haze or flaring in an image, caused by internal lens reflections. Note that you can only apply a single one of these adjustments to each Dual Pixel RAW image. Please note that if you do not plan on making use of these adjustments, then you will not want to enable Dual Pixel RAW, since it will cause the image files to be much larger, and it will reduce the maximum shooting speed and burst rate.

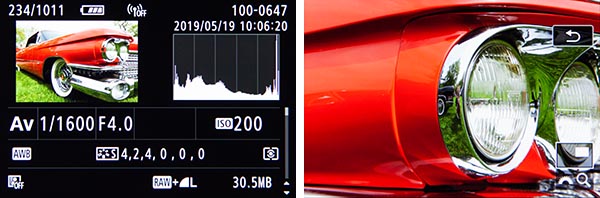
Image Playback – The previously separate Playback Shooting Information Display screens for playback are now all on the same screen, and you press up or down on the Cross Keys to change the information at the bottom half of the screen, rather than clicking through several different detailed screens (see Figure 6 – left). And since there is only one Magnify Button there is a new way of zooming in and out – you will press the Magnify Button and then turn the top Main Dial (see Figure 6 – right). You can then use the Cross Keys or touch screen to pan around the frame.

Figure 6 – Left: The Playback Shooting Information Display Screen, where you can press up or down on the Cross Keys to view different information at the bottom of the screen. Right: You will now zoom-in on a playback image using the single Magnify Button and the top Main Dial.

Set Image Search Conditions – This search feature is a recent addition to Canon dSLR cameras. It allows you to search for images on the memory card based on their Rating or Date taken, or for all images in a specific Folder, or images that are protected with the Protect feature, or specific types of files such as Stills, Movies, RAW, and JPEG files. You can include more than one of the parameters in the search, in order to locate a very specific set of images. This feature can be accessed in the Playback 2 Menu, or on the image playback Quick Control Screen (see Figure 7).

Figure 7 – Left: Access the Playback Quick Control Screen by pressing the Q / SET Button during image playback. Right: The new Image Search options, which allow you to search for images based on various parameters.

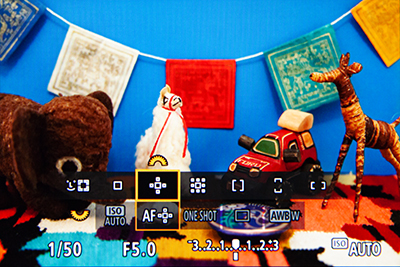
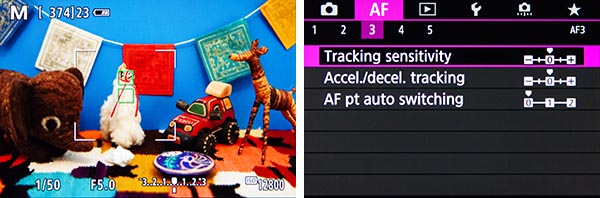
Autofocusing – The AF system of a mirrorless camera such as the EOS R is more similar to the Live View autofocusing system of previous cameras, and makes use of autofocus areas (called AF Methods) such as Face+Tracking AF (including eye-detection), Expand AF Area, and Zone AF (see Figure 8 – left). The EOS R also allows you to use either the Cross Keys or the touch screen to position the active AF Point. There are two AF Operations that you are likely familiar with, One-Shot AF for still subjects, and Servo AF to track and retain focus on moving subjects. When using Servo AF, the EOS R includes adjustable autofocus parameters for best tracking and retaining focus on a variety of moving subjects (see Figure 8 – right). Other new autofocusing menu options will help you to gain more control over the autofocus system, the autofocus points, and where and how the camera focuses. And various manual focusing aids including Focus Peaking and the rangefinder Focus Guide frame will assist you with accurate manual focus.

Figure 8 – Left: Making use of the Zone AF Method. Right: The AF3 Menu tab with the adjustable parameters for tracking moving subjects.

Auto ISO – The EOS R offers additional control over Auto ISO, where you can specify the ISO range in which you wish the camera to remain, and set the minimum shutter speed. You can even let the camera choose the minimum shutter speed based on the current lens focal length, and then further adjust that Auto setting if you want the camera to choose a faster or slower minimum shutter speed (see Figure 9 – left).

Figure 9 – Left: When using Auto ISO, you can allow the camera to choose the Minimum Shutter Speed based on the current lens focal length, and also adjust that “Auto” setting for a faster or slower minimum shutter speed. Right: The EOS R allows Manual Mode with Auto ISO plus Exposure Compensation.

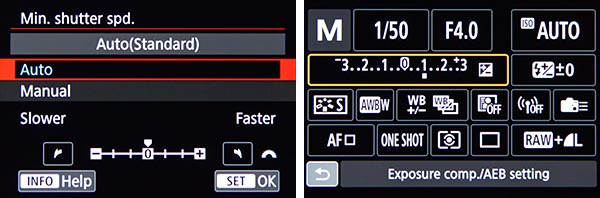
If shooting still images or movies in Manual (M) Mode, you can use Auto ISO and allow the camera to adjust the ISO setting to maintain the proper exposure, plus you can apply Exposure Compensation in this situation, if you wish to adjust to a brighter or darker exposure (see Figure 9 – right).

Bulb Timer – When working in Bulb (B) Shooting Mode, you can set the Bulb Timer (in the Photo Shooting 6 Menu) to dictate how long the shutter will remain open, rather than having to hold down the Shutter Button for the entire duration (see Figure 10 – left). This will also help to eliminate camera movement.

Figure 10 – Left: Enable the Bulb Timer and press the INFO Button to set the exposure time, for when using Bulb (B) Shooting Mode. Right: The Sharpness parameters, which are available with each of the Picture Styles.

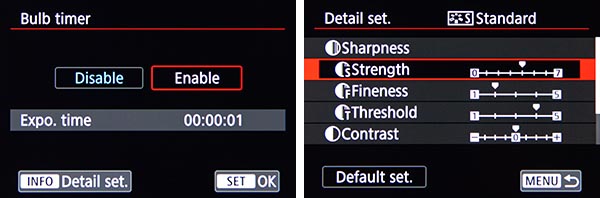
New Picture Style Options – The EOS R offers the Fine Detail Picture Style, designed to help maximize the level of image detail. Plus, advanced Sharpness parameters of Strength, Fineness, and Threshold are available for all of the Picture Styles (see Figure 10 – right).

New Auto White Balance Options – When making use of Auto White Balance (Shooting 4 Menu), you can choose between two settings. The Ambience Priority setting will retain the warm color cast of incandescent (tungsten) lighting, which you may be used to or expect with images of indoor scenes. This setting is most similar to the Auto White Balance of previous Canon cameras. The White Priority setting will render more neutral whites and color tones, and reduce the red or yellow tones of incandescent lighting (see Figure 11 – left).

Figure 11 – Left: The Auto White Balance options. Right: The Movie shooting screen, displaying various video settings.

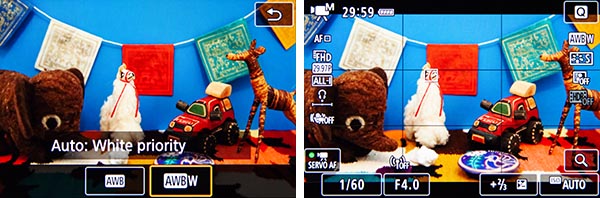
Video – The EOS R includes important new video features, most notably 4K video (see Figure 11 – right). It also offers the ability to adjust the Movie Servo AF speed, as the camera autofocuses on a subject at a different distance, dictating how quickly the new subject comes into focus. An HDR video feature is now available, and the High Frame Rate option allows you to shoot HD videos at 119.9/100.0 fps, which can then be played in slow motion. The camera provides 4K stills at 8.3 megapixels, various file compression options, and 8-bit and 10-bit Canon Log options.

There are additional changes noted and explained throughout my guide, Canon EOS R Experience, such as new lens correction capabilities and multiple My Menu tabs, so I encourage you to have a look at the full guide!

Canon EOS R Experience book manual guide how to learn master quick start tips tricks

Quick Start Setup for the Sony a7R III

The Sony Alpha a7R III mirrorless camera offers numerous improved features and updates from previous versions of the camera, including an improved autofocus system with more effective eye-detection, faster continuous shooting at up to 10 frames per second, better in-camera stabilization, and a faster processor. Boasting 42.2 megapixels, the image resolution is excellent enough to meet most any photographer’s needs.

The a7R III offers numerous menu options, features, and customizations, and you may have found that the menus can be challenging to navigate, and some options are confusing or difficult to understand. In fact there are over 180 menu items, spread across 35 menu pages, and organized under 5 separate tabs. However, it is important to properly set up the options to match your shooting needs, and essential to understand what the features are doing and how the camera is operating, so that you can take full advantage of all that that a7R III offers.

I have put together a comprehensive Sony a7R III Menu Setup Guide Spreadsheet to help walk you through all the Camera Settings and Setup Menus. The spreadsheet contains separate listings of suggested settings and starting points for various types of shooting situations, including:

General / Travel / Street
Landscape / Architecture
Action / Sports
Moving Wildlife / Birds
Studio / Portraits
Concert / Performance

Below is a small detail of the setup guide. You can download the Sony a7R III Menu Setup Guide Spreadsheet at the link below, where you will also find instructions for printing the spreadsheet. This spreadsheet is available for free for a limited time!

http://www.fullstopbooks.com/setup-guides/

Sony a7R III setup quick start guide how to manual

I also offer a companion text guide, which provides more detailed explanations of all the Sony a7R III menu items, recommendations for setting them up, and for making use of the various camera features and functions, along with some a7R III tips and tricks. This more detailed text guide, Sony a7R III Menu Setup Guide, will be available in May 2018. The text guide and the setup guide spreadsheet work hand-in-hand, to help you set up and get the most from your camera.

Take control of your a7R III and the images you create!

Sony a7R III manual menu setup guide how to use quick start

Recommended Nikon D850 Settings

I’ve put together a comprehensive Nikon D850 Menu Setup Spreadsheet, with suggested settings for various types of shooting situations, such as Landscape, Action/Sports, Portrait, Concert, etc. The Excel spreadsheet covers all of the Photo Shooting Menu items, all of the Custom Settings, and various other camera and exposure settings. A free link to the spreadsheet is included inside my Nikon D850 Experience guide if you purchase that, otherwise you can purchase and download the spreadsheet here, where you will also find instructions for printing it out:

http://www.fullstopbooks.com/setup-guides/

Here is an image of just a small portion of the comprehensive spreadsheet:

Nikon D850 setup guide menu custom setting spreadsheet quick start tips tricks

The setup guide spreadsheet is a great companion to my full D850 guide, Nikon D850 Experience, which is a clear and comprehensive guide to the camera. The full guide explains all the Menu and Custom Settings items, as well as all of the other camera features, functions, and controls.

Nikon D850 Experience book manual how how to use tips tricks

Nikon D500 Setup Guide Spreadsheet

In conjunction with my camera guide for the new Nikon D500, Nikon D500 Experience, I have created a free Nikon D500 Setup Guide – a comprehensive spreadsheet with suggested settings for the applicable Menus, all of the Custom Settings, plus some shooting and exposure settings. It has complete and separate camera setup recommendations for different types of shooting, including:

General / Travel / Street
Landscape / Architecture
Action / Sports
Moving Wildlife / Birds
Studio / Portraits
Concert / Performance

Here is an example detail of just a small part of the Setup Guide spreadsheet:

 Nikon D500 Setup Guide Spreadsheet Experience Full Stop tips tricks recommend suggested setting menu Custom Setting

The direct link to download the Excel spreadsheet is:

http://docs.fullstopbooks.com/forms/Nikon_D500_Experience-Setup_Guide.xls

To print the spreadsheet guide, you may wish to print it across several pages and then tape them together, so that the data is legible:

-First, be sure to set the print area, to avoid all the blank pages. Do this by manually selecting all the cells with data in them (drag the cursor from cell A1 to G190 and they will all appear blue.) Then access the menu for File > Print Area > Set Print Area.

-Then go to File > Print Preview and select the Setup button.

-Then set the page for “Landscape” and “Fit To” 2 pages wide by 3 pages tall.

This should result in 6 pages to be printed (as long as you have set the print area first).

Be sure to check the Print Preview to see that the data will print at a reasonable size, and that there are only 6 or so pages that will print.

Nikon D500 viewfinder autofocus AF points crop 1.3x grid

In the past I have resisted requests for these types of quick-start “cheat sheets,” because I prefer that readers of my Full Stop camera guides read through all of the Menu and Custom Settings options, and determine which settings suit their shooting situations and preferences. This is one of the best ways to really learn the ins-and-outs of one’s new camera, so I still encourage you to do so. But I can appreciate the value and the handy reference features of this type of recommendation guide.

Please feel free to take the advice of dedicated Wildlife or Concert photographers, for example, above mine if it differs! And for further information, explanations, justifications, and caveats for the settings I specify, please have a look at my clear and comprehensive guide Nikon D500 Experience.

Nikon D500 Experience book manual guide how to use set up quick start setting recommend menu custom setting setup guide

Version History of Spreadsheet

2016-05-22 – v1.0 – First version released

2016-05-24 – v1.1 – Minor formatting corrections

Nikon D7200 Setup Guide with Recommended Settings

In conjunction with my camera guide for the new Nikon D7200, Nikon D7200 Experience, I have created the free and comprehensive Nikon D7200 Setup Guide, with recommended settings for the applicable Menus, all of the Custom Settings, plus some shooting and exposure settings. It has complete and separate camera setup recommendations for different types of shooting, including:

General / Travel / Street
Landscape / Architecture
Action / Sports
Moving Wildlife / Birds
Studio / Portraits
Concert / Performance

Here is a detail of just a small part of the Setup Guide spreadsheet:

Nikon D7200 Setup Guide spreadsheet menu custom settings setup quick start tips tricks

The direct link to download the Excel spreadsheet is:

http://docs.fullstopbooks.com/forms/Nikon_D7200_Experience-Setup_Guide-UL.xls

alternate link:

http://www.dojoklo.com/Full_Stop/forms/Nikon_D7200_Experience-Setup_Guide-UL.xls

To print the spreadsheet guide, you may wish to print it across several pages and then tape them together, so that the data is legible:

-First, be sure to set the print area, to avoid all the blank pages. Do this by manually selecting all the cells with data in them (drag the cursor from cell A1 to G151 and they will all appear blue.) Then access the menu for File > Print Area > Set Print Area.

-Then go to File > Print Preview and select the Setup button.

-Then set the page for “Landscape” and “Fit To” 2 pages wide by 3 pages tall. Alternately, you can set for “Adjust to 60% Normal Size.”

Either of those options should result in 6 pages to be printed (as long as you have set the print area first).

Be sure to check the preview to see that the data will print at a reasonable size, and that there are only 6 or so pages that will print.

Nikon D7200 Experience book manual guide set up spreadsheet menu custom setting tips tricks shooting exposure


In the past I have resisted requests for these types of quick-start “cheat sheets,” because I prefer that readers of my Full Stop camera guides read through all of the Menu and Custom Settings options, and determine which settings suit their shooting situations and preferences. This is one of the best ways to really learn the ins-and-outs of one’s new camera, so I still encourage you to do so. But I can appreciate the value and the handy reference features of this type of recommendation guide.

Please know that I am not an expert in all of the different photography categories I have included, so feel free to follow the advice of dedicated Bird or Concert photographers, for example, if it differs from mine. Or follow your own preferences as they develop with experience. And for further information, explanations, justifications, and caveats for the settings I specify, please have a look at my clear and comprehensive guide Nikon D7200 Experience.

Nikon D7200 Experience book manual guide quick start master tips tricks recommend autofocus metering


Version History of Spreadsheet

2015-03-24 – v1.0 – First version released

Nikon D810 Setup Guide with Recommended Settings

In conjunction with my camera guide for the new Nikon D810, Nikon D810 Experience, I have created a Nikon D810 Setup Guide – a comprehensive spreadsheet (cheat sheet!) with recommended settings for the applicable Menus, all of the Custom Settings, plus some shooting and exposure settings. It has complete and separate camera setup recommendations for different types of shooting, including:

General / Travel / Street
Landscape / Architecture
Action / Sports
Moving Wildlife / Birds
Studio / Portraits
Concert / Performance

Here is a detail of just a small part of the Setup Guide spreadsheet:

Nikon D810 Setup guide menu custom setting cheat sheet quick start tips tricks recommend setting, book manual guide how to

The direct link to the Excel spreadsheet is:

http://docs.fullstopbooks.com/forms/Nikon_D810_Experience-Setup_Guide.xls

alternate link:

http://www.dojoklo.com/Full_Stop/forms/Nikon_D810_Experience-Setup_Guide.xls

Please note that the guide will also apply to the D800 and D800E, but new D810 menu items and features will obviously not be on the D800, and the names/ terms of some of the items has changed slightly.

To print the guide, you may wish to print it across several pages and then tape them together, so that the data is legible:

First, be sure to set the print area, to avoid all the blank pages. Do this by manually selecting all the cells with data in them (drag the cursor from cell A1 to G168 and they will all appear blue.) Then access the menu for File > Print Area > Set Print Area.

Then go to File > Print Preview and select the Setup button,

Then set the page for “Landscape” and “Fit To” 2 pages wide by 3 pages tall. Alternately, you can set for “Adjust to 60% Normal Size.”

Either of those options should result in 6 pages to be printed (as long as you have set the print area first).

Be sure to check the preview to see that the data will print at a reasonable size, and that there are only 6 or so pages that will print.

In the past I have resisted requests for these types of quick-start “cheat sheets,” because I prefer that readers of my Full Stop camera guides read through all of the Menu and Custom Settings options, and determine which settings suit their shooting situations and preferences. This is one of the best ways to really learn the ins-and-outs of one’s new camera, so I still encourage you to do so. But I can appreciate the value and the handy reference features of this type of recommendation guide.

Please know that I am in no way an experienced expert in all of the different photography categories I have included, so take the advice of dedicated Bird or Concert photographers, for example, above mine if it differs! And for further information, explanations, justifications, and caveats for the settings I specify, please have a look at my clear and comprehensive guide Nikon D810 Experience.

Version History
v1.2 – First version released
v1.3 – Formatting/ appearance changes
v1.4 – Formatting/ appearance changes
v1.5 – Formatting/ appearance changes
v1.6 – Footnote number corrections, some minor settings changes based on further findings and the final text of the guide

 Nikon D810 setup guide menus custom setting quick start cheat sheet how to manual tutorial tips tricks recommend
Nikon D810 – 1965 Ford Mustang GT – 2014 Annual Antique Auto Show – Codman Estate, Lincoln, Mass.

If you have purchased my Nikon D810 Experience e-book guide, be sure to sign up on the updates page, so that I can inform you of any updates made to the guide or to this spreadsheet, and well be able to provide you with a free updated guide, should there be any major updates or corrections.

Nikon D810 manual guide setup tips tricks how to use quick start recommend setting
Nikon D810, shown with 50mm f/1.4 AI-S lens. Camera courtesy of LensProToGo. Lens courtesy of Newtonville Camera.

If you have found this blog helpful and plan to purchase a Nikon D810 or some lenses or accessories for it, please consider using my affiliate links for Amazon or for B and H, found at the left side of this page. Your price will be the same, but they will give me a small referral fee – thanks! And please feel free to spread the word if this blog has been helpful.

The Secrets to an Interesting Photo – Unlocked!

A few days ago Reuters published a collection of the Best Photos of the Year 2012. This collection, similar to the Atlantic’s 2012: The Year in Photos, is a sometimes inspiring, often depressing look back at the events of the past year. The content and subjects of the images aside, they are both excellent presentations of some of the best in photojournalism and image making for the year, and I encourage you to not only look through the images, but to analyze the ones that you like or that move you, and determine what it is about the images that makes them so powerful. Look at the position and point of view of the camera, the aperture settings used (shallow depth of field vs. deep dof), the composition including wide vs. tight and what was put in the frame and what may have been left out, how the elements, forms, and colors in the image relate, the moment captured, etc.


Reuters photographer Joseba Etxaburu is knocked down by a wild cow during festivities in the bullring following the sixth running of the bulls of the San Fermin festival in Pamplona July 12, 2012. Etxaburu suffered some scratches on his right elbow but was able to continue shooting afterwards. Canon EOS-1D Mark IV, lens 70-200mm, f3.5, 1/640, ISO 500. http://blogs.reuters.com/fullfocus/2012/11/30/best-photos-of-the-year-2012/#a=1

In an interesting exercise, someone has compiled the type of cameras and lenses used for the photos, and the exposure settings, and then put it all into easy to read pie charts. To turn this information on its head, it seems that to have the best chance of make an interesting image, what you need is a Canon 1D Mark IV with a 16-35mm lens (likely the EF 16-35mm f/2.8L), set your aperture at f/2.8, shutter speed at 1/320, and use 200 ISO.

But to look seriously and more in-depth at the information compiled and presented in the charts, one can learn a lot about how photojournalists in the field operate:

They seem to prefer Canon dSLR cameras, with Canons used in about 90% of the images* – or it perhaps merely shows that Reuters provides, supports, and/ or encourages Canon equipment. (For example, they likely have a collection of Canon bodies and lenses at their offices for the photojournalists to use or to supplement their equipment when they need a specialized lens.) The top camera used, the Canon 1D Mark IV is a very rugged and reliable professional camera, which is interesting to note has “only” 16 megapixels (though it has a much higher quality image sensor than consumer cameras). It has recently been replaced with the more current Canon 1D X.

Prime lenses were used (rather than zooms) in about 55%* of the images, and the most common favorites were nearly equally divided over the 24mm, 50mm, and 16mm (each used about 8% of the time overall when including all lenses*).

With zoom lenses, the wide angle 16-35mm (EF 16-35mm f/2.8L) was used most often (about 19% of the time overall with all lenses*), followed by the 70-200mm (likely the EF 70-200mm f/2.8L IS version I or II). (The lens links here are for Canon lenses – I’ll try to get back to this and add similar Nikon lens links.)

(*these numbers may be off, as the numbers on Reddit seem to be inconsistent/ incomplete)

What this tells us is that wide angle lenses really are the “bread and butter” lens of the photojournalist, used to capture a wide scene or to place the subject or the action into a larger context – which is often important in telling a full and accurate story in a single image. It also means that the photographer was typically very close to the subject, right in the middle of the action. Sometimes however, a close-up portrait or detail best tells the story, or a photographer can’t get as close as desired, and that is where the 70-200mm comes in.  It is interesting to note that when I did extensive research into choosing lenses at the start of my professional career, I followed many working photographers’ advice and settled first upon these exact lenses – the 16-35mm and 70-200mm. You can do a lot of great travel and photojournalism work with those two lenses alone. One problem you will run into if you are only using one body, however, is that you sometimes have to quickly switch to the other, and that is where the more versatile 24-105mm f/4L or 24-70mm f/2.8L lenses can be more practical.  And you can see that these mid-range zooms were two of the other, lesser used zooms in the chart.

After some time with the zooms, most people want to try their hand at a prime lens – to increase image quality, help them work a bit more at composing and framing, and to provide even shallower depth of field. And as you can see, the wide primes are the most popular among photojournalists. The 50mm f/1.2L or the more affordable 50mm f/1.4 will give you a field of view approximating your normal vision (hence they are called “normal” lenses. The 24mm f/1.4L and 16mm focal lengths are much wider. These also show that the photographers were right up in the action.

The photojournalist’s expression used to be “f/8 and be there” but based on this data, it will obviously have to be modified to “f/2.8 and be there.” The most common aperture setting in these images was f/2.8, used in about 29% of the photos, followed by f/4, f/1.4 (which is possible with some of the prime lenses), and f/3.2. What this means is that they are most often using a very shallow depth of field, usually in an attempt to visually separate the subject of the image from the background, and to call attention to exactly where in the image they want the viewer’s eye to fall. Plus the wide aperture lets in lots of light, which may help them be able to use the fast shutter speeds and low ISO settings they desire.

The “f/8 and be there” expression has been interpreted in a few different ways, but what it seems to say is have your camera ready, and then just be at the scene. The camera settings aren’t nearly as important in photojournalism as simply being there to capture the action.  It also shows that with f/2.8 (and other wide apertures) being used as the most common aperture setting today, photography has likely made a shift over the past few decades where shallower depth of field is much more common.  This would be interesting to investigate, but it could be the result of autofocus systems, allowing a photojournalist to be much more sure of their focus and able to use shallow dof – where as before they had to quickly manually focus and a slightly deeper dof allowed some focusing lee-way. It could also have to do with lenses now being sharper at wider apertures.

The most often used shutter speeds were 1/320, 1/250, 1/800, and 1/640. A photojournalist is often capturing action or precise moments, and thus a fast shutter speed is desired. The best thing to do in these types of situations – especially if working in Aperture Priority Mode so that you have full control over your depth of field – is to set an ISO speed (based on the lighting of the scene) that will allow the camera to select appropriately fast shutter speeds. The best shutter speed depends on the situation and how fast/ what direction the subject might be moving, but from these results it shows that anywhere from 1/250 to 1/800 can work for many scenes – although 1/1000, 1/2000, or faster will be needed for sports and fast action. So set an ISO speed that will result in this shutter speed range when your aperture is set around f/2.8 or f/5.6 (or whatever aperture range you plan to use). The results show that the photojournalists seem to choose the lowest ISO possible for the situation (based on the lighting), as this will result in the least amount of digital noise – interestingly the most used ISO settings actually went in order from 200, 400, 800, to 1600. The fact that ISO 100 came in next, but at a much smaller percentage seems to say: don’t risk it with 100 ISO – just use 200 ISO so that you don’t inadvertently use too slow of a shutter speed when the lighting level decreases but you aren’t paying attention to the exposure settings. The noise and sharpness difference between 100 and 200 is pretty negligible for most current cameras.

Don’t quite understand all these settings and the terminology?  Have a look at my Full Stop dSLR camera guides, such as Canon 5D Mark III Experience and Nikon D600 Experience, which cover not explain the functions, features, and controls of Nikon and Canon dSLR cameras, but more importantly how, when and why to make use of them in your photography.

full stop dslr photo photography camera manual guide for dummies canon nikon


A Brief Introduction to Exposure Bracketing

If you have begun to take control of your camera’s functions and settings and are understanding the basics of exposure, and perhaps are working in Aperture Priority or Shutter Priority Mode, you may still find that sometimes your images are coming out lighter or darker than you desire.  This could be due to an unusual lighting situation, a scene that contains a wide range of bright and dark areas, a subject that is back-lit, the camera metering from the “wrong” area of the scene, or a number of other reasons.

In this situation hopefully you have begun experimenting with exposure compensation.  If not, exposure compensation can be the solution to these types of problems by enabling you to “over-ride” the camera’s exposure decision and making the next image lighter or darker as desired.  And since most all the functions and settings of a dSLR are inter-related, the use of other metering modes such as Center-Weighted or Spot metering can also be part of the solution (or part of the problem) – but those are topics for other posts!  I’ve written one about Exploring Metering Modes, and should probably tackle some exposure issues soon.

exposure compensation auto exposure bracketing aeb canon nikon dslr
Figure 1 – French Medieval Storefront Carving, Gloucester, Mass. – Three bracketed exposures of the same scene:  the “proper” exposure as determined by the camera (Center-Weighted Average Metering Mode) in the center; over-exposed +1 stop on the left; under-exposed -1 stop on the right.  The desired exposure, for my eye, lies somewhere between the “proper” exposure and the darker under-exposure, where some highlights on the figure remain but the color and detail of the wood can be seen in those areas.  Center exposure:  Shutter speed 1/60 aperture f/2.8, ISO 200

If you have begun to make use of Exposure Compensation, or wish to start, a technique called exposure bracketing can expand upon that or perhaps help you to learn and understand over- and under-exposures.  Exposure bracketing is when you take at least three photos of the same scene, one at the “proper” or desired exposure, one under-exposed, and one over-exposed (see Figure 1).  For example you may take the second and third shot with the exposure compensation set at +1 and then -1.  This is done to ensure that you capture exactly the right exposure you desire or to experiment and see the results of varying your exposure settings.  A common feature of dSLR cameras called Auto Exposure Bracketing (AEB) can even automate this process for you.

In the days of film, exposure bracketing was a helpful technique – especially for critical situations – since one didn’t have the immediate feedback of the image on an LCD screen and a histogram.  It can still be used today for critical situations or for test shots when determining the right exposure settings.  The Auto Exposure Bracketing feature of digital SLRs automates this process by automatically changing the exposure settings between shots.  You set the amount of under- and over-exposure desired (such as +1, -1 or +2/3, -2/3) and then take three images in a row.  The camera automatically adjusts the exposure for each shot so that one is taken at the “proper” or baseline exposure, another shot is under-exposed, and the other is over-exposed.  If your camera is set on continuous drive mode, you can just hold down the shutter button and the camera will take the three shots in a row.  Or if you have it set on single shooting, you click the shutter three times in a row, ideally of the same scene.  Many cameras even allow you to dictate the order that the images are taken, and whether or not AEB cancels itself after one use or when the camera is turned off.

Or you can perform this process yourself, by either using exposure compensation between shots or by working in Manual Mode and adjusting the aperture or shutter speed setting between shots.

auto exposure bracketing canon nikon dslr aeb
Figure 2 – Weaver Constructing the Keshwa Chaca, Huinchiri, Peru – Three bracketed exposures of the same scene:  the “proper” exposure as determined by the camera (Evaluative metering mode) in the center, under-exposed -2/3 stop on the left, over-exposed +2/3 stop on the right.  The desired exposure in this case, for my eye, lies somewhere between the “proper” exposure and the over-exposure.  With auto exposure bracketing you can often customize the order that the bracketed images are taken, for example proper/under/over or under/proper/over.  In this example they were taken proper/under/over, so they are displayed here in a different order than actually captured.  Center exposure:  Shutter speed 1/1000, aperture f/5.0, ISO 100

Exposure compensation and bracketing are also used in HDR (high dynamic range) photography to take three or five or more photos of the same scene at various exposures.  All the images are then combined by the photographer, using HDR software, into a single image which will contain a much broader dynamic range of light and dark than is possible with a single image.

The basic principles of exposure as well as all of the other important functions and controls of a dSLR, such as Metering Modes and the Autofocus System, are explained in my e-book Ten Steps to Better dSLR Photography, as well as in all my other dSLR camera guides to specific cameras such as Nikon D5100 Experience and Canon T3i Experience.  Click on the titles or the cover below to learn more!

dslr learn improve autofocus exposure aperture shutter priority for dummies


Don’t Let the Locations of the AF Points Dictate Your Composition

I began to discuss the autofocus modes of various dSLR cameras in previous posts including Taking Control of Your Canon Autofocus System and Taking Advantage of the Autofocus Systems of the Nikon D5100 and the Nikon D7000

In this post I wish to go into more detail about one of the reasons it is important to take control of your autofocus system, namely not allowing the locations of the AF Points in your viewfinder to dictate your final composition.

As I mentioned in previous autofocus posts, one of the essential steps in taking a successful photo is controlling where the camera focuses.  If you allow the camera to auto focus by choosing its own focus point(s), it typically focuses on the closest object.  This may or may not be what you want to focus on, so you should select where the camera focuses using the Auto Focus Points.  For example, you often want to focus on a subject’s eyes, but if you allow the camera to choose the autofocus point itself, it may select another part of the face, or somewhere else on the body, or even a raised hand that is nearer to the camera than the face to focus most sharply on.

In addition, there are reasons to use the outer focus points and not just focusing with the center AF point and then recomposing.  First, if you are taking several shots of the same subject and framing, you will not have to re-focus with the center point and recompose between each shot.  And by controlling exactly where you focus, you then have greater, more precise control over the use of dramatic depth of field.  Also, if you use the center point and recompose, you have swept the camera in an arc to recompose, and are thus always focusing at a distance behind the subject.  This may not be as noticeable when the subject is further away, but for a close subject – especially when using shallow depth of field – the difference is critical.

One of the additional critical reasons to take control of your autofocus system is so that you don’t let the location of the AF Points dictate your composition. What happens when the subject you want to focus on is not located exactly under one of the AF Points? Even with 9 or 19 or more AF Points to choose from, they will not always be located exactly at or near where you need them to be.  Recomposing or re-framing your shot is often necessary so that you can capture exactly the image you wish to and not one dictated by the locations of the AF Points as you see them in the viewfinder.

Canon 7D 5D mark II 60D T3i 600D autofocus system AF point choose select set setting
Figure 1 – The desired framing and composition of the shot I wish to take, yet no AF Point, including the selected lower right point (the larger point shown in red here) is located exactly at the woman’s head where I wish to focus. (Canon 7D viewfinder shown)

Canon 7D 5D mark II 60D T3i 600D autofocus system AF point choose select set setting
Figure 2 – Image is temporarily framed to place the selected AF Point over the woman’s head, Shutter Button is pressed half-way and held to lock focus at that distance, image is recomposed to the desired framing of previous Figure 1, and Shutter Button is fully pressed to capture the image.

Figure 1 shows the desired framing and composition of the shot I want to take, but the woman is not located under an AF Point. This composition is desired for me because it captures the entire window along with some space around it, as well as some space in front of the woman for her to “walk into” – but not an excessive amount of space. So I manually select the lower right AF Point (using Single-Point AF Mode), temporarily frame the image to place the selected AF Point over her face or head, press and hold the Shutter Button half-way to lock focus at that distance (Figure 2), and see the Focus Confirmation Light illuminate in the viewfinder. I then recompose back to the final framing I want (Figure 1) and press the Shutter Button fully to take the image. Even though the subject is moving, I do not need the sophisticated tracking of AI Servo (Canon) or Continuous Servo (Nikon) Focus Mode to keep her in focus. I can quickly lock focus using One Shot (Canon) or Single Servo (Nikon) Focus Mode, recompose, and take the image without the camera-to-subject focus distance changing significantly.

With the example images above (Figures 1, 2), focusing on the wall would not have been tragic because the distance between the subject and the background is small, and if a medium or narrow aperture such as f/8 or f/16 is used both the wall and the subject may be in acceptable focus. If the background was further away, and/ or a wide aperture such as f/2.8 was used – especially with a telephoto lens, and if the image was enlarged, you would clearly see that the camera focused on the wall and not the woman. Not to mention the fact that the wall is a somewhat consistent area of color and the AF system may have difficulty properly focusing on it. So it is best not to take shortcuts such as focusing on the wall and hoping the subject will also be in focus, because in many other situations you will not have this option. It is best to take the photo properly and to learn and practice the habit of working in the more rigorous manner if you want all your photos to be sharp.

If you would like to learn more about the autofocus systems of your Canon or Nikon dSLR camera, as well as learn to use the other features of your camera including metering modes, Aperture and Shutter priority modes, all the menus and Custom Function settings, and more, have a look at my Full Stop e-book camera guides. In addition to explaining the features and settings, the guides clearly explain when and why to use them in order to capture the images you desire.

Take control of your camera and the images you create!

Learn more about the e-books by clicking on their titles or on the banner below:
Canon 7D Experience
Canon T3i Experience
Your World 60D
T2i Experience.

Nikon D7000 Experience
Nikon D5100 Experience.

full stop dslr photo photography camera manual guide for dummies canon nikon

For those with other cameras, check out my Ten Steps to Better dSLR Photography which also discusses taking advantage of any dSLR camera’s autofocus system.

Was this post helpful?  Please let others know about it by clicking the Facebook or Twitter sharing buttons below, linking to it from your blog or website, or mentioning it on a forum.  Thanks!  Want to help support this blog with no cost or effort?  Simply click on the Amazon, B&H Photo, or Adorama logos on the left side of this page to go to those sites and make your purchases.  They will then give me a little referral bonus!

Taking Control of Your Canon Autofocus System

This article mostly applies to the 9 point autofocus system of the Canon 60D and the Rebels including the T5i / 700D and T4i / EOS 650D (and their predecessors), as well as to the new Canon 6D and its 11 AF points.  The Canon EOS 7D also shares the same Autofocus Modes discussed below, but it adds Autofocus Area Modes to the mix as well as additional Custom Functions affecting the AF system, so I will have to address those additional capabilities in the future (or you can learn all about them now in my Canon 7D Experience e-book).  I have written a separate post that addresses the AF system of the Canon 5D Mark III.

You can learn much more about using these cameras with my Full Stop e-book camera guides for Canon dSLR cameras.

Using Auto Focus
One of the essential steps in taking a successful photo is controlling where the camera focuses.  If you allow the camera to auto focus by choosing its own focus point(s), it typically focuses on the closest object.  This may or may not be what you want to focus on, so you should select where the camera focuses using the Auto Focus Points.  This does not mean you have to manually focus the camera, it means you tell the camera exactly where to autofocus.  For example, you often want to focus on a subject’s eyes, but if you allow the camera to choose the autofocus point itself, it may select another part of the face, or somewhere else on the body, or even a raised hand that is nearer to the camera than the face to focus most sharply on.  If you are capturing an image of a bird in a tree, the camera has no idea you want the autofocus system to zero-in on the bird so that it is in sharp focus and not the branches or leaves near it, or the leaves closest to you.

Autofocus works by looking for contrast, so try to focus (place your AF Point) on a detail with a strong line or strong contrast between light and dark.  It may not be able to focus on a large area of consistent color – such as a white wall or blue sky or even an evenly colored and lit shirt – or on a subject that is too dark.  It can be disrupted by regular patterns or confused when looking through close objects to objects farther away, such as looking through a fence.  And it sometimes fails to work as well in dim light, though the AF-Assist Beam can assist in this situation.  When photographing people, always try to focus somewhere on the face, ideally on the eyes or eyebrows, then recompose the framing of your image if necessary.

Select an Auto Focus Point, or AF Point, using the Multi-Controller or using the AF Point Selection Button and the Cross Keys (depending on your camera).  If you have a model with the Multi-Controller (such as the 60D with the thumb-pad or the 7D or 5DII with the thumb-joystick), be sure to set the Custom Function setting for AF Point Selection Method so that you can directly change the AF Point without pressing the AF Button first.

Canon 60D T3i 600D autofocus system AF point select choose set setting
Figure 1 – The selected AF Point is located over the subject’s eye in order to ensure the camera autofocuses where desired.  (Canon 60D viewfinder shown, T3i/600D viewfinder similar)

To see how autofocus point selection works, make sure the switch on your lens it set to AF and your Autofocus Mode, as seen on the top LCD Panel or rear LCD screen, is set to One Shot, then:

•    Tap the Shutter Button with a half-press to wake up the camera.
•    Looking through the viewfinder, use the Multi-Controller or Cross Keys to select the focus point that is nearest to where you want to focus.
•    Place that point over your intended subject.
•    Press and hold the Shutter Button halfway down and see that point blink red.  The Focus Confirmation Light should light up in your viewfinder.  You have locked the focus.
•    Keeping the Shutter Button pressed halfway, recompose if necessary, and take the shot by fully pressing the Shutter Button.

There are reasons to use the outer focus points and not just the center one all the time.  First, if you are taking several shots of the same subject and framing, you will not have to re-focus with the center point and recompose between each shot.  And by controlling exactly where you focus, you then have greater, more precise control over the use of dramatic depth of field.  Also, if you use the center point and recompose, you have swept the camera in an arc to recompose, and are thus always focusing at a distance behind the subject (think of an arc that is your focus distance, and the tangent line off that arc that is the focus plane which now runs behind the subject after re-composing).  This may not be as noticeable when the subject is further away, but for a close subject – especially when using shallow depth of field – the difference is critical.

It may sound difficult to select the focus point each time, but it is actually very quickly done and should become instinctive.  You may even start to set your focus point as you approach a scene before even bringing your camera to your eye.

Focus Modes
The 60D and T3i (and 5D/ 5DII and 7D) have different focus modes to choose from, typically depending if your subject is still or moving, or if you wish to track its movement.

One-Shot AF
Use this mode when your subject is still and not going to move, or if your subject is not going to move very much, or if the distance between you and the subject is not going to change between the time you lock focus, recompose, and take the shot.  Lock focus on the subject and recompose if necessary.  This mode can even be used for moving people or objects if you quickly take the shot after establishing or locking focus.

Focus on your subject by pressing the Shutter Button halfway.  The active or selected AF Point will be displayed or will illuminate, and the Focus Confirmation Light at the lower right in the Viewfinder will illuminate as well.  Continue to press the Shutter Button all the way to take the shot.  If you half-press the Shutter Button to lock focus on your subject, the camera will remain focused at that distance as long as you keep half-pressing the Shutter Button.  You can recompose the shot as you wish and then full press the Shutter Button to take the photo.

As just noted, if the Focus Confirmation Light does not light up and the camera does not take the photo, the camera may not be finding enough contrast to focus on, you may be too close to your subject for the lens to focus, or the lighting may be too dim for the AF system to work properly.

However, if you are photographing a subject that is approaching or receding from view at a relatively constant rate, or photographing fast or erratic or unpredictably moving subjects, or photographing sports, action, or wildlife you will usually want to use AI Servo Focus Mode.

Canon 7D 5D mark II 60D T3i 600D autofocus system AF point choose select set setting
Figure 2 – Use One-Shot AF mode and select your desired AF Point to capture still or moderately moving subjects.  (Canon T3i viewfinder shown – 60D similar)

AI Servo
AI Servo mode is used for tracking and focusing on moving subjects, and is ideal for capturing sports and wildlife including birds.  If the subject is moving towards you or away from you the camera will keep evaluating the focus distance as long as the subject remains under the focus point that was originally active and the Shutter Button is kept half-pressed, and if the subject is moving from side to side or throughout the frame the camera will track it as it passes from one AF Point or Zone to the other ones (if you started tracking with the center AF point on the 60D and T3i or any selected AF point with the 7D).

If the subject is going to be moving across your field of view, set the camera to automatically select the focus point using all the AF points (this is one of the few times you will not be manually selecting the auto focus point), focus on the moving subject with the center focus point, and then as long as the Shutter Button remains half-pressed the camera will track the subject to the other focus points if it moves to them.  Thus when the image is taken, the subject is in focus.  This will even work in conjunction with continuous shooting.  If you keep the Shutter Button fully pressed and continue to take photos, the camera will keep focusing on the moving subject.  As you can imagine, this is ideal for tracking a player running across a field, a dog running toward you, or a bird moving across the fame.  Note that when shooting with Continuous Shooting Drive Mode not every shot may be in sharp focus as the camera sometimes can’t keep up and accurately predict the subject’s speed or location.  But you should be able to capture many sharp images with this technique.  The more sophisticated Canon 7D will allow you to start tracking moving subjects with any selected AF Point and not just the center AF Point.  These are the types of advanced capabilities you are paying for (and should take advantage of!) with a more expensive dSLR.

As you will see, when using AI Servo mode your compositions will be partially dictated by the positions of the autofocus points in your Viewfinder.  The subject needs to be at one of these AF Points in order for the camera to maintain focus on it.  This is why in some situations becoming skilled at quickly using One-Shot AF – even for action scenes – will give you much more ability to control your compositions.

AI Focus
This mode is a hybrid of the two other focus modes.  It starts in One-Shot AF mode then changes to AI Servo mode if your subject starts moving.  Why shouldn’t you use this all the time, then?  Well, it is typically not the best of both worlds.  If you are focusing and then recomposing, as you may often be doing, your movement of the camera may fool it into thinking that the subject is moving and then activate subject tracking AI Servo Mode, and your resulting focus may not be where you intend it to be or may not be as accurate as it could have been with One-Shot AF.  And in AI Focus Mode it may not be as quick to respond to a moving subject as it would in AI Servo Mode.  Typically you know if your subject is still or moving so it is better to select one of the other two AF Modes.  Plus that way you always know which AF Mode you are working in and can either lock focus where you want it or begin tracking a subject without wondering what mode the camera is in and if it will suddenly change.  But there may be situations that call for this combination mode such as a still bird or animal that may start moving unexpectedly, so keep it in mind.

How do you remember which mode is which since the terms “AI Servo” and “AI Focus” tell you nothing that makes sense?  Although I listed them in a different order above to explain them more easily, on your camera they are listed:

ONE SHOT
AI FOCUS
AI SERVO

Remember that One-Shot AF just focuses once and doesn’t change once you lock it in, and AI Servo AF is the other extreme – continuous focus used for moving objects. And AI Focus AF is listed in the middle, between the two, because it is the hybrid, combination of the two.

Checking Focus
You can review your images on the rear LCD Monitor of your camera to try to determine if they are in focus, especially by zooming in as close as possible.  But be aware that this screen has only about one million dots or pixels, while your actual image has about 18 million pixels.  That means that many images will appear to be in proper focus on your LCD screen, but you might discover that the actual images are not really so sharply in focus.

Before continuing, I want to mention that much of this text is excerpted from my dSLR guides for the Canon EOS 6D, Canon 70D, Rebel T5i / EOS 700D, Rebel T4i / EOS 650D, and the Canon EOS 7D. If you would like to learn more about the autofocus systems as well as all the other features of your camera including metering modes, Aperture and Shutter priority modes (Av and Tv), all the menus and Custom Function settings, and more, have a look at my Full Stop e-book camera guides. In addition to explaining the features and settings, the guides clearly explain when and why to use them in order to capture the images you desire.

Take control of your camera and the images you create!

Learn more about the e-books by clicking on the banner below:

full stop dslr photo photography camera manual guide for dummies canon nikon


To learn about another important reason why you need to take control of your autofocus system, and why the two example photos above actually weren’t my final compositions, see the next post:

Don’t Let the Locations of the AF Points Dictate Your Composition

What do you do when, with your desired framing, your subject is not located exactly under or near an AF point?  Even with the 19 or 39 points of an advanced Canon 7D or Nikon D7000, this will often be an issue.  For example in Figure 2 above, I actually wish to capture the entire window and more space around it within the image frame, but moving the camera and framing for that composition leaves me with no AF Point at the woman where I wish to focus.  Have a look at the above post to learn why this is an issue and how to resolve it.

Focus and Depth of Field

Many functions of dSLR cameras are related to some degree or another, and Focus and Depth of Field are two of these.  The depth of field, based on your aperture setting (and thus related to exposure…) expands forward and back from your point of focus.  Thus, one important aspect of controlling your depth of field begins with focusing exactly where you want to.  To begin learning more about depth of field, have a look at my post Depth of Field Simplified.

Was this post helpful?  Please let others know about it by clicking the Facebook or Twitter sharing buttons below, linking to it from your blog or website, or mentioning it on a forum.  Thanks!  Want to help support this blog with no cost or effort?  Simply click on the Amazon, B&H Photo, or Adorama logos on the left side of this page to go to those sites and make your purchases.  They will then give me a little referral bonus!

Understanding and Using Exposure Compensation and Bracketing

One of the key elements for obtaining the proper exposure of your images when working in Aperture Priority or Shutter Priority modes is making use of Exposure Compensation.  Although all the exposure related settings of a dSLR are intimately intertwined (such as aperture, shutter speed, ISO setting plus the exposure metering mode you are using, etc.) and it is challenging to speak of one without addressing the others, I will focus here on exposure compensation and when and how to use it.

The following text is excerpted from my e-book guide Ten Steps to Better dSLR Photography, where you can learn more about exposure compensation plus apertures, shutter speeds, exposure metering modes, composition and more.  Click on the cover at the end of the post to learn more about the guide, preview it, or purchase it.

Why Exposure Compensation is Needed

If you take an image that turns out to be darker or lighter than you desire, based on reviewing the image and/ or its histogram on your rear LCD screen, you can use exposure compensation in the non-Auto shooting modes to “override” the exposure that the camera is selecting, in order to brighten or darken the next image’s exposure.  You may want to do this if you have seen that your highlights have run off the right side of the histogram and been blown-out, resulting in complete loss of detail in those areas of the image.  Consult your manual to determine how to adjust exposure compensation on your specific camera.  With some Canon models, you press the Exposure Compensation [+/-] button and turn the Main Dial.  With other Canon models you use the Quick Control Dial to adjust this setting.  With Nikon, Sony, Pentax, and Olympus models you typically press the Exposure Compensation [+/-] button and turn a dial.  You will then see the exposure compensation amount change in your viewfinder and/ or on the top or rear LCD screen.  If the exposure level indicator in one of these places is not changing, press the shutter button half-way to first wake up the camera, or move/ press the Lock switch/ button near the rear dial on a Canon.

Putting Exposure Compensation to Use

If you have taken a photo that is too dark and you wish to retake the image and make the next exposure of the scene lighter, adjust exposure compensation in the positive (+) direction.  To make the next exposure darker, adjust exposure compensation in the negative (-) direction.  Try changing the Exposure Compensation by perhaps 1/3, 1/2, or 2/3 in the direction you desire, retake the shot, and see if your exposure problem is solved.  Increase or decrease the exposure compensation as needed.  Remember to set the exposure compensation back to zero when you are done with that situation and move on to take different images!  This is one reason why you should check your camera’s settings often – to make sure you haven’t left the camera on the settings from a previous situation.  This can often happen with the ISO setting and exposure compensation setting.  Check your current settings on the top or rear LCD display or in the viewfinder.

To remember how to compensate – which direction to turn the dial – think of the histogram peaks on the graph.  If you wish to shift the peaks to the left, to the darker side, to make the image darker, turn the dial so that the exposure compensation level moves to the negative side (-1, -2, etc.).  If you wish to shift the peaks to the right, to the lighter side, to make the image lighter, turn the dial so that the exposure compensation level moves to the positive side (+1, +2, etc).  Curiously, some cameras put the negative side of the exposure level indicator on the left, and others put it on the right, so look in the manual or viewfinder to see how yours operates.

Bracketing

Exposure compensation can also be used to “bracket” an exposure.  Bracketing is when you take at least three photos of the same scene, one at the “proper” exposure, one under-exposed, and one over-exposed (see the image below).  For example you may take the second and third shot with the exposure compensation set at +1 and then -1.  This is done to ensure that you capture exactly the right exposure you desire.  In the days of film this was a helpful technique, especially for critical situations, since one didn’t have the immediate feedback of the image on an LCD screen and a histogram.  It can still be used today for critical situations or for test shots when determining the right exposure settings.  Digital SLR cameras typically have an auto exposure compensation feature so that this process is more automated.  You set the amount of under- and over-exposure desired (such as +1, -1 or +1 2/3, -1 2/3) and then take three images in a row.  The camera automatically adjusts the exposures for each shot in order to bracket the second and third shots.  If your camera is set on continuous drive mode, you can just hold down the shutter button and the camera will take the three shots in a row.


Weaver Constructing the Keshwa Chaca, Huinchiri, Peru – Three bracketed exposures of the same scene:  the “proper” exposure as determined by the camera (Evaluative metering mode) in the center, under-exposed -2/3 stop on the left, over-exposed +2/3 stop on the right.  The desired exposure, for my eye, lies somewhere between the “proper” exposure and the over-exposure.  With auto exposure bracketing you can often customize the order that the bracketed images are taken, for example proper/under/over or under/proper/over.  In this example they were taken proper/under/over, so they are displayed here in a different order than actually captured.  Center exposure:  Shutter speed 1/1000, aperture f/5.0, ISO 100, focal length 105mm.

Exposure compensation and bracketing are also used in HDR (high dynamic range) photography to take three or five or more photos of the same scene at various exposures.  All the images are then combined by the photographer, using HDR software, into a single image which will contain a much broader dynamic range of light and dark than is possible with a single image.

Beyond Exposure Compensation

As I mentioned at the start, exposure is determined by a number of controls and settings on your dSLR.  If you are consistently taking images that are under- or over-exposed, you may wish to explore the other metering modes, to ensure that the camera is metering your exposures exactly where and how you want.  Have a look at my previous post on Exploring Metering Modes to learn more about this, or have a look at my e-book guide Ten Steps to Better dSLR Photography to learn about all the aspects of exposure and how they relate.


Ten Steps to Better dSLR Photography

Ten Steps to Better dSLR Photography is an e-book guide to help digital SLR photographers take control of their camera and the images they create.

tips tricks photography dslr learn use manual instruction tutorial for dummies guide

Capturing great images with your dSLR should not be the occasional result of chance and luck.  By taking control of your camera, its functions, and its settings you can begin to work with consistency and intention and take the photos you desire.

Readers of my popular dSLR camera guides such as Nikon D5100 Experience and Your World 60D have benefited from the clear and concise explanations of digital SLR photography functions and concepts. With Ten Steps to Better dSLR Photography all photographers can learn these essential elements necessary for taking full advantage of a dSLR including how, when and why to use the camera’s various functions and settings.

With this guide you will learn:

  • Controlling Your Autofocus System – focus where you want for sharp photos of still and moving subjects.
  • Understanding Apertures and using Aperture Priority Mode to capture dramatic depth of field.
  • Understanding Shutter Speed and using Shutter Priority Mode to freeze or express action.
  • Choosing the Metering Mode, Adjusting Exposure Compensation, and Using the Histogram for proper exposure in all lighting situations.
  • Determining proper ISO Settings and White Balance Settings.
  • Selecting JPEG or RAW image file format to save your images.
  • Improving Image Composition.
  • The Image Taking Process – a tutorial making use of all the steps learned.
  • …and more!

These are not simply photography “tips and tricks” but rather clear, concise, and useful explanations and examples of the fundamental functions, settings, and concepts of digital SLR photography. This 54 page illustrated PDF guide can help the novice or intermediate photographer better understand their camera and how to use it to its full capabilities to consistently capture better images, whether you shoot with a Canon, Nikon, Pentax, Sony, or Olympus dSLR camera.

Author:  Douglas Klostermann
Format:  PDF – Instant Download
Page Count:  54 pages, illustrated
ISBN:  978-1-4524-4764-3
Price: $8.99 new release sale!  $6.99
secure payment with PayPal or Credit card (via PayPal)
(plus 6.25% sales tax for residents of Massachusetts)

Buy Now with PayPal  or  Buy Now with your Visa/MC


Other versions of Ten Steps to Better dSLR Photography are available:

The Kindle edition is available on Amazon
The Nook version is available at BarnesandNoble.com
The iPad and iBooks version is available through iTunes or through the iBooks App on your iPhone/iPad

Take control of your dSLR camera and the images you create!

.

.

Deconstructing the Shot – Photo 3

This post is the third in an occasional series in which I describe the making of a photograph, from both a technical and artistic standpoint. I’ll go through the camera settings and why they were chosen, as well as the thought processes going through my head regarding composition and the creation of the image. These types of posts will be concrete examples of a previous post of mine called How Pros Photograph, which describes the various decisions that may be going through a photographer’s head as they work a scene and make photos. The first post in this series can be read here, and the second post is here.

This one can be called the Aperture Edition or Depth of Field Edition, as you will learn below.

Douglas J. Klostermann Photography
Men on Avenida el Sol – Cusco, Peru – 2008

The Photo: The photo I’ve selected for this example (seen just above) is one I took in Cusco, Peru in June 2008, called Men on Avenida el Sol. It was taken during the Cusco Week festivities, which is a series of events, dances, parades, and performances leading up to Inti Raymi, the Inca Festival of the Sun that occurs each year at the solstice. The wonderful thing about this week of activities is that it offers so many opportunities for a photographer to capture cultural, dance, and people photos. And because they are all public events where people expect, and even enjoy being photographed, it eliminates the difficulties and hesitations many photographers have about approaching individuals for photographs – although that is something any serious photographer needs to overcome, and it is actually quite easy. You approach the subject, make direct eye contact, and ask, “Do you mind if I take a photograph of you?” If they speak another language, hold up and nod towards your camera with a cheerful, inquisitive look on your face. They will either agree or not – problem solved!

Although I took hundreds of photos of the events over the week, I selected this one for this exercise because I learned something very definitively in the process of capturing it. More on that later. Although great subjects and action are directly in front of you during a parade or performance, there is a bit more to capturing good photos than just clicking away. I write a bit about that, with some tips and suggestions, in this post Cambridge Carnival.

This particular event was a parade down a main street of Cusco leading into the central plaza. I’ve created some strips of photos to show a selection of images as I worked this scene:

process01

The Process: I was heading back home after taking dance photos in the plaza, and made my way down Avenida el Sol looking for additional quick shots. Most of the people and groups were standing about, waiting to move forward to perform or parade through the plaza, where the spectators were, so there were not many interesting opportunities. However, this group of older men captured my attention due to their wonderful expressive faces and their colorful traditional outfits. My intention was merely to capture these faces and subjects. However, they were a bit bored, just standing around waiting, so you can see most of the images do not really stand out.

I was using a Canon Rebel XT with a 28-105mm f/3.5-4.5 II lens. I stood on the sidewalk near the group, and set my camera on Aperture Priority mode (Av on Canon, A on Nikon). This was so I could control the depth of field and call attention to single or multiple subjects and make the background a bit blurry and less distracting. I experimented with various aperture settings, ranging from f/4.5 to f/13 depending on if I wanted one of the men to be in focus or a row of two or three of them to be in focus. A wide open aperture such as f/4.5 will have a narrow depth of field so that just one of the men is in focus, where a narrower aperture such as f/8 or f/11 will have a deeper depth of field so that the entire row of men might be in focus. With the wide apertures, I focused on the eyes of the man I wanted in-focus, and with narrower apertures, I focused about 1/3 or 1/2 way into the area I wanted to be in focus, meaning if there was a row of three faces, I focused on the middle one. The ISO was set at 200 which allowed the camera to choose fast shutter speeds of around 1/1000 s. This is because I had been capturing dance and action scenes, and wanted to be ready for the same. The metering mode was set on the general Evaluative Metering, which did a decent job of capturing the proper exposures. A couple images were mysteriously overexposed, possibly due to where I locked exposure while I was locking focus – which is why I now use a back-button focusing technique and/or lock exposures separately from focus. White Balance was set on Auto, but would have worked on Sunny as well.

As you hopefully know by now, depth of field is controlled by the aperture setting. I write more about it in these posts Depth of Field Simplified and Mastering Depth of Field. Since your specific depth of field in any situation will vary based not only on the aperture setting but also on the lens focal length and your distance from the subject, it is often difficult to predetermine what exactly is going to be in focus in the resulting image. You can try using the depth of field preview button on your camera, but it is difficult to see in the tiny, dim viewfinder what the preview is showing. You can also use your rear LCD and trial and error to view a series of experiments. But again, this is only a small screen with relatively low resolution, so it is difficult to see the precise results. And in many situations you simply don’t have the time for these methods. You just have to get a feel for your lenses and their different apertures through experience and studying your results. But one thing is certain: to get minimum, shallow depth of field and thus maximum background blurriness with any lens, zoom in as close as you can, (for example, zoom to 200mm on a 70-200mm lens) situate yourself as close as you can to your subject while still obtaining the framing you want, and use the widest aperture possible (for example f/2.8 or f/4). Work back from that if you wish to increase the depth of field – for example to have a slightly deeper depth of field in focus, use an aperture of f/5 or f/5.6, or increase your distance away from the subject, or remain close but use a shorter focal length like 28mm or 50mm.

As you can see, most of the images are very “busy,” with a lot of extraneous and distracting background people and activity. I wasn’t very pleased with the images, but I continued to take basically the same image over and over. I knew the faces, outfits, and colors were interesting, and I hoped the resulting images would be as well. I zoomed in as close as I could with most of the images, working in the 75mm to 105mm range of my lens. However, without a lens that had the 100mm to 200mm range, I could not zoom closer and could not obtain the “compression” I was looking for, where the more distant faces would appear to be closer behind the closest subject.

process02

What I didn’t do that I should have been doing, instead of trying to take the same photo over and over, was to change my position and point of view. Doing so would change the backgrounds, perhaps make them less busy or distracting (such as the spectators and the white sign), and would allow for the camera to be on the same level or looking up towards the subjects rather than looking slightly down at them.

I took a series of 60 images over a period of 7.5 minutes. Besides the selected image, only a couple other ones are mildly interesting. I knew I wasn’t capturing what I wanted, my companion was becoming impatient, and eventually I decided to move on. But then I took a few final images. My point of view had slightly changed. I was directly to the side of the men and slightly closer. The last image finally got what I had wanted. It stands out dramatically among all the other ones. It is more simple and straightforward, less cluttered, and the subjects fill the frame.

process03

The Post Process: To create the final image, I adjusted the color and contrast in Adobe Camera Raw (ACR) and in Photoshop (PS). As you can see by the unprocessed images, the color and contrast is a little dull and lifeless straight out of the camera. The original file was a JPEG file, and the Picture Style was Standard (I hadn’t started using RAW yet). In ACR, the Blacks were increased to about 7 or 10 to give it the nice deep blacks, which helps to make the bright colors pop even more. Some Recovery was used to bring back the overexposed highlights on the man’s face. Clarity and Vibrance were used to give it some, well, clarity and vibrance. In Photoshop, the contrast was increased with Curves using the preset setting of Linear Contrast. In Levels, the midtones were darkened to .93 to give a deeper more realistic color to the faces. I did some additional burning on the faces to try to reduce the hot-spots. The image was sharpened using Unsharpen Mask, probably at Amount: 85 or 100, Radius: 1, and Threshold: 4. I may have used the Hue/Saturation to reduce the saturation and lightness of the red color, though I should have done that a little more, as you can see by the man’s face which appears too red and the rear hat where the red is blown out. The Rebel XT sensor, and other digital SLR sensors often overexpose the color red. It is similar to blowing out the highlights, where the color red is blown out and there is just red and not other detail in those areas. You can use the RGB histogram rather than the brightness histogram to monitor for this on the camera’s rear LCD screen while reviewing images. I didn’t crop the image at all, as you can see. It is best to try to get the framing you want when you capture the photo, especially when using an 8 megapixel camera that doesn’t allow for much cropping! (A cropped image would have much lower image quality because the resulting resolution would be much less – it would not allow for much manipulation, and would appear pixellated when enlarged.)

The Final Image:
Douglas J. Klostermann Photography
Canon Rebel XT, 28-105mm f/3.5-4.5 II at 93mm, ISO 200, f/5, 1/1000s

The Lesson: We should always learn from our photos, so that next time we are in a similar situation, we can create an even better image. The valuable lesson I learned in this situation, in addition to perhaps always grabbing one final frame, is to make a change when the composition is not working. Change your perspective, angle, or point of view. Zoom in or out to change the framing. Don’t continue to take the same image that isn’t working, over and over again. If the subject is interesting, there is an interesting composition that can be found to best express that subject. Mentally envision the scene from a variety of positions and angles, and move around the scene as much as possible to see the options. Some other improvements I could have made to this image include using a polarizing filter. Because I was working in the bright, harsh mid-day sun at a high altitude, this could have improved the exposure, color rendition, and contrast of the original image. Since it was overexposed a bit, causing hot-spots on the subject’s face, I should have paid more attention to my histogram and adjusted the exposure compensation accordingly, or used a different metering mode such as Partial or Spot to meter directly off the man’s face.

So hopefully you can see from this explanation and from my previous posts that photographs don’t necessarily just happen. They are created through a combination of thought processes, a series of decisions, and the application of camera settings based on these decisions and on the situation at hand.

See the Related Posts section just below for links to parts 1 and 2 in this series.  And learn more about how to take control of your camera and the images you create with my Full Stop e-book camera and photography guides.

Full Stop photography e book camera user guide Nikon Canon dSLR

Deconstructing the Shot – Photo 2

This post is the second in an occasional series in which I describe the making of a photograph, from both a technical and artistic standpoint.  I’ll go through the camera settings and why they were chosen, as well as the thought processes going through my head regarding composition and the creation of the image.  These types of posts will be concrete examples of a previous post of mine called How Pros Photograph, which describes the various decisions that may be going through a photographer’s head as they work a scene and make photos.  The first post in this series can be read here.

This one can be called the Shutter Speed Edition, as you will learn below.  For those looking to learn about Depth of Field, please also view Deconstructing the Shot post 3, the Aperture Edition.

Douglas J. Klostermann Photography
Canon Rebel XT, 28-105mm f/3.5-4.5 II at 50mm, ISO 100, f/14, 1/20s

The Photo: The photo I’ve selected for this example (seen above) is one I took in Pucallpa, Peru in July 2008.  Pucallpa is a town located along the Ucayali River, a tributary of the Amazon.  Though it is a relatively small town, it has a bustling (though undeveloped) port which receives food and goods from deeper in the Amazon region.  The streets of Pucallpa buzz with the constant traffic of moto-taxis, the motorcycle rickshaws found in much of Peru and the developing world.  I had a few days before hopping on a slow boat to Iquitos, so I roamed the town looking for photo opportunities.  I’ve created some strips of photos to show a selection of images as I worked this particular scene:

Pucallpa Series 1

The Process: I wanted to capture the ubiquitous motion and activity of the traffic in the streets of Pucallpa, which is dominated by the moto-taxis.  The best way to do this, I decided, was to capture the blur of motion as the traffic sped by.  I was using a Canon Rebel XT with a 28-105mm f/3.5-4.5 II lens.  I selected a busy and interesting intersection and set the camera to Shutter Priority mode (Tv on Canon, S on Nikon).  This is so I could control the shutter speed and set it to a slow shutter speed so that fast motion would become a blur.  I initially chose a shutter speed of 1/50, but that wasn’t resulting in enough blur, so through quick experimentation, I settled on 1/20.  This shutter speed, 1/20 of a second, is very slow for hand-holding.  While the motion will blur, it is difficult at this shutter speed to hold it still enough (without a tripod) so that the background will remain sharp and not cause unwanted blur due to camera shake in the in-focus areas.  I now actually recommend using 1/30 as a starting point for creating motion blur.  But even with 1/30, you have to pay attention to holding the camera very still.  I selected ISO 100 since it was a very bright, sunny afternoon, and because I atypically needed to work in a slow shutter speed range.

I initially took some images of the traffic crossing the intersection, trying to capture many vehicles at once to accentuate my idea of the busy traffic.  However, I soon decided to face directly across the street and capture the moto-taxis as they crossed my field of view.  I set the Drive Mode to continuous so that I could fire off a series of photos each time the light turned green and the traffic crossed my view.  The Rebel XT has a slow maximum rate of 3 frames per second (fps) but many current cameras will allow a more useful and faster frame rate of 5 or 6, or even 8 fps.  White Balance was set on Auto, though Sunny setting would have worked well too.  Metering was set on Evaluative.  However, since the lighting and the scene remained relatively consistent, it would not have been a mistake to determine the best exposure then switch the camera to Manual mode, M, and set that exposure for all the photos.

In Shutter Priority mode, you choose the shutter speed and the camera will choose the aperture, based on the ISO setting.  The aperture setting for this photo wasn’t too important to me.  Since the foreground was going to be a blur of motion, it was best that the background was relatively in focus.  So a narrow aperture providing relatively deep depth of field, such as f/11 or f/16 would be fine.  Based on the ISO and the amount of light, the camera was selecting apertures ranging from f/8 to f/22 for various images, with most of them somewhere in the middle of that range.  Also, since the subject was going to be a blur of motion, there was no point in trying to focus on it.  The motion would most likely confuse the auto-focus system anyway, so I switched the lens to MF, Manual Focus, and focused on the sign post directly across the street from me.  Though I may have zoomed slightly in or out with the lens at first, I settled on a focal length of 50mm and left it there.

Pucallpa series 2

While the subject of this composition is the blur of the vehicles, the background also comes into play, and as with every image, can not be ignored.  The street and trees beyond created a nice background, both showing the urban context of the scene and blocking out what could have been a large area of dull, light sky.  The yellow sign post, where I focused, added a nice element of color.  You can see that the yellow post and the curb of the far side of the street lie near the “rule of thirds” lines.  This isn’t an accident, and they were consciously placed there to help create an interesting composition.  This was done through squatting or kneeling in order to place myself at the desired point of view and still capture most of the vehicles from top to bottom.

I took a series of 59 images over a period of nearly 8 minutes, with 48 of the images being the straight-on images in a period of just 2 minutes.  I used a horizontal composition since that worked best with the blur of motion of the traffic.  I typically just held down the shutter button as the traffic started to go by, just after the stoplight changed.  By doing that I captured a variety of interesting images, with the moto-taxis blurring by in all types of configurations.  In a situation like this, luck and chance play a big part.  The photographer must control all the elements they can through composition, framing, and camera settings, and then allow the scene to play out in front of them.  So I would actually call this controlled chance.  There were a few very nice results, and I settled on an frame from the middle of the series, IMG_3306, as my chosen image.  In addition to showing the blur of the moto-taxi, it also captured some pedestrians across the street and fully showed the one-way sign, which I thought were nice additions to the image.  With these added elements, it becomes more of an overall “portrait” of the city streets of Pucallpa rather than just an image about motion.

The Post Process: To create the final image, I adjusted the color and contrast in Adobe Camera Raw (ACR) and in Photoshop (PS).  As you can see by the unprocessed images, the color and contrast is quite dull and lifeless straight out of the camera.  The original file was a JPEG file, and the Picture Style was Standard (I hadn’t started using RAW yet).  In ACR, the Blacks were increased to 10 to give it the nice deep blacks, which helps to make the bright colors pop even more.  A Fill setting of 10 was used to lighten up the foreground moto-taxi a bit, and Clarity +15 and Vibrance +10 were used to give it some, well, clarity and vibrance.  In Photoshop, the contrast was increased with Curves using a setting probably close to Medium Contrast.  I typically don’t make the blacks so black and purposefully lose detail in the shadows, but I was experimenting with this look and it seemed to work well here.  The image was sharpened using Unsharpen Mask, probably at Amount: 85 or 100, Radius: 1, and Threshold: 4.  Now I would try being more aggressive with the Amount and Radius, but I am not sure the 8MP JPEG file from the Rebel XT would withstand much more without starting to degrade.  Somewhere along the way, either in ACR or PS, the color temperature was also changed to warm it up a little, which is more in keeping with the afternoon sun of the Amazon region.  I didn’t crop the image at all, as you can see.  It is best to try to get the framing you want when you capture the photo, but I am somewhat surprised myself that I did it so well.  I once had a photo teacher in college who complimented me on my ability to capture the frame and not need to crop.  I just thought that was the way one was supposed to take a photo!  Thankfully I still sometimes demonstrate that ability.

The Final Image:

Douglas J. Klostermann Photography
Canon Rebel XT, 28-105mm f/3.5-4.5 II at 50mm, ISO 100, f/14, 1/20s

The Lesson: We should always learn from our photos, so that next time we are in a similar situation, we can create an even better image.  Some improvements I could have made to this image include using a neutral density (ND) filter or a polarizing filter.  This would have given me more control over the range of aperture settings that the camera selected and allowed for a wider-open aperture so that the far distance became more of a blur.  A polarizing filter would have also helped to darken the bits of sky that appear.  And as I mentioned above, a shutter speed of 1/30 would have still created the blur, but would have been slightly easier to hand-hold without creating unwanted blur in the background due to camera shake.

This image was chosen to be used on the cover of the programs for the Brooklyn Philharmonic’s Nuevo Latino Festival in 2009.  Incredibly, the near square crop of the image works really well too:

Douglas J. Klostermann Photography

So hopefully you can see from this explanation and from my previous posts that photographs don’t necessarily just happen.  They are created through a combination of thought processes, a series of decisions, and the application of camera settings based on these decisions and on the situation at hand – plus some controlled chance!

See the Related Posts section just below for links to parts 1 and 3 in this series.  And learn more about how to take control of your camera and the images you create with my Full Stop e-book camera and photography guides.

Full Stop photography e book camera user guide Nikon Canon dSLR

Cambridge Carnival 2010

Cambridge Carnival 2010 in Cambridge, MA:  the music, dancing, and vibrant colors of the Caribbean, conveniently found down the street from me today.

All of these images were shot using a Canon 50D (60D is current version) with the 70-200mm f/4L IS lens.

Douglas J. Klostermann Photography

Douglas J. Klostermann Photography

There is a very recent and timely post on PhotoFocus about photographing parades.  It has some useful advice.  I would add to that a few more:

-Arrive early and work your way into the assembly area, where there is often a sense of tension and pent-up excitement.  Capture photos of participants getting ready and chatting, musicians practicing, and posed portraits of individuals or groups who are eager to have their photo taken in their outfits or costumes.

-During the parade, always be aware of your image backgrounds.  Position yourself so that you have light or dark backgrounds as appropriate, or crowds of faces.  Be sure you have clean, or at least not distracting backgrounds.  Use wide open apertures to make the backgrounds blurry and less distracting.  Some distracting backgrounds I had to avoid at this event included a bright yellow rental truck with the name across it and porta-potties.  Keep your eyes open for these types of things.  Changing your position and point of view can make the street, some trees, or the sky become your background.

-Be very aware of the light and where it is coming from.  Position yourself on the best side of the street so that you can capture the light on the participants’ faces.  Or backlight them if you want photos with sun-flare.  Position yourself near intersecting side streets where the sunlight is unobstructed by buildings and trees to avoid shadows across the parade route.  Look for mirrored, glass, or light colored buildings to act as natural reflectors which throw back and diffuse the light nicely onto all the participants.  Of find areas with light and dark shadow areas and try to highlight a participant as they step into the light.

-Bring ear plugs so you can concentrate of taking images even when the giant sound truck is stationed right in front of you.

-Experiment with slow shutter speeds to create blurs of motion and color.  Put your camera on shutter priority mode (Canon=Tv or Nikon=S).  Try starting with a shutter speed of 1/30 and adjust from there as necessary.

-If you are using a flash outdoors, do not use your flash diffuser (like a Sto-Fen Omni-Bounce) except for very close portraits.  All you are doing is reducing the light coming from your flash and causing your flash to work harder and take longer to recycle.  It does not change the “softness” or the “warmness” of the light from your flash.  A flash diffuser works by bouncing light and diffusing shadows because the light is then coming from various directions.  It does not magically “soften” light.  You can not bounce light off the sky.  It just doesn’t work.  Use your flash straight on, dial it down minus 1 or 2 so that it doesn’t blow out highlights, and use an orange or straw gel if you want more warmth.  It is much more efficient to reduce the light from your flash by dialing it to -1 and having it use less of its power than it is to put something in front of it and cause it to use more of its power, all for the same look.  If you wish to spread its light, use the built-in, flip-down wide angle screen.  I don’t care if you see the “pros” or the guys with the big cameras using one – they haven’t bothered to read the instructions.  They aren’t able to bounce light off clouds just because they have big cameras.

Photography, Creativity, and Angst

It seems that a lot of photography blogs that aren’t caught up in discussing the latest equipment and technology (as I find myself doing lately) are often addressing the struggles of photography, art, and creativity. Most every photographer seems to relate to the frustrations of not being able to create the images that they wish they could – images like the ones of the photographers they admire or images like the ones they envision in their own mind.

This isn’t a bad thing, and in fact this dissatisfaction with one’s current work is one of the most important components in inspiring and pushing oneself to improve. But there is a huge problem if this struggle becomes angst and doesn’t serve a positive purpose. It is an easy path to fall into with photography, especially when just starting out or soon after technical and equipment mastery is attained. There is so much to learn and everyone else seems to have picked up important and secret knowledge which you don’t know where to find. And there are so many great photographers out there who you like and no matter how hard you try your images don’t look anything like theirs.

Rome Casa Blanca and Statue piazza del quirinale black and white italy
Rome – Statue in front of Palazzo del Quirinale

I fell into this trap when I first became serious about photography. I saw images in galleries, museums, and magazines (there was no internet yet…) that I wished I could create, but had no idea how. What kind of camera were they using? What kind of chemicals and darkroom techniques did they use? Where did they come up with their ideas and inspiration? I had no idea, but tried to learn what I could from books and experimentation. But the learning curve was so steep, my interests and ambitions were too broad and scattered, and the dedication was not yet there. The angst and frustration built and slowly I stopped even taking photos. I had wanted to create great images at will but knew I couldn’t. My results rarely matched my vision, so I stopped making any images at all.

Rome Bernini Fountain piazza navona italy
Rome – Fontana dei Quattro Fiumi by Bernini facing Sant’Agnese in Agone by Borromini and Rainaldi

I thought the angst was part of being an artist, a photographer, and that holding onto it would lead somewhere. But the angst didn’t get me anywhere. In fact all it led me to was abandoning photography. Years later, when I became frustrated with the limitations of my digital compact and dSLRs became affordable, I decided to give it another try. I went out on my first self-assignment, not really knowing what I was doing, relearning how to use a camera and compose photos. But this time I had a different attitude, a new mindset. The photos on my LCD screen still didn’t look like the ones in my head, but I didn’t care, and I continued to happily work away. I knew I was learning with each photo, I didn’t expect instant masterpieces. I knew I would improve over time when I studied the results and identified the differences between where I was and where I wanted to be.

Rome Piazza Navona woman walking italy
Rome – Piazza Navona

Most importantly I had finally given up on trying to take Ansel Adams’ photos and started to take my photos. If they weren’t any good, I would keep taking my photos, and figure out how to make them better versions of my photos. For the first time I was truly happy with my images because I stopped comparing them with some real or imagined perfect images that I would never take. It doesn’t mean I still don’t have the angst. Every time I look at Ami Vitale’s photos I want to take Ami Vitale’s photos. But I let it go, I don’t let it become a negative, limiting frustration. I study them and learn from them, but I continue to take my photos. Because those are really the only ones I can take, and those I the ones I am happiest with anyway.

So it is true – as everyone concludes their “photographer’s struggle” blog posts: just get out and shoot. That is virtually all there is to it. But there is another important component. Let go of the angst. Art and creativity does not equal angst. Change your mindset. Stop dwelling on creativity, thinking about creativity, reading about creativity…and just go create. Shoot your photos, improve on your photos, and be happy knowing that with each frame you are learning and progressing. Besides, you shouldn’t want to be imitating anyone else because you don’t want to be called “The next Henri Cartier Bresson.” You want some future budding photographer to be called “The next (your name here).”

Rome Sant'Ivo Sant Ivo alla Sapienza Borromini Italy
Rome – Street with view of Sant’Ivo alla Sapienza by Borromini

(These photos were taken the first time I ever used a “real” camera, an SLR – a Canon AE-1 I borrowed for an afternoon. Taken in Rome, Italy in 1990 or 1991 while studying with the University of Notre Dame Architecture Rome Studies Program. Not a bad start, huh?!)

Deconstructing the Shot – Photo 1

This post is the first in an occasional series in which I will describe the making of a photograph, from both a technical and artistic standpoint. I’ll go through the camera settings and why they were chosen, as well as the thought processes going through my head regarding composition and the creation of the image. These types of posts will be concrete examples of a previous post of mine called How Pros Photograph, which describes the various decisions that may be going through a photographer’s head as they work a scene and make photos.

Douglas J. Klostermann Photography
Ventanas Abiertas – San Miguel Dueñas, Guatemala – Canon 7D, 16-35mm f.2.8L II at 35mm, ISO 200, f/5, 1/100s

The Photo: As the first example photo, I’ve chosen the full, original version of the current header image of this blog (also seen just above), a line of kids reading in the courtyard of Ventanas Abiertas, an after-school learning center in San Miguel Dueñas, Guatemala. I traveled to this NGO near Antigua in November of 2009 to photograph the center, its founder, teachers and students, and its work in the community. I created this strip of images showing select photos from the series as I worked towards finding and making this image:

The Process: As I roamed the center taking photos, I spotted the kids all lined up on a curb in the courtyard, reading. The linear composition and the striking yellow wall made for a pretty obvious opportunity. I had a Canon 16-35mm f/2.8L II lens on a Canon 7D, with a protective UV filter on the lens. I first took a shot from a standing position, composing the image with the kids across the center of the frame. The focal length of the lens was at 23mm, a wide shot to capture the whole scene. That shot has a bit of a snapshot look, and didn’t take full advantage of the yellow wall, had far too much of the grey concrete patio, and created too static of a composition which did not make use of the opportunity to apply the rule of thirds for a more dynamic composition. I re-framed to move the line of kids to the bottom third of the frame, and still had the lens wide and was standing. To better fill the frame with just the kids and to create a better point of view, more on the level of the kids, I crouched down and zoomed in to 35mm. Although the 35mm focal length is a wide angle and thus prone to distortion, due to my camera to subject distance there is only a slight amount of distortion in the image. If I had moved closer to the subjects, more distortion would have been obvious. At this point I checked my settings and saw I was at ISO 400 from the previous shots in the shade, so I lowered it to ISO 200 since the late afternoon light was still pretty bright. The lowest ISO possible for the given situation will typically create a higher quality image file. For all the shots I was using Aperture Priority mode. I almost always use Av mode unless i am dealing with motion or blur that needs to be controlled (then I use Tv mode), or am using the flash in a controlled situation (and then I often use Manual, M mode). The aperture was set at f/5.0 to give me a relatively shallow depth of field, but enough so that the kids and the wall behind them were all in focus, but anything inside the doorway and window would be a bit blurry and thus less distracting. Unlike most of my images, the aperture setting wasn’t critical here, as the depth of the entire image is mostly all within a couple feet, from the kids’ toes to the wall behind them. So f/4.0 or f/8 would have given me virtually the same image. At ISO 200, the shutter speed was at 1/80 or 1/100, which was fast enough for handholding. A little faster would have been better to ensure there was no blurring if a child moved their head or hands during a shot, so leaving the camera set on ISO 400 would not have been a mistake.

As you can see in the first several photos, many of the kids were aware of me taking their photo, and were posing, goofing, or self conscious. I continued to take a few shots and waited for them to begin to ignore me. I liked the composition, and the window and the doorway to anchor the sides of the frame, so I continued to take the same shot, attempting to get the best moment of poses and facial expressions. I attempted to keep the image straight, aided by the lines visible in the viewfinder of the 7D. For all of the shots, I manually selected an auto-focus point, using a point below the central focus point which would line up on or near the face of one of the central kids. This would take advantage of the nice contrast between the dark hair and the lighter face to ensure proper auto-focus. By selecting an AF point exactly where I wanted to focus, I didn’t have to worry about focusing or have to re-frame each subsequent shot. The exposure metering was set on evaluative. The bright yellow wall could have easily messed with the metering, and I’m sure another camera like my 50D would have miscalculated the exposure based on the wall, but the 7D performed nicely on this mode. I checked my histogram a couple times to make sure I wasn’t blowing out any highlights and thus needing to use exposure compensation to adjust for that.

Douglas J. Klostermann Photography
The Final Image: Canon 7D, 16-35mm f.2.8L II at 35mm, ISO 200, f/5, 1/100s

I took a series of 19 images of this same scene, over 1 minute and 12 seconds. As you can see, it didn’t take long for the kids to begin to ignore my presence. My chosen shot was from the middle of this series, IMG_3068. It stood out among all the others in the poses, positions, groupings, and facial expressions of all the kids. Throughout the time of the series, a head appeared in the window, and people moved around inside the doorway. Luckily with my chosen shot, the head was in the window, as I like this subtle, almost hidden detail. I liked the bit of green from the plant on the left, but my chosen shot unfortunately doesn’t show much of it.

The Post-Process: To create the final image, I adjusted the color and contrast in Adobe Camera RAW (ACR). I had shot the image in RAW for maximum quality and processing latitude. Due to the available light of the scene and the proper exposure, it required little processing. I set the Temperature at 4600 and the Tint to 8. I adjusted Recovery to 5 to bring back some of the detail of the yellow wall which was very slightly blown out, Fill to 15 to lighten up the children’s clothes, Brightness stayed at the standard 50, I set Contrast to 20 with plans to increase it a bit more in Photoshop. Clarity 20, Vibrance 15, and Saturation 0. I like a bit of color saturation, vibrance, and contrast in my images, but I prefer not to overprocess or to make the adjustments obvious. While the yellow of these images is definitely vibrant, especially compared to the dull, neutral RAW images, it is a realistic representation of the actual color. Typically I straighten and maybe crop a bit in ACR, but miraculously this shot was very level, and also left no room for cropping. In Photoshop I used Curves to adjust the contrast somewhere between the Linear and Medium presets, and used Unsharpen Mask to sharpen. I don’t know what my exact settings were, but I had to use aggressive sharpening because the Canon 7D I used had a severe front-focusing problem. The settings were probably Amount: 175 or 200, Radius: 1.8, and Threshold: 4.

The Lesson: We should always learn from our photos, so that next time we are in a similar situation, we can create an even better image. Some improvements I could have made to this image include possibly crouching or sitting even lower to be more on level with the kids faces (although this would have caused keystoning of the vertical lines), eliminating the doorway at right by either re-framing or moving slightly to the left (which would cut out a child or two on the right) or moving to my right and shooting back towards them at a slight angle, but this would have affected the straight-on view which I feel is important to this composition. I would not have minded a little more of the green plant on the left in the frame. The image demonstrates the importance of keeping the camera level and the sensor parallel to the subject to avoid unwanted distortion. The best way to keep the horizontal and verticals straight while taking the photo is to make sure the camera is not tilted up or down and that the sensor is parallel to the wall. This involves moving yourself and the camera up or down to get the framing you desire. Also, in post-processing, I could have used the lens correction menus in ACR or Photoshop to perfectly straighten all the verticals and horizontals. Finally, although the color looks good, now I would have paid more attention to adjusting the Temperture and Tint, or adjusting the white balance using Curves in Photoshop because I have experimented and learned a bit more about these settings since then. Also, now that I see IMG_3074 again, (the last one in the strip above) I like it a lot, and should probably process that one and add it to my collection of final images.

So hopefully you can see from this explanation and from my previous post that photographs don’t necessarily just happen. They are created through a combination of thought processes, a series of decisions, and the application of camera settings based on these decisions and on the situation at hand.

See the Related Posts section just below for links to parts 2 and 3 in this series.

And learn more about how to take control of your camera and the images you create with my Full Stop e-book camera and photography guides.

Full Stop photography e book camera user guide Nikon Canon dSLR

One on One Digital Photography Instruction

Digital SLR Camera Lessons

I am offering one-on-one, individual instruction (or small group workshops) in all aspects of digital photography in the Boston and Cambridge, MA area. I will create a unique lesson with you that can include topics such as choosing a new digital SLR or advanced compact camera and related equipment, learning how to use the various settings and features of your digital camera, photographic composition and taking stronger images, processing and editing your images in Photoshop, and preparing for photographing while traveling.  The lesson plan is up to you and is customized to your interests, needs, level of experience, and specific equipment.  Subjects will be explained, demonstrated, and practiced in ways you will understand, remember, and use.

Please view the Lessons page here, or under Lessons in the blog menu above, to learn more details.

Douglas J. Klostermann Photography Cambridge, MA
Central Square – Cambridge, MA – “Crosswinds” mural by Daniel Galvez

Learn to use your camera with confidence, get the most out of your digital SLR photography equipment, and learn to take better images. Get in touch with me at doug (at) dojoklo (dot) com or at 347-272-Seven Thousand.

How Pros Photograph

or What Pros are Doing When it Looks Like
They are Just Pointing and Clicking

You’ve probably had the experience where you locate the right spot and attempt to take the same photo as one you admire, yet the outcome is never quite the same. Or maybe you’ve stood next to a photo tour leader, and think you are taking the same photos, yet your images don’t seem to look like theirs do. Why is this? What is an experienced or professional photographer doing differently? What’s the big secret, the trick to getting those images?

It’s not impossible, it’s not luck, and it is not dependent on tricks. It’s not necessarily equipment or Photoshop skill. But rather it is a number of decisions and accumulated experience, all happening in those brief moments when a photographer sees a scene, raises their camera to their eye, frames the shot, adjusts the settings, and clicks the shutter. Here’s what the pros are doing in those moments when all you think you see them doing is pointing and clicking:

Festival de Tinajani - Smiling Woman Dancer
Festival de Tinajani – Ayaviri, Peru

The Right Light: A photographer is always chasing the best light. Their eye is always looking for good lighting, interesting lighting, the interplay of light and shadows, silhouettes. They are always aware of the quality of light – the color, the warmth or coolness of the light. Ideally they shoot only at the best times: in the morning and evening. But that isn’t always possible, so they must seek out interesting lighting, make the best of the available light, use a flash or off-camera lighting, or work in shaded areas. If the great light is there, but the subject isn’t, they wait for a subject to come into the scene. They consider not only the lighting on the main subject but also the lighting on the background and how it might enhance or distract from the subject. They place themselves in the best position in relation to the light and the subject to ensure their subject is illuminated as they desire, they remain aware of the light/ subject relationship, and move around as necessary as it changes.

Pre-Visualizing: The photographer begins to see the composition of the image before they raise their camera to their eye. They look at the elements and decide how they want them to relate to each other in the final image. They consider how near and distant elements will relate when compressed into two dimensions. As with the lighting, they look at not only their main subject but also the background that will appear behind it. They look for strong lines, color, weight and balance of elements, symmetry or asymmetry of the elements. They consider their main subject and the environment around it and determine how much they want to include – if they want a wide shot or wish to zoom in or move in for a closer shot. They consider which point of view will best express their subject – high, low, eye-level? They determine if the image and relationships will work best in landscape or portrait orientation, and hold the camera accordingly. They scroll through their mental file of similar images they’ve taken, and consider what was and wasn’t successful and how to improve this shot.

Festival de Tinajani - Woman Dancers Practicing
Festival de Tinajani – Ayaviri, Peru

Metering: When they see that interesting or challenging light they know how to meter for it. They don’t count on their camera to know how they want the scene exposed and they don’t want to blow out their highlights, so they may use partial metering or spot metering directed at the right part of the scene to determine their exposure settings. They do this quickly and instinctively because they’ve practiced and experimented with numerous types of difficult lighting scenes, and…

Camera Settings: …they know their camera inside and out. They know which settings to change and how to change those settings. They’ve customized their buttons and menus to quickly get to the settings they use most frequently. Their eye is on the aperture, shutter speed and ISO numbers in the viewfinder, and their fingers know which dials to move to adjust them without taking the camera from their eye. They know how their camera tends to under-expose or over-expose in certain situations, and they change the exposure compensation accordingly. And they (hopefully) remember to reset these settings when they move into a different lighting or subject situation.

Aperture Priority Mode: The pros often work in aperture priority mode so that they can control their aperture and depth of field and thus establish relationships of near and distant elements, foreground and background. They blur the background to call more attention to the subject, or dramatically place just a narrow plane of the subject in focus. Or perhaps they bring everything from near to far into sharp focus. They select their depth of field based on the relationships they desire to create. They know how the lens they are using renders images at its various apertures, and perhaps use the depth of field preview button to verify.

Festival de Tinajani - Twirling Skirt
Festival de Tinajani – Ayaviri, Peru

Shutter Priority Mode: They turn their mode dial to shutter priority mode when freezing or blurring motion is key to the image. They use a high shutter speed to freeze action, or a slow one to blur or pan. They know the proper shutter speed is critical to this type of shot, and don’t let the camera choose it for them.

ISO: They check the setting that they are not controlling (the shutter speed in Aperture priority mode/ the aperture in Shutter priority mode) and adjust their ISO to bring that setting into the range they want or need. They know from experience which ISO range is appropriate for the amount of lighting they are shooting in, and change it in advance as they move between situations.

Manual Mode: They turn the mode dial to M when they have consistent lighting and a setting that they know is not going to change, or in challenging situations where both aperture and shutter speed are critical. They’ve determined their exposure by metering, and set the camera accordingly.

Auto or Program Modes: They never use these, as their lack of control scares them as much as Aperture Priority mode scares the new dSLR user.

Festival de Tinajani - Flag Dancers Posing
Festival de Tinajani – Ayaviri, Peru

Framing: As they look through the viewfinder, they frame the image based on their pre-visualization and composition decisions. They scan all parts of the frame and not just the subject, from edge to edge and each corner, from near to far, to determine if there are any unwanted elements, elements not essential to their image, or undesired relationships (i.e. the tree growing out of someone’s head.) They move slightly to the left or right, or slightly up or down to bring all the elements in the frame into the desired or most dramatic relationship.

Focusing: They manually choose their auto-focus point to ensure that the camera focuses on what they want it to focus on, not on what the camera chooses to focus on. They lock the focus setting if they need to slightly reframe or wish to hold that focus for a sequence of images. If there is going to be a dramatic shift between the framing seen while focusing and the final framing of the image, they lock the exposure setting on the final intended framing before or after locking in the focusing. They use the other auto-focus modes to capture action that moves across the scene or which is too fast for manually choosing a single point.

Waiting: They wait for the right facial expression and pose, or for the subject to relax, or the moving elements to fall into place, or the peak of action and then…

Clicking the Shutter: Finally! They press the shutter, slowly and smoothly. They have their camera set for single exposure or multiple exposure based on the situation. They fire off several quick shots, or slowly take a couple to ensure they got the shot or to take variations of the image.

Festival de Tinajani - Dancer with Rope
Festival de Tinajani – Ayaviri, Peru

Reviewing: “Chimping” is the somewhat derogatory term for looking at the rear LCD screen right after taking a photo to check out the image. When pros do it, they are not looking at the picture to see what they got. They know what they got. They know what the image looks like because they studied it when they framed and took the photo. They are looking at the histogram and looking for blinking highlights to ensure they did not blow out the highlights or in any way over- or under-expose the shot. If they did, they adjust the exposure compensation, or the aperture and shutter settings, and take it again.

Working the Scene: A pro continues to work the scene, looking for different perspectives, compositions, and points of view.  They look at how relationships of subjects and objects in the scene change, even with just a slight adjustment of the camera’s position or angle.  Even if they think they may have nailed the shot, they know from experience that there may be an even better image to be found or made if they continue to study and photograph the scene.  And they don’t accept “good enough” and continue on to the next scene or shot.  They strive to capture the best image they know they are capable of, sometimes even if it involves returning to the location at a different time of day or even a different season when the light might be better.

These are some of the things an experienced photographer is thinking and doing in those brief moments between the time they pause from scanning the scene around them, raise the camera to their eye, and take the shot. It’s not because they have a pro camera with pro lenses that they got a great image. It’s not some pro secret that was passed onto them when they read the right book and gained entry the right forum. It is the sum of an alert eye, numerous conscious decisions while visualizing and framing, knowing how to adjust their equipment and use its controls, as well as sub-conscious decisions based on taking countless images, experimenting, and learning from the results both good and bad.

To read about an actual example of this process in action in the creation of a photograph, see my post Deconstructing the Shot.

Exploring Metering Modes

It is one thing to know that your cool new Canon or Nikon digital SLR provides you with 3 or 4 different metering modes. It’s another thing to know how and when to actually use them in the field or in different real life situations. The Canon 5D, 7D, 60D, 50D and T3i all offer four different metering modes – Evaluative, Center-Weighted, Partial, and Spot – as I’m sure you have thoroughly read about in your manual, right? Nikons, like the D7000, D51000, and D3100 generally have three different modes: Matrix, Center-Weighted, and Spot. I’ll try to cut to the chase and simplify the explanations and their uses.  Note that there are some important differences between how they work for Canon and Nikon cameras, particularly the Spot mode.

Canon T3i T2i 60D metering mode partial spot viewfinder
The viewfinder of the Canon T3i (T2i and 60D similar) showing the areas evaluated for Partial Metering (superimposed grey area) and Spot Metering (black circle in center).

Evaluative (Canon) or Matrix (Nikon): This is the default mode for your camera, and it can be used for almost every situation you shoot. Yes, maybe 90% of the time, maybe more. The camera evaluates the entire scene, as divided into several zones, and chooses the best exposure based on its knowledge of thousands of potential image situations. The current metering systems are so good, they can even be relied on for backlit or other challenging lighting situations. An important feature of this mode is that advanced cameras such as the Canon 7D, Canon 60D or Nikon D7000, D5100 take into account the selected focus point in its determination of exposure settings. It is assuming your focus point is on your most important subject, so under challenging and critical situations, it is wise to confirm that the camera has chosen the focus point you want (well, this is always wise). Even better, you should typically manually choose the focus point or cluster of focus points, as the camera has no idea what your intended image is. So in special situations, such as dramatically back-lit scenes or a situation with bright light plus deep shadows, make sure you are not using the center point to focus and meter, and then recomposing to take the shot – because some of the zones that the camera evaluated are now no longer in your shot after recomposing, and other new areas are, so the camera has set exposure for an image other than the one you are taking.


San Miguel Duenas, Guatemala

Partial (Canon only): This mode meters a smaller area, about 9.4%, in the center of the scene on the 7D and 6.5% with the 60D. Nikons do not have this mode, though some Nikons such as the D7000 offer the ability to change the size of the Center-Weighted Metering circle (see Center-Weighted Metering below), so it makes up for this.  The area is approximately a circle that reaches to the top and bottom focus points, and the metering system ignores the rest of the frame. This mode is useful where there is a dramatic difference in lighting between the foreground or subject and the background. For example, when your subject is backlit – maybe standing in front of a bright window or the sun – and consequently their face is in shadow. I know I said evaluative mode can often handle this type of situation, but if you want the face or subject to be properly exposed and not risk blowing the shot, it is worth it to quickly switch to Partial metering mode. Again, another time to use this is when there is a wide range of light in your scene, from bright sunlight to deep shadows. Remember, this mode is not linked to your focus point. The partial area that is metered is always in the center, so meter on the part of the scene that is most critical and that you want properly exposed, using the central area of the viewfinder, lock in that exposure, then recompose and take the shot.


Campo Nuevo, Guatemala

Important Note about Locking In the Metered Exposure: The metered exposure setting is sometimes locked in by pressing the shutter button half-way down or sometimes not “locked” until the image is taken (depending on your camera, or current shooting mode, or how you set it up – read your manual!).  The shutter button also typically locks focus (unless you have changed that setting).  If you wish to lock in focus and exposure separately, which you often will need to do, on a Canon use the AF-Lock (for focus) button and/ or the AE-Lock (for exposure) button – which looks like this: * – to lock in one of them before locking in the other with the half-press or full press of the shutter button. On the Nikons, you have to set one of your buttons to be the exposure lock button, either the AE-L/AF-L Button or the Fn Button on some cameras like the D7000. I suggest first metering on the subject and locking in that exposure by pressing the appropriate button, then recomposing and locking in focus right before or as you take the photo. Or else learning the advanced methods of back button focusing. Get in the habit of knowing how to do this instinctively, and if you need to hold or just press the particular button, so that it comes naturally during critical situations. On the 7D and D7000 and other cameras you can also customize how these buttons perform or set other buttons to do these tasks. You can see in the viewfinder that you have locked focus when the focus dot is lit. You can see that exposure is locked with the AE-L indication in the Nikon viewfinder or the * symbol in the Canon viewfinder.

Locking exposure and focus, independently, each in the brief seconds before you take a shot? Confusing? A little, but not impossible to figure out with some experimentation and practice. Remember, this is why you bought the fancy dSLR, so that you could make use of all these advanced features and take your photos to another level!

Center-Weighted Average: This metering mode is sort of a cross between Evaluative and Partial metering. It acknowledges that the subject is in the center and requires special metering attention, but it also takes into account all the other zones. Again, this is not linked to the focus point, but always to the center, so if your subject is off center – which it typically should be for a more dynamic image – you need to lock in exposure on your subject and then recompose. I have found that with the Canon 50D, this mode is actually more consistent than Evaluative metering, which often over exposes by 1/3 or 1/2 a stop.  Note that you can use the Custom Settings of the D7000 to change the size of the center area being weighted.

This mode can be used when you want to ensure that the subject is properly exposed, but you also want the camera to consider the background. However, if the background is much darker or lighter than the subject, and you want the camera to expose only for the subject and ignore the background, use Spot Metering…


San Miguel Duenas, Guatemala

Spot: This mode meters a small center area, 2.3% of the frame with the 7D, 2.8% with the 60D, and 2.5% with the D5100 and D7000. This area is indicated by the small circle in the center of the viewfinder of the 7D and 60D. There is no center circle in the Nikon viewfinder and you will soon find out why.  So when do you want to use Spot metering? This, again, is useful for scenes with great variation in light and shadow, or in very critical situations. One of the most common ways to use it is when metering for proper exposure on a dramatically lit face or subject, but the exposure of the rest of the scene is unimportant. Or perhaps your subject is set against a plain but consistent background, like a bird against a large blue sky. It is also used to determine proper exposure of a subject before switching the camera to manual for a controlled studio shot, or a critical shot or series of shots where the lighting is not going to change. If your background is completely dark or extremely bright, and you don’t want the exposure system to consider it at all when determining the exposure of you subject, use Spot rather than Center-Weighted or Partial. With Canon cameras, the Spot that is used to evaluate the exposure is in the center of the frame, and is often indicated by a small circle. However, with Nikon cameras like the D5100 and D7000, the Spot surrounds the active focus point and is not necessarily in the center of the frame unless you are using the center AF point. So it is wise to become familiar with how your camera operates.

A fifth metering mode is Manual metering, which isn’t actually a mode in your camera, but is a method of metering. This is where you use a light meter or use your camera as a light meter (such as described at the end in the Spot section above) and then manually set your exposure based on the meter readings. This is used when you want ultimate control of the metering and exposure.

You can learn much more about the Exposure modes of specific cameras, including the 60D, T3i, D7000 and D5100, in my e-book users guide. See my e-book website, Full Stop to learn more about them or click the banner below! The guides also go into much more detail about setting up the related metering mode Custom Functions/Custom Settings and camera controls.

full stop dslr photo photography camera manual guide for dummies canon nikon

I recently ran across an interesting article which takes this discussion to another level by addressing the use of different metering modes in the very specific situation of a wedding. Since one of the main subjects in typically all in white, and the other in black, the metering mode you select and where you meter can make a dramatic difference in the exposure. While that article is specific to weddings, it is useful and helpful to read to further understand how the different modes work, and how special situations might call for some extra thought.