A Brief Introduction to Exposure Bracketing

If you have begun to take control of your camera’s functions and settings and are understanding the basics of exposure, and perhaps are working in Aperture Priority or Shutter Priority Mode, you may still find that sometimes your images are coming out lighter or darker than you desire.  This could be due to an unusual lighting situation, a scene that contains a wide range of bright and dark areas, a subject that is back-lit, the camera metering from the “wrong” area of the scene, or a number of other reasons.

In this situation hopefully you have begun experimenting with exposure compensation.  If not, exposure compensation can be the solution to these types of problems by enabling you to “over-ride” the camera’s exposure decision and making the next image lighter or darker as desired.  And since most all the functions and settings of a dSLR are inter-related, the use of other metering modes such as Center-Weighted or Spot metering can also be part of the solution (or part of the problem) – but those are topics for other posts!  I’ve written one about Exploring Metering Modes, and should probably tackle some exposure issues soon.

exposure compensation auto exposure bracketing aeb canon nikon dslr
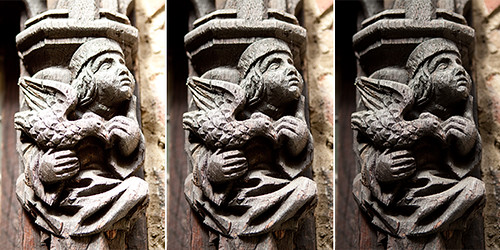
Figure 1 – French Medieval Storefront Carving, Gloucester, Mass. – Three bracketed exposures of the same scene:  the “proper” exposure as determined by the camera (Center-Weighted Average Metering Mode) in the center; over-exposed +1 stop on the left; under-exposed -1 stop on the right.  The desired exposure, for my eye, lies somewhere between the “proper” exposure and the darker under-exposure, where some highlights on the figure remain but the color and detail of the wood can be seen in those areas.  Center exposure:  Shutter speed 1/60 aperture f/2.8, ISO 200

If you have begun to make use of Exposure Compensation, or wish to start, a technique called exposure bracketing can expand upon that or perhaps help you to learn and understand over- and under-exposures.  Exposure bracketing is when you take at least three photos of the same scene, one at the “proper” or desired exposure, one under-exposed, and one over-exposed (see Figure 1).  For example you may take the second and third shot with the exposure compensation set at +1 and then -1.  This is done to ensure that you capture exactly the right exposure you desire or to experiment and see the results of varying your exposure settings.  A common feature of dSLR cameras called Auto Exposure Bracketing (AEB) can even automate this process for you.

In the days of film, exposure bracketing was a helpful technique – especially for critical situations – since one didn’t have the immediate feedback of the image on an LCD screen and a histogram.  It can still be used today for critical situations or for test shots when determining the right exposure settings.  The Auto Exposure Bracketing feature of digital SLRs automates this process by automatically changing the exposure settings between shots.  You set the amount of under- and over-exposure desired (such as +1, -1 or +2/3, -2/3) and then take three images in a row.  The camera automatically adjusts the exposure for each shot so that one is taken at the “proper” or baseline exposure, another shot is under-exposed, and the other is over-exposed.  If your camera is set on continuous drive mode, you can just hold down the shutter button and the camera will take the three shots in a row.  Or if you have it set on single shooting, you click the shutter three times in a row, ideally of the same scene.  Many cameras even allow you to dictate the order that the images are taken, and whether or not AEB cancels itself after one use or when the camera is turned off.

Or you can perform this process yourself, by either using exposure compensation between shots or by working in Manual Mode and adjusting the aperture or shutter speed setting between shots.

auto exposure bracketing canon nikon dslr aeb
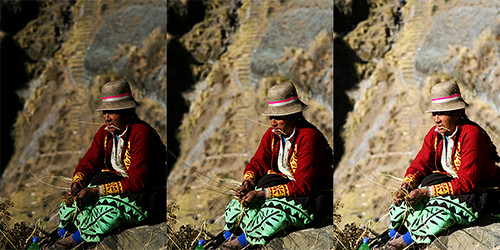
Figure 2 – Weaver Constructing the Keshwa Chaca, Huinchiri, Peru – Three bracketed exposures of the same scene:  the “proper” exposure as determined by the camera (Evaluative metering mode) in the center, under-exposed -2/3 stop on the left, over-exposed +2/3 stop on the right.  The desired exposure in this case, for my eye, lies somewhere between the “proper” exposure and the over-exposure.  With auto exposure bracketing you can often customize the order that the bracketed images are taken, for example proper/under/over or under/proper/over.  In this example they were taken proper/under/over, so they are displayed here in a different order than actually captured.  Center exposure:  Shutter speed 1/1000, aperture f/5.0, ISO 100

Exposure compensation and bracketing are also used in HDR (high dynamic range) photography to take three or five or more photos of the same scene at various exposures.  All the images are then combined by the photographer, using HDR software, into a single image which will contain a much broader dynamic range of light and dark than is possible with a single image.

The basic principles of exposure as well as all of the other important functions and controls of a dSLR, such as Metering Modes and the Autofocus System, are explained in my e-book Ten Steps to Better dSLR Photography, as well as in all my other dSLR camera guides to specific cameras such as Nikon D5100 Experience and Canon T3i Experience.  Click on the titles or the cover below to learn more!

dslr learn improve autofocus exposure aperture shutter priority for dummies


Understanding and Using Exposure Compensation and Bracketing

One of the key elements for obtaining the proper exposure of your images when working in Aperture Priority or Shutter Priority modes is making use of Exposure Compensation.  Although all the exposure related settings of a dSLR are intimately intertwined (such as aperture, shutter speed, ISO setting plus the exposure metering mode you are using, etc.) and it is challenging to speak of one without addressing the others, I will focus here on exposure compensation and when and how to use it.

The following text is excerpted from my e-book guide Ten Steps to Better dSLR Photography, where you can learn more about exposure compensation plus apertures, shutter speeds, exposure metering modes, composition and more.  Click on the cover at the end of the post to learn more about the guide, preview it, or purchase it.

Why Exposure Compensation is Needed

If you take an image that turns out to be darker or lighter than you desire, based on reviewing the image and/ or its histogram on your rear LCD screen, you can use exposure compensation in the non-Auto shooting modes to “override” the exposure that the camera is selecting, in order to brighten or darken the next image’s exposure.  You may want to do this if you have seen that your highlights have run off the right side of the histogram and been blown-out, resulting in complete loss of detail in those areas of the image.  Consult your manual to determine how to adjust exposure compensation on your specific camera.  With some Canon models, you press the Exposure Compensation [+/-] button and turn the Main Dial.  With other Canon models you use the Quick Control Dial to adjust this setting.  With Nikon, Sony, Pentax, and Olympus models you typically press the Exposure Compensation [+/-] button and turn a dial.  You will then see the exposure compensation amount change in your viewfinder and/ or on the top or rear LCD screen.  If the exposure level indicator in one of these places is not changing, press the shutter button half-way to first wake up the camera, or move/ press the Lock switch/ button near the rear dial on a Canon.

Putting Exposure Compensation to Use

If you have taken a photo that is too dark and you wish to retake the image and make the next exposure of the scene lighter, adjust exposure compensation in the positive (+) direction.  To make the next exposure darker, adjust exposure compensation in the negative (-) direction.  Try changing the Exposure Compensation by perhaps 1/3, 1/2, or 2/3 in the direction you desire, retake the shot, and see if your exposure problem is solved.  Increase or decrease the exposure compensation as needed.  Remember to set the exposure compensation back to zero when you are done with that situation and move on to take different images!  This is one reason why you should check your camera’s settings often – to make sure you haven’t left the camera on the settings from a previous situation.  This can often happen with the ISO setting and exposure compensation setting.  Check your current settings on the top or rear LCD display or in the viewfinder.

To remember how to compensate – which direction to turn the dial – think of the histogram peaks on the graph.  If you wish to shift the peaks to the left, to the darker side, to make the image darker, turn the dial so that the exposure compensation level moves to the negative side (-1, -2, etc.).  If you wish to shift the peaks to the right, to the lighter side, to make the image lighter, turn the dial so that the exposure compensation level moves to the positive side (+1, +2, etc).  Curiously, some cameras put the negative side of the exposure level indicator on the left, and others put it on the right, so look in the manual or viewfinder to see how yours operates.

Bracketing

Exposure compensation can also be used to “bracket” an exposure.  Bracketing is when you take at least three photos of the same scene, one at the “proper” exposure, one under-exposed, and one over-exposed (see the image below).  For example you may take the second and third shot with the exposure compensation set at +1 and then -1.  This is done to ensure that you capture exactly the right exposure you desire.  In the days of film this was a helpful technique, especially for critical situations, since one didn’t have the immediate feedback of the image on an LCD screen and a histogram.  It can still be used today for critical situations or for test shots when determining the right exposure settings.  Digital SLR cameras typically have an auto exposure compensation feature so that this process is more automated.  You set the amount of under- and over-exposure desired (such as +1, -1 or +1 2/3, -1 2/3) and then take three images in a row.  The camera automatically adjusts the exposures for each shot in order to bracket the second and third shots.  If your camera is set on continuous drive mode, you can just hold down the shutter button and the camera will take the three shots in a row.


Weaver Constructing the Keshwa Chaca, Huinchiri, Peru – Three bracketed exposures of the same scene:  the “proper” exposure as determined by the camera (Evaluative metering mode) in the center, under-exposed -2/3 stop on the left, over-exposed +2/3 stop on the right.  The desired exposure, for my eye, lies somewhere between the “proper” exposure and the over-exposure.  With auto exposure bracketing you can often customize the order that the bracketed images are taken, for example proper/under/over or under/proper/over.  In this example they were taken proper/under/over, so they are displayed here in a different order than actually captured.  Center exposure:  Shutter speed 1/1000, aperture f/5.0, ISO 100, focal length 105mm.

Exposure compensation and bracketing are also used in HDR (high dynamic range) photography to take three or five or more photos of the same scene at various exposures.  All the images are then combined by the photographer, using HDR software, into a single image which will contain a much broader dynamic range of light and dark than is possible with a single image.

Beyond Exposure Compensation

As I mentioned at the start, exposure is determined by a number of controls and settings on your dSLR.  If you are consistently taking images that are under- or over-exposed, you may wish to explore the other metering modes, to ensure that the camera is metering your exposures exactly where and how you want.  Have a look at my previous post on Exploring Metering Modes to learn more about this, or have a look at my e-book guide Ten Steps to Better dSLR Photography to learn about all the aspects of exposure and how they relate.