
This post is the second in an occasional series in which I describe the making of a photograph, from both a technical and artistic standpoint. I’ll go through the camera settings and why they were chosen, as well as the thought processes going through my head regarding composition and the creation of the image. These types of posts will be concrete examples of a previous post of mine called How Pros Photograph, which describes the various decisions that may be going through a photographer’s head as they work a scene and make photos. The first post in this series can be read here.
This one can be called the Shutter Speed Edition, as you will learn below. For those looking to learn about Depth of Field, please also view Deconstructing the Shot post 3, the Aperture Edition.

Canon Rebel XT, 28-105mm f/3.5-4.5 II at 50mm, ISO 100, f/14, 1/20s
The Photo: The photo I’ve selected for this example (seen above) is one I took in Pucallpa, Peru in July 2008. Pucallpa is a town located along the Ucayali River, a tributary of the Amazon. Though it is a relatively small town, it has a bustling (though undeveloped) port which receives food and goods from deeper in the Amazon region. The streets of Pucallpa buzz with the constant traffic of moto-taxis, the motorcycle rickshaws found in much of Peru and the developing world. I had a few days before hopping on a slow boat to Iquitos, so I roamed the town looking for photo opportunities. I’ve created some strips of photos to show a selection of images as I worked this particular scene:
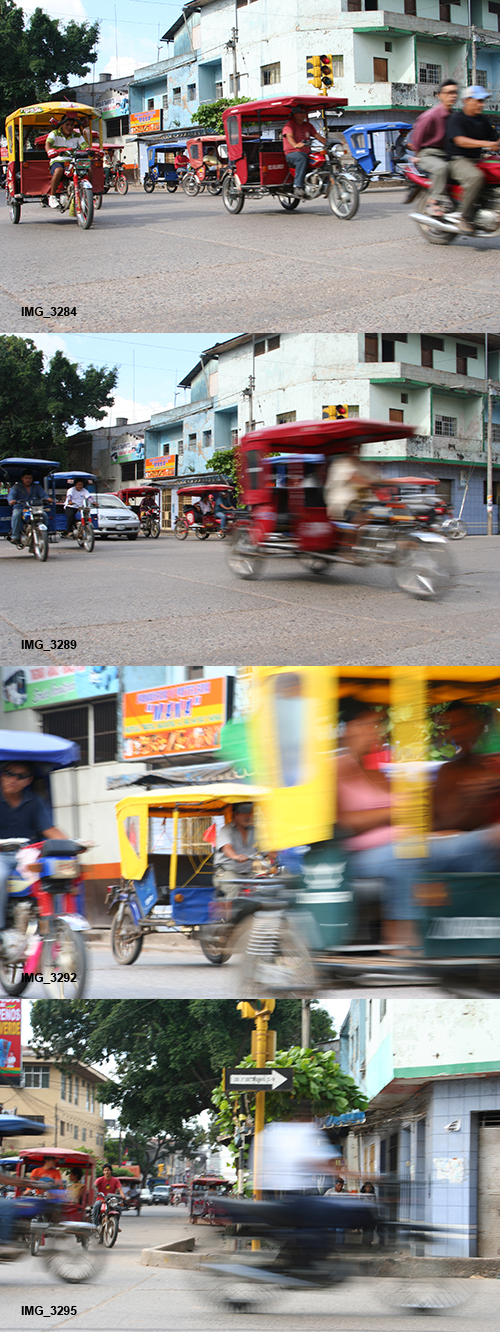
The Process: I wanted to capture the ubiquitous motion and activity of the traffic in the streets of Pucallpa, which is dominated by the moto-taxis. The best way to do this, I decided, was to capture the blur of motion as the traffic sped by. I was using a Canon Rebel XT with a 28-105mm f/3.5-4.5 II lens. I selected a busy and interesting intersection and set the camera to Shutter Priority mode (Tv on Canon, S on Nikon). This is so I could control the shutter speed and set it to a slow shutter speed so that fast motion would become a blur. I initially chose a shutter speed of 1/50, but that wasn’t resulting in enough blur, so through quick experimentation, I settled on 1/20. This shutter speed, 1/20 of a second, is very slow for hand-holding. While the motion will blur, it is difficult at this shutter speed to hold it still enough (without a tripod) so that the background will remain sharp and not cause unwanted blur due to camera shake in the in-focus areas. I now actually recommend using 1/30 as a starting point for creating motion blur. But even with 1/30, you have to pay attention to holding the camera very still. I selected ISO 100 since it was a very bright, sunny afternoon, and because I atypically needed to work in a slow shutter speed range.
I initially took some images of the traffic crossing the intersection, trying to capture many vehicles at once to accentuate my idea of the busy traffic. However, I soon decided to face directly across the street and capture the moto-taxis as they crossed my field of view. I set the Drive Mode to continuous so that I could fire off a series of photos each time the light turned green and the traffic crossed my view. The Rebel XT has a slow maximum rate of 3 frames per second (fps) but many current cameras will allow a more useful and faster frame rate of 5 or 6, or even 8 fps. White Balance was set on Auto, though Sunny setting would have worked well too. Metering was set on Evaluative. However, since the lighting and the scene remained relatively consistent, it would not have been a mistake to determine the best exposure then switch the camera to Manual mode, M, and set that exposure for all the photos.
In Shutter Priority mode, you choose the shutter speed and the camera will choose the aperture, based on the ISO setting. The aperture setting for this photo wasn’t too important to me. Since the foreground was going to be a blur of motion, it was best that the background was relatively in focus. So a narrow aperture providing relatively deep depth of field, such as f/11 or f/16 would be fine. Based on the ISO and the amount of light, the camera was selecting apertures ranging from f/8 to f/22 for various images, with most of them somewhere in the middle of that range. Also, since the subject was going to be a blur of motion, there was no point in trying to focus on it. The motion would most likely confuse the auto-focus system anyway, so I switched the lens to MF, Manual Focus, and focused on the sign post directly across the street from me. Though I may have zoomed slightly in or out with the lens at first, I settled on a focal length of 50mm and left it there.
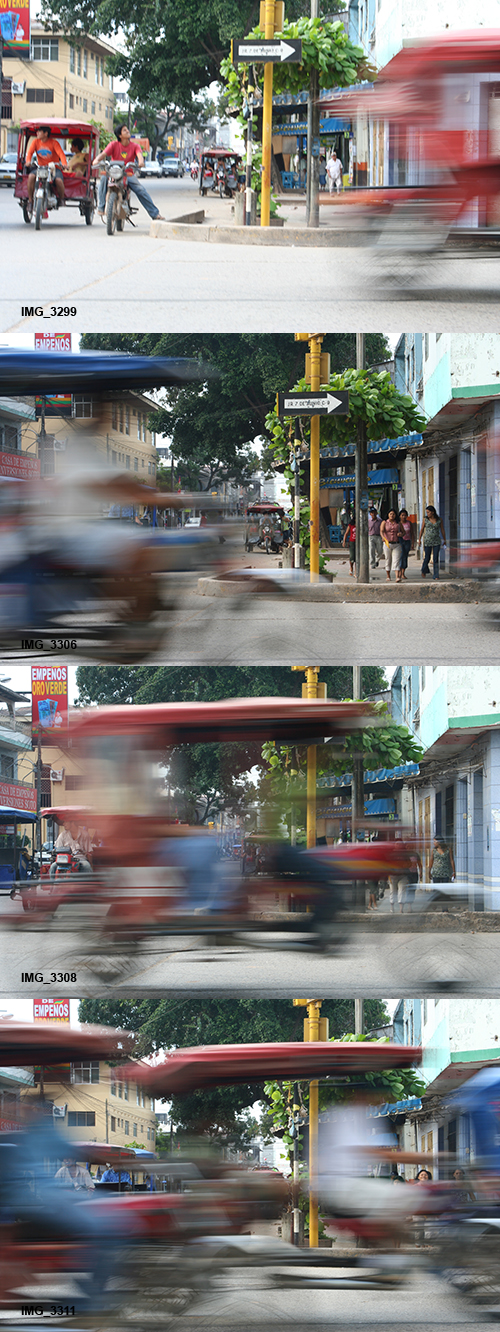
While the subject of this composition is the blur of the vehicles, the background also comes into play, and as with every image, can not be ignored. The street and trees beyond created a nice background, both showing the urban context of the scene and blocking out what could have been a large area of dull, light sky. The yellow sign post, where I focused, added a nice element of color. You can see that the yellow post and the curb of the far side of the street lie near the “rule of thirds” lines. This isn’t an accident, and they were consciously placed there to help create an interesting composition. This was done through squatting or kneeling in order to place myself at the desired point of view and still capture most of the vehicles from top to bottom.
I took a series of 59 images over a period of nearly 8 minutes, with 48 of the images being the straight-on images in a period of just 2 minutes. I used a horizontal composition since that worked best with the blur of motion of the traffic. I typically just held down the shutter button as the traffic started to go by, just after the stoplight changed. By doing that I captured a variety of interesting images, with the moto-taxis blurring by in all types of configurations. In a situation like this, luck and chance play a big part. The photographer must control all the elements they can through composition, framing, and camera settings, and then allow the scene to play out in front of them. So I would actually call this controlled chance. There were a few very nice results, and I settled on an frame from the middle of the series, IMG_3306, as my chosen image. In addition to showing the blur of the moto-taxi, it also captured some pedestrians across the street and fully showed the one-way sign, which I thought were nice additions to the image. With these added elements, it becomes more of an overall “portrait” of the city streets of Pucallpa rather than just an image about motion.
The Post Process: To create the final image, I adjusted the color and contrast in Adobe Camera Raw (ACR) and in Photoshop (PS). As you can see by the unprocessed images, the color and contrast is quite dull and lifeless straight out of the camera. The original file was a JPEG file, and the Picture Style was Standard (I hadn’t started using RAW yet). In ACR, the Blacks were increased to 10 to give it the nice deep blacks, which helps to make the bright colors pop even more. A Fill setting of 10 was used to lighten up the foreground moto-taxi a bit, and Clarity +15 and Vibrance +10 were used to give it some, well, clarity and vibrance. In Photoshop, the contrast was increased with Curves using a setting probably close to Medium Contrast. I typically don’t make the blacks so black and purposefully lose detail in the shadows, but I was experimenting with this look and it seemed to work well here. The image was sharpened using Unsharpen Mask, probably at Amount: 85 or 100, Radius: 1, and Threshold: 4. Now I would try being more aggressive with the Amount and Radius, but I am not sure the 8MP JPEG file from the Rebel XT would withstand much more without starting to degrade. Somewhere along the way, either in ACR or PS, the color temperature was also changed to warm it up a little, which is more in keeping with the afternoon sun of the Amazon region. I didn’t crop the image at all, as you can see. It is best to try to get the framing you want when you capture the photo, but I am somewhat surprised myself that I did it so well. I once had a photo teacher in college who complimented me on my ability to capture the frame and not need to crop. I just thought that was the way one was supposed to take a photo! Thankfully I still sometimes demonstrate that ability.
The Final Image:
Canon Rebel XT, 28-105mm f/3.5-4.5 II at 50mm, ISO 100, f/14, 1/20s
The Lesson: We should always learn from our photos, so that next time we are in a similar situation, we can create an even better image. Some improvements I could have made to this image include using a neutral density (ND) filter or a polarizing filter. This would have given me more control over the range of aperture settings that the camera selected and allowed for a wider-open aperture so that the far distance became more of a blur. A polarizing filter would have also helped to darken the bits of sky that appear. And as I mentioned above, a shutter speed of 1/30 would have still created the blur, but would have been slightly easier to hand-hold without creating unwanted blur in the background due to camera shake.
This image was chosen to be used on the cover of the programs for the Brooklyn Philharmonic’s Nuevo Latino Festival in 2009. Incredibly, the near square crop of the image works really well too:

So hopefully you can see from this explanation and from my previous posts that photographs don’t necessarily just happen. They are created through a combination of thought processes, a series of decisions, and the application of camera settings based on these decisions and on the situation at hand – plus some controlled chance!
See the Related Posts section just below for links to parts 1 and 3 in this series. And learn more about how to take control of your camera and the images you create with my Full Stop e-book camera and photography guides.

Thanks! Very generous of you to put it up with such specific details
Inspiring and very helpful! (oh: perhaps you might want to bring a one-pod with you next time…)
And thanks for your post on 60D – I am now calm and convinced that this IS the camera for me – don’t need 7 or 5D – will spend my money on lenses.
Keep on posting!
Claus
Thanks for reading, and I’m glad you found it helpful. I will be continuing the “Deconstructing the Shot” series with a new post every few weeks. The next installment will be “the aperture edition.” And I’m considering turning the concept into an ebook… Be sure to check out my ebook on the 60D, Your World 60D. It will get you up and running with the camera and help you get the most out of this advanced dSLR!
Yes I too am really enjoying this series. Very well done and very informative