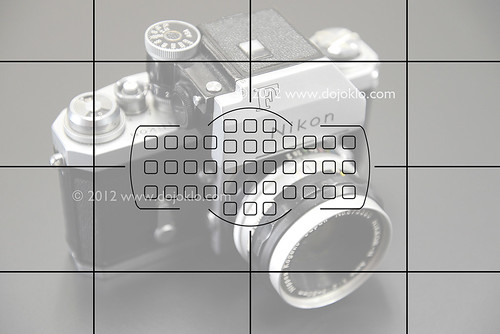
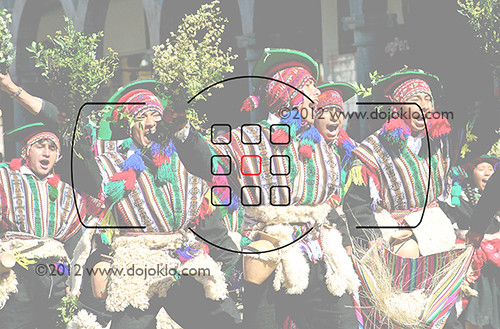
Don’t Let the Locations of the AF Points Dictate Your Composition

I began to discuss the autofocus modes of various dSLR cameras in previous posts including Taking Control of Your Canon Autofocus System and Taking Advantage of the Autofocus Systems of the Nikon D5100 and the Nikon D7000

In this post I wish to go into more detail about one of the reasons it is important to take control of your autofocus system, namely not allowing the locations of the AF Points in your viewfinder to dictate your final composition.

As I mentioned in previous autofocus posts, one of the essential steps in taking a successful photo is controlling where the camera focuses.  If you allow the camera to auto focus by choosing its own focus point(s), it typically focuses on the closest object.  This may or may not be what you want to focus on, so you should select where the camera focuses using the Auto Focus Points.  For example, you often want to focus on a subject’s eyes, but if you allow the camera to choose the autofocus point itself, it may select another part of the face, or somewhere else on the body, or even a raised hand that is nearer to the camera than the face to focus most sharply on.

In addition, there are reasons to use the outer focus points and not just focusing with the center AF point and then recomposing.  First, if you are taking several shots of the same subject and framing, you will not have to re-focus with the center point and recompose between each shot.  And by controlling exactly where you focus, you then have greater, more precise control over the use of dramatic depth of field.  Also, if you use the center point and recompose, you have swept the camera in an arc to recompose, and are thus always focusing at a distance behind the subject.  This may not be as noticeable when the subject is further away, but for a close subject – especially when using shallow depth of field – the difference is critical.

One of the additional critical reasons to take control of your autofocus system is so that you don’t let the location of the AF Points dictate your composition. What happens when the subject you want to focus on is not located exactly under one of the AF Points? Even with 9 or 19 or more AF Points to choose from, they will not always be located exactly at or near where you need them to be.  Recomposing or re-framing your shot is often necessary so that you can capture exactly the image you wish to and not one dictated by the locations of the AF Points as you see them in the viewfinder.

Canon 7D 5D mark II 60D T3i 600D autofocus system AF point choose select set setting
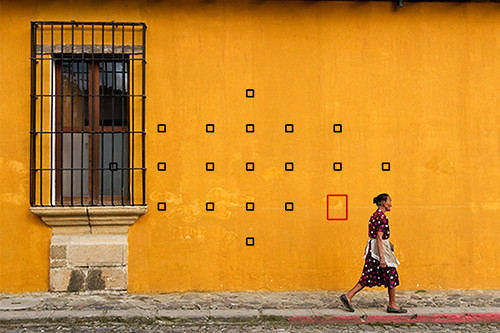
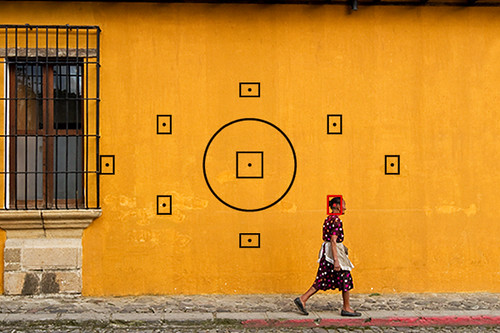
Figure 1 – The desired framing and composition of the shot I wish to take, yet no AF Point, including the selected lower right point (the larger point shown in red here) is located exactly at the woman’s head where I wish to focus. (Canon 7D viewfinder shown)

Canon 7D 5D mark II 60D T3i 600D autofocus system AF point choose select set setting
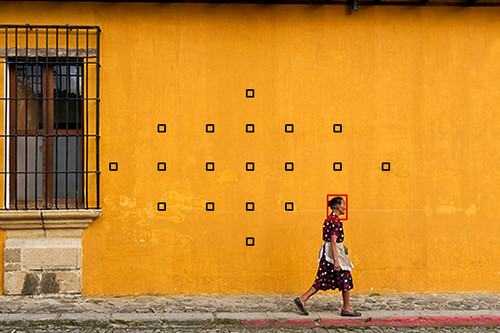
Figure 2 – Image is temporarily framed to place the selected AF Point over the woman’s head, Shutter Button is pressed half-way and held to lock focus at that distance, image is recomposed to the desired framing of previous Figure 1, and Shutter Button is fully pressed to capture the image.

Figure 1 shows the desired framing and composition of the shot I want to take, but the woman is not located under an AF Point. This composition is desired for me because it captures the entire window along with some space around it, as well as some space in front of the woman for her to “walk into” – but not an excessive amount of space. So I manually select the lower right AF Point (using Single-Point AF Mode), temporarily frame the image to place the selected AF Point over her face or head, press and hold the Shutter Button half-way to lock focus at that distance (Figure 2), and see the Focus Confirmation Light illuminate in the viewfinder. I then recompose back to the final framing I want (Figure 1) and press the Shutter Button fully to take the image. Even though the subject is moving, I do not need the sophisticated tracking of AI Servo (Canon) or Continuous Servo (Nikon) Focus Mode to keep her in focus. I can quickly lock focus using One Shot (Canon) or Single Servo (Nikon) Focus Mode, recompose, and take the image without the camera-to-subject focus distance changing significantly.

With the example images above (Figures 1, 2), focusing on the wall would not have been tragic because the distance between the subject and the background is small, and if a medium or narrow aperture such as f/8 or f/16 is used both the wall and the subject may be in acceptable focus. If the background was further away, and/ or a wide aperture such as f/2.8 was used – especially with a telephoto lens, and if the image was enlarged, you would clearly see that the camera focused on the wall and not the woman. Not to mention the fact that the wall is a somewhat consistent area of color and the AF system may have difficulty properly focusing on it. So it is best not to take shortcuts such as focusing on the wall and hoping the subject will also be in focus, because in many other situations you will not have this option. It is best to take the photo properly and to learn and practice the habit of working in the more rigorous manner if you want all your photos to be sharp.

If you would like to learn more about the autofocus systems of your Canon or Nikon dSLR camera, as well as learn to use the other features of your camera including metering modes, Aperture and Shutter priority modes, all the menus and Custom Function settings, and more, have a look at my Full Stop e-book camera guides. In addition to explaining the features and settings, the guides clearly explain when and why to use them in order to capture the images you desire.

Take control of your camera and the images you create!

Learn more about the e-books by clicking on their titles or on the banner below:
Canon 7D Experience
Canon T3i Experience
Your World 60D
T2i Experience.

Nikon D7000 Experience
Nikon D5100 Experience.

full stop dslr photo photography camera manual guide for dummies canon nikon

For those with other cameras, check out my Ten Steps to Better dSLR Photography which also discusses taking advantage of any dSLR camera’s autofocus system.

Was this post helpful?  Please let others know about it by clicking the Facebook or Twitter sharing buttons below, linking to it from your blog or website, or mentioning it on a forum.  Thanks!  Want to help support this blog with no cost or effort?  Simply click on the Amazon, B&H Photo, or Adorama logos on the left side of this page to go to those sites and make your purchases.  They will then give me a little referral bonus!

Taking Control of Your Canon Autofocus System

This article mostly applies to the 9 point autofocus system of the Canon 60D and the Rebels including the T5i / 700D and T4i / EOS 650D (and their predecessors), as well as to the new Canon 6D and its 11 AF points.  The Canon EOS 7D also shares the same Autofocus Modes discussed below, but it adds Autofocus Area Modes to the mix as well as additional Custom Functions affecting the AF system, so I will have to address those additional capabilities in the future (or you can learn all about them now in my Canon 7D Experience e-book).  I have written a separate post that addresses the AF system of the Canon 5D Mark III.

You can learn much more about using these cameras with my Full Stop e-book camera guides for Canon dSLR cameras.

Using Auto Focus
One of the essential steps in taking a successful photo is controlling where the camera focuses.  If you allow the camera to auto focus by choosing its own focus point(s), it typically focuses on the closest object.  This may or may not be what you want to focus on, so you should select where the camera focuses using the Auto Focus Points.  This does not mean you have to manually focus the camera, it means you tell the camera exactly where to autofocus.  For example, you often want to focus on a subject’s eyes, but if you allow the camera to choose the autofocus point itself, it may select another part of the face, or somewhere else on the body, or even a raised hand that is nearer to the camera than the face to focus most sharply on.  If you are capturing an image of a bird in a tree, the camera has no idea you want the autofocus system to zero-in on the bird so that it is in sharp focus and not the branches or leaves near it, or the leaves closest to you.

Autofocus works by looking for contrast, so try to focus (place your AF Point) on a detail with a strong line or strong contrast between light and dark.  It may not be able to focus on a large area of consistent color – such as a white wall or blue sky or even an evenly colored and lit shirt – or on a subject that is too dark.  It can be disrupted by regular patterns or confused when looking through close objects to objects farther away, such as looking through a fence.  And it sometimes fails to work as well in dim light, though the AF-Assist Beam can assist in this situation.  When photographing people, always try to focus somewhere on the face, ideally on the eyes or eyebrows, then recompose the framing of your image if necessary.

Select an Auto Focus Point, or AF Point, using the Multi-Controller or using the AF Point Selection Button and the Cross Keys (depending on your camera).  If you have a model with the Multi-Controller (such as the 60D with the thumb-pad or the 7D or 5DII with the thumb-joystick), be sure to set the Custom Function setting for AF Point Selection Method so that you can directly change the AF Point without pressing the AF Button first.

Canon 60D T3i 600D autofocus system AF point select choose set setting
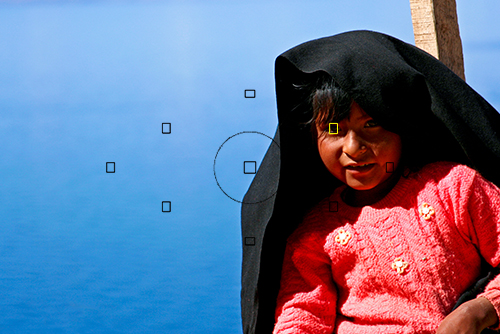
Figure 1 – The selected AF Point is located over the subject’s eye in order to ensure the camera autofocuses where desired.  (Canon 60D viewfinder shown, T3i/600D viewfinder similar)

To see how autofocus point selection works, make sure the switch on your lens it set to AF and your Autofocus Mode, as seen on the top LCD Panel or rear LCD screen, is set to One Shot, then:

•    Tap the Shutter Button with a half-press to wake up the camera.
•    Looking through the viewfinder, use the Multi-Controller or Cross Keys to select the focus point that is nearest to where you want to focus.
•    Place that point over your intended subject.
•    Press and hold the Shutter Button halfway down and see that point blink red.  The Focus Confirmation Light should light up in your viewfinder.  You have locked the focus.
•    Keeping the Shutter Button pressed halfway, recompose if necessary, and take the shot by fully pressing the Shutter Button.

There are reasons to use the outer focus points and not just the center one all the time.  First, if you are taking several shots of the same subject and framing, you will not have to re-focus with the center point and recompose between each shot.  And by controlling exactly where you focus, you then have greater, more precise control over the use of dramatic depth of field.  Also, if you use the center point and recompose, you have swept the camera in an arc to recompose, and are thus always focusing at a distance behind the subject (think of an arc that is your focus distance, and the tangent line off that arc that is the focus plane which now runs behind the subject after re-composing).  This may not be as noticeable when the subject is further away, but for a close subject – especially when using shallow depth of field – the difference is critical.

It may sound difficult to select the focus point each time, but it is actually very quickly done and should become instinctive.  You may even start to set your focus point as you approach a scene before even bringing your camera to your eye.

Focus Modes
The 60D and T3i (and 5D/ 5DII and 7D) have different focus modes to choose from, typically depending if your subject is still or moving, or if you wish to track its movement.

One-Shot AF
Use this mode when your subject is still and not going to move, or if your subject is not going to move very much, or if the distance between you and the subject is not going to change between the time you lock focus, recompose, and take the shot.  Lock focus on the subject and recompose if necessary.  This mode can even be used for moving people or objects if you quickly take the shot after establishing or locking focus.

Focus on your subject by pressing the Shutter Button halfway.  The active or selected AF Point will be displayed or will illuminate, and the Focus Confirmation Light at the lower right in the Viewfinder will illuminate as well.  Continue to press the Shutter Button all the way to take the shot.  If you half-press the Shutter Button to lock focus on your subject, the camera will remain focused at that distance as long as you keep half-pressing the Shutter Button.  You can recompose the shot as you wish and then full press the Shutter Button to take the photo.

As just noted, if the Focus Confirmation Light does not light up and the camera does not take the photo, the camera may not be finding enough contrast to focus on, you may be too close to your subject for the lens to focus, or the lighting may be too dim for the AF system to work properly.

However, if you are photographing a subject that is approaching or receding from view at a relatively constant rate, or photographing fast or erratic or unpredictably moving subjects, or photographing sports, action, or wildlife you will usually want to use AI Servo Focus Mode.

Canon 7D 5D mark II 60D T3i 600D autofocus system AF point choose select set setting
Figure 2 – Use One-Shot AF mode and select your desired AF Point to capture still or moderately moving subjects.  (Canon T3i viewfinder shown – 60D similar)

AI Servo
AI Servo mode is used for tracking and focusing on moving subjects, and is ideal for capturing sports and wildlife including birds.  If the subject is moving towards you or away from you the camera will keep evaluating the focus distance as long as the subject remains under the focus point that was originally active and the Shutter Button is kept half-pressed, and if the subject is moving from side to side or throughout the frame the camera will track it as it passes from one AF Point or Zone to the other ones (if you started tracking with the center AF point on the 60D and T3i or any selected AF point with the 7D).

If the subject is going to be moving across your field of view, set the camera to automatically select the focus point using all the AF points (this is one of the few times you will not be manually selecting the auto focus point), focus on the moving subject with the center focus point, and then as long as the Shutter Button remains half-pressed the camera will track the subject to the other focus points if it moves to them.  Thus when the image is taken, the subject is in focus.  This will even work in conjunction with continuous shooting.  If you keep the Shutter Button fully pressed and continue to take photos, the camera will keep focusing on the moving subject.  As you can imagine, this is ideal for tracking a player running across a field, a dog running toward you, or a bird moving across the fame.  Note that when shooting with Continuous Shooting Drive Mode not every shot may be in sharp focus as the camera sometimes can’t keep up and accurately predict the subject’s speed or location.  But you should be able to capture many sharp images with this technique.  The more sophisticated Canon 7D will allow you to start tracking moving subjects with any selected AF Point and not just the center AF Point.  These are the types of advanced capabilities you are paying for (and should take advantage of!) with a more expensive dSLR.

As you will see, when using AI Servo mode your compositions will be partially dictated by the positions of the autofocus points in your Viewfinder.  The subject needs to be at one of these AF Points in order for the camera to maintain focus on it.  This is why in some situations becoming skilled at quickly using One-Shot AF – even for action scenes – will give you much more ability to control your compositions.

AI Focus
This mode is a hybrid of the two other focus modes.  It starts in One-Shot AF mode then changes to AI Servo mode if your subject starts moving.  Why shouldn’t you use this all the time, then?  Well, it is typically not the best of both worlds.  If you are focusing and then recomposing, as you may often be doing, your movement of the camera may fool it into thinking that the subject is moving and then activate subject tracking AI Servo Mode, and your resulting focus may not be where you intend it to be or may not be as accurate as it could have been with One-Shot AF.  And in AI Focus Mode it may not be as quick to respond to a moving subject as it would in AI Servo Mode.  Typically you know if your subject is still or moving so it is better to select one of the other two AF Modes.  Plus that way you always know which AF Mode you are working in and can either lock focus where you want it or begin tracking a subject without wondering what mode the camera is in and if it will suddenly change.  But there may be situations that call for this combination mode such as a still bird or animal that may start moving unexpectedly, so keep it in mind.

How do you remember which mode is which since the terms “AI Servo” and “AI Focus” tell you nothing that makes sense?  Although I listed them in a different order above to explain them more easily, on your camera they are listed:

ONE SHOT
AI FOCUS
AI SERVO

Remember that One-Shot AF just focuses once and doesn’t change once you lock it in, and AI Servo AF is the other extreme – continuous focus used for moving objects. And AI Focus AF is listed in the middle, between the two, because it is the hybrid, combination of the two.

Checking Focus
You can review your images on the rear LCD Monitor of your camera to try to determine if they are in focus, especially by zooming in as close as possible.  But be aware that this screen has only about one million dots or pixels, while your actual image has about 18 million pixels.  That means that many images will appear to be in proper focus on your LCD screen, but you might discover that the actual images are not really so sharply in focus.

Before continuing, I want to mention that much of this text is excerpted from my dSLR guides for the Canon EOS 6D, Canon 70D, Rebel T5i / EOS 700D, Rebel T4i / EOS 650D, and the Canon EOS 7D. If you would like to learn more about the autofocus systems as well as all the other features of your camera including metering modes, Aperture and Shutter priority modes (Av and Tv), all the menus and Custom Function settings, and more, have a look at my Full Stop e-book camera guides. In addition to explaining the features and settings, the guides clearly explain when and why to use them in order to capture the images you desire.

Take control of your camera and the images you create!

Learn more about the e-books by clicking on the banner below:

full stop dslr photo photography camera manual guide for dummies canon nikon


To learn about another important reason why you need to take control of your autofocus system, and why the two example photos above actually weren’t my final compositions, see the next post:

Don’t Let the Locations of the AF Points Dictate Your Composition

What do you do when, with your desired framing, your subject is not located exactly under or near an AF point?  Even with the 19 or 39 points of an advanced Canon 7D or Nikon D7000, this will often be an issue.  For example in Figure 2 above, I actually wish to capture the entire window and more space around it within the image frame, but moving the camera and framing for that composition leaves me with no AF Point at the woman where I wish to focus.  Have a look at the above post to learn why this is an issue and how to resolve it.

Focus and Depth of Field

Many functions of dSLR cameras are related to some degree or another, and Focus and Depth of Field are two of these.  The depth of field, based on your aperture setting (and thus related to exposure…) expands forward and back from your point of focus.  Thus, one important aspect of controlling your depth of field begins with focusing exactly where you want to.  To begin learning more about depth of field, have a look at my post Depth of Field Simplified.

Was this post helpful?  Please let others know about it by clicking the Facebook or Twitter sharing buttons below, linking to it from your blog or website, or mentioning it on a forum.  Thanks!  Want to help support this blog with no cost or effort?  Simply click on the Amazon, B&H Photo, or Adorama logos on the left side of this page to go to those sites and make your purchases.  They will then give me a little referral bonus!

Taking Advantage of the Nikon D810/ D610 / D7100 / D5300 Autofocus System

This was originally written for the Nikon D7000, but as the Nikon D7100, the Nikon D7000, the Nikon D610 / D600, the Nikon D810 / D800, and the Nikon D5200 / D5300 all share a similar Autofocus system, most of this information will apply to all of them.  And even though some of the models have 51 AF Points instead of the 39 AF Points of the other cameras, all the same settings and actions apply.

The Nikon D7100, the Nikon D7000, the Nikon D610 / D600, the Nikon D810 / D800, and the Nikon D5200 / D5200 dSLRs all share very similar, and quite sophisticated autofocus systems – especially if you are coming from a D90, D5100, or earlier camera.  With their 39 AF points or 51 AF points that can be used independently or together in a variety of ways, its Autofocus Custom Settings that affect many of the functions of the AF system, and the three different Autofocus Modes that are used in various combinations with the four different Autofocus AF-Area Modes, it is no wonder that users are having difficulty figuring it all out. (Plus the D810 offers an additional Group Area AF Area Mode!)

Nikon D600 D7000 autofocus af system 39 point auto focus control learn use how to dummie book guide manual
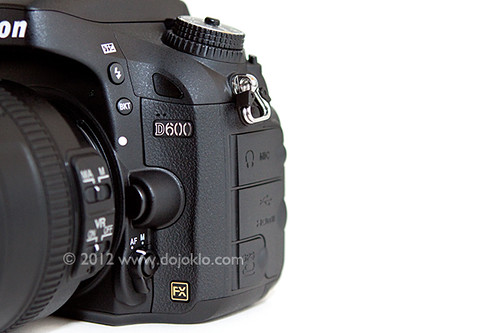
Some of the Autofocus controls of the Nikon D600, located near the base of the lens (to the left of the FX badge and below the Lens Release Button).

First, the Autofocus Controls on the D810/ D800, D610/ D600, D7100, and D7000 are a bit different than previous cameras.  You can change the Autofocus Mode and AF Area Mode by pressing the AF Mode Button (located inside the Focus Mode Selector switch) and then use the Command Dials to adjust the settings as you view them on the top LCD Control Panel or in the Viewfinder.

Focus Mode Selector – This switch is used to turn on or off autofocus. Set to AF for autofocus and M for manual focus. Be sure to set the similar switch on the lens as well. If your camera does not seem to be autofocusing, be sure to check this switch and the one on your lens.

AF Mode Button – This button, located inside the Focus Mode Selector switch, may be confusing at first to those who have not previously seen or used it on the Nikon D7000 or D600, though you should quickly find that it is a convenient design. It is used to select the Focus Mode as well as the autofocus AF-Area Mode. Press this button and turn the rear Main Command Dial to select the Focus Mode, such as AF-A or AF-C, while viewing the setting on the top Control Panel or in the Viewfinder. Press this button and turn the front Sub-Command Dial to set the AF-Area Mode, such as Single-Point AF or 39-Point Dynamic-Area AF. Again, you can view the selected setting on the top Control Panel or in the Viewfinder. The autofocus system including the Focus Modes and AF-Area Modes will be explained below.

Next you will need to set up some of the autofocus Custom Settings to begin to customize how the AF system functions for your needs (Some of these options may not be available with the D5200):

AF-C priority selection – This setting determines if attaining focus is top priority when you are in Continuous-servo AF (Auto-Focus) Mode (AF-C), or if you just want the shots to be taken even if exact focus is not attained for each shot.  If exact focus is your priority, set on Focus.  If getting the shots at all costs is the priority, set for Release.

AF-S priority selection – This is similar to above, except that this setting is for when you are working in Single-servo AF Mode (AF-S), typically used when your subject is not moving.  Since AF-S is typically used with subjects that are not moving, it makes more sense to make sure focus is attained, thus you should typically select Focus for this setting.

Focus tracking with lock-on – This setting determines how the autofocus system reacts to sudden, dramatic changes in the distance of the subject when you are working in AF-C or AF-A modes.  Decide if you wish to have the camera quickly refocus on a new or closer subject (1-Short), wait awhile until it ideally picks up the intended subject again (5-Long), somewhere in between, or immediately refocus on a new subject at a large distance from the initial subject (Off).  Keep this option in mind with the various AF-C and AF Area Mode configurations, as it may change depending on your subject and situation.  Sometimes you don’t want the camera to quickly refocus on a closer or more distant subject, while other times you do.

AF point illumination – This is used to set whether or not the selected autofocus point (AF Point) is illuminated in the viewfinder.  Since you pretty much always want to know where your camera is focusing, this should be set for On.

Focus point wrap-around – This determines if the AF Point selection will “wrap around” to the other side of the screen when you reach an edge.  In other words, if you are selecting your AF Point (as you should be doing at almost all times) and you reach an AF Point on the far right, when you click right again, do you want to “wrap around” to a focus point on the far left, or do you wish to stop at the edge and not continue to the other side?

Number of focus points – This setting determines the number of autofocus points that are available for selection in your viewfinder.  If you are always selecting your AF Point (as you typically should) you may find that it is quicker and easier, at least at first, to limit the number of AF Points to 11 – AF11.  If you prefer to have all the AF Points available for your selection, set this at AF39 (or AF51 with the D7100).  If you set to 11 AF points your selection will be limited to those 11 AF points, but the additional surrounding AF points will still be active to be used by the camera in the AF-Area Modes and in subject tracking, so the camera is still taking advantage of all the AF points of the autofocus system.

Built-in AF-assist illuminator – This is used to enable or disable the autofocus assist light.  Turn this On to assist you in autofocusing in low light, but be sure to turn it Off if you are working in situations where it will be distracting, unwanted, or unnecessary.

and

Assign AE-L/AF-L button (f4 on the D600 and D7100) – This is to assign the function of the AE-L/AF-L Button.  You may want to use this in conjunction with the Function or Fn Button and use one to lock exposure and the other to lock focus.  In that case, you would typically set this to AF lock only to use this button to lock focus.

I go into much more detail about each these Custom Settings, how you may wish to set them up, and recommended settings in my e-book guides for all the current and previous cameras including Nikon D600 Experience, Nikon D7100 Experience, and Nikon D5200 Experience – but this should get you started.

Nikon D600 book ebook camera guide download manual how to dummies field instruction tutorial     Nikon D7100 book ebook manual tutorial field guide how to learn use dummies


Using Autofocus
Now on to using the AF system.  (All of the information below is also adapted from my e-book user’s guides, so I hope you will have a look at them to learn more.)

One of the essential steps in taking a successful photo is controlling where the camera focuses.  If you allow the camera to autofocus by choosing its own Focus Point(s), it typically focuses on the closest object or a person in the scene.  This may or may not be what you want to focus on.  So you should choose where the camera focuses using the autofocus Focus Points.  But first you will need to select an appropriate Autofocus Mode and an Autofocus Area Mode, based on your subject and situation.

Autofocus Modes
The D7100, D7000, D600, and D5200 each have three different Autofocus Modes to choose from, typically depending if your subject is still or moving.  They also have four different Autofocus Area Modes (see below) to specify how many of the AF points are active and how they track a moving object.  You can set these two functions in various combinations.  First the Autofocus Modes:

Single-Servo AF (AF-S)
Use this mode when your subject is stationary, or still and not going to move, or if your subject is not going to move very much, or if the distance between you and the subject is not going to change between the time you lock focus, recompose, and take the shot.  Lock focus on the subject and recompose if necessary.  When using AF-S, you can select from two Autofocus Area Modes, either Single-Point AF where you select the AF point, or Auto-Area AF, where the camera selects the AF point(s) for you.  I suggest you nearly always select your own desired AF point.

Continuous-Servo AF (AF-C)
Use this mode when your subject is moving.  If the subject is moving towards you or away from you, the camera will keep evaluating the focus distance, as long as the Shutter Button is kept half-pressed.  You will need to use this in conjunction with the Autofocus Area Modes to determine if and how the camera tracks the subject laterally to the surrounding AF points, or if it will only track the subject if it remains at the initially selected AF point.  If the subject is going to be difficult to follow or is moving across your field of view, set the AF-Area Mode to one of the Dynamic-Area AF modes or to the 3D-Tracking mode.  Focus on the moving subject with the selected point if using Single-Point, one of the Dynamic Area Modes, or 3D-Tracking, or let the camera select the AF point in Auto-Area AF, and then as long as the Shutter Button remains half-pressed the camera will track the subject as it moves closer or farther in distance.  Depending which AF Area Mode you are using, the camera may also maintain focus or track the subject to some or all of the surrounding focus points if it moves away from the initially selected point.  More about this in the Autofocus Area Modes section just below.

Auto-Servo AF (AF-A)
This mode is a hybrid of the two other focus modes.  It starts in Single-Servo AF (AF-S) mode then changes to Continuous-Servo AF (AF-C) mode if your subject starts moving.  Why shouldn’t you use this all the time, then?  Well, if you are focusing and then recomposing, as you may often be doing, your movement of the camera may fool it into thinking that the subject is moving and your resulting focus may not be where you want it to be, or may not be as accurate as it might be if you are using Single-Servo AF.

Nikon D600 autofocus 39 point af system use learn tutorial how to auto focus mode area
The arrangement and position of the 39 AF points of the Nikon D600, shown with the optional viewfinder grid display.

Manual Focus
Sometimes you may be taking several photos of the same subject from the same distance, or for some other reason want to keep the same focus distance and not have to keep re-focusing and re-composing.  Or you may be taking multiple photos for a panorama.  In these situations, turn off the auto-focus on your lens by switching from AF to M with the camera’s Focus Mode Selector switch and with the A/M switch on the lens itself.  Just remember to switch them back when you are finished.  You may also wish to do this if you want to precisely manually focus with the focus ring on your lens.  For lenses with “full time manual focus” however, you don’t need to switch to M in order to manually override the autofocus with the lens focus ring.  These lenses will have M/A and M on the lens focus mode switch instead of A and M.

Autofocus Area Modes
The Autofocus Area Modes are used to set if just a single AF point is active or else how many AF points surrounding your selected AF point will be used to maintain focus or to track a moving subject if you are using AF-C or AF-A Autofocus Modes.

Single-Point AF
Only one AF point will be active, and surrounding AF points will not become active to maintain focus or to track a subject that moves away from the one selected point.  This is typically used along with Single-Servo AF (AF-S) to focus on a stationary or still subject, or in a situation where you will be reframing the shot after you lock focus at a specific distance.  It can also be used with accuracy with AF-S mode for moving subjects if you take the photo quickly or if you recompose and take the shot quickly after locking in focus, especially if the camera-to-subject distance does not change at all or very much in that period between locking focus and taking the photo.  Use the Multi Selector to choose your active AF point as you look through the viewfinder and use the OK Button to quickly select the center AF point.  Also, remember that Custom Setting a6 allowed you to choose between having all 39 AF points available or to limit the camera to 11 AF points.  If you are just starting out with manually selecting a single Focus Point, you may wish to limit them to 11 now, and when you get the hang of it or when you are using one of the other AF Area Modes described below, increase it to 39 to take full advantage of all the AF points of the D7000 autofocus system.  If you choose Single-Point AF with Continuous-Servo AF (AF-C) or Auto-Servo AF (AF-A) for tracking moving subjects, it will only track the subject as long as it is positioned at the selected AF point, and it will not be tracked laterally to the other, surrounding points.  In other words, the single AF point you select will track a subject if it moves closer or farther away, but the AF system will not follow or track the subject if it moves left, right, up, or down and away from your selected AF point.  To do this, you use Dynamic-Area AF Mode or 3D-Tracking.

Dynamic-Area AF
With the Dynamic-Area AF Modes, you select an AF point to tell the camera where to autofocus, and if your subject briefly moves away from that point to a neighboring point or if you lose the subject from your AF point while panning, the camera will use the surrounding AF points to help maintain focus on it.  Select one of the Dynamic-Area AF options (below) when you are photographing moving or potentially moving subjects using Continuous-Servo AF (AF-C) or Auto-Servo AF (AF-A).  These modes are ideal for a subject moving closer or further from the camera but which may also move laterally away from the selected AF point faster than you can react in order to keep it located at that point, or for when you are panning and following the subject and attempting to keep it located at the selected AF point, but may have a little or a lot of difficulty doing so.  Remember that you need to keep the Shutter Button half-pressed in order for the continuous focusing at the initial point or the surrounding points to occur.  Note that the camera may pick up and start tracking a new subject that falls under the selected AF point if you lose your initial subject, in part determined by your setting for Custom Setting a3.

9-Point Dynamic-Area AF will use the immediate surrounding AF points to help maintain focus on a subject that briefly leaves the selected AF point.  This can be used with predictably moving subjects, like a runner or vehicle moving towards you or one that you can easily follow laterally by panning.

21-Point Dynamic-Area AF will use even more of the surrounding AF Points, more than half the total AF Points, to help maintain focus on a subject that briefly leaves the selected AF point.  This should be used for more unpredictably moving objects, like sports players on a field, which may quickly move further away from your selected AF point before you have a chance to realign that point over the subject.

39-Point Dynamic-Area AF (or 51-Point Dynamic-Area AF with the D7100) will use all of the 39 AF points (or 51 points) to help maintain focus on a subject that briefly leaves the selected AF point.  It can be used for very quick and unpredictably moving subjects, like pets, birds or other wildlife, and all 39 AF points will be used to maintain focus on the subject as you attempt to realign the selected AF point with the subject.

The Dynamic-Area AF Modes are not used to track and maintain focus on a subject that is moving across the various AF points in the frame, but rather are used to stay focused on a moving subject that you attempt to keep located at your selected AF Point.  To track a subject that is moving across the frame, intentionally passing from one AF point to the next, use 3D-Tracking.

Nikon D5200 autofocus af system viewfinder 39 point how to use learn manual guide book instruction dummies tutorial area mode dynamic
A simulated image of the Nikon D5200 viewfinder, showing the autofocus focus points active with 9-Point Dynamic Area AF area mode, when the center AF point is selected. (Image shown at 50% opacity to better view AF points.)

3D-Tracking
This mode is used for subjects moving across the frame in any direction, or subjects moving erratically from side-to-side in the frame, and they are tracked by areas of color.  This is used when you don’t wish to necessarily pan or follow the subject to keep it located in the same part of the frame, but rather when you wish to keep the camera relatively still as the subject moves across the frame.  You may select this option when you are tracking and photographing moving subjects using Continuous-Servo AF (AF-C) or Auto-Servo AF (AF-A).  Again, you choose the initial AF point to locate the subject and begin the tracking.  If the area of color you wish to track is too small or if it blends into the background, this mode might not be very effective.

Auto-Area AF
The camera uses all 39 AF points to detect what it thinks is the subject and automatically choose the appropriate AF point(s).  Typically, the camera will select the nearest subject or a human in the frame, so it may not focus on exactly what you wish to focus on.  That is why it is best to use one of the other modes and select the AF point yourself.

Group Area AF
The Nikon D810 and D4s include the Group Area AF autofocus area mode, which makes use of a group of 5 AF Points arranged in a cross-shaped pattern. And instead of selecting a primary point with the surrounding points being “helper points,” you will actually be selecting the group of five points, which will all be used to attempt to focus on the subject. Unlike the other AF Area Modes with multiple points, the Viewfinder will actually display the four outer points of the group, but for some reason not the central point – perhaps so that you can better view the subject.

Keep in mind that with the other somewhat similar Dynamic Area AF modes, you choose a primary point and attempt to keep the subject located at that point, and the surrounding points act as “helper” points if the subject happens to move away from the primary point. But with Group Area AF you select the entire group of AF Points, and they all work equally to focus on the subject. This mode can be used similar to Single Point AF but when it might be challenging to locate the subject under an individual point. When working in AF-S Focus Mode and using Group Area AF, the selected AF points will give priority to faces if they are present, otherwise they will focus on the closest subject.


The next step is to learn to lock focus independent of locking exposure, and customize the camera’s controls to perform these functions how you wish.  But you are going to have to have a look at my e-book guides Nikon D7100 Experience, Nikon D7000 Experience, Nikon D600 Experience and Nikon D5200 Experience to learn about this and many other important functions of your sophisticated Nikon D600, D5200, or D7000!

Nikon D600 book ebook camera guide download manual how to dummies field instruction tutorial      Nikon D7100 book ebook manual tutorial field guide how to learn use dummies


To learn about another important reason why you need to take control of your autofocus system, see the related post:

Don’t Let the Locations of the AF Points Dictate Your Composition

What do you do when, with your desired framing, your subject is not located exactly under or near an AF point? Even with all the AF points of an advanced Nikon D7000 and D600, this will often be an issue. Have a look at the above post to learn why this is an issue and how to resolve it.

Still need to purchase your D7100, D7000, D5200 or D600.  Please use my links to have a look at them on Amazon:

Nikon D7100 24.1 megapixel DX format dSLR camera

Nikon D7000 16.2 megapixel DX format dSLR camera

Nikon D600 24.3 megapixel full-frame FX format dSLR camera

Nikon D5200 24.2 megapixel DX format dSLR camera

Was this post helpful?  Please let others know about it by clicking the Facebook or Twitter sharing buttons below, linking to it from your blog or website, or mentioning it on a forum.  Thanks!  Want to help support this blog with no cost or effort?  Simply click on the Amazon, B&H Photo, or Adorama logos on the left side of this page to go to those sites and make your purchases.  They will then give me a little referral bonus!

Assignment: Guatemala – Canon 7D Tutorial and Review

I recently returned from a trip to Guatemala, where I was taking photos for an NGO that works with children, literacy, and education. It gave me the perfect opportunity to try out a bunch of new equipment and really put it to the test in the field.


San Miguel Duenas, Guatemala – Canon 7D, 70-200mm f/4L IS lens at 78mm, 1600 ISO, 1/100, f/5.6

Jump to the Custom Function section

First and foremost, it was the first time I really had the opportunity to use the Canon 7D body (I discuss the additional gear in this related post). The camera performed wonderfully in many ways, however, I did have autofocus related problems – namely a serious front focus issue. With both wide angle and telephoto L-series lenses, the camera was consistently focusing several inches or more in front of the subjects. I played around briefly with the AF Microadjustments, with the intention of taking a closer look at the situation when I returned home.  (Body was later exchanged for another that focuses properly.)

I had another, odd and unexpected complaint in the field, and that is with the high speed shooting modes. One has the choice of 3fps or 8fps, yet I needed something more like 5fps! I’ve included some images throughout the post that are straight from the camera (I merely converted from RAW to JPEG). Anyway, on to the review and instructions for many of the camera’s settings, and how and when to use them in real world situations. And at the end there is some info about video tutorials available for downloading and watching.

If any of the digital photography terms you come across in this post are unfamiliar, be sure to refer to this great glossary for assistance.

Design – The camera is extremely comfortable to hold and use, especially due to the size, shape, and material of the grip, and it felt to be designed perfectly for my hands. It is nicely weighted with both a 16-35 f/2.8L II and a 70-200 f/4, and carries well with an R-Strap attached to the camera body (the 70-200 f/4 doesn’t come with a collar). Due to its similar design and button placement as previous Canon models, it was easy to get used to changing various settings on the fly – everything from ISO right up on top to Flash Control in the menus. There are a few settings that I quickly fell into, but that I would like to experiment with a little more with before I settle permanently into. Here are a few notes, in no particular order of importance:

Av Mode – I set the camera to Av mode for 99% of the time, as that is how I typically work (because I always want to control the depth of field). About the only time I took it out was when I was experimenting in an HDR type situation where I was in Manual and bracketing, trying to properly expose both a dark colonnade I was under and the cathedral in bright sunlight beyond. I haven’t yet worked on combining the exposures, but here is a nice shot that came from that situation:


Antigua, Guatemala – Canon 7D, 16-35 f/2.8L lens at 16mm, 1600 ISO, 1/500, f/16

(edit – I added the camera and lens information to these images.  Please note that the camera settings used for these various images may not necessarily be the “best” or “ideal” settings to use in the specific situations, but camera settings are always the result of changing situations and lighting, coming from another scene, going back and forth between action and still subjects, adapting, experimenting, and sometime just plain not paying attention!)

ISO – I had high hopes for Auto ISO, thinking I would finally be given the freedom to stop worrying where I left it set, but I quickly found that in Av, I didn’t like the slow shutter speeds that were resulting when I selected the aperture and the camera selected the ISO. So I ended up never using it. I would like to experiment with it some more, and figure out if there is something I can do to keep the shutter speeds in a better range. It is wonderful to have the versatility to change ISO on the fly, but one often gets caught up in shooting, and forgets to change it to an appropriate setting, and thus sometimes the shutter speed isn’t the most ideal. So, I just have to stay in the habit of paying attention to where all three settings are as I go from indoor to out or change lenses, etc. This is aided by these settings being visible in the 7D viewfinder.

High Speed Continuous Shooting – many people marvel at the 7D’s ability to shoot 8fps in High Speed Continuous Mode. However, for my purposes on this trip, that proved far too excessive. I often shoot a burst of photos when someone or something is in motion and I want to capture the peak of action or a flattering pose, or when a gesture or facial expression might change rapidly. Unfortunately, 8fps results in a lot of unwanted files, and as I will soon address, these files are HUGE and rapidly fill up a hard drive. But sadly, the Low Speed Continuous drive setting is only 3fps, which is too slow to capture the rapid changes in a scene. The 3fps speed was one of the main drawbacks of my previous body, and a major reason for upgrading. What I need is something in between, maybe 5fps! Perhaps Canon or someone will tweek the firmware to allow this…


San Miguel Duenas, GuatemalaCanon 7D, 16-35 f/2.8L lens at 35mm, 800 ISO, 1/500, f/3.5

Custom Functions – In order for you to get the most out of the 7D, and to set it to function best how you work, you need to dig into the Custom Functions. One of the settings I use is customizing My Menu, and then having My Menu always appear first when I hit the Menu button. (My Menu Settings / Display from My Menu=enable) I played around with different items on My Menu, but have settled for now on the ones that I use most often or that I may quickly need and want to access without digging into the menus. They are:

Flash Control
– you can quickly adjust all the settings for the built in flash, external flash, wireless flash. You can even control all the setting of the 580EX II remotely – when it is not attached to your camera. Very cool.
Exposure Compensation/ AEB – exposure compensation is easy to change at any time with the big dial, so this shortcut is for using when I want to bracket (AEB).
Review Time – I found that I was often shooting away without chimping (looking at the LCD), so I often just turn off the LCD review altogether. Other times, however, I want to review.
ISO Expansion – I haven’t used this yet, but I wanted it handy in case I want to use the high ISO. I typically have this turned off because I didn’t want the camera to default to High ISO during any situations. But considering I wasn’t using Auto ISO, this all seems unnecessary, and now that I realize this, I will have to replace this with something else on the menu! I never went above 1600 ISO, which I did have to use sometimes in very dark classroom settings along with the flash. Upon quick review of those images, the lack of noise in these files is really good.
Format – this is to format the memory card in preparation for use the next day. Always reformat the card, never simply erase them or use the Erase All option if your camera had that (the 7D does not). However, after formatting, turn the dial to select another menu item so that next time you hit Menu, Format isn’t still selected and you quickly make a grave mistake of pressing it.
Highlight Tone Priority (II-3) – this is a great setting to use in a high key situation, or with a bright subject or scene. It helps to retain detail in the highlights so they don’t get blown out, such as a white wedding dress, or a snow or beach scene. I never did use it, but I keep it in this menu to remind me it is there for the day when I do need it!


Chichicastenango, Guatemala – Canon 7D, 70-200mm f/4L IS lens at 155mm, 200 ISO, 1/80, f/4

Other important Custom Function Settings

(please note, this post was initially written to explain how I used these settings in a specific travel situation.  I go into more detail about each of the Custom Function settings, with clear explanations of what they are and when and why to use them, in my e-book Canon 7D Experience, which is discussed below.)

Safety Shift (I-6) – I sometimes enable this setting. It allows the camera to shift the shutter speed or aperture automatically, without your expressed permission, in order to get the shot. This is great for situations where the light suddenly and dramatically changes, such as at a concert.  However if you are carefully choosing your settings, or working with a flash, you will want to disable this so that the camera isn’t overriding your careful settings.

AI Servo Tracking Sensitivity (III-1) – This dictates how quickly focus tracking switches to another subject when it momentarily loses the initial subject, such as when another subject passes in front of it. You can choose to have it stay focused on the initial subject (Slow), or focus quickly on a new subject that moves in front of your initial subject (Fast). Typically I want to stay focused on my selected subject, and ignore someone or something that momentarily passes between us. If you want to quickly focus on different subjects at different distances, put it on fast.

AI Servo 1st/2nd (III-2) – Is your priority focusing on the subject, tracking the subject, firing off rapid shots? Look at the manual to see which situation works best for how you shoot.Personally I think 0 or 1, with the autofocus (AF) Priority, is best. (The camera makes sure it focuses first before taking the shot. It may cost you a microsecond of time however.) Regarding tracking vs. drive, I keep it at 0. Setting 0 continues to prioritize focusing possibly at the expense of speed, while setting 1 will prioritize the speed of subsequent shutter releases at the expense of focus.

AI Servo AF Tracking Method (III-3) – This works with autofocus modes where more than one AF point is active. The names of the choices are a little confusing but what they do is Setting 0 will focus on a closer subject that enters into your view, not necessarily in front of your subject. while setting 1 will remain focused on the initial subject. I keep mine on 1, since I want to stay focused on my initial subject.


San Juan del Obisbo, GuatemalaCanon 7D, 70-200mm f/4L IS lens at 200mm, 100 ISO, 1/1000, f/4

AF Focus Mode (III-6) – I enabled all the AF modes in the Custom Functions – by default, several of them are not available to you unless you change that setting. I started out using Single Point, but sometimes changed to Spot for more precision. The cost of using Spot is that it may not focus as quickly or as well when hand held or with a moving subject, and is generally not necessary unless you are trying to focus on a very small, precise area, such as through a fence to a subject beyond.  I occasionally used AF Point Expansion when photographing rapidly moving children. I don’t know how other photographers work (according to a Canon rep who gave a 7D presentation at B+H, there are big name professionals who still just focus with the center point and recompose), but I always choose the focus point I want manually, using the Multi-Controller button. This takes a little longer, now that I am dealing with 19 focus points, but that enables me to quickly get the composition I want, makes sure the camera focuses on what I want it to, and to get subsequent shots without too much reframing. There is an important menu setting so that you can use the Multi-Controller directly to change the AF point without having to press the AF thumb button first – I believe it is on the screen where you can customize all the camera’s buttons. Oh, and I changed the custom settings so that all the focus points always show, and that they light up upon achieving focus, even in bright sunlight (which they would not do if you had this setting on Auto or Disable). That way I always know when it has focused.  And I set Custom Function III-7 to stop focus point selection when I reach the edge and not loop around to the other side. I’m also thrilled that the 7D has a grid display that you can turn on in the viewfinder, which helps me keep my horizons and compositions straight. The viewfinder looks pretty busy, filled up with AF points and the grid, but when you are shooting away and focusing on your subject, you don’t even notice they are there.

Single Point Focus vs. Spot Focus Size – This controls the size of the area being looked at for focusing purposes on the 7D.  With Single Point AF Area Mode, the camera is actually looking at a cross shape area (all focus points are cross type, center point is dual diagonal as well at certain apertures) that extends about 2x as big as the actual square you see in the viewfinder. With Spot AF Area Mode, the size of the cross is about the size of the square you see, I think perhaps slightly larger.  Now you might think that using Spot AF will be more accurate all the time and sounds like a great idea and will get you sharper pictures, but this is not necessarily the case.  Since Spot AF is so precise, and since autofocus works by looking for an area of contrast, Spot AF may not focus as well or as quickly in many general situations (because it may be looking at such a precise area that is all one color or  tone).

Spot AF is for when you need a really precise “focus beam” to pinpoint, for example a bird in a tree, and not the branches and leaves surrounding it and all around it, which may be closer to you and the camera.  Or if, say, you are shooting through a chain link fence and you want the camera to focus on the animal beyond and not on the fence.  If you were to use Spot AF all the time, you would have to continue to act in a slower and more precise manner, so that you ensure you are focusing on an area of contrast or a nice line.  For example, if you capture a shot of a person, you want to focus on the eye typically.  If you do this quickly with Single Point AF, you can aim at the general area of the eye and you will likely include it in the area being looked at by the camera.  However if you grab a quick shot with Spot AF, you may  be a little off and the camera is looking at an area of cheek to focus on, which will be difficult since there isn’t much contrast there.

Orientation Linked AF Point – This setting allows you to choose your favorite AF points, and when you are hold the camera horizontally or vertically, those points are automatically selected. However, it is very complicated to set, so much so that is would seem Canon doesn’t even understand it. The Canon rep did not fully explain it properly at the B+H presentation, the instructions in the manual do not work, and after 3 different instructions by email from Canon, I may finally have the correct way. I still have to try their latest directions. (note- nope, latest instructions still don’t work properly) **12/17/2009** AHA!! Here it is, finally explained in its entirety.

I also changed the button/ dial function settings so that in Manual mode, the big dial controls shutter speed and the top dial controls aperture. The default is the opposite. I changed this because I almost always shoot in Av mode, where the top dial controls aperture, so when I switch to Manual mode, I want that to remain the same.

Additional edit – August 2011:
I have written a popular e-book user’s guide for the Canon 7D
called Canon 7D Experience. It not only explains all of the features, functions, and controls of this powerful, sophisticated, and highly customizable camera, but also when and why to use them in your photography – including EVERY Menu item and Custom Function setting, with explanations and recommended settings for real-life use.  You can learn more about the guide, preview it, and purchase it here.


AF Microadjustments – This is a setting on the 7D which enables you to tweak the auto-focusing to your different lenses. A site about AF micro adjustments that look to be helpful is below:

http://www.northlight-images.co.uk/article_pages/cameras/1ds3_af_micoadjustment.html#Anchor-Canon-49575

Here is a micro-adjustment focus test chart you can use.

Viewfinder – The viewfinder on the 7D is big and bright and wonderful. It is nearly 100% view of the image you will capture. The aperture and shutter speed info is of course displayed below, along with the current ISO setting, which one should get in the habit of glancing at often. See the AF Focus Mode category above for more info on what you can view in the viewfinder to assist with focusing and composition.

Picture Style – I had this on Standard, since I shoot in RAW and intend to post-process, however, I would like to do a comparison of the styles to see which one best matches my visual preferences – although the Picture Styles will only affect JPEGs and, it is important to know, the image you see on your rear LCD screen when shooting RAW.


Jalapa, GuatemalaCanon 7D, 16-35 f/2.8L lens at 35mm, 800 ISO, 1/2000, f/8

File Size – I shot RAW for almost the entire trip, and quickly discovered that these files are HUGE. The files range from about 21MB to around 31MB each. I used SanDisk Extreme III 16GB cards, which worked great, and one card often lasted much of the day. I have no good reason for using SanDisk over Lexar, other than the fact that the Lexar people haven’t approached me about sponsorship… :) The Extreme III cards have been replaced by the new Extreme and Extreme Pro cards, and are thus the old ones are much cheaper at the moment, especially with current rebates. At 30MB/s, they were fast enough for the types of shooting and short bursts I was doing. However, downloading them to my computer and external HD were pretty slow using the SanDisk ImageMate CF card reader. Eventually I’m going to have to spring for a card reader that goes right into the PC slot. I used Adobe Bridge to simultaneously save the day’s files to 2 external hard drives. The 160GB Iomega Ego filled up before the trip was over, but fortunately I also had a Lacie 500GB. I am dreading the number of external hard drives I am going to have to buy for travel and for home storage, but once you go RAW, it’s hard to go back to shooting just JPEG. I’m going to have to look into the Drobo system that many rave about.

Battery Life – The battery life of the 7D is excellent. When you get new batteries, first charge them all the way. Do not recharge until they are completely drained. Do this one or two cycles. I know they say you no longer have to do this, but some claim that seasoning the batteries like this will maximize their charge life. Anyway, one battery lasted well into 2 days of shooting, maybe longer, I didn’t keep track. They just keep going, even with heavy use, chimping (LCD reviewing), frequent use of an external Speedlite flash, and use of image stabilization (IS) on the 70-200 lens. I carried 3 batteries, but probably could have gotten away with 2. The spring-loaded battery door that pops right open for quick battery changes is a nice touch.


Antigua, Guatemala – Canon 7D, 70-200mm f/4L IS lens at 78mm, 100 ISO, 1/250, f/4

Automatic Sensor Cleaning – Like most good dSLRs these days, the 7D automatically cleans the sensor at start up and shut down. Since the dust that is shaken off is collected on a tiny sticky strip at the base of the sensor, it seems to me that you should hold the camera straight as this happens. I’m not sure if this is actually true, but I think I read in the manual that it even says to place the camera flat on a table as you use this, so I have gotten in the habit of holding it straight and still as I turn it off and on. Yeah! No more having to clean the sensor manually with a Rocket Blower!

Video – I did not have a chance to even experiment with the HD video on the 7D yet…so much to learn, so little time…

The next post will review all the other gear I used on the trip – the camera backpack, R-strap, accessories, etc. – and perhaps some of the other lessons learned. Read it here.

Purchasing: If you plan to buy the Canon 7D or any other camera or equipment from Amazon.com, I would appreciate it if you use my referral link by clicking on the text or logo below. Your price will be the same, and they will give me a little something for referring you, which will help support this blog. Thanks!


See and buy the Canon 7D on Amazon

And due to popular request, if you are in the UK, here is my referral link to Amazon UK.

And for those wishing to purchase from B&H Photo, Adorama, or directly from Canon just click their logos on the left side of the page.


Jalapa, GuatemalaCanon 7D, 70-200mm f/4L IS lens at 200mm, 200 ISO, 1/1600, f/4

Again, be sure to check out my e-book user’s guide for the Canon 7D called Canon 7D Experience. It not only explains all the features, functions, and controls of this powerful, sophisticated, and highly customizable camera, but also when and why to use them in your photography. You can learn more about the guide, preview it, and purchase it here.

I’ve run across a nice set of video tutorials (link below) for using the Canon 7D. You can watch them online, or even download them to your camera for viewing. The one on AF Custom Fuctions is especially helpful at clarifying those setting. Be sure to look around on the Canon Digital Learning Center to find all kinds of other cool stuff about using your camera plus useful tips and instructions from pros who use them.

link to Canon 7D Video Tutorials

The distinctive voice you hear in the 7D tutorial videos is Canon guru Rudy Winston, and the photo samples are his images as well. If you are in NYC, you can often find him leading workshops and presentations at places like B+H and Adorama. I went to a wonderfully informative introduction to the 7D that he gave a B+H a month or 2 ago, and these videos are pretty much the same presentation.

Here is additional information from Canon Europe about custom functions of the 7D: