This was originally written for the Nikon D7000, but as the Nikon D7100, the Nikon D7000, the Nikon D610 / D600, the Nikon D810 / D800, and the Nikon D5200 / D5300 all share a similar Autofocus system, most of this information will apply to all of them. And even though some of the models have 51 AF Points instead of the 39 AF Points of the other cameras, all the same settings and actions apply.
The Nikon D7100, the Nikon D7000, the Nikon D610 / D600, the Nikon D810 / D800, and the Nikon D5200 / D5200 dSLRs all share very similar, and quite sophisticated autofocus systems – especially if you are coming from a D90, D5100, or earlier camera. With their 39 AF points or 51 AF points that can be used independently or together in a variety of ways, its Autofocus Custom Settings that affect many of the functions of the AF system, and the three different Autofocus Modes that are used in various combinations with the four different Autofocus AF-Area Modes, it is no wonder that users are having difficulty figuring it all out. (Plus the D810 offers an additional Group Area AF Area Mode!)
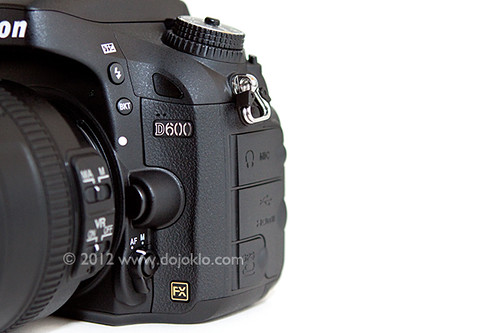
Some of the Autofocus controls of the Nikon D600, located near the base of the lens (to the left of the FX badge and below the Lens Release Button).
First, the Autofocus Controls on the D810/ D800, D610/ D600, D7100, and D7000 are a bit different than previous cameras. You can change the Autofocus Mode and AF Area Mode by pressing the AF Mode Button (located inside the Focus Mode Selector switch) and then use the Command Dials to adjust the settings as you view them on the top LCD Control Panel or in the Viewfinder.
Focus Mode Selector – This switch is used to turn on or off autofocus. Set to AF for autofocus and M for manual focus. Be sure to set the similar switch on the lens as well. If your camera does not seem to be autofocusing, be sure to check this switch and the one on your lens.
AF Mode Button – This button, located inside the Focus Mode Selector switch, may be confusing at first to those who have not previously seen or used it on the Nikon D7000 or D600, though you should quickly find that it is a convenient design. It is used to select the Focus Mode as well as the autofocus AF-Area Mode. Press this button and turn the rear Main Command Dial to select the Focus Mode, such as AF-A or AF-C, while viewing the setting on the top Control Panel or in the Viewfinder. Press this button and turn the front Sub-Command Dial to set the AF-Area Mode, such as Single-Point AF or 39-Point Dynamic-Area AF. Again, you can view the selected setting on the top Control Panel or in the Viewfinder. The autofocus system including the Focus Modes and AF-Area Modes will be explained below.
Next you will need to set up some of the autofocus Custom Settings to begin to customize how the AF system functions for your needs (Some of these options may not be available with the D5200):
AF-C priority selection – This setting determines if attaining focus is top priority when you are in Continuous-servo AF (Auto-Focus) Mode (AF-C), or if you just want the shots to be taken even if exact focus is not attained for each shot. If exact focus is your priority, set on Focus. If getting the shots at all costs is the priority, set for Release.
AF-S priority selection – This is similar to above, except that this setting is for when you are working in Single-servo AF Mode (AF-S), typically used when your subject is not moving. Since AF-S is typically used with subjects that are not moving, it makes more sense to make sure focus is attained, thus you should typically select Focus for this setting.
Focus tracking with lock-on – This setting determines how the autofocus system reacts to sudden, dramatic changes in the distance of the subject when you are working in AF-C or AF-A modes. Decide if you wish to have the camera quickly refocus on a new or closer subject (1-Short), wait awhile until it ideally picks up the intended subject again (5-Long), somewhere in between, or immediately refocus on a new subject at a large distance from the initial subject (Off). Keep this option in mind with the various AF-C and AF Area Mode configurations, as it may change depending on your subject and situation. Sometimes you don’t want the camera to quickly refocus on a closer or more distant subject, while other times you do.
AF point illumination – This is used to set whether or not the selected autofocus point (AF Point) is illuminated in the viewfinder. Since you pretty much always want to know where your camera is focusing, this should be set for On.
Focus point wrap-around – This determines if the AF Point selection will “wrap around” to the other side of the screen when you reach an edge. In other words, if you are selecting your AF Point (as you should be doing at almost all times) and you reach an AF Point on the far right, when you click right again, do you want to “wrap around” to a focus point on the far left, or do you wish to stop at the edge and not continue to the other side?
Number of focus points – This setting determines the number of autofocus points that are available for selection in your viewfinder. If you are always selecting your AF Point (as you typically should) you may find that it is quicker and easier, at least at first, to limit the number of AF Points to 11 – AF11. If you prefer to have all the AF Points available for your selection, set this at AF39 (or AF51 with the D7100). If you set to 11 AF points your selection will be limited to those 11 AF points, but the additional surrounding AF points will still be active to be used by the camera in the AF-Area Modes and in subject tracking, so the camera is still taking advantage of all the AF points of the autofocus system.
Built-in AF-assist illuminator – This is used to enable or disable the autofocus assist light. Turn this On to assist you in autofocusing in low light, but be sure to turn it Off if you are working in situations where it will be distracting, unwanted, or unnecessary.
and
Assign AE-L/AF-L button (f4 on the D600 and D7100) – This is to assign the function of the AE-L/AF-L Button. You may want to use this in conjunction with the Function or Fn Button and use one to lock exposure and the other to lock focus. In that case, you would typically set this to AF lock only to use this button to lock focus.
I go into much more detail about each these Custom Settings, how you may wish to set them up, and recommended settings in my e-book guides for all the current and previous cameras including Nikon D600 Experience, Nikon D7100 Experience, and Nikon D5200 Experience – but this should get you started.
Using Autofocus
Now on to using the AF system. (All of the information below is also adapted from my e-book user’s guides, so I hope you will have a look at them to learn more.)
One of the essential steps in taking a successful photo is controlling where the camera focuses. If you allow the camera to autofocus by choosing its own Focus Point(s), it typically focuses on the closest object or a person in the scene. This may or may not be what you want to focus on. So you should choose where the camera focuses using the autofocus Focus Points. But first you will need to select an appropriate Autofocus Mode and an Autofocus Area Mode, based on your subject and situation.
Autofocus Modes
The D7100, D7000, D600, and D5200 each have three different Autofocus Modes to choose from, typically depending if your subject is still or moving. They also have four different Autofocus Area Modes (see below) to specify how many of the AF points are active and how they track a moving object. You can set these two functions in various combinations. First the Autofocus Modes:
Single-Servo AF (AF-S)
Use this mode when your subject is stationary, or still and not going to move, or if your subject is not going to move very much, or if the distance between you and the subject is not going to change between the time you lock focus, recompose, and take the shot. Lock focus on the subject and recompose if necessary. When using AF-S, you can select from two Autofocus Area Modes, either Single-Point AF where you select the AF point, or Auto-Area AF, where the camera selects the AF point(s) for you. I suggest you nearly always select your own desired AF point.
Continuous-Servo AF (AF-C)
Use this mode when your subject is moving. If the subject is moving towards you or away from you, the camera will keep evaluating the focus distance, as long as the Shutter Button is kept half-pressed. You will need to use this in conjunction with the Autofocus Area Modes to determine if and how the camera tracks the subject laterally to the surrounding AF points, or if it will only track the subject if it remains at the initially selected AF point. If the subject is going to be difficult to follow or is moving across your field of view, set the AF-Area Mode to one of the Dynamic-Area AF modes or to the 3D-Tracking mode. Focus on the moving subject with the selected point if using Single-Point, one of the Dynamic Area Modes, or 3D-Tracking, or let the camera select the AF point in Auto-Area AF, and then as long as the Shutter Button remains half-pressed the camera will track the subject as it moves closer or farther in distance. Depending which AF Area Mode you are using, the camera may also maintain focus or track the subject to some or all of the surrounding focus points if it moves away from the initially selected point. More about this in the Autofocus Area Modes section just below.
Auto-Servo AF (AF-A)
This mode is a hybrid of the two other focus modes. It starts in Single-Servo AF (AF-S) mode then changes to Continuous-Servo AF (AF-C) mode if your subject starts moving. Why shouldn’t you use this all the time, then? Well, if you are focusing and then recomposing, as you may often be doing, your movement of the camera may fool it into thinking that the subject is moving and your resulting focus may not be where you want it to be, or may not be as accurate as it might be if you are using Single-Servo AF.
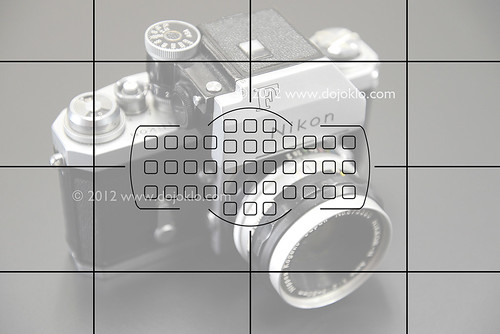
The arrangement and position of the 39 AF points of the Nikon D600, shown with the optional viewfinder grid display.
Manual Focus
Sometimes you may be taking several photos of the same subject from the same distance, or for some other reason want to keep the same focus distance and not have to keep re-focusing and re-composing. Or you may be taking multiple photos for a panorama. In these situations, turn off the auto-focus on your lens by switching from AF to M with the camera’s Focus Mode Selector switch and with the A/M switch on the lens itself. Just remember to switch them back when you are finished. You may also wish to do this if you want to precisely manually focus with the focus ring on your lens. For lenses with “full time manual focus” however, you don’t need to switch to M in order to manually override the autofocus with the lens focus ring. These lenses will have M/A and M on the lens focus mode switch instead of A and M.
Autofocus Area Modes
The Autofocus Area Modes are used to set if just a single AF point is active or else how many AF points surrounding your selected AF point will be used to maintain focus or to track a moving subject if you are using AF-C or AF-A Autofocus Modes.
Single-Point AF
Only one AF point will be active, and surrounding AF points will not become active to maintain focus or to track a subject that moves away from the one selected point. This is typically used along with Single-Servo AF (AF-S) to focus on a stationary or still subject, or in a situation where you will be reframing the shot after you lock focus at a specific distance. It can also be used with accuracy with AF-S mode for moving subjects if you take the photo quickly or if you recompose and take the shot quickly after locking in focus, especially if the camera-to-subject distance does not change at all or very much in that period between locking focus and taking the photo. Use the Multi Selector to choose your active AF point as you look through the viewfinder and use the OK Button to quickly select the center AF point. Also, remember that Custom Setting a6 allowed you to choose between having all 39 AF points available or to limit the camera to 11 AF points. If you are just starting out with manually selecting a single Focus Point, you may wish to limit them to 11 now, and when you get the hang of it or when you are using one of the other AF Area Modes described below, increase it to 39 to take full advantage of all the AF points of the D7000 autofocus system. If you choose Single-Point AF with Continuous-Servo AF (AF-C) or Auto-Servo AF (AF-A) for tracking moving subjects, it will only track the subject as long as it is positioned at the selected AF point, and it will not be tracked laterally to the other, surrounding points. In other words, the single AF point you select will track a subject if it moves closer or farther away, but the AF system will not follow or track the subject if it moves left, right, up, or down and away from your selected AF point. To do this, you use Dynamic-Area AF Mode or 3D-Tracking.
Dynamic-Area AF
With the Dynamic-Area AF Modes, you select an AF point to tell the camera where to autofocus, and if your subject briefly moves away from that point to a neighboring point or if you lose the subject from your AF point while panning, the camera will use the surrounding AF points to help maintain focus on it. Select one of the Dynamic-Area AF options (below) when you are photographing moving or potentially moving subjects using Continuous-Servo AF (AF-C) or Auto-Servo AF (AF-A). These modes are ideal for a subject moving closer or further from the camera but which may also move laterally away from the selected AF point faster than you can react in order to keep it located at that point, or for when you are panning and following the subject and attempting to keep it located at the selected AF point, but may have a little or a lot of difficulty doing so. Remember that you need to keep the Shutter Button half-pressed in order for the continuous focusing at the initial point or the surrounding points to occur. Note that the camera may pick up and start tracking a new subject that falls under the selected AF point if you lose your initial subject, in part determined by your setting for Custom Setting a3.
9-Point Dynamic-Area AF will use the immediate surrounding AF points to help maintain focus on a subject that briefly leaves the selected AF point. This can be used with predictably moving subjects, like a runner or vehicle moving towards you or one that you can easily follow laterally by panning.
21-Point Dynamic-Area AF will use even more of the surrounding AF Points, more than half the total AF Points, to help maintain focus on a subject that briefly leaves the selected AF point. This should be used for more unpredictably moving objects, like sports players on a field, which may quickly move further away from your selected AF point before you have a chance to realign that point over the subject.
39-Point Dynamic-Area AF (or 51-Point Dynamic-Area AF with the D7100) will use all of the 39 AF points (or 51 points) to help maintain focus on a subject that briefly leaves the selected AF point. It can be used for very quick and unpredictably moving subjects, like pets, birds or other wildlife, and all 39 AF points will be used to maintain focus on the subject as you attempt to realign the selected AF point with the subject.
The Dynamic-Area AF Modes are not used to track and maintain focus on a subject that is moving across the various AF points in the frame, but rather are used to stay focused on a moving subject that you attempt to keep located at your selected AF Point. To track a subject that is moving across the frame, intentionally passing from one AF point to the next, use 3D-Tracking.
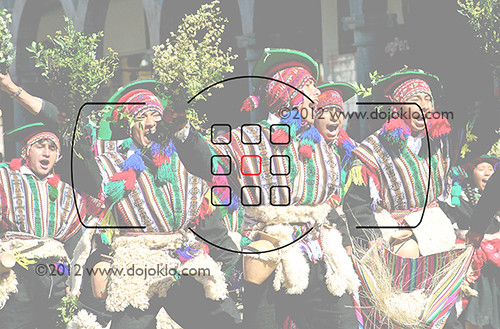
A simulated image of the Nikon D5200 viewfinder, showing the autofocus focus points active with 9-Point Dynamic Area AF area mode, when the center AF point is selected. (Image shown at 50% opacity to better view AF points.)
3D-Tracking
This mode is used for subjects moving across the frame in any direction, or subjects moving erratically from side-to-side in the frame, and they are tracked by areas of color. This is used when you don’t wish to necessarily pan or follow the subject to keep it located in the same part of the frame, but rather when you wish to keep the camera relatively still as the subject moves across the frame. You may select this option when you are tracking and photographing moving subjects using Continuous-Servo AF (AF-C) or Auto-Servo AF (AF-A). Again, you choose the initial AF point to locate the subject and begin the tracking. If the area of color you wish to track is too small or if it blends into the background, this mode might not be very effective.
Auto-Area AF
The camera uses all 39 AF points to detect what it thinks is the subject and automatically choose the appropriate AF point(s). Typically, the camera will select the nearest subject or a human in the frame, so it may not focus on exactly what you wish to focus on. That is why it is best to use one of the other modes and select the AF point yourself.
Group Area AF
The Nikon D810 and D4s include the Group Area AF autofocus area mode, which makes use of a group of 5 AF Points arranged in a cross-shaped pattern. And instead of selecting a primary point with the surrounding points being “helper points,” you will actually be selecting the group of five points, which will all be used to attempt to focus on the subject. Unlike the other AF Area Modes with multiple points, the Viewfinder will actually display the four outer points of the group, but for some reason not the central point – perhaps so that you can better view the subject.
Keep in mind that with the other somewhat similar Dynamic Area AF modes, you choose a primary point and attempt to keep the subject located at that point, and the surrounding points act as “helper” points if the subject happens to move away from the primary point. But with Group Area AF you select the entire group of AF Points, and they all work equally to focus on the subject. This mode can be used similar to Single Point AF but when it might be challenging to locate the subject under an individual point. When working in AF-S Focus Mode and using Group Area AF, the selected AF points will give priority to faces if they are present, otherwise they will focus on the closest subject.
The next step is to learn to lock focus independent of locking exposure, and customize the camera’s controls to perform these functions how you wish. But you are going to have to have a look at my e-book guides Nikon D7100 Experience, Nikon D7000 Experience, Nikon D600 Experience and Nikon D5200 Experience to learn about this and many other important functions of your sophisticated Nikon D600, D5200, or D7000!
To learn about another important reason why you need to take control of your autofocus system, see the related post:
Don’t Let the Locations of the AF Points Dictate Your Composition
What do you do when, with your desired framing, your subject is not located exactly under or near an AF point? Even with all the AF points of an advanced Nikon D7000 and D600, this will often be an issue. Have a look at the above post to learn why this is an issue and how to resolve it.
Still need to purchase your D7100, D7000, D5200 or D600. Please use my links to have a look at them on Amazon:
Nikon D7100 24.1 megapixel DX format dSLR camera
Nikon D7000 16.2 megapixel DX format dSLR camera
Nikon D600 24.3 megapixel full-frame FX format dSLR camera
Nikon D5200 24.2 megapixel DX format dSLR camera
Was this post helpful? Please let others know about it by clicking the Facebook or Twitter sharing buttons below, linking to it from your blog or website, or mentioning it on a forum. Thanks! Want to help support this blog with no cost or effort? Simply click on the Amazon, B&H Photo, or Adorama logos on the left side of this page to go to those sites and make your purchases. They will then give me a little referral bonus!


