Comparing the Nikon D600 vs. D7000 vs. D300s:
I’ve written a previous post comparing the Nikon D7000 vs D90 vs D300s, as well as one comparing the current Nikon dSLR line-up of the Nikon D7000 vs. D5100 vs. D90 vs. D3100. Now that the full frame Nikon D600 has been introduced (and almost immediately made available for sale), I need to revisit these comparisons to include this latest Nikon dSLR. I am going to focus on the D600 vs D7000 vs D300s here, with some D90 specs thrown in, but leaving out the D5100 plus the more expensive D800 full frame (FX) model for now until I get the chance to incorporate them into the discussion.
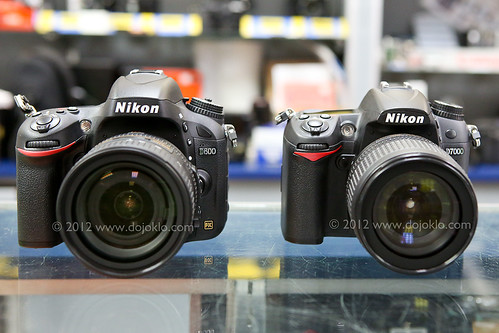
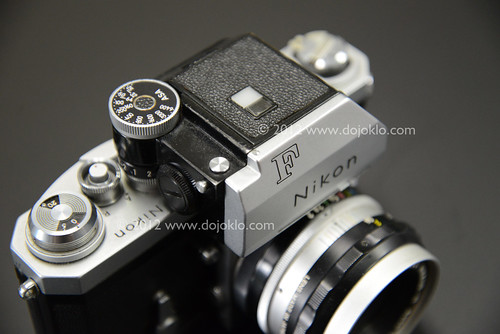
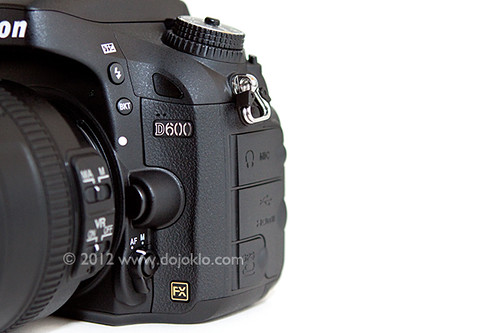
Nikon D600 vs Nikon D7000 – comparison of body size and controls of the full frame FX vs the APS-C sized DX format dSLR cameras – image by author, courtesy of Newtonville camera of Newton, Mass.
The introduction of the full frame (a.k.a. FX format) sensor sized Nikon D600 has expanded the Nikon dSLR line-up, and perhaps made it even more challenging to determine which camera is right for you. To get a sense of where the D600 sits, it is designed to be the first full frame dSLR aimed at the photography “enthusiast” – in both features and price (about $2100). (Full frame or FX format means that the sensor is the same size as a frame of 35mm film.) It does not have quite all the features, continuous frame rate speed, larger and more rugged body, external controls, and customization options as a professional level dSLR like the Nikon D800, yet it still offers more than enough in terms of image quality, features, controls, and durable construction for most any serious enthusiast. I would even contend that it is plenty capable as a semi-pro’s full frame body or second body, or even a smaller, lighter weight option for sometime-use by a pro.
Sitting Between the D7000 and D800: The D600 has been described by Nikon as sitting between the APS-C sensor sized (DX) D7000 and the full frame (FX) D800. What that means is that, first, it has the approximate size, weight, and “feel” of the pro-sumer D7000. This “FX camera in a DX body” is a desirable feature for a lot of photographers, especially those carrying and using their camera all day such as when traveling. Plus it incorporates the sophisticated and customizable 39 point autofocus system of the D7000, along with that camera’s “user-friendly” interface and controls (the autofocus system has actually even been improved over the D7000 in terms of greater sensitivity). This makes it an easy transition for D7000 users wanting to go full frame, or wanting to simultaneously work with both bodies. Yet is also boasts some technology borrowed from the higher end D800 like the HDMI output, uncompressed video recording, and improved exposure metering.
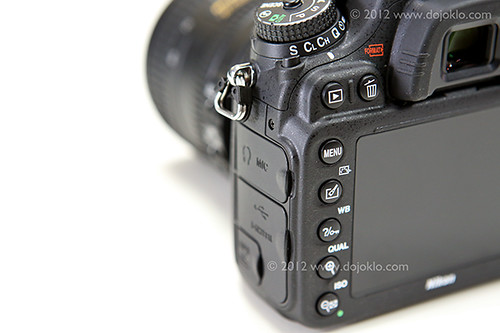
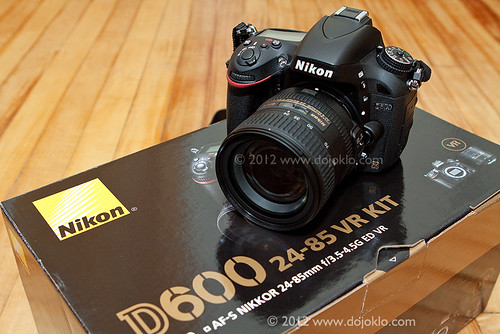
Detail of the Nikon D600 full frame dSLR camera – image by author
The Second Highest Rated Sensor: Previously, in order to offer a high-quality, fully featured yet affordable camera for enthusiasts and semi-pros, the compromise was a smaller sensor – the APS-C sized sensor (or what Nikon calls the DX format) which is about two-thirds of the size of a full frame sensor. Larger sensors have always been desired for several reasons: they typically deliver better performance in terms of improved resolution, increased dynamic range, and improved low light / high ISO performance. In other words, the images have much better detail and can withstand serious cropping, display a fuller range of colors and tones, and are cleaner with less digital noise, especially in low light situations. And indeed the sensor of the D600 lives up to these expectations – in fact it is the second highest rated sensor on DXOmark, behind only the Nikon D800E and D800 (the D800E is the D800 without the anti-aliasing filter in front of the sensor). So in terms of image quality for the price, the D600 really can’t be beat at this point.
The full frame sensor will also affect the field of view of your lenses. For those moving from an APS-C sized (DX) sensor camera to a full frame body, a 50mm lens will now act as a true 50mm lens – no more 1.5x crop factor to consider. This means that your wide angle lenses will now act as true wide angle lenses, but your telephoto lenses will no longer have quite as much reach as you may be used to. But in the interest of lens compatibility, Nikon DX lenses can be used with the D600 and the camera will automatically crop the images as if using a DX sized sensor (so the sensor is reduced to 10.5 MP).
I first introduced the Nikon D600 in my post The First Affordable Full Frame dSLR, and there you can learn about a lot of the camera’s specifications and what they mean as far as real-life photographic use. Here I will try to spell out the difference in specs and how that might affect your choice. As I always like to point out, when you are trying to determine which camera to purchase or upgrade to, you need to first consider and determine your needs, and then see which camera fills those needs. Not the other way around where you look at the new features and speculate if you really need or will use them. The latest cameras almost always have more impressive features and specifications than the preceding models, but if your needs and shooting style don’t required those upgrades then it is possible that you can save some money and be completely happy with a less expensive or earlier model (and spend your money on better lenses!)
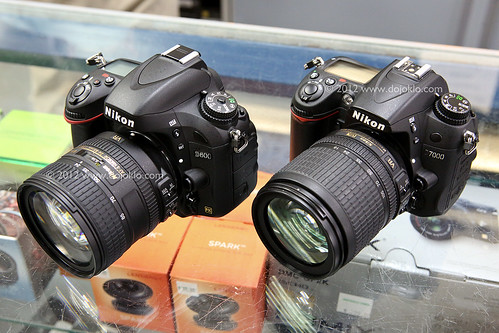
Nikon D600 vs Nikon D7000 – comparison of body size and controls of the full frame FX vs the APS-C sized DX format dSLR cameras – Click on this image to have a closer look. Image by author, courtesy of Newtonville camera of Newton, Mass.
Sensor and Image Quality: The image sensor of the D7000 was greatly improved over both the D90 and the D300s, and now the sensor of the D600 is an even greater leap. The D7000 has 16.2 megapixels, where the D90 and D300s each have 12.3 megapixels. The D600 boasts 24.3 megapixels. In addition to its dramatic improvement in resolution, I noted above the other image quality advantages of a full frame sensor, as well as how that will affect your lenses’ field of view. This increase in resolution will also allow for more intrusive editing of the files in Photoshop, the ability to crop a picture and still obtain an image with high enough resolution for printing or display, and allow for larger prints. You can have a look at dxomark.com to compare the sensors – run your mouse along the red-to-green color bar to the right of the Measurement graphs (such as Dynamic Range) to see how these differences affect images. You can see from the charts that there are some significant improvements over the sensor of the D7000.
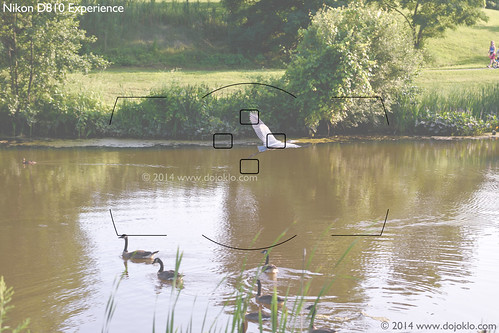
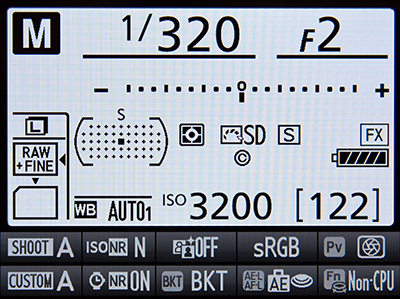
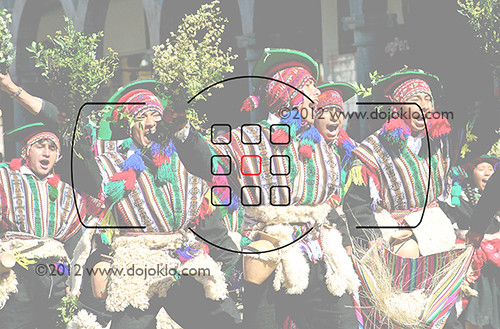
Exposure Metering: As with the D7000, the D600 has a 2016 pixel RGB metering sensor – although Nikon has stated that this latest version is improved over the D7000. Both of these are certainly improved compared to the D90 and D300s, and will result in better TTL metering performance of straightforward and complex lighting scenes, such as back-lit situations. All of these Nikon cameras offer Matrix metering, Center-weighted average metering, and Spot metering. With center-weighted metering, the D600 offers the option of an 8, 12, 15, or 20mm center circle for its weighting, or simply an old-fashioned Average reading. The D90 makes use of your choice of a 6, 8, or 10mm center circle for its weighting, while the D7000 and D300s add a 13mm circle option to that. A nice feature of Nikon dSLR cameras is that the Spot Metering is linked to the active AF Point, so in the image below, the AF Point was placed on the subject’s face, and the camera determined metering there (rather than requiring me to first meter where I wanted and then lock the exposure as Canon Spot Metering requires).

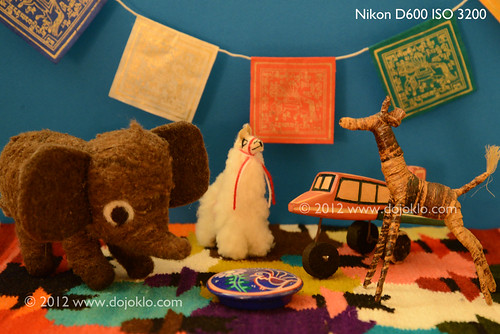
Nikon D600 – Use of Spot Metering and Active-D Lighting in severe backlit situation. As you can see, you still need to know how to make use of the metering modes and determine a proper exposure, as the camera can’t perform magic. Use of fill flash in this situation resulted in better exposure and contrast on the subject.
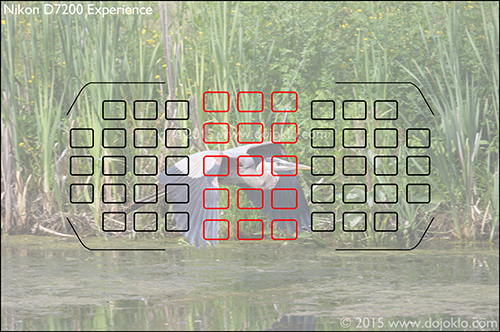
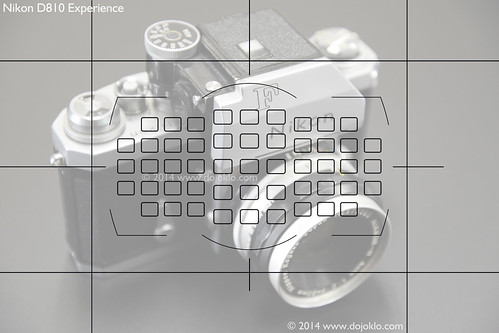
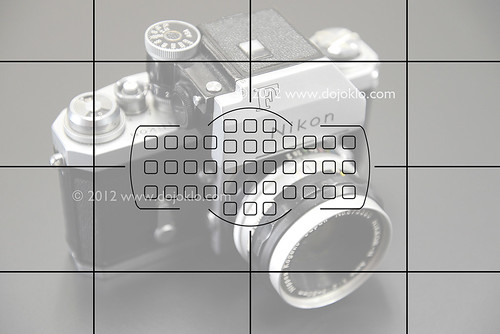
Autofocus: The autofocus system of the D600 is similar to the D7000 AF system, with its 39 AF points and 9 more sensitive cross-type points (clustered in the center). However, you can see that the AF points are spread much more widely across the viewfinder with the DX sized D7000:
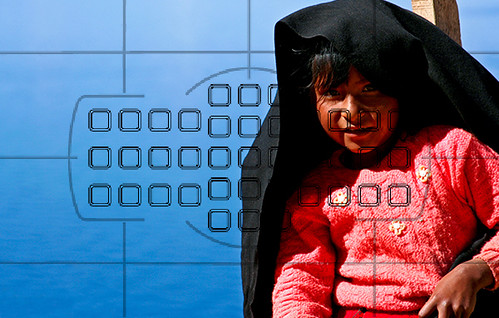
Simulated view of Nikon D7000 viewfinder, showing the location of all the autofocus AF points (and the viewfinder grid that can be turned on or off)- image by author.
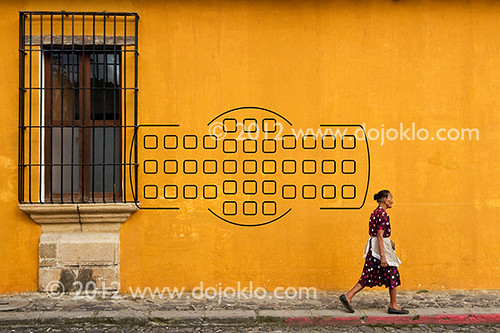
Simulated view of Nikon D600 viewfinder, showing the location of all the autofocus AF points (viewfinder grid not show but is available to view)- image by author.
Each of these above images show the full simulated framing as seen in the viewfinder, and you can clearly see how the 39 AF Points of the D600 are limited more to the central area of the frame. This means that you are likely going to have to do some significant “focus-lock and recomposing” as you create interesting compositions where the subject is off-center. This will also impact the use of the AF Points when using AF-C Continuous Autofocus Mode to track moving subjects. The moving subject will have to remain within the area of the AF Points in order for the camera to continue tracking it, so you will have to move the camera around to follow the subject more closely. This again is going to seriously limit your compositions when using AF-C and tracking a subject, as the subject is always going to have to be located in the central part of the frame. If you are a serious action, sports, bird, or wildlife photographer, you are going to have to seriously consider if this AF Point arrangement of the D600 is going to work for you. Or else consider using the camera in DX Crop “mode,” where you use just a DX-sized portion of the sensor to capture the image. Although you will only be making use of 10 megapixels, the AF Points will in effect be spread out over more of the frame, more similar to what you see in the D7000 viewfinder.
As mentioned above, the 39 AF Points of the D600 are more sensitive than those of the D7000, with 33 of them sensitive down to f/8. This means when you use a teleconverter (such as with a long lens in order to turn a 200mm lens into a 400mm lens) which reduces the effective maximum aperture of your lens by a stop or 2 or 3, you can sill make full use of most of the AF Points. As with the D7000, you can limit the number of selectable AF Points to 11 if you prefer to manually select your AF Point (as you typically should) and you find 39 too many to contend with. Since the AF system of the D600 as well as its controls and autofocus Custom Settings are so similar to the D7000, you can have a look at this post Taking Control of your D7000 Autofocus System to begin to learn how to get the most out of it. The AF systems of the D600 and D7000 (and D300s) allow for you to use the numerous autofocus points in various ways to best capture still subjects (typically using AF-S autofocus mode) or track and capture moving subjects (using AF-C autofocus mode), including Automatic AF point selection, Single Point AF, and Dynamic Area AF using your choice of 9 points, 21 points, all points, or all points with 3D-Tracking.
Regarding the D90 and D300s, the autofocus system of the D90 has 11 autofocus (AF) points with only the center one being the more accurate cross type. The D300s offers 51 AF points with 15 being cross type, and thus is ideal for sports, action, and wildlife – although it has begun to become outdated and superseded by many of the other features of the D7000.
 Brief commercial interruption: I would like to mention that I have written an e-book user’s guide for the D7000 called Nikon D7000 Experience, and will be offering an e-book guide for the D600 – Nikon D600 Experience. The guides discuss not only how to use the features, controls, autofocus systems, and various settings of the cameras, but more importantly when and why to make use of them in your photography. They also explain the metering modes, aperture and shutter priority modes and manual shooting, focus lock, exposure lock, and more. Plus they describe all of the Menu options and Custom Settings, with recommended settings. Learn more about my Full Stop dSLR camera guides here!
Body, Construction and Size/ Weight: The D600 and D7000 (and even the older D90) appear very similar at first glance, and both have a rugged partial magnesium alloy body (top and rear) with a polycarbonate front. However, the D600 is actually slightly lighter than the D7000: 1.68 lbs. vs 1.7 lbs. The D300s is slightly larger than the other 2 bodies, and weighs in at 2.2 lbs, with full magnesium construction. The sturdier construction of the D600 and the D7000, including their nice rubber gripping surfaces, creates the feel of a more professional body. The D600, D7000, and D300s all have weather sealing at the memory card and battery doors. The D600 has a slightly larger rear LCD Monitor at 3.2″ vs. the 3″ rear LCD screen of the D7000 and D300s.
ISO: As mentioned in the Sensor/ Image Quality section above, the high ISO performance of the D600 is improved over the D7000, which was already improved over both the D90 and the D300s. The tests at dxomark.com tell this story. The native ISO range of the D600 and D7000 is 100-6400 expandable up to 25,600. The D300s and D90 have a native ISO range of 200-3200 expandable to 6400. This means that with the D600 you can use high ISO settings when required, such as in low light situations, and not have any difficulty with digital noise, particularly in the shadow areas of images. You can view my informal ISO test images on this post of Nikon D600 ISO Test Sample Images to see the excellent high ISO performance when shooting JPEG images.
Controls: The controls of the D600 are very similar to the D7000, with some minor changes such as the locking Mode Dial switch (a nice touch), the different Live View / Movie switch and relocated Record Button, and in the “why did they do that?” category the reversing of the zoom in and zoom out buttons. The Multi-Selector thumb pad size has also been reduced on the D600, which I find to be less comfortable than the larger D7000 Multi-Selector. Overall, all of the controls are easily accessible, user friendly, and quick and easy to access and use for changing settings on the fly. Many controls make use of a button press and then either of the Command Dials to change the setting. For example, press the AF-Mode Button at the base of the lens and then turn the Main Command Dial to change the AF Mode or the Sub-Command Dial to change the AF Area Mode, as you look on the top LCD Control Panel to see your choices. I found myself always intuitively turning the wrong dial in conjunction with the ISO Button, but that will just take some practice (one dial enables Auto ISO while the other changes the ISO setting).
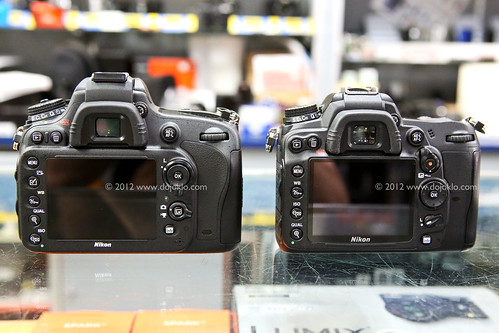
Nikon D600 vs Nikon D7000 – comparison of body size and controls of the full frame FX vs the APS-C sized DX format dSLR cameras – image by author, courtesy of Newtonville camera of Newton, Mass.
The D300s has entirely different switches, dials, and buttons than the D600 and D7000, however this allows for quicker and easier direct access to a few more features and settings on the D300s. As with the D7000, the D600 offers two customizable user settings (U1, U2) on the mode dial for pre-setting a combination of camera settings and Custom Settings. For example, you can set up your camera for landscape photography with all the settings you use for that and assign these settings to U1, and then configure your camera for studio/ portrait use and assign that combination of settings to the U2 mode. You can also assign numerous functions of your choice to certain buttons such as the Fn Button, such as quickly and temporarily changing to Spot Metering Mode or turning on the built-in level display.
Wireless Flash: All of these Nikon cameras allow for advanced wireless lighting using the built in flash as a remote Commander for Nikon Speedlights, allowing you to make use of and remotely control simple or complex off-camera lighting set-ups.
Viewfinder: As with the D7000 and D300s, the D600 has a large, bright 100% optical viewfinder coverage.
Processor: The D90 and D300s have the Nikon Expeed Processor, the D7000 has the improved Expeed II processor, and the D600 boasts the speedier Expeed 3 processor. This allows for more video options including full 1080p HD at all the frame rates and overall faster processing of stills and video files especially when using in-camera processing features while shooting such as Vignetting Control or High ISO Noise Reduction. The fast processor also allows for quick results when taking in-camera HDR or Multiple Exposure images.
Continuous Shooting Speed: The D600 can shoot at a maximum continuous frame rare of 5.5 frames per second (fps) up to 100 images when shooting JPEG or up to 16 images when shooting at the best RAW setting. This allows you to capture exactly the right moment of an action situation, or a rapidly changing expression on a subject. The D90 can shoot 4.5 frames per second (fps) up to 100 images, the D7000 shoots 6 fps up to 100 shots, and the D300s shoots 7 fps – or 8fps with the battery grip. If you often capture action and really need the highest frame rate, such as for sports or wildlife shooting, you are going to have to seriously consider the D300s or D800 over the D600. Otherwise, 7 or 8 fps is often complete overkill in typical real-life use.
Memory Card: Like the D7000, the D600 accepts 2 SD cards, where the second card can be used in a variety of ways: overflow, JPEG on one / RAW on the other, or mirrored backup of the first card. The D300s uses 1 CF card and 1 SD card, which also can be configured in a variety of ways. The second card can definitely come in handy if one is shooting a lot of still and video files or wants instant back-up of all images. There is a “trick” for choosing which memory card slot is viewed during image playback: Press and hold the BKT Button and then press Up on the Multi-Selector and follow the prompts to make your choice.
Battery: The D600 and D7000 both use the high capacity EN-EL15 battery, which will last for over 1000 shots. TheD600 accepts the optional, new MB-D14 battery grip for the use of two batteries – and to perhaps make the camera more comfortable for some users particularly when using larger lenses or working often in portrait orientation. Similarly, the D7000 accepts the optional MB-D11 battery pack/ vertical grip, and the D300s uses the EN-EL3e battery and the optional MB-D10 battery pack/ vertical grip. The D90 also uses the EN-EL3e battery and its optional battery pack/ vertical grip is the MB-D80.
Full HD video: The D600 offers full HD video with manual control and all the usual frame rates (1080p at 30/25/24 fps and 720p at 60/50/30 fps), for up to 20 minutes of recording at the highest settings. As with stills, you can switch to DX (as if you were using a smaller DX sized sensor) for a “telephoto boost,” and it is capable of full time autofocus, though most dedicated videographers still prefer manually focusing. The camera records mono audio but is compatible with optional stereo mics, and has a headphone jack for audio monitoring. The D90 and D300s offer 720p video at 24 fps, with a 5 minute shooting time. The D7000 improved upon that with full 1080p HD video at 24 fps for up to 20 minutes with full-time continuous autofocus. Plus it offers 720p at 30, 24, and 25 fps.
Price: Just under $2100 – may vary slightly at different retailers.
Shooting Experience: The D600 feels and performs absolutely wonderfully. Its body and controls are comfortable and responsive in the hands, with the exception of what I think is a too-small Multi-Selector pad. All controls are easily accessible for quickly changing all the essential settings such as autofocusing modes, ISO, white balance, metering modes, bracketing, etc. The Shutter Button is thankfully less sensitive than that of the D7000, thus allowing focus lock or exposure lock using a half-press, without accidentally taking the shot. The Matrix Metering works great to properly determine exposure in a wide variety of situations, and the Auto White Balance even captures sunset colors nicely rather than turning them into less warm daylight colors as many previous cameras might have done. The D600 has carried over all of the nice touches from the D7000 such as the optional grid in the viewfinder, the ability to limit the AF points to 11 – for quicker manual selection, the ability to change the continuous low shooting speed between 1 to 5 shots (which Canon has yet to do on their non-pro cameras), and the versatility to change the size of the central spot size for center weighted metering.
Choosing a Camera: So which camera is best for your needs? At this point I would be hesitant to recommend to D300s to most users, simply due to the fact that it is an “older” model. While it is still a highly capable camera, the image resolution and many of the features have been improved upon by the current models. So if you plan to use your dSLR for several more years, just consider how “outdated” it will be in 4 more years.
The D600 and D7000 are similar in so many ways that a big part of the decision comes down to the full frame sensor vs. the APS-C sized sensor. Of course the D600 has improved resolution, dynamic range, etc, but remember that all that is relative. You can still capture excellent, professional quality images on the D7000, or even the D90. Pixel peepers will certainly find a difference, but it may not be significant enough for many users. The full frame will also allow you to capture wider more sweeping views with your wide angle lenses, and indirectly more dramatically shallow depth of field.
This is because depth of field is affected by not only your aperture setting but also by the camera-to-subject distance. So say that you were to use the full frame D600 to frame a shot with a 50mm focal length and f/2.0 aperture, from 10 feet away. To “recreate” this same shot with the APS-C sensor-sized D7000 and a 50mm focal length, you would have to back up several feet to have the same field of view. The full frame sensor will capture a wider field of view, while the APS-C “crops” the scene due to its smaller size. Even though you use the same f/2.0 aperture setting, the depth of field does not appear as dramatically shallow because the camera-to-subject distance has increased. So…indirectly…a full frame camera can contribute to more dramatic depth of field. (However, this all gets a bit more complicated and a lot of photographers, including myself until recently, misunderstand the role of the focal length in this – namely that it does not affect this issue: http://www.bluesky-web.com/dofmyth.htm)
However, since the autofocus points of the D600 are grouped more closely to the center of the frame, they are not as useful as the more widely spread AF points of the D7000 for tracking and capturing moving subjects when working in AF-C autofocus mode. If you intend to shoot lots of sports, action, birds or other wildlife, the D7000 may work better. The faster continuous frame rate of the D7000 will greatly assist with action photography as well. Plus the D7000’s DX sensor will “extend” the reach of your telephoto lenses in these situations. You can always use the D600 in DX Mode to “widen” you AF point spread and “extend” your telephoto reach, but the tradeoff is that you will only be using 10 megapixels of your sensor.
Purchasing these cameras: If you plan to buy any of these cameras, accessories, or anything else through Amazon.com or B and H Photo, I would appreciate it if you use my referral links. Your price will be the same, and they will give me a little commission for referring you, which will help support my blog. Thank you for supporting my efforts!
Order your D600 today on Amazon or B and H – it is already available and shipping!
Nikon D600 on Amazon (body only or kit)
Nikon D600 at B and H Photo – body only
Nikon D600 at B and H Photo – with the 24-85mm f/3.5-4.5G ED VR Lens

Purchasing from the UK? Use my Amazon UK referral link here.
Brief commercial interruption: And don’t forget, I will be offering an e-book guide for the D600 – Nikon D600 Experience. The guide discusses not only how to use the features, controls, autofocus systems, and various settings of the cameras, but more importantly when and why to make use of them in your photography. It also explains the metering modes, aperture and shutter priority modes and manual shooting, focus lock, exposure lock, and more. Plus it goes over all of the Menu options and Custom Settings, with recommended settings. Learn more about my Full Stop dSLR camera guides here!