The First Nikon D610 guide, Now Available!

Nikon has recently introduced the full-frame Nikon D610, an update to the popular and powerful D600. The new model has some small but significant upgrades, and I’ve taken the opportunity to update my guide for this new D610, with additional explanations and lots of new images.

Nikon D610 Experience, my latest Full Stop e book and the first D610 user’s guide, is now available! This e book goes beyond the manual to help you learn the features, settings, and controls of the powerful and highly customizable Nikon D610. Plus most importantly it explains how, when, and why to use the functions, settings, menu options, and controls in your photography – including the sophisticated autofocus system and the in-camera features such as Multiple Exposure, HDR, and Time-Lapse Shooting.

Nikon D610 book manual guide how to autofocus settings menu custom setup dummies learn use tips tricks

Written in the clear, concise, and comprehensive style of all Full Stop dSLR guides, Nikon D610 Experience will help you learn to use your full-frame D610 quickly and competently, to consistently create the types of images you want to capture. This e-book is available in either PDF or EPUB format for reading on your computer, tablet, iPad, e-reader, etc.

Learn more about it, view a preview, and purchase it here:

http://www.dojoklo.com/Full_Stop/Nikon_D610_Experience.htm

As one reader has said about Full Stop guides, “I don’t know how I could fully take advantage of all the features the camera has to offer without this publication! It’s well-organized, easy to understand, and succinct enough to keep your attention while still containing a wealth of information to get the most out of your camera.”

Nikon D610 book manual guide how to autofocus settings menu custom setup dummies learn use tips tricks   Nikon D610 book manual guide how to autofocus settings menu custom setup dummies learn use tips tricks

Take control of your Nikon D610, the image taking process, and the photos you create!

This guide is designed for Intermediate and Enthusiast dSLR Photographers who wish to take fuller advantage of the capabilities of the camera to go beyond Auto and Program modes and shoot competently in A, S, and M modes; take control of the sophisticated 39 point autofocus system; learn how, when, and why to use the controls, buttons, and features of the D610, and much more. It covers basic dSLR camera functions and exposure concepts for those learning digital SLR photography, and explains more advanced camera controls and operation such as using the various metering modes and exposure compensation for correct exposure of every image.

For experienced photographers coming to the D610 from previous models, this guide explains the new and advanced features to quickly get you up and running and taking advantage of these capabilities, including the advanced 39 Point Autofocus System and its Autofocus Modes, AF-Area Modes, Menu options and Custom Settings. Plus it explains the camera controls, the in-camera HDR, Multiple Exposures, Interval Timer and Time-Lapse Shooting features, introduces the settings and controls of the HD video capabilities, and guides you through all the Menu and Custom Settings options to help you set up the camera for your specific needs.

Nikon D610 book manual guide how to autofocus settings menu custom setup dummies learn use tips tricks   Nikon D610 book manual guide how to autofocus settings menu custom setup dummies learn use tips tricks

Nikon D610 Experience focuses on still-photography with an introduction to HD video in order to get you up and running with shooting movies, including the movie settings and menu options. Sections include:

  • Setting Up Your D610 – All of the D610 Custom Settings and Playback, Shooting, and Setup Menus, including Movie Mode Menus, with explanations and recommended settings for practical, everyday use. Set up and customize the advanced features of your dSLR to work best for the way you photograph.
  • Aperture Priority (A), Shutter Priority (S), and Manual (M) Modes – How and when to use them to create dramatic depth of field, freeze or express motion, or take total control over exposure settings.
  • Auto Focusing Modes and Area Modes and Release (Drive) Modes – The 39 point D610 autofocus system is a is a powerful tool, and taking control of it will enable you to successfully capture more sharp images, especially in action situations. Learn the AF Modes, AF Area Modes, and AF Custom Settings, how they differ, how and when to take advantage of them to capture both still and moving subjects. Plus how and when to use focus lock and back-button focusing techniques.
  • Exposure Metering Modes of the Nikon D610 – How they differ, how and when to use them for correct exposures in every situation, and how to customize them for your needs. Also how to make use of exposure lock.
  • Histograms, Exposure Compensation, Bracketing, and White Balance – Understanding and using these features for adjusting to the proper exposure in challenging lighting situations, and setting custom white balance.
  • The Image Taking Process – Descriptive tutorials for using the settings and controls you just learned to take photos of both still and moving subjects.
  • Photography Accessories – The most useful accessories and books for day-to-day and travel photography including accessories specific to the D610.
  • Composition – Tips, techniques, and explanations, including the creative use of depth of field.
  • Introduction to Video Settings – Settings and explanations to get you started shooting HD video.

Nikon D610 book manual guide how to autofocus settings menu custom setup dummies learn use tips tricks   Nikon D610 book manual guide how to autofocus settings menu custom setup dummies learn use tips tricks

This digital guide to the Nikon D610 is a 260 page illustrated e-book that goes beyond the manual to explain how, when, and why to use the features, settings, and controls of the D610 to help you get the most from your camera.

Learn more about Nikon D610 Experience, view a preview, and purchase it on my Full Stop website here:

www.dojoklo.com/Full_Stop/Nikon_D610_Experience.htm


Tips and Tricks for the Nikon D7100 – part 1

As you are likely discovering with your Nikon D7100, it is a highly customizable and versatile camera, and there are a lot of Menu options and Custom Settings that you can make use of in order to fine-tune the camera to perfectly fit your needs, shooting style, and scene or situation. The autofocus system and exposure metering system can be adjusted according to your needs and desires, the camera controls can be customized and assigned to a variety of functions, the displays, White Balance, and ISO can be tweaked according to your preferences. I’ve spent a considerable amount of time with the D7100 as I researched and wrote my e-book user’s guide to the D7100 called Nikon D7100 Experience, and below are the some of the top “tips and tricks” I’ve discovered for setting up and photographing with this powerful dSLR.  I previously put together a similar “D7000 Tips and Tricks” post for the Nikon D7000, and all of those tips apply to the D7100 as well.  I have repeated a couple of the important ones, and added several new ones here (in no particular order). Since this has turned into such a long post, I am dividing into two parts (Part 2 coming soon…)

Nikon D7100 body book manual guide dummies how to tips tricks setting menu quick start
Detail of the Nikon D7100 dSLR camera – photo by author

1. Take Control of the D7100 Autofocus System: Before getting into some of the tips regarding features and functions specific to the D7100, one needs to first take control of the basic functions of the camera, including the autofocus system and exposure metering settings. The D7100 boasts a 51 point autofocus system, upgraded from the 39 point system of the D7000. The large number of focus points and their positions in the Viewfinder will allow you to focus exactly where you wish – with minimal recomposing (when working in Single-Servo AF-S mode), plus will better enable you to track moving subjects throughout the frame when working in Continuous-Servo (AF-C) autofocus mode. The various autofocus modes (AF-S, AF-C, etc.) and the autofocus area modes (Single Point, Dynamic Area, etc.) may be intimidating at first, but once they are understood, it is easy to determine which combinations fit your shooting needs. Despite the increase in AF points, the system works nearly the same as that of the D7000, and I wrote an entire post introducing the use of the Nikon autofocus system, its AF and AF-Area modes, and its controls. If you have not previously used the D7000 or D600 you may at first be confused by the autofocus controls with the AF switch / button near the base of the lens (used in conjunction with the Command Dials), but you should quickly find that it is a quick and convenient way to change the AF modes and AF area modes.

Nikon D7100 autofocus, af, system, viewfinder, book manual guide dummies how to tips tricks setting menu quick start
Simulated view of the Nikon D7100 Viewfinder, with all 51 AF points shown for reference.

In addition, the D7100 offers several Custom Settings to customize various aspect of the autofocus system, namely Custom Settings a1-a6. You can use these to tell the camera if achieving exact focus takes priority over maintaining the fastest continuous frame rate, how long the AF system continues to track a specific subject (distance) even if the subject momentarily moves away from the active AF point, and if the active AF points are illuminated in the Viewfinder. You can even limit the number of selectable AF points to 11 if that helps you to more quickly or easily select your desired AF point. Each of these options are explained in my previous Nikon AF system post mentioned above.

2. Take Advantage of the new [i] Button: The D7100 adds the [i] Button (on the rear of the camera) which gives you immediate access to the Information Display screen, where many shooting settings and functions can be viewed and changed. You can press this button to turn on the Information Display on the Monitor and immediately access these settings with the use of the Multi Selector and OK Button. Press the [i] Button a second time or the Info button to “de-activate” the settings and simply view the camera settings on the Information Display Screen. Or, after the Info Button is pushed to display the camera settings of the Information Display screen on the rear Monitor, this [i] Button is pressed to “activate” the screen to enable changing the settings. In addition to the readily accessible camera buttons on the body of the D7100, this [i] Button and Information Display screen can be a quick and easy way to change many of the camera settings without having to dig into the menus, such as Image Area, Active D-Lighting, High ISO Noise Reduction, and Long Exposure Noise Reduction. Plus you can use this screen to quickly access and customize the DOF Preview Button, AE-L / AF-L Button, and Fn Button Assignments.

Nikon D7100 book manual guide dummies how to tips tricks setting menu quick start
Detail of the Nikon D7100 with [i] Button shown – photo by author

The [i] Button can also be used during Live View shooting, Movie shooting, and Image Playback – to quickly access a number of applicable functions.  During Live View shooting it can be pressed to access settings including Image Area, Image Quality, Image Size, Picture Control, Active D-Lighting, Remote Control Mode, and Monitor Brightness. During Movie shooting, the [i] Button will access Image Area, Picture Control, Monitor Brightness, Frame Size and Frame Rate, Movie Quality, Microphone sensitivity, Destination for which SD card slot movies will be saved to, and Headphone Volume. Plus during video playback, the [i] Button is also used to display movie edit options. When reviewing images during Image Playback, the [i] Button will access the Retouch Menu, which will allow you to apply various image edits such as Color Balance, Filter Effects, and Distortion Control.

Nikon D7100 menu display book manual guide dummies how to tips tricks setting menu quick start
Information Display shown on the rear LCD Monitor. Press the [i] Button to “activate” the screen and access/ change various settings. Select and change the settings along the bottom of the screen, such as the Picture Controls shown active and highlighted here.

3. Beware of Menu Conflicts: As with most current dSLR cameras, the D7100 has a couple menu settings and function “quirks” or conflicts that may drive you crazy if you are not aware why they are occurring. Most notably, some settings will be greyed-out or inaccessible in the menus and you will not be able to select them when working in one of the auto shooting modes, if not using an optional accessory, or if a “conflicting” setting is enabled. An example includes HDR shooting, which is not accessible when the camera is set to capture files in the (NEF) RAW or (NEF) RAW+JPEG image formats. Or, since White Balance Bracketing and RAW format are incompatible, if the camera is set for White Balance Bracketing and (NEF) RAW or (NEF) RAW+JPEG image formats, the BKT Button will not allow you to access bracketing. These are actually not arbitrary quirks, but are typically logical conflicts.

Nikon D7100 book manual guide dummies how to tips tricks setting menu quick start
Custom Setting f2: Assign Function (Fn) Button, with the “Press” and “Press+Command Dials” options. Some of the “Press” options shown at right.

Another set of conflicts involves the customization of some buttons (Fn Button, Preview Button, and AE-L/AF-L Button) where you have the option to set a separate Press function (where you simply press the button) and a Press+Dial function (where you press the button and turn a dial in order to change a setting). While it at first seems handy that the D7100 menus separated the Press from the Press+Dial functions thus allowing you more options, you will soon find that most of them conflict, and in reality you will likely only be able to set either a Press function or a Press+Dial function.

4. Extend Your Reach with the 1.3x Crop Mode: Just as the D600 allows you to shoot in either full-frame FX mode or in a cropped DX mode, the D7100 allows you to shoot in full-sensor DX mode or in a cropped 1.3x mode. Using the Image Area menu setting, you can set the D7100 APS-C sized DX format sensor to act as an even smaller sized sensor, with an additional 1.3x crop. While the default DX setting takes advantage of the entire sensor, by enabling the 1.3x crop setting you can change the aspect ratio (very slightly) and angle of view (dramatically) of your resulting images – basically cropping your photos from what you see in the full Viewfinder to what you see inside the 1.3x outline shown in the Viewfinder when this feature is enabled.

Nikon D7100 DX 1.3x crop sensor autofocus af viewfinder book manual guide dummies how to tips tricks setting menu quick start
Simulated D7100 Viewfinder view, showing the full size DX Image Area and the approximate size of the cropped 1.3x image indicated by the black rectangle surrounding the AF brackets. Location of all the Focus Points shown for reference. The 1.3x crop will, in effect, allow you to extend the reach of your lens and get closer to the action, as well as nearly fill the width of the active frame with the Focus Points.

The first advantage of the 1.3x crop is that it will allow you to “get closer” to the action by virtually extending the reach of your lenses. This can be particularly helpful when using a telephoto lens to capture sports, wildlife, or bird images where the subject is at a significant distance from you. It will allow, for example, your 200mm focal length lens to act as nearly a 400mm focal length. (Since the DX frame is already a 1.5x crop sensor in relation to a full-frame 35mm sized sensor, the additional 1.3x crop effectively doubles the focal length of the lens: 200mm X 1.5 X 1.3 = 390mm.)

The second advantage is that with the 1.3x crop, the area of the autofocus points as seen in the Viewfinder reaches nearly to the sides of the effective frame. This will allow you to track and capture a moving subject throughout almost the entire width of the active frame (when using continuous AF-C Focus Mode), or enable you to focus on and capture a still subject most anywhere in the frame without having to lock focus and reframe (when using single-shot AF-S Focus Mode).

A third advantage of working in 1.3x crop mode is that the Continuous High shooting speed goes from 6 fps to 7 fps (when shooting in JPEG or in 12-bit NEF-RAW), allowing you to capture slightly more images in a quick burst.

The disadvantage of the 1.3x crop is that you will only be using 15 megapixels of your 24.1 megapixel sensor, so you will have slightly reduced image resolution. The end result will be as if you cropped the image in post-processing. However, 15 MP is still a very high resolution, and for many shooting situations and image needs this may be more than sufficient.

5. Interval Timer and Time-Lapse Shooting: The Interval Timer Shooting function can be used to take a continuous series of photographs at each specified time interval, for a set number of intervals, with the intervals to begin either immediately or at a set time. It can be used to take these multiple series of shots over several minutes or hours – for example, 3 photos in a row every 10 minutes, for 12 intervals. This will result in a total of 36 photos, as the camera will calculate and show you. This Interval Timer Shooting menu can also be used for time-lapse photography by taking a series of individual photos over an extended period of minutes or hours, with just one photo per interval, which can then be combined into a time-lapse movie (using software designed for this such as Photoshop).

Nikon D7100 book manual guide how to tips tricks interval timer time lapse setting menu quick
Interval Timer Shooting menus. Left: Setting the Interval time period between shots, here set for 10 minutes. Right: Setting the number of intervals and the number of shots to be taken at the start of each interval. Here, 12 intervals are set, with 3 shots to be taken each interval, for a total of 36 shots. The intervals are to start immediately, with the time between intervals as 10 minutes. The current time is 16:17 (which is shown in case you wish to set the Start Time).

Use the Interval Timer Shooting menu to choose all of your desired settings. Ideally, set up your camera on a tripod for the duration of Interval Timer Shooting, and use the included Eyepiece Cap to cover the Viewfinder and prevent stray light from altering the exposure. The camera will need to focus before taking the shots, so it may be best to pre-focus the camera and then set the camera and lens to manual focus.

For time-lapse photography you will need to take images at short intervals, with just one image per interval, for numerous intervals, in order to create a long and effective movie. For example, a photo every 30 seconds, for 8 hours. Be sure to have a large memory card or cards in the camera, and set the Role Played by Card in Slot 2 for Overflow if necessary. In the software you will set the movie frame rate, and that setting (24fps, 30fps, etc.) will determine to total length of the movie. There are time-lapse formulas, as well as apps, which you can use to plug-in your variables and determine either the settings you will need to use, or the resulting length of the final movie.

Here is a link to a tutorial for creating a time lapse movie using Photoshop. There are also plug-ins/ templates for Lightroom which will allow you to assemble and export a time-lapse video using that software (direct link to presets zip file).

The second part of these top ten Nikon D7100 tips and tricks continues here. Also, I explain these features and functions in even more detail, as well as explain all the other aspects of the D7100 in my e-book guide Nikon D7100 Experience, available on my Full Stop website. The guide not only explains the features, functions, and controls of the camera, but more importantly explains when and why you will want to use them in your photography. Take control of your D7100 and the images you create! Click the cover below to learn more, preview, and purchase the guide.

Nikon D7100 book manual ebook field guide dummies how to use learn instruction tutorial

Still looking to purchase your D7100 or some lenses or accessories for it? Please consider using my affiliate links for Amazon or for B and H, found at the left side of this page – thanks! And please feel free to spread the word if this blog has been helpful.

The First Nikon D7100 e book user’s guide Now Available!

Nikon D7100 Experience, my my recent Full Stop e book and the very first D7100 user’s guide, is now available! This e book goes beyond the manual to help you learn the features, settings, and controls of the powerful and highly customizable Nikon D7100. Plus most importantly it explains how, when, and why to use the functions, settings, menu options, and controls in your photography – including the sophisticated 51 Point autofocus system and the in-camera features such as Multiple Exposure, HDR, 1.3x crop mode, and Interval Timer Shooting.

Written in the clear, concise, and comprehensive style of all Full Stop guides, Nikon D7100 Experience will help you learn to use your D7100 quickly and competently, to consistently make the types of images you desire. This e-book is available in either PDF or EPUB format for reading on your computer, tablet, iPad, e-reader, etc.

Nikon D7100 book ebook manual field guide tutorial how to use learn tips tricks dummies

Learn more about it, view a preview, and purchase it here:

http://www.dojoklo.com/Full_Stop/Nikon_D7100_Experience.htm

Take control of your Nikon D7100, the image taking process, and the photos you create!

This guide is designed for Intermediate and Enthusiast dSLR Photographers who wish to:

  • Take fuller advantage of the capabilities of their camera to go beyond Auto and P modes and shoot competently in A, S, and M shooting modes.
  • Make full use of the complex 51 point autofocus system to capture sharp photos.
  • Learn how, when, and why to use and customize the controls, buttons, and features of the D7100.

It covers basic dSLR camera functions and exposure concepts for those learning digital SLR photography, and explains more advanced camera controls and operation such as using the various metering modes and exposure compensation for correct exposure of every image.

For experienced photographers upgrading to the D7100, this guide explains the new and advanced features to quickly get you taking advantage of them, including the 51 point AF system and its Autofocus Modes, AF-Area Modes, and Custom Settings. Plus it explains all the camera controls, the in-camera HDR, Multiple Exposure, and Interval Timer features, introduces the video capabilities, and guides you through all the Menus and Custom Settings, with recommended settings to help you set up the camera for your specific needs.

Nikon D7100 Experience focuses on still-photography with an introduction to the HD video settings. Sections include:

  • Setting Up Your D7100 – All the Custom Settings and Playback, Shooting, and Setup Menus, with explanations and recommended settings to customize the advanced features to work best for you.
  • Camera Controls – An explanation of the camera controls, buttons, and displays, plus customizing the controls to best fit your specific shooting needs.
  • Aperture Priority (A), Shutter Priority (S), and Manual (M) Modes – How and when to use them to create dramatic depth of field, freeze or express motion, or take full control of exposure settings.
  • Autofocus Modes, AF-Area Modes, and Release Modes – Learn the AF Modes, AF-Area Modes, and AF Custom Settings of the new 51 point AF system, how they differ, how and when to take advantage of the different modes to capture still and moving subjects.
  • Exposure Metering Modes – How and when to use and customize them for correct exposures in every situation.
  • Histograms, Exposure Compensation, Bracketing, and White Balance – Understanding and using these features for adjusting to the proper exposure in challenging lighting situations.
  • The Image Taking Process – Descriptive tutorials for capturing both still and moving subjects.
  • Introduction to Video Settings – Explanations of the settings and options to get you started.
  • Photography Accessories – Useful accessories for the D7100 and for dSLR photography.
  • Composition – Tips and techniques, including the creative use of depth of field.

This illustrated e-book guide to the Nikon D7100 goes beyond the manual to explain how, when, and why to use the features, settings, and controls of the D7100 to help you get the most from your camera.

As one reader has said about Full Stop guides, I don’t know how I could fully take advantage of all the features the camera has to offer without this publication! It’s well-organized, easy to understand, and succinct…while still containing a wealth of information to get the most out of your camera.”

Learn more about Nikon D7100 Experience, view a preview, and purchase it on my Full Stop website here:

http://www.dojoklo.com/Full_Stop/Nikon_D7100_Experience.htm

The First Nikon D5200 e book user’s guide Now Available!

Nikon D5200 Experience, my most recent e book and the first D5200 user’s guide, is now available! As with all my Full Stop guides, this e book goes beyond the manual to help you learn the features, settings, and controls of the versatile Nikon D5200, including its sophisticated 39 point autofocus system. Plus most importantly it explains how, when, and why to use the functions, settings, menu options, and controls in your photography. It includes recommended settings for the Menu and Custom Settings options, and explanations of the in-camera features such as Multiple Exposure, HDR, and Time-Lapse Shooting.

Written in the clear, concise, and comprehensive style of all Full Stop guides, Nikon D5200 Experience will help you learn to use your camera quickly and competently, to consistently make the types of images you want to capture. This e-book is available in either PDF or EPUB format for reading on your computer, tablet, iPad, e-reader, etc.

Nikon D5200 Experience book ebook manual guide instruction tutorial how to dummies field guide use autofocus af system

Learn more about it, view a preview, and purchase it here:

http://www.dojoklo.com/Full_Stop/Nikon_D5200_Experience.htm

As one reader has said about Full Stop guides, “It’s the first guide I’ve read which has taken me through all the settings in an understandable way. I now feel that I have control over the camera.”

Take control of your Nikon D5200, the image taking process, and the photos you create!

This instant download Nikon D5200 e book is for those who wish to get more out of their camera, go beyond Auto and Program modes, and shoot in Aperture-Priority (A), Shutter-Priority (S) and Manual (M) modes. To get you started, it guides you through all the Playback, Shooting, and Setup Menus, Custom Settings, and Movie Mode Menu settings of the D5200 to help you best set up the camera and its controls for your specific shooting needs. The guide covers basic dSLR camera functions and exposure concepts for those new to digital SLR photography, and explains more advanced camera controls and operation, such as taking full advantage of the upgraded, advanced 39-Point Autofocus System and its AF Modes, AF Area Modes, and Custom Settings for sharp focus of still and moving subjects. It explains how and when to use the various metering modes and exposure compensation for correct exposure of every image, how to take advantage of other features of the D5200 such as the in-camera HDR and Time-Lapse Shooting features, and introduces the HD video capabilities.

Nikon D5200 Experience book manual field guide dummies learn tutorial how to instruction autofocus night HDR    Nikon D5200 Experience book manual field guide dummies learn tutorial how to instruction autofocus body controls

Nikon D5200 Experience book manual field guide dummies learn tutorial how to instruction autofocus controls viewfinder    Nikon D5200 Experience book manual field guide dummies learn tutorial how to instruction autofocus
Sample images from Nikon D5200 Experience.

Nikon D5200 Experience not only covers the various settings, functions and controls of the Nikon D5200, but it also explains when and why to use them for your photography. The guide focuses on still-photography with an introduction to the movie settings and menus to get you up and running with HD video. Sections include:

  • Setting Up Your D5200 – All of the D5200 Custom Settings and Playback, Shooting, and Setup Menus, including Movie Mode Menus, with explanations and recommended settings for practical, everyday use. Set up and customize the advanced features of your dSLR to work best for the way you photograph.

  • Aperture Priority (A), Shutter Priority (S), and Manual (M) Modes – How and when to use them to create dramatic depth of field, freeze or express motion, or take total control over exposure settings.

  • Auto Focusing Modes and Area Modes and Release (Drive) Modes – The 39 point D5200 autofocus system is a is a powerful tool, and taking control of it will enable you to successfully capture more sharp images, especially in action situations.  Learn the AF Modes, AF Area Modes, and AF Custom Settings, how they differ, how and when to take advantage of them to capture both still and moving subjects. Plus how and when to use focus lock.

  • Exposure Metering Modes of the Nikon D5200 – How they differ, how and when to use them for correct exposures in every situation, and how to customize them for your needs. Also how to make use of exposure lock.

  • Histograms, Exposure Compensation, Bracketing, and White Balance – Understanding and using these features for adjusting to the proper exposure in challenging lighting situations, and setting custom white balance.

  • The Image Taking Process – Descriptive tutorials for using the settings and controls you just learned to take photos of both still and moving subjects.

  • Photography Accessories – The most useful accessories for day-to-day and travel photography including accessories specific to the D5200.

  • Composition – Brief tips, techniques, and explanations, including the creative use of depth of field.

  • Introduction to Video Settings – Settings and explanations to get you started shooting HD video.

This digital guide to the Nikon D5200 is a 195 page, illustrated e-book that goes beyond the official manual to explain how, when, and why to use the features, settings, and controls of the D5200 to help you get out there shooting in the real world.

Learn more about Nikon D5200 Experience, view a preview, and purchase it on my Full Stop website here:

http://www.dojoklo.com/Full_Stop/Nikon_D5200_Experience.htm


Ten Tips and Tricks for the Nikon D610 / D600

I spent a considerable amount of time with both the Nikon D610 and the Nikon D600 as I researched and wrote my guides to the camera, Nikon D610 Experience and Nikon D600 Experience, and it has proven to be one of my favorite dSLR bodies.  It is well designed, fully featured, and the image quality and low light performance has proved to be excellent. It is indeed a very powerful and versatile dSLR camera, and much of that is due to its autofocus system, its controls, and its custom settings.  In fact, if you go through the Menus and Custom Settings of the D610 / D600, you will find that a “Top 25 Tips and Tricks” post could easily be put together from just these options alone.

Below is an explanation or introduction to several of these features and options for the D610 / D600.  I go into much more detail about using all of these particular functions and settings, as well as everything else about the camera, in my e-book user guides Nikon D610 Experience and Nikon D600 ExperienceAnd in fact, some of the content from these books is excerpted or summarized throughout this post.

Nikon D600 body buttons controls manual use learn how to book guide dummies customize
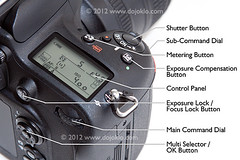
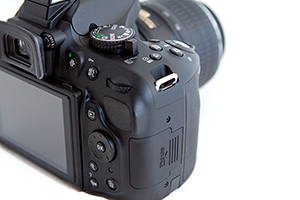
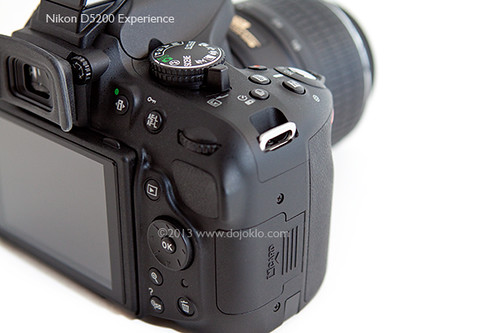
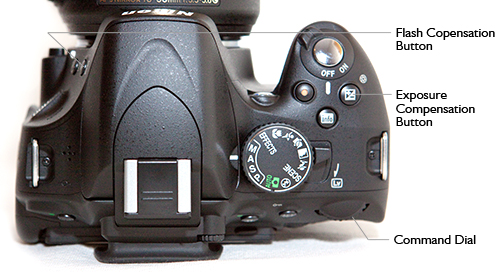
Detail of the controls of the Nikon D600 dSLR camera.

Despite the title of this post, I’m sure you realize there generally really aren’t “tricks” to improving your photography and camera use, but rather there are functions, features, settings, techniques, and controls that you should learn and be familiar with if you wish to take full advantage of your powerful camera. That being said, “tips and tricks” makes for a shorter, more intriguing article title and format, and so I have put together this list of ten helpful … tips for taking control and full advantage of your D610 / D600:

1. Take Control of your Autofocus System:

When capturing an image, it is essential that the image is sharp and that the camera focuses exactly where you want it to. So in order to focus on your desired subject, or precisely on – for example – your subject’s eye, you need to take full control of the AF system. The 39 AF points of the D610 / D600 will allow you to tell the camera exactly where you wish to focus, but the various configurations of Autofocus Modes and Autofocus AF-Area Modes may make it more of a challenge to learn initially. So I have written an entire post about making use of this AF system, which you can read here. It involves first learning the AF related controls and then setting up the applicable Custom Settings so that the AF system works as you want it to. (Some of these settings are especially important when using AF-C mode to track moving subjects.) You will then choose an Autofocus Mode (such as AF-S or AF-C) typically based on if the subject is still or moving, and an Autofocus AF-Area Mode (such as Single-Point or Dynamic-Area) typically based on how you wish for the camera to make use of surrounding AF Points such as to help focus on a subject or track a moving subject.

Nikon D600 autofocus system af viewfinder learn use control book manual guide dummies how to
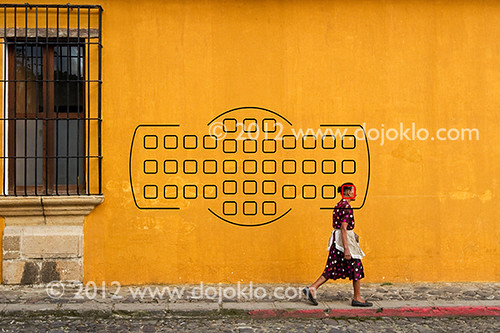
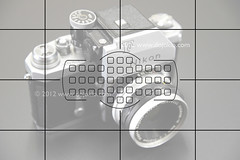
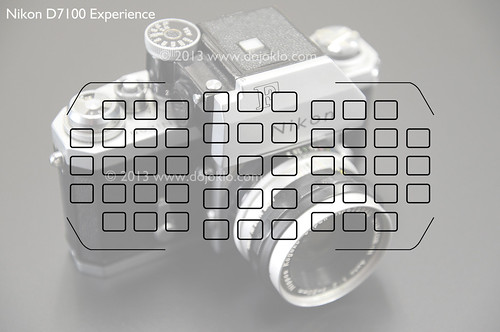
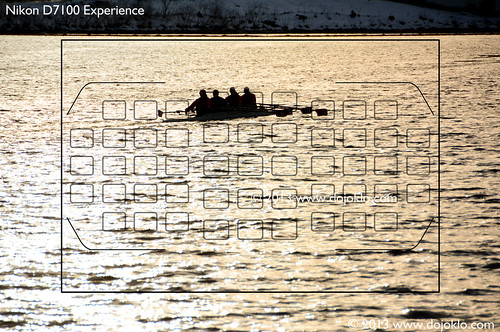
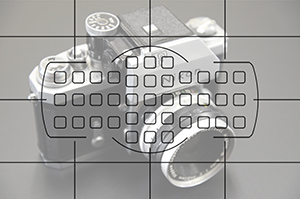
Simulated view of the Nikon D610 / D600 Viewfinder, showing the locations of the 39 AF Points (all of the AF Points will not be visible in the viewfinder at the same time as seen here).

The Menus and Custom Settings will also allow you to do things such as limit the number of available AF Points to just 11 if you find the 39 points excessive for your needs or overwhelming at first when learning to use them (a6: Number of focus points).  And you can make use of another setting to dictate whether or not the focus point selection “wraps around” to the other side of the screen when you reach, say, the far right AF Point (a5: Focus point wrap-around).

2. Make Full Use of and Customize the Buttons and Controls:

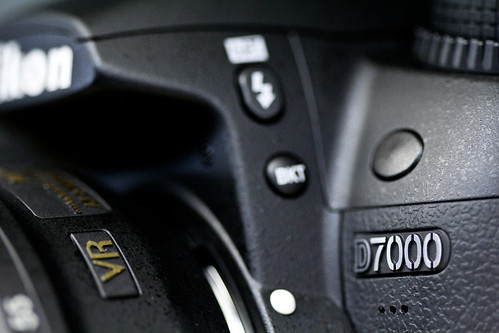
In order to work quickly or more efficiently, you should not only learn all the buttons and controls on the camera, but the D610 / D600 will allow you to customize them to fit your shooting needs and personal shooting style. Buttons like the Exposure Compensation and Metering Mode buttons on the top of the camera will obviously enable you to quickly change these settings. The AF Mode Button button, located inside the Focus Mode Selector switch near the base of the lens, may be confusing at first to those who have not previously seen or used it on the Nikon D7000, though you should quickly find that it is a convenient design. It is used to select the Autofocus Mode as well as the Autofocus AF-Area Mode. Press this button and turn the rear Main Command Dial to select the Focus Mode, such as AF-A or AF-C, while viewing the setting on the top Control Panel or in the Viewfinder. Press this button and turn the front Sub-Command Dial to set the AF-Area Mode, such as Single-Point AF or 39-Point Dynamic-Area AF, which you can also view on the top Control Panel or in the Viewfinder.

Nikon D600 buttons controls book manual guide how to use learn autofocus tutorial
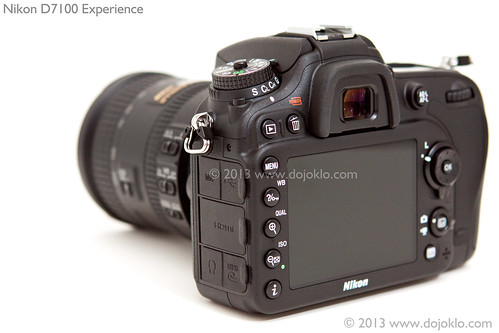
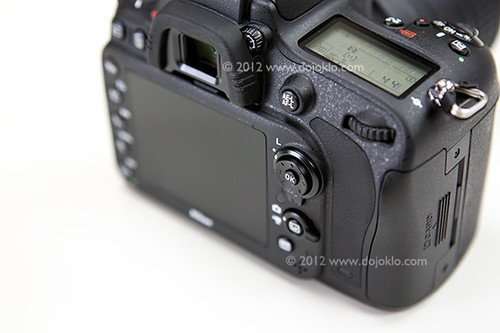
View of the rear controls of the Nikon D600.

The AE-L/AF-L Button can be customized to lock the exposure setting and/ or focus distance independently of the Shutter Button, or configured to perform back-button focusing duties. And buttons like the Fn Button and Preview Button can be set up to access one of numerous other settings that there is not a specific dedicated button for, such as quickly changing to Spot Metering or temporarily capturing RAW files while shooting in JPEG format. The Flash Button on the front of the camera will not only raise the flash, but it is also used in conjunction with the rear Main-Command Dial to set the Flash Mode (as viewed on the top LCD Control Panel), and with the front Sub-Command Dial to change the Flash Compensation amount.

Nikon D600 function button customize use learn book manual how to dummies field guide
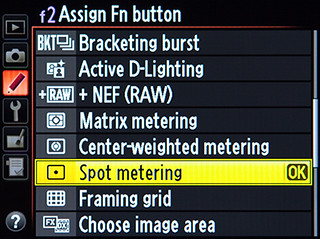
Some of the options for Custom Setting f2, to assign your desired function to the Fn Button.

3. Learn the Difference Between Interval Timer Shooting and Time-Lapse Photography:

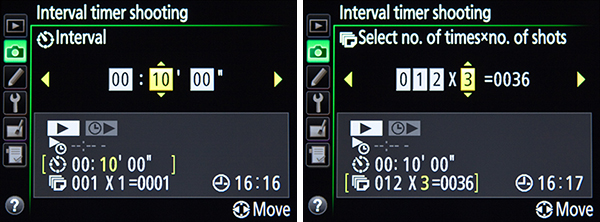
Unlike some other Nikon dSLR cameras, the D610 / D600 has separate settings for Interval Timer Shooting and Time-Lapse Photography Shooting. Although they are closely related – and are both methods of setting up the camera to automatically take photographs at regular, preset intervals – there are important differences.

Interval Timer Shooting can be used to take a series of images at each interval (for example, four images in a row every 1 hour for 3 hours). It can be used to take these multiple series of shots over several minutes or hours. Time-Lapse Photography is used to take a series of individual photos at each interval over an extended period, which are then automatically combined into a time-lapse movie (for example, one photo every 30 seconds for 6 hours, which are then turned into a movie). The resulting movie will use the video frame rate you have set in the camera, and the menu will calculate and display how long the final movie will be based on your settings.

4. Make Use of and Customize Picture Controls for those Shooting in JPEG Format:

If you are capturing images as JPEG files, you will want to set and/ or customize the Picture Controls so that your images have your desired level of sharpening, contrast, brightness, saturation, and hue. In other words, so that they look exactly how you want them to when they come out of the camera. These Picture Control settings are permanently applied to JPEG image files as they are processed and saved in the camera (but do not permanently affect RAW-NEF files). You can choose one of the presets such as Standard, Vivid, Landscape, and even black and white Monochrome. Or modify one of the presets to your desired settings or create your own custom Picture Control. You can even find custom Picture Controls online, such as ones that mimic certain types of film.

Nikon D600 Picture Control menu option manual guide book how to instruction tutorial dummies
Nikon D600 Picture Control menus to choose and modify a Picture Control, which determines the final look of JPEG images.

Picture Control settings are not necessarily needed if you shoot in RAW. The Picture Control settings will be associated with the RAW file as metadata and may be “applied” as you view the image in processing software such as Nikon Capture or View NX 2, but the settings will not permanently affect the RAW file and they can be changed during processing without affecting the quality of the image. Although please note that the Picture Control you set applies to the images and their Histograms that you see on the rear LCD Monitor even if you are shooting in only RAW. So, for example, if you were to set a Picture Control with high contrast, the images shown on the LCD Monitor will incorporate this setting (and the Histogram will reflect this setting) and thus will not look the same as the “unprocessed” exposure captured in the RAW files that you will later view on your computer. Therefore you may want to have this set at Standard or Neutral if you shoot RAW so that the images and their histograms you view on the camera’s LCD Monitor closely resemble the actual unprocessed RAW images. Or you can take a different approach and customize the Picture Controls to closely resemble how you typically process your RAW files. That way you can preview on the rear LCD how your final, processed image will appear. This approach should be taken only after you have gained experience with post processing and have developed your own typical processing settings.

5. Configure Your Camera for Easy Exposure Compensation:

Pressing the Exposure Compensation Button, indicated by (+/-), and turning the rear Main Command Dial will adjust Exposure Compensation, so that the exposure of a subsequent image is lighter or darker. If you wish to “cancel” exposure compensation, you will need to remember to change this setting back to zero after you take the shot.

If you often make use of Exposure Compensation (EC), you may wish to sometimes apply EC to just the next shot but sometimes use it for all of your following shots.  Custom Setting b3: Easy exposure compensation can give you very precise control over how you use the camera controls to set exposure compensation. You can set it up so that you must press the Exposure Compensation button as you turn the Main Command Dial in order to adjust exposure compensation. Or you can select to just directly turn the Command Dial of your choice, without pressing the Exposure Compensation Button first (by choosing setting On). This is a quicker way to adjust exposure compensation but introduces the possibility of changing it accidentally. With either of these above settings, exposure compensation will not be reset to 0 when you turn the camera off or when the metering standby timer period ends, so you must be sure to check your settings often to ensure you are not using exposure compensation when you don’t wish to.

Nikon D600 easy exposure compensation menu custom setting screenshot
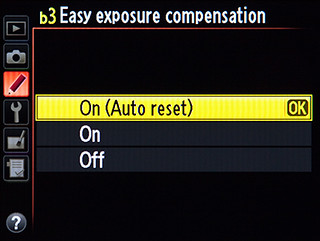
Custom Setting b3 to set up Easy Exposure Compensation.

Alternately, you can set up the camera so that you turn one of the Command Dials (of your choice in Custom Setting f5) to directly adjust exposure compensation (EC), but your EC setting will be reset when the camera or exposure meter (Standby Timer) turns off. This option is the most sophisticated and most flexible, and may be the best one to learn and use. This is because you can still continue to use the Exposure Compensation Button with a Command Dial to set EC, but by setting it for On (Auto reset) EC will not be reset when the camera or Standby Timer turns off. Exposure compensation will only be automatically reset if you set it directly using the Command Dial without the button. So if you wish to use exposure compensation for just one shot, you can adjust EC with just the dial and then let it cancel after than single shot. But if you wish to take a series of shots with the same adjusted EC, you can use the button / dial combination to set it more “permanently.” Once you learn more about exposure compensation and how and when to use it, this will all start to make more sense, and you will begin to understand why this is such a powerful and useful Custom Setting.

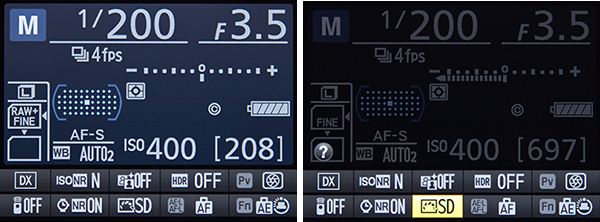
6. Take Advantage of the Two SD Card Slots:

If you insert SD memory cards in both of the available slots, you can configure the second card to function in a variety of ways, by using the Role Played by Card in Slot 2 menu setting.  Overflow will save your images onto the second card after the first card is full. Backup will simultaneously record copies of all images onto both card 1 and card 2. Raw Slot 1 – JPEG Slot 2 will store NEF (RAW) images on card 1 and JPEG images on card 2, for example when you are shooting NEF (RAW)+JPEG in order to capture both file formats at the same time. When the second or third option is selected, the camera will use the card with the least amount of remaining memory to determine the displayed amount of exposures remaining. In the Movie Settings Menu you can also select to save movies on a specific card.

Nikon D600 dual two card slot memory SD body detail learn use book manual guide

You can also use the Copy Image(s) menu item to copy images from one memory card to another when two cards are inserted in the camera. This can be used to back up specific images or the entire card at once. This could be useful to create back-up copies of your images when you don’t have access to your computer, external hard drive, or CD/DVD burner – but it is best to back them up on one of these more permanent devices as soon as possible.

7. Experiment with HDR Shooting and Multiple Exposure Shooting:

Previously, HDR processing was performed only with software, but with the in-camera HDR (high dynamic range) feature of the D600 you can now capture two images of various exposures (an under-exposed image and an over-exposed image), automatically combine them into a single HDR image, and process them using a variety of options, all in-camera. While this will not result in the distinctive, dramatic types of HDR images you may have seen, it can create an image with a broader range of tones. (To create dramatic HDR images, you will still need to manually bracket three, five, or seven exposures of the same scene and combine and process them using HDR software.)

The in-camera HDR Shooting menu will allow you to select the exposure value (EV) increments of the two images (from 1 EV to 3 EV, or choose Auto), and you can also set the amount of Smoothing used when combining the images. You can set the camera to take just one HDR series, or continue to shoot in HDR Mode until you disable the function.

Nikon D600 in camera HDR mode shooting learn use how to
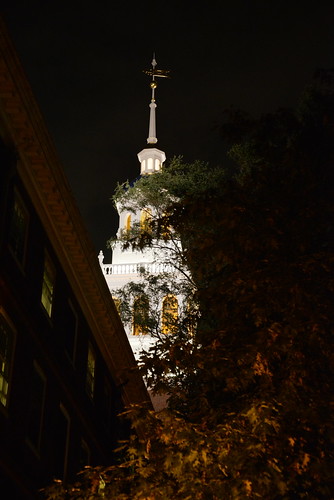
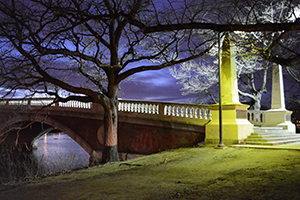
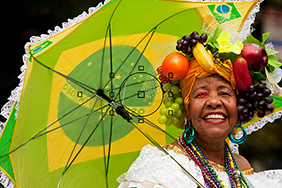
Lowell House, Cambridge, Mass – Making use of in-camera HDR to obtain a better exposure at night, with broader range of light, dark, and shadow details than would be possible with a normal exposure.

The in-camera Multiple Exposure Shooting Mode of the D610 / D600 allows you to create multiple exposure shots, with either two or three exposures superimposed in one image. You can use the Multiple Exposure menu to initiate Multiple Exposure Mode, and as with HDR Shooting you can decide if you wish to take a series of multiple exposure shots, or a single one after which the camera automatically reverts back to regular shooting. You can then select the number of shots to be combined, and set the Auto gain (use On unless you are working with a dark background. When Auto gain is set for On, the exposure of each shot is adjusted so that the final shot has the correct density. For example, if three shots are taken and combined for the final multiple exposure, the gain for each shot will be set at 1/3. If Auto Gain is turned Off, the result will likely be a dark, muddy shot.)

Nikon D600 multiple exposure shooting mode book manual guide dummies how to use learn tutorial
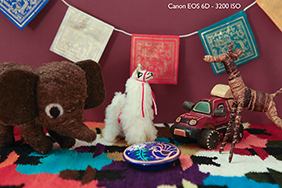
Multiple Exposure image taken with the D600 using Multiple Exposure Shooting mode.

8. Set the Center Weighted Metering Circle Size, and Fine-Tune the Metering:

With the D610 / D600, Custom Setting b4: Center-weighted area gives you the ability to customize the size of the central area that is used in determination proper exposure when working in Center-Weighted Area metering mode. When using Center-Weighted Metering the camera looks at the entire frame to determine exposure, but adds extra “weight” to the exposure values of the central area of the frame.  You can choose the desired diameter of the central circle area: 8mm, 12mm, 15mm, or 20mm. Or you can choose for the camera to determine the Average exposure of the entire frame, with setting Avg.

This option should be set based on how precise you wish your metered area to be or based on the size of the subject that you are metering. Since you can use Spot Metering mode for very precise metering of a 4mm diameter spot when you need that, perhaps it is useful to leave this at the default 12mm (though note that the 4mm Spot Metering circle moves and is centered around the active AF Point, while the Center-Weighted circle does not move). You can also set this to Avg to average the entire scene. This is a far less sophisticated mode of evaluating the entire scene than Matrix Metering (which takes the selected Focus Point and other data into consideration), and is similar to using an old film camera that averages the entire scene to 18% grey to determine proper exposure.

Nikon D600 viewfinder metering mode center weighted spot autofocus system af learn use book manual guide grid
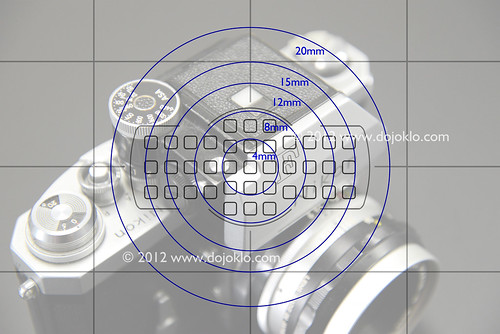
Simulated view of the Nikon D610 / D600 Viewfinder, showing the location of the AF Points, the approximate sizes of the Center-Weighted Metering area size options, and the optional grid. The 4mm circle is the size of the Spot Metering area, which will actually move based on the active AF Point.

You can also take advantage of Custom Setting b5: Fine-tune optimal exposure to fine-tune the exposure value that is selected by the camera in each of its various metering modes. If you find that your images are always typically being slightly underexposed or overexposed when using a specific metering mode, you can adjust this accordingly so that you don’t have to use exposure compensation every time you use that metering mode. For example, you may find that Center-Weighted Metering delivers great exposures, but you would prefer that the images taken with Matrix Metering were 1/3 EV (1/3 step) overexposed all the time. If that is the case, you would adjust Matrix metering to +2/6 using the Custom Setting b5 menu. If you make use of this adjustment, you can still use exposure compensation in any situation in addition to this fine-tune adjustment. The fine-tune adjustment of Custom Setting b5 will happen “behind the scenes” to adjust the baseline exposure prior to any exposure compensation adjustment.

9. Configure the ISO Settings and Take Advantage of the Auto ISO Options:

You can use the menu item for ISO Sensitivity Settings to do much more than simply changing the ISO setting (which is more easily done simply using the ISO Button on the camera). If you plan to use Auto ISO rather than selecting your own ISO setting, this menu is also used to set the optional Auto ISO Sensitivity Control, which will function in P, S, A, and M shooting modes. Making use of Auto ISO can allow you to concentrate more closely on your aperture or shutter speed settings, and of course on your composition and framing. And the D600 has some great options that make the use of Auto ISO more viable and appealing than previous cameras.

Nikon D600 ISO sensitivity settings menu auto iso screenshot how to use set up learn manual guide book dummies
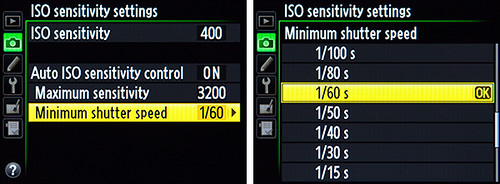
Nikon D610 / D600 ISO Sensitivity Settings Menu, including Auto ISO.

If you enable Auto ISO then the camera will automatically change your selected ISO, without your expressed permission, in certain situations in order to obtain a proper exposure. For example, if you are working in Aperture-Priority Auto Mode (A) and set the ISO at 1600, but based on your selected aperture and the lighting the camera does not believe there is enough light for the exposure and a realistic shutter speed (that you also set in this menu item – see below), it will automatically raise the ISO so that the shutter speed does not become impossibly slow for hand-holding. This may be good if you are still getting used to the cameras controls and settings and wish for the camera to help you out a bit in certain situations where you may not be paying close enough attention to your settings. Or perhaps in situations such as at a concert where the lighting may change dramatically without you realizing it or responding fast enough. But if you want complete control of your settings and exposures, you will need to turn this Off.

If you do set Auto ISO Sensitivity Control to be On, then you also set the Maximum Sensitivity or maximum ISO that the camera will use in these situations. For example, you may wish to set it no higher than 3200 or perhaps 6400 if you are willing to accept the digital noise of photos at that high an ISO. You also set the Minimum Shutter Speed that you would like the camera to automatically use in these situations. I suggest you set it at the slowest shutter speed you can possibly hand-hold and still potentially get an image without blur, perhaps 1/30 at the slowest if you are careful.

One of the powerful features of Auto ISO with the D600 is that when using it, the camera selects an ISO setting based on the local length of the lens being used. If you find that, when using Auto ISO, the camera is selecting shutter speeds that are slower than you wish (and thus may cause blur due to camera-shake), you can use this menu to adjust these settings and instruct the camera to use a faster shutter speed.

10. Make use of the Playback Display Options and Histogram

You will likely want to enable most or all of the Playback Display Options so that you can better evaluate your images, their settings, and the resulting exposures. That way you will know how to adjust the camera settings for the subsequent images. When these various display options are enabled, you can view the different screens during full-screen image playback (not multiple thumbnail view) by pressing up or down on the Multi Selector.

Nikon D600 menu playback display histogram
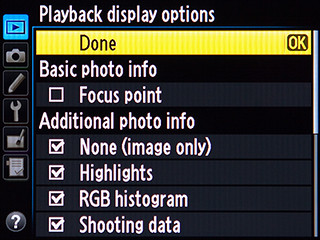
Playback Display Options menu screen of the D610 / D600.

On the menu screen shown above, None will display a full screen image with no information, which helps you to inspect the image. Highlights will display blinking areas to alert you of where the image has been overexposed, which can help you determine the proper exposure for the subsequent shots. RGB histogram will display histogram graphs of the various color channels to also assist you in determining proper exposure. This one may actually be optional if you do not yet make use of individual color channel histograms. Shooting data displays additional information including the lens and focal length used, flash information, and Picture Controls settings. This screen is not necessarily very informative immediately after taking the shot since you already know most of these settings, but can be handy when later reviewing an image in-camera. Overview displays a thumbnail of the image along with the RGB histogram and shooting information. This is perhaps the most important and useful information screen to use while shooting to help determine that you obtained the proper or desired exposure of an image.

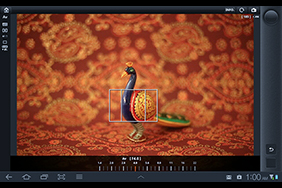
The option for Focus point will show you which Focus Point was used when capturing an image, and will thus verify if you properly focused where you intended (unless you recomposed after locking focus). It is that tiny red square or squares superimposed on your image when you view it on the rear LCD Monitor, but will not be on the actual image. It is most helpful for when you let the camera select the autofocus point, such as in action situations, and/ or when using an AF-Area Mode other than Single Point AF – and then you can see if the camera focused where you wished. But if you manually select your own AF point, as you typically should in many situations, you will already know where the camera focused.

Nikon D600 playback histogram how to use learn manual guide tutorial book
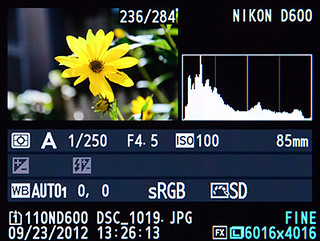
Overview Playback Display option, which shows a thumbnail of the image along with the RGB histogram and shooting information.

The Histogram is used to help you determine if your image was under- or over-exposed, and you generally want to make sure the graph falls down to zero before it reaches the edges of the histogram chart. If the data runs off the right side or spikes against the right edge, it means that you have over-exposed areas of your image, and you will need to adjust your exposure settings or make use of Exposure Compensation for taking the subsequent image.

There are, of course, numerous other settings and features of the D600 that can help you take full advantage of your camera. My guides Nikon D600 Experience and Nikon D610 Experience go beyond the manual to help you learn the features, settings, and controls of these sophisticated and highly customizable cameras.  Most importantly, they explain not only how but also when and why to use the D600/D610 basic and advanced features, settings, and controls in your photography. You can learn more about the guides, preview them, and purchase them by visiting my Full Stop webpage or by clicking on the book covers below:

Nikon D600 book ebook camera guide download manual how to dummies field instruction tutorial   Nikon D610 book manual guide how to autofocus settings menu custom setup dummies learn use tips tricks

Purchasing the Nikon D610: If you are still contemplating the D610 and plan to buy, please consider using my affiliate links to make your purchase, and the retailer will give me a little something for referring you – thanks! You can click on the Amazon, B&H, or Adorama logos on the left of this page, or click here for the Nikon D610 on Amazon.

The First Canon 6D User’s Guide Now Available!

Canon 6D Experience, my newest Full Stop e book and the first EOS 6D user’s guide, is now available! This e book goes beyond the manual to help you learn the features, settings, and controls of the powerful and highly customizable full-frame Canon 6D. Plus most importantly it explains how, when, and why to use the functions, settings, menu options, and controls in your photography – including the autofocus system, exposure and shooting settings, and the in-camera features such as Multiple Exposure, HDR, RAW image processing, and the new Wi-Fi and GPS functions.

Written in the clear, concise, and comprehensive style of all Full Stop guides, Canon 6D Experience will help you learn to use your full-frame 6D quickly and competently, to consistently create the types of images you want to capture. This e-book is available in either PDF or EPUB format for reading on your computer, tablet, iPad, e-reader, etc.

Canon 6D EOS book manual dummies field guide instruction tutorial how to use learn full frame autofocus system

Learn more about it, view a preview, and purchase it here:

http://www.dojoklo.com/Full_Stop/Canon_6D_Experience.htm

As readers have said about Full Stop guides:

“An excellent guide, clear and concise. A great tool for budding photographer as well as the seasoned pro. A sure way to get the most out of your camera.”

and

“I don’t know how I could fully take advantage of all the features the camera has to offer without this publication! It’s well-organized, easy to understand, and succinct enough to keep your attention while still containing a wealth of information to get the most out of your camera.”

Take control of your Canon 6D, the image taking process, and the photos you create!

For Intermediate and Enthusiast Photographers:

This instant download Canon EOS 6D e book is designed for enthusiast dSLR photographers who wish to take fuller advantage of the capabilities of their camera:

  • Go beyond Auto+ and Program modes and shoot competently in Av, Tv, and M modes.
  • Take full control of the versatile autofocus system.
  • Learn how, when, and why to use and customize the various controls, buttons, and features of the 6D.

To get you started, it includes explanations and recommended settings for all Menu settings and Custom Function options of the 6D.  It covers basic dSLR camera functions and exposure concepts for those learning digital SLR photography, and explains more advanced camera controls and operation, such as taking control of the autofocus system for sharp focus of still or moving subjects, using the various metering modes and exposure compensation for correct exposure of every image, and taking advantage of the newer features found in the 6D such as in-camera HDR and Multiple Exposure Modes.

For Experienced Photographers to get up and running with the 6D :
For experienced photographers coming to the EOS 6D from other models, this guide explains the new and advanced features and settings in order to quickly get you up and running and taking advantage of these capabilities.  Plus it explains the camera controls, the in-camera HDR and Multiple Exposures features, in-camera image processing, introduces the HD video capabilities, Wi-Fi and GPS functions, and guides you through all the 6D Menu and Custom Function items in order to help you best set up and customize the camera and its controls for your specific shooting needs.

Canon EOS 6D ISO     Canon EOS 6D af autofocus point

Canon 6D multiple exposure shooting mode     Canon 6D wireless wi-fi wifi control ipad tablet iphone shootin
Example images from Canon 6D Experience:
High ISO sample, Autofocus AF Points in Viewfinder,
Multiple Exposure Shooting Mode, Wi-Fi remote shooting using smart device.

Canon 6D Experience not only covers the various settings, functions and controls of the Canon 6D, but also explains when and why to use them for your photography. The guide focuses on still-photography with an introduction to the movie menus, settings, and options to get you up and running with HD video.  Sections include:

  • Setting Up Your EOS 6D – Explanations of all of the Canon 6D Custom Function settings and Menu options, with recommended settings for practical, everyday use. These settings are a significant part of what makes the 6D such a powerful and versatile camera.  Set up and customize the advanced features to work best for the way you photograph.
  • Camera Controls – Description of all of the camera’s controls, how to customize them for your needs, and when and why to use them.
  • Aperture Priority (Av), Shutter Priority (Tv), and Manual (M) Modes – How and when to use them to create dramatic depth of field, freeze or express motion, or take total control over exposure settings.
  • Auto Focusing Modes and Drive Modes – How they differ, how and when to use them to capture sharp images of both still and moving subjects. Also how and when to use focus lock and back-button focusing.
  • Exposure Metering Modes of the Canon 6D – How they differ, how and when to use them for correct exposures in every situation. Also how to make use of exposure lock.
  • Histograms, Exposure Compensation, Bracketing, and White Balance – Understanding and using these features for adjusting to the proper exposure in challenging lighting situations or for capturing a range of exposures to combine into HDR images.
  • Wi-Fi and GPS – Introduction to the set-up and use of the camera’s built-in Wi-Fi and GPS. Wirelessly control the 6D, save, or share images with your smart device or computer, and geotag and map your photos.
  • Introduction to Video Settings – Explanations of the menus, settings, and options to get you started.
  • Composition – Brief tips, techniques, and explanations, including the creative use of depth of field.
  • The Image Taking Process – Descriptive tutorials for using the settings and controls you just learned to take still and action photos.
  • Lenses – Explanation of Canon lenses and choosing your next lens.
  • Photography Accessories – The most useful accessories for day-to-day and travel photography including those specific to the 6D, plus recommended photography books.

This digital guide to the Canon 6D is a 248 page illustrated e-book that goes beyond the 6D manual to explain how, when, and why to use the features, settings, and controls of the 6D to help you get the most from your camera.

Learn more about Canon 6D Experience, view a preview, and purchase it on my Full Stop website here:

http://www.dojoklo.com/Full_Stop/Canon_6D_Experience.htm

The First Nikon D600 e book user’s guide Now Available!

Nikon D600 Experience, my latest Full Stop e book and the first D600 user’s guide, is now available! This e book goes beyond the manual to help you learn the features, settings, and controls of the powerful and highly customizable Nikon D600. Plus most importantly it explains how, when, and why to use the functions, settings, menu options, and controls in your photography – including the sophisticated autofocus system and the in-camera features such as Multiple Exposure, HDR, and Time-Lapse Shooting.

Written in the clear, concise, and comprehensive style of all Full Stop guides, Nikon D600 Experience will help you learn to use your full-frame D600 quickly and competently, to consistently create the types of images you want to capture. This e-book is available in either PDF or EPUB format for reading on your computer, tablet, iPad, e-reader, etc.

Nikon D600 book ebook camera guide download manual how to dummies field instruction tutorial

Learn more about it, view a preview, and purchase it here:

http://www.dojoklo.com/Full_Stop/Nikon_D600_Experience.htm

As one reader has said about Full Stop guides, “I don’t know how I could fully take advantage of all the features the camera has to offer without this publication! It’s well-organized, easy to understand, and succinct enough to keep your attention while still containing a wealth of information to get the most out of your camera.”

Take control of your Nikon D600, the image taking process, and the photos you create!

For experienced photographers coming to the D600 from previous models, this guide explains the new and advanced features to quickly get you up and running and taking advantage of these capabilities, including the advanced 39 Point Autofocus System and its Autofocus Modes, AF-Area Modes, Menu options and Custom Settings. Plus it explains the camera controls, the in-camera HDR, Multiple Exposures, Interval Timer and Time-Lapse Shooting features, introduces the settings and controls of the HD video capabilities, and guides you through all the Menu and Custom Settings options to help you set up the camera for your specific needs.

This guide is also designed for Intermediate and Enthusiast dSLR Photographers who wish to take fuller advantage of the capabilities of the camera to go beyond Auto and Program modes and shoot competently in A, S, and M modes; take control of the sophisticated 39 point autofocus system; learn how, when, and why to use the controls, buttons, and features of the D600, and much more. It covers basic dSLR camera functions and exposure concepts for those learning digital SLR photography, and explains more advanced camera controls and operation such as using the various metering modes and exposure compensation for correct exposure of every image.

Nikon D600 Experience focuses on still-photography with an introduction to HD video in order to get you up and running with shooting movies, including the movie settings and menu options. Sections include:

  • Setting Up Your D600 – All of the D600 Custom Settings and Playback, Shooting, and Setup Menus, including Movie Mode Menus, with explanations and recommended settings for practical, everyday use. Set up and customize the advanced features of your dSLR to work best for the way you photograph.
  • Aperture Priority (A), Shutter Priority (S), and Manual (M) Modes – How and when to use them to create dramatic depth of field, freeze or express motion, or take total control over exposure settings.
  • Auto Focusing Modes and Area Modes and Release (Drive) Modes – The 39 point D600 autofocus system is a is a powerful tool, and taking control of it will enable you to successfully capture more sharp images, especially in action situations.  Learn the AF Modes, AF Area Modes, and AF Custom Settings, how they differ, how and when to take advantage of them to capture both still and moving subjects. Plus how and when to use focus lock.
  • Exposure Metering Modes of the Nikon D600 – How they differ, how and when to use them for correct exposures in every situation, and how to customize them for your needs. Also how to make use of exposure lock.
  • Histograms, Exposure Compensation, Bracketing, and White Balance – Understanding and using these features for adjusting to the proper exposure in challenging lighting situations, and setting custom white balance.
  • The Image Taking Process – Descriptive tutorials for using the settings and controls you just learned to take photos of both still and moving subjects.
  • Photography Accessories – The most useful accessories for day-to-day and travel photography including accessories specific to the D600.
  • Composition – Brief tips, techniques, and explanations, including the creative use of depth of field.
  • Introduction to Video Settings – Settings and explanations to get you started shooting HD video.

This digital guide to the Nikon D600 is a 217 page illustrated e-book that goes beyond the manual to explain how, when, and why to use the features, settings, and controls of the D600 to help you get the most from your camera.

Learn more about Nikon D600 Experience, view a preview, and purchase it on my Full Stop website here:

http://www.dojoklo.com/Full_Stop/Nikon_D600_Experience.htm

Nikon D600 E-Book User’s Guide Now Available!

Nikon D600 Experience – The Still Photography Guide to Operation and Image Creation With the Nikon D600 is an e book user’s guide that goes beyond the manual to help you learn the features, settings, and controls of this sophisticated and highly customizable camera.  Most importantly, it explains not only how but also when and why to use the camera’s basic and advanced features, settings, and controls in your photography.

Nikon D600 book ebook camera guide download manual how to dummies field instruction tutorial

Written in the clear, concise, and comprehensive manner of all Full Stop dSLR camera guides, Nikon D600 Experience will help you learn to use your D600 quickly and competently, to consistently create the types of images you want to capture. As one reader has said about Full Stop guides:

“I don’t know how I could fully take advantage of all the features the camera has to offer without this publication!  It’s well-organized, easy to understand, and succinct enough to keep your attention while still containing a wealth of information to get the most out of your camera.”

For dSLR users from Experienced to Enthusiast:

For experienced photographers coming to the D600 from the D90, D7000, D5100, etc., this guide explains the new and advanced features in order to quickly get you up and running and taking advantage of these capabilities, including the sophisticated 39 Point Autofocus System and all its AF Modes, AF Area Modes, and Custom Settings.  Plus it explains the camera controls, the in-camera HDR, Multiple Exposure, and Time Lapse features, introduces the video capabilities, and guides you through all the Playback, Shooting, and Setup Menus, Custom Settings, and Movie Mode Menu settings of the D600 in order to help you best set up the camera and its controls for your specific shooting needs.

For intermediate and enthusiast photographers this instant download Nikon D600 e book will help you learn to take fuller advantage of the capabilities of your camera:

  • Go beyond Auto and Program modes and shoot competently in A, S, and M shooting modes.
  • Take full advantage of the sophisticated 39 point autofocus system.
  • Learn how, when, and why to use and customize the various controls, buttons, and features of the D600.

To get you started, it includes explanations and recommended settings for all Menu options and Custom Settings of the D600.  It covers basic dSLR camera functions and exposure concepts for those learning digital SLR photography, and explains more advanced camera controls and operation, such as taking control of the powerful autofocus system for sharp focus of still or moving subjects, using the various metering modes and exposure compensation for correct exposure of every image, and taking advantage of other features of the D600 such as in-camera HDR and Multiple Exposure Mode.

Nikon D600 book ebook download manual guide instruction tutorial how to dummies   Nikon D600 book ebook download manual guide instruction tutorial how to dummies

Nikon D600 book ebook download manual guide instruction tutorial how to dummies   Nikon D600 book ebook download manual guide instruction tutorial how to dummies
Example images from the text of Nikon D600 Experience

You can preview Nikon D600 Experience at the Full Stop webpage:

Nikon D600 Experience not only covers the various settings, functions and controls of the Nikon D600, but it also explains when and why to use them for your photography. The guide focuses on still-photography with an introduction to the movie menus and settings to get you up and running with video. Sections include:

  • Setting Up Your D600 – All of the D600 Custom Settings and Playback, Shooting, and Setup Menus, including Movie Mode Menus, with explanations and recommended settings for practical, everyday use. Set up and customize the advanced features of your dSLR to work best for the way you photograph.
  • Aperture Priority (A), Shutter Priority (S), and Manual (M) Modes – How and when to use them to create dramatic depth of field, freeze or express motion, or take total control over exposure settings.
  • Auto Focusing Modes and Area Modes and Release (Drive) Modes – The 39 point D600 autofocus system is a is a powerful tool, and taking control of it will enable you to successfully capture more sharp images, especially in action situations.  Learn the AF Modes, AF Area Modes, and AF Custom Settings, how they differ, how and when to take advantage of them to capture both still and moving subjects. Plus how and when to use focus lock.
  • Exposure Metering Modes of the Nikon D600 – How they differ, how and when to use them for correct exposures in every situation, and how to customize them for your needs. Also how to make use of exposure lock.
  • Histograms, Exposure Compensation, Bracketing, and White Balance – Understanding and using these features for adjusting to the proper exposure in challenging lighting situations, and setting custom white balance.
  • Composition – Brief tips, techniques, and explanations, including the creative use of depth of field.
  • The Image Taking Process – Descriptive tutorials for using the settings and controls you just learned to take photos of both still and moving subjects.
  • Photography Accessories – The most useful accessories for day-to-day and travel photography including accessories specific to the D600.
  • Introduction to Video Settings – Settings and explanations to get you started.

This digital guide to the Nikon D600 is an illustrated e-book that goes beyond the D600 manual to explain how, when, and why to use the features, settings, and controls of the D600 to help you get out there shooting in the real world.  It is available in instant download PDF and EPUB formats.

Title:  Nikon D600 Experience
Author:  Douglas Klostermann
Page Count:  217, illustrated
ISBN #: 978-1-3017-2999-9
Price: $14.99

What Readers are Saying about Doug’s previous guide Nikon D7000 Experience:

This book, together with the manual that came with your camera, is all you need to start discovering the full potential of the D7000.
-Max M.

It’s the first guide I’ve read which has taken me through all the settings in an understandable way. I now feel that I have control over the camera.
-Peter S.

Really practical and tremendously helpful. Readers of this e-book can expect to benefit from a more rewarding photographic experience using this superb camera, and be better able to exploit its potential to match their personal objectives and photographic style. Highly recommended.
-M.M.

I would recommend this to anyone who wants to get a quick start to using the D7000.  Manuals are nice, but this eBook highlights the important information and gives a quick easy to understand explanation of most all of the functions and controls.
-Ray M.

I found the Nikon manual good for understanding how to set things up but not much on the why – this book really focuses on the WHY.  The guide helped me understand why to use specific settings for specific needs.  The Custom Settings sections helps to make firm decisions on how to apply settings by understanding the usage of each in addition to knowing how to set them up.
-Benoit A.

This manual is a clearly written, concise and useful explanation of the rationale for the seemingly infinite and often confusing settings options for the D7000. Used in conjunction with the Nikon manual I feel a bit more confident in understanding how to at last proceed in getting better photographs.
-W.L.S.

It’s clear, concise and gets to the heart of the camera’s multiple and often confusing options. Very highly recommended – for experienced user and beginner alike. As previous reviewers have remarked, the official manual is very good on what to do, but not so clear on why.
-G.S.A.

A well written, professional helpful guide – Brilliant, just what I was looking for! A manual for the D7000 that was exciting, clear to follow, had examples and was used by a professional who gave just the right amount of technical with explanations of why you use those settings, when to use those settings and so on, all properly explained. The book is a revelation, a joy to follow, well thought through and well written. Nikon should be employing Doug to write every one of their cameras manuals.
-R.D.C.

The First User’s Guide to the Canon Rebel T4i / EOS 650D Now Available!

Canon T4i / 650D Experience, my most recent Full Stop dSLR e-book and the first available user’s guide to the T4i / 650D, goes beyond the manual to help you learn the features, settings, and controls of the advanced and versatile T4i / 650D, plus most importantly how, when, and why to use the functions, settings, and controls in your photography.

Written in the clear, concise, and comprehensive style of all Full Stop guides, Canon T4i / 650D Experience will help you learn to use your Canon T4i / 650D quickly and competently, to consistently create the types of images you want to capture. The e-book is available in PDF format for reading on your computer, e-reader, or tablet.

Learn more about it, preview it, and purchase it here:
http://www.dojoklo.com/Full_Stop/Canon_T4i_Experience.htm

As one reader has said about the previous Canon T3i Experience e-book:A Must-Have Accessory – What a great addition to my bag. This is a well written, full body of work that explains, in plain English, how to get the most out of my new camera.  Doug provides the knowledge and experience to bring you to the next level.  I look forward to learning more every time I open the book.”

Take control of your Rebel T4i / EOS 650D, the image taking process, and the photos you create!

Canon Rebel T4i 650D book ebook manual guide tutorial instruction bible how to dummies field EOS

For beginner, intermediate and enthusiast photographers:  This Canon T4i / 650D e-book is for those who wish to get more out of their camera and to go beyond Auto+ and Program modes and shoot in Aperture Priority (Av), Shutter Priority (Tv), and Manual (M) modes. To get your camera set up, it begins with explanations and recommended settings for all Menu settings, Custom Function options, and Movie Mode Menu settings of the T4i / 650D.  It covers basic dSLR camera functions and exposure concepts for those new to digital SLR photography, and explains more advanced camera controls and operation, such as using the various metering modes and exposure compensation for correct exposure of every image, controlling autofocus modes and focus points for sharp focus of still or moving subjects, and making use of the camera’s new multi-shot exposure modes.

Canon T4i / 650D Experience focuses on still-photography with an introduction to the movie menus and settings to get you up and running with video. Sections include:

  • Setting Up Your Camera – All of the Menu settings and Custom Function settings for the T4i / 650D, including movie mode menus, with brief descriptions and recommended settings for practical, everyday use. Set up and customize the advanced features of this dSLR to work best for the way you photograph.
  • Camera Controls – Description of all of the camera’s controls, plus when and why to use them, including how to take advantage of the new Touch Screen and Quick Control settings screens.
  • Aperture Priority (Av), Shutter Priority (Tv), and Manual (M) Modes – How and when to use them to create dramatic depth of field, freeze or express motion, or take total control over exposure settings.
  • Auto Focusing Modes and Drive Modes – How they differ, how and when to use them to capture sharp images of both still and moving subjects. Also how and when to use focus lock and back-button focusing.
  • Exposure Metering Modes of the Canon T4i / 650D – How they differ, how and when to use them for correct exposures in every situation. Also how to make use of exposure lock.
  • Histograms, Exposure Compensation, Bracketing, and White Balance – Understanding and using these features for adjusting to the proper exposure in challenging lighting situations.
  • Lenses – Explanation of Canon lenses and choosing your next lens.
  • Composition – Brief tips, techniques, and explanations, including the creative use of depth of field.
  • The Image Taking Process – A descriptive tutorial for using the settings and controls you just learned to take still and action photos.
  • Photography Accessories – The most useful accessories for day-to-day and travel photography including those specific to this camera, plus recommended photography books.
  • Introduction to Video Settings – Some basic settings to get you started.

This digital guide to the Canon Rebel T4i / EOS 650D is a 165 page illustrated e-book that goes beyond the manual to explain how, when, and why to use the features, settings, and controls of the T4i / 650D to help you get the most from your camera.

Learn more about Canon T4i / 650D Experience e book manual for the Rebel T4i / EOS 650D on my Full Stop website here:

http://www.dojoklo.com/Full_Stop/Canon_T4i_Experience.htm


The First Canon 5D Mark III e book user’s guide Now Available!

Canon 5D Mark III Experience is my latest Full Stop dSLR user’s guide e book, which goes beyond the manual to help you learn the features, settings, and controls of the powerful and highly customizable EOS 5D Mk III, plus most importantly how, when, and why to use the functions, settings, and controls in your photography.

Written in the clear, concise, and comprehensive style of all Full Stop guides, Canon 5D Mark III Experience will help you learn to use your Canon 5D Mk 3 quickly and competently, to consistently create the types of images you want to capture.  The e-book is available in either PDF, EPUB, or MOBI format for reading on any device.

Learn more about it, preview it, and purchase it here:
http://www.dojoklo.com/Full_Stop/Canon_5DMkIII_Experience.htm

As one Canon user has said about Full Stop guides, “I don’t know how I could fully take advantage of all the features the camera has to offer without this publication! It’s well-organized, easy to understand, and succinct enough to keep your attention while still containing a wealth of information to get the most out of your camera.”

Take control of your 5D Mk III, the image taking process, and the photos you create!

Canon 5D Mark III mk 3 book ebook manual guide tutorial instruction bible how to dummies field EOS

For experienced photographers coming to the 5D Mk III from previous EOS models, this guide explains the new and advanced features to quickly get you up and running and taking advantage of these capabilities, including the new 61 Point Autofocus System and its Modes, Area Modes, Menu options and AF Case Presets. Plus it explains the new camera controls, the in-camera HDR and Multiple Exposures features, introduces the new video capabilities, and guides you through all the Menu and Custom Function items to help you set up the camera for your specific needs. This guide is also designed for Intermediate and Enthusiast dSLR Photographers who wish to take fuller advantage of the capabilities of the camera to go beyond Auto+ and P modes and shoot competently in Av, Tv, and M modes; take control of the sophisticated 61 point autofocus system; learn how, when, and why to use the controls, buttons, and features of the 5D Mk III, and much more. It covers basic dSLR camera functions and exposure concepts for those learning digital SLR photography, and explains more advanced camera controls and operation such as using the various metering modes and exposure compensation for correct exposure of every image.

Canon 5D Mark III Experience focuses on still-photography with an introduction to the movie menus and settings to get you up and running with video. Sections include:

  • Setting Up Your 5D Mk III – Explanations of all of the Custom Function settings and Menu options, with recommended settings.
  • Auto Focusing Modes and Drive Modes – Taking control of the new 61 point autofocus system will enable you to successfully capture more sharp images in still and action situations. Learn the AF Modes, AF Area Modes, and AF Configuration Presets and how and when to take advantage of them.
  • Aperture (Av), Shutter (Tv), and Manual (M) Modes – How and when to use them to create dramatic depth of field, freeze or express motion, or take total control over exposure settings.
  • Exposure Metering Modes – How they differ, how and when to use them for correct exposures in every situation.
  • Histograms, Exposure Compensation, Bracketing, and White Balance – Understanding these features for adjusting to the proper exposure in challenging lighting situations.
  • HDR Shooting mode and Multiple Exposure mode – Configure and use these new features.
  • The Image Taking Process – Descriptive tutorials.
  • Composition – Brief tips, techniques, and explanations, including the creative use of depth of field.
  • Lenses – Canon lens notations and choosing L series lenses.
  • Photography Accessories – Useful accessories for the 5D Mk III and for dSLR photography.
  • Introduction to Video Settings – Explanations of the settings and options to get you started.

This digital guide to the Canon 5D Mark III is a 195 page illustrated e-book that goes beyond the manual to explain how, when, and why to use the features, settings, and controls of the 5D Mark III to help you get the most from your camera.

Learn more about Canon 5D Mark III Experience e book manual for the EOS 5DIII, preview it, and purchase it on my Full Stop website here:
http://www.dojoklo.com/Full_Stop/Canon_5DMkIII_Experience.htm


Take Control of your Canon 5D Mark III with my e-book guide!

I have completed my e-book guide for the new Canon EOS 5D Mark III, called Canon 5D Mark III Experience.  This Still Photography Guide to the EOS 5D Mark III goes beyond the EOS 5D Mk III manual to help you learn when and why to use the various controls, features, and custom settings of this powerful camera, including the advanced and sophisticated 61 point autofocus system, the numerous Menu and Custom Function options, and the new controls and features.  Written in the clear and concise manner of all Full Stop guides, Canon 5D Mark III Experience can help you learn to use your Canon 5DIII quickly and competently, to consistently create the types of images you want to capture.

Take control of your Canon 5D Mk III and the images you create!

Canon EOS 5D Mark III Mk 3 111 manual guide how to dummies instruction autofoucs meter mode experience

As one Canon user has said about on of my previous guides:

I don’t know how I could fully take advantage of all the features the camera has to offer without this publication! It’s well-organized, easy to understand, and succinct enough to keep your attention while still containing a wealth of information to get the most out of your camera.”

This book is now available!  To learn more about it, please click on the cover or the link below to have a look at my Full Stop e-book website:

http://www.dojoklo.com/Full_Stop/Canon_5DMkIII_Experience.htm


What Readers Had to Say about Doug’s Previous dSLR Camera Guides:

Brilliant – just what I was looking for! A manual that was exciting, clear to follow, had examples and was used by a professional who gave just the right amount of technical info with explanations of why you use those settings, when to use those settings and so on…all properly explained. Doug’s book is a joy to follow, well thought through and well written. The camera company should be employing Doug to write their cameras manuals!
-Robert D.

A Must-Have Accessory – What a great addition to my bag. This is a well written, full body of work that explains, in plain English, how to get the most out my new camera. Doug provides the knowledge and experience to bring you to the next level. I look forward to learning more every time I open the book.
-Steven

Definitely reduces the slope of the learning curve to an easy gradient – I found that it was easy to read and understand, full of important hints and suggestions and allowed me to get to grips with the tools available in the camera in a very short time indeed. Excellent value!
-O.B.

It’s the first guide I’ve read which has taken me through all the settings in an understandable way. I now feel that I have control over the camera.
-Peter S.

Ten Steps to Better dSLR Photography

Ten Steps to Better dSLR Photography is an e-book guide to help digital SLR photographers take control of their camera and the images they create.

tips tricks photography dslr learn use manual instruction tutorial for dummies guide

Capturing great images with your dSLR should not be the occasional result of chance and luck.  By taking control of your camera, its functions, and its settings you can begin to work with consistency and intention and take the photos you desire.

Readers of my popular dSLR camera guides such as Nikon D5100 Experience and Your World 60D have benefited from the clear and concise explanations of digital SLR photography functions and concepts. With Ten Steps to Better dSLR Photography all photographers can learn these essential elements necessary for taking full advantage of a dSLR including how, when and why to use the camera’s various functions and settings.

With this guide you will learn:

  • Controlling Your Autofocus System – focus where you want for sharp photos of still and moving subjects.
  • Understanding Apertures and using Aperture Priority Mode to capture dramatic depth of field.
  • Understanding Shutter Speed and using Shutter Priority Mode to freeze or express action.
  • Choosing the Metering Mode, Adjusting Exposure Compensation, and Using the Histogram for proper exposure in all lighting situations.
  • Determining proper ISO Settings and White Balance Settings.
  • Selecting JPEG or RAW image file format to save your images.
  • Improving Image Composition.
  • The Image Taking Process – a tutorial making use of all the steps learned.
  • …and more!

These are not simply photography “tips and tricks” but rather clear, concise, and useful explanations and examples of the fundamental functions, settings, and concepts of digital SLR photography. This 54 page illustrated PDF guide can help the novice or intermediate photographer better understand their camera and how to use it to its full capabilities to consistently capture better images, whether you shoot with a Canon, Nikon, Pentax, Sony, or Olympus dSLR camera.

Author:  Douglas Klostermann
Format:  PDF – Instant Download
Page Count:  54 pages, illustrated
ISBN:  978-1-4524-4764-3
Price: $8.99 new release sale!  $6.99
secure payment with PayPal or Credit card (via PayPal)
(plus 6.25% sales tax for residents of Massachusetts)

Buy Now with PayPal  or  Buy Now with your Visa/MC


Other versions of Ten Steps to Better dSLR Photography are available:

The Kindle edition is available on Amazon
The Nook version is available at BarnesandNoble.com
The iPad and iBooks version is available through iTunes or through the iBooks App on your iPhone/iPad

Take control of your dSLR camera and the images you create!

.

.

Go Beyond the Manual with my Canon 7D User’s Guide

I have completed a Canon 7D e book user’s guide, Canon 7D Experience – The Still Photographer’s Guide to Operation and Image Creation that goes beyond the EOS 7D manual to help you learn when and why to use the various controls, features, and custom settings of this powerful camera, including the advanced and sophisticated autofocus system and Custom Function settings. Written in the clear and concise manner of all Full Stop guides, Canon 7D Experience can help you learn to use your Canon 7D quickly and competently, to consistently create the types of images you want to capture.

Take control of your camera, the image taking process, and the photos you create!

Canon 7d book manual user guide instruction tutorial firmware 2 v 2.0 for dummies mark mk i ii 1 2 EOS experience

As one Canon user has said about the previous guide:

I don’t know how I could fully take advantage of all the features the camera has to offer without this publication! It’s well-organized, easy to understand, and succinct enough to keep your attention while still containing a wealth of information to get the most out of your camera.”

Price: $12.99 secure payment with PayPal or Credit card (via PayPal)
(plus 6.25% sales tax for residents of Massachusetts)

Buy Now with PayPal or    Buy Now with your Visa/MC

This instant download Canon 7D book is for those who wish to take fuller advantage of the capabilities of their camera and to go beyond Auto and Program modes and shoot competently in Av and Tv modes. To get you started, it includes explanations and recommended settings for all Custom Functions, Menu settings, and Movie Mode settings of the 7D. Aimed towards intermediate photographers, it also covers basic dSLR camera functions and exposure concepts for those new to digital SLR photography, and explains more advanced camera controls and operation, such as taking control of the powerful autofocus system for sharp focus of still or moving subjects, using the various metering modes and exposure compensation for correct exposure of every image, and utilizing dramatic depth of field. This guide builds upon the information provided in the manual and explains essential settings and information to help you get out there shooting in the real world.

This PDF e book can be read on your computer and printed on your printer, or transferred and read on an iPad, Android, or other tablet, Kindle, Nook, or other eReader. You can preview Canon 7D Experience at the following link. The preview shows the Table of Contents and Introduction, a sample 7D Menu Settings page, a sample Custom Functions page, and sample text pages.

http://www.dojoklo.com/Full_Stop/previews/Canon_7D_Experience-Preview.pdf

Canon 7D Experience not only covers the various settings, functions and controls of the Canon 7D, but it also explains when and why to use them for your photography. The guide focuses on still-photography with a brief introduction to the movie menus and settings to get you up and running with video. You will learn:

  • Setting Up Your 7D – All of the EOS 7D Custom Function settings and Menu settings, including movie mode menus, with brief descriptions and recommended settings for practical, everyday use. These settings are a significant part of what makes the 7D such a unique and powerful camera. Set up and customize the advanced features to work best for the way you photograph.
  • Aperture Priority Mode (Av) and Shutter Priority Mode (Tv) – How and when to use them to create dramatic depth of field or to freeze or express motion.
  • Auto Focusing Modes and Drive Modes – The 7D autofocus system is a revolutionary upgrade for Canon dSLR cameras, and taking control of it will enable you to successfully capture more action images. Learn the AF Modes and AF Area Modes, how they differ, how and when to use them to capture sharp images of both still and moving subjects. Also how and when to use focus lock and back-button focusing.
  • Exposure Metering Modes of the Canon 7D – How they differ, how and when to use them for correct exposures in every situation. Also how to make use of exposure lock.
  • Histograms, Exposure Compensation, Bracketing, and White Balance – Understanding and using these features for adjusting to the proper exposure in challenging lighting situations.
  • The Image Taking Process – A descriptive tutorial for using the settings and controls you just learned to take photos.
  • Composition – Brief tips, techniques, and explanations, including the creative use of depth of field.
  • Lenses – Explanation of Canon lenses and notations, and choosing your next lens.
  • Photography Accessories – The most useful accessories for day-to-day and travel photography.
  • Introduction to Video Settings – Some basic settings to get you started.

This digital guide to the Canon 7D is an 80 page, illustrated PDF document that expands upon the information found in the 7D manual, to help one begin to master their dSLR and learn to use the Canon 7D to its full capabilities. It is packed with helpful information applicable to the new and intermediate dSLR photographer – to begin to turn you into an advanced digital photographer!

Author: Douglas Klostermann
Format:
PDF – Instant Download
Page Count:
80 pages, illustrated
ISBN #:  978-1-4524-6479-4
Price: $12.99 secure payment with PayPal or Credit card (via PayPal)
(plus 6.25% sales tax for residents of Massachusetts)

Buy Now with PayPal or Buy Now with your Visa/MC

This PDF version can be:
-Read on your computer
-Printed from your printer
-Read on your Kindle, Nook, or other e-reader
-Read on any tablet, including iPad or iPhone following these instructions on the FAQ page


Other versions of Canon 7D Experience e-book are available:

The Kindle edition is available on Amazon
The Nook edition is available on BarnesandNoble.com
The iPad and iPhone version is available through iTunes or through the iBooks App on your iPhone/iPad.


What Readers Had to Say about Doug’s Previous Canon Guides Your World 60D and T2i Experience:

Essential Companion – Alas, a comprehensive and concise guide for hobbyists who desire to enhance their photography experiences. I highly recommend this guide to anyone who wants to get out of auto mode and learn how to take high-quality photos. It brilliantly explains how to apply advanced techniques and tips, walks you through the daunting task of menu settings, and smoothly guides you through the image-taking process. The instructions and explanations are easy to follow and well organized. The guide is a portable class on digital photography! A must-have if you want to learn how to use your camera to its fullest advantage.
Elizabeth J.

Best Guide to Using a T2i – I don’t know how I could fully take advantage of all the features the T2i has to offer without this publication! It’s well-organized, easy to understand, and succinct enough to keep your attention while still containing a wealth of information, tips and tricks to get the most out of your camera. I’m very happy that I found this guide.
-Nathan K.

A very helpful and clear step-by-step guide: This e-book is a low cost worthwhile investment thanks to your expertise.
-John T.

New E-Book Camera Guide for the Canon 7D

I have completed an e-book camera user’s guide for the Canon EOS 7D called Canon 7D Experience.

Like all my previous Full Stop camera guides, Canon 7D Experience explains not only the features, functions, settings, and controls of the camera, but also – and more importantly – when and why to use them in your photography.  This includes metering modes, aperture and shutter priority modes (Av and Tv), advanced autofocus use, and more.  It also describes all the Menu settings and Custom Function settings – with recommended settings.  The guide also thoroughly explains the versatile and sophisticated autofocus system, which helps to make this such a unique and powerful camera.

Take control of your camera and the images you create!

Click on the cover image below or click here to learn more, preview, and purchase Canon 7D Experience.

Canon 7D EOS firmware 2 v 2.0 book ebook e-book manual how to instruction learn tutorial use tips tricks for dummies

The E-Book Handbook – Now Available!

My latest e-book, The E-Book Handbook, is now available!

The E-Book Handbook – A Thoroughly Practical Guide to Formatting, Publishing, Marketing, and Selling Your E-Book is a comprehensive guide that will help you create, publish, and market your own e-book, and sell it online through Amazon, Barnes and Noble, and Apple iTunes and iBooks – all easily and inexpensively.

The E-Book Handbook e book ebook how to create format publish market sell Amazon Kindle Nook iPad for dummies

It explains how to properly format and convert your text for PDF, tablet, and e-reader versions (such as the Kindle and Nook), create interactive bookmarks and table of contents, and include a book cover and images.  It includes step-by-step instructions for easily uploading and selling your e-book on major retail websites including Amazon through Kindle Direct Publishing, Barnes and Noble through PubIt!, and Apple’s iBooks and iTunes through Smashwords, plus setting up the e-book’s descriptions and author pages – all at no cost.  And it describes how to set up and automate sales and digital delivery from your own website and blog using reliable, low-cost services like E-Junkie and PayPal.

This instant download e-book explains multiple ways to market your e-book to increase sales, including detailed instructions for setting up a website and blog, marketing through various channels on the Internet, optimizing search engine results so that your e-book and sites are found, and monetizing your website and blog through advertising and affiliate programs. The E-Book Handbook also explains how to keep track of and evaluate sales, income, and expenses and offers a detailed spreadsheet to record and monitor this information.  Throughout the text, the guide contains links to every website and retailer discussed, as well as comprehensive lists in the Appendixes.

The E-Book Handbook will provide you with the knowledge and tools to successfully create, publish, market, and sell your own e-book. It includes tips and straightforward information from the author’s experiences as a best-selling e-book writer and publisher, in order to make the process as low-cost and efficient as possible.

The E-Book Handbook is a 112 page, illustrated PDF document that can help turn you into an e-book author and publisher.  This PDF e-book can be read on your computer and printed on your printer, or transferred and read on an iPad, Android, or other tablet, Kindle, Nook, or other e-reader.

Author: Douglas Klostermann
Format:
PDF – Instant Download
Page Count:
112 pages, illustrated
ISBN #:  978-1-4524-0474-5
Price: $9.99
secure payment with PayPal or Credit card (via PayPal)
(plus 6.25% sales tax for residents of Massachusetts)

or   Buy Now


Other versions of The E-Book Handbook are available:

The Kindle edition is available on Amazon.com
The Nook edition is available on BarnesandNoble.com
The iPad and iPhone version is available through iTunes or through the iBooks App


Doug Klostermann is a travel, culture, and humanitarian photographer and successful, best-selling e-book author and publisher.  He has sold over 4,000 e-book camera guides which are regularly at or near the top of the Kindle and Amazon bestseller lists for Photography Equipment and Reference.

Doug has photographed for numerous organizations in Latin America and the United States, been recognized by the United Nations Development Programme for his humanitarian photography, and been published in magazines and books including Conde Nast Traveler, Sherman’s Travel, South American Explorer, and Viva Travel Guides. Doug is a member of the National Press Photographers Association. View his images at www.dojoklo.com.  Learn more about e-books and photography equipment and techniques on his blog Picturing Change at http://blog.dojoklo.com/.

Ten Tips and Tricks for the Nikon D7000

In addition to delivering great image quality, exceptional low light/high ISO performance, and rugged construction, the Nikon D7000 is an extremely sophisticated camera that can be highly customized to work exactly how you want or need it to.  Its autofocus system and metering system can be set up and tweaked according to your preferences, its buttons and dials can be assigned and customized for your most-used functions, its frame rates can be adjusted, its white balance fine-tuned, and much more.  I’ve spent a lot of time with the Nikon D7000 as I researched and wrote my e-book user’s guide to the D7000 called Nikon D7000 Experience, and here are the some of the top “tips and tricks” I’ve discovered for setting up and using this powerful dSLR (in no particular order):

(Looking for additional tips for the Nikon D7100? New post here.)

Nikon D7000 tips tricks book guide download how to learn
Detail of the Nikon D7000 – photo by author

1. Take Control of your Autofocus System: In order to always ensure that the camera autofocuses where and how you want, you need to take control of your AF system.  Use AF-S Autofocus Mode and Single Point AF Autofocus Area Mode for still subjects, and use AF-C Autofocus Mode and Dynamic Area AF or 3D-Tracking Autofocus Area Mode for tracking moving subjects.  Select your desired AF point so that the camera focuses on, or begins to track, your intended subject.  Press the AF Mode Button and then turn the Command and Sub-Command Dials to change the Autofocus Mode and Autofocus Area Mode as you view the settings on the top LCD screen.  There is so much more you can do with the AF system, including selecting the number of active AF points and determining exactly how it tracks moving subjects.  I wrote an entire previous post that goes into more detail about the settings and capabilities of the D7000 autofocus system.

2. Set up your Dual SD Memory Card Slots: The two memory card slots of the D7000 can function in a couple different ways, including using one for RAW and the other for JPEG files, saving all your images to both cards simultaneously, using the second card as overflow when the first one fills up, or saving stills to one and movies to the other.  You can set this up in the Shooting Menu under “Role played by card in slot 2.” To set how the cards function for saving videos, use the Shooting Menu > Movie Settings > Destination.

3. Set or Create a Picture Control for your JPEG Images and Movies: If you are shooting in RAW (NEF) or JPEG and will be post-processing your images in Photoshop, Lightroom, or using the Nikon software, then you don’t need to worry about Picture Controls.  If that is the case, set the Picture Control for Standard or Neutral and that way the images that you view on the camera’s rear LCD screen will be close to how they will appear in the actual RAW image file.  However if you are not post-processing, you will want the images to come out of the camera looking as you want them to, so you will need to set, customize, or create a Picture Control that best creates your desired look.  Adjust the contrast, saturation, brightness, and sharpening to achieve the look you are after.  Save the Picture Controls you have created to access them later.  You can even create your own styles using the included software, or find them online and download them.  There are styles to be found online that recreate the look of various roll films including Kodachrome and Velvia.

4. Verify that you Haven’t Over-Exposed Your Highlights: View your histogram along with your image during image review or image playback to confirm that you haven’t over- or under-exposed your image.  To see the Overview image-view that shows the histogram, press up or down on the Multi-controller during image playback to flip through the different available views.  The histogram will show you if your highlights or shadows have run off the graph, indicating that those areas of the image contain no detail in the highlights or shadows other than pure white or pure black.  In the RGB Histogram and Highlights view, the over-exposed highlights will also blink in the tiny image, indicating that those areas of the image have been “blown-out” and that there is no detail other than pure white in those parts of the image.  If you have over- or under-exposed your image, then…

5. Make use of Exposure Compensation: Explore the various options in Custom Setting b3 to customize exactly how exposure compensation works.  Set it so that you press the Exposure Compensation Button first before turning a dial to change EC, or have it set so that you can just turn a dial to quickly and directly change EC.  You can even select which dial you use with Custom Setting f6.  And you can set it so that the EC amount that you dialed in stays set for the subsequent shots, or that it is automatically reset to zero, depending on which controls you use to set EC.  This last option is the most sophisticated and most flexible, and may be the best one to learn and use.  Using this option, On (Auto reset), you can choose to turn a dial to directly adjust EC, but your EC setting will be reset when the camera or exposure meter turns off .  This is because you can still continue to use the Exposure Compensation Button with a Command Dial to set EC, but by setting it this way, EC will not be reset when the camera or meter turns off.  EC will only be automatically reset if you set it directly using the dial without the button.  So if you wish to use EC for just one shot, you can adjust EC with just the dial.  But if you wish to take a series of shots with the same adjusted EC, you can use the button/ dial combination to set it more “permanently.”  Pretty powerful stuff!  This is why you got the D7000, right?  So that you can take advantage of these sophisticated controls!

Brief Commercial Interruption: Are you already getting a little confused?  Want to learn more about these and other features of the D7000?   I recently completed an e-book user’s guide for the Nikon D7000 called Nikon D7000 Experience that explains all of this and much more.  The guide covers all the Menus, Custom Settings, functions and controls of the Nikon D7000, focusing modes, exposure modes, shooting modes, white balance, etc., PLUS when and why you may want to use them when shooting.  As one reader has said, “This book, together with the manual, is all you need to start discovering all the camera’s potential.” It will help you to take control of your camera and the images you create!  Learn more about the features and settings discussed in the ” tips and tricks” here and much more.  To read more about the book, preview it, and purchase it, see my Full Stop bookstore website here!
Nikon D7000 tips tricks book download manual
Nikon D7000 Experience by Douglas Klostermann

6. Fine-Tune the Exposure Metering Modes: Using Custom Setting b5, you can fine-tune the exposure for each of the different Exposure Metering Modes (Matrix, Center-Weighted Average, Spot), all independently.  For example, if you find that Center-Weighted metering is slightly under-exposing all the time, fine-tune it for +1/3 or +2/3 using Custom Setting b5.  This tweaks the exposure behind the scenes, independent of exposure compensation.  You can still continue to use EC as always, on top of this fine-tuning.

7. Lock Exposure and Focus Independently: Sometimes you need to lock the focus distance before recomposing, or lock the metered exposure setting for one shot or for several shots in a row.  Or sometimes you need to lock both focus and exposure for the same shot, perhaps independently of each other.  By default, the Shutter Button locks focus when you half-press it and exposure is determined when you fully press the Shutter Button to take the shot.  You can use Custom Setting c1 to have the Shutter Button half-press also lock exposure, or better yet use Custom Setting f3 to use the Fn Button for locking exposure.  You can even set it so that you either press and hold the Fn Button or just press it and release.  Then you can use Custom Setting f5 to set the AE-L/AF-L Button for locking focus.  This is known as back-button focusing and that way you can lock these settings independently.  Learning to use back-button focus and even exposure lock can be awkward at first, and you may not fully understand why it is necessary.  But I highly recommend starting to experiment with them, then hopefully getting in the habit of using them all the time – especially if you shoot a lot of action scenes or situations where you are rapidly taking lots of photos (perhaps a wedding and reception), or if you are recomposing your framing between when you focus and when you take the shot.  You may soon find them both indispensable and wonder how you once managed without them!

Nikon D7000 tips tricks how to instruction book download user guide learn
Detail of the Nikon D7000 – photo by author

8. Reverse the Values of the Exposure Indicators: In the viewfinder and on the top LCD screen of the Nikon D7000, the exposure indicator shows the negative values on the right and the positive values on the left.  Perhaps you find this as counter-intuitive as I do.  Ever since grade school, negative values have always been to the left!  Plus with the histogram, the brighter values are shown on the right of the graph, and thus to make use of exposure compensation you would dial to the negative side to correct for over-exposed values, thus moving your histogram to the left.  So why do you have to move the value to the right on the exposure indicator?  It can obviously cause great confusion!  Use Custom Setting f9 to reverse the indicators to the more logical orientation.

9. Put Your Most Used Settings in My Menu: Instead of digging into the menus and Custom Settings all the time to find your most used settings, you can create your own custom menu called My Menu, which is then quickly and easily accessed with the Menu Button.  You can even decide what order to list the items in.  Set up My Menu by selecting Choose Tab in the Recent Settings menu, and select My Menu.  Then Add Items and Rank Items in the order you desire.  You can add items from most all of the Menus and Custom Settings Menus.  Determine what settings you are digging into the menus to look for and change most often, and put them in My Menu, such as maybe Format and White Balance (for more WB options and fine-tuning).  I recommend you include Format since you should re-format your memory card each time you are ready to clear off that card, and not just Erase All.  However, put Format lower down in My Menu so that you don’t have a tragic memory card accident.

10. Make Use of the Other Exposure Modes: While Matrix Metering will do an excellent job of determining the proper exposure of an image the majority of the time, there are some situations where you may wish to use the other exposure modes – Center-Weighted Metering and Spot Metering.  This includes dramatically backlit situations, subjects with a dramatically dark background, scenes that contain a wide range of highlights and shadow areas, or other dramatic lighting situations.  It is best to turn to one of these other modes to ensure you properly meter for the subject and don’t blow the shot.  If the background is not dramatically lighter or darker than the subject, but you still want to ensure that the camera’s metering system concentrates on the subject and not the entire scene, use Center-Weighted.  This is a situation where you may wish to lock in the exposure and recompose if your subject is not going to be in the center in the final framing.  You can even use Custom Setting b4 to change the size of the area being metered with Center-Weighted metering.  If the background is very dark or light and you want the camera to ignore it and just meter on a certain critical area of the scene, use Spot metering.  Again, meter for that critical area, lock the exposure, and recompose.

10a. Quickly Use Spot Metering to Determine a Critical Exposure:  You can use Custom Setting f4 to assign the Depth-of-Field Preview Button to Spot Metering so that you can quickly meter for a precise area without having to take your eye from the viewfinder and change the Metering Mode.  Versatile Custom Settings such as this are a big part of what makes the D7000 such a powerful, customizable camera, and this demonstrates why it is worthwhile to completely understand and take advantage of these advances capabilities.

There are many more great features and settings of the Nikon D7000 to take advantage of.  You have a powerful camera in your hands, so why not learn to take advantage of its advanced features?!  Have a look at my e-book guide Nikon D7000 Experience to learn more about the settings, features, and controls mentioned here, and so much more.  Learn to take control of your camera and the images you create!

Also, please know that there aren’t really any tips or tricks for better photography.  To improve your photography, simply learn your camera inside and out and learn the techniques of dSLR photography (with my e-book!) and then practice, practice, practice taking images, study the results, and look at and learn from the work of talented photographers.

Have a look at that post I mentioned earlier about the autofocus system of the D7000, and another post I’ve written which discusses the Menus and Custom Settings of the D7000.  Some of the same items are addressed, but there is also much additional information to be found in the older posts.

Was this post helpful?  Please let others know about it by clicking the Facebook or Twitter sharing buttons below, linking to it from your blog or website, or mentioning it on a forum.  Thanks!  Want to help support this blog with no cost or effort?  Simply click on the Amazon and B&H Photo logos on the left side of this page to go to those sites and make your purchases.  They will then give me a little referral bonus!

Best-Selling, Most Popular Guide to the Nikon D5100 Currently Available

My e-book user’s guide for the Nikon D5100, called Nikon D5100 Experience, is the best-selling, most popular guide to the camera currently available!  How did I learn this?  Because it is the only guide to the D5100 currently available!

Nikon D5100 book manual download how to instruction tutorial

Through the flexibility of independent e-publishing, Nikon D5100 Experience is available months before any of the other guides for this dSLR are available.  OK, so maybe one of the other ones is selling more in pre-orders – I have no way of knowing that.  But for all the guides currently available…mine is on top!  And is in the top spot for Kindle Hot New Releases in the Photo Equipment AND Photo Reference categories.  And I’m quite proud of it.

Even if it wasn’t the only one currently available, I still think it is the most helpful guide out there, explaining not only the features, controls, and functions of the camera, but more importantly when and why to use them in your photography.

You can learn a lot more about the guide on my Full Stop bookstore website here:
http://www.dojoklo.com/Full_Stop/Nikon_D5100_Experience.htm

Want to become an affiliate and earn 25% commission for selling the PDF version of this e-book?  See here for complete details on how to sign up as an affiliate and make money referring sales of Full Stop e-books on your blog or website!


Ten Tips and Tricks for the Nikon D5100 / D5200

edit 3012-05-07: While this post was originally written for the Nikon D5100, all of these tips also apply to the D5200.  So while I work on an updated Nikon D5200 Tips and Tricks post, start out by making use of these tips.  And of course, they all still apply to the D5100.

nikon d5100 autofocus af system use learn tips tricks how to
Detail of the Nikon D5100

nikon d5200 autofocus af system use learn tips tricks how to dummies guide manual instruction tips tricks
Detail of the Nikon D5200

I’ve spent quite a bit of time with the Nikon D5100 as I researched and wrote my eBook user’s guide Nikon D5100 Experience (and now Nikon D5200 Experience also!), and here are some of the handy “tips and tricks” I’ve learned that may prove useful for you as you set up and use your D5100.  This camera has many features, Menu settings and Custom Settings you can use to make it operate how you want it to and to match your needs and shooting style, so it is worth-while to learn them and/ or to set them up according to your preferences.  For example, in no particular order:

1. Change the Flash Mode and Flash Exposure Compensation Quickly: You can quickly set your desired Flash Mode and then adjust the amount of Flash Exposure Compensation with the press of a button or two and the Command Dial.  Press the Flash Mode Button to raise the flash in P, A, S, or M mode, then press and hold it and turn the Command Dial to change the Flash Mode (Fill Flash, Red-Eye Reduction, Rear-Curtain Sync, etc.).  Press the Flash Mode Button (also the Flash Compensation Button) and the Exposure Compensation Button and turn the Command Dial, and you can quickly change the Flash Compensation as you view it on the Information Display Screen.

Nikon D5100 tips tricks book guide manual instruction user guide for dummies experience
Top of the Nikon D5100 with flash settings controls

2. Assign the Function (Fn) Button: You can use Custom Setting f2 to assign a different function to the Function (Fn) Button than the default Self-Timer setting.  Figure out which setting you change most often or need handy at your fingertips.  Some that I think are most useful are ISO Sensitivity, White Balance, or Auto Bracketing. You can also assign it to +RAW so that if you are shooting in JPEG but have a great image you want an NEF(RAW) copy of also, press the Fn Button first then take the photo, and you will save a copy of the image in both formats.

3. Adjust the Auto Off Timers: Use Custom Setting c2 to set how long the various displays stay visible on the rear LCD Monitor.  Though it may be convenient for them to stay on a long while, that will drain your battery more quickly.  But if they turn off too soon, it is annoying and could affect your shooting in a demanding situation.  So find a happy compromise.  You can set them all to stay on for a reasonable length by setting for NORM, or you can adjust them individually.  My preference is Playback/ menus 20s or 1min; Image review 4s or 8s; Live View 3 min or 5 min; Auto meter-off 20s or 1 min.  The first person to leave a comment on this post correctly telling the difference between Playback and Image Review will get a FREE copy of my latest eBook user’s guide for the Nikon D5100 called Nikon D5100 Experience! See later in this post for more info on this user’s guide – the only guide currently available for the Nikon D5100!

Custom Setting c2 – Auto-off timers

4. See if You Have Over-Exposed Your Highlights: You have to tell the camera which playback views you would like the option of seeing when you look at your images on the rear LCD Monitor, and thus be able to view your histograms and over-exposed highlights.  In the Playback Menu under Playback Display Options, check the ones you want to be able to view.  Two of the most important ones are Highlights and Overview.  These two will let you know if you’ve blown-out (over-exposed) your highlights.  The Highlights view will do this by having those areas of your image blink.  The Overview view will show you by displaying the histogram, which will show you if your highlights or shadows have run off the graph, indicating that those areas of the image contain no detail in the highlights or shadows other than pure white or pure black.

Overview playback view showing the histogram – (note you should set your JPEGs for FINE not NORMAL as I realized the camera default is set at)

5. Set a Precise Fluorescent White Balance: When you change the White Balance (WB) setting using the i Button and Information Display Screen, you can choose from several white balance options including Fluorescent White Balance.  However, there are several types of fluorescent light bulbs ranging in temperature from perhaps 3,000K to 6,5000K.  To tell the camera which one to adjust for, you have to go behind the scenes to the WB options in the Shooting Menu.  There you can set which fluorescent option to use, such as Warm-white or Cool-white.  You can also access this menu item to set your own custom Preset White Balance using a couple different methods.

6. Put Your Most Used Settings in My Menu: Instead of digging into the menus and Custom Settings all the time to find your most used settings, such as the White Balance settings just described, you can create your own custom menu called My Menu, which is then quickly and easily accessed with the Menu Button.  You can even decide what order to list the items in.  Some possible items to add could be perhaps auto bracketing or HDR if you often make use of those.

Brief Commercial Interruption: How did I learn all these useful and convenient settings?  I just completed an eBook user’s guide for the Nikon D5100 called Nikon D5100 Experience. (and now Nikon D5200 Experience also). Following in the footsteps of my bestselling Nikon D7000 Experience, these guides cover all the Menus, Custom  Settings, functions and controls of the Nikon D5100 and D5200, focusing modes, exposure modes, shooting modes, white balance, etc., PLUS when and why you want to use them when shooting.  As one reader has said of my previous D7000 guide, “This book, together with the manual, is all you need to start discovering all the camera’s potential.” It will help you to take control of your camera and the images you create!  Learn more about the features and settings discussed in the tips and tricks here and much more.  To read more about them, preview them, and purchase, see my Full Stop bookstore website here!

Nikon D5100 tips tricks book guide manual instruction "for dummies" Experience Douglas Klostermann     Nikon D5200 tips tricks book guide manual instruction dummies Experience Douglas Klostermann
Nikon D5100 Experience eBook user’s guide

7. Lock Your Focus and/ or Your Exposure Settings Before Recomposing Your Shot: When you press and hold the Shutter-Release Button, the focus distance is locked (or you start tracking the subject in AF-C and AF-A modes), but the exposure is determined when the photo is taken. You can customize how this button and the AE-L/AF-L button function so that you can do back-button focusing, lock the exposure, swap the function of the two buttons, or several other options dealing with focus and exposure.

8. Create Images with More Impact Without Photoshop, Using Picture Controls: If you are not going to be processing all your images in Photoshop, Lightroom, Aperture, etc, you can set or create a Picture Control so that your JPEG images (and videos) have the look you want.  Boost the contrast and saturation, or sharpen them a bit.  You can even shoot in black and white or sepia (though it is best to shoot in color and capture an image with all the original information first).  You can save your custom Picture Controls, create your own with the included software, or find ones online then load them on your camera.  Some available online include Picture Controls that mimic the look of roll films such as Kodachrome or Velvia.  But be careful with setting or adjusting Picture Controls if shooting in RAW.  Find out why in my user’s guide!

Adjusting the Picture Control settings

9. Set the ISO Sensitivity Control to Help you out in Difficult Situations: Of course you can adjust the ISO setting on the fly, but you can also set up the camera to automatically adjust some settings if you are in a situation where the lighting changes and the camera determines you will not be able to get the shot without some adjustments to the ISO and/ or shutter speed.   You can set this in the Shooting Menu under ISO Sensitivity Settings, where you can turn this option on, then tell the camera the maximum ISO and minimum shutter speed to use in these situations.  I suggest you set the ISO no higher than 3200 or 6400 if you are willing to accept some noise, and the minimum shutter speed for around 1/30, which you can still hand-hold if careful.  However, if you are carefully metering and adjusting your settings and you don’t like the camera making these types of settings changes without your expressed permission, be sure to turn this setting off.

Setting the ISO Sensitivity Settings

10. Have the Camera Assist You with Manual Focusing: Although digital SLR cameras are designed to be used with their sophisticated autofocus systems, some users prefer to manually focus or are using older manual focus lenses.  And situations such as close up and macro photography sometimes require precise manual focusing.  If you are going to be turning off the autofocus on your camera and lens, you can have the camera assist you in focusing with the Rangefinder.  The camera uses the exposure indicator in the viewfinder to tell you if you are focusing in front of or behind your subject, or if you are in focus.

There are numerous other cool settings you can take advantage of with your D5100 or D5200, including things like Auto Bracketing for Exposure, in-camera HDR, reversing the direction of your Command Dial or exposure indicator, changing the format and color of your Information Display, adjusting your file sizes and types to maximize your maximum continuous burst rate, and determining your best settings for video shooting.  All of these and more are discussed in my e-book user’s guides, Nikon D5100 Experience and Nikon D5200 Experience, both available now.  Learn more about the books, preview them, and purchase at my Full Stop website here. Learn to take control of your camera and the images you create!

Also, please know that there aren’t really any tips or tricks for better photography.  To improve your photography, simply learn your camera inside and out and learn the techniques of dSLR photography (with my e-book!) and then practice, practice, practice taking images, study the results, and look at and learn from the work of talented photographers.

I put together a video and a more in-depth article to introduce and further explain the D5100 autofocus system:

For more detailed information read the article Taking Advantage of the Nikon D5100 Autofocus System.

Still haven’t purchased your Nikon D5100, or need a better lens? Check them out on Amazon below.  I appreciate it if you use these referral links to make your purchase – Amazon will give me a small referral bonus which helps support this blog!  Or use the other camera store links on the left side of this page.  Thanks!

See and buy the Nikon D5100 with 18-55mm Lens on Amazon

See and buy the Nikon D5100 – Body Only on Amazon

Look for a new Nikon Lens on Amazon – I suggest considering the high quality, versatile, all-purpose
Nikon 18-200mm f/3.5-5.6G VR

Was this post helpful?  Please let others know about it by clicking the Facebook or Twitter sharing buttons below, linking to it from your blog or website, or mentioning it on a forum.  Thanks!

Nikon D5100 Experience e-book user’s guide Now Available!

Nikon D5100 User’s Guide

My latest eBook user’s guide, Nikon D5100 Experience – The Still Photographer’s Guide to Operation and Image Creation with the Nikon D5100, is available for purchase!  This guide will not only help you to learn the functions, controls, and custom settings of the D5100, but also when and why to use them.  As one reader has said of the Nikon Experience guides, “This book, together with the manual, is all you need to start discovering the camera’s full potential.”

Go beyond the Nikon D5100 manual and take control of your camera, the image taking process, and the photos you create.

Learn more about it, view a preview, and purchase it on my Full Stop ebook website:

http://www.dojoklo.com/Full_Stop/Nikon_D5100_Experience.htm

Nikon D5100 manual download book guide tutorial how to for dummies instruction Nikon D5100 Experience ebook

Go Beyond the Nikon D5100 Manual with this D5100 e Book User’s Guide

Nikon D5100 User’s Guide

My latest e-book, a user’s guide for the Nikon D5100 digital SLR, is called Nikon D5100 Experience – The Still Photographer’s Guide to Operation and Image Creation.  This guide goes beyond the manuals to help you set up and learn the camera, plus more importantly when and why to use the various controls, features, and custom settings when photographing.  As one reader has commented about my previous Nikon D7000 guide, “This book, together with the manual, is all you need to start discovering the camera’s full potential.”

Nikon D5100 book guide manual tutorial how to for dummies instruction Nikon D5100 Experience ebook

This instant download Nikon D5100 e book is for those who wish to get more out of their camera and to go beyond Auto and Program modes and shoot in A mode and S mode. To get you started, it includes explanations and recommended settings for all Playback, Shooting, and Setup Menus, Custom Settings, and Movie Mode settings of the D5100.  It covers basic dSLR camera functions and exposure concepts for those new to digital SLR photography, and explains more advanced camera controls and operation, such as using the various metering modes and exposure compensation for correct exposure of every image, controlling autofocus modes and focus points for sharp focus of still or moving subjects, and utilizing dramatic depth of field for professional looking photographs.  This guide builds on the information provided in the manuals and explains essential settings and information to help you get out there shooting in the real world.

You can preview Nikon D5100 Experience at the following link. The preview shows the Table of Contents and Introduction, a sample D5100 Menu Settings page, a sample Custom Settings page, and a sample text page.

http://www.dojoklo.com/writing/Nikon-D5100-Experience-Preview.pdf

Nikon D5100 Experience not only covers the various settings, functions and controls of the Nikon D5100, but it also explains when and why to use them for your photography. The guide focuses on still-photography with a brief introduction to the movie menus and settings to get you up and running with video. Sections include:

  • Setting Up Your D5100 – All of the D5100 Custom Settings and Playback, Shooting, and Setup Menus, with brief descriptions and recommended settings for practical, everyday use. Set up and customize the advanced features of your dSLR to work best for the way you photograph.
  • Aperture Priority Mode (A) and Shutter Priority Mode (S) – How and when to use them to create dramatic depth of field or to freeze or express motion.
  • Auto Focusing Modes and Area Modes and Release (Drive) Modes – How they differ, how and when to use them to capture sharp images of both still and moving subjects. Also how and when to use focus lock.
  • Exposure Metering Modes of the Nikon D5100 – How they differ, how and when to use them for correct exposures in every situation. Also how to make use of exposure lock.
  • Histograms, Exposure Compensation, Bracketing, and White Balance – Understanding and using these features for adjusting to the proper exposure in challenging lighting situations, and setting custom white balance.
  • Composition – Brief tips, techniques, and explanations, including the creative use of depth of field.
  • The Image Taking Process – A descriptive tutorial for using the settings and controls you just learned to take photos.
  • Photography Accessories – The most useful accessories for day-to-day and travel photography including accessories specific to the D5100.
  • Introduction to Video Settings – Some basic settings to get you started

This digital guide to the Nikon D5100 is a 70 page, illustrated PDF document that expands upon the information found in the D5100 manuals, to help one begin to master their dSLR and learn to use the Nikon D5100 to its full capabilities!  It is packed with helpful information applicable to the new and intermediate dSLR photographer – to begin to turn you into an advanced digital photographer!

Author: Douglas Klostermann
Format:
PDF – Instant Download – read on your computer, print on your printer, transfer to your iPad, Android, or other tablet, transfer to your Kindle, Nook or other e-reader.
Page Count: 70 pages, illustrated
Price: $10.99

(plus 6.25% sales tax for residents of Massachusetts)
Secure payment with PayPal or Credit card

Buy Now with PayPal! or Buy Now

This PDF version is 8.5″x11″ and can be read on your computer, printed, or loaded to your tablet, e-reader, or iPad or iPhone following these instructions on the FAQ page

Other versions of Nikon D5100 Experience e-book:

The Kindle edition is available on Amazon.com
The Nook edition is available on BarnesandNoble.com
The iPad and iPhone version is available through Apple’s iTunes or through the iBooks App on your mobile device.

What Readers are Saying about Nikon D5100 Experience:

I read it from front to back in one sitting, playing with the camera as I went along, and I found it covered all the major things I was having trouble with.  It left me much more confident about focusing and exposure issues particularly.  If you are new to DSLRs or want to bypass hours of hunting through manuals, this is great.  There are many sensible real-world suggestions for configuring the camera that are very helpful, the author writes clearly and concisely, and his approach is accessible and friendly.  If you’re having trouble getting going with your new camera, I think this is well worth it.
Jay M.

Great manual! This book made it much easier to operate my new Nikon D5100.  It basically expands on the manual that comes with the camera and tells you what each setting is and what you should set it at.  It also gave me some great pointers on Aperture priority mode, Shutter and ISO. Highly recommended!
-GK

From beginners to experienced users: This guide is very useful for beginners to experienced users.  When you buy this kind of camera you want to understand the best ways to freeze moments which is exactly explained in this book.  This book is written in a human way by an experienced photographer who gives you the tips you need to create a beautiful picture – how to prepare your camera, create shortcuts, or activate such options to make you efficient in the field.  I would recommend this e-book to every new Nikon D5100 buyer!
-Oliver

What Readers are Saying about Doug’s previous guide, Nikon D7000 Experience:

This book, together with the manual that came with your camera, is all you need to start discovering the full potential of the D7000.
-Max M.

It’s the first guide I’ve read which has taken me through all the settings in an understandable way. I now feel that I have control over the camera.
-Peter S.

I would recommend this to anyone who wants to get a quick start to using the D7000.  Manuals are nice, but this eBook highlights the important information and gives a quick easy to understand explanation of most all of the functions and controls.
-Ray M.

I found the Nikon manual good for understanding how to set things up but not much on the why – this book really focuses on the “why.”   I would like to thank you for saving me time – now I’m confident  that my camera is well tuned!
-Benoit A.

This manual is a clearly written, concise and useful explanation of the rationale for the seemingly infinite and often confusing settings options for the D7000. Used in conjunction with the Nikon manual I feel a bit more confident in understanding how to at last proceed in getting better photographs.
-WLS

It’s clear, concise and gets to the heart of the camera’s multiple and often confusing options. Very highly recommended – for experienced user and beginner alike. As previous reviewers have remarked, the official manual is very good on what to do, but not so clear on why.
-GSA

Learn to use your D5100, quickly and competently, to create the types of images you want to capture. The Nikon D5100 is a sophisticated and customizable tool, and this guide explains how to start to use it to its full capability.  It will help you begin to take control of your camera, the image taking process, and the photos you create.

See and buy the Nikon D5100 with 18-55mm Lens on Amazon $899

See and buy the Nikon D5100 – Body Only on Amazon $799

Any other purchase on Amazon.com (use this link or any of my Amazon links to help support this blog.  Thanks!)

I have also created a video introduction to the D5100 autofocus system: