Nikon D850 Tips and Tricks: New and Hidden Features of the D850

The introduction of the Nikon D850 has resulted in tremendous excitement for Nikon photographers, with features and improvements that have exceeded expectations. This full-frame (FX) dSLR offers both high-speed shooting and a high resolution 45.7 megapixel sensor, as well as great image quality at high ISO settings for low-light shooting. The camera boasts a responsive 153 point autofocus system, with 99 cross-type points and 55 selectable AF points spread widely across the central area of the viewfinder. Plus all of the AF points are capable of focusing in very dim lighting. This superb autofocus system, combined with a fast 7 frames per second (fps) continuous frame rate and extremely large buffer, will allow you to maintain this rapid frame rate for up to 200 RAW images in a continuous burst, making the D850 ideal for sports, action, bird, and wildlife photography. The frame rate can even be improved to 9 fps with the addition of the Nikon MB-D18 Battery Pack and an EN-EL18b battery.

For those coming to the D850 from a previous, advanced Nikon dSLR, and who are already familiar with the typical features, functions, and controls and wish to immediately learn about the new and upgraded features and buttons, below is a summary of what has been added or improved with the D850. I’ve described some of these features as “hidden” features, because they can only be accessed in very specific ways, sometimes outside of using the menus or Custom Settings, and may be challenging to find if you are not familiar with them.

Nikon D850 tips tricks book manual guide body controls how to set up

Detail of the Nikon D850 dSLR camera.

This article is based on the “New and Hidden Features” section of my Nikon D850 Experience guide to the camera. Be sure to have a look at this clear and comprehensive guide to learn about all the controls, features, Menus, and Custom Settings of the D850, as well as when and how to make use of them in your photography. You can learn more about the guide on my Full Stop Books website here: http://www.fullstopbooks.com/nikon-d850-experience/.

Nikon D850 Experience book manual how how to use tips tricks

New Features of the D850

First, it is important to note that while the OK Button and the Multi Selector Center Button are often interchangeable for completing menu functions, there are some functions that require you to use the OK Button. The most notable example of this is when you are formatting a memory card. You need to press the OK Button to complete this process, not the Multi Selector Center Button as you may be used to!

-Large 3.2” High-Resolution (2,359K-dot), Tilting, Touch-screen LCD Monitor, which can be color customized with the Monitor Color Balance item of the Setup Menu. The touch screen capability allows you to view, zoom, and scroll through playback images, enter text with the on-screen keyboard, as well as select an autofocus area and Spot White Balance area when working in Live View, and to release the shutter in Live View. The “Frame Advance Bar” for image review enables you to use the touch screen to quickly scroll through images without having to swipe one-by-one. Simply touch the lower portion of the rear Monitor during image playback to access the frame advance scroll-bar.

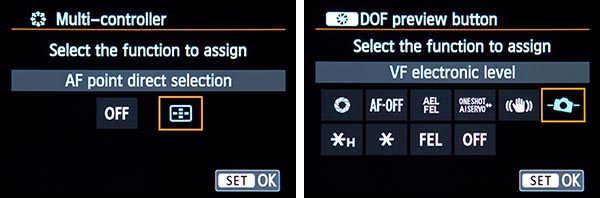
-Modified and New Controls, and Illuminated Buttons – As with most current Nikon dSLR models, the D850 includes the AF Mode Button and Focus Mode Selector switch, located on the front of the camera near the base of the lens. If you are not yet used to this control, you will find that it allows you to quickly change the AF Mode and AF-Area Mode by pressing the button and turning the appropriate Command Dial. The D850 includes the Sub-Selector joystick control rather than the AE-L/AF-L Button. This control can be used to select AF Points as well as navigate menus, and the button press can be customized to your desired function, such as focus lock and/ or exposure lock. The Mode Button and ISO Button have been moved compared to previous models, and the D850 has a Metering Mode Button rather than a small dial of older models. The D850 also has two customizable Fn-Function Buttons, and the i Button which enables quick access to various functions during shooting, Live View, and playback. Many of the buttons and controls can be customized in the Custom Setting f1 menu so that you can quickly access various functions and settings while shooting. The buttons of the D850 are also now illuminated, to help locate them in low light (see Figure 1 – left).

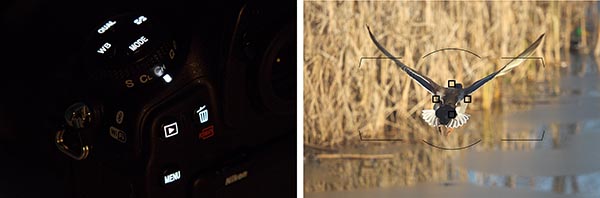
Figure 1 – Left: Detail of the illuminated buttons of the D850. Right: Simulated view of the Viewfinder with Group AF Area Mode in use.

Group-Area AF Area Mode – A group of five large AF Points (and adjacent assist points), configured in a cross-shaped pattern, can all be used together to help focus on a subject, in situations where using a single AF Point may not work as well (see Figure 1 – right).

Highlight-Weighted Metering Mode – This mode helps to prevent the overexposure of highlights, such as a subject under bright stage lighting.

-No Built-In FlashWhile the D810 has a built-in flash, the D850 requires an optional external Speedlight if you wish to make use of flash. The front Flash Button of the D810 is thus eliminated, and the Flash settings can be accessed as a secondary function of the Zoom-out Button.

XQD High Speed Memory Card Slot, in addition to the SD memory card slot – Making use of an XQD card will allow you to take advantage of the maximum continuous burst capability of the D850, including 51 consecutive images when capturing 14-bit lossless compressed RAW L files. With the dual memory card slots, you can choose which slot is the primary one, and the function of the other card, including Overflow, simultaneous Backup, or recording NEF (RAW) to one card and JPEG to the other (see Figure 2 – left).

Figure 2 – Left: Secondary Slot Function menu item, to select the function of the second memory card. Right: ISO Sensitivity Settings, including the versatile Auto ISO options.

-Expanded Native ISO Sensitivity Range – The native ISO range is expanded to include ISO 64 to 25,600. This can assist photographers with decreased noise at higher ISO settings. You can also select the Lo settings (down to ISO 32), and the Hi settings (up to the very grainy ISO 102,400).

Auto ISO Options – As with all the other current Nikon dSLR models, the D850 offers a powerful Auto ISO option, which will change the ISO setting if necessary in order to obtain a proper exposure, including when capturing images or recording video in Manual (M) Mode. You can set the parameters of Auto ISO, including the Maximum Sensitivity and Minimum Shutter Speed that the camera will use for Auto ISO (see Figure 2 – right). One useful option is that if you set the Minimum Shutter Speed to the Auto setting, the camera will select a shutter speed based on the focal length of the lens. For example, a longer telephoto lens requires a faster shutter speed to avoid blur from camera movement. But, if you are unhappy with the choice that the camera is making, you can continue to press right from the Minimum Shutter Speed > Auto setting, and you can fine-tune this setting so that the camera selects a faster or slower Auto shutter speed.

-RAW S and RAW M File Types – The smaller RAW S and RAW M formats will allow you to capture smaller RAW images, of reduced file size and resolution compared to full RAW images. However they lack the full quality of the RAW L files, have been shown to exhibit some softness compared to RAW L, and will be Lossless Compressed, 12-bit files.

Nikon D850 autofocus af points viewfinder grid

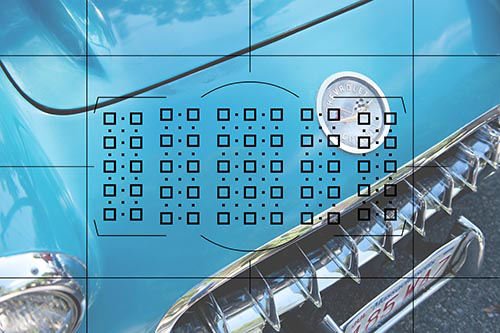
Figure 3 – Simulated view of the D850 Viewfinder, showing the location of all 153 AF Points, including the assist points. Note that only the active AF Point(s) will be visible in the Viewfinder. Background image shown at 75% opacity to better see Viewfinder elements.

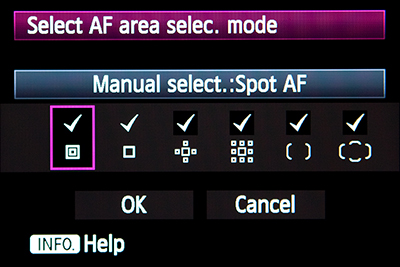
-Improved Autofocus System – The D850 boasts 153 AF Points, 55 of which are selectable (see Figure 3). (The non-selectable points are assist points, typically located between the larger selectable points.) Of all these points, 99 are more accurate cross-type points (with 35 selectable cross-type). The large number of points, spread relatively widely across the frame, will allow you to more accurately track moving subjects when using AF-C AF Mode. When tracking moving subjects using 3D-Tracking AF-Area Mode, you can choose to make use of face detection (Custom Setting a4). And you can customize new focus tracking parameters to best match the motion of your subject (Custom Setting a3). The autofocus system can achieve focus in extremely low light, down to -4 EV for the center AF Point, and -3 EV for all of the other 152 other points.

Auto AF Fine-Tune – You can make use of Live View focusing to automatically fine tune the autofocusing of individual lenses, to correct for back-focus or front-focus issues (see Figure 4 – left). The data acquired by the process is entered into the AF fine-tune item of the Setup Menu, and registered for the attached lens.

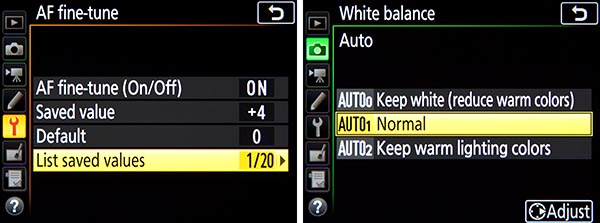
Figure 4 – Left: AF Fine-Tune menu, where Auto AF Fine-Tune data is saved and modified. Right: New Auto White Balance options.

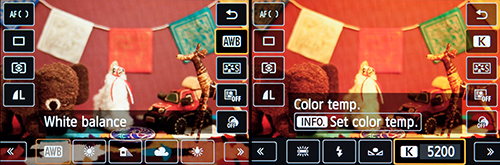
-White Balance Improvements – You can now choose between three different Auto White Balance options, including Keep white (reduce warm colors), Normal, and Keep warm lighting colors, as well as a new Natural Light Auto setting, which obviously adjusts the colors for what is seen by the eye under natural light (see Figure 4 – right). And you can store up to 6 Preset (PRE) White Balance settings, as well as make use of the new Spot WB measurement feature when working in Live View. You can also select a separate white balance for movie shooting while retaining the current photo shooting white balance, or set the movie white balance to be Same as photo settings.

Flicker Reduction – With this new anti-flicker option, the camera will detect the flickering of certain types of lighting often found in stadiums and areas, and will adjust the timing of the shutter release in order to maintain more consistent exposures.

Electronic Front-Curtain Shutter – This can help to reduce camera vibrations and thus potential blur in controlled situations such as landscape and macro shots. It is used with the Mirror Up (Mup) Release Mode during either Viewfinder or Live View shooting. The D850 also adds the ability to use this feature with the Quiet (Q) and Quiet Continuous (Qc) Release Modes. With the high resolution 45.7 megapixel sensor of the D850, these slight movements can become more apparent in images.

Picture Controls Options – The D850 offers the new Flat Picture Control, which is desired by videographers as it provides the greatest latitude for post-procesing by helping to retain details in both highlights and shadows. It can also be used for still images that are going to be heavily processed. Also, the Picture Controls now include a Clarity setting, the Brightness adjustment allows a wide range, and the settings allow finer (0.25 step) adjustment increments, and an Auto option (see Figure 5 – left). As with white balance, you can also select a separate Picture Control for movie shooting while retaining the current photo shooting Picture Control, or set the movie Picture Control to be Same as photo setting.

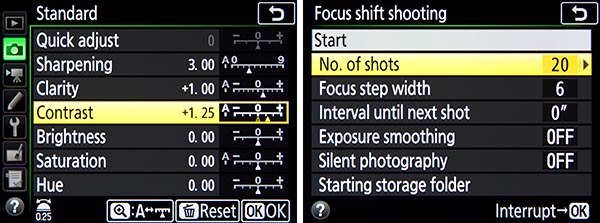
Figure 5 – Left: Picture Control options, including Clarity, and the ability to make adjustments in 0.25 increments. Right: The Focus Shift Shooting menu, used to set up and initiate this feature.

-Focus Shift ShootingThis new feature of the D850 enables you to take a series of images of the same scene, where the focus distance is automatically changed by the camera for each image. You will select the Focus step width to be used, which is a relative distance (see Figure 5 – right). The images can then be combined, using optional software, to make use of a technique called focus stacking. This is often used in close-up and macro photography, since it is difficult or impossible to capture the entire subject in focus in a single image, at such a close distance.

-Live View Pinpoint AF-Area ModePinpoint AF is a new Live View AF-Area Mode added on the D850. It is similar to Normal-area AF, except that it makes use of an even smaller focus point, so that you can focus on a more precise area or detail (see Figure 6).

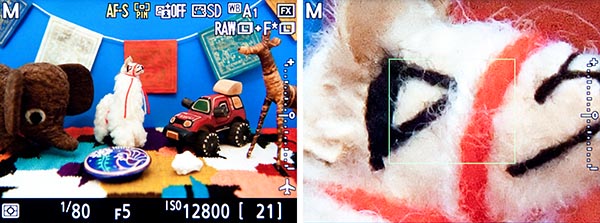
Figure 6 – Left: Setting the Live View Autofocus Area Mode for “Pinpoint AF” as indicated by the icon highlighted in yellow at the top-center of the screen. Right: A view of the rear monitor, zooming in on the scene, to show the size of the Pinpoint AF area.

-Silent Live View PhotographyThis option can be used to completely eliminate the sound of the shutter when working in Live View, as well as reduce internal camera movement which can lead to image blur when working on a tripod with still subjects. The On (Mode 2) option can be used for extremely high frame rates of up to 30 fps for 3 seconds, however you will only be able to capture cropped images of the DX Image Area size, and the Image Quality will be JPEG Normal, Optimal Quality.

-Negative Digitizer – This new Live View feature of the D850 will enable you to transform your color negatives or black and white negatives into positive images (see Figure 7). Nikon also offers the Nikon ES-2 Film Digitizing Adapter Set, which includes holders for 35mm film strips and slides, and attaches to the AF-S Micro 60mm f/2.8 lens. This can be used with the Negative Digitizer feature to more easily “scan” your negatives and capture them as high-resolution files.

Figure 7 – Press the i Button during Live View to access the Negative Digitizer option (left), which reverses a film negative to the positive image, and you can then capture a high resolution photo of it.

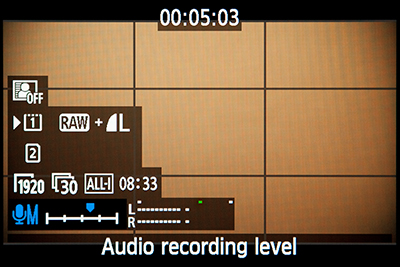
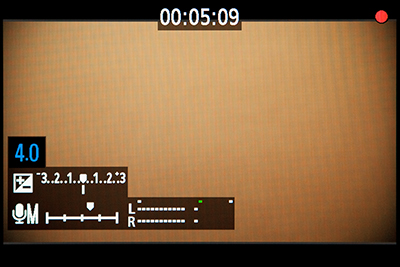
-Video improvements – The D850 now boasts 4K Ultra High Definition (UHD) video (3840 x 2160), in addition to Full HD video. And 4K video makes use of the entire width of the sensor, without the 1.5x crop of previous models. Plus the camera offers new Electronic Vibration Reduction to help stabilize the scene when hand-holding, the Active D-Lighting option for full HD recording, the Flat Picture Control, built-in stereo microphones, the Power Aperture feature when recording to a memory card or to an external device, simultaneous recording to an internal memory card and external recorder, selectable audio frequency range (the standard Wide range or the narrower Vocal range), and Auto ISO during Manual (M) Exposure Mode for smooth exposure transitions while retaining the desired aperture and shutter speed settings. The D850 includes “zebra stripes” Highlight Display for viewing highlights and potentially overexposed areas, with the ability to adjust the brightness sensitivity as well as the pattern of the stripes. The D850 also includes the new Peaking Highlights focus peaking feature for Live View and movie shooting, which enables you to verify on the rear Monitor exactly what areas or parts of the subject are in-focus, when manually focusing (see Figure 8). The in-focus areas will be indicated by colored outlines, and you can select the sensitivity as well as which color is used on the screen.

Nikon D850 focus peaking video manual focus

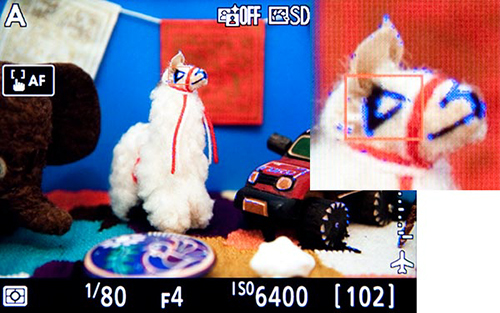
Figure 8 – Peaking Highlights enabled during Live View shooting. Here, the blue areas on the hood of the toy car and on the llama’s face indicate that those details are in-focus (see inset detail of llama’s head).

Wi-Fi and Bluetooth – Used in conjunction with Nikon’s new SnapBridge app, the wireless connection between the camera and a smart device can be used to remotely control the camera and to transfer images, as well as to share GPS information from the phone to the camera. You will need to initiate a Bluetooth connection between the camera and the SnapBridge app, and the app will prompt you to switch to a Wi-Fi connection when required.

-New Multiple Exposure Options – These include new overlay options of Add, Average, Lighten and Darken, which will allow you to further process multiple exposure images. The camera also provides the option to Keep all exposures, so that the individual frames that make up the multiple exposure can be saved, and you can use the Select first exposure (NEF) option to choose a RAW image already on the memory card to be the first frame of the multiple exposure (see Figure 9 – left). When a multiple exposure series is in progress, you can press the Playback Button and then the i Button to access a menu which will allow you to view the progress, as well as edit the series by retaking or discarding the last exposure if desired.

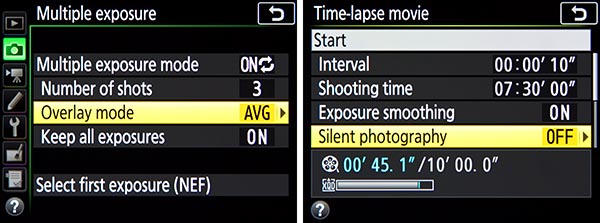
Figure 9 – Left: Multiple Exposure options, including the new Overlay Mode option. Right: Time-Lapse Movie, including the new Silent Photography option.

-New Interval Timer and Time-Lapse Movie Options – The D850 offers Exposure Smoothing options for Interval Timer and Time-Lapse shooting to help maintain consistency among the individual exposures. You can create UHD 4K time-lapse movies, in-camera, or use the Interval Timer feature to capture full-quality still images that can be combined, with optional software, into an 8K time-lapse movie. The Interval Timer menu also offers the Silent Photography option, and enables you to automatically create a new folder to store the images. The Time-Lapse Movie menu offers new options such as Silent Photography, Image Area, and Frame Size / Frame Rate. (see Figure 9 – right). An Interval Priority option will become active in P and A Shooting Modes (if enabled), if the exposure time conflicts with the interval time.

-New Menu and Custom Settings Options – In addition to the above improvements, the D850 offers several new options in various menu items and Custom Settings, such as the option to batch process multiple images when using the NEF (RAW) Processing feature of the Retouch Menu. The After Burst, Show item of the Playback Menu will enable you to choose which image in a burst is initially shown during image playback, either the first or the last.

Nikon D850 Chevrolet Corvette 1960

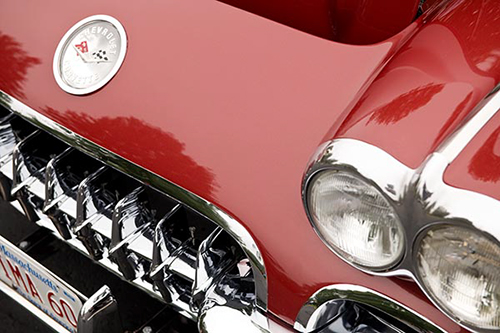
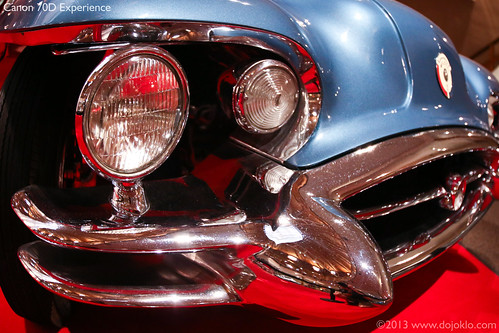
1960 Chevrolet Corvette – Great Bay Corvette Club Car Show, Newington, New Hampshire – Shutter speed 1/640, Aperture f/5.6, ISO 400, Exposure Compensation +1.

“Hidden” Features of the D850

Users are often curious about “hidden” features that their camera may have, though typically most dSLR models really don’t have many, as long as one carefully goes through all of the Menu and Custom Settings items, and reads through the manual or a guide. However, with so many options and functions, there are a few items that truly are actually a bit hidden away on the Nikon D850. It’s not that the D850 manual doesn’t mention them, or that they can’t be found with careful investigation of the camera, but you may need to have them called to your attention to learn how to locate them and how to take advantage of them. And there are a few button shortcuts to access features and settings that you simply need to learn if you wish to take advantage of, because once you are using your camera, they are not indicated in any menus or button icons.

Some of these features were just listed above in the new features, and several of them are accessed with the i Button when working in the appropriate mode. Others are accessible in the menus but may require an understanding of the options as they are listed, or might require additional steps of sub-menu navigation to locate them.

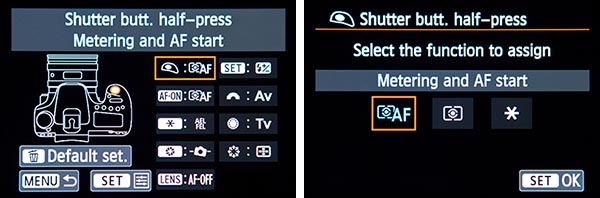
Information Display and Button Settings – If you first press the Info Button to display the Information Display on the rear Monitor, you can then press most of the camera buttons to change the corresponding settings as you view them on the larger rear screen, rather than on the smaller top Control Panel. For example, you can press the AF Mode Button, and turn the appropriate Command Dial to change the AF-Area Mode and the Focus Mode (see Figure 10 – left). The screen will even indicate which Command Dial to use for each setting. This can also be used for the buttons on the top of the camera such as White Balance and ISO, as well as the BKT (Bracketing) Button and Flash (Zoom-out) Button.

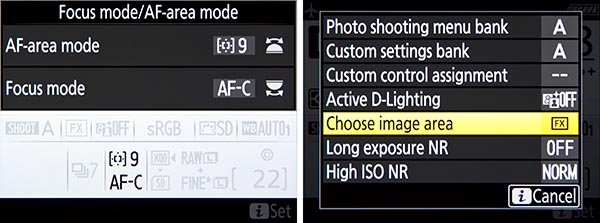
Figure 10 – Left: First press the Info Button to display the Information Display, then press most any of the camera buttons to view and change those settings as you view them on the rear Monitor, such as the AF Mode Button for the autofocus settings. Right: Press the i Button during shooting to access the Photo Shooting i Button menu.

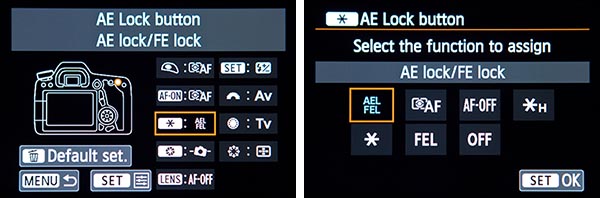
i Button Features – The D850 includes the i Button, which is included on most other current Nikon dSLR models. Pressing the i Button when shooting will allow you to access and change several settings using the i Button menu on the rear LCD Monitor, such as Active D-Lighting, Image Area, Long Exposure Noise Reduction, and High ISO Noise Reduction (see Figure 10 – right). It will also allow you to access the Custom Control Assignment menu where you assign the function of various camera buttons including the Pv, Fn1, and BKT Buttons, and the Sub-Selector joystick. When working in Live View, Movie Live View, image playback, and movie playback, the i Button will access a contextual menu for each mode, and in some situations it is the only way to access and change certain of these “hidden” features.

i Button in Live View – For example, the Live View i Button menu will allow you to access the Photo Live View Display White Balance feature. This feature allows you to set the white balance of the Live View screen separately than the white balance that will be used when the image is captured. While this may sound odd, it can come in handy when setting up a shot that will actually be taken with different lighting, such as with a Speedlight or studio strobes. So using this feature, you can set the white balance of the LCD Monitor to better set up the scene in the current lighting. The i Button is also the only way to access the Negative Digitizer, and the Split-Screen Display Zoom during Live View, where you can simultaneously zoom in on two different areas of the frame to help determine if they are level (see Figure 11). This can come in handy for landscape and architectural photographers.

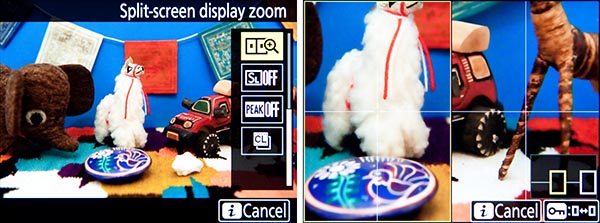
Figure 11 – Live View i Button Menu – Press the i Button when in Live View or in Movie Live View to access the applicable i Button Menu screen and items such as Split-Screen Display Zoom (left). Right: Split-Screen Display Zoom shown in use, to compare two areas of the same scene to help determine if the framing is level.

The Live View i Button Menu can also be used to quickly access Silent Live View Photography and the Peaking Level sensitivity setting for focus peaking. Although the Electronic Front-Curtain Shutter is accessible with Custom Setting d6, and thus isn’t “hidden,” I will mention it here because it can also be accessed with the i Button during Live View. What you need to know is that this feature must be used in conjunction with Mirror Up (Mup), Quiet (Q), or Quiet Continuous (Qc) Release Modes.

Live View Exposure Preview – An important function to make note of is that pressing the OK Button when in Live View will display the Exposure Indicator scale on the screen, and the brightness of the screen will reflect the current exposure settings rather than simply showing the scene at an optimal brightness level (see Figure 12 – left). This will allow you to better preview the resulting image and make exposure adjustments, and will also enable you to view the Live View Histogram, by pressing the Info Button.

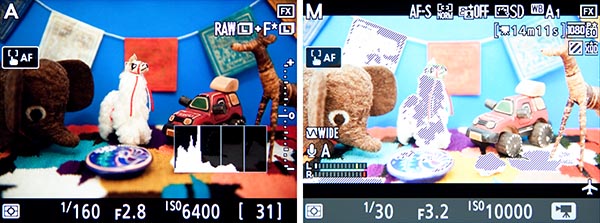
Figure 12 – Left: Press the OK Button when in Live View to enable Exposure Preview, and then press the Info Button to view the Live View Histogram. Right: The movie Highlight Display “zebra stripes” option, which will alert you to overexposed areas of the scene.

i Button in Movie Live View – Just as with Live View, some “hidden” features can be accessed with the i Button when working in Movie Live View. The “zebra stripes” feature is accessed with the Highlight Display item of the i Button menu, and you can select which highlight pattern to use (see Figure 12 – right). This will display diagonal lines on the screen at potentially over-exposed areas of the scene, thus helping you to adjust to the proper exposure. As with Live View, you can also access the Peaking Level sensitivity setting for focus peaking, used with manual focusing. You will also need to press the i Button if you wish to adjust the Headphone Volume if monitoring the audio with optional headphones. And the i Button will access the Multi-selector power aperture feature, where you can press up or down on the Multi Selector to smoothly adjust the aperture setting while recording. Power aperture can also be assigned to the Pv and Fn1 Buttons using Custom Setting g1. The new Electronic Vibration Reduction can also be accessed via the i Button, or by using the Movie Shooting Menu.

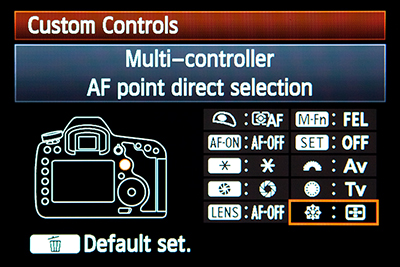
Custom Control Assignments – A few other “hidden” features of the Nikon D850 can only be accessed by customizing one of the camera buttons to assign it to that function. For example, you can make use of the Viewfinder Virtual Horizon, which is a camera level that you can display in the Viewfinder. It will show an electronic level along the bottom of the screen as well as one on the right side, so that you can see both pitch and roll of the camera body. In order to use this feature, you need to use Custom Setting f1 to assign either the Fn1 Button, Pv Button, or Sub-Selector Center press to the Viewfinder Virtual Horizon option. You can also assign the Pv Button or Fn1 Button to the 1 Step Speed / Aperture setting, which will allow you to quickly change the shutter speed or the aperture setting in 1 EV (full stop) increments, rather than the typical 1/3 EV adjustments that are made when you turn Command Dials. This can come in handy for manually bracketing exposures, such as for a series of images that you will later combine into an HDR image.

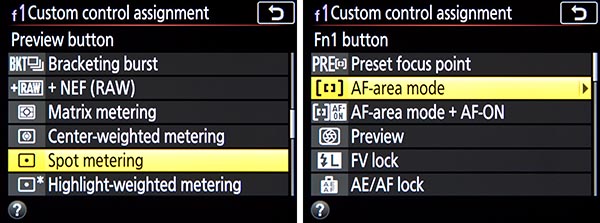
Figure 13 – Custom Control Assignments  Left: Assigning the Preview (Pv) Button to the Spot Metering function, to temporarily switch to a different Metering Mode. Right: Assigning the Function 1 (Fn1) Button to the AF-Area Mode option, to temporarily switch to a different AF-Area Mode.

Another handy customization will allow you to press and hold a button to temporarily switch to a different Metering Mode such as Spot Metering (see Figure 13 – left). Or you can press a button to temporarily switch to a different AF-Area Mode (see Figure 13 – right). For example, if you have set up the camera to capture a bird in flight using Dynamic-Area 25 Point AF-Area Mode, you can customize the camera to press the Pv Button, Fn1 Button, AF-ON Button, or Sub-Selector Center to temporarily switch to Single-Point AF to better capture a still subject.

Figure 13a – Left: Customize Command Dials, Menus and Playback options. Right: Customize Command Dials, Sub-Dial Frame Advance options.

Sub-Dial Frame Advance during Playback – If you wish to quickly scroll through your images as you view them on the rear Monitor during playback, you can use the rear Main Dial to advance one image at a time, and use the front Sub-Command Dial to advance 10 or 50 images. To set this up, access Custom Setting f4, and set the Menus and playback option for On (see Figure 13a – left). Setting for On (image review excluded) also allows you to use the Command Dials for menu navigation and image playback in the same manner as On, but they will have no effect during image review. (Image playback is when you press the Playback Button to view images, and image review is when the images are automatically displayed immediately after capture.)

The Sub-Command Dial will then be used to jump 10 or 50 images at a time (based on the next setting in this menu, Sub-dial frame advance), or to navigate up and down when reviewing thumbnails, or to access sub-menus when navigating menus. Set the Sub-dial frame advance item for 10 images or 50 images, or you can also choose to jump to protected images, still images or movies only, or to a different folder (see Figure 13a – right). Jumping 10 images is a handy setting when you are quickly scrolling through numerous images on a memory card.

OK Button and Multi Selector Shortcuts – During image playback, you can press the OK Button and simultaneously press the up arrow on the Multi Selector thumb pad to access the Choose slot and folder options. This allows you to quickly choose which memory card (SD or XQD) and folder is being accessed during image playback, so that you can quickly locate specific image files. You can also simply scroll through the images from one card to the next, or you can press the Zoom-out Button repeatedly to access this Choose slot and folder screen (rather than the calendar view screen of other Nikon models). You can also press the OK Button plus the right arrow of the Multi Selector to access the Retouch Menu. When using an optional Nikon WT-7 Wireless Transmitter, you can press the OK Button plus the Multi Selector Center Button to immediately upload a photo over a wireless or Ethernet network.

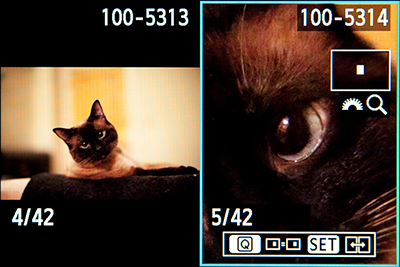
Figure 14 – Custom Setting f2 – Multi Selector Center Button, Playback Mode – Set the Center Button for Playback Mode to show a magnified view (left), or to show a large histogram (right).

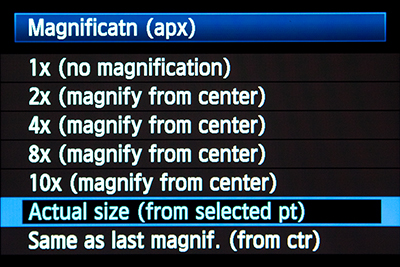
One Button Playback Zoom / Histogram – Using Custom Setting f2, you can assign the Multi Selector Center Button so that during image playback it will immediately zoom-in, at the magnification level of your choice, centered at the area of the active focus point so that you can closely inspect your image (see Figure 14 – left). Or you can instead assign the button press to display a large histogram with the image, so that you can evaluate your exposure (see Figure 14 – right).

Autofocus Auto Fine-Tune – As mentioned above, the Autofocus Auto Fine-Tune feature will enable you to use Live View focusing to automatically fine tune the autofocusing of individual lenses. The procedure involves first simultaneously pressing the AF Mode Button and Movie Record Button (see Figure 15 – left).

Live View Spot White Balance – This feature enables you to take a white balance measurement of a precise area of the scene when working in Live View. This is accessed by setting the white balance to Preset Manual (PRE), then pressing the WB Button until the PRE icon flashes. You can then tap on the touch screen to select the area used for the Spot White Balance Measurement (see Figure 15 – right).

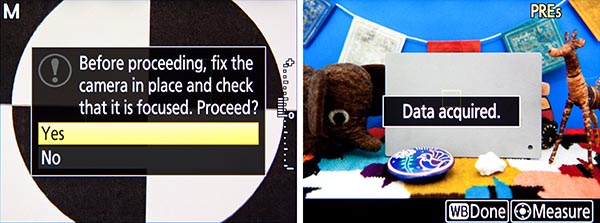
Figure 15 – Left: Simultaneously press the AF Mode Button and Movie Record Button to begin the Autofocus Auto Fine-Tune procedure. Right: Use the Live View Spot White Balance function to set the white balance off of a detail in the scene, such as the grey card here.

White Balance Color Temperature Selection – When making use of the K – Choose Color Temp White Balance Setting, you can select the desired color temperature in the White Balance menu item, or you can quickly adjust this setting during shooting by pressing the WB Button and turning the front Sub-Command Dial while viewing the setting on the top Control Panel or on the Live View Screen. If you wish to directly enter a value, you can press the WB Button and use the Multi-Controller to select and change the individual digits, again either on the top Control Panel or on the Live View screen.

Synchronized Release of Remote Cameras – If you are making use of an optional wireless remote to trigger multiple cameras, there is also a “hidden” setting for this in the Custom Setting f1 button assignments. You can choose to assign the Pv Button, Fn1 Button, or Sub-Selector Center press to the Sync. Release selection option, which is used in conjunction with Custom Setting d4 – Sync. Release Mode Options. You can set up the camera so that, for example, when using the D850 as a master camera to remotely trigger other cameras, you can press the Fn1 (or Pv) Button while taking the shot, and then just the master camera will shoot, or just the remote cameras and not the master, based on your settings.

Flash Information Screen – With an optional Speedlight flash attached and turned on, press the Info Button twice to access the Flash Information Screen showing the current flash settings, and then press the i Button to view and change the various settings and options, including Wireless Flash Options (see Figure 16).

Nikon D850 menu custom setting how to set up tips tricks quick start hints recommend

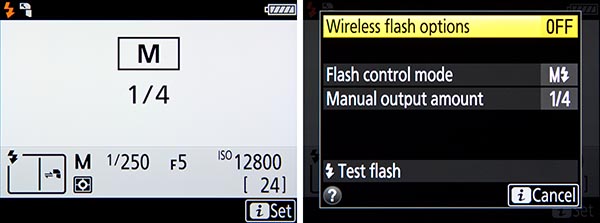
Figure 16 – When using an optional Speedlight flash, press the Info Button twice to access the Flash Information Screen showing the current flash settings (left), then press the i Button to view and change the various settings and options, and to access the Wireless Flash Options (right).

I hope that this information helps you to locate and take advantage of the various new and hidden features of the Nikon D850. This text is based on the “New and Hidden Features” section of my Nikon D850 Experience user guide to the camera. Be sure to have a look at this clear and comprehensive user guide to learn about all the controls, features, Menus, and Custom Settings of the D850, as well as when and how to make use of them in your photography. You can learn more about the guide on my Full Stop Books website here: http://www.fullstopbooks.com/nikon-d850-experience/

Nikon D850 Experience book manual guide set up settings quick start tips tricks

There is also a companion Nikon D850 Setup Guide Spreadsheet, which along with the book is designed to help you set up the Menus and Custom Settings of this powerful camera.

If you are purchasing a Nikon D850 (or any accessories), please consider using my Amazon Associates link to purchase it on Amazon – your cost will be the same, and they will give me a small referral fee – thanks!: http://amzn.to/2z7dh0H

The First Nikon D610 guide, Now Available!

Nikon has recently introduced the full-frame Nikon D610, an update to the popular and powerful D600. The new model has some small but significant upgrades, and I’ve taken the opportunity to update my guide for this new D610, with additional explanations and lots of new images.

Nikon D610 Experience, my latest Full Stop e book and the first D610 user’s guide, is now available! This e book goes beyond the manual to help you learn the features, settings, and controls of the powerful and highly customizable Nikon D610. Plus most importantly it explains how, when, and why to use the functions, settings, menu options, and controls in your photography – including the sophisticated autofocus system and the in-camera features such as Multiple Exposure, HDR, and Time-Lapse Shooting.

Nikon D610 book manual guide how to autofocus settings menu custom setup dummies learn use tips tricks

Written in the clear, concise, and comprehensive style of all Full Stop dSLR guides, Nikon D610 Experience will help you learn to use your full-frame D610 quickly and competently, to consistently create the types of images you want to capture. This e-book is available in either PDF or EPUB format for reading on your computer, tablet, iPad, e-reader, etc.

Learn more about it, view a preview, and purchase it here:

http://www.dojoklo.com/Full_Stop/Nikon_D610_Experience.htm

As one reader has said about Full Stop guides, “I don’t know how I could fully take advantage of all the features the camera has to offer without this publication! It’s well-organized, easy to understand, and succinct enough to keep your attention while still containing a wealth of information to get the most out of your camera.”

Nikon D610 book manual guide how to autofocus settings menu custom setup dummies learn use tips tricks   Nikon D610 book manual guide how to autofocus settings menu custom setup dummies learn use tips tricks

Take control of your Nikon D610, the image taking process, and the photos you create!

This guide is designed for Intermediate and Enthusiast dSLR Photographers who wish to take fuller advantage of the capabilities of the camera to go beyond Auto and Program modes and shoot competently in A, S, and M modes; take control of the sophisticated 39 point autofocus system; learn how, when, and why to use the controls, buttons, and features of the D610, and much more. It covers basic dSLR camera functions and exposure concepts for those learning digital SLR photography, and explains more advanced camera controls and operation such as using the various metering modes and exposure compensation for correct exposure of every image.

For experienced photographers coming to the D610 from previous models, this guide explains the new and advanced features to quickly get you up and running and taking advantage of these capabilities, including the advanced 39 Point Autofocus System and its Autofocus Modes, AF-Area Modes, Menu options and Custom Settings. Plus it explains the camera controls, the in-camera HDR, Multiple Exposures, Interval Timer and Time-Lapse Shooting features, introduces the settings and controls of the HD video capabilities, and guides you through all the Menu and Custom Settings options to help you set up the camera for your specific needs.

Nikon D610 book manual guide how to autofocus settings menu custom setup dummies learn use tips tricks   Nikon D610 book manual guide how to autofocus settings menu custom setup dummies learn use tips tricks

Nikon D610 Experience focuses on still-photography with an introduction to HD video in order to get you up and running with shooting movies, including the movie settings and menu options. Sections include:

  • Setting Up Your D610 – All of the D610 Custom Settings and Playback, Shooting, and Setup Menus, including Movie Mode Menus, with explanations and recommended settings for practical, everyday use. Set up and customize the advanced features of your dSLR to work best for the way you photograph.
  • Aperture Priority (A), Shutter Priority (S), and Manual (M) Modes – How and when to use them to create dramatic depth of field, freeze or express motion, or take total control over exposure settings.
  • Auto Focusing Modes and Area Modes and Release (Drive) Modes – The 39 point D610 autofocus system is a is a powerful tool, and taking control of it will enable you to successfully capture more sharp images, especially in action situations. Learn the AF Modes, AF Area Modes, and AF Custom Settings, how they differ, how and when to take advantage of them to capture both still and moving subjects. Plus how and when to use focus lock and back-button focusing techniques.
  • Exposure Metering Modes of the Nikon D610 – How they differ, how and when to use them for correct exposures in every situation, and how to customize them for your needs. Also how to make use of exposure lock.
  • Histograms, Exposure Compensation, Bracketing, and White Balance – Understanding and using these features for adjusting to the proper exposure in challenging lighting situations, and setting custom white balance.
  • The Image Taking Process – Descriptive tutorials for using the settings and controls you just learned to take photos of both still and moving subjects.
  • Photography Accessories – The most useful accessories and books for day-to-day and travel photography including accessories specific to the D610.
  • Composition – Tips, techniques, and explanations, including the creative use of depth of field.
  • Introduction to Video Settings – Settings and explanations to get you started shooting HD video.

Nikon D610 book manual guide how to autofocus settings menu custom setup dummies learn use tips tricks   Nikon D610 book manual guide how to autofocus settings menu custom setup dummies learn use tips tricks

This digital guide to the Nikon D610 is a 260 page illustrated e-book that goes beyond the manual to explain how, when, and why to use the features, settings, and controls of the D610 to help you get the most from your camera.

Learn more about Nikon D610 Experience, view a preview, and purchase it on my Full Stop website here:

www.dojoklo.com/Full_Stop/Nikon_D610_Experience.htm


Canon 70D – Hands-on Review and Field Test

I’ve been waiting until I got my hands on the latest new dSLR, so that I could coordinate a camera “field test” with a visit to an exhibit I’ve been wanting to see. The Heritage Museum and Gardens is currently showing an exhibit of concept cars, called Driving Our Dreams, which will be there until October 27, 2013. They have gathered together one of the coolest collections of American concept cars from the 1950’s to the present, ranging from the “space-age” 1956 GM Firebird II turbine powered highway rocket to the solar powered 2009 Infinium – and what better place to try out a new camera?! So thanks to LensProToGo for putting a new Canon EOS 70D into my hands, just as it was hitting the stores at the end of August!

Canon 70D EOS hands on review field test book manual guide how to settings set up 1956 Buick Centurion concept
All images in this post taken with the Canon 70D at the Heritage Museum, Sandwich, Massachusetts. 1956 Buick Centurion concept car. (Learn about the over-saturated red channel below.)

I headed out to Sandwich, Mass., the oldest town on Cape Cod, to visit the museum. I’ve been researching and writing about the 70D since it was announced a few months ago, as I work on my latest camera guide Canon 70D Experience, so I was already extremely familiar with its features and controls.

You can read all about the camera’s new features, and some tips for customizing the settings and controls of your 70D, in some of my previous Canon 70D articles. And if you wish to learn not only the features, functions, and controls of the 70D, but more importantly when and why to use them, be sure to look at my guide Canon 70D Experience. It will help you to take control of your camera, and the images you create!

Canon 70D EOS book manual guide tutorial how to tips tricks recommended settings set up dummies use quick start

Controls and Touch Screen: If you have worked with a Canon 60D, 7D, or even a 50D (or earlier), you should find that the 70D feels very familiar. It has about the same weight and feel, and while some of the controls move around from model to model, most of them are similar. I found that I quickly learned which button to instinctively press for my needs, whether the Image Playback Button, Info Button, or Q Button, etc. Even more convenient is the new Touch Screen, first seen on the Canon Rebel T4i/ EOS 650D. For those who may be skeptical about using a touch screen because of either responsiveness concerns or due to the “purity” of using a camera’s controls, the Canon 70D Touch Screen may very well change your mind. As with the screen on the T4i/650D and T5i/700D, it is as responsive as you have come to expect with an iPhone, and even uses many of the same Multi-Touch gestures – particularly when reviewing images during Image Playback (swipe for the next image, spread and pinch for zooming in and out, etc.). Even though many of the menu tabs, menu items, and function icons of the 70D are tiny, I rarely ever have any problem immediately selecting the right one. And regarding the desire to use the actual camera buttons and controls to change settings, I have quickly gotten into the habit of just pressing the Q Button to access the Quick Control Screen, then using the Touch Screen to change my settings with a few taps. After I have reviewed an image and wish to change settings, I find that it is quicker and easier to do it this way and simply leave the camera in the same position in your hands as you look at the rear screen, than it is to tilt the camera up, locate your desired settings button, press it and look at the small top LCD screen. You can change all the shooting settings on the Quick Control Screen, jump around the menus for various other settings, review all your settings on the Shooting Function Settings screen, and go back into image review all with your right thumb and left index finger, while holding the camera in the same position. Though I still use the dials and controls to change the aperture / shutter speed settings and control the autofocus points as I work through the viewfinder.

Canon 70D EOS hands on review field test book manual guide how to settings set up 1954 Buick Wildcat II concept
1954 Buick Wildcat II concept car

The top Main Dial of the 70D, while solid, has that great “soft” rubber feel to it rather than the harder plastic feel of entry-level models.  And this softer material is much easier on your fingertip after a long day of shooting. I always gripe about the inclusion of the thumb-pad Multi-Controller on the 60D and 70D, rather than the joystick version of the 7D, 50D, and 5D Mark III. I prefer the joystick because of its location, which is much closer to the other buttons on the top rear of the camera that your thumb will also be using. However, I found that after some time with the 70D I eventually got used to the thumb-pad.  While I still dislike the location, it does make it a bit easier to select an autofocus point the diagonal directions. One of the Custom Controls that I found I like is to customize the SET Button for ISO selection. While there is a dedicated ISO Button on the top of the camera, or you can easily select it on the Quick Control Screen, I find that it is also quick and easy to press the SET Button as you turn the top Main Dial to make this adjustment. As described above, it helps you to make this adjustment while keeping the camera in the same “image review” position. Plus you can quickly use this method to change the setting while your eye stays in the Viewfinder. And while you can always use the top ISO button in the same manner, it is much more difficult to determine which top button is the ISO Button without looking at it. (While it has a little bump on it to help locate it by feel, it is not a big enough difference from the other buttons for me to locate it with confidence.)

Canon 70D EOS hands on review field test book manual guide how to settings set up Corvette 1962
1962 Corvette – production model

I decided with this photo shoot to use the 70D just as I would during any normal shoot, and thus concentrate on the controls, exposure issues, and autofocus system (rather than, say, playing with the Multiple Exposure or HDR features). I had earlier experimented with some of the other functions of the camera such as Auto Lighting Optimizer, in-camera HDR, Multi-Shot Noise Reduction, Multiple Exposures, Creative Filters, etc., and those can all be learned about in Canon 70D Experience. There will also be example images of all these features in my Canon 70D Flickr set.

Lighting, Exposure, White Balance, and Noise: One of the first things I discovered is that lighting at an indoor automobile exhibit is very challenging! While they allowed the use of flash, it would not have worked out well due to all the reflections and bright spots it would cause in the car body, glass, and chrome (which of course is well represented in the 50’s cars). Perhaps indirect flash would work well, but as I was going to be taking hundreds of shots, I didn’t wish to disrupt the other visitors with constant flashes. In addition, getting the right exposure was challenging because I was often taking close-up shots of a large area of a light tone or dark tone, which would fool the exposure meter and cause it to want to under- or over-expose the image. Plus some of the cars were bare metal, which is prone to very bright reflective areas and dark non-reflective areas depending on how the lights are hitting it and the angle of view. So the exposure level reading could change dramatically from the initial framing where I locked focus to the final framing when I took the shot. I had to carefully keep an eye on how the light changed based on what area of the car I was photographing, as well as how it changed based on my angle of view as I moved slightly side to side, or crouched down low. I needed to sometimes lock the exposure settings for my final framing or for an important area (using the AE Lock * Button on the rear of the camera), and I had to check the results and the histogram, and adjust the Exposure Compensation to lighten or darken the subsequent shots (while then remembering to set EC back to 0 when I moved on to the next shot!). (If you don’t yet fully understand what this all means, I discuss locking exposure settings, the Histogram, and Exposure Compensation in detail in my Canon 70D Experience guide.)

Canon 70D EOS hands on review field test book manual guide how to settings set up Corvette 1962
1962 Corvette – production model

There was relatively low lighting in the exhibition space, but I was able to make use of ISO 1600. I primarily worked in Aperture-Priority AE Shooting Mode (Av) so that I had control of the depth of field. Sometimes the shutter speed that the camera chose dropped below a desirable 1/100 or 1/125, so I often took a quick burst of images knowing that at least one would come out sharp. In truth, I just looked over my previous ISO tests of the 70D, and there is very little loss of quality between 1600 ISO and 3200 ISO, in the JPEG images straight from the camera.  Some excessive graininess definitely appear by 6400 ISO. So I could have safely increased the ISO well above 1600, perhaps even up to 3200. But it was simply an old habit of never going above 1600, drilled into me with older cameras such as the 50D – and I should have left that prejudice aside when working with the 70D. You can view JPEG test results at the various ISO settings, in my Canon 70D ISO Flickr set.

The images shown here and on Flickr were originally shot in RAW image quality, and converted to DNG using the Adobe DNG converter. They were then processed, sharpened, and saved as JPEG. Unfortunately, I did not apply any noise reduction during processing, and the results are excessively noisy. I am going to have to go back and apply noise reduction to these images, either using Photoshop or Canon Digital Photo Professional (DPP). Below are some details of the above image, showing the difference between:

  • the original JPEG
  • the original RAW converted with Adobe DNG and processed in Photoshop and output as a JEPG, no noise reduction
  • the original RAW processed in Canon DPP with noise reduction applied and output as a JPEG.

For any pixel peepers, please note that all of the processing was done relatively quickly, so as to illustrate the overall differences. This is not intended to show definitive lab-quality results that one could achieve with much more careful, patient processing and noise reduction application. Please view the results at DPReview to see their lab-quality tests of JPEG, RAW, image quality, and noise.

Click on these image details to see larger versions:

Canon 70D EOS hands on review field test noise high ISO JPEG vs RAW book manual guide how to settings set up
Detail of original JPEG straight from camera, 1600 ISO with “High ISO Speed NR” set for Standard – very little noise seen.

Canon 70D EOS hands on review field test noise high ISO JPEG vs RAW book manual guide how to settings set up
Detail of processed RAW>DNG (processed with Photoshop)>JPEG, with no noise reduction applied, and thus excessively noisy.

Canon 70D EOS hands on review field test noise high ISO JPEG vs RAW book manual guide how to settings set up
Detail of processed RAW (processed with Canon DPP)>JPEG with noise reduction applied, very little noise seen.

So the lesson of the above examples is that you can confidently shoot in JPEG, up to 1600 and even higher, and achieve clean, low-noise results. You can make use of the 70D in-camera High ISO Speed NR option to assist with this, setting it for Standard or High. View the tests on DPReview to see how high you are willing to raise the ISO before the noise is too much for your tastes or image-output needs. And, if you shoot in RAW, you are going to need to apply noise reduction (and contrast, sharpening, etc. as always) as you process the images, especially when you are shooting in high ISO settings (800, 1600, and higher). Apply noise reduction in Adobe Camera Raw, Photoshop, Lightroom, Aperture, Canon DPP, etc.

Regarding White Balance, I learned that I should not have forgotten to bring my digital grey card for creating some benchmark images or even for setting a Custom White Balance. Though my post-processing experiments, I discovered that the White Balance color temperature of the exhibit space was very close to the Incandescent setting, but it would have been helpful, and would have saved time, if I had simply taken a couple images with the grey card in the scene. The lighting also varied throughout the space, as some areas had a bit of daylight from large windows. With images like these, I feel it is very important to closely match the actual colors of the cars, as they are documentary images of sorts. While the artificial lighting of an exhibition space vs. natural lighting outside would make these cars, (and images of these cars) appear differently, I wanted to match as closely as possible what I saw. If you wish to create a Custom White Balance with the 70D, you can take an image of a white object or grey card, filling a large central area of the Viewfinder with the card (about the size of the AF Points diamond), then go into the Shooting 3 menu and select the Custom White Balance menu item. It will ask you to select the image of the grey card you just took. When that is set, simply set your White Balance setting to the Custom WB icon, by pressing the Q Button and using the Quick Control Screen.

Canon 70D EOS hands on review field test book manual guide how to settings set up 1956 Buick Centurion concept
1956 Buick Centurion concept car

As is common with many dSLR sensors, the red channel can have a tendency to be sensitive to over-saturation. I experienced this as well with the 70D, though as you can see in the above image there was a large expanse of brightly lit red. In this and other images of the red and white Buick Centurion, some of the brightest areas of red become over-saturated and lose all detail, variation, or shadow, and are simply “pure” red. This is most easily seen in the first image at the top of this post, where there is a large area of lighter red on the top of the rear fender, where all subtle detail of varying color tones and shadow gradation is lost. If you are only watching the Brightness Histogram you may not pick this up, as the overall image – according to the camera – is not over-exposed. In order to keep your eye on this as you work, you can make use of the RGB Histogram. As shown below, the red channel is cut off at the right edge of the graph, and thus all detail will be lost in those areas of the image where this occurs. The sensor has simply reached its limits of what it can capture. If you experience this, you can adjust the lighting and perhaps make use of reflectors or diffusers, or move the subject, or alter your angle of view. In a situation where you can’t control these elements, you will need to adjust the exposure (under expose) before retaking the image, then check the RGB Histogram to make sure the color channels are not cut off at the right side of the graph.  Then carefully work with the image in post-processing to “bring back” or raise the overall exposure while trying to keep the problematic color channel from becoming over-saturated.

Canon 70D RGB Histogram learn use how to book guide manual dummies
Canon 70D RGB and Brightness Histogram, showing that areas of red have been over-saturated.

Aperture-Priority, Lenses, Autofocusing: As I mentioned above, I primarily worked in Aperture-Priority AE Shooting Mode, where I controlled the aperture setting while the camera chose the appropriate shutter speed. This allowed me to control the depth of field of the images, since I was primarily aiming to achieve very shallow, dramatic depth of field in the detail images, as shown in the tail-fin image below:

Canon 70D EOS hands on review field test book manual guide how to settings set up aperture depth of field 1954 Buick Wildcat II concept car
1954 Buick Wildcat II concept car

By working with a Canon 70-200mm F/4L IS lens, I set the lens at or near the 200mm focal length, backed up several yards, and then focused on my area of interest while setting the aperture at f/4. This results in very shallow depth of field and calls attention to the area of detail.  For the images showing a larger area of the cars, I used either the 16-35mm f/2.8L wide angle lens or the Canon 24-70mm f/2.8L, with the aperture set around f/2.8 or f/4.

I primarily autofocused using One-Shot AF Focus Mode and Single-Point AF Autofocus Area Selection Mode. One-Shot AF is used for still (or relatively still) subjects. As with the Canon 7D, the 70D has an Autofocus Area Selection Button on the top of the camera near the Shutter Button, which allows you to choose between these modes as you look through the Viewfinder (Single-Point AF, Zone AF, or 19-Point Automatic Selection AF), and these modes determine how many AF Points are being used to try to find the subject to focus on. With Single Point AF, I am able to manually select my desired AF Point using the Multi-Controller as I look through the Viewfinder, place it over the exact area where I wish to focus, and then lock focus with a half-press of the Shutter Button or by pressing the rear AF-ON Button. I can then recompose the shot to get the framing I desire, and press the Shutter Button to take the shot. While the 70D has 19 AF Points to choose from, it is relatively quick and easy to select the one you wish. You can even customize the camera so that if you are selecting one of the edge points, you can choose to stop at the edge or “wrap-around” to the AF Point on the other side if you continue to click the Multi-Controller.  I always choose to have it stop at the edge.  That way if I am choosing an “edge” point, I can simply quickly “click, click, click” on the left Multi-Controller, and I know it will stop at the far left AF Point and not “wrap-around” to an AF Point on the other side of the frame.

As you may be aware, the Canon 70D has a brand new, potentially revolutionary Live View / Movie autofocus system. It is a phase-detection AF system called Dual Pixel CMOS AF, which can quickly and smoothly grab focus, and can also be used to very effectively track a moving subject.  Based on my tests and on many test videos found on the Internet, the system is living up to the hype and performs as well as promised. Previously, Live View focus was slow, and the camera often hunted for the subject.  With this new system, it achieves focus on the subject extremely quickly an accurately. I made use of both the rotating rear LCD screen of the 70D and the Live View AF system to take some shots looking down from the first level onto the lower level, as seen in this image:

Canon 70D EOS hands on review field test book manual guide how to settings set up 1956 GM Firebird II concept
1956 GM Firebird II concept car

I held the camera out at arms length, rotated the rear screen so that I could see it, and pressed the AF-ON Button to lock focus. Even in the low lighting, the camera immediately focused. With the Live View autofocusing system you can also select from different autofocusing methods that determine how large an area the camera looks at to find a subject. Again I used the smallest, most precise area, called FlexiZone-Single AF, which provides a small focus square that you can move around the screen and locate where you wish, either using the Multi-Controller or the Touch Screen.

Creative Filters:  In spite of what I said earlier, I did play around with the in-camera Creative Filters and applied them to some of these images. I used the the Art Bold Effect, which affects contrast and saturation, on an image of the Buick Centurion.  By setting it on the High setting, I totally blew out the red (over-exposed), but is also made the interior glow nicely and has a cool effect on the chrome. And I used the Fish-eye Effect on the Buick Wildcat II, which works well if you get in close while having receding lines, as I found at the corner of this bumper.

Canon 70D in camera creative filter art bold
Canon 70D In-camera Creative Filter – Art Bold Effect – High.

Canon 70D eos Creative Filter Fish-eye fisheye effect
Canon 70D In-camera Creative Filter – Fish-eye Effect – Low.

Conclusion: After spending a dedicated week with the Canon 70D, exploring every menu item and experimenting with every function and feature, I have grown tremendously fond of this camera. Part of this is the familiarity I feel from working so long with the 50D and the 7D. But it is also due to some of its new features, which would make going back to either of those cameras extremely difficult. The first is the Touch Screen, which is an extremely quick, easy, and convenient way to change settings on the fly, access menus, and review images. Second is the new Live View autofocus system, which works as well as promised. It mot only makes Live View shooting much less frustrating and much more viable for all kinds of shooting situations, but it also makes autofocusing during movie shooting a reality. In addition, you can now use the Touch Screen to immediately change the area of focus, while movie shooting, simply by touching the screen. And finally, there are some of the smaller features, but these little additions can make a big difference. For example, during image playback you can access the Playback Quick Control screen and quickly set an image Rating. When this first appeared on the 5DIII and Rebels, I thought it might be a bit frivolous. But I have come to make very effective use of it, and will miss it on other dSLRs that don’t have this feature.  It allows you to go through your images and the camera and quickly mark (rate) the best ones, as well as mark the bad ones (with one star) that you will likely be able to quickly delete after viewing them on your computer. It is a simple feature that can provide significant time savings in a busy workflow.

Another simple feature that I discovered I made use of more than expected is the electronic level in the viewfinder. Unlike previous cameras where you can use the AF Points, as seen in the Viewfinder, as a level, the 70D includes a small “level” icon at the bottom of the Viewfinder screen.  (You can also make use of the AF Points as a level, which is sort of a hidden feature I will explain in a moment.) This level icon is simply a camera icon surrounded by either straight or diagonal lines, which indicate if you are on or off level. Or if both the straight and diagonal lines are displayed, you are almost level. I have long had a tendency to hold the camera slightly off-level, so I always appreciate the Viewfinder grid, which can be enabled in the 70D. But this level icon helped even more to keep my images straight. I found that I could compose the image, take care of locking focus and exposure if necessary, and then take a peek at the level icon before pressing the Shutter Button to take the shot.  More often than not, it indicated I was slightly off, so I carefully leveled the camera and took the shot. Again, such a simple feature helped a great deal – by keeping my images straight and level, which eliminated the need to straighten (and thus slightly crop) numerous photos later in Photoshop.

Regarding the “hidden” Viewfinder level that uses the AF Points, you can use the Custom Controls to set the Depth of Field Preview Button to the Electronic Level option. You can then press this DOF Preview Button during shooting and activate a level that uses the AF Points in the Viewfinder to indicate if the camera is level or not. Press the Shutter Button to turn it off and return to shooting.  You can learn about several other Custom Controls and Custom Function settings in my post on the 70D Custom Controls.

Canon 70D EOS hands on review field test book manual guide how to settings set up 1956 Buick Centurion concept
1956 Buick Centurion concept car

Regarding image quality, while I failed to properly apply noise reduction to the RAW images used here as I processed them, my subsequent tests and inspections have confirmed that you can work in high ISO settings (approaching 3200) and achieve a low, acceptable amount of noise with JPEG images straight out of the camera, and with RAW images with noise reduction applied in post processing. This has been confirmed with test images on DPReview and other sites.

Additional concept cars and more images from this visit to the Heritage Museum can be seen on Flickr here.

Remember to check out my other Canon 70D blog posts to find out more about the camera. And if you wish to take control of your Canon 70D, and learn how, when, and why to use its controls, features, and settings, be sure to check out my e-book guide, Canon 70D Experience.

If you are planning to purchase your Canon 70D online, please consider using my affiliate links and help support this blog – thanks!

Order your Canon EOS 70D from Amazon or B and H Photo:

Amazon:

Canon 70D – Body or with choice of kit lenses – $1,199 to $1,549

B and H Photo:

Canon 70D – Body only – $1,199

Canon 70D – with 18-135mm STM lens – $1,549

Canon 70D – with 18-55mm STM lens – $1,349

~ ~ ~

Was this post helpful?  Please let others know about it by clicking the Facebook or Twitter sharing buttons below, linking to it from your blog or website, or mentioning it on a forum.  Thanks!  Want to help support this blog with no cost or effort?  Simply click on the AmazonB&H Photo, or Adorama logos on the left side of this page to go to those sites and make your purchases.  They will then give me a little referral bonus!

Canon 70D Tips and Tricks – Custom Controls

One of the most powerful features of the Canon EOS 70D is the ability to customize the functions of various buttons and controls on the camera body. Taking advantage of this will allow you to set up the camera specifically for you and your shooting style and needs, and thus enable you to work more smoothly, quickly, and efficiently. Having the ability to easily and intuitively change the camera settings on the fly will also allow you to focus on the more important aspects of capturing the framing, moment, or composition you are after.

These settings are found in the  III-4: Custom Controls menu (see Figure 1). At first you may wish to leave many of these on the default settings or set them to match your previous camera settings. Then after working with the camera awhile, you will begin to know how you work and how you wish to work faster or more conveniently through customizing some controls. Pages 384-385 of the Canon 70D manual show all the possible options, and you might consider printing these manual pages to carefully study and consider your potential configurations.

These explanations are excerpted from my e-book guide to the EOS 70D called Canon 70D Experience. As with all my dSLR guides, Canon 70D Experience will help you to learn not only how but more importantly when and why to use the features, functions, and controls of the 70D. Learn more about the guide on my Full Stop website here.

Canon 70D set up quick start tips tricks recommended setting guide cool tricks menu custom function
Figure 1 – Custom Controls menu to customize the buttons and controls of the camera to function exactly how you need, to fit your working methods and shooting style.

Some custom controls that you may consider experimenting with are the assigned settings of the Shutter Button (when it is pressed halfway), the AF Start Button (AF-ON), and the AE Lock Button (the one with the [*] symbol). You can customize them so that they initiate and/ or lock focus and exposure separately or in a variety of different button combinations. When working in Evaluative Metering Mode and One-Shot AF, the default setting is that exposure metering is locked and focus is locked at your active AF Point when you press the Shutter Button halfway. You then recompose if necessary and fully press the Shutter Button to take your photo. But the exposure settings were locked on a different framing than your final framing! So you may wish to lock focus with a different button than you lock exposure, or else re-determine the exposure metering settings for the final framing before taking the shot (which is typically done with the AE Lock  [*] Button).

Canon, 70D, Canon 70D, book, manual, guide, how to, dummies, tips, tricks, quick start
Figure 2 – Custom Controls options – Selecting the Shutter Button (left), and choosing which function(s) it will perform when pressed half-way (right).

When working in One-Shot AF with one of the Metering Modes other than Evaluative Metering (Spot, Partial, or Center-Weighted), the default setting is that exposure metering is begun (not locked) and focus is locked when you press the Shutter Button halfway. You then recompose if necessary and fully press the Shutter Button to take your photo, and exposure is determined at that moment. But with these other Metering Modes it is likely that you will want to lock exposure on a certain area before framing for the final shot and taking the photo.

Either of these above default settings may cause you to meter for a scene or area that is different from what you intend, and thus result in a slight or profound under- or over-exposed shot. With the default button settings and the above scenarios, you can always use the AE Lock Button (exposure lock button with the [*] symbol) to lock in the exposure of your desired framing. But you may find that after working awhile, you would like to start or stop exposure metering and/ or focusing in a different manner than the default settings, and then you can reconfigure the functions of these buttons (See Figure 2).

To test how your camera functions before or after changing these settings, set it on One-Shot AF Mode, Tv or Av Shooting Mode, and Evaluative Metering Mode, hold the camera to your eye, aim it at a bright area, and half-press the Shutter Button. While keeping the Shutter Button half-pressed, move the camera and aim it at a dark area. Keep your eye on the aperture and shutter speed settings in the viewfinder and watch if they change or if they remain locked. Change the metering mode (Spot, Partial, or Center-Weighted) and do this again. Then repeat the process by first pressing the Shutter Button half-way and then pressing (and releasing) the AE Lock [*] Button. You can repeat a similar process to see focus lock in action or to test your custom focus lock button settings.

Note that there are multiple Auto Exposure Lock (AE Lock) options, such as when setting the function of the AE Lock [*] Button (see Figure 3). The AE Lock option will lock the exposure for the current scene when you press and release it. If you reframe the shot and want the camera to re-evaluate and re-lock the exposure, just press the [*] Button again. The AE Lock (while button pressed) option only applies to the Shutter Button, and will lock the exposure as long as the Shutter Button remains half-pressed, similar to how the camera works with the One-Shot / Evaluative Metering default settings, as described above. This differs from assigning the Shutter Button to Metering start because with Metering start, the camera will start evaluating for exposure, but the exposure values will not be locked but will continue to change until you take the photo or press the AE Lock [*] button (when you are working in Partial, Spot, or Center-Weighted Metering Modes). Again, you can see this in action by half-pressing the Shutter Button to start metering, look in the viewfinder (or on the LCD Panel) at the exposure settings, move the camera around, and see the settings change. The AE Lock (hold) option (indicated with “*H”) will lock the exposure and maintain that lock with those exposure settings for all subsequent shots, until you press the AE Lock [*] Button again. The AE Lock option without the (hold) option (indicated in the menu options with “*”) will only lock the exposure settings until the metering timer ends (the exposure numbers disappear in the viewfinder and on the top LCD Panel).

The AE Lock/FE Lock option will lock both the exposure settings as well as the flash output setting when using a flash. If a button is set for this option, pressing the button will fire a pre-flash from the built-in flash or a Speedlite to determine and then lock the proper flash output.

Canon 70D how to manual guide book how to
Figure 3 – Custom Controls options for customizing the functions of the AE Lock Button.

Some options will allow you to perform what is called “back button focusing,” which is further explained in the Back Button Focusing section of Canon 70D Experience. This technique allows you to start and/ or stop (lock) the autofocusing using the AF-ON button, in conjunction with or instead of the Shutter Button. Taking advantage of these options can help you to fully utilize the autofocus system of the 70D as well as modify it for your personal shooting style.

While you may wish to work with your camera before considering changing most of these settings, I strongly encourage you to immediately change the function of the thumb-pad Multi-Controller to AF Point direct selection so that you don’t have to press the AF Point Selection Button first every time before you select your autofocus point (see Figure 4). Instead you can just press the thumb-pad Multi-Controller to choose your desired AF Point (once you have tapped the Shutter Button to wake up the camera and begin metering).

Canon 70D set up quick start tips tricks recommended setting guide cool tricks
Figure 4 – Left: Custom Controls options for the Multi-Controller (thumb pad) to set for AF Point Direct Selection so that your desired AF Point can be quickly selected with the Multi-Controller alone. Right: Custom Controls options for customizing the functions of the Depth-of-Field Preview Button, including the Electronic Level.

You may also want to consider assigning the Depth of Field Preview Button to one of the other available functions if you don’t typically use it for its depth of field preview function (see Figure 5). For example, you can use it for FE Lock (flash exposure lock) or to quickly switch between One-Shot focus mode and AI Servo focus mode. The switch only occurs as you hold the button, so for example if you are shooting a still subject using One-Shot focus mode but suddenly wish to start tracking a moving subject, press and hold this button to temporarily work in AI Servo mode. Or if the camera is set for AI Servo mode, holding this button will temporarily switch the camera to One-Shot mode.

70D “Hidden” Feature: You can also set the Depth of Field Button as the Viewfinder’s VF Electronic Level, which is sort of a “hidden” feature of the 70D. This is different than the Viewfinder Level icon of the Shooting 1 menu, and instead uses the AF Points displayed in the Viewfinder as a one-axis level. This level will function in either camera orientation (see Figure 4). If this option is selected, when you are shooting simply press the Depth of Field Preview button for this Viewfinder Level to appear, then tap the Shutter Button to resume shooting.

And you may want to assign the SET Button to the function of your choice for quick access, such as perhaps Flash Exposure Compensation since there is not a dedicated button for this. Or you might set it for Image Quality. This can be a helpful setting because certain camera functions such as HDR Mode are only accessible when capturing JPEG images, so you may need to quickly change from RAW or RAW+JPEG image quality to JPEG only. Another interesting setting for the SET Button is Set ISO speed (hold button, turn Main Dial). What this customization does is allow you to change the ISO setting by pressing and holding the SET Button and turning the top Main Dial (see Figure 5). While this may seem unnecessary as there is a dedicated ISO Button on the top of the camera that allows you to quickly change the ISO, it can come in handy during shooting. For example if your camera is on a tripod and you are positioned behind it using the Live View screen, it may easier to use this SET Button and Main Dial arrangement to change the ISO than it is for you to look or feel around the top of the camera to determine which button is the ISO Button. Or you may find that this method is just a really quick way to change the ISO during Viewfinder shooting. Of course you can always use the [Q] Button or icon and Touch Screen to change the ISO setting as well. So, as with many other settings, determine which camera set-up and method works best for you and your shooting situation.

Unfortunately, if you set the Multi-Controller to AF Point direct selection, the SET Button will not directly select the center AF Point, as you may be used to. You will still have to press the AF Point Selection Button first and then press the SET Button to directly choose the center AF Point. This issue may cause you a bit of trouble if you have assigned the SET Button to another function, as that function screen will suddenly appear on the rear LCD Monitor if you press the SET Button while you are shooting, and you may accidentally change that setting. If this becomes an issue, assign the SET Button to OFF.

Canon 70D set up quick start tips tricks recommended setting guide
Figure 5 – Custom Controls options for customizing the functions of the SET Button.

Finally, if you often work in Aperture Priority (Av) mode but then sometimes work in Manual (M) shooting mode I suggest you swap the functions of the Main Dial and the Quick Control Dial in Manual Mode (see Figure 6). Access the Main Dial option (the half-circle icon) and assign it to the Av option (Aperture setting in M mode). Then access the Quick Control Dial (the full-circle icon) and assign it to the Tv option (Shutter speed setting in M mode). By doing this the Main Dial controls the aperture setting in M mode just as it does in Aperture Priority Mode, and the Quick Control Dial controls the shutter speed setting when working in Manual (M) mode. If you typically work in Av Mode and then switch over to M mode, the muscle memory of your index finger will thank you as it will instinctively turn the Main Dial to adjust the aperture setting, and this was not the default setting of the camera. If you typically work in Tv Mode and sometimes switch to M Mode, leave these buttons on the default settings.

Canon 70D set up quick start tips tricks recommended setting guide cool tricks
Figure 6 – Custom Controls options for customizing the functions of the Main Dial (left) and Quick Control Dial (right) when working in Manual (M) Shooting Mode.

To learn more about using your Canon 70D and how to take full advantage of all its features, functions and controls – including back-button focusing, plus taking control of the autofocus system, making use of the various metering modes, and understanding the elements of exposure – have a look at my e-book guide called Canon 70D Experience. As with all my dSLR guides, Canon 70D Experience will help you to learn not only how but more importantly when and why to use the features, functions, and controls of the 70D. Learn more about the guide on my Full Stop website here.

Canon, 70D, Canon 70D, book, manual, guide, how to, dummies, tips, tricks, quick start

Read my hands-on preview of the 70D with some sample images at my Canon 70D Unboxing and Hands-On Preview post.

Live View – White Balance: I ran across a question online about setting a Kelvin white balance in Live View, so I will add this info here with some screen shots below. To change the WB in Live View, press the Q Button to access the Quick Control Screen, then select the White Balance icon, either by navigating to it by pressing up or down on the Multi-Controller, or simply using the Touch Screen. If you have navigated to it, you can then press left and right on the Multi-Controller to make your selection at the bottom of the screen. If you select the K option, press the INFO Button to select your desired temperature.

Canon 70D white balance live view kelvin k setting custom touch screen EOS


And if you are planning to purchase your Canon 70D online, please consider using my affiliate links and help support this blog – thanks!

Order your Canon EOS 70D from Amazon or B and H Photo:

Amazon:

Canon 70D – Body or with choice of kit lenses – $1,199 to $1,549

B and H Photo:

Canon 70D – Body only – $1,199

Canon 70D – with 18-135mm STM lens – $1,549

Canon 70D – with 18-55mm STM lens – $1,349

Top Tips and Tricks for the Canon 5D Mark III

OK, I admit, I’m being a bit deceptive.  While this post will include “tips” for taking full advantage of the Canon EOS 5D Mk III, it won’t really contain any “tricks.”  That is because with digital photography, especially a camera as powerful and complex as the 5D3, there really aren’t any tricksTricks implies shortcuts, and to paraphrase Euclid, there is no royal road to dSLR photography.  Instead there are techniques and camera controls that can and should be learned.  These will then allow you to adapt not just to a specific situation or emulate a certain image or style, but will give you the tools and knowledge to adapt to any situation and create the images you desire.

I spent several intimate weeks with the Canon 5D Mk III as I researched and wrote my dSLR camera guide, Canon 5D Mark III Experience, the first (and hopefully best!) book available for the 5D Mk III.  In the process I learned and discovered a few obvious and not so obvious things about the 5D3 that will help you get the most from your camera.

Canon 5D mark III mk 3 Experience e book tips tricks how to learn manual guide instruction
Detail of the Canon 5D Mark III

Learn and Take Advantage of the Autofocus System

First and foremost is to learn, understand, and make full use of the new 61 Point autofocus system.  This powerful and highly customizable AF system will allow you to capture more sharp images of a variety of moving subjects which was not previously possible with the 5DII, or even the 7D.  But to do this you will need to take control of it in order to focus on, or begin tracking, your intended subject.  This involves making use of the AF Modes as well as the AF Area Selection Modes and AF Points.

For moving subjects you can then employ the AF Cases and their settings to let the camera know what to expect as far as subject movement.  AF subject tracking works in part by predicting where the subject will be when the Shutter is pressed, so if the camera knows the subject is going to be moving erratically about the frame and changing its rate of speed, then it can take measures to better follow this than if it is set for a subject that is expected to move smoothly at a steady rate.  Ten tips could easily be written about the autofocus system alone, but I will limit it to a few (my e-book guide Canon 5D Mark III Experience contains extensive explanation of the AF system and all its elements, if you wish to learn it inside and out.)

Canon 5d mark iii mk 3 auto focus autofocus 61 af point select
Simulated image of the Canon 5D Mark III viewfinder showing the 61 autofocus points, with the desired AF Point shown as the larger black square.

One of the essential steps in taking a successful and sharp photo is controlling where the camera autofocuses.  If you allow the camera to autofocus by automatically choosing its own focus point(s) (such as in Auto+ Shooting Mode or with One-Shot AF Mode and Auto Selection – 61 Point AF Area Selection Mode) it typically focuses on the closest object.  This may or may not be what you want to focus on, so you should select or at least narrow down where the camera focuses using the autofocus AF Points or Zones.  By doing so you are telling the camera exactly where to autofocus or to look to find a moving subject to track.  For example, you often want to focus on a subject’s eyes, but if you allow the camera to choose the autofocus point itself, it may select another part of the face, or somewhere else on the body, or even a raised hand that is nearer to the camera than the face to focus most sharply on.  If you are capturing an image of a bird in a tree, the camera has no idea you want the autofocus system to zero in on the bird so that it is in sharp focus and not the branches or leaves near it or the perhaps even the leaves closer to you.

You will select an AF Mode based on whether the subject is still or moving, and select an AF Area Selection Mode based on how large of an area you want the camera to look at to find your intended subject – ranging from a small spot to a wider Zone to all the available 61 AF Points.  You can set the AF Modes and AF Area Selection Modes in a variety of combinations based on what and how you are shooting.

Activate all the Available AF Area Selection Modes at first and experiment with them all.  Then if you decide that you will never or rarely use one or more of them, de-activate those modes so that you don’t have to “click” through them every time to select your desired mode.

canon 5d mark III mk 3 autofocus auto focus af point zone 61 af area selection mode
Available AF Area Selection Modes of the Canon 5D Mark III

Spot AF is Not Necessarily More Accurate than Single-Point AF.  You may be inclined to use Spot AF all the time, assuming it will be more accurate than Single-Point AF, but this is not advised.  Spot AF is designed for specific situations and autofocusing challenges, where you need to focus on a very precise area and avoid any surrounding or foreground objects that the AF system may otherwise lock onto.  This can include making sure you zero-in on a bird that is sitting among leaves and branches, or perhaps shooting through a fence to a subject beyond.  In those situations you may find that Single-Point AF searches back and forth between the near leaves/ fence and the further subject, because the area it is looking at to find the subject encompasses both potential subjects.  Spot AF will allow you to target in on a more precise area.  Although Spot AF is indicated in the Viewfinder by the tiny square within the larger selected AF Point square, Spot AF will actually pinpoint the focus to an area about the size of the larger square.

So while Spot AF will be more accurate in certain situations as described, it should not be used for general use.  Because it is so precise, the area it looks at to find contrast or a detail on which to focus may be an area of solid color.  For example if you used Spot AF to quickly focus on the general cheek and eye area of a face, it may be aimed at an area of skin without contrast, whereas the Single-Point AF area might encompass the cheek and the eye and thus find enough contrast to be able to properly and quickly focus.

Decide How Many Selectable AF Points you wish to Choose From.  If you are coming from a Canon 5D Mark II, the 60D, or any number of other previous Canon dSLR cameras, you may be used to only having 9 AF Point to choose from.  If you still wish to manually select a specific point or zone, you may find that 61 points are a bit overwhelming at first.  Even if you are used to the 19 AF Points of the Canon 7D, you may not wish to suddenly jump up to 61 AF Points.  So you can limit the number of AF Points you wish to choose from to either 15 or 9, or to just the more accurate cross-type points.  Unfortunately, the 9 points are not in the nice diamond pattern of previous EOS cameras, but you may find them to be more manageable.

canon 5d mark III mk 3 auto foucs autofocus af mode point area selection 61 11
Limit your Selectable AF Points if 61 are too many to deal with.

Choose Your Priority when Working in AI Servo – Focus or Release.  You will need to tell the camera what your priority is when shooting in AI Servo AF mode – is it to ensure that the subject is in focus, or that the shutter is release immediately, whether or not the subject is in focus?  There are two menu items to set the priority for the first image and the second and subsequent images if shooting in Continuous Shooting Mode.

For AI Servo 1st Image Priority, Release priority will prioritize shutter release, or immediately capturing the initial shot at the possible expense of exact focus.  Generally when taking a photo, you are supposed to half-press the Shutter Button, allow the camera to focus, then continue the full-press of the Shutter Button to take the image.  If you simply “mash” down the Shutter Button, this setting will cause the camera to take the photo without bothering to focus first.  Sometimes when photographing sports, news, or events, capturing the “decisive moment” may take priority over exact focus.

Setting for Focus priority will prioritize focus for the first shot, ensuring that the subject is in focus before the picture is taken.  So when you fully press the Shutter Button, this setting may cause a brief, perhaps micro-seconds delay while the camera confirms focus before actually releasing the shutter.

Equal priority is a slight compromise between Release and Focus priorities.  It allows a brief (perhaps micro-seconds) pause for the camera to possibly find focus before releasing the shutter.  It does not guarantee that the image will be in focus, but merely gives it more of a chance to find focus.  It generally seems to make more sense to choose Release or Focus based on your priority.

Canon 5D mark III mk 3 custom setting function control multi controller direct autofocus point
AI Servo 1st Image Priority menu to determine if capturing the shot or getting the subject in-focus is the priority.

AI Servo 2nd Image Priority is similar except that it applies to the second and subsequent images in the burst.  Setting for Speed (Shooting speed priority) will prioritize shutter release, or continuing the high speed burst at the possible expense of exact focus.

Setting for Focus will prioritize focus tracking for the following shot(s), ensuring that the subject is in focus as you continue to take the burst of images.  Again, this may cause a brief, perhaps micro-seconds delay while the camera confirms focus before releasing the shutter for each image.

Equal priority again allows a slight pause before each of the subsequent shots to perhaps give the camera time to find focus before releasing the shutter.  This pause may be slightly more pronounced when shooting in low light or low contrast situations.

These 1st Image Priority and 2nd Image Priority settings should be set in conjunction with each other, based on the type of situation you are photographing and thus your priorities.  Generally, it sharp images are your goal, you will want to set both for  Focus Priority.  You may sacrifice the maximum 6 frames per second (fps) continuous shooting speed (if you have the Drive Mode set for High Speed Continuous) as there might be a  couple micro-seconds or more delays as the camera ensures that the subject is in focus before taking the subsequent shots.  If you are capturing a “decisive moment” such as a runner at the finish line or a goal being scored, you will want to set one or both of the settings to Release Priority/ Speed Priority, but ensure somehow that you have pre-focused on the subject distance so the result is not wildly out of focus.  Again, I go into much more detail about the various combinations and when to make use of them in my e-book.

Set the Custom Controls for Multi-Controller Direct.  This will allow you to manually select your AF Point or Zone more quickly by simply toggling the Multi-Controller thumb joystick, without having to first press the AF Point Selection Button.  You have probably noticed, to the dismay of your muscle memory, that the AF Point Selection Button no longer controls image zoom.  This is because there are many more image review options that are now made possible by Comparative Playback (side by side image review), discussed just below.

canon 5d mark iii mk 3 multi controller direct af auto focus autofocus point select

canon 5d mark iii mk 3 auto focus autofocus multi controller direct af point select zone control custom function setting
Set the Multi-Controller for AF Point Direct Selection for ease and speed.

Take Advantage of Comparative Playback (Side by Side Image Review).  Of course you can instantly review the image you just captured on the rear LCD Monitor, but the 5D Mk III now also offers Comparative Image Playback Mode (Two-Image Display) which gives you the ability to simultaneously compare two images or two different sections of the same image.  Whereas before, one would have to “flip” back and forth between two images and navigate around the images, this feature allows for some extremely helpful and flexible image analysis that was previously only possible once you were back at your computer.

To enter Comparative Playback Mode during image playback or review, press the Creative Photo / Comparative Playback Button (at the top of the row on the left of the camera back), which is also indicated by the side-by-side blue squares icon for side-by-side image playback.  Use the SET Button to highlight which of the two image windows you wish to navigate, then use the Quick Control Dial or Main Dial to scroll or jump to the desired image, the Magnify Button followed by the top Main Dial to zoom in or out of the selected image, and the Multi-Controller to navigate around the selected image frame.  You can press the INFO Button repeatedly to change the Shooting Information Display in order to view shooting information and/ or the Histograms.  If you zoom in on a specific area of one image and wish to zoom in on the other image to the same magnification and same area of the image, press the SET Button to switch to the other image window, then press the [Q] Button.  Also, press and hold the Playback Button to view the highlighted image as a single, full-screen image.

canon 5d mark iii mk 3 view image lcd side by side comparative playback review rear screen
Comparative Playback Mode view of two different images, also showing the images’ Histograms.

There are several different viewing options and potential uses for Comparative Playback, whether you are simultaneously viewing two separate images or two areas of the same image.

-Display the active AF point(s).
-Preview alternate cropping guides.
-View the thumbnail plus the Luminance Histogram.
-View the thumbnail plus the RGB Histograms.
-View the thumbnail plus basic exposure information.

For two different images:
-Compare the compositions of two images simultaneously.
-Zoom in and simultaneously compare a specific area for focus or exposure.
-View the thumbnails along with histograms or basic exposure information of both images.

For the same image:
-Zoom in and simultaneously compare two separate areas of the same image to have a closer look at focus or exposure.
-View the entire image for overall composition while also zooming in to view an area of detail for focus or exposure (see Figure 61).

Set the Default Magnification for Image Review.  In order to immediately review your images according to your preferences, you should set the initial magnification and position that you will view an image during image review (Playback) when you press the Magnify Button.  You can set for no magnification (1x) and then use the top Main Dial to zoom in and out.  This can be handy if you have the image review set to initially show the Shooting Information Display with the Histogram.  Since the image in that view is a thumbnail, you can then press the Magnify Button to show the full size image.  After this initial zoom, you can then use the Main Dial to zoom in or out.

Or set for 2x, 4x, 8x, or 10x magnification and it will instantly zoom to that magnification when the Magnify Button is pressed.  Again, after this initial zoom, you can then use the Main Dial to zoom in or out.  Each of these magnifications will zoom from the center of the image.  Or you can set it to quickly zoom in to full size, 100% view of the pixels, zoomed into the AF Point where focus was achieved, using setting Actual size (from selected pt).  This can be useful to quickly check for precise focus, though note that if you focused with a selected AF Point and recomposed, it will zoom into the final position of that AF Point in the composition, not the actual position where you used it to focus on your subject.  But if you only recomposed slightly, it will often be easy to quickly navigate to the actual area of focus.  The setting Same as last magnif. (from ctr) will zoom in at the same magnification that you last viewed an image at, centered at the image center.

canon 5D mark III mk 3 magnify button lcd view zoom
Magnification menu to set how images are initially viewed during Playback when the Magnify Button is pressed.


I’m still putting this post together but wanted to share what I had already written.  Next week I will go into more detail about the tips below:

Turn on the Viewfinder Warnings

canon 5D mark III mk 3 viewfinder warning custom function setting


Auto Rotate Images in the Camera and on Your Computer

canon 5D mark III mk 3 auto rotate image view lcd


Use the Q Button for Quick Access to a Variety of Features for Still Images

canon 5d mark iii mk 3 q button control edit image view lcd


Make Use of the Silent Control Touch Pad and Q Button for Movie Shooting

canon 5d mark iii mk 3 movie video silent control touch pad q button menu


canon 5d mark iii mk 3 movie video silent control touch pad q button menu


All of the above information – and much, much more – can be found in Canon 5D Mark III Experience, my latest Full Stop dSLR user’s guide e book, which goes beyond the manual to help you learn the features, settings, and controls of the powerful and highly customizable EOS 5D Mk III, plus most importantly how, when, and why to use the functions, settings, and controls in your photography.

Written in the clear, concise, and comprehensive style of all Full Stop guides, Canon 5D Mark III Experience will help you learn to use your Canon 5D Mk 3 quickly and competently, to consistently create the types of images you want to capture. The e-book is available in either PDF, EPUB, or MOBI format for reading on any device.

Learn more about it, preview it, and purchase it here:
http://www.dojoklo.com/Full_Stop/Canon_5DMkIII_Experience.htm

As one Canon user has said about Full Stop guides, “I don’t know how I could fully take advantage of all the features the camera has to offer without this publication! It’s well-organized, easy to understand, and succinct enough to keep your attention while still containing a wealth of information to get the most out of your camera.”

Take control of your 5D Mk III, the image taking process, and the photos you create!

Canon 5D Mark III mk 3 book ebook manual guide tutorial instruction bible how to dummies field EOS