Top Tips and Tricks for the Canon 5D Mark III

OK, I admit, I’m being a bit deceptive.  While this post will include “tips” for taking full advantage of the Canon EOS 5D Mk III, it won’t really contain any “tricks.”  That is because with digital photography, especially a camera as powerful and complex as the 5D3, there really aren’t any tricksTricks implies shortcuts, and to paraphrase Euclid, there is no royal road to dSLR photography.  Instead there are techniques and camera controls that can and should be learned.  These will then allow you to adapt not just to a specific situation or emulate a certain image or style, but will give you the tools and knowledge to adapt to any situation and create the images you desire.

I spent several intimate weeks with the Canon 5D Mk III as I researched and wrote my dSLR camera guide, Canon 5D Mark III Experience, the first (and hopefully best!) book available for the 5D Mk III.  In the process I learned and discovered a few obvious and not so obvious things about the 5D3 that will help you get the most from your camera.

Canon 5D mark III mk 3 Experience e book tips tricks how to learn manual guide instruction
Detail of the Canon 5D Mark III

Learn and Take Advantage of the Autofocus System

First and foremost is to learn, understand, and make full use of the new 61 Point autofocus system.  This powerful and highly customizable AF system will allow you to capture more sharp images of a variety of moving subjects which was not previously possible with the 5DII, or even the 7D.  But to do this you will need to take control of it in order to focus on, or begin tracking, your intended subject.  This involves making use of the AF Modes as well as the AF Area Selection Modes and AF Points.

For moving subjects you can then employ the AF Cases and their settings to let the camera know what to expect as far as subject movement.  AF subject tracking works in part by predicting where the subject will be when the Shutter is pressed, so if the camera knows the subject is going to be moving erratically about the frame and changing its rate of speed, then it can take measures to better follow this than if it is set for a subject that is expected to move smoothly at a steady rate.  Ten tips could easily be written about the autofocus system alone, but I will limit it to a few (my e-book guide Canon 5D Mark III Experience contains extensive explanation of the AF system and all its elements, if you wish to learn it inside and out.)

Canon 5d mark iii mk 3 auto focus autofocus 61 af point select
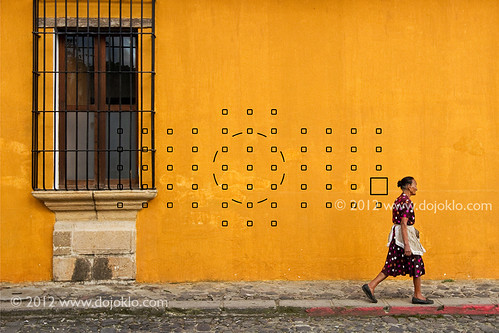
Simulated image of the Canon 5D Mark III viewfinder showing the 61 autofocus points, with the desired AF Point shown as the larger black square.

One of the essential steps in taking a successful and sharp photo is controlling where the camera autofocuses.  If you allow the camera to autofocus by automatically choosing its own focus point(s) (such as in Auto+ Shooting Mode or with One-Shot AF Mode and Auto Selection – 61 Point AF Area Selection Mode) it typically focuses on the closest object.  This may or may not be what you want to focus on, so you should select or at least narrow down where the camera focuses using the autofocus AF Points or Zones.  By doing so you are telling the camera exactly where to autofocus or to look to find a moving subject to track.  For example, you often want to focus on a subject’s eyes, but if you allow the camera to choose the autofocus point itself, it may select another part of the face, or somewhere else on the body, or even a raised hand that is nearer to the camera than the face to focus most sharply on.  If you are capturing an image of a bird in a tree, the camera has no idea you want the autofocus system to zero in on the bird so that it is in sharp focus and not the branches or leaves near it or the perhaps even the leaves closer to you.

You will select an AF Mode based on whether the subject is still or moving, and select an AF Area Selection Mode based on how large of an area you want the camera to look at to find your intended subject – ranging from a small spot to a wider Zone to all the available 61 AF Points.  You can set the AF Modes and AF Area Selection Modes in a variety of combinations based on what and how you are shooting.

Activate all the Available AF Area Selection Modes at first and experiment with them all.  Then if you decide that you will never or rarely use one or more of them, de-activate those modes so that you don’t have to “click” through them every time to select your desired mode.

canon 5d mark III mk 3 autofocus auto focus af point zone 61 af area selection mode
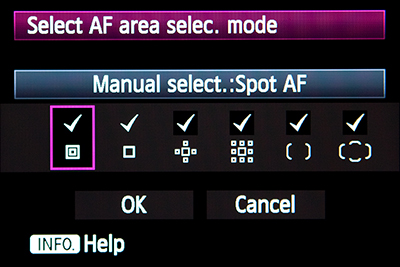
Available AF Area Selection Modes of the Canon 5D Mark III

Spot AF is Not Necessarily More Accurate than Single-Point AF.  You may be inclined to use Spot AF all the time, assuming it will be more accurate than Single-Point AF, but this is not advised.  Spot AF is designed for specific situations and autofocusing challenges, where you need to focus on a very precise area and avoid any surrounding or foreground objects that the AF system may otherwise lock onto.  This can include making sure you zero-in on a bird that is sitting among leaves and branches, or perhaps shooting through a fence to a subject beyond.  In those situations you may find that Single-Point AF searches back and forth between the near leaves/ fence and the further subject, because the area it is looking at to find the subject encompasses both potential subjects.  Spot AF will allow you to target in on a more precise area.  Although Spot AF is indicated in the Viewfinder by the tiny square within the larger selected AF Point square, Spot AF will actually pinpoint the focus to an area about the size of the larger square.

So while Spot AF will be more accurate in certain situations as described, it should not be used for general use.  Because it is so precise, the area it looks at to find contrast or a detail on which to focus may be an area of solid color.  For example if you used Spot AF to quickly focus on the general cheek and eye area of a face, it may be aimed at an area of skin without contrast, whereas the Single-Point AF area might encompass the cheek and the eye and thus find enough contrast to be able to properly and quickly focus.

Decide How Many Selectable AF Points you wish to Choose From.  If you are coming from a Canon 5D Mark II, the 60D, or any number of other previous Canon dSLR cameras, you may be used to only having 9 AF Point to choose from.  If you still wish to manually select a specific point or zone, you may find that 61 points are a bit overwhelming at first.  Even if you are used to the 19 AF Points of the Canon 7D, you may not wish to suddenly jump up to 61 AF Points.  So you can limit the number of AF Points you wish to choose from to either 15 or 9, or to just the more accurate cross-type points.  Unfortunately, the 9 points are not in the nice diamond pattern of previous EOS cameras, but you may find them to be more manageable.

canon 5d mark III mk 3 auto foucs autofocus af mode point area selection 61 11
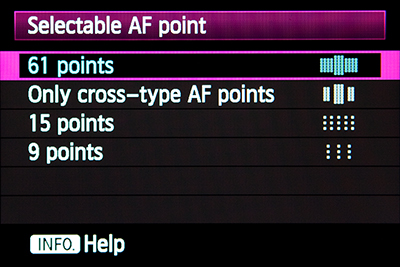
Limit your Selectable AF Points if 61 are too many to deal with.

Choose Your Priority when Working in AI Servo – Focus or Release.  You will need to tell the camera what your priority is when shooting in AI Servo AF mode – is it to ensure that the subject is in focus, or that the shutter is release immediately, whether or not the subject is in focus?  There are two menu items to set the priority for the first image and the second and subsequent images if shooting in Continuous Shooting Mode.

For AI Servo 1st Image Priority, Release priority will prioritize shutter release, or immediately capturing the initial shot at the possible expense of exact focus.  Generally when taking a photo, you are supposed to half-press the Shutter Button, allow the camera to focus, then continue the full-press of the Shutter Button to take the image.  If you simply “mash” down the Shutter Button, this setting will cause the camera to take the photo without bothering to focus first.  Sometimes when photographing sports, news, or events, capturing the “decisive moment” may take priority over exact focus.

Setting for Focus priority will prioritize focus for the first shot, ensuring that the subject is in focus before the picture is taken.  So when you fully press the Shutter Button, this setting may cause a brief, perhaps micro-seconds delay while the camera confirms focus before actually releasing the shutter.

Equal priority is a slight compromise between Release and Focus priorities.  It allows a brief (perhaps micro-seconds) pause for the camera to possibly find focus before releasing the shutter.  It does not guarantee that the image will be in focus, but merely gives it more of a chance to find focus.  It generally seems to make more sense to choose Release or Focus based on your priority.

Canon 5D mark III mk 3 custom setting function control multi controller direct autofocus point
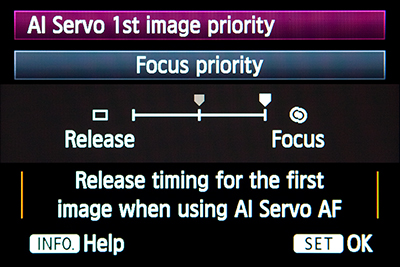
AI Servo 1st Image Priority menu to determine if capturing the shot or getting the subject in-focus is the priority.

AI Servo 2nd Image Priority is similar except that it applies to the second and subsequent images in the burst.  Setting for Speed (Shooting speed priority) will prioritize shutter release, or continuing the high speed burst at the possible expense of exact focus.

Setting for Focus will prioritize focus tracking for the following shot(s), ensuring that the subject is in focus as you continue to take the burst of images.  Again, this may cause a brief, perhaps micro-seconds delay while the camera confirms focus before releasing the shutter for each image.

Equal priority again allows a slight pause before each of the subsequent shots to perhaps give the camera time to find focus before releasing the shutter.  This pause may be slightly more pronounced when shooting in low light or low contrast situations.

These 1st Image Priority and 2nd Image Priority settings should be set in conjunction with each other, based on the type of situation you are photographing and thus your priorities.  Generally, it sharp images are your goal, you will want to set both for  Focus Priority.  You may sacrifice the maximum 6 frames per second (fps) continuous shooting speed (if you have the Drive Mode set for High Speed Continuous) as there might be a  couple micro-seconds or more delays as the camera ensures that the subject is in focus before taking the subsequent shots.  If you are capturing a “decisive moment” such as a runner at the finish line or a goal being scored, you will want to set one or both of the settings to Release Priority/ Speed Priority, but ensure somehow that you have pre-focused on the subject distance so the result is not wildly out of focus.  Again, I go into much more detail about the various combinations and when to make use of them in my e-book.

Set the Custom Controls for Multi-Controller Direct.  This will allow you to manually select your AF Point or Zone more quickly by simply toggling the Multi-Controller thumb joystick, without having to first press the AF Point Selection Button.  You have probably noticed, to the dismay of your muscle memory, that the AF Point Selection Button no longer controls image zoom.  This is because there are many more image review options that are now made possible by Comparative Playback (side by side image review), discussed just below.

canon 5d mark iii mk 3 multi controller direct af auto focus autofocus point select

canon 5d mark iii mk 3 auto focus autofocus multi controller direct af point select zone control custom function setting
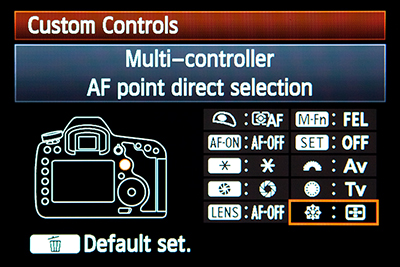
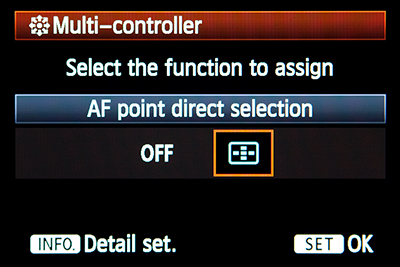
Set the Multi-Controller for AF Point Direct Selection for ease and speed.

Take Advantage of Comparative Playback (Side by Side Image Review).  Of course you can instantly review the image you just captured on the rear LCD Monitor, but the 5D Mk III now also offers Comparative Image Playback Mode (Two-Image Display) which gives you the ability to simultaneously compare two images or two different sections of the same image.  Whereas before, one would have to “flip” back and forth between two images and navigate around the images, this feature allows for some extremely helpful and flexible image analysis that was previously only possible once you were back at your computer.

To enter Comparative Playback Mode during image playback or review, press the Creative Photo / Comparative Playback Button (at the top of the row on the left of the camera back), which is also indicated by the side-by-side blue squares icon for side-by-side image playback.  Use the SET Button to highlight which of the two image windows you wish to navigate, then use the Quick Control Dial or Main Dial to scroll or jump to the desired image, the Magnify Button followed by the top Main Dial to zoom in or out of the selected image, and the Multi-Controller to navigate around the selected image frame.  You can press the INFO Button repeatedly to change the Shooting Information Display in order to view shooting information and/ or the Histograms.  If you zoom in on a specific area of one image and wish to zoom in on the other image to the same magnification and same area of the image, press the SET Button to switch to the other image window, then press the [Q] Button.  Also, press and hold the Playback Button to view the highlighted image as a single, full-screen image.

canon 5d mark iii mk 3 view image lcd side by side comparative playback review rear screen
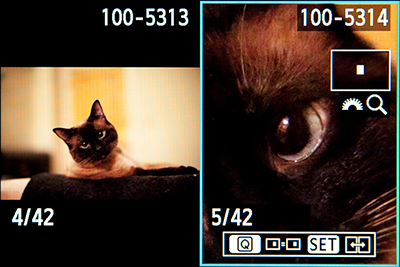
Comparative Playback Mode view of two different images, also showing the images’ Histograms.

There are several different viewing options and potential uses for Comparative Playback, whether you are simultaneously viewing two separate images or two areas of the same image.

-Display the active AF point(s).
-Preview alternate cropping guides.
-View the thumbnail plus the Luminance Histogram.
-View the thumbnail plus the RGB Histograms.
-View the thumbnail plus basic exposure information.

For two different images:
-Compare the compositions of two images simultaneously.
-Zoom in and simultaneously compare a specific area for focus or exposure.
-View the thumbnails along with histograms or basic exposure information of both images.

For the same image:
-Zoom in and simultaneously compare two separate areas of the same image to have a closer look at focus or exposure.
-View the entire image for overall composition while also zooming in to view an area of detail for focus or exposure (see Figure 61).

Set the Default Magnification for Image Review.  In order to immediately review your images according to your preferences, you should set the initial magnification and position that you will view an image during image review (Playback) when you press the Magnify Button.  You can set for no magnification (1x) and then use the top Main Dial to zoom in and out.  This can be handy if you have the image review set to initially show the Shooting Information Display with the Histogram.  Since the image in that view is a thumbnail, you can then press the Magnify Button to show the full size image.  After this initial zoom, you can then use the Main Dial to zoom in or out.

Or set for 2x, 4x, 8x, or 10x magnification and it will instantly zoom to that magnification when the Magnify Button is pressed.  Again, after this initial zoom, you can then use the Main Dial to zoom in or out.  Each of these magnifications will zoom from the center of the image.  Or you can set it to quickly zoom in to full size, 100% view of the pixels, zoomed into the AF Point where focus was achieved, using setting Actual size (from selected pt).  This can be useful to quickly check for precise focus, though note that if you focused with a selected AF Point and recomposed, it will zoom into the final position of that AF Point in the composition, not the actual position where you used it to focus on your subject.  But if you only recomposed slightly, it will often be easy to quickly navigate to the actual area of focus.  The setting Same as last magnif. (from ctr) will zoom in at the same magnification that you last viewed an image at, centered at the image center.

canon 5D mark III mk 3 magnify button lcd view zoom
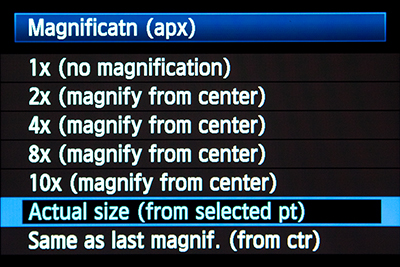
Magnification menu to set how images are initially viewed during Playback when the Magnify Button is pressed.


I’m still putting this post together but wanted to share what I had already written.  Next week I will go into more detail about the tips below:

Turn on the Viewfinder Warnings

canon 5D mark III mk 3 viewfinder warning custom function setting


Auto Rotate Images in the Camera and on Your Computer

canon 5D mark III mk 3 auto rotate image view lcd


Use the Q Button for Quick Access to a Variety of Features for Still Images

canon 5d mark iii mk 3 q button control edit image view lcd


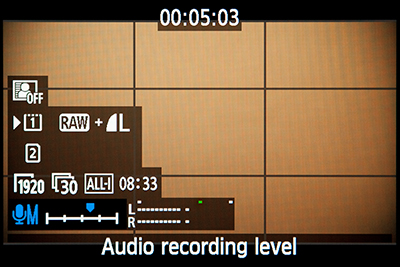
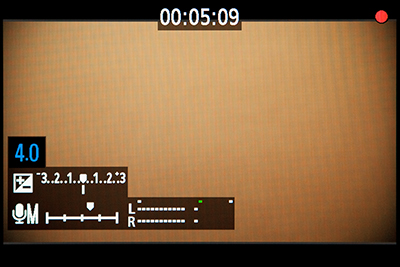
Make Use of the Silent Control Touch Pad and Q Button for Movie Shooting

canon 5d mark iii mk 3 movie video silent control touch pad q button menu


canon 5d mark iii mk 3 movie video silent control touch pad q button menu


All of the above information – and much, much more – can be found in Canon 5D Mark III Experience, my latest Full Stop dSLR user’s guide e book, which goes beyond the manual to help you learn the features, settings, and controls of the powerful and highly customizable EOS 5D Mk III, plus most importantly how, when, and why to use the functions, settings, and controls in your photography.

Written in the clear, concise, and comprehensive style of all Full Stop guides, Canon 5D Mark III Experience will help you learn to use your Canon 5D Mk 3 quickly and competently, to consistently create the types of images you want to capture. The e-book is available in either PDF, EPUB, or MOBI format for reading on any device.

Learn more about it, preview it, and purchase it here:
http://www.dojoklo.com/Full_Stop/Canon_5DMkIII_Experience.htm

As one Canon user has said about Full Stop guides, “I don’t know how I could fully take advantage of all the features the camera has to offer without this publication! It’s well-organized, easy to understand, and succinct enough to keep your attention while still containing a wealth of information to get the most out of your camera.”

Take control of your 5D Mk III, the image taking process, and the photos you create!

Canon 5D Mark III mk 3 book ebook manual guide tutorial instruction bible how to dummies field EOS


Ten Top Things to do in Cusco that are Not on Your Itinerary…Yet!

Cusco cuzco peru plaza night fountain
Cusco’s Plaza de Armas at night – all photos by the author – www.dojoklo.com

Every visitor to Cusco is likely to tour the Cathedral and a couple major museums, relax in the Plaza de Armas, and marvel at the exotic offerings in the San Pedro food market.  However there are additional essential sites and experiences that you may not find in your guidebook or that your tour guide might not take you to, which you don’t want to miss.  Most of these lie along or mere steps off the tourist trail, and with a little planning and effort can be fit into any itinerary.

EATING

All the guide books lists the popular restaurants in Cusco, and there are many worth eating at including Pachapapa for its distinct Peruvian dishes with international flair or the MAP Cafe for its creative Andean cuisine in a unique museum setting.  But the real local food is found with the local shops and vendors.

1. Picarones – An incredibly tasty snack that is a favorite among locals are Picarones, deep-fried pumpkin or squash donuts.  Although delicious by themselves, they are irresistible when covered with the syrup or molasses they are always paired with.  Shops and vendors selling picarones can be found throughout Cusco, so ask your hotel desk clerk for their favorite nearby spot.  Be sure to bring your own handi-wipes along because after eating a couple your fingers will be hopelessly sticky, and the damp cloths they provide are already too well used to work very well!

cusco cuzco peru picarones
Deep-fried and delicious Picarones

2. Tamales – As with picarones, the best tamales are found at the local shops and vendors.  As you walk around the city keep your ears open to the cry of “Tamales, Tamales!” and look for a woman with a large basket in her arms or at her feet.  There was one very popular vendor often under the colonnade at the north corner of the main Palza near Gatos market, though I don’t know if she is still there.  Be sure to try the “dulces” or sweet ones as well as the “pollo” variety that holds a tiny bit of chicken and an olive in the center.

3.  Cafe Restaurant Aldea Yanapay – Although there are many good restaurants to choose from in town, only a couple help to support social programs such as disadvantage children or orphan girls.  And only one is decorated like the inside of a dreaming child’s head!  This wonderful café-restaurant is run by the founder of Aldea Yanapay, a volunteer organization with various programs for the underprivileged children of Cusco, and all proceeds from the café benefit these programs.  Sit on pillows, play games, hold a stuffed animal, wear a silly hat, take in a playful performance, or just sit at a table and enjoy the delicious French toast, lunch and dinner entrees, or the best giant hot chocolate in town.  Ruinas 415, second floor

Aldea Yanapay Cafe Restaurant Cusco Cuzco Peru
Interior of Cafe Yanapay

Another restaurant associated with a non-profit is the Panaderia El Buen Pastor bakery and coffeeshop.  Enjoy a morning coffee while watching the racks emerge from the ovens with delicious pastries, sweets, and empanadas.  You will have to keep coming back each morning in order to try all the appetizing looking offerings.  Proceeds from this cafe benefit a home for orphan girls.  Cuesta San Blas 579 – San Blas

4. Brick Oven Pizza – While you’ve probably had great brick oven pizza, you’ve likely never watched it being made with such flair, while listening to reggae, and being warmed by the brick oven on a chilly Cusco evening.  Toss on a couple spoonfuls of the spicy aji sauce, and you won’t be able to understand how you ever ate pizza without it.  Maruri near San Agustin

CULTURE

After being fortified with Cusco’s great food, venture off to explore its cultural offerings.  Of course there are the Cathedral and Compañia facing the Plaza, the Inca walls and Coricancha Temple of the Sun, and the art and history museums.  But there are lesser known and equally as fascinating museums.

5. Andean Children’s Art Museum – Museo de Arte de Ninos Andinos, Irq’i Yachay – This unique museum displays the artwork of Quechua children from remote Andean communities.  A non-profit organization traveled to these communities to introduce the children to art and materials they had never had the opportunity to use, and the children responded with incredible creations portraying their lives, myths, dreams, and themselves.  An introductory short movie of the project and a free guided tour are provided in Spanish, and donations are encouraged.  Calle Teatro 344

Cusco Cuzco Peru Andean Children's Art Museum Museo de Arte de Ninos Andinos Irq’i Yachay Quechua Andes Andean museum kids children
Detail of a child’s painting in the Andean Children’s Art Museum

A similarly interesting local museum is the Taki Andean Music Museum, which not only exhibits Andean and Amazonian musical instruments, but is also a cultural center that organizes musical and cultural events, gatherings, workshops, sessions, lectures, concerts, teaches children to play, as well as promotes and supports traditional music groups.  Calle Hatunrumiyoc 487 #5

SHOPPING

Of course you are going to want to bring home souvenirs to remember your experiences and unique gifts for your friends and family.  Instead of grabbing the mass produced trinkets sold by every vendor and every shop, why not seek out quality handicrafts that better represents the local culture while also directly supporting local artisans and their cultural traditions.

6. Center for Traditional Textiles – A non-profit organization founded this center to preserve and continue traditional weaving, and to teach and support this work in numerous communities around Cusco.  There is a very nice museum of the history and traditions of Andean textiles, and always a live weaving demonstration in the store.  The beautiful items are more pricey than the tourist versions at stores and markets, but are truly hand crafted and naturally dyed.  Avenida el Sol 603

7.  Museo Taller Hilario Mendivil – This museum, workshop, and shop of the notable local artisan Mendivil family is famous for the unique long-necked religious figures, dressed with indigenous influences.  The space also contains a small museum of historic pieces, and the proprietress may give you a tour (in Spanish).  Numerous beautiful works of of both the “long-neck” style as well as several other styles are available for purchase.  Plazoleta San Blas (along the right side as you stand in the plaza and face the fountain)

Cusco Suzco Mendivil sargento Peru dance
My Sargento figure from the Mendivil Workshop

8. Local Food Markets – Venture beyond the covered San Pedro market to the open street markets and local covered food markets in the areas behind the main market.  Ask the vendors about exotic fruits or animal parts that you can’t quite identify, and try some such as the delicious cherimoya (or custard apple) and the maracuya (or passion fruit).  In all markets, be aware for pick-pockets and be very careful with all belongings – carry your bags in front and go with empty pockets.

Cusco Cuzco Peru market meat cow beef tongue
Various tasty cow parts at a Cusco market

EXPERIENCES

Travel isn’t just about seeing sights and eating food.  Some of your strongest and fondest memories may come from the unique experiences you can only undertake in a foreign place.  Strolling through a local market, looking behind the scenes to gain more insight into daily life, and interacting with vendors and shopkeepers can all provide these types of experiences.  There are other opportunities to take advantage of in Cusco:

9. Volunteering – It sometimes seems that Cusco may have more NGO’s per capita than any other other city, particularly any tourist-oriented city.  But this is due to real needs brought about by the inequities and social conditions that are common to many areas of Peru.  Find an NGO (non-profit organization) that serves a need which interests you.  This might include orphans, underprivileged children, single mothers, the environment, disabled children, cultural heritage, or countless other areas and needs.  The South American Explorer’s Club has extensive resources on local volunteer opportunities, and there is also a helpful list of organizations here: http://www.volunteersouthamerica.net/

volunteer aldea yanapay cusco cuzco peru
A student at Aldea Yanapay

I have volunteered for several weeks at Aldea Yanapay, mentioned in the Eating section above.  They run an after-school program and cultural center for the disadvantaged children of Cusco, as well as other projects.  You can take Spanish classes at FairPlay which in itself is an NGO that helps single mothers, and who will also assist you with volunteer placement.

10. Inti Raymi…Up Close – While many visitors to Cusco in June have the opportunity to experience the Inti Raymi Inca sun festival, those who make an extra effort can see more of the events from close-up.  The festival starts at Coricancha, the original Inca temple of the sun.  Arrive several hours early and you can grab a front-row spot near where the Inca King – Sapa Inca – greets the morning sun.  Locate your self at the top of the hill near the curving Inca wall that now forms the base of the Santo Domingo church, so that you can view the Sapa Inca atop that location and the royal court as they stand among the terraces.  Immediately after the ceremony, run just up the street to near the entrance of the church, where the procession will emerge, so that you have an up-close view of the Inca, his court, and the entire procession as they start to make their way to the Plaza de Armas.  Be sure to orient yourself so that you are in the best position for photos, where the light hits the subjects and you are not facing into the sun if possible.

Inti Raymi Inca king Sapa Inca sun festival Coricancha
The Sapa Inca greeting the sun at Coricancha

Inti Raymi Cusco Cuzco Peru Coricancha
A Ñusta (Inca Princess) in the procession leaving Coricancha

I have put together a list of some of my favorite additional places to visit in Cusco, including restaurants, shops, and practical resources such as banks.  You can view this list of Cusco Places to Visit here:  http://www.dojoklo.com/writing/cuscoplacestovisit.pdf  Be sure to do your research and plan your visit to Cusco so that you can fully take advantage of all that it offers.

Want to learn how to take better travel photos on your trip to Peru, such as the ones highlighted in my Peru and Dance photo galleries shown here?  Have a look at my blog posts about Photography Technique or my latest e-book Ten Steps to Better dSLR Photography:

Ten Tips and Tricks for the Nikon D5100 / D5200

edit 3012-05-07: While this post was originally written for the Nikon D5100, all of these tips also apply to the D5200.  So while I work on an updated Nikon D5200 Tips and Tricks post, start out by making use of these tips.  And of course, they all still apply to the D5100.

nikon d5100 autofocus af system use learn tips tricks how to
Detail of the Nikon D5100

nikon d5200 autofocus af system use learn tips tricks how to dummies guide manual instruction tips tricks
Detail of the Nikon D5200

I’ve spent quite a bit of time with the Nikon D5100 as I researched and wrote my eBook user’s guide Nikon D5100 Experience (and now Nikon D5200 Experience also!), and here are some of the handy “tips and tricks” I’ve learned that may prove useful for you as you set up and use your D5100.  This camera has many features, Menu settings and Custom Settings you can use to make it operate how you want it to and to match your needs and shooting style, so it is worth-while to learn them and/ or to set them up according to your preferences.  For example, in no particular order:

1. Change the Flash Mode and Flash Exposure Compensation Quickly: You can quickly set your desired Flash Mode and then adjust the amount of Flash Exposure Compensation with the press of a button or two and the Command Dial.  Press the Flash Mode Button to raise the flash in P, A, S, or M mode, then press and hold it and turn the Command Dial to change the Flash Mode (Fill Flash, Red-Eye Reduction, Rear-Curtain Sync, etc.).  Press the Flash Mode Button (also the Flash Compensation Button) and the Exposure Compensation Button and turn the Command Dial, and you can quickly change the Flash Compensation as you view it on the Information Display Screen.

Nikon D5100 tips tricks book guide manual instruction user guide for dummies experience
Top of the Nikon D5100 with flash settings controls

2. Assign the Function (Fn) Button: You can use Custom Setting f2 to assign a different function to the Function (Fn) Button than the default Self-Timer setting.  Figure out which setting you change most often or need handy at your fingertips.  Some that I think are most useful are ISO Sensitivity, White Balance, or Auto Bracketing. You can also assign it to +RAW so that if you are shooting in JPEG but have a great image you want an NEF(RAW) copy of also, press the Fn Button first then take the photo, and you will save a copy of the image in both formats.

3. Adjust the Auto Off Timers: Use Custom Setting c2 to set how long the various displays stay visible on the rear LCD Monitor.  Though it may be convenient for them to stay on a long while, that will drain your battery more quickly.  But if they turn off too soon, it is annoying and could affect your shooting in a demanding situation.  So find a happy compromise.  You can set them all to stay on for a reasonable length by setting for NORM, or you can adjust them individually.  My preference is Playback/ menus 20s or 1min; Image review 4s or 8s; Live View 3 min or 5 min; Auto meter-off 20s or 1 min.  The first person to leave a comment on this post correctly telling the difference between Playback and Image Review will get a FREE copy of my latest eBook user’s guide for the Nikon D5100 called Nikon D5100 Experience! See later in this post for more info on this user’s guide – the only guide currently available for the Nikon D5100!

Custom Setting c2 – Auto-off timers

4. See if You Have Over-Exposed Your Highlights: You have to tell the camera which playback views you would like the option of seeing when you look at your images on the rear LCD Monitor, and thus be able to view your histograms and over-exposed highlights.  In the Playback Menu under Playback Display Options, check the ones you want to be able to view.  Two of the most important ones are Highlights and Overview.  These two will let you know if you’ve blown-out (over-exposed) your highlights.  The Highlights view will do this by having those areas of your image blink.  The Overview view will show you by displaying the histogram, which will show you if your highlights or shadows have run off the graph, indicating that those areas of the image contain no detail in the highlights or shadows other than pure white or pure black.

Overview playback view showing the histogram – (note you should set your JPEGs for FINE not NORMAL as I realized the camera default is set at)

5. Set a Precise Fluorescent White Balance: When you change the White Balance (WB) setting using the i Button and Information Display Screen, you can choose from several white balance options including Fluorescent White Balance.  However, there are several types of fluorescent light bulbs ranging in temperature from perhaps 3,000K to 6,5000K.  To tell the camera which one to adjust for, you have to go behind the scenes to the WB options in the Shooting Menu.  There you can set which fluorescent option to use, such as Warm-white or Cool-white.  You can also access this menu item to set your own custom Preset White Balance using a couple different methods.

6. Put Your Most Used Settings in My Menu: Instead of digging into the menus and Custom Settings all the time to find your most used settings, such as the White Balance settings just described, you can create your own custom menu called My Menu, which is then quickly and easily accessed with the Menu Button.  You can even decide what order to list the items in.  Some possible items to add could be perhaps auto bracketing or HDR if you often make use of those.

Brief Commercial Interruption: How did I learn all these useful and convenient settings?  I just completed an eBook user’s guide for the Nikon D5100 called Nikon D5100 Experience. (and now Nikon D5200 Experience also). Following in the footsteps of my bestselling Nikon D7000 Experience, these guides cover all the Menus, Custom  Settings, functions and controls of the Nikon D5100 and D5200, focusing modes, exposure modes, shooting modes, white balance, etc., PLUS when and why you want to use them when shooting.  As one reader has said of my previous D7000 guide, “This book, together with the manual, is all you need to start discovering all the camera’s potential.” It will help you to take control of your camera and the images you create!  Learn more about the features and settings discussed in the tips and tricks here and much more.  To read more about them, preview them, and purchase, see my Full Stop bookstore website here!

Nikon D5100 tips tricks book guide manual instruction "for dummies" Experience Douglas Klostermann     Nikon D5200 tips tricks book guide manual instruction dummies Experience Douglas Klostermann
Nikon D5100 Experience eBook user’s guide

7. Lock Your Focus and/ or Your Exposure Settings Before Recomposing Your Shot: When you press and hold the Shutter-Release Button, the focus distance is locked (or you start tracking the subject in AF-C and AF-A modes), but the exposure is determined when the photo is taken. You can customize how this button and the AE-L/AF-L button function so that you can do back-button focusing, lock the exposure, swap the function of the two buttons, or several other options dealing with focus and exposure.

8. Create Images with More Impact Without Photoshop, Using Picture Controls: If you are not going to be processing all your images in Photoshop, Lightroom, Aperture, etc, you can set or create a Picture Control so that your JPEG images (and videos) have the look you want.  Boost the contrast and saturation, or sharpen them a bit.  You can even shoot in black and white or sepia (though it is best to shoot in color and capture an image with all the original information first).  You can save your custom Picture Controls, create your own with the included software, or find ones online then load them on your camera.  Some available online include Picture Controls that mimic the look of roll films such as Kodachrome or Velvia.  But be careful with setting or adjusting Picture Controls if shooting in RAW.  Find out why in my user’s guide!

Adjusting the Picture Control settings

9. Set the ISO Sensitivity Control to Help you out in Difficult Situations: Of course you can adjust the ISO setting on the fly, but you can also set up the camera to automatically adjust some settings if you are in a situation where the lighting changes and the camera determines you will not be able to get the shot without some adjustments to the ISO and/ or shutter speed.   You can set this in the Shooting Menu under ISO Sensitivity Settings, where you can turn this option on, then tell the camera the maximum ISO and minimum shutter speed to use in these situations.  I suggest you set the ISO no higher than 3200 or 6400 if you are willing to accept some noise, and the minimum shutter speed for around 1/30, which you can still hand-hold if careful.  However, if you are carefully metering and adjusting your settings and you don’t like the camera making these types of settings changes without your expressed permission, be sure to turn this setting off.

Setting the ISO Sensitivity Settings

10. Have the Camera Assist You with Manual Focusing: Although digital SLR cameras are designed to be used with their sophisticated autofocus systems, some users prefer to manually focus or are using older manual focus lenses.  And situations such as close up and macro photography sometimes require precise manual focusing.  If you are going to be turning off the autofocus on your camera and lens, you can have the camera assist you in focusing with the Rangefinder.  The camera uses the exposure indicator in the viewfinder to tell you if you are focusing in front of or behind your subject, or if you are in focus.

There are numerous other cool settings you can take advantage of with your D5100 or D5200, including things like Auto Bracketing for Exposure, in-camera HDR, reversing the direction of your Command Dial or exposure indicator, changing the format and color of your Information Display, adjusting your file sizes and types to maximize your maximum continuous burst rate, and determining your best settings for video shooting.  All of these and more are discussed in my e-book user’s guides, Nikon D5100 Experience and Nikon D5200 Experience, both available now.  Learn more about the books, preview them, and purchase at my Full Stop website here. Learn to take control of your camera and the images you create!

Also, please know that there aren’t really any tips or tricks for better photography.  To improve your photography, simply learn your camera inside and out and learn the techniques of dSLR photography (with my e-book!) and then practice, practice, practice taking images, study the results, and look at and learn from the work of talented photographers.

I put together a video and a more in-depth article to introduce and further explain the D5100 autofocus system:

For more detailed information read the article Taking Advantage of the Nikon D5100 Autofocus System.

Still haven’t purchased your Nikon D5100, or need a better lens? Check them out on Amazon below.  I appreciate it if you use these referral links to make your purchase – Amazon will give me a small referral bonus which helps support this blog!  Or use the other camera store links on the left side of this page.  Thanks!

See and buy the Nikon D5100 with 18-55mm Lens on Amazon

See and buy the Nikon D5100 – Body Only on Amazon

Look for a new Nikon Lens on Amazon – I suggest considering the high quality, versatile, all-purpose
Nikon 18-200mm f/3.5-5.6G VR

Was this post helpful?  Please let others know about it by clicking the Facebook or Twitter sharing buttons below, linking to it from your blog or website, or mentioning it on a forum.  Thanks!