Ten Tips and Tricks for the Nikon D5100 / D5200

edit 3012-05-07: While this post was originally written for the Nikon D5100, all of these tips also apply to the D5200.  So while I work on an updated Nikon D5200 Tips and Tricks post, start out by making use of these tips.  And of course, they all still apply to the D5100.

nikon d5100 autofocus af system use learn tips tricks how to
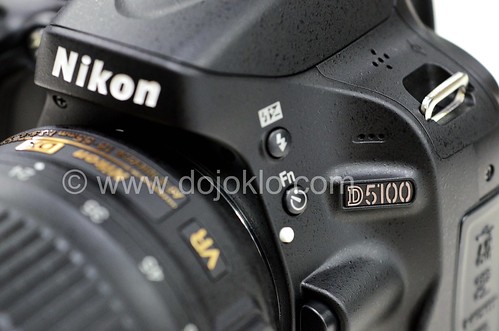
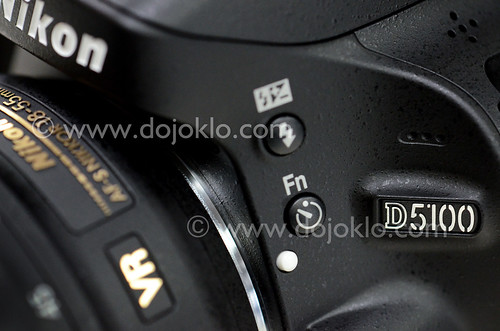
Detail of the Nikon D5100

nikon d5200 autofocus af system use learn tips tricks how to dummies guide manual instruction tips tricks
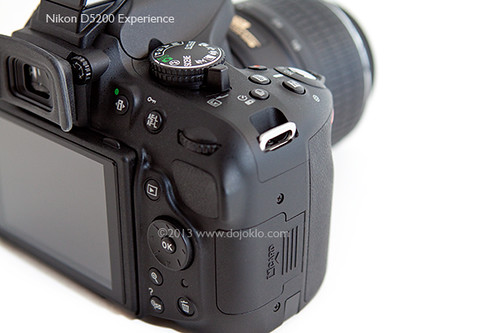
Detail of the Nikon D5200

I’ve spent quite a bit of time with the Nikon D5100 as I researched and wrote my eBook user’s guide Nikon D5100 Experience (and now Nikon D5200 Experience also!), and here are some of the handy “tips and tricks” I’ve learned that may prove useful for you as you set up and use your D5100.  This camera has many features, Menu settings and Custom Settings you can use to make it operate how you want it to and to match your needs and shooting style, so it is worth-while to learn them and/ or to set them up according to your preferences.  For example, in no particular order:

1. Change the Flash Mode and Flash Exposure Compensation Quickly: You can quickly set your desired Flash Mode and then adjust the amount of Flash Exposure Compensation with the press of a button or two and the Command Dial.  Press the Flash Mode Button to raise the flash in P, A, S, or M mode, then press and hold it and turn the Command Dial to change the Flash Mode (Fill Flash, Red-Eye Reduction, Rear-Curtain Sync, etc.).  Press the Flash Mode Button (also the Flash Compensation Button) and the Exposure Compensation Button and turn the Command Dial, and you can quickly change the Flash Compensation as you view it on the Information Display Screen.

Nikon D5100 tips tricks book guide manual instruction user guide for dummies experience
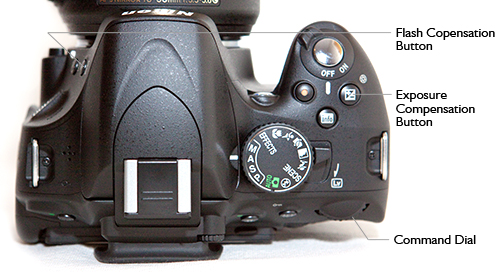
Top of the Nikon D5100 with flash settings controls

2. Assign the Function (Fn) Button: You can use Custom Setting f2 to assign a different function to the Function (Fn) Button than the default Self-Timer setting.  Figure out which setting you change most often or need handy at your fingertips.  Some that I think are most useful are ISO Sensitivity, White Balance, or Auto Bracketing. You can also assign it to +RAW so that if you are shooting in JPEG but have a great image you want an NEF(RAW) copy of also, press the Fn Button first then take the photo, and you will save a copy of the image in both formats.

3. Adjust the Auto Off Timers: Use Custom Setting c2 to set how long the various displays stay visible on the rear LCD Monitor.  Though it may be convenient for them to stay on a long while, that will drain your battery more quickly.  But if they turn off too soon, it is annoying and could affect your shooting in a demanding situation.  So find a happy compromise.  You can set them all to stay on for a reasonable length by setting for NORM, or you can adjust them individually.  My preference is Playback/ menus 20s or 1min; Image review 4s or 8s; Live View 3 min or 5 min; Auto meter-off 20s or 1 min.  The first person to leave a comment on this post correctly telling the difference between Playback and Image Review will get a FREE copy of my latest eBook user’s guide for the Nikon D5100 called Nikon D5100 Experience! See later in this post for more info on this user’s guide – the only guide currently available for the Nikon D5100!

Custom Setting c2 – Auto-off timers

4. See if You Have Over-Exposed Your Highlights: You have to tell the camera which playback views you would like the option of seeing when you look at your images on the rear LCD Monitor, and thus be able to view your histograms and over-exposed highlights.  In the Playback Menu under Playback Display Options, check the ones you want to be able to view.  Two of the most important ones are Highlights and Overview.  These two will let you know if you’ve blown-out (over-exposed) your highlights.  The Highlights view will do this by having those areas of your image blink.  The Overview view will show you by displaying the histogram, which will show you if your highlights or shadows have run off the graph, indicating that those areas of the image contain no detail in the highlights or shadows other than pure white or pure black.

Overview playback view showing the histogram – (note you should set your JPEGs for FINE not NORMAL as I realized the camera default is set at)

5. Set a Precise Fluorescent White Balance: When you change the White Balance (WB) setting using the i Button and Information Display Screen, you can choose from several white balance options including Fluorescent White Balance.  However, there are several types of fluorescent light bulbs ranging in temperature from perhaps 3,000K to 6,5000K.  To tell the camera which one to adjust for, you have to go behind the scenes to the WB options in the Shooting Menu.  There you can set which fluorescent option to use, such as Warm-white or Cool-white.  You can also access this menu item to set your own custom Preset White Balance using a couple different methods.

6. Put Your Most Used Settings in My Menu: Instead of digging into the menus and Custom Settings all the time to find your most used settings, such as the White Balance settings just described, you can create your own custom menu called My Menu, which is then quickly and easily accessed with the Menu Button.  You can even decide what order to list the items in.  Some possible items to add could be perhaps auto bracketing or HDR if you often make use of those.

Brief Commercial Interruption: How did I learn all these useful and convenient settings?  I just completed an eBook user’s guide for the Nikon D5100 called Nikon D5100 Experience. (and now Nikon D5200 Experience also). Following in the footsteps of my bestselling Nikon D7000 Experience, these guides cover all the Menus, Custom  Settings, functions and controls of the Nikon D5100 and D5200, focusing modes, exposure modes, shooting modes, white balance, etc., PLUS when and why you want to use them when shooting.  As one reader has said of my previous D7000 guide, “This book, together with the manual, is all you need to start discovering all the camera’s potential.” It will help you to take control of your camera and the images you create!  Learn more about the features and settings discussed in the tips and tricks here and much more.  To read more about them, preview them, and purchase, see my Full Stop bookstore website here!

Nikon D5100 tips tricks book guide manual instruction "for dummies" Experience Douglas Klostermann     Nikon D5200 tips tricks book guide manual instruction dummies Experience Douglas Klostermann
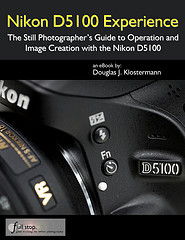
Nikon D5100 Experience eBook user’s guide

7. Lock Your Focus and/ or Your Exposure Settings Before Recomposing Your Shot: When you press and hold the Shutter-Release Button, the focus distance is locked (or you start tracking the subject in AF-C and AF-A modes), but the exposure is determined when the photo is taken. You can customize how this button and the AE-L/AF-L button function so that you can do back-button focusing, lock the exposure, swap the function of the two buttons, or several other options dealing with focus and exposure.

8. Create Images with More Impact Without Photoshop, Using Picture Controls: If you are not going to be processing all your images in Photoshop, Lightroom, Aperture, etc, you can set or create a Picture Control so that your JPEG images (and videos) have the look you want.  Boost the contrast and saturation, or sharpen them a bit.  You can even shoot in black and white or sepia (though it is best to shoot in color and capture an image with all the original information first).  You can save your custom Picture Controls, create your own with the included software, or find ones online then load them on your camera.  Some available online include Picture Controls that mimic the look of roll films such as Kodachrome or Velvia.  But be careful with setting or adjusting Picture Controls if shooting in RAW.  Find out why in my user’s guide!

Adjusting the Picture Control settings

9. Set the ISO Sensitivity Control to Help you out in Difficult Situations: Of course you can adjust the ISO setting on the fly, but you can also set up the camera to automatically adjust some settings if you are in a situation where the lighting changes and the camera determines you will not be able to get the shot without some adjustments to the ISO and/ or shutter speed.   You can set this in the Shooting Menu under ISO Sensitivity Settings, where you can turn this option on, then tell the camera the maximum ISO and minimum shutter speed to use in these situations.  I suggest you set the ISO no higher than 3200 or 6400 if you are willing to accept some noise, and the minimum shutter speed for around 1/30, which you can still hand-hold if careful.  However, if you are carefully metering and adjusting your settings and you don’t like the camera making these types of settings changes without your expressed permission, be sure to turn this setting off.

Setting the ISO Sensitivity Settings

10. Have the Camera Assist You with Manual Focusing: Although digital SLR cameras are designed to be used with their sophisticated autofocus systems, some users prefer to manually focus or are using older manual focus lenses.  And situations such as close up and macro photography sometimes require precise manual focusing.  If you are going to be turning off the autofocus on your camera and lens, you can have the camera assist you in focusing with the Rangefinder.  The camera uses the exposure indicator in the viewfinder to tell you if you are focusing in front of or behind your subject, or if you are in focus.

There are numerous other cool settings you can take advantage of with your D5100 or D5200, including things like Auto Bracketing for Exposure, in-camera HDR, reversing the direction of your Command Dial or exposure indicator, changing the format and color of your Information Display, adjusting your file sizes and types to maximize your maximum continuous burst rate, and determining your best settings for video shooting.  All of these and more are discussed in my e-book user’s guides, Nikon D5100 Experience and Nikon D5200 Experience, both available now.  Learn more about the books, preview them, and purchase at my Full Stop website here. Learn to take control of your camera and the images you create!

Also, please know that there aren’t really any tips or tricks for better photography.  To improve your photography, simply learn your camera inside and out and learn the techniques of dSLR photography (with my e-book!) and then practice, practice, practice taking images, study the results, and look at and learn from the work of talented photographers.

I put together a video and a more in-depth article to introduce and further explain the D5100 autofocus system:

For more detailed information read the article Taking Advantage of the Nikon D5100 Autofocus System.

Still haven’t purchased your Nikon D5100, or need a better lens? Check them out on Amazon below.  I appreciate it if you use these referral links to make your purchase – Amazon will give me a small referral bonus which helps support this blog!  Or use the other camera store links on the left side of this page.  Thanks!

See and buy the Nikon D5100 with 18-55mm Lens on Amazon

See and buy the Nikon D5100 – Body Only on Amazon

Look for a new Nikon Lens on Amazon – I suggest considering the high quality, versatile, all-purpose
Nikon 18-200mm f/3.5-5.6G VR

Was this post helpful?  Please let others know about it by clicking the Facebook or Twitter sharing buttons below, linking to it from your blog or website, or mentioning it on a forum.  Thanks!

the Nikon D5100 and the Canon T3i

The latest addition to the Nikon dSLR line-up is the versatile Nikon D5100, which replaces the D5000. It sits just above the D3100 in the Nikon consumer offerings, and a bit below the D90 and D7000 – both sturdier and more sophisticated cameras. The D5100 boasts a 16 megapixel sensor (like the D7000), and a swivel screen more like the one on the Canon T3i and 60D, attached at the left side, rather than the less convenient bottom swivel of the previous D5000. (see my post comparing several of the latest Canon dSLR cameras here, and one comparing the Nikons here.)

Nikon D5100 book manual how to instruction download vs Canon T3i
Nikon D5100 – photo by author – copyright 2011 – please do not use without permission!

The D5100 shoots 4 frames per second, faster than the 3 fps of the D3100, and of course has 1080p HD video with all the frame rate options. The D5100 now has in-camera processing filters like those of the 60D and T3i (including miniature, high or low key, and selective color in the Nikon). And it has the 11 point AF system, with one cross type sensor, like the D3100.

Canon T3i vs Nikon D5100 compare side by side
Canon Rebel T3i on left, Nikon D5100 on right

First, a Comparison of the Nikon D5100 vs. the Canon Rebel T3i specs, to see how they stack up “on paper”:

Canon Rebel T3i / EOS 600D

  • 18 megapixels
  • Articulating rear LCD screen
  • 1080p HD video with all the frame rate options
  • 9 point autofocus system with 1 cross-type sensor
  • 3.7 frames per second continuous shooting for a maximum 34 JPEG burst
  • 63 zone dual layer exposure metering system – the same as the one in the 60D and 7D
  • In-camera image processing filters plus RAW to JPEG, cropping, and other options
  • Some scene modes
  • ISO range 100-6400
  • 95% viewfinder with .85 magnification
  • 1.26 lbs with battery
  • Accepts optional battery pack / vertical grip – the Canon BG-E8
  • Wireless flash control of external Speedlites with built-in flash
  • Compatible with and autofocuses with all Canon EF and EF-S lenses
  • Depth of Field preview button
  • Full manual video exposure control
  • Exposure Simulation of approximate image exposure and histogram in all Live View shooting modes

Canon T3i vs Nikon D5100 compare side by side
Canon Rebel T3i on left, Nikon D5100 on right

Nikon D5100

  • 16 megapixels
  • Articulating rear LCD screen
  • 1080p HD video with all the frame rate options
  • 11 point autofocus system with 1 cross-type sensor
  • 4 frames per second continuous shooting for a maximum 100 JPEG burst
  • 420 pixel RGB metering sensor like the one in the D3100, not the 2016 pixel RGB metering sensor found in the D7000.
  • In-camera image processing filters
  • A lot of scene modes
  • ISO range 100-6400
  • 95% viewfinder with .78 magnification
  • 1.2 lbs with battery
  • Does not offer an official Nikon optional battery pack-vertical grip (3rd party grip now available)
  • No wireless flash control of external Speedlights with the built-in flash
  • No autofocus motor in body, and will not autofocus with non-AF-S lenses, such as the 50mm f/1.8
  • No Depth of Field preview button
  • Also an auto HDR feature where the camera combines 2 images to create an image with extended tonal range.
  • NO full manual video exposure control
  • Exposure Simulation of approximate exposure in P, A, S Live View shooting modes.  NO Exposure Simulation in M mode.  NO histogram in any Live View mode.

Canon T3i vs Nikon D5100 compare side by side
Canon Rebel T3i on left, Nikon D5100 on right

As you can see, both cameras are incredibly similar as far as specifications, and it looks as if the price may even be nearly the same.  The wireless flash capability, better exposure metering system, and ability to autofocus with all compatible lenses are all definite advantages for the Canon T3i.  But the D5100 offers in-camera Auto Distortion Correction (such as when using a wide-angle lens) and a faster rate and higher number of continuous shots in a single burst.  (But with any camera, consider if you ever really need to take a 100 shot burst, much less a 34 shot burst.  If you shoot like that, you should probably be looking at a Canon 7D or Nikon D7000!)  Another deciding factor may be which camera feels more comfortable in your hands as you are using it and accessing the typical buttons and controls (not simply holding it and and checking its weight and general “feel”), which controls and menus seem better placed and easier to navigate for you (though either are equally easy to learn and to become used to using), and which system you want to invest in for the long term (lenses, flashes, etc.).  The Canon T3i is a slightly larger camera, plus allows for the optional battery grip.  The D5100 is not compatible with an optional Nikon vertical grip (edit:  a 3rd party has now made an optional battery grip for the D5100).  A look at the image quality here seems to show that the Canon’s JPEG images straight out of the camera are sharper, have more clarity, and more color “punch,” but these types of settings are widely adjustable with the Picture Settings or Picture Controls.

Also, while the specs look similar on paper, there are numerous small differences that are encountered in actual use, which begin to add up and become significant if they affect the features and controls you will be using.  For example, one important one is how the settings are changed using the “i” or “Q” buttons and the rear LCD screen. If you change your settings often, you will see on the D5100 Information Display Screen how you have to navigate down the line through each setting to get to the one you want then enter a second menu to change it.  On the T3i Quick Control screen, you can jump quickly to the setting you want then simply turn the Main Dial to quickly change it without opening up a second menu.  So that is a speed and convenience issue that would be noticeable if you are one to change your settings often, on the fly.  And while the rear LCD screens appear nearly similar, the 3:2 aspect ration of the screen on the T3i matches its sensor ratio, so images viewed during playback are seen larger on the Canon screen than on the Nikon Screen, possibly allowing you to inspect the focus and details slightly better.

There are other small but potentially important differences between the two cameras that are worth considering if you have specific needs (especially full manual control of exposure in video mode – see below).  For example, while in Live View, both cameras have Exposure Simulation so that as you change your exposure or exposure compensation settings, you will see the approximate resulting exposure on the image on your rear LCD screen.  However, with the D5100, Exposure Simulation does not function while in Manual M shooting mode.  This could be a deal-breaker if you use and need that feature.  Using the T3i in Live View you can optionally view the histogram to help determine proper exposure, however the histogram is not available on the D5100 when using Live View in any shooting mode.

Also, do you make use of Spot Metering mode?  You may prefer the viewfinder of the T3i, as it indicates the Spot Metering area with a circle, while the D5100 does not.  But, there is a very good reason the D5100 doesn’t have the center spot, and that is because in the Nikon, Spot Metering is linked to the selected AF point, and so not necessarily to the center AF point and center of the frame.  This is obviously a very useful feature and maybe you’d prefer that your camera’s Spot Metering works that way.


Canon Rebel T3i viewfinder with 9 autofocus points and Spot Metering area indicated in center


Nikon D5100 viewfinder with 11 autofocus points but Spot Metering area not visually indicated because it is linked to the active AF point

As mentioned, it is not possible to see actual exposure simulation with the Nikon D5100 in Live View while in Manual M shooting mode. However, in the P, A, or S shooting modes, the live view image will lighten or darken to simulate the exposure settings or the exp. compensation that you set. And to add insult to injury, there is no exposure meter displayed on the Live View screen, so to check your exposure you will need to temporarily leave Live View and switch to the control panel view by pressing the [i] Button.  The Canon 60D and Canon Rebel T3i both have Exposure Simulation in all modes during Live View. On the 60D you can turn this feature off and on. On the T3i it is on automatically while in Live View.

Manual Control of Exposure in Video Mode: It was quickly discovered by D5100 users that the camera does not offer full manual control of exposure in video mode.  The T3i offers this ability.  This is pretty important if you are serious about shooting video.  However, there is a “work-around” for this deficiency.  To manually set your shutter speed, you must set the camera on Shutter-Priority Auto Mode (S) and set your desired shutter speed before going into Live View mode, use exposure compensation to obtain the aperture setting you want, and use the AE-L/AF-L Button to lock that exposure (set Custom Setting f2 for AE-Lock Hold).  If you wish to first set the aperture setting, you must set the camera on Aperture-Priority Auto Mode (A) and set your desired aperture before going into Live View mode, use exposure compensation to obtain the shutter speed setting you want, and use the AE-L/AF-L Button to lock that exposure (set Custom Setting f2 for AE-Lock Hold).

The Canon T3i comes with a much more comprehensive and user friendly user’s manual than the small brochure size user’s manual of the Nikon D5100, although the more detailed D5100 Reference Manual is available as a file on the included Reference CD.

To gain further understanding of what the specs, features, controls, and functions of these cameras mean in relation to real life shooting and camera use, have a look at the articles that compare the various current Canon dSLR models and Nikon dSLR models.

If you decide on the Canon T3i, please be sure to check out my ebook, Canon T3i Experience, and if you choose the Nikon D5100, have a look at my ebook Nikon D5100 Experience.  Each of these guides will help you to take control of your camera in order to consistently capture better images!

See and purchase the Canon T3i with 18-55mm lens on Amazon

See and purchase the Nikon D5100 with 18-55mm lens on Amazon

Was this post helpful?  Please let others know about it by clicking the Facebook or Twitter sharing buttons below, linking to it from your blog or website, or mentioning it on a forum.  Thanks! 

Want to help support this blog with no cost or effort?  Simply click on the Amazon and B&H Photo logos on the left side of this page to purchase from their sites, or click on the links throughout this post to view and purchase those products on Amazon.  They will then give me a little referral bonus!