Learn How to Use the Nikon D5100 Autofocus System
The autofocus system of the Nikon D5100 may not be quite as complicated as the 39 point AF system of the Nikon D7000, but it does offer many of the same capabilities and options, and can be a little confusing to figure out. The autofocus system includes not only the three Focus Modes used in various combinations with four Autofocus Area Modes, but also includes a few Custom Settings as well as the optional AF-L or Autofocus Lock Button.

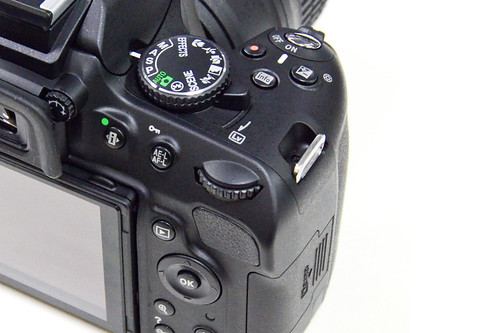
Image by author – copyright 2011 – please do not use without permission!
You will first want to set up the autofocus Custom Settings so that the AF system functions how you desire.
a1: AF-C priority selection – This setting determines if attaining focus is top priority when you are in Continuous-servo AF mode (AF-C autofocus mode), or if you just want the shots to be taken even if exact focus is not attained for each shot. If exact focus is your priority, set on Focus. If getting the shots at all costs is the priority, set for Release.
a2: Built-in AF-assist illuminator – This is used to enable or disable the autofocus assist light, to assist you in autofocusing in low light. Note that the AF-assist lamp only works in AF-S mode or when the camera is in AF-A and choosing single-servo (not always under your control), and when in Auto-area AF area mode or only with the center AF point in other AF area modes.
a3: Rangefinder – This setting is used to help obtain focus when you have turned off autofocus and are using Manual Focus mode (MF) and manually focusing. (Be sure to also set the autofocus switch on your lens to M) The exposure indicator in the viewfinder is used to indicate if the subject is correctly in focus.
f2: Assign AE-L/AF-L button – This is to assign the function of the AE-L/AF-L Button., which gives you the option to use this button to lock focus or to initiate focus, and this separate those functions from the Shutter Button.
This should get you started, and I go into more detail about each of these Custom Settings, as well as all the other D5100 Custom Settings in my e-book guide Nikon D5100 Experience.
Using Autofocus
The information below is also excerpted from my e-book user’s guide Nikon D5100 Experience, so I hope you have a look at the guide in order to learn more about the AF system as well as all the other functions and controls of the D5100.
One of the essential steps in taking a successful photo is controlling where the camera focuses. If you allow the camera to autofocus by choosing its own Focus Point(s), it typically focuses on the closest object or human subject. This may or may not be what you want to focus on. So you should choose where the camera focuses using the autofocus Focus Points and selecting a specific AF point. This does not mean you have to manually focus the camera, it means you tell the camera exactly where to autofocus. But you also need to select the desired Focus Mode and Autofocus Area Mode, based on your subject and its type of movement (or lack of movement).
Focus Modes
The D5100 has three different Focus Modes to choose from, typically depending if your subject is still or moving. It also has four different Autofocus Area Modes (see below) to specify how many of the AF points are active and how they track a moving object. You can set these two functions in various combinations. First the Focus Modes.
Single-Servo AF (AF-S)
Use this mode when your subject is stationary, or still and not going to move, or if your subject is not going to move very much, or if the distance between you and the subject is not going to change between the time you lock focus, recompose, and take the shot. Lock focus on the subject and recompose if necessary. When using AF-S, you can select from two Autofocus Area Modes, either Single-Point AF where you select the AF point, or Auto-Area AF, where the camera selects the AF point(s) for you. I suggest you nearly always select your own desired AF point so that the camera focuses exactly where you want it to.
Continuous-Servo AF (AF-C)
Use this mode when your subject is moving. If the subject is moving towards you or away from you, the camera will keep evaluating the focus distance, as long as the Shutter-Release Button is kept half-pressed. You will need to use this in conjunction with the Autofocus Area Modes to determine if and how the camera tracks the subject laterally to the surrounding AF points, or if it will only track the subject if it remains at the initially selected AF point. Single-Point AF will only track the subject’s distance as it moves near or far if it remains under the selected point. It will not track lateral movement if the subject leaves the selected AF point. If the subject is going to be moving somewhat unpredictably and may leave your selected AF point before you can react, use the Dynamic-Area AF mode so that the surrounding AF points are used to maintain focus while you realign your selected AF point with the subject. If the subject is going to be moving across your field of view, set the AF-Area Mode to the 3D-Tracking mode so that the camera tracks it in any direction as it moves to the other AF points.
Focus on the moving subject with the selected AF point when using Dynamic Area Mode or 3D-Tracking Mode, or let the camera select the AF point in Auto-Area AF Mode, and then as long as the Shutter-Release Button remains half-pressed the camera will track the subject to the other focus points if it moves to them and as it moves closer or farther in distance.
Auto-Servo AF (AF-A)
This mode is a hybrid of the two other focus modes. It starts in Single-Servo AF (AF-S) mode then changes to Continuous-Servo AF (AF-C) mode if your subject starts moving. Why shouldn’t you use this all the time, then? Well, if you are focusing and then recomposing, as you may often be doing, your movement of the camera may fool it into thinking that the subject is moving and your resulting focus may not be where you want it to be, or may not be as accurate as it might be if you are using Single-Servo AF.
Manual Focus
Sometimes you may be taking several photos of the same subject from the same distance, or for some other reason want to keep the same focus distance and not have to keep re-focusing and re-composing. Or you may be taking multiple photos for a panorama. In these situations, turn off the auto-focus with the autofocus switch on the lens itself (set to M) and change your camera’s Focus Mode to MF (Manual Focus). Just remember to switch them back when you are finished. You may also wish to do this if you want to precisely manually focus with the focus ring on your lens. (Note that for lenses with “full time manual focus” you don’t need to switch to M in order to manually override when slightly tweaking the autofocus with the lens focus ring. These lenses will have M/A and M on the lens focus mode switch instead of A and M.) Use the Rangefinder feature of the D5100 to assist with manual focus – Custom Setting a3.
Autofocus Area Modes
The Autofocus Area Modes are used to set if just a single AF point is active or else how many AF points surrounding your selected AF point will be used to track a moving subject if you are using AF-C or AF-A Focus Modes.

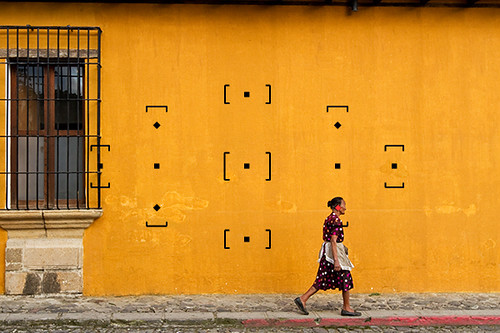
Selecting an AF Point using Single-Point AF and locking focus
Single-Point AF
Only one AF point will be active, and surrounding AF points will not become active to track a subject that moves away from the one selected point. This is typically used along with Single-Servo AF (AF-S) to focus on a stationary or still subject, or in a situation where you will be reframing the shot after you lock focus at a specific distance. It can also be used with accuracy with AF-S mode for moving subjects if you take the photo quickly or if you recompose and take the shot quickly after locking in focus, especially if the camera-to-subject distance does not change at all or very much in that period between locking focus and taking the photo. Use the Multi Selector to choose your active AF point as you look through the viewfinder and use the OK Button to quickly select the center AF point. If you choose Single-Point AF with Continuous-Servo AF (AF-C) or Auto-Servo AF (AF-A) for tracking moving subjects, it will only track the subject as long as it is positioned at the selected AF point, and it will not be tracked laterally to the other, surrounding points. As noted above, the single AF point you select will track a subject if it moves closer or farther away, but the AF system will not track the subject if it moves left, right, up, or down and away from your selected AF point. To do this, you use Dynamic-Area AF mode or 3D-Tracking mode.
Dynamic-Area AF
With the Dynamic-Area AF Mode, you select an AF point to tell the camera where to autofocus, and if your subject briefly moves away from that point to a neighboring point or if you lose the subject from your AF point while panning, the camera will use the surrounding AF points to help maintain focus on it. Select Dynamic-Area AF when you are photographing moving or potentially moving subjects using Continuous-Servo AF (AF-C) or Auto-Servo AF (AF-A). These modes are ideal for a subject moving closer or further from the camera but which may also move laterally away from the selected AF point faster than you can react in order to keep it located at that point, or for when you are panning and following the subject and attempting to keep it located at the selected AF point, but may have a little or a lot of difficulty doing so. Remember that you need to keep the Shutter Button half-pressed in order for the continuous focusing at the initial point or the surrounding points to occur. Note that the camera may pick up and start tracking a new subject that falls under the selected AF point if you lose your initial subject.
The Dynamic-Area AF Mode is not used to track and maintain focus on a subject that is moving across the various AF points in the frame, but rather is used to stay focused on a moving subject that you attempt to keep located at your selected AF Point. To track a subject that is moving across the frame, intentionally passing from one AF point to the next, use 3D-Tracking.
3D-Tracking
This mode is used for subjects moving across the frame in any direction, or subjects moving erratically from side-to-side in the frame, and they are tracked by areas of color. This is used when you don’t wish to necessarily pan or follow the subject to keep it located in the same part of the frame, but rather when you wish to keep the camera relatively still as the subject moves across the frame. You may select this option when you are tracking and photographing moving subjects using Continuous-Servo AF (AF-C) or Auto-Servo AF (AF-A). Again, you choose the initial AF point to locate the subject and begin the tracking. If the area of color you wish to track is too small or if it blends into the background, this mode might not be very effective.
Auto-Area AF
The camera uses all 11 AF points to detect what it thinks is the subject and automatically choose the appropriate AF point(s). Typically, the camera will select the nearest subject or a human in the frame, so it may not focus on exactly what you wish to focus on. That is why it is best to use one of the other modes and select the AF point yourself. However in certain situations such as quick sports or action scenes you may have to make use of this.
Locking Focus
The next step is to learn to lock focus independent of locking exposure, typically through the use of the AE-L/AF-L Button as noted in the f2 Custom Setting above. But for that, and numerous other important functions of the D5100, you are going to have to have a look at my e-book, Nikon D5100 Experience!

I’ve put together a video introduction to the D5100 autofocus system to compliment this article:
To learn about another important reason why you need to take control of your autofocus system, see the related post:
Don’t Let the Locations of the AF Points Dictate Your Composition
What do you do when, with your desired framing, your subject is not located exactly under or near an AF point? Even with all the AF points of an advanced Nikon D5100 or D7000, this will often be an issue. Have a look at the above post to learn why this is an issue and how to resolve it.
Was this post helpful? Please let others know about it by clicking the Facebook or Twitter sharing buttons below, linking to it from your blog or website, or mentioning it on a forum. Thanks!
Want to help support this blog with no cost or effort? Simply click on the Amazon, B&H Photo, or Adorama logos on the left side of this page to go to those sites and make your purchases. They will then give me a little referral bonus!

