Taking Advantage of the Nikon D5100 Autofocus System

Learn How to Use the Nikon D5100 Autofocus System

The autofocus system of the Nikon D5100 may not be quite as complicated as the 39 point AF system of the Nikon D7000, but it does offer many of the same capabilities and options, and can be a little confusing to figure out.  The autofocus system includes not only the three Focus Modes used in various combinations with four Autofocus Area Modes, but also includes a few Custom Settings as well as the optional AF-L or Autofocus Lock Button.

Nikon D5100 autofocus system AF focus mode autofocus area mode
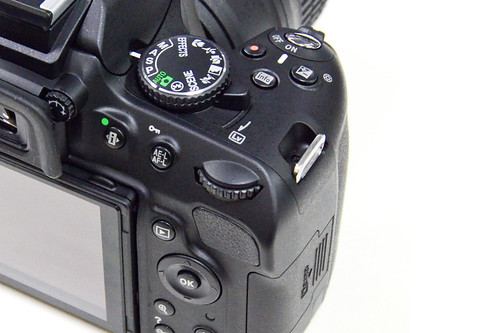
Image by author – copyright 2011 – please do not use without permission!

You will first want to set up the autofocus Custom Settings so that the AF system functions how you desire.

a1: AF-C priority selection – This setting determines if attaining focus is top priority when you are in Continuous-servo AF mode (AF-C autofocus mode), or if you just want the shots to be taken even if exact focus is not attained for each shot.  If exact focus is your priority, set on Focus.  If getting the shots at all costs is the priority, set for Release.

a2: Built-in AF-assist illuminator – This is used to enable or disable the autofocus assist light, to assist you in autofocusing in low light.  Note that the AF-assist lamp only works in AF-S mode or when the camera is in AF-A and choosing single-servo (not always under your control), and when in Auto-area AF area mode or only with the center AF point in other AF area modes.

a3: Rangefinder – This setting is used to help obtain focus when you have turned off autofocus and are using Manual Focus mode (MF) and manually focusing.  (Be sure to also set the autofocus switch on your lens to M)  The exposure indicator in the viewfinder is used to indicate if the subject is correctly in focus.

f2: Assign AE-L/AF-L button – This is to assign the function of the AE-L/AF-L Button., which gives you the option to use this button to lock focus or to initiate focus, and this separate those functions from the Shutter Button.

This should get you started, and I go into more detail about each of these Custom Settings, as well as all the other D5100 Custom Settings in my e-book guide Nikon D5100 Experience.

Using Autofocus
The information below is also excerpted from my e-book user’s guide Nikon D5100 Experience, so I hope you have a look at the guide in order to learn more about the AF system as well as all the other functions and controls of the D5100.

One of the essential steps in taking a successful photo is controlling where the camera focuses.  If you allow the camera to autofocus by choosing its own Focus Point(s), it typically focuses on the closest object or human subject.  This may or may not be what you want to focus on.  So you should choose where the camera focuses using the autofocus Focus Points and selecting a specific AF point.  This does not mean you have to manually focus the camera, it means you tell the camera exactly where to autofocus.  But you also need to select the desired Focus Mode and Autofocus Area Mode, based on your subject and its type of movement (or lack of movement).

Focus Modes

The D5100 has three different Focus Modes to choose from, typically depending if your subject is still or moving.  It also has four different Autofocus Area Modes (see below) to specify how many of the AF points are active and how they track a moving object.  You can set these two functions in various combinations.  First the Focus Modes.

Single-Servo AF (AF-S)
Use this mode when your subject is stationary, or still and not going to move, or if your subject is not going to move very much, or if the distance between you and the subject is not going to change between the time you lock focus, recompose, and take the shot.  Lock focus on the subject and recompose if necessary.  When using AF-S, you can select from two Autofocus Area Modes, either Single-Point AF where you select the AF point, or Auto-Area AF, where the camera selects the AF point(s) for you.  I suggest you nearly always select your own desired AF point so that the camera focuses exactly where you want it to.

Continuous-Servo AF (AF-C)
Use this mode when your subject is moving.  If the subject is moving towards you or away from you, the camera will keep evaluating the focus distance, as long as the Shutter-Release Button is kept half-pressed.  You will need to use this in conjunction with the Autofocus Area Modes to determine if and how the camera tracks the subject laterally to the surrounding AF points, or if it will only track the subject if it remains at the initially selected AF point.  Single-Point AF will only track the subject’s distance as it moves near or far if it remains under the selected point.  It will not track lateral movement if the subject leaves the selected AF point.  If the subject is going to be moving somewhat unpredictably and may leave your selected AF point before you can react, use the Dynamic-Area AF mode so that the surrounding AF points are used to maintain focus while you realign your selected AF point with the subject.  If the subject is going to be moving across your field of view, set the AF-Area Mode to the 3D-Tracking mode so that the camera tracks it in any direction as it moves to the other AF points.

Focus on the moving subject with the selected AF point when using Dynamic Area Mode or 3D-Tracking Mode, or let the camera select the AF point in Auto-Area AF Mode, and then as long as the Shutter-Release Button remains half-pressed the camera will track the subject to the other focus points if it moves to them and as it moves closer or farther in distance.

Auto-Servo AF (AF-A)
This mode is a hybrid of the two other focus modes.  It starts in Single-Servo AF (AF-S) mode then changes to Continuous-Servo AF (AF-C) mode if your subject starts moving.  Why shouldn’t you use this all the time, then?  Well, if you are focusing and then recomposing, as you may often be doing, your movement of the camera may fool it into thinking that the subject is moving and your resulting focus may not be where you want it to be, or may not be as accurate as it might be if you are using Single-Servo AF.

Manual Focus
Sometimes you may be taking several photos of the same subject from the same distance, or for some other reason want to keep the same focus distance and not have to keep re-focusing and re-composing.  Or you may be taking multiple photos for a panorama.  In these situations, turn off the auto-focus with the autofocus switch on the lens itself (set to M) and change your camera’s Focus Mode to MF (Manual Focus).  Just remember to switch them back when you are finished.  You may also wish to do this if you want to precisely manually focus with the focus ring on your lens.  (Note that for lenses with “full time manual focus” you don’t need to switch to M in order to manually override when slightly tweaking the autofocus with the lens focus ring.  These lenses will have M/A and M on the lens focus mode switch instead of A and M.)  Use the Rangefinder feature of the D5100 to assist with manual focus – Custom Setting a3.

Autofocus Area Modes

The Autofocus Area Modes are used to set if just a single AF point is active or else how many AF points surrounding your selected AF point will be used to track a moving subject if you are using AF-C or AF-A Focus Modes.

Nikon d5100 autofocus af auto focus system lock point area mode
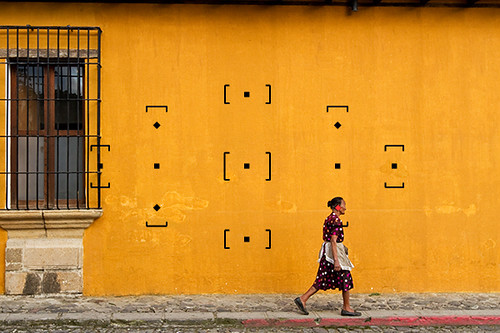
Selecting an AF Point using Single-Point AF and locking focus

Single-Point AF
Only one AF point will be active, and surrounding AF points will not become active to track a subject that moves away from the one selected point.  This is typically used along with Single-Servo AF (AF-S) to focus on a stationary or still subject, or in a situation where you will be reframing the shot after you lock focus at a specific distance.  It can also be used with accuracy with AF-S mode for moving subjects if you take the photo quickly or if you recompose and take the shot quickly after locking in focus, especially if the camera-to-subject distance does not change at all or very much in that period between locking focus and taking the photo.  Use the Multi Selector to choose your active AF point as you look through the viewfinder and use the OK Button to quickly select the center AF point.  If you choose Single-Point AF with Continuous-Servo AF (AF-C) or Auto-Servo AF (AF-A) for tracking moving subjects, it will only track the subject as long as it is positioned at the selected AF point, and it will not be tracked laterally to the other, surrounding points.  As noted above, the single AF point you select will track a subject if it moves closer or farther away, but the AF system will not track the subject if it moves left, right, up, or down and away from your selected AF point.  To do this, you use Dynamic-Area AF mode or 3D-Tracking mode.

Dynamic-Area AF
With the Dynamic-Area AF Mode, you select an AF point to tell the camera where to autofocus, and if your subject briefly moves away from that point to a neighboring point or if you lose the subject from your AF point while panning, the camera will use the surrounding AF points to help maintain focus on it.  Select Dynamic-Area AF when you are photographing moving or potentially moving subjects using Continuous-Servo AF (AF-C) or Auto-Servo AF (AF-A).  These modes are ideal for a subject moving closer or further from the camera but which may also move laterally away from the selected AF point faster than you can react in order to keep it located at that point, or for when you are panning and following the subject and attempting to keep it located at the selected AF point, but may have a little or a lot of difficulty doing so.  Remember that you need to keep the Shutter Button half-pressed in order for the continuous focusing at the initial point or the surrounding points to occur.  Note that the camera may pick up and start tracking a new subject that falls under the selected AF point if you lose your initial subject.

The Dynamic-Area AF Mode is not used to track and maintain focus on a subject that is moving across the various AF points in the frame, but rather is used to stay focused on a moving subject that you attempt to keep located at your selected AF Point.  To track a subject that is moving across the frame, intentionally passing from one AF point to the next, use 3D-Tracking.

3D-Tracking
This mode is used for subjects moving across the frame in any direction, or subjects moving erratically from side-to-side in the frame, and they are tracked by areas of color.  This is used when you don’t wish to necessarily pan or follow the subject to keep it located in the same part of the frame, but rather when you wish to keep the camera relatively still as the subject moves across the frame.  You may select this option when you are tracking and photographing moving subjects using Continuous-Servo AF (AF-C) or Auto-Servo AF (AF-A).  Again, you choose the initial AF point to locate the subject and begin the tracking.  If the area of color you wish to track is too small or if it blends into the background, this mode might not be very effective.

Auto-Area AF
The camera uses all 11 AF points to detect what it thinks is the subject and automatically choose the appropriate AF point(s).  Typically, the camera will select the nearest subject or a human in the frame, so it may not focus on exactly what you wish to focus on.  That is why it is best to use one of the other modes and select the AF point yourself.  However in certain situations such as quick sports or action scenes you may have to make use of this.

Locking Focus

The next step is to learn to lock focus independent of locking exposure, typically through the use of the AE-L/AF-L Button as noted in the f2 Custom Setting above.  But for that, and numerous other important functions of the D5100, you are going to have to have a look at my e-book, Nikon D5100 Experience!
Nikon D5100 book user guide manual download ebook

I’ve put together a video introduction to the D5100 autofocus system to compliment this article:

To learn about another important reason why you need to take control of your autofocus system, see the related post:

Don’t Let the Locations of the AF Points Dictate Your Composition

What do you do when, with your desired framing, your subject is not located exactly under or near an AF point? Even with all the AF points of an advanced Nikon D5100 or D7000, this will often be an issue.  Have a look at the above post to learn why this is an issue and how to resolve it.

Was this post helpful?  Please let others know about it by clicking the Facebook or Twitter sharing buttons below, linking to it from your blog or website, or mentioning it on a forum.  Thanks! 

Want to help support this blog with no cost or effort?  Simply click on the Amazon, B&H Photo, or Adorama logos on the left side of this page to go to those sites and make your purchases.  They will then give me a little referral bonus!

Canon 7D vs. 5D Mk II vs. 50D – part II (plus 550D / Rebel T2i)

NOTE: Some of the information in this post has been updated to include the current Canon dSLR models, the 60D and the Rebel T3i / 600D. Please check out my blog post at the following link to read the most current information:

http://blog.dojoklo.com/2011/02/20/canon-t3i-600d-vs-t2i-550d-vs-60d-vs-7d-etc/

Original Post: I’ve had a lot of visits to my previous post comparing these cameras – the Canon 7D, Canon 5D Mark II, and the Canon 50D – and since that really wasn’t much of a comparison post, but rather just a link to an impartial, technically based testing site, I’ll try to give a little more insight into helping you make this decision. Please note, this is aimed towards still photographers and not videographers. I know that videographers have different priorities when making this selection, and I am not knowledgeable enough to address them. I have written some updated comparison posts which also address the Canon 60D here and here.

I’ve used the 50D and the 7D pretty extensively, so I can speak with a bit of confidence about them. I’m very familiar with the features of the 5D Mk II and how they compare to the other cameras, so I will discuss them too. I’ll address the 550D (Rebel T2i) at the end of this post. Also, all the precise specifications of these cameras can be researched online and compared, so I will discuss them on a user-experience level, but I encourage you to decide which factors are most important to you for further research. I know it is a long post with a lot to read, but if you are investing several hundred or thousands of dollars in a dSLR and lenses, you should be thorough! On a final note before I begin, you may have been convinced by forums, reviews, or online comments to question and compare image quality, auto-focus speed, ISO and noise, etc., but those factors are all nearly completely irrelevant. Each of these cameras has more than enough quality in all of those areas. Your choice should instead be based on your level and needs as a photographer, and on which camera best serves the way you work. If you wish to see this complicated choice summarized in an easy to read format, view this post (it is a bit tongue-in-cheek, but mostly accurate). And when you are done selecting a camera body, you can learn more about lenses here.

While I have your attention, I want to mention that I have written eBook tutorials for the Canon 60D and for the Canon T2i, which cover ALL the Menu settings and Custom Function settings, with recommended settings, plus in-depth descriptions of how and and why to use the cameras’ settings and features in everyday use – Your World 60D and T2i Experience. Learn more about the eBooks by clicking on their titles.

Also, please let me know about broken links in my posts, as they seem to mysteriously happen from time to time.


Hudson River – Cold Spring, NY (this image is entirely in color – look at the plants!)

Sensor Size: If you are, or plan to be a professional photographer, and you’ve limited your selection down to two or three of these cameras, you are going to want to seriously consider the 5D MkII. This is due primarily to the fact that it has a full frame sensor (a sensor approximately the size of a frame of 35mm film), which is pretty much expected for you to have as a professional. (Note that whenever I say 5D in this post, I am referring to the 5D Mark II).  The 7D and the 50D have smaller sensors, with a 1.6 crop factor. This means that their sensors are a bit smaller than a frame of traditional 35mm film. A wide angle lens will not produce as wide of a field of view on a cropped sensor as on the 5D: a 16mm will give the field of view of a 16 x 1.6 = 25mm lens, but a telephoto on a cropped sensor will appear to zoom closer, thus making a 200mm lens appear to be a 200 x 1.6 = 320mm lens. You can begin down the professional path with a 50D or 7D, but you are eventually going to experience the limitations of the smaller sensors and start to understand the need for full frame. BUT…there are a few problems with this choice…

Price and Obsolescence: First, you probably haven’t run out to get a 5D MkII because of its cost. As of 5/2010, the price is $2,500. AND, the 5D MkII dates from 9/2008, and is due for an upgrade, likely in 2012, maybe as soon as later in 2011. In some respects, the 7D – being newer – has better features than the 5D, such as the advanced auto focus and metering systems and faster frame rate. Not to mention the fact that if you wait around long enough, a 7D type camera WITH a full frame sensor but a lower price than the 5D is bound to come out! But you need a camera now, so let’s continue. The 7D is $1,600 or $1,700 depending on current promotions, and the 50D is about $1,000. The 50D however, is also the closest one to being replaced (by the 60D or whatever it may be called). This doesn’t mean that it isn’t still a very capable and feasible camera – people are still happily using 20D and 30D cameras, just that it is reaching the end of its production life. So as far as the newest model, that is the 7D (and the 550d/ T2i).

Megapixels / Image Quality: Regarding megapixels, it really isn’t much of an issue unless you plan on printing out billboard size prints. All of these cameras have more than enough megapixels and image quality for most photographers’ needs. The 7D is at 18mp, the 5D Mk II at 21mp, and the 50D at 15mp. I have found that more megapixels give you more lee-way to push and pull the image around in Photoshop before it starts to fall apart and look over manipulated. In this respect there is a significant difference between 8 megapixels of a Rebel XT and 15 or 18 mp. The 8mp barely allow you to do a regular amount of exposure, contrast, and color correction before it starts to really show, but there is little to be concerned about between the 15mp of the 50D and 18mp of the 7D (unless you are a hard-core pixel peeper, in which case you will be deeply offended by these kinds of statements). Be aware that sensors with more megapixels more readily show the shortcomings of cheaper lenses, and thus demand higher quality lenses, like the Canon L series, for the sharpest, most detailed image across the entire frame. From experience, I can tell you there is a huge improvement in clarity, color, and overall image quality when using an L lens with a 50D or 7D.


Marquee – Tarrytown, NY

HD Video: If you are concerned about HD video, then you choice is narrowed down to the 7D and the 5D Mk II. With firmware updates and 3rd party Magic Lantern firmware, they are about on par as far as frame rates etc., so cost and sensor size is again the differing factor here. If you are not going to need or use video, it is definitely worth considering the 50D, which will give you 85-90% of the still photography features and performance of the 7D at a much lower price.

ISO, Frame Rate, File Size: For ISO performance, you can look at the testing site mentioned above to see that they are incredibly similar. Being a professional camera, the 5D has a broader ISO range on both ends, lower noise at higher ISOs, and a better dynamic/ tonal range. This is a large factor in why you pay $2400 for this camera. But for the non-pro, in general you hardly ever want to go above ISO 1,600, so unless you have a specific reason for needing really high ISO and photos with the lowest possible noise at high ISOs (for example shooting lots of indoor or dark events like concerts, weddings and receptions), then this isn’t much of a deciding factor. And if you are concerned about dynamic range, well, don’t be. Anyone who actually needs to be concerned about dynamic range is a commercial photographer who is not reading this post because they are busy choosing between a $7,000 camera and a $10,000 camera. The frame rate performance, however, may be an important factor depending on how you work and what you take photos of. The 7D has a continuous rate of 3fps and a high speed continuous rate of 8fps. Personally, I’m unhappy with this choice of rates. The 3fps is too slow for action situation, and the 8fps is ridiculously high, giving me far too many unwanted photos that quickly fill up the memory card. I wish for a rate closer to 5 or 6 fps. The 5D has one rate of 3.9fps, which again seems a bit too slow for action situations, and limits its use for capturing sports action. The 50D offers 3fps and 6.3fps, which I find ideal. Oh, also, the file size of the 7D images are much larger than the files of the 50D and somewhat larger than the files of the 5D. While this indicates that the files contain more information and detail, this affects size and number of memory cards you will need, plus size and expense of storage on your hard drive and external hard drives, PLUS the time it takes to download, transfer, copy, open, save, and upload files. It is a significant hidden cost in storage dollars and time of the 7D that should not be ignored. (Is this apparent difference of the 7D and 50D images visible to the naked eye of anyone other than pixel peepers and people making jumbo prints? Not necessarily. The image quality you need is available from any of these cameras, so it is more productive as a photographer to focus on image content!)


St. Patrick’s Day Parade – Brooklyn, NY

Features, Customization: Being the newest camera, the 7D has the most advanced features. As I mentioned above, it has an advanced auto focus system, providing more focus points, more focus modes (single point, spot, zone, expansion, etc.) and numerous options for how the focus points perform and select and track a subject. I’ve written a bit more about these features here, along with links to additional resources. There are advanced custom functions for auto focusing and tracking, flash control (the 7D is the only one which offers remote flash capabilities, which will save you a couple hundred dollars on Pocket Wizards if you are going to use this), and customization of buttons and displays. Again, I’ve explained a lot of these features in this post. Read through them. Do you understand them? Are you going to learn them? Are you going to need and use them? Probably not. They are nice to have, make you feel like you have a really powerful camera you are in control of if you learn how to choose, set and use them, but in everyday shooting I rarely, if ever, make use of them. The live view (which the 50D has as well) and the built in level are cool, but will you ever use them? I don’t. (The built in level will be most useful to landscape photographers). Of all the features and customizations of the 7D that are not on the older 50D, the only ones I miss are the remote flash capability, the grid overlay in the viewfinder, the larger more inclusive viewfinder, the spring loaded doors of the 7D, and the ability to switch functions of the top dial and back dial in Manual mode. (It is such a nice feature on the 7D – since I use Av mode most of the time, the top dial controls aperture. But when I switch to M mode, the top dial now controls shutter speed. So with the 50D I have to overcome muscle memory and use the back dial for aperture. But with the 7D, one can switch the dials’ functions.) Unless you are an intense sports or animal shooter who needs to customize how the camera selects and auto focuses on a moving object, how it addresses an object that moves in front of your subject, and how fast it responds to this new object before it addresses or ignores it, then you don’t need these features. And when you compare the features of the 7D to the 5D or 50D, you find that the older cameras are not outdated dinosaurs as forums will lead you to believe – but rather they also have many of these features and customizations as well. As far as all the new auto focus features of the 7D, it turns out they barely mattered to me because I manually select my auto focus point 99% of the time. I don’t want the camera necessarily focusing on the closest object, and it certainly does not know what I wish to focus on, so I don’t leave it up to chance, and I select the point myself. Therefore I rarely use any of these advanced auto-focus modes. In addition, it is much easier and quicker to manually select an auto focus point on the 5D and the 50D when you are selecting from 9 focus points rather than the 19 focus points of the 7D! However, if you photograph fast moving objects that you would prefer the camera to locate, track, and properly focus on, most of the time, all by itself, then the 7D is the camera for you. Also, note that due to the fact that the 5D is a professional body and not a consumer level camera, it does not have a built in pop-up flash. If you plan to use a flash with it, you will need to buy the Canon 580EX II flash (which you should do with any of these camera anyway).


San Miguel Dueñas, Guatemala

It is expected that the 5D Mk III and possibly the 60D (or whatever it may be called) will also incorporate this new 7D type focusing system when they come out. The 5D, 7D, and 50D all have AF microadjustment capability, which means that you can adjust the auto-focusing of each lens individually, in the camera, if they happen to front- or back-focus a little bit. The problem is that it is a maddening procedure, and you can never get it quite right because the focusing typically varies slightly for each focus point, as well as for different distances and apertures. (You may get it exactly sharp for the center focus point at 15 feet at f/4, yet find that it is still off for the upper left focus point when you shoot under real life conditions that vary from those settings.) I feel that if you need an excessive amount of AF microadjustment, you should probably send the camera or lens back for repair, calibration, or replacement. Personally, if I were using a non-L-series lens, I wouldn’t worry about a few mm of front- or back-focusing. And if I were using an L-series lens that didn’t focus dead on, I would send it back to Canon for recalibration – which in fact is something I have done. (I don’t understand people’s celebration of AF microadjustment – isn’t it a built in admission of poor manufacturing quality control, especially when pairing a Canon lens with a Canon body?) Finally, be aware that the mode dials of the 7D and 5D do not have most of the “basic zone” mode settings such as sports, portrait, and landscape. As the user of such an advanced camera, you are expected to know how to change the camera’s settings (aperture, shutter speed, ISO, etc.) yourself for these types of situations. If you don’t, and/ or if you plan on keeping your camera set on Auto (so called “green box mode”) or Program (P) mode, you probably shouldn’t be considering a 5D, 7D or 50D anyway, because you’ll be paying for far more camera than you will be using! Start with the 550D or one of the other Rebels for now and upgrade later if you feel you have outgrown its capabilities. If you are concerned about the best image quality, your image quality difference between a 7D on Auto and a 550D on Auto will be negligible. (Note that these cameras also have a Creative Auto mode, which is a weird “transitional” mode between Auto and actually learning how to make use of aperture settings and exposure compensation in Av, Tv or M mode. Since using aperture settings to dictate desired depth of field is essential to photographic composition, it is best you actually learn it directly.)

Metering: The 7D has an advanced metering system compared to the 5D Mk II and the 50D, and this is actually one very important advantage. The 7D has a more precise 63 zone metering system vs. the 35 zone system of the 5D and 50D. With the 7D, I can confidently leave it on evaluative metering 97% of the time, and it meters the subject exceptionally well 98% of those times. Canon claims that it will meter properly for a wide variety of subjects, including back lit and extreme contrast subjects. I have found this to be true. Compared to the 50D, this is significant. I have found that the 50D regularly overexposes by about 1/3 or 1/2 a stop, and I have exposure compensation on -1/3 all the time to avoid blown out highlights (except in dark situations, where it tends to under-expose). Also, the 50D just does not always correctly expose in unusual or difficult lighting situations. And for dramatic and powerful photos, you want unusual or difficult lighting situations, so I have found that I am using exposure compensation, or having to change to center weighted, partial, or spot metering often. While this is sharpening my metering eye and skills, it is a pain and it leads to the risk of lost shots. I would prefer that it just got the exposure right the majority of the time, as the 7D does. (I have subsequently found that using center-weighted averaging mode on the 50D all the time results in more consistent exposures than evaluative metering mode). You can learn more about the various metering modes, and when to use them, in this post.


Vinnie – Brooklyn, NY

550D / Rebel T2i: The Canon 550D or Rebel T2i has some impressive specs, and shares many features of the 50D and the 7D, and it is actually the newest model of all of them. It has 18mp and HD video like the 7D, but only 3.7fps continuous shooting mode frame rate. And it has 9 AF points and less complex auto focus options, like the 50D. It is fully capable of taking photos that are virtually the same quality as the 7D and the 50D, and if you don’t have intensive shooting and ego demands (ie, wanting the biggest, most expensive body whether or not you actually understand, need, or use its advanced features), it is worth seriously considering. But the 550D can’t have every feature and custom function of the higher level cameras, otherwise it would just be a 7D! If you are concerned about comparing image quality, ISO performance, auto-focusing speed, etc, all of these cameras have more than enough of what you need. You should instead be comparing the features and advanced options of the cameras which are most important to how you work. The top of the line camera won’t help you take better photos. But mastery of the tool that best fits your need just might (when combined with good knowledge of composition and lighting). I encourage you look at Flickr users’ photos taken with an “old,” 8MP Rebel XT to confirm this. Also, don’t rule out the Canon Rebel XSi if you are just starting out with digital SLRs.

If you are comparing a 5D Mk II vs. 550D (5D vs. T2i) you are looking at a professional full frame camera vs. a consumer, entry level dSLR, and skipping 2 pro-sumer cameras in between. So while the features of the 550D are nearly on par with the 7D in many ways, the 550D vs. 5D MkII is an odd comparison that quite frankly confuses me. Are you new to digital SLRs? Get a 550D (or a 50D/ 60D if you wish to spend more money or need the higher frame rate for sports or photojournalism). Have you outgrown all the features, capabilities, or limitations after extensive use of a 20D, 40D or 50D? Get a 5D MkII.  (Note that whenever I say 5D, I am referring to the 5D Mark II, the current model at this time).  Are the images you’ve been taking with your Rebel or 40D no longer living up to your professional level needs in terms of dynamic range and noise at high ISOs? Get a 5D. Want to spend $2,400 on a camera body? Get a 5D. Want to spend $800 and still have a tool that is fully capable of taking professional quality images? Get the 550D.

There are a few reasons why you would need a 7D or a 50D over a 550D / T2i. A major one is the advanced controls over camera settings. The more expensive models have additional buttons, controls, and displays on the exterior of the camera to enable quicker changes of important settings and easier viewing of what the current settings are. The 550D is capable of changing all these settings too, it is just done in a different way. For example, the 7D and 50D have the big dial on the back for quickly scrolling through menus, images, and for quick exposure compensation changes and changes of other settings. They also have the little toggle joystick on the back, primarily for quickly changing focus points. These 2 cameras also have the additional display screen and buttons on the top to easily view and change a number of settings such as ISO, drive mode, white balance, and metering mode – among others. These cameras are designed for a professional or advanced user who makes use of all these settings and needs to quickly change them while working. However, with a little practice, these settings can also be quickly changed using the buttons and big screen on the back of the 550D. The 7D and 50D also have advanced menus which give the user more customization options, like those discussed above (27 custom functions on the 7D vs. 12 on the 550D), and additional features desired by advanced users or pros, such as 1/3 ISO increments where the 550D has full increments (100-200-400 etc.).

What you are also paying for with the 7D and the 50D are stronger, better constructed metal bodies to handle daily use and abuse as well as some weatherproofing of the buttons and doors. (However, Canon cameras have fallen from elephants and airplanes and have survived, so they are all generally pretty rugged. At pitcher of water was thrown on the back of my Rebel XT and it was fine.) All these features give the 7D and 50D a bigger and heavier body than the smaller, lighter 550D, which may be an important consideration for some users. Also, the 7D, and 50D have AF microadjustment capability, but the 550D does not. AF Microadjustment means that you can adjust the auto-focusing for each lens, in the camera menu, if they happen to front- or back-focus a little bit. I don’t think this is a very important feature, as I discuss above in Features. (The problem is that it is a maddening procedure, and you may get the focus exactly sharp for the center focus point at 15 feet at f/4, yet find that it is still off for the upper left focus point when you shoot under real life conditions that vary from those settings.) As I said above, if you need an excessive amount of AF microadjustment, you should probably send the camera or lens back for repair, calibration, or replacement. Or if you are that obsessed about pixels, you should be looking at a pro-sumer or pro camera and L series lenses. Finally, the 550D also uses SD type memory cards, while the other cameras all use CF, and the smaller battery of the 550D will not last for as many shots as the other cameras.

Also, as I discussed above, be aware that the mode dials of the 7D and 5D MkII do not have most of the “basic zone” mode settings such as sports, portrait, and landscape. If you are starting to learn dSLR photography, these modes are helpful for seeing the results from different camera settings, and are good shortcuts until you have learned more about apertures and shutter speeds. Or if you never intend to use or learn more about the advance settings, the basic modes are good for helping you get better looking results than Auto or Program modes. So if you plan on keeping your camera set on Auto, Program, or the basic modes (sports, landscape, etc.), start with the 550D or one of the other Rebels for now and upgrade later if you feel you have outgrown its capabilities. Your image quality difference between a 7D on Auto and a 550D on Auto will be negligible.

So there you have it. You can read great, in depth reviews of each of these cameras on DPreview.com. There are probably numerous features and points that I forgot to mention, but hopefully this will give you a starting point in determining which features are important to you, and what warrants further research to help you in making your decision. The important thing is to choose one that fits your needs and budget, then stop comparing and get out and shoot! As I said above, your camera choice should be based on your level and needs as a photographer, and on which camera best serves the way you work. Whichever one you choose, I highly encourage you to get the the applicable Canon Guide to Digital SLR Photography from David Busch, or a similar book like the Magic Lantern Guides. They are much more user friendly versions of the camera’s manual, and will get you up and running quickly and assist you in fully understanding the settings, controls, and functions of your dSLR.

Need a lens to go with your new camera? Read about choosing a lens other than the kit lens in this post Why You Shouldn’t Buy the Kit Lens, and learn about the Best Lenses for Travel Photography here.

Please leave a comment, ask a question. Let me know what has been helpful, and what you’d like to read more about.

If you plan to purchase any of this equipment or books, I encourage you to do so through the site I’ve set up with Amazon, Doug’s Picturing Change Digital Photography Equipment and Books. Purchasing through this site or one of the direct-to-Amazon.com links below will help support my blog and my work. Thanks! And for those of you across the pond, click here for my referral link to Amazon UK. If you are in another country, click on one of my Amazon links, scroll to the bottom of the page, and click on your country for your local Amazon.
See the T2i on Amazon.
See the 60D on Amazon.
See the 7D on Amazon.
See the Canon 5D MkII on Amazon.