
Here is the second part of the Nikon D7100 “tips and tricks” article I posted a few weeks ago. You can read the first part here.
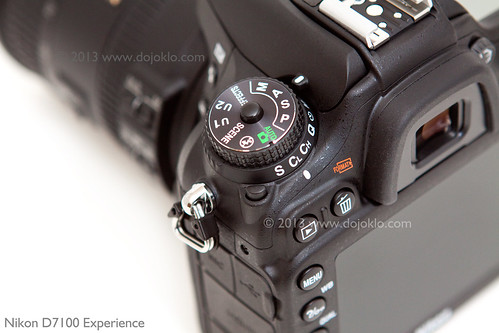
Detail of the Nikon D7100 dSLR camera – photo by author
6. Set up your Dual SD Memory Card Slots: The two memory card slots of the D7100 can function in a couple different ways, including using one for saving RAW files and the other for JPEG files, saving all your images to both cards simultaneously, using the second card as overflow when the first one fills up, or saving still images to one and movies to the other. You can set this up in the Shooting Menu under Role played by card in slot 2. To set how the cards function for saving videos, use the Shooting Menu > Movie Settings > Destination.
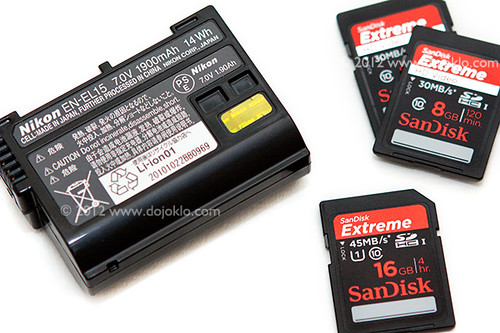
Nikon EN-EL15 battery and SD memory cards for the Nikon D7100
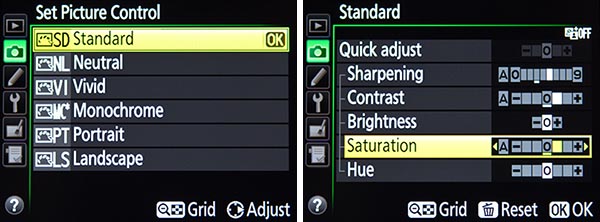
7. Use Picture Styles for your JPEG Images: If you are capturing your images as (NEF)RAW or JPEG files and will be post-processing your images in software such as Photoshop or Lightroom, then you don’t necessarily need to worry about Picture Styles. If that is the case, set the Picture Style for Standard or Neutral so that the images that you view on the camera’s rear LCD screen will be close to how they will appear in the actual RAW image file that you open on your computer. However if you are not post-processing, you will want the images to come out of the camera looking as you want them to, so you will need to set, customize, or create a Picture Style that best creates your desired look. Adjust the contrast, saturation, sharpening, etc. to achieve the look you are after. Save the Picture Styles you have created to access them later. You can even create your own styles using the included software, or find them online and download them. There are even styles to be found online that recreate the look of various traditional types of film including Kodachrome and Velvia.
8. Customize the Exposure Compensation Controls: Exposure Compensation can be used to adjust the camera’s exposure settings in order to achieve the final exposure that you desire. Explore the various options of Custom Setting b3: Easy Exposure Compensation to customize exactly how the exposure compensation (EC) controls works. You can set it so that you press the Exposure Compensation Button first before turning a dial to change EC, or have it set so that you can just turn a dial to quickly and directly change EC. You can even select which dial you use with Custom Setting f5. And you can set it so that the EC amount that you dialed in stays set for the subsequent shots, or that it is automatically reset to zero, depending on which controls you choose to use to set EC. This last option is the most sophisticated and most flexible, and may be the best one to learn and take advantage of. Using this option, On (Auto reset), you can choose to turn a dial to directly adjust EC, but your EC setting will be reset when the camera or exposure meter turns off. This is because you can still continue to use the Exposure Compensation Button with a Command Dial to set EC, but by setting it this way, EC will not be reset when the camera or meter turns off. Exposure Compensation will only be automatically reset if you set it directly using the dial without the button. So if you wish to use EC for just one shot, you can adjust EC with just the dial. But if you wish to take a series of shots with the same adjusted EC, you can use the button/ dial combination to set it more “permanently.” Pretty powerful stuff! This is why you got the D7100, right? So that you can take advantage of these sophisticated controls!
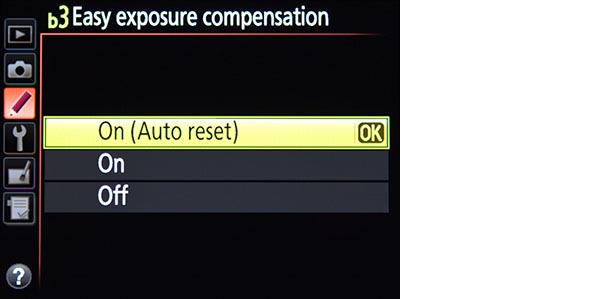
Making use of Easy Exposure Compensation to configure how the controls can be used to change exposure compensation
9. Fine-Tune the Exposure Metering Modes: While the Matrix Metering Mode will do an excellent job of determining the proper exposure for your images the majority of the time, there are some situations where you may wish to use the other exposure modes – Center-Weighted Metering and Spot Metering. This includes dramatically backlit situations, subjects with a dramatically dark background, scenes that contain a wide range of highlights and shadow areas, or other dramatic lighting situations.
If you find that you are consistently not quite happy with how the camera’s meter is determining the exposure settings when making use of any of these modes, you can make fine-tune adjustments to the metering system using Custom Setting b5: Fine-tune optimal exposure. This is not an exposure compensation adjustment, but rather a “behind the scenes” fine-tuning of how the camera’s meter will determine the exposure settings, independently for each of the different Exposure Metering Modes (Matrix, Center-Weighted Average, Spot). If you find that your images are always typically being slightly underexposed or overexposed when using a specific metering mode, adjust this accordingly so that you don’t have to use exposure compensation every time you use that metering mode. For example, you may find that Center-Weighted Metering delivers great exposures, but you would prefer that the images taken with Spot Metering were 1/3 EV (1/3 step) underexposed all the time. If that is the case, you would adjust Spot metering to -2/6 using this menu. If you make use of this fine-tune adjustment, you can still use exposure compensation in any situation in addition to this fine-tune adjustment.
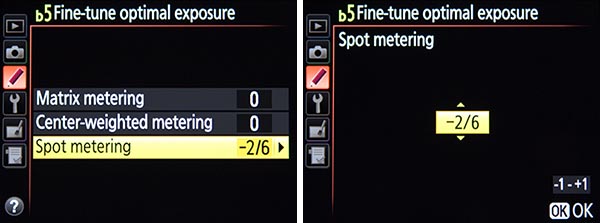
Custom Setting b5: Fine-Tune Optimal Exposure, used to adjust the exposures of each metering mode to your preference, “behind the scenes,” so that exposure compensation is not needed each time you use that metering mode (left). Fine-tuning Spot Metering to underexpose by -1/3 EV (right) – not recommended, just an example!
10. Put Your Most Used Settings in My Menu: Instead of navigating into the Menus and Custom Settings all the time to find your most used settings, you can create your own custom menu called My Menu, which is then quickly and easily accessed with the Menu Button. You can even decide what order to list the items in. Set up My Menu by selecting Choose Tab in the Recent Settings menu, and select My Menu. Then Add Items and Rank Items in the order you desire. You can add items from most all of the Menus and Custom Settings Menus, such as maybe Movie Settings, some of the Flash control settings, or White Balance for easier access to additional white balance options and fine-tuning. If you frequently make use of a feature such as changing the Image Area from DX to 1.3x, use Interval Timer Shooting, or Multiple Exposures add these to your My Menu.

Adding and item from the Shooting Menu to My Menu
I explain most of these features and functions in even more detail, as well as explain all the other aspects of the D7100 in my e-book guide Nikon D7100 Experience, available on my Full Stop website. The guide not only explains the features, functions, and controls of the camera, but more importantly explains when and why you will want to use them in your photography. Take control of your D7100 and the images you create! Click the cover below to learn more, preview, and purchase the guide:
Still looking to purchase your D7100 or some lenses or accessories for it? Please consider using my affiliate links for Amazon or for B and H, found at the left side of this page – thanks! And please feel free to spread the word if this blog has been helpful.
Thank you for sharing your knowledge and experience.
Gratefully
Faruk
Where can I download picture control file for velvia to use with D7100?
Hello, you can dl the Velvia Picture Control, and several more here:
http://www.neebu.net/~khuon/photography/NIKON/CUSTOMPC/
Be sure to read the text files for instructions on using the camera Picture Controls files vs the ViewNx tone curves files.
Hi, how can I set multiple exposure in Nikon D7100?
Access the Multiple Exposure item in the Shooting Menu, where you can enable it and select your desired settings.
I am tempted in doing a fine exposure metering adjustemt as i consistently gett under exposed images when shooting inside. They usualy tend to be around 1 stop and even up to 2.4
When outside i do not experience the same dramas. My reluctance in adjusting the fine tune is that i may end up with over exposed images that i shoot outside.
I know my settings and tried numerous options and still they tend to be under some what. Interestingly they look ok on the Cameras display.
I also noticed that my hand held metering unit also differs from the mettering suggested by my Camera. I continue tom investigate further.
I never had such issues with my D90 or D7000. It is frustrating as to why this should be different with the d7100?
Hello, Which metering mode are you using inside? Are you using a flash? And are you using a sufficiently high ISO for the inside shots, perhaps 800, 1600, or higher?
If the exposure of the outside images is fine, I would not suggest fine-tuning the exposure. For the inside shots yYou may instead wish to use a different metering mode, or make use of exposure compensation, or a flash if necessary.