Why the Nikon D7200 is not a DX Version of the D750

The Nikon D7200 starts shipping today (March 19, 2015), and like its predecessor the D7100, it should prove to be a highly capable camera. The D7200 offers a few incremental upgrades over the D7100, most importantly an increased buffer capacity, which will greatly benefit sports, wildlife, and other action shooters. (More on this in a little bit, in the Image Quality Settings section of this article.) The new model also boasts an updated version of the 51-point autofocus system, which will improve autofocusing in low light situations (down to -3EV, improved over the -2EV of the D7100). Battery life has been increased, Wi-Fi capabilities are built-in including NFC connection with Android smart devices, which allows you to touch the camera to the device to initiate a Wi-Fi connection. The D7200 also includes the new Hi BW1 and Hi BW2 ISO settings, extremely high ISO sensitivity settings which will allow very low-light shooting, but which only capture in black and white.

aa-D7200-viewfinder-AF-51-point-RedCT-500

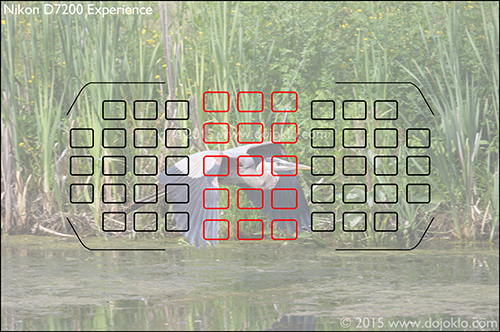
Simulated view of the D7200 Viewfinder – The 51 AF Points, including the 15 centrally located cross-type points indicated in red here.

Video improvements to the D7200 include the 1080/60p Frame Rate, and the “zebra stripes” (Highlight Display Indicator) to indicate areas of overexposure. Audio recording now offers a selectable audio frequency range (the standard Wide range or the narrower Voice range). The new Nikon Flat Picture Control is also included, which is desired by videographers as it provides the greatest latitude for post-processing, by helping to retain details in both highlights and shadows. It can also be used for still images that are going to be heavily processed. Also, the Picture Control options now include the Clarity setting, the Brightness adjustment allows a wider range, and the settings allow finer 0.25 increments or Auto adjustment.

As with the D750, the D7200 offers numerous advanced options, such as the ability to capture images with different Image Areas, customize the size of the Center-Weighted Metering circle, fine tune the different metering modes, set up the dual memory card slots in various capacities (simultaneous, overflow, RAW + JPEG), specify exactly how exposure compensation is changed (Easy Exposure Compensation), and customize the controls for quick access to numerous different functions. The Autofocus Modes and AF Area Modes will allow you to set and customize the camera to best capture still subjects, and to accurately track and capture moving subjects (as explained in this post).

You can learn about all the features, functions, settings, and controls of the D7200, plus most importantly when and why to use them, with my guide Nikon D7200 Experience.

aa-01-D7200-viewfinder-Vette-Grid-500

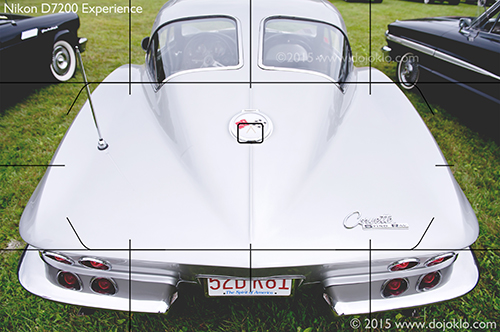
Simulated view of the D7200 Viewfinder – Making use of the Viewfinder Grid to create a straight, level image.

Nikon D7200 vs. Nikon D750

As I teased you with the title of this post, although the D7200 is a highly capable camera, it unfortunately is not the DX version of the Nikon D750, as many had hoped. While the D7200 shares numerous features, controls, and menu options of the D750, a close look at the specs and the menus reveals that there are some important options missing, which were among the most notable advancements of the D750. This makes it easy to see what the future Nikon D7300 will include, but it is unfortunate in that the existing Nikon technology added to the D750 (and D810) will not be seen in a DX model for awhile.

The features of the D750 that were not included in the D7200 include the new Group-Area AF autofocus area mode, Highlight-Weighted Metering, Face Detection for Matrix Metering, and Power Aperture for video. With the D750, these features added the following capabilities, that photographers shooting certain types of scenes and situations are finding extremely useful:

Group-Area AF Area Mode – A group of five AF points, in a cross-shaped pattern, can all be used together to help focus on a subject, in situations where using a single AF point may not work as well, such as capturing birds in flight.

Highlight-Weighted Metering Mode – This new mode helps to prevent the overexposure of highlights in specific situations, such as a performer, singer, or dancer under bright stage lighting and against a dark background.

-Matrix Metering Face-Detection option – The Custom Setting called Matrix Metering allows you to decide if you wish for the camera to take faces into account when determining the best exposure, when working in Matrix Metering Mode. This can help you obtain proper and consistent exposures if your portrait subject or bride is moving in and out of shadows.

-The Power Aperture feature allows you to smoothly open or close the aperture during movie shooting, so that you can adjust the exposure on the fly or change the depth of field, without it being noticeable in the recording.

So while the D7200 is a highly capable and customizable camera, and the D7200 and the D750 are very different cameras due to one being a cropped-sensor DX model and one being a full-frame FX model, the D7200 could have been a truer “little brother” to the D750. But the absence of these key features with the D7200 has prevented this from being the case…until the D7300 eventually comes out.

You can learn about all the features, functions, settings, and controls of the D750, plus most importantly when and why to use them, with my guide Nikon D750 Experience.

Nikon D7200 book manual guide how to tips tricks set up master quick start

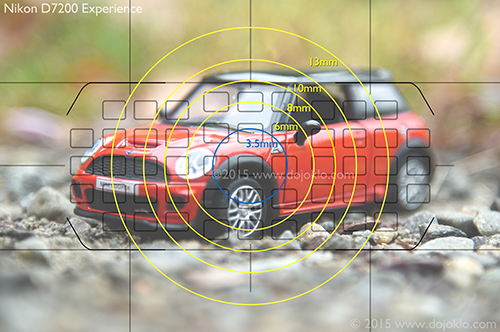
Simulated view of the D7200 Viewfinder – The AF Points and Grid, plus the approximate size of the Spot Metering circle and the various Center-Weighted Metering Mode options. (Spot Metering will surround the active AF Point and not necessarily be in the center.)

Image Quality Settings

To further explain the various Image Quality settings that will affect the buffer capacity of the D7200, with the highest quality 14-bit, lossless compressed RAW image quality setting, the D7200 can capture up to 18 continuous images before the buffer fills and the camera needs to pause a moment to save the files. You can increase this rate by using the 12-bit lossless compressed RAW setting (27 images), the 14-bit compressed setting (26 images), or boost it significantly by using the 12-bit compressed setting (35). If capturing Large, Fine JPEG images, you will be able to capture up to 100 continuous images.

How will these settings affect your images? The Lossless compressed setting will reduce the NEF (RAW) file size anywhere from 20-40% using a reversible method that does not affect image quality. If you desire smaller file sizes, the Compressed setting will perform a non-reversible compression resulting in 35-55% file size reduction. This will provide smaller files than Lossless compressed but Nikon claims the image quality reduction will be negligible. You will also separately select an NEF (RAW) bit depth setting of either 12-bit or 14-bit. The 14-bit setting will capture more color information but will result in larger files. The difference may be slight for many images, but the 14-bit setting will be beneficial for images containing areas of shadow, low-light images taken at high ISO settings, or for underexposed images that you wish to repair in post-processing.


Again, be sure to have a look at my guide Nikon D7200 Experience to learn about all the features, functions, settings, and controls of the D7200, plus most importantly when and why to use them.

Canon 5D Mark III is Here!

Here are my first quick shots of the Canon EOS 5D Mark III, during the ceremonial unboxing at Newtonville Camera, Newton Mass.  (Thanks guys!)

Canon 5D Mark III mk 3 EOS unbox unboxing package box
Images copyright by author, taken at Newtonville Camera, Newton, Mass.  Please do not use without permission.

Canon 5D Mk III mark 3 unboxing unbox box package new EOS
Images copyright by author, taken at Newtonville Camera, Newton, Mass.  Please do not use without permission.

I am in the process of working on the first and best (hopefully on both counts) e-book guide for the Canon 5D Mk III called Canon 5D Mark III Experience – The Still Photography Guide to Operation and Image Creation with the Canon EOS 5D Mk III.  You can learn more about it by clicking on the title or here:

http://www.dojoklo.com/Full_Stop/Canon_5DMkIII_Experience.htm

I wrote an initial post about the 5D Mk III Specs and What They Mean for real world use, so you can begin to learn about its new and/ or improved features.  I’ve also spent a lot of time with the manual, and a little bit of time with the camera itself, and I am thoroughly impressed!  I love the new autofocus system and the new menu systems that are far better organized than ever before.  The new menus include the new AF Autofocus Menu tab and sub-menus with the pre-set autofocus Cases to make it far easier to configure your camera for your specific subject tracking needs than was previously possible with the Canon 7D menus and Custom Functions.  The side-by-side Comparative Image Review is great for comparing two images at once on the nice, wide rear LCD Monitor, or for comparing a full image with a detailed view of part of it.

Canon 5D Mark III Mk 3 111 eos detail image quality
Quick shot with the 5D MkIII, with a detail of the dew drop I noticed during post-processing.  Captured in JPEG – looks even better full size!.  Images copyright by author, taken at Newtonville Camera, Newton, Mass.  Please do not use without permission.

The feel of the body is great too, more 7D than 5D Mk II, and the sound of the shutter is much more appealing than the “ka-chunk” of the 5D Mk II.  The silent Touch Pad control for movie shooting works great, and the in-camera HDR and Multiple Exposures are fun to play with.  I will write more about the camera and its features as I get a chance.

Canon EOS 5D Mark III Mk 3 unbox unboxing box package
Images copyright by author, taken at Newtonville Camera, Newton, Mass.  Please do not use without permission.  (Sorry for the copyright watermarks, but I had my previous unboxing image widely stolen by unsavory websites.)

Here are some in-camera HDR Mode and in-camera Multiple Exposure Mode experiments:

Canon 5D Mark III mk 3 111 sample image photo in camera HDR mode art embossed lowell house harvard square cambridge ma mass
Lowell House, Harvard Square, Cambridge, Mass.  Canon 5D Mark III – in-camera HDR Mode, Art Embossed

Canon 5D mark III mk 3 111 in camera hdr mode sample image art vivid
Lowell House, Harvard Square, Cambridge, Mass.  Canon 5D Mark III – in-camera HDR Mode, Art Vivid

Example images of all of the other HDR processing options can be seen here.

Canon 5D Mark III mk 3 111 multiple exposure mode test shot image sample
Neon Sign, Cambridge, Mass. – Canon 5D Mark III Multiple Exposure Mode.  Multiple-exposure control: Bright, 3 exposures

Canon 24-70mm f/2.8L II vs. 24-70mm f/2.8L

Canon has just announced an updated, improved version of it’s high-quality EF 24-70mm f/2.8L standard zoom, called the EF 24-70mm f/2.8L II USM.  (To understand what all the notions mean, please see my Canon Lens Notations post.)

Some would call this the full frame standard zoom, though as an EF lens it can also be used on non-full-frame cameras such as the 7D, 60D, and T3i/600D.  The difference is that on non-full-frame bodies, it will act more like a 38-112mm focal length lens due to the crop factor of the smaller sensors.

Canon 24-700mm f/2.8L II lens new updated improved
New Canon 24-70mm f/2.8L II USM – (image from Canon USA)

Many, including myself, had hoped for – or even expected – this update to incorporate image stabilization, but this was not included.  The image stabilization would have made it an even tougher decision between the new 24-70 f/2.8L II and the 24-105mm f/4L IS, which offers a similar focal length plus image stabilization, but has a minimum aperture of “only” f/4.0.

Canon states that the lens has been completely redesigned, and in addition to still offering great weather sealing like the original, the same .38m / 1.25 ft. minimum focus distance, and improved durability, it also now “features completely redesigned optics to provide outstanding clarity, image quality and durability. A compact design makes it ideal for carrying on every shoot, and a range of optical enhancements provide improved performance – capturing greater detail across the frame while reducing distortion throughout the entire zoom range, particularly at the maximum 70mm focal length.

With a redesigned optical system that includes two Ultra-low Dispersion (UD) and one Super UD aspheric elements to minimise chromatic aberration and colour blurring, the lens delivers consistently sharp, high-contrast images. Each lens element also features Canon’s optimised Super Spectra coatings to reduce ghosting and flare and ensure excellent colour balance. Additionally, a fluorine coating minimises the amount of dust, dirt and fingerprints that adhere to the front and rear of the lens, helping to maintain superior image quality.”

The original 24-70mm f/2.8L lens included “the use of two different types of aspherical lens elements and a UD (Ultra-low Dispersion) glass element for obtaining sharper image quality.”  (quotes from Canon press releases)

Canon 24-70mm f/2.8L original lens
Original Canon 24-70mm f/2.8L USM – (image from Cburnett, Wikipedia, GFDL license)
PLEASE do not put a cheap Tiffen filter on an L lens – use a high quality multi-coated B+W MRC filter

There are some significant differences in the design of the new lens vs. the older version.  They both have ultrasonic motors for autofocus and full time autofocus (you can override the AF by turning the focus ring without switching to manual focus).  And they both use an external zoom mechanism, meaning the lens extends as you zoom in and out.  However, the original lens extended as you zoomed toward the 24mm wide end, which is “backwards” from a typical zoom lens.  The new version acts as a more typical zoom, extending as you zoom towards the 70mm telephoto end.  They both include a lens hood, though the older hood attached to the main section of the lens and the lens extends inside of the hood, thus working more effectively as a hood throughout the entire focal range from wide to tele.  The hood of the new version attaches to the extending section, and thus is a smaller tulip style lens hood typical of most lenses.  Perhaps the new coatings and lens elements make up for any internal reflections that might have resulted from this less effective hood.  The new lens offers a lock switch for when it is retracted, though L lenses typically zoom so smoothly and tightly that they don’t tend to creep.

The sizes of the lenses are similar, though the new version is slightly shorter and lighter but wider.  Due to the changed design, the new lens boasts a larger 82mm filter size.  And the prices at this point are dramatically different.  As far as the image quality, it is certain that the new 24-70mm is going to demonstrate dramatically improved image quality, especially when paired with the new Canon 5D MkIII (Canon 5D X?) when it comes out, as it is rumored to boast 30+ MP, which is going to require excellent glass to fully take advantage of.

24-70mm f/2.8L
3.3″ x 4.9″
2.1 lbs (950 g)
77mm filter size
$1,269 at B&H
$1,299 on Amazon

24-70mm f/2.8L II
3.5″ x 4.4″
1.77 lbs (805 g)
82mm filter size
$2,299 at B&H available for pre-order, expected in mid-April

New “Deeper Frame” E-Book from David duChemin

As some of you may know, popular travel and culture photographer and blogger David duChemin suffered an accident in Italy a couple months ago, falling from a wall and shattering his ankles.  He spent about 40 days in a hospital, but has recently been released and continues to recover.

As he recovered, he worked on a new e-book, called A Deeper Frame, about achieving visual, physical depth in out photographs.  Here is the press release for this new book, now available from Craft and Vision:

New eBook Available: A Deeper Frame
David duChemin’s first eBook in over 6 months, A Deeper Frame, is an introduction to the discussion about re-introducing the illusion, or perception, of depth that is removed when the camera flattens the three-dimensional world into two. This insightful and inspirational eBook will help you understand principles that artists have understood for centuries, but that seldom get discussed in popular photography with more than a passing mention.

A Deeper Frame outlines seven ways that we can create more engaging images through the re-creation of a sense of depth in the flattened image to create photographs that feel immersive and invite a reader of that photograph to not merely look at the photograph but into or through the photograph.

A Deeper Frame is available now as a downloadable PDF for just $5USD.


Special Offer on PDFs
For the first five days only, if you use the promotional code DEEP4 when you checkout, you can have the PDF version of A Deeper Frame for only $4 OR use the code DEEP20 to get 20% off when you buy 5 or more PDF ebooks from the Craft & Vision collection. These codes expire at 11:59pm PST July 2, 2011.  Click here to go to the Craft and Vision website and make your purchase.

Nikon D5100 Unboxed – Hands On

The Nikon D5100 has arrived!
Nikon D5100 dslr camera photo dummies preview review book how to user guide unbox box manual compare vs
Photo by author – copyright 2011 – please do not use without permission!

I’ll be putting together a user’s guide ebook for the D5100, Nikon D5100 Experience, following in the tradition of my popular and well received Nikon D7000 Experience ebook.  See here to learn more about the new book, and be sure to check back in the upcoming weeks to see when it will become available!

The Nikon D5100 Reference Manual is available online here.  My Nikon D5100 Experience user’s guide builds upon the information found in the manual to help you learn the features, settings, and controls of your camera, plus when and why to use them in your photography!

I wrote a post comparing the new D5100 with the D7000, D90, and D3100, which can hopefully help you decide which model is the right dSLR for you.  Below are some brief hands on notes from the first couple days of use.  I leave the image quality reviews to the pixel-peepers, or better yet DPReview and dxomark.

Nikon D5100 Hands on Experience: The camera body of the D5100 fits nicely in the hand, and is a little bit taller than the D3100, so the pinky doesn’t fall off the grip quite as easily.  The rubber gripping surface and rubber thumb spot work nicely, and help retain the grip on the body, even when holding it at your side or carrying it around without a strap, and the light weight of the camera also adds to this ease of portability.  Those who prefer the ergonomics of a larger, more solid feeling camera body will have to look at the D90 or D7000.  The Live View switch, placed on the top of the camera at the mode dial, feels and sounds a little plasticy, but works find, and the record button for movies is conveniently placed on the top of the camera, near the shutter button.  The FN button, on the front near the lens mount, can be customized to adjust one of a number of settings quickly, like image quality, white balance, HDR, or +RAW (to take a RAW file in addition to a JPEG if set on just JPEG).  I prefer to make it an ISO button.  The side mounted rear LCD screen is a definite improvement over the bottom mounted, limited screen of the D5000, and rugged and durable.  The view through the viewfinder is a bit tiny and cramped, as is typically the case in this level of dSLR.  Changing settings is quick and easy with the “i” button and rear LCD screen.  Overall, the body, feel, controls, and LCD screen of the D5100 make for a great image taking experience.

See and buy the Nikon D5100 with 18-55mm Lens on Amazon $899

See and buy the Nikon D5100 – Body Only on Amazon $799

First images from the D5100, unedited:
Nikon D5100

Nikon D5100

How to Choose a New dSLR Camera

When selecting a new dSLR camera, many people seem to look at the latest offerings, attempt to compare their many features, and determine which one, in or near their price range, is “better.” But this is the backwards way to approach it. Of course a continuous burst rate of of 126 JPEGs at 8 frames per second is “better” than 58 frames at 5.3 frames per second. But do you need the ability to take 126 consecutive images in 15.75 continuous seconds? Ever? Certainly the ability to to control both the method and the sensitivity of AI Servo Tracking is impressive and powerful, but do you even understand it, wish to learn about it, need it, and will you ever use it? If a camera’s features don’t fit your needs as a photographer, it is not a better camera for you. In fact, it may be a worse camera for you because its complexities and options may serve to work against you and your image making.

Douglas J. Klostermann Photography
Iquitos, Peru

When you are trying to determine which new dSLR camera to purchase or upgrade to, you need to first consider and determine your needs, and then see which camera fills those needs. Not the other way around where you look at the new features and determine if you really need or will use them.

For example, I began shooting with a Rebel XT and took it on an extended trip where I shot lots of outdoor dance and festivals (see the Peru and Dance galleries here for the results – those are all shot with a Rebel XT.) I soon discovered this camera wasn’t fulfilling my growing needs and I made a mental list of what my next camera needed:

  • more focus points which are more strategically positioned (the Rebel XT only has 7 focus points in a simple cross pattern which did not suit the way I focus and compose)
  • faster frame rate in continuous shooting mode (it only has 3 fps which wasn’t good enough for catching a good burst at the peak of action)
  • better sealed body (I ended up in several very dusty or wet situations)
  • integrated sensor cleaning (see “dusty or wet situations” above)
  • more megapixels (the 8 MP of the XT just weren’t sufficient when it came to cropping and post-processing)
  • battery with longer capacity (I used it on weekend trips to the middle of nowhere with no electricity, but didn’t want to have to buy and take more than 3 batteries)
  • larger LCD screen to better review photos (the XT has a tiny screen)
  • grid in the viewfinder (I just can’t keep it straight sometimes)

Amazonia Shipibo Vendor
Iquitos, Peru

These are the features I looked for in my next camera. I didn’t work backwards and wonder, “Do I need or will I ever need auto lighting optimizer and highlight tone priority?” If I had exposure issues on my list, I would have looked for these kinds of features, but I didn’t. I didn’t wonder, “Do I need multiple flash remote firing? Should I worry about that?” That wasn’t on my list because it wasn’t a need I ran into, ever, in months of shooting. I don’t even own multiple flashes and wish to minimize using the one. I didn’t ask myself, “Do I need an extensively redesigned focus system with AF Point Expansion and Zone focusing?” I nearly always choose my own focus point – I don’t want the camera choosing the closest point which is bound to be a dancer’s flying hand and not their face, so I don’t need that. No matter how awesome and advanced it is, even if the subjects are moving. I’m pretty quick with the focus point selection, I just need more and better placed focus points. If you haven’t run into a need for certain features in your months or years of extensive shooting, you aren’t going to suddenly need it just because it is now offered on a camera. Sit down and make your list, then look at the cameras’ offerings.

And please be aware, no new camera will help you instantly create better photos. Or better yet, all of the latest cameras will help you take better photos, but equally so, none any better than the others. If you wish to take better photos, just chose one of the cameras and get out and shoot. Learn how to use the basic settings (aperture, shutter speed, ISO, focusing modes and focus points, exposure metering modes, histograms) and then concentrate on composition and telling a story through your images. Get a book like Bryan Peterson’s newly updated Understanding Exposure to get a handle on the essential functions and relationships of aperture, shutter speed, and ISO.  Or have a look at my Full Stop e-book camera guides for various Canon and Nikon dSLR cameras!  And see the following posts to help you on your way:

How Pros Photograph

Deconstructing the Shot

Pucallpa kids and boat
Pucallpa, Peru

Need a lens to go with your new camera? Read about choosing a lens other than the kit lens in this post Why You Shouldn’t Buy the Kit Lens, and learn about the Best Lenses for Travel Photography here.

If you are interested in researching or purchasing the equipment or books I use, discuss, or recommend, I would appreciate it if you use this referral link to Amazon. Your price will be the same, and it will help support my blog and my work. Thanks!  And for those of you across the pond, click here for my referral link to Amazon UK. If you are in another country, click on one of my Amazon links, scroll to the bottom of the page, and click on your country for your local Amazon.