I began to discuss the autofocus modes of various dSLR cameras in previous posts including Taking Control of Your Canon Autofocus System and Taking Advantage of the Autofocus Systems of the Nikon D5100 and the Nikon D7000
In this post I wish to go into more detail about one of the reasons it is important to take control of your autofocus system, namely not allowing the locations of the AF Points in your viewfinder to dictate your final composition.
As I mentioned in previous autofocus posts, one of the essential steps in taking a successful photo is controlling where the camera focuses. If you allow the camera to auto focus by choosing its own focus point(s), it typically focuses on the closest object. This may or may not be what you want to focus on, so you should select where the camera focuses using the Auto Focus Points. For example, you often want to focus on a subject’s eyes, but if you allow the camera to choose the autofocus point itself, it may select another part of the face, or somewhere else on the body, or even a raised hand that is nearer to the camera than the face to focus most sharply on.
In addition, there are reasons to use the outer focus points and not just focusing with the center AF point and then recomposing. First, if you are taking several shots of the same subject and framing, you will not have to re-focus with the center point and recompose between each shot. And by controlling exactly where you focus, you then have greater, more precise control over the use of dramatic depth of field. Also, if you use the center point and recompose, you have swept the camera in an arc to recompose, and are thus always focusing at a distance behind the subject. This may not be as noticeable when the subject is further away, but for a close subject – especially when using shallow depth of field – the difference is critical.
One of the additional critical reasons to take control of your autofocus system is so that you don’t let the location of the AF Points dictate your composition. What happens when the subject you want to focus on is not located exactly under one of the AF Points? Even with 9 or 19 or more AF Points to choose from, they will not always be located exactly at or near where you need them to be. Recomposing or re-framing your shot is often necessary so that you can capture exactly the image you wish to and not one dictated by the locations of the AF Points as you see them in the viewfinder.
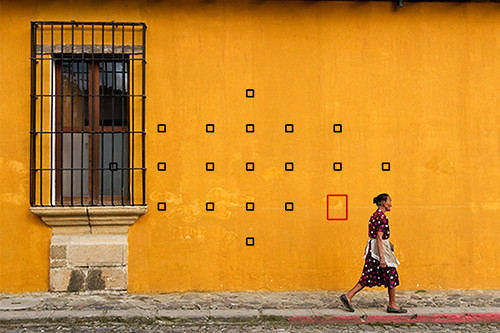
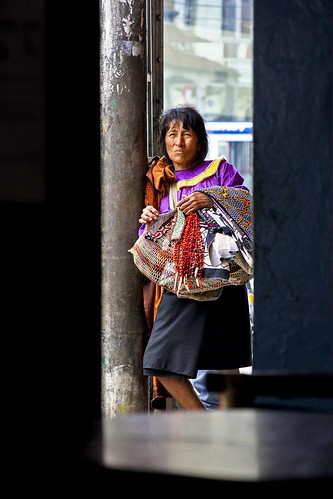
Figure 1 – The desired framing and composition of the shot I wish to take, yet no AF Point, including the selected lower right point (the larger point shown in red here) is located exactly at the woman’s head where I wish to focus. (Canon 7D viewfinder shown)
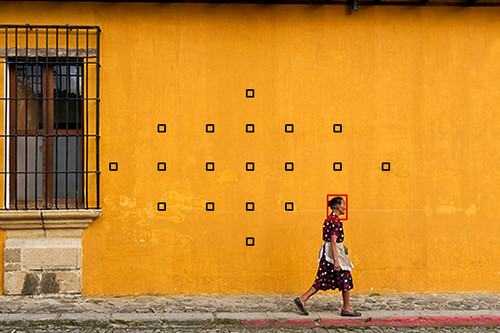
Figure 2 – Image is temporarily framed to place the selected AF Point over the woman’s head, Shutter Button is pressed half-way and held to lock focus at that distance, image is recomposed to the desired framing of previous Figure 1, and Shutter Button is fully pressed to capture the image.
Figure 1 shows the desired framing and composition of the shot I want to take, but the woman is not located under an AF Point. This composition is desired for me because it captures the entire window along with some space around it, as well as some space in front of the woman for her to “walk into” – but not an excessive amount of space. So I manually select the lower right AF Point (using Single-Point AF Mode), temporarily frame the image to place the selected AF Point over her face or head, press and hold the Shutter Button half-way to lock focus at that distance (Figure 2), and see the Focus Confirmation Light illuminate in the viewfinder. I then recompose back to the final framing I want (Figure 1) and press the Shutter Button fully to take the image. Even though the subject is moving, I do not need the sophisticated tracking of AI Servo (Canon) or Continuous Servo (Nikon) Focus Mode to keep her in focus. I can quickly lock focus using One Shot (Canon) or Single Servo (Nikon) Focus Mode, recompose, and take the image without the camera-to-subject focus distance changing significantly.
With the example images above (Figures 1, 2), focusing on the wall would not have been tragic because the distance between the subject and the background is small, and if a medium or narrow aperture such as f/8 or f/16 is used both the wall and the subject may be in acceptable focus. If the background was further away, and/ or a wide aperture such as f/2.8 was used – especially with a telephoto lens, and if the image was enlarged, you would clearly see that the camera focused on the wall and not the woman. Not to mention the fact that the wall is a somewhat consistent area of color and the AF system may have difficulty properly focusing on it. So it is best not to take shortcuts such as focusing on the wall and hoping the subject will also be in focus, because in many other situations you will not have this option. It is best to take the photo properly and to learn and practice the habit of working in the more rigorous manner if you want all your photos to be sharp.
If you would like to learn more about the autofocus systems of your Canon or Nikon dSLR camera, as well as learn to use the other features of your camera including metering modes, Aperture and Shutter priority modes, all the menus and Custom Function settings, and more, have a look at my Full Stop e-book camera guides. In addition to explaining the features and settings, the guides clearly explain when and why to use them in order to capture the images you desire.
Take control of your camera and the images you create!
Learn more about the e-books by clicking on their titles or on the banner below:
Canon 7D Experience
Canon T3i Experience
Your World 60D
T2i Experience.
Nikon D7000 Experience
Nikon D5100 Experience.

For those with other cameras, check out my Ten Steps to Better dSLR Photography which also discusses taking advantage of any dSLR camera’s autofocus system.

Was this post helpful? Please let others know about it by clicking the Facebook or Twitter sharing buttons below, linking to it from your blog or website, or mentioning it on a forum. Thanks! Want to help support this blog with no cost or effort? Simply click on the Amazon, B&H Photo, or Adorama logos on the left side of this page to go to those sites and make your purchases. They will then give me a little referral bonus!