It is one thing to know that your cool new Canon or Nikon digital SLR provides you with 3 or 4 different metering modes. It’s another thing to know how and when to actually use them in the field or in different real life situations. The Canon 5D, 7D, 60D, 50D and T3i all offer four different metering modes – Evaluative, Center-Weighted, Partial, and Spot – as I’m sure you have thoroughly read about in your manual, right? Nikons, like the D7000, D51000, and D3100 generally have three different modes: Matrix, Center-Weighted, and Spot. I’ll try to cut to the chase and simplify the explanations and their uses. Note that there are some important differences between how they work for Canon and Nikon cameras, particularly the Spot mode.
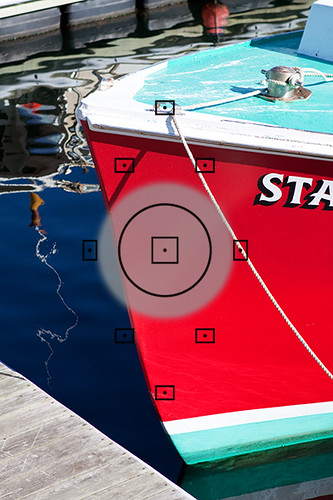
The viewfinder of the Canon T3i (T2i and 60D similar) showing the areas evaluated for Partial Metering (superimposed grey area) and Spot Metering (black circle in center).
Evaluative (Canon) or Matrix (Nikon): This is the default mode for your camera, and it can be used for almost every situation you shoot. Yes, maybe 90% of the time, maybe more. The camera evaluates the entire scene, as divided into several zones, and chooses the best exposure based on its knowledge of thousands of potential image situations. The current metering systems are so good, they can even be relied on for backlit or other challenging lighting situations. An important feature of this mode is that advanced cameras such as the Canon 7D, Canon 60D or Nikon D7000, D5100 take into account the selected focus point in its determination of exposure settings. It is assuming your focus point is on your most important subject, so under challenging and critical situations, it is wise to confirm that the camera has chosen the focus point you want (well, this is always wise). Even better, you should typically manually choose the focus point or cluster of focus points, as the camera has no idea what your intended image is. So in special situations, such as dramatically back-lit scenes or a situation with bright light plus deep shadows, make sure you are not using the center point to focus and meter, and then recomposing to take the shot – because some of the zones that the camera evaluated are now no longer in your shot after recomposing, and other new areas are, so the camera has set exposure for an image other than the one you are taking.

San Miguel Duenas, Guatemala
Partial (Canon only): This mode meters a smaller area, about 9.4%, in the center of the scene on the 7D and 6.5% with the 60D. Nikons do not have this mode, though some Nikons such as the D7000 offer the ability to change the size of the Center-Weighted Metering circle (see Center-Weighted Metering below), so it makes up for this. The area is approximately a circle that reaches to the top and bottom focus points, and the metering system ignores the rest of the frame. This mode is useful where there is a dramatic difference in lighting between the foreground or subject and the background. For example, when your subject is backlit – maybe standing in front of a bright window or the sun – and consequently their face is in shadow. I know I said evaluative mode can often handle this type of situation, but if you want the face or subject to be properly exposed and not risk blowing the shot, it is worth it to quickly switch to Partial metering mode. Again, another time to use this is when there is a wide range of light in your scene, from bright sunlight to deep shadows. Remember, this mode is not linked to your focus point. The partial area that is metered is always in the center, so meter on the part of the scene that is most critical and that you want properly exposed, using the central area of the viewfinder, lock in that exposure, then recompose and take the shot.

Campo Nuevo, Guatemala
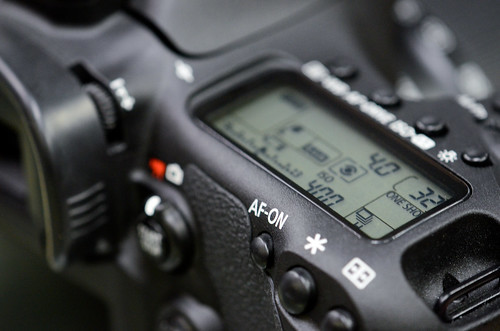
Important Note about Locking In the Metered Exposure: The metered exposure setting is sometimes locked in by pressing the shutter button half-way down or sometimes not “locked” until the image is taken (depending on your camera, or current shooting mode, or how you set it up – read your manual!). The shutter button also typically locks focus (unless you have changed that setting). If you wish to lock in focus and exposure separately, which you often will need to do, on a Canon use the AF-Lock (for focus) button and/ or the AE-Lock (for exposure) button – which looks like this: * – to lock in one of them before locking in the other with the half-press or full press of the shutter button. On the Nikons, you have to set one of your buttons to be the exposure lock button, either the AE-L/AF-L Button or the Fn Button on some cameras like the D7000. I suggest first metering on the subject and locking in that exposure by pressing the appropriate button, then recomposing and locking in focus right before or as you take the photo. Or else learning the advanced methods of back button focusing. Get in the habit of knowing how to do this instinctively, and if you need to hold or just press the particular button, so that it comes naturally during critical situations. On the 7D and D7000 and other cameras you can also customize how these buttons perform or set other buttons to do these tasks. You can see in the viewfinder that you have locked focus when the focus dot is lit. You can see that exposure is locked with the AE-L indication in the Nikon viewfinder or the * symbol in the Canon viewfinder.
Locking exposure and focus, independently, each in the brief seconds before you take a shot? Confusing? A little, but not impossible to figure out with some experimentation and practice. Remember, this is why you bought the fancy dSLR, so that you could make use of all these advanced features and take your photos to another level!
Center-Weighted Average: This metering mode is sort of a cross between Evaluative and Partial metering. It acknowledges that the subject is in the center and requires special metering attention, but it also takes into account all the other zones. Again, this is not linked to the focus point, but always to the center, so if your subject is off center – which it typically should be for a more dynamic image – you need to lock in exposure on your subject and then recompose. I have found that with the Canon 50D, this mode is actually more consistent than Evaluative metering, which often over exposes by 1/3 or 1/2 a stop. Note that you can use the Custom Settings of the D7000 to change the size of the center area being weighted.
This mode can be used when you want to ensure that the subject is properly exposed, but you also want the camera to consider the background. However, if the background is much darker or lighter than the subject, and you want the camera to expose only for the subject and ignore the background, use Spot Metering…

San Miguel Duenas, Guatemala
Spot: This mode meters a small center area, 2.3% of the frame with the 7D, 2.8% with the 60D, and 2.5% with the D5100 and D7000. This area is indicated by the small circle in the center of the viewfinder of the 7D and 60D. There is no center circle in the Nikon viewfinder and you will soon find out why. So when do you want to use Spot metering? This, again, is useful for scenes with great variation in light and shadow, or in very critical situations. One of the most common ways to use it is when metering for proper exposure on a dramatically lit face or subject, but the exposure of the rest of the scene is unimportant. Or perhaps your subject is set against a plain but consistent background, like a bird against a large blue sky. It is also used to determine proper exposure of a subject before switching the camera to manual for a controlled studio shot, or a critical shot or series of shots where the lighting is not going to change. If your background is completely dark or extremely bright, and you don’t want the exposure system to consider it at all when determining the exposure of you subject, use Spot rather than Center-Weighted or Partial. With Canon cameras, the Spot that is used to evaluate the exposure is in the center of the frame, and is often indicated by a small circle. However, with Nikon cameras like the D5100 and D7000, the Spot surrounds the active focus point and is not necessarily in the center of the frame unless you are using the center AF point. So it is wise to become familiar with how your camera operates.
A fifth metering mode is Manual metering, which isn’t actually a mode in your camera, but is a method of metering. This is where you use a light meter or use your camera as a light meter (such as described at the end in the Spot section above) and then manually set your exposure based on the meter readings. This is used when you want ultimate control of the metering and exposure.
You can learn much more about the Exposure modes of specific cameras, including the 60D, T3i, D7000 and D5100, in my e-book users guide. See my e-book website, Full Stop to learn more about them or click the banner below! The guides also go into much more detail about setting up the related metering mode Custom Functions/Custom Settings and camera controls.

I recently ran across an interesting article which takes this discussion to another level by addressing the use of different metering modes in the very specific situation of a wedding. Since one of the main subjects in typically all in white, and the other in black, the metering mode you select and where you meter can make a dramatic difference in the exposure. While that article is specific to weddings, it is useful and helpful to read to further understand how the different modes work, and how special situations might call for some extra thought.