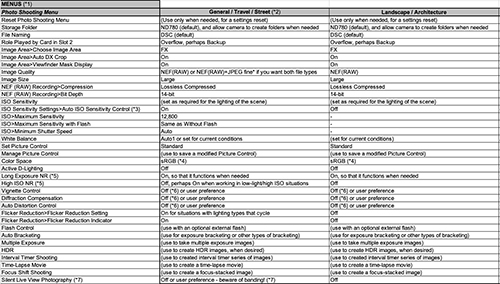
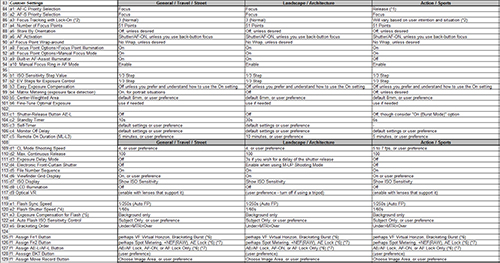
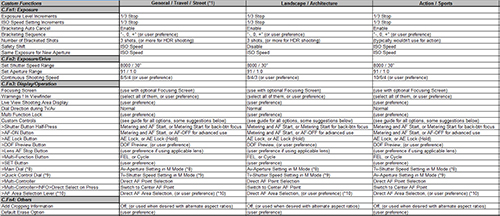
As with all new mirrorless and dSLR cameras, the lists of specifications don’t tell the entire story. Many of the important functions, options, and additions of a new camera can be found in the menus and Custom Settings. These are the types of options that can really differentiate a camera, from a user-experience perspective, and yet these options are often over-looked by reviewers and spec comparison posts. For example, two cameras may share the same autofocus AF Modes and AF Area Modes, and thus look equal on a spec comparison sheet. But one will be much better suited for photographing action and movement because it has additional menu options and Custom Settings which allow the user to tweak and customize the AF system for their specific needs and shooting style.
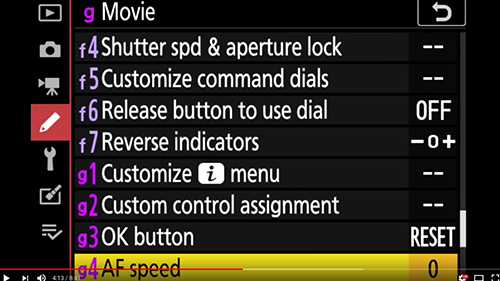
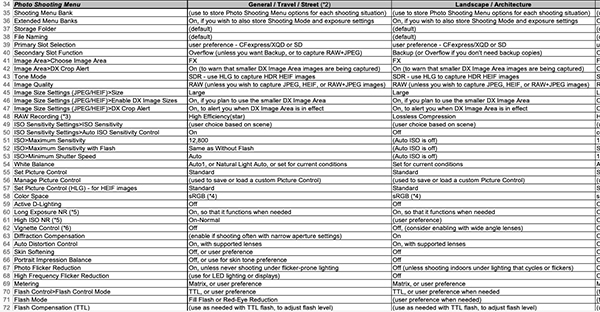
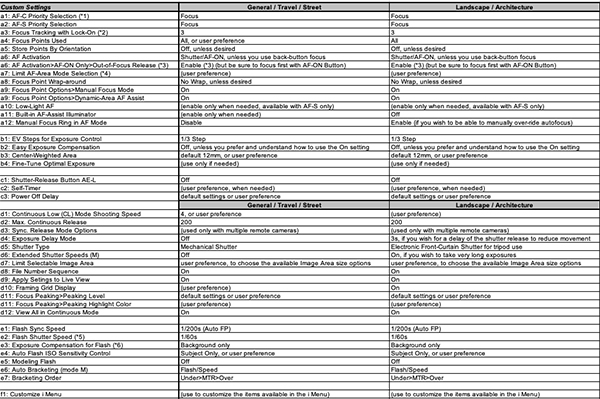
Some of the Custom Settings options of the Nikon Z 7
A video of all the Nikon Z 7 menu items has been posted on YouTube by Jeff Curtner. You can find the video here. It is simply a video of someone navigating all the Z 7 menu items, the i Menu, and the Live View display, but lots of information can be gathered from this, including a few menu options that have not been mentioned in Nikon’s materials or by other reviews of the Nikon Z 7 and Nikon Z 6. All of the screenshots in this post have been taken from this video.
Despite being a mirrorless camera, and thus differing from a Nikon dSLR, a large number of the menu items and options are similar to the Nikon D850 and other recent Nikon models. I will not go into detail about any of those items, since if you are currently using a D850, D500, D7500, D750, etc, you will already be familiar with those menu items and their options. You can consult one of my Menu Setup Spreadsheets to learn about suggested settings for those menu items, or have a look at my comprehensive user-guides for these cameras, such as Nikon D850 Experience. A comprehensive user-guide for the Z 7 and Z 6, Nikon Z 7 / Z 6 Experience, will be available in November or December 2018. You can learn more about it here:
http://www.fullstopbooks.com/nikon-z-7-z-6-experience/
Menu Setup Spreadsheets:
http://www.fullstopbooks.com/setup-guides/
Comprehensive User Guides for most Nikon dSLR models:
http://www.fullstopbooks.com
And now a look at some of the Menu and Custom Setting options of the Nikon Z 7 and Nikon Z 6 that have not been discussed in many recent Z 7 and Z 6 camera reviews. Some of the most important ones are in the Custom Settings items, but we will start at the top of the Menu tabs, with the Photo Shooting Menu:
Photo Shooting Menu
The Expeed 6 processor of the Nikon Z 7 and Z 6 offers processing speed that allows for some new features, including Diffraction Compensation, a Mid-Range Sharpening Picture Control parameter in addition to the Sharpening and Clarity parameters, and the new Creative Picture Controls. As an in-camera processing feature, Diffraction Compensation may potentially slow down the maximum continuous frame rate a tiny bit, though perhaps not – we will have to read the fine-print of the Nikon Z 7 User’s Manual when it is available. The Creative Picture Controls are found in the Set Picture Control menu, and listed after all the typical Picture Controls. If you don’t wish to separately set the three Picture Control sharpening parameters, you can use the new Quick Sharp option to adjust these sharpening-related parameters together.

Diffraction Compensation menu item (left), and the Creative Picture Controls as found in the Set Picture Control menu (right). The Movie Picture Control option is shown here, but a similar menu is also found in the Photo Shooting Menu, for still image shooting.
The White Balance menu item is located in the Photo Shooting Menu, though for quick access it can also be assigned to one of the Function Buttons, or changed via the i Button Menu on the rear Monitor or in the Viewfinder. As with recent Nikon models, the Z 7 and Z 6 offer three different Auto White Balance options, Keep White, Normal, and Keep Warm Lighting Colors. The cameras also offer the recently added Natural Light Auto option, designed to reproduce colors as the eye sees them in natural light. And there are the other standard Nikon WB options, including multiple Fluorescent sub-options such as Day White and Cool-White. To access these options quickly while shooting, you can assign WB to one of the customizable buttons, and then press that button and change the WB setting as you view it in the electronic Viewfinder or on the rear Monitor, as shown in the figure below.
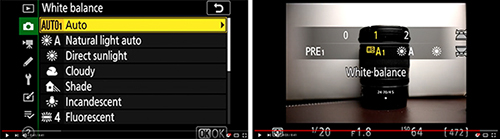
Left: Photo Shooting Menu – White Balance options, including three Auto WB options, and the Natural Light Auto option. Right: If WB is assigned to one of the camera buttons, you can also quickly access and change this setting in the Viewfinder or on the rear Monitor.
The Z 7 and Z 6 offer in-camera, 5-axis Vibration Reduction, for both still image and video shooting. This image stabilization also works with F-mount lenses, including non-VR lenses, via the Nikon FTZ Adapter. (Image stabilization will be limited to 3-axis VR with non-VR lenses.) I’m not sure if this menu item shown below is for enabling the in-body electronic image stabilization, or if it is an option that is used with newer Nikon lenses that have VR, but don’t have the VR and VR Mode switches on the lens itself. I will update when more information is known.

Left: Vibration Reduction menu item, to enable VR and to set the VR Mode. It is possible that this is not the in-camera Electronic Vibration Reduction menu item, but rather it is possibly for enabling VR on newer lenses that don’t have the VR and VR Mode switches on the lens itself. Right: Focus Shift Shooting options (Focus stacking), including the Peaking Stack Image preview image option.
The focus stacking feature of the Z 7 and Z 6 is called Focus Shift Shooting, and is accessed in the Photo Shooting Menu. You will use this menu to set the Number of Shots, Focus Step Width, and Interval between shots. It will also allow you to lock the exposure on the first frame, enable completely Silent Photography for the process, and create a new storage folder to save the focus stack images where you can quickly locate them. The new Peaking Stack Image option will display a monochrome preview of the final focus-stacked images, which can be viewed after the focus stacking function is performed. Beware that the Silent Photography option can result in banding in the images, particularly under artificial lighting that cycles. So if you are using this option, it is best to verify that your images are clean before initiating the Focus Shift process.
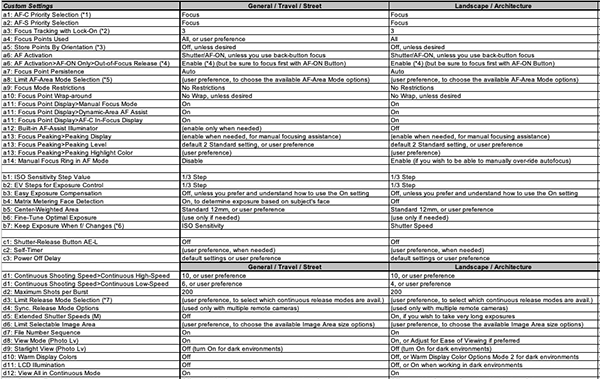
Custom Settings Menu
Many of the importation functions, options, and customizations for the Z 7 and Z 6 can be found in the Custom Settings Menu. These menu items are often where the important, powerful functions of a Nikon camera are found. For example, the on-camera, phase-detection aspect of the hybrid autofocus system of the Z 7 and Z 6 allows for Face-Detection autofocusing, with both Viewfinder shooting and Live View shooting. This feature can only be used with the Auto-Area AF area mode, and is enabled with Custom Setting a4. The Custom Setting a5 – Focus Points Used, can be used to limit the number of selectable focus points. The Z 7 has 493 AF Points, and the the Z 6 has 273 AF Points, so that is a ridiculous number of focus points to have to click across in order to locate the active AF Point where you want it to be. I will have to confirm this, but I believe that this menu item will be used to limit the number of selectable points, so that you can more quickly and easily select the AF Point you desire. I am going to speculate that all the the AF Points will actually be used by the camera when automatically tracking a moving subject.
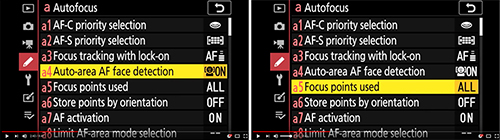
Left: Custom Setting a4, to enable AF Face Detection when working in Auto-Area AF area mode. Right: Custom Setting a5, to limit the number of selectable AF Points.
The Z 7 and Z 6 also offer a Dynamic Area AF area mode, where the selected AF Point is used to focus on the subject, but the immediate surrounding points will help retain focus on the subject if it momentarily strays from the initial point. This is similar to the 9-Point Dynamic-Area AF of previous Nikon dSLR models. The Custom Setting a10 – Focus Point Options offers the Dynamic-Area AF Assist item, which applies to this area mode. If enabled, you will be able to also view the active surrounding AF Points, in the Viewfinder when shooting, and not just see the single selected AF Point. The Custom Setting a11 – Low-Light AF is a new option for the Z 7 and Z 6, and is used to make the autofocusing system even more sensitive when working in low light. However, enabling this option may cause a slight lag in autofocusing.
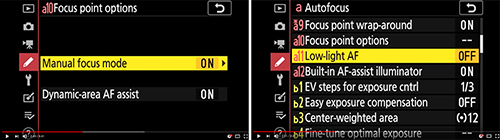
Left: Custom Setting a10, to enable the Dynamic-Area AF Assist option in order to view all the active AF Points when using that AF Area Mode. Right: Low-Light AF, to assist with focusing in low light situations.
The Z 7 and Z 6 offer an Electronic Front-Curtain Shutter option, found in Custom Setting d5. This feature makes use of an electronic shutter, using the sensor itself as the shutter, and thus eliminates the sound and the motion of the first curtain of the mechanical shutter. This can help to eliminate slight internal camera movements and vibrations when capturing an image, and is useful for tripod shooting such as landscape and macro shots. The cameras also offer a Silent Shutter option, which will be completely silent. However, that can cause banding when used with artificial lighting that cycles. When Custom Setting d8 – Apply Settings to Live View is enabled, all of the various camera settings and exposure settings will be applied to the scene as viewed on the rear Monitor during Live View. This will include the White Balance setting, Picture Control, and Exposure Compensation amount. Thus you will better be able to preview the appearance of the final image.

Left: Custom Setting d5, to enable the Electronic Front-Curtain Shutter. Right: Custom Setting d8 – Apply Settings to Live View, where the scene on the rear Monitor will reflect the current camera settings and exposure settings.
The cameras offer a newly designed i Menu, which will allow you to quickly access and change various settings. This menu can be accessed on the rear Monitor, and also in the electronic Viewfinder. This offers the advantage of changing various camera settings, while shooting, without taking the camera down from your eye. Custom Setting f1 enables you to Customize i Menu, so that you will be able to access the settings and functions you use most frequently. For example, if you often use the in-camera HDR or Bracketing features, you can add them to this menu. Custom Setting f2 – Custom Control Assignment allows you to customize various buttons and controls on the camera, including the Fn1 and Fn2 Button, and the Movie-Record Button. For example, you can assign WB or AF Modes to the Fn Buttons, and then press the button and turn the dials to quickly adjust those settings. The Multi-Selector Center Press can be assigned to a function such as AE/AF Lock, or I believe it will be able to be used to quickly, temporarily switch to a different AF Mode / AF Area Mode. This is useful if you need to quickly switch between shooting a still subject and a moving subject, while shooting.
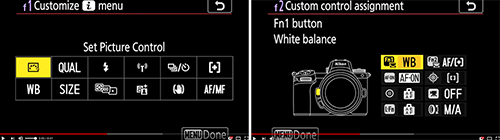
Left: Custom Setting f1, used to customize the functions available on the i Menu. Right: Custom Setting f2 – Custom Control Assignment, to customize the various camera buttons.
Setup Menu
There are a few additional notable new features located in the Setup Menu, including the ability to adjust the Brightness and the Color Balance of both the rear Monitor and the electronic Viewfinder. The HDMI menu item allows you to adjust the video settings when recording to an optional external device, including 8-bit or 10-bit, and enabling N-Log, and View Assist to preview the appearance of the final image.
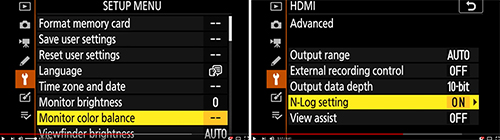
Setup Menu options for adjusting Monitor Color Balance (left), and the advanced HDMI settings for recording video to an optional external device (right).
Of course there are additional menu items and functions that have not been discussed here, including many of the features found on previous models such as the D850. You can learn more about many of the new features and functions of the Nikon Z 7 and Nikon Z 6 in my previous blog post Nikon Z 7 and Z 6 – Beyond the Specifications:
http://blog.dojoklo.com/2018/08/24/nikon-z-7-and-z-6-specifications/
And be sure to join the Nikon Z6 and Z7 Setup and User Tips Facebook page, to learn, share, and ask more about using your Z 6 / Z 7.
~ ~ ~
To learn about all the features, functions, controls, and customizations of the Nikon Z 7 and Nikon Z 6, be sure to have a look at my Nikon Z 7 / Z 6 Experience user guide, to be available in November or December 2018. It is a comprehensive 350+ page guide, to help you take control of your camera, and the images you create.
My Nikon Z 7 / Z 6 Menu Setup Spreadsheet Excel document will be available in October 2018. It will be free for a limited time after the introduction of the camera, and will be available for download here:
http://www.fullstopbooks.com/setup-guides/
If you want to pre-order or order the Nikon Z 7 or Nikon Z 6, please consider using my affiliate links below. Your price will be the same, but they will give me a small commission – thanks!
Nikon Z 7 at Amazon: https://amzn.to/2MPaiU5 – $3396.95
Nikon Z 7 at B and H:
https://www.bhphotovideo.com/c/buy/Mirrorless_System_Cameras/ci/16158/N/4288586281/BI/7364/KBID/7886/kwid/000/DFF/d10-v1-t3-z4288586281
Nikon Z 6 at Amazon: https://amzn.to/2MKHSe0 – $1996.95
Nikon Z 6 at B and H:
https://www.bhphotovideo.com/c/buy/Mirrorless_System_Cameras/ci/16158/N/4288586281/BI/7364/KBID/7886/kwid/000/DFF/d10-v1-t3-z4288586281