I’ve had some hands-on time with the new Nikon D7100 as I research and write my latest camera guide Nikon D7100 Experience, and just as with the recently introduced Nikon D600 this new model does not disappoint. In fact, much of what I’ve said about the D600 will apply to the D7100, as in many ways the D7100 is basically a D600 but with a DX sensor (rather than the full frame FX sensor of the D600). Of course there are some important differences (in addition to the image sensor size) such as the 51 point autofocus system and slightly faster 6 frames per second shooting speed of the D7100, but the feel, performance, features, menu system, and Custom Settings of the two cameras are quite similar.
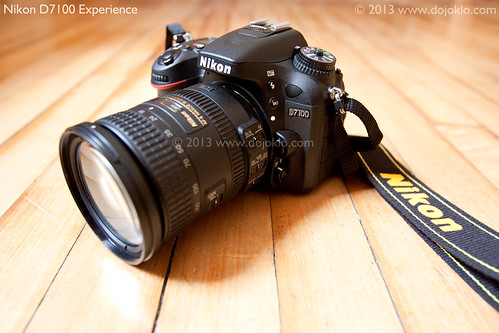
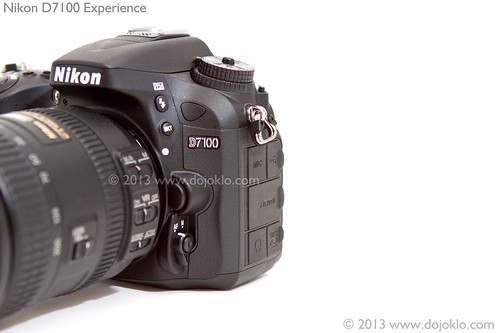
The Nikon D7100 Unboxing – shown here with a Nikon 18-200mm f/3.5-5.6 lens attached, not the 18-105mm f/3.5-5.6 kit lens.
The D7100 is a worthwhile and timely upgrade to the popular and well-respected D7000. The new model boasts an improved 24.1 megapixel DX format image sensor (vs. 16MP of the D7000), a sophisticated 51 point autofocus system with 15 centrally positioned cross-type points (vs. the older 39 point system with 9 cross-type points), the rapid 6 (or even 7) frames per second continuous shooting speed, and a larger and higher resolution 3.2″ rear LCD screen. All of these features make it particularly well-equipped for action and movement situations including sports, wildlife, and bird photography.
With this new image sensor, Nikon has done away with the optical low pass filter – a choice which promises to deliver higher image resolution (though at the risk of increased moiré when capturing fine pattern details). And its high ISO capability will result in decreased digital noise in low-light situations. The new, optional 1.3x crop mode of the D7100 will allow you to use a 15 megapixel portion of the sensor to “extend” the reach of your telephoto lenses in order to get closer to the action as well as fill the active frame with the 51 Focus Points – in order to more accurately track moving subjects across nearly the full width of the frame. And the continuous shooting speed even increases from 6 frames per second (fps) to 7 fps when working in this 1.3x crop mode. Plus when capturing video using the 1.3x crop Image Area, you can choose from the additional 1080 frame size at 60i or 50i frame rates.
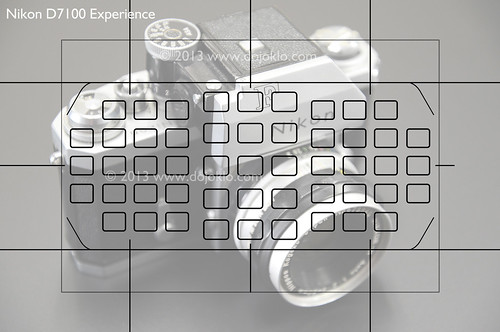
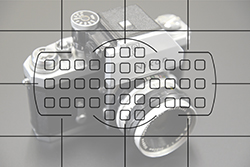
Simulated view of the Nikon D7100 viewfinder, showing the location of the 51 autofocus points, the optional grid, and the area of the 1.3x crop mode.
As with its predecessor, the Nikon D7100 is aimed at intermediate and dedicated enthusiast photographers (and dSLR beginners willing to learn!), not only with its price and build, but also with its features and accessible controls and menus. It is obviously not quite as fully-featured as the professional-level D800 or D4, yet it contains nearly every feature that the majority of “non-pro” or even semi-pro photographers will need. And its low light performance and image quality can certainly deliver professional results in most every shooting situation.
As the author of dSLR user guides, my primary interest when reviewing a camera is more with the controls, features, functions, and “real world” use – as opposed to the image quality/ sensor issues (resolution, dynamic range, noise, etc.), which I leave up to DP Review, DXOMark, and other sites to examine in depth. Although I will discuss and give examples of some of these factors in this post, I direct you these other sites to view samples/ comparison images and read detailed discussions of sensor and image quality results.
Body: Weight and Size: The D7100 is nearly identical in size and weight (765 g / 1.7 lb w/ battery) to the D7000. It is of course bigger and heavier than the mid-level D5200, but is an excellent size for the serious shooter – and pairs excellently with a wide range of lenses from a 50mm f/1.4 prime to the hefty 70-200mm f/2.8.
Body: Controls and Feel: The controls of the D7100 are very similar to the D7000, and even more similar to the D600. If you have not yet used either of those previous cameras you may be initially confused by the autofocus controls at the base of the lens, including the AF-Mode Button and the Focus-Mode Selector Switch. However, once learned you will quickly discover that they are a convenient, well thought-out set of controls for rapidly accessing and changing the various autofocus settings – even without taking your eye from the Viewfinder.
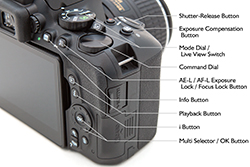
Detail of the front controls of the Nikon D7100, including the autofocus mode and area mode controls at the base of the lens.
Compared to the D7000, the D7100 adds an i Button to the rear of the camera, which is used to quickly access a variety of settings and options – which will vary based on if you are shooting stills, reviewing images, working in Live View, or in movie shooting. During shooting it allows you to access the Information Display screen where you can change a number of settings that you otherwise would have had to dig into the menus to find. This is similar during Live View and movie shooting, but accesses settings appropriate to those modes. During image playback, the i Button quickly brings up the Retouch Menu for editing and processing image files.
The placement of the zoom-in and zoom-out buttons on the rear of the D7100 has been swapped compared to the D7000, which may drive you crazy until your muscle memory is retrained. But the new rear Live View / Movie switch, the relocation of the video record button to the top of the camera near the Shutter Button, and the locking Mode Dial are welcome conveniences (which I prefer as there have been many times my Mode Dial was accidentally turned when pulling the camera out of its bag). Other than that, D7000 users should feel right at home with the controls such as the Release Mode Dial for selecting the frame rate and the Playback and Delete Buttons. And the consistency of layout between the D7100 and the D600 is a welcome move from Nikon – which hopefully continues into future models. The Multi Controller thumb-pad is responsive and precise, which is necessary when using it to select among the 51 autofocus points or to quickly navigate and change a menu settings. And the rubberized feel of the Command Dials is much nicer to the touch than the plastic feel of lower-end models.
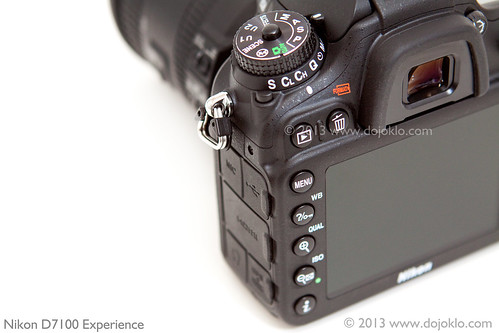
Some of the top and rear controls of the Nikon D7100, including the Release Mode and locking Shooting Mode Dials, and new i Button.
A few of the buttons along the left side of the camera perform additional functions when pressed and used in conjunction with the Command Dials. These are handy to learn and use so that you can quickly change these settings on the fly, though you will likely need to glance at the buttons to recall which function it performs. (And I would prefer that the WB, QUAL, and ISO text be a bit closer and adjacent to the appropriate button, as you can see one needs to often take a second look to see of ISO applies to the button below or above.) So, for example, the QUAL Button is pressed as the rear Main Command Dial is turned to select the Image Quality (JPEG / RAW), and it is press as the front Sub-Command Dial is turned to select the JPEG Image Size (S, M, L).
In addition to the previous customization options for the controls as found on the D7000 and D600, the D7100 offers even more custom controls. For example during image playback, the OK Button can be set up to instantly zoom in on the image at the area of focus, and you can even set the magnification level for high, medium, or low. You can set the OK Button to perform other functions during shooting and Live View, though I recommend that it be used to quickly select the center AF Point. The Fn Button and Depth of Field Preview Button can be customized to perform different functions when just pressed and when pressed and used with a Command Dial. For example, you can set one of these buttons for quick, temporary access to Spot Metering Mode or to display the Virtual Horizon in the Viewfinder. Or you can press the button as you turn the Command Dials to quickly change to 1.3x crop Image Area Mode or to activate HDR shooting and set the HDR Mode with one dial and HDR Strength with the other. Unfortunately, there are a lot of conflicts between the just Press and the Press+Dial settings which allow you to actually use only one of the options, so you will likely only be able to set each button for one function. I suggest setting the AE-L/AF-L Button to lock focus, the Fn Button to lock exposure, and the DOF Preview button to the function of your choice.
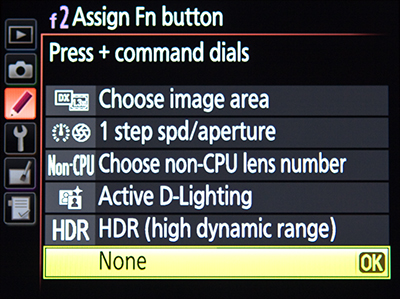
Example of one of the button customization options – assigning the Fn Button for use with a Command Dial.
The new Live View Selector switch is used to quickly choose between Live View and movie shooting, then the central LV Button is pressed to enter that mode. Again, the Movie-Record Button is now on the top near the Shutter Button.
I found the Shutter Button to be less sensitive than that of the D7100, which is a welcome change, as I often accidentally took a picture when simply trying to lock focus with the D7000 – though this change could simply indicate that I have gotten used to controlling the more sensitive button.
Overall, the body size, weight, and materials feel great and solid, and all the necessary and desired buttons and controls are in the right places. As with the D600, this results in a camera that I find a joy to use with the easy ability to access a wide variety of settings and functions.
Brief Commercial Interruption: I have written an e-book guide to the Nikon D7100, called Nikon D7100 Experience. The guide covers all the controls, functions, features, Menus options and Custom Settings (with recommended settings), autofocus system, exposure, metering, and more. Plus most importantly, it explains how, when, and why to use the various controls, features, and functions of the D7100. Click the link above or the cover to learn more, preview, and purchase the guide (available early April 2013).
Use and Response: There really isn’t too much else I can say about the D7100 in action, as it performs excellently, as expected. The autofocus response is quick and accurate in normal use, and able to lock on quickly and accurately even in dim lighting. Note that the 15 central AF Points are cross-type points, which you will want to make use of in low light and challenging focusing situations. (This means that these points look for contrast in both the horizontal and vertical orientation, and thus can more easily and quickly find contrast to focus on.) In low light, night-time scenes – such as the in-camera Multiple Exposure image and the in-camera HDR image below – the camera locked right on and focused well.

Multiple Exposure Mode of the Nikon D7100, where three images are automatically combined in-camera.
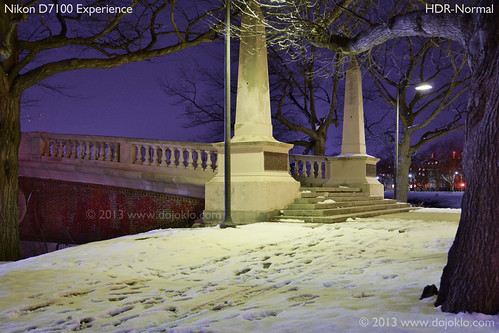
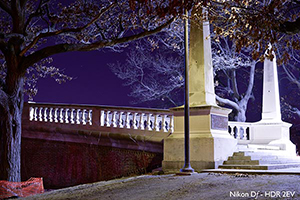
HDR Mode of the Nikon D7100, where and over-exposed and under-exposed image are automatically combined and processed in-camera, at a user defined HDR Strength setting.
Autofocus System: As with the D7000, the autofocus system of the D7100 is one of its most important features, and you will need to learn to take control of it in order to get the most out of the camera. This means choosing the appropriate Autofocus Mode and Autofocus Area Mode, depending on if the subject is still or moving. I go into detail on this in an article about Taking Control of the D7000 Autofocus System. While the D7100 of course offers 51 autofocus points rather than 39, the exact same principles apply – you simply have more AF points to help you compose the image exactly how you wish or to help you more accurately track a moving subject throughout the frame. And if 51 autofocus points are too many to deal with at first or in a specific situation, you can limit the number of selectable Focus Points to 11 in the Custom Settings menu.
I briefly did some testing of the AF system using AF-C Focus Mode for tracking moving subjects using 9-Point Dynamic Area AF Autofocus Area Mode, while shooting bursts of images in Continuous Shooting release mode. With the Dynamic Area AF modes, you select your desired AF Point to begin tracking the subject, and the surrounding points are used to help retain focus on the subject if it briefly leaves the active AF point. You can choose from either 9 additional “helper” points, 21 points, or all of them. Since I was tracking a relatively easy-to-keep-track-of running dog, I selected 9-Point. I placed the selected point on the dog, pressed the shutter button half-way to begin tracking the subject distance, then held it down as the camera took a continuous burst of shots. The camera had no trouble keeping focus on the dog as it ran about, even when it momentarily left the active point and was therefore picked up by a surrounding point.
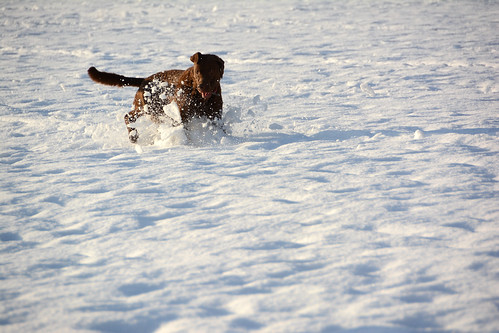
Image of running dog, making use of AF-C continuous focus mode and 9 point Dynamic Area AF to retain focus on a moving subject. (Some sharpening and exposure adjustment applied to JPEG.)

Crop of above image of running dog, making use of AF-C continuous focus and 9 point Dynamic Area AF to retain focus on a moving subject. (Some sharpening and exposure adjustment applied to JPEG.)
Functions and Features: The D7100 has all the features of the D7000, adds the newer features introduced on the D600, and offers a couple more. There is the in-camera HDR Mode, Multiple Exposure Mode, Interval Timer and Time-Lapse Photography shooting, AF Fine-Tune to microadjust the focusing of individual lenses, in-camera Noise Reduction features, and the in-camera image editing and processing features. The camera can auto bracket for exposure (or flash exposure, white balance, or Active D-Lighting) either 2, 3, or 5 shots, in EV steps from 0.3 to 2 EV – which can greatly assist those capturing shots to combine into a true HDR image. The bracketing variables are easily set with the BKT Button on the front of the camera and the Command Dials, and offers a wide range of options such as shooting all the exposures in a positive or in a negative exposure direction, rather than simply an underexposure and overexposure surrounding 0. For example, with the +3F setting, the first exposure is taken at 0 (the correct exposure), the second at +1 and the third at +2, rather than the typical bracketing sequence of 0, -1, +1.
The new addition to the D7100 is the 1.3x crop mode Image Area, which will allow you to virtually extend the reach of your telephoto lenses by using a smaller 15MP portion of the sensor. While it is basically the same as cropping your photo after the fact, it offers some advantages such as nearly filling the width of the frame with the autofocus points. This will allow you to more accurately track a moving subject throughout most of the active frame, as there will likely be an AF Point to focus on the subject no matter where in the frame the subject is located. Plus in this mode, you can increase the High Speed Continuous shooting speed to 7 frames per second. Since the APS-C sensor of the D7100 is a 1.5x crop of a full frame sensor, the additional 1.3x crop will basically double the focal length of your lens, meaning a 200mm lens will act as a 200 X 1.5 X 1.3 = 390mm lens.
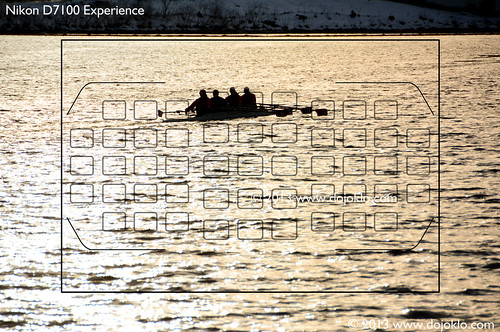
Simulated view on the Nikon D7100 viewfinder, showing the area of the 1.3x crop mode, as well as the locations of the autofocus points. Notice how the 1.3x crop extends the reach of your lens, and how the AF points then nearly fill the width of the frame when working in 1.3x crop Image Area.
As with previous models of this level, the D7100 allows you to use the built-in flash as a Commander flash, to wirelessly remotely control and trigger up to 2 groups of optional external Speedlights. The D7100 also works with a wide variety of optional accessories such as:
Nikon WU-1a Wireless Mobile Adapter which can be used to wirelessly transmit your images to a tablet or smart-phone as you shoot, share your images, or even use your smart phone or tablet to remotely release the camera’s shutter – all with Nikon’s Wireless Mobile Adapter Utility app.
Nikon GP-1 GPS Unit: Use this GPS receiver for automatic geotagging of your images including location, altitude data, and UTC time.
Nikon ML-L3 Wireless Remote Controller or WR-R10/ WR-T10 Wireless Remote Controller and Transceiver: These wireless remotes will allow you to trigger the shutter of the camera remotely, thus allowing either self-portraits or the ability to release the shutter without pressing the Shutter Button thus preventing possible camera shake. The WR set communicates via radio frequencies, and thus does not require direct line-of-sight between the camera and the remote. You can even use multiple WR-R10 receivers on multiple cameras and trigger them simultaneously with one WR-T10 remote transmitter. The new WR-1 Wireless Remote Controller will allow even greater wireless control over one or multiple cameras with their own WR-1 or WR-R10 unit.
Additional Nikon D7100 Accessories can be seen here.
Menus and Custom Settings: The Menus and Custom Settings of the D7100 allow you to personalize the camera controls and functions to work best for you and your needs and shooting style. They are a powerful set of options, and you should carefully set them up and then review them occasionally to see if they can be tweaked to better suit your current needs. For example, you can customize the size of the area metered by the camera when using Center-Weighted Metering. This can be the default 8mm circle, or else a 6mm, 10mm, or 13mm circle. You can modify the roles of the two memory card slots so that the second one acts as either overflow when the first card fills, simultaneous back-up of the first card, or JPEG on one and RAW on the other. And you can manually copy images from one card to the other. You can set the Continuous Low frame rate anywhere from 1 to 6 fps, though you may find that since Continuous High is 6 fps, 3 or 4 fps should work well. This is a wonderful option that Canon has yet to adopt on its cameras of this level. As mentioned earlier, you can customize the functions of various buttons, and there are numerous other adjustments to the controls and camera functions that you can make. I go though all of these Menu and Custom Setting options in my guide Nikon D7100 Experience, along with recommended settings for various uses.
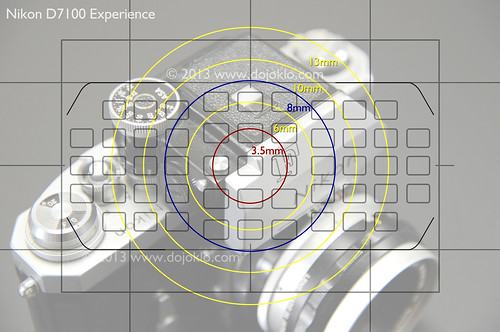
Simulated view of the Nikon D7100 viewfinder, showing the location of the 51 autofocus points, the optional grid, the area of the 1.3x crop mode, and the size of the Spot and Center-Weighted Metering circles (default 8mm with additional custom options shown in yellow).
A relatively new feature in Nikon dSLRs in the additional control over Auto ISO. If you do not wish to worry about the ISO setting and would prefer that the camera takes care of that, you can enable Auto ISO and then the camera will automatically change your selected ISO, without your expressed permission, in certain situations in order to obtain a proper exposure. For example, if you are working in Aperture-Priority Auto Mode (A) and set the ISO at 800, but based on your selected aperture and the lighting the camera does not believe there is enough light for the exposure and a realistic minimum shutter speed (that you can also set in this menu item), it will automatically raise the ISO so that the shutter speed does not become impossibly slow for hand-holding. You can tell the camera the Maximum Sensitivity or maximum ISO that the camera will use in these situations as well as the Minimum Shutter Speed that you would like the camera to automatically use. Alternately, you can choose to leave the Minimum Shutter Speed set for Auto. The great advantage of this setting is that the camera will now select an Auto ISO setting based on the focal length of the lens being used. This is helpful because longer telephoto lenses typically require faster shutter speeds to prevent hand-held camera shake (which will result in blur). In addition, if you find when using this Auto setting for the Minimum Shutter Speed that the camera is still selecting shutter speeds that are slower than you wish (and thus possibly causing blur due to camera shake), you can use this menu to fine-tune this setting and instruct the camera to select a faster Auto shutter speed. So as you can see, it becomes much more viable to make use of the Auto ISO setting of the D7100 and you can still rely on the camera to not alter the settings beyond your desired parameters.
There are a couple functions that will be greyed-out in your menus if you have a certain conflicting setting option set. For example, some features will not be available (like HDR Mode) if you have the image quality set for RAW or JPEG+RAW. You will have to switch to JPEG only in order to access these features. This is bound to aggravate you at first as you try to determine why the function is greyed-out and not accessible in the menus.
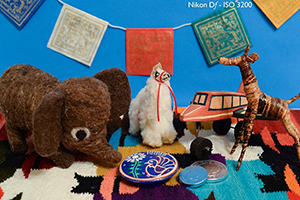
Image Quality: I am not a pixel peeper but rather more of the “just get out there and shoot” variety, and I believe that most all the current consumer cameras – including the D7100 – offer more than enough in terms of image quality and low noise for most every photography from enthusiast to semi-pro. So I will leave it up to DP Review, DXOMark, and other sites to evaluate the image quality and sensor performance. I have shot some informal ISO tests, which can be viewed on Flickr, such as the image below:
Video: As noted above, the D7100 offers all the usual frame sizes and rates, including now 1080 frame size at 60i or 50i frame rates when working in the 1.3x crop mode. It has a built-in stereo microphone plus the ability to use an optional external mic, and offers manual audio control. As with all Nikons, there is manual control over the exposure settings, but you have to set the aperture before going into Live Mode movie shooting. The D7100 now offers a headphone jack for monitoring audio and you can control its volume. As noted above, you can use the new i Button to quickly access and change various video related settings before starting to record.
Conclusion: Overall I found the D7100 to be an excellent camera in all areas: handling and feel, build, features, use, controls, and image quality. It is an excellent value for the price, and offers all the controls and features (and then some) that most any enthusiast or semi-pro photographer would need in most any shooting situation. There really aren’t any shortcomings to this camera (unless the lack of an anti-aliasing filter will affect the types of photos you take). My only minor gripes are the labeling of the left-rear buttons that I mentioned, and the long, scrolling menus that Nikon uses. I definitely prefer the additional menu tabs of the Canon menus that eliminate scrolling menus.
The D7100 should meet or exceed the needs of dedicated enthusiasts shooting any type of images – landscape, portraits, travel, low-light, etc., and is particularly well suited for action, wildlife, and sports photography due to its wide array of 51 autofocus points, fast shooting speed, and 1.3x crop ability to extend the reach of your telephoto lenses. Its sensor, image quality, and capabilities will certainly provide anyone with the potential to not only take professional quality images, but in most situations to capture exactly the image you intend. And that, in the end, is one of the top goals of photography!
Weeks Bridge in Cambridge, Mass., taken with the Nikon D7100.
Sample Images: More of my sample images from the D7100 can be seen on Flickr here:
http://www.flickr.com/photos/dojoklo/sets/72157632977605494/
Manual: To quickly learn all the essential and important features of the camera, how to set up the menus and Custom Settings, how to take control of the autofocus system and metering modes, and learn how, when, and why to use the various controls, features, and functions of the Nikon D7100, have a look at my e-book guide Nikon D7100 Experience. Click the link or the cover to learn more, preview, and purchase the guide (available early April 2013).
Purchasing the D7100: If you are going to be ordering your Nikon D7100 online, please consider using my affiliate links below or on the left side of the page (Amazon, B and H). Your camera (or other gear) will be the same price, but they will give me a small referral bonus – thanks!
Nikon D7100 on Amazon (body only or with 18-105mm f/3.5-5.6 kit lens)
Nikon D7100 on B and H (body only)
Nikon D7100 on B and H (with 18-105mm f/3.5-5.6 kit lens)
If you enjoyed this post, please be sure to share it, mention it, or link to it!