The First Nikon D850 guide, Now Available!

Nikon D850 Experience, my latest Full Stop e book and the first D850 user’s guide, is now available! This e book goes beyond the manual to help you learn the features, settings, and controls of the powerful, versatile, and highly customizable Nikon D850. Plus most importantly it explains how, when, and why to use the functions, settings, menu options, and controls in your photography – including the sophisticated autofocus system with its Group-Area AF mode, the Highlight-Weighted metering mode, the touch screen, customizable buttons and Sub-Selector control, plus UHD 4K video and several video improvements. It covers the new features of the camera such as Focus Shift Shooting for focus stacking, Negative Digitizer for creating positive images from film negatives, Bluetooth connection via Nikon’s SnapBridge app, and completely silent shooting modes.

Nikon D850 Experience book manual how how to use tips tricks

Written in the clear, concise, and comprehensive style of all Full Stop dSLR guides, Nikon D850 Experience will help you learn to use your full-frame D850 quickly and competently, to consistently make the types of images you desire. This e-book is available in either PDF or EPUB format for reading on your computer, tablet, iPad, e-reader, etc.

As one reader has said about Full Stop guides,

“I don’t know how I could fully take advantage of all the features the camera has to offer without this publication! It’s well-organized, easy to understand, and succinct enough to keep your attention while still containing a wealth of information to get the most out of your camera.”

Take Control of your Nikon D850 with this Clear and Comprehensive User Guide!

E-Book Format: Available in two instant-download formats to choose from. (Learn more about the differences of these two formats, later on this page).

Buy Now with PayPal or Credit Card!

Buy Now with PayPal or Credit Card!

This guide is designed for both intermediate and experienced photographers:

For Intermediate / Enthusiast Photographers: This instant download Nikon D850 Experience user guide is designed to help you take fuller advantage of the capabilities of your camera. It covers standard dSLR camera functions and exposure concepts for those learning digital SLR photography, and explains more advanced camera controls and operations for experienced enthusiasts.

-Go beyond Program mode and shoot competently in A, S, and M shooting modes.

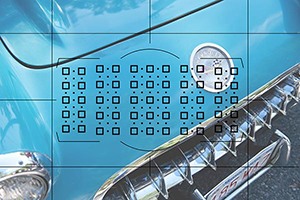
-Take full advantage of the sophisticated 153 point autofocus system and its Focus modes, AF-area modes, and Custom Settings – for sharp focus of still or moving subjects.

-Set up your camera with clear explanations and recommended settings for all Menu options and Custom Settings of the D850.

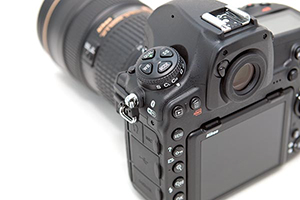
-Learn how, when, and why to use and customize the controls, buttons, touch screen, and features of the D850 to best fit your shooting needs.

-Understand the various metering modes, exposure compensation, and exposure lock for correct exposure of every image, even in challenging lighting situations.


For Experienced Photographers coming to the D850 from previous Nikon models, this Nikon D850 Experience user guide explains the new and advanced features in order to quickly get you up and running and taking advantage of these capabilities, including the advanced 153-point Autofocus System and all its AF Modes, AF-Area Modes, and Custom Settings, for capturing both still and moving subjects. It also covers back-button focusing and trap focus techniques with the D850, the Group-Area AF mode, and newly added subject-tracking parameters. Plus it explains the camera controls and how to customize them for your shooting needs, features such as Highlight-Weighted Metering Mode, Focus Shift Shooting, Negative Digitizer, and the HDR, Multiple Exposure, and Time-Lapse Shooting features.

The guide also introduces the HD and 4K UHD video features and settings, and guides you through all the Playback, Shooting, and Setup Menus, Custom Settings, and Movie Mode Menu settings of the D850 in order to help you best set up the camera and its controls for your specific shooting needs, and includes the helpful, comprehensive Nikon D850 Menu Setup Spreadsheet created by the author.

You can preview Nikon D850 Experience user guide at the following link. The preview shows the complete Table of Contents and excerpts from the Introduction, Menu Settings section, Custom Settings section, and Autofocus section.

IMPORTANT NOTE to Mozilla Firefox browser users: the current built-in PDF viewer in Firefox may not work well and may cause the PDF preview to appear in a low resolution. Please download and/ or view the PDF preview with Adobe Acrobat Reader to see the proper, full resolution.

Click here to Preview Nikon D850 Experience

   Nikon D850 Experience book manual guide

Nikon D850 Experience not only covers the various settings, functions and controls of the Nikon D850, but most importantly it also explains when and why to use them for your photography. The guide focuses on still-photography with an introduction to the movie functions, settings, and menus to get you up and running with HD and 4K UHD video. Sections include:

-Setting Up Your D850 – All of the D850 Custom Settings and Playback, Shooting, and Setup Menus, including Movie Mode Menus, with explanations and recommended settings for practical, everyday use. Set up and customize the advanced features of your dSLR to work best for the way you photograph. Plus a free link to the D850 Menu Setup Spreadsheet for assistance and reference.

-Aperture Priority (A), Shutter Priority (S), and Manual (M) Modes – How and when to use them to create dramatic depth of field, freeze or express motion, or take total control over exposure settings.

-Auto Focusing Modes and Area Modes and Release (Drive) Modes – The new 153-point D850 autofocus system is a powerful tool, and taking control of it will enable you to successfully capture more sharp images, in both still and action situations. Learn the AF Modes, AF Area Modes, and AF Custom Settings including the subject-tracking options, how they differ, how and when to take advantage of them to capture both still and moving subjects. Plus how and when to use focus lock and back-button focusing.

-Exposure Metering Modes of the Nikon D850 – How they differ, including the new Highlight-Weighted Metering Mode, how and when to use them for correct exposures in every situation, and how to customize them for your needs. Plus how to make use of exposure lock.

-Histograms, Exposure Compensation, Bracketing, and White Balance – Understanding and using these features for adjusting to the proper exposure in challenging lighting situations, and customizing the controls for easy access to these features. Plus making use of the new Auto White Balance options, and setting a custom white balance.

-The Image Taking Process – Descriptive tutorials for using the settings and controls you just learned to take photos of both still and moving subjects.

-Introduction to Video Settings – Settings and explanations to get you started shooting HD and 4K UHD video.

-Photography Accessories – The most useful accessories, including those specific to the D850.

-Lenses – Nikon (Nikkor) lenses compatibility with the D850, and explanations of Nikon lens notations.

-Composition – Tips, techniques, and explanations, including the creative use of depth of field.


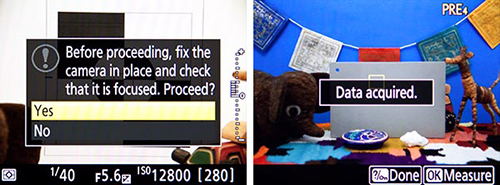
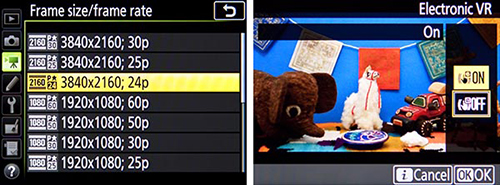
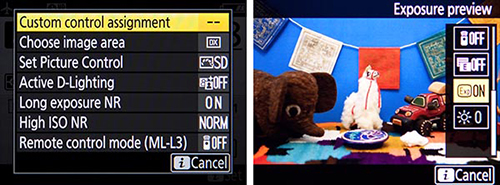
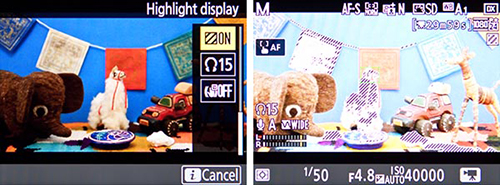
This 465 page Nikon D850 Experience user guide is a digital e-book, illustrated with over 350 images, diagrams, and screen shots. It goes beyond the manual to clearly explain how, when, and why to use the features, settings, and controls of the Nikon D850 to help you get the most from your camera.

Title: Nikon D850 Experience
Author:
Douglas Klostermann
Page Count: 465 pages, illustrated
Price: $14.99 – Now Available!
E-Book Format:
Available in two instant-download formats to choose from:

Buy Now with PayPal or Credit Card! PDF format for reading on your computer or printing on your printer using the latest version of Adobe Reader. Or transferring and reading on some e-readers and most tablet devices. PDF is the most versatile format. Instructions for transferring a PDF to an iPad or e-reader device are on the FAQ Page. (Please note that the PDF security settings may prevent transfer to a Kindle or Playbook. Please contact me for a MOBI or EPUB version if you encounter this issue with your PDF on your e-reader device/ tablet.)

Buy Now with PayPal or Credit Card!EPUB format for reading on a Nook, Sony Reader, other e-reader device, or on the iPad using iBooks. Or on an Android tablet (Galaxy, Xoom, Playbook, etc.) using an ePub reader app such as the free OverDrive Media Console. Or viewing on your computer with free Adobe Digital Editions software. (EPUB not able to be printed on your printer.) If you are unable to transfer or read the EPUB on your Kindle, please contact me for a MOBI format version of the book.

MOBI format for Kindle – please contact me.

Over 95,000 readers in more than 75 countries are taking control of their cameras and improving their photography with Full Stop e book camera guides!


What Readers are Saying about Doug’s previous guides, including Nikon D750 Experience and Nikon D7100 Experience:

A well written, professional helpful guide – Brilliant, just what I was looking for! A manual that was exciting, clear to follow, had examples and was used by a professional who gave just the right amount of technical info with explanations of why you use those settings, when to use those settings and so on, all properly explained. The book is a revelation, a joy to follow, well thought through and well written. Nikon should be employing Doug to write every one of their cameras manuals.
-R.D.C.

All You Need – This book, together with the manual that came with your camera, is all you need to start discovering the full potential of the camera.
-Max M.

It is like I have a personal instructor on-call! I have learned so much about this dSLR and continue to learn more each time I review various sections.
-John C.

Excellent. I use this book the most! I bought several books, paperback and Kindle, after buying the D750 and have noticed I use this book by far the most. I recommend this book without reservation.
-D. Cardona

Really practical and tremendously helpful. Readers of this e-book can expect to benefit from a more rewarding photographic experience using this superb camera, and be better able to exploit its potential to match their personal objectives and photographic style. Highly recommended.
-M.M.

This manual is a clearly written, concise and useful explanation of the rationale for the seemingly infinite and often confusing settings options for the camera. Used in conjunction with the Nikon manual I feel more confident in understanding how to at last proceed in getting better photographs.
-W.L.S.

This is the most helpful manual I’ve ever used. There is no comparison to the book Nikon includes with the camera, this book outshines it completely. No serious user should be without this. I find myself referring back to this book quite often and find it very easy to find what I need and even easier to understand.
-S.B.

Better Than the Manual – Douglas Klostermann has done a great job of not only producing a very accessible guide but he also offers very useful and sensible suggestions for getting the best results from the camera. Reading the guide was like one photographer talking to another. Thanks Doug.
-Malcolm

I would recommend this to anyone who wants to get a quick start to using the camera. Manuals are nice, but this eBook highlights the important information and gives a quick, easy to understand explanation of most all of the functions and controls.
-Ray M.

It’s clear, concise and gets to the heart of the camera’s multiple and often confusing options. Very highly recommended – for experienced user and beginner alike.
-G.S.A.

Amazing – Mr. Klostermann has done an amazing job with this book. He’s outlined every detail, option, feature, and use of this camera possible, and actually surpasses the expectations of use of the camera. I moved from an old SLR to a modern full frame digital SLR, and found it to be more than I expected. This book really helped me come more to grips on what I was doing wrong. Not to mention the fact that this book, at the price you pay, is a steal. If you have a Nikon, I HIGHLY recommend you buy this book!!!
-Jacob King

Valuable Resource and Time Saver – If you’re contemplating purchasing this book I would recommend doing so without hesitation. Not only are the explanations behind the individual settings enlightening but the general theory on auto-focus and its associated uses is among some of the easiest to understand that I’ve come across. Definitely a good investment. As a result of his thoroughness, my confidence in being able to use a new piece of equipment soared. Additionally, the time required to figure out the differences between my previous camera and my new purchase was reduced sharply.
-Bryan L.

Really focuses on the WHY – I found the Nikon manual good for understanding how to set things up but not much on the why – this book really focuses on the WHY. The guide helped me understand why to use specific settings for specific needs. The Custom Settings sections helps to make firm decisions on how to apply settings by understanding the usage of each in addition to knowing how to set them up.
-Benoit A.

More than a Guide – I am a passionate photographer and cinematographer. Not only did I find Doug Klostermann’s guide well written and informative, but I really enjoyed the manner in which he shared his image-making philosophy. This is much more than a camera guide and I really appreciate the links to other authors found throughout the text as well as the chapter on suggested photography accessories.
Simon Wilkie

A Very Easy to Read but Detailed Guide – I have just bought this camera, and whilst I have been using digital SLRs for years i realize that I am not really getting the full potential out of all those buttons. Now I understand and use them.
-G.F.

Great Source of Information! – I have been a Nikon user for decades and was of the view that I was very knowledgeable about these products. Still, once I started working with the camera I concluded that there was a good deal that was still to be learned. This book provided me with the information required, and has proven to be a very valuable resource: well set out, a comprehensive Table of Contents, and well written. The personal preferences and setting recommendations are most helpful. Job well done!
-T. E. Valentine

New and Hidden Features of the Nikon D7500

Introduction to the New and Hidden Features of the Nikon D7500

If you are a user of a previous Nikon dSLR and upgraded to the Nikon D7500, and you are already familiar with the typical features, functions, and controls, you will want to become familiar with the various new and improved features of the camera. Here is a summary of what has been added, changed, or improved with the D7500 compared to the D7200 and other previous Nikon models. Some of these features were included on the D7200, but may be unfamiliar to those coming from an earlier or different Nikon model.

The D7500 also contains a few “hidden” features. It is not that they aren’t explained in the Nikon manual, however then can be difficult to locate when using the camera since they aren’t directly accessed with a button or with a menu item. Several of them are accessed via the i Button and i Button Menus, which vary with the current camera function (viewfinder shooting, Live View shooting, image playback, etc.). Or some of these items must be assigned to a specific button using the Custom Settings.

All of these new and hidden features and items are explained in more detail in my Nikon D7500 Experience user guide to the camera, from which this material is based on.

Nikon D7500 body controls buttons touch screen monitor tilting dial

Figure 1 – The Nikon D7500 dSLR.

-Articulating Touch Screen Monitor – The large 3.2” high-resolution (922K-dot), tilting, touch-screen LCD Monitor can be color customized with the Monitor Color Balance item of the Setup Menu. The touch screen capability allows you to view, zoom, and scroll through playback images, enter text with the on-screen keyboard, as well as select an autofocus area and Spot White Balance area when working in Live View, and to release the shutter in Live View (Touch Shutter). The “Frame Advance Bar” for image review enables you to use the touch screen to quickly scroll through images without having to swipe one-by-one.

Figure 2 – Use the tilting rear monitor to help take photos from low or high vantage points.

-Expanded Native ISO Sensitivity Range – The ISO range is expanded to include ISO 100 to 51,200. This can assist photographers with decreased noise at higher ISO settings. Additional ISO settings down to 50 and up to the excessively noisy 1,640,000 can also be used.

Figure 3 – Left: The ISO Sensitivity Settings and Auto ISO options. Right: Selecting the Minimum Shutter Speed the camera will use with Auto ISO, including the “Auto” option which will be based on the lens focal length.

-Auto ISO – As with other current Nikon models, the D7500 offers a powerful Auto ISO option, which will change the ISO setting if necessary in order to obtain a proper exposure. You can set the parameters of Auto ISO, including the Maximum Sensitivity and Minimum Shutter Speed that the camera will use for Auto ISO, as well as the new Maximum sensitivity with flash option (see Figure 3 – left). One powerful option is that if you set the Minimum Shutter Speed to its Auto setting, the camera will select a minimum shutter speed based on the focal length of the lens (see Figure 3 – right). For example, a longer telephoto lens requires a faster shutter speed to avoid blur from camera movement. But, if you are unhappy with the settings that the camera is choosing, you can continue to press right in the Minimum Shutter Speed > Auto setting, and access the option to fine-tune this setting so that the camera selects a faster or slower Auto shutter speed. And in the new Movie Shooting Menu, you can also set the Auto ISO parameters separately for movie shooting.

-Group-Area AF Area Mode – A group of five AF Points, configured in a cross-shaped pattern, can all be used together to help focus on a subject, in situations where using a single AF Point may not work as well (see Figure 4).

Figure 4 – Group Area AF Area Mode, where five AF Points work together to focus on a subject. The central point of the group is also active, but not seen in the Viewfinder. 

-Highlight-Weighted Metering Mode – This Metering Mode helps to prevent the overexposure of highlights, such as a subject under bright stage lighting, particularly in situations with moving subject where Spot Metering becomes impractical.

Flicker Reduction – With this new anti-flicker option, the camera will detect the flickering of certain types of lighting often found in stadiums and arenas, and will adjust the timing of the shutter release in order to maintain more consistent exposures.

Electronic Front-Curtain Shutter – This feature, found in Custom Setting d4, can help to reduce camera vibrations and thus potential blur in controlled situations such as landscape and macro shots (see Figure 5 – left). It is used with the Mirror Up (Mup) Release Mode during either Viewfinder or Live View shooting. With the high resolution 20.9 megapixel sensor of the D7500, these slight movements can become more apparent in images.

Figure 5 – Left: Custom Setting d4, to enable the Electronic Front Curtain Shutter feature used with Mirror-Up release mode. Right: Picture Controls menu, including the new Clarity setting as well as the ability to adjust the settings in 0.25 increments.

Picture Controls – The D7500 offers the Auto Picture Control where the camera will determine the best settings, though the Auto setting can also be slightly adjusted by the user. The camera also includes the recent Flat Picture Control, which is desired by videographers as it provides the greatest latitude for post-processing, by helping to retain details in both highlights and shadows. It can also be used for still images that are going to be heavily processed. Also, the Picture Control options include a Clarity parameter, and the Brightness adjustment allows a wider range. The parameters allow finer (0.25 step) adjustment increments, as well as an Auto option for each parameter (see Figure 5 – right).

Figure 6 – Left: Simultaneously press the AF Mode Button and Movie Record Button to perform the Autofocus Auto Fine-Tune procedure when in Live View. Right: The Live View Spot White Balance feature, in use.

Auto AF Fine-Tune – The Autofocus Auto Fine-Tune feature will enable you to use Live View focusing to automatically fine tune the autofocusing of individual lenses, to correct for back-focus or front-focus issues. The data acquired by the process is entered into the AF fine-tune item of the Setup Menu, and registered for the attached lens. The procedure involves autofocusing in Live View and then simultaneously pressing the AF Mode Button and Movie Record Button to perform the process (see Figure 6 – left).

White Balance Improvements – The D7500 offers two Auto White Balance options, including Normal and Keep warm lighting colors which will preserve the warm glow created by incandescent bulbs and add a warmer touch to outdoor photos. You can now store up to six Preset (PRE) White Balance settings, as well as make use of the Live View Spot White Balance measurement feature (which was also available on the previous D7200), (see Figure 6 – right). The Live View Spot White Balance feature enables you to take a white balance measurement of a precise area of the scene when working in Live View.

White Balance Color Temperature Selection – When making use of the K – Choose Color Temp White Balance Setting, you can select the desired color temperature in the White Balance menu item, or you can quickly adjust this setting during shooting by pressing the WB Button and turning the front Sub-Command Dial while viewing the setting on the top Control Panel or on the Live View Screen. If you wish to directly enter a value, you can press the WB Button and use the Multi Selector to select and change the digits, again either on the top Control Panel or on the Live View screen.

Auto Exposure Bracketing – Either 2, 3, 5, 7, or up to 9 shots can be automatically taken when bracketing, at increments of 0.3 EV, or up to 3 EV increments.

Batch Processing for NEF (RAW) images – In-camera batch processing is now possible, using the new options in the NEF (RAW) Processing item of the Retouch Menu. These options give you the ability to select and simultaneously process multiple individual images, using the same processing settings. Or you can use the Select date option to process all images taken on a certain date, or Select all images to process all images on the memory card (see Figure 7 – left).

Figure 7 – Left: The NEF (RAW) Processing menu, including the options to batch process multiple images by selection, date, or all images. Right: Selecting images to be transferred to a smart device, as soon as a wireless connection is made between the camera and the device.

Bluetooth and Wi-Fi – Used in conjunction with Nikon’s SnapBridge app, these wireless connections between the camera and a smart device can be used to remotely control the camera, share GPS information from the phone to the camera, and to transfer images to the device (see Figure 7 – right).

New Menu and Custom Settings Options – In addition to the above improvements, the D7500 offers several new options in various menu items and Custom Settings. These include new Multiple Exposure overlay options of Add, Average, Lighten and Darken, which will allow you to further process multiple exposure images, and Exposure Smoothing options for Interval Timer and Time-Lapse shooting to help maintain consistency among the individual exposures.

Figure 8 – Left: Selecting one of the Ultra High Definition, 4K video Frame Size / Frame Rate options. Right: Enabling the Electronic Vibration Reduction feature for movie shooting.

Video – The D7500 now offers Ultra High Definition 4K video (3840 x 2160) at 30p, 25p, and 24p frame rates (see Figure 8 – left). Although note that when recording at 4K, the camera will make use of a smaller 1.5x cropped Image Area and not the entire width of the frame. The camera also offers Full HD video (1920 x 1080) at all the typical frame rates (60/50/30/25/24p). Plus the camera offers new Electronic Vibration Reduction to help stabilize the scene when hand-holding (see Figure 8 – right), and the Active D-Lighting option for full HD recording. The D7500 includes the Highlight Display “zebra stripes” feature for viewing highlights and potentially overexposed areas, a built-in stereo microphone, simultaneous recording to an internal memory card and external recorder, selectable audio frequency range (the standard Wide range or the narrower Voice range), and Auto ISO during Manual (M) Exposure Mode for smooth exposure transitions while retaining the desired aperture and shutter speed settings. The new Power Aperture feature will allow you to smoothly adjust the aperture setting while recording. There is also a new Movie Shooting Menu tab, where you can easily access most all of the movie settings, as well as set some of them independently from the similar settings used during still photography, such as the Picture Control and White Balance.

i Button – The D7500 also includes the i Button, (also present on the previous D7200), which is used to quickly access context-appropriate settings that will differ for Viewfinder shooting, Live View, Movie, and image playback. Pressing the i Button when shooting will allow you to access and change several settings via the i Button menu, such as Choose image area, Active D-Lighting, and High ISO Noise Reduction (see Figure 9 – left). The Custom control assignment option will allow you to assign your desired function to various camera buttons including the Fn1 Button, Fn2 Button, and AE-L/AF-L Button. When working in Live View, you can press the i Button to access and adjust settings such as the Image Area, Image Quality, Picture Controls, Exposure Preview, and Live View Monitor Brightness (see Figure 9 – right).

Figure 9 – Press the i Button during Viewfinder shooting (left), or when in Live View (right), to access the applicable i Button Menu screen.

Live View Exposure Preview – When working in Live View, press the i Button to enable the Exposure preview item (see Figure 9 – right), which will display the Exposure Indicator scale on the screen, and the brightness of the screen will reflect the current exposure settings rather than simply showing the scene at an optimal brightness level. This will allow you to better preview the resulting image and make exposure adjustments.

i Button in Movie Live View – Some “hidden” features can be accessed with the i Button when working in Movie Live View. The “zebra stripes” feature is accessed with the Highlight Display item of the i Button menu (see Figure 10). This will display diagonal lines on the screen at potentially over-exposed areas of the scene, thus helping you to adjust to the proper exposure. You will also need to press the i Button if you wish to adjust the Movie Live View Monitor Brightness and the Headphone Volume if monitoring the audio with optional headphones. The i Button will also access the Multi-selector power aperture feature, where you can press up or down on the Multi Selector to smoothly adjust the aperture setting while recording. Power aperture can also be assigned to the Fn1 and Fn2 Buttons using Custom Setting g1. The new Electronic Vibration Reduction can also be accessed via the i Button, or by using the Movie Shooting Menu.

Figure 10 – The Highlight Display (zebra stripes) video feature, to check for overexposure, is accessed via the Movie Shooting i Button Menu.

Flash Information Screen – With the built-in flash, or with an optional Speedlight flash attached and turned on, press the Info Button twice to access the Flash Information Screen showing the current flash settings, and then press the i Button to view and change the various settings and options, including Wireless Flash Options (see Figure 11).

Figure 11 – When using the built-in flash or an optional Speedlight flash, press the Info Button twice to access the Flash Information Screen showing the current flash settings (left), then press the i Button to view and change the various settings and options (right).

Camera Controls Assignments – A few other “hidden” features of the Nikon D7500 can only be accessed by customizing one of the camera buttons to assign it to that function. For example, you can make use of the Viewfinder Virtual Horizon, which is a camera level that you can display in the Viewfinder. It will show an electronic level along the bottom of the screen as well as one on the right side, so that you can see both pitch and roll of the camera body. In order to use this feature, you need to use Custom Setting f1 to assign either the Fn1 Button or Fn2 Button to the Viewfinder Virtual Horizon option. You can also assign the Fn1 or Fn2 Button to the 1 Step Speed / Aperture setting, which will allow you to quickly change the shutter speed or the aperture setting in 1 EV (full stop) increments, rather than the typical 1/3 EV adjustments that are made when you turn Command Dials. Another handy customization will allow you to press and hold the Fn1 Button or Fn2 Button to temporarily switch to a different Metering Mode (see Figure 12 – left).

Figure 12 – Left: Assigning the Fn2 Button to temporarily switch to a different Metering Mode. Right: The OK Button has been customized to display a large histogram, when pressed during image playback.

One Button Playback Zoom / Histogram – Using Custom Setting f2, you can assign the OK Button so that during image playback it will immediately zoom-in, at the magnification level of your choice (including 100% zoom), centered at the area of the active focus point so that you can closely inspect your image. Or you can instead assign the button press to display a large histogram with the image, so that you can evaluate your exposure (see Figure 12 – right).

Figure 13 – Left: Frame Advance Bar – Touch the bottom of the Monitor touch screen during image playback, and use the Frame Advance Bar to quickly scroll through multiple images. Right: Quick Crop – Magnify an image during playback and adjust to the desired framing, then press the i Button and select the Quick Crop option to crop the image and create a new image that is cropped to the framing shown on the Monitor.

Playback Scroll and Playback Zoom Cropping – Other “hidden” playback features include the ability to quickly scroll through multiple images using the touch screen, and a Quick crop feature. When viewing an image during playback, touch the bottom of the Monitor and the Frame Advance Bar will appear. Move your finger left and right to quickly scroll trough multiple images (see Figure 20 – left). To make use of the Quick crop feature, zoom-in on an image during playback, use the Multi Selector or touch screen to adjust the framing of the image as desired, and then press the i Button (see Figure 13 – right). Choose the Quick crop option, which will crop the image and create a new image that will be cropped to the framing currently shown on the Monitor.

All of the other features, menu items, Custom Settings, and controls of the Nikon D7500 are explained in my clear and comprehensive guide to the camera, Nikon D7500 Experience. Also be sure to have a look at my free D7500 Setup Guide Spreadsheet, to help you set up the Photo Shooting Menu items and the Custom Settings of the camera.

Nikon D7500 book manual guide how to use learn tips tricks setup setting quick start