Nikon Z8 Experience User Guide Now Updated for Firmware 2!

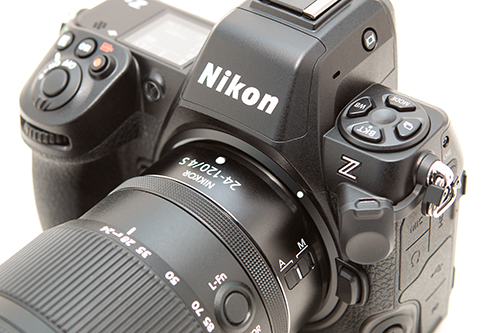
My latest Full Stop e-book, Nikon Z 8 Experience  user guide to the Nikon Z8 mirrorless camera has been fully updated for the changes and additions of camera Firmware 2.00! This e-book goes beyond the manual to help you learn the features, settings, and controls of the powerful and highly customizable Nikon Z 8. Plus most importantly it explains how, when, and why to use the functions, settings, menu options, and controls in your photography.

Nikon Z8 Experience book manual guide how to tips tricks field guide quick start Firmware 2 2.0 2.00

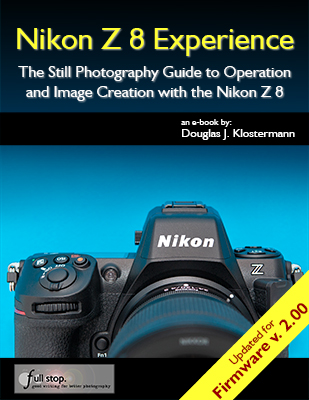
You can learn more about this Nikon Z8 guide, view a preview, and purchase it here:

www.fullstopbooks.com/nikon-z-8-experience/

Here is a summary of the Firmware 2.00 updates, which have all been incorporated into the Nikon Z 8 Experience book:

In February of 2024, Nikon released a Firmware 2.00 update for the Z 8. This firmware includes significant additions and changes to the camera, and borrows features from the flagship Z 9 and the Z f models. These include bird subject detection, Auto Capture to set up the camera to automatically capture images based on specific parameters, and new Picture Controls for stills and video. The update also adds Pixel Shift Shooting to create up to a 180 MP image from several exposures, new shutter sound options, and more options for customizing the camera controls. The performance of 3D-Tracking AF-Area Mode has been improved for certain situations including small, fast-moving subjects. Additional video options include new Slow-Motion Video, Low ISO settings for N-Log video, and changes to Hi-Res Zoom speeds.

Nikon has created a Supplementary Firmware Update Manual that includes all these Firmware 2.00 changes. This document and the file with the latest firmware can be downloaded here:

https://downloadcenter.nikonimglib.com/en/products/616/Z_8.html

The firmware changes have been incorporated into the text of this book in the appropriate sections.

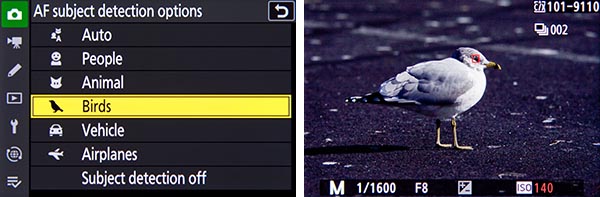
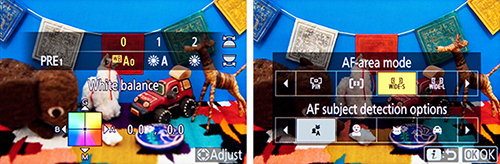
Left: The new Birds option in the AF Subject Detection Options. Right: The camera detected a bird, and placed the autofocusing frame at its eye.

Still Photography: Subject Detection now includes the Birds option. The camera has added new Bracketing increments such as 1.3 and 1.7, three new Picture Controls including Flat Monochrome,  Deep Tone Monochrome, and Rich Tone Portrait, and the Large size option for the JPEG (HEIF) Primary – JPEG (HEIF) Secondary recording. Additions also include Pixel Shift Shooting for creating high resolution images, and Auto Capture where you can set up the camera to automatically capture an image based on subject type, motion, and distance. Pre-Release Capture will now buffer for up to 300 seconds when the shutter button is half-pressed, and new shutter sound options have been added.

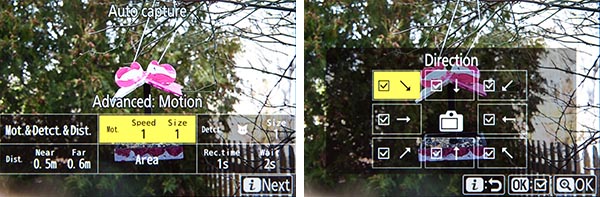
Left: The new Auto Capture feature and its various options. Right: Selecting the desired subject Direction for Auto Capture.

Video Recording: Subject Detection now includes the Birds option, and the camera has added three new Picture Controls, Auto Capture, Slow-Motion Videos, and a change in color for the Hi-Res Zoom in-focus display. Low ISO sensitivity settings for N-Log video have been added (down to 200 ISO equivalent), as well as changes to the Hi-Res Zoom speed options.

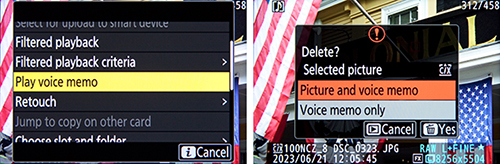
Playback: In the Playback i Menu the behavior of the Select for Upload option has changed. Select for upload will now mark an image for transfer and place it in the upload queue, and Select for Priority Upload will mark an image for immediate upload to a computer or FTP. Playback Speed has been added to the Video Playback i Menu. In the Playback Menu, Series Playback now includes Auto Series Playback Options such as loop, delay, and speed, and the Auto Image Rotation item has been added for playback.

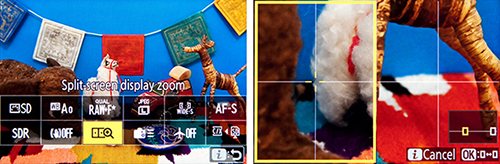
Controls: Support for Power Zoom has been added for PZ lenses, including the ability to customize controls such as the Zoom-in and Zoom-out Buttons or the Fn1 and Fn2 Buttons to operate Power Zoom. The size of the Focus Point Border Width can be changed for the Focus Point Display, so that it can be more easily seen. Exposure Delay Mode has been added to delay shutter release up to 3 seconds after pressing the shutter. A Half-Press to Cancel Zoom (MF) option has been added so that a zoomed-in view of the displays will be cancelled by half-pressing the Shutter Button, and the full view of the frame can be seen before capturing an image when manually focusing. If a button has be assigned to the Recall Shooting Functions (Hold) option, exposure compensation and white balance can now be changed while shooting, and the new setting will be retained by the recall function.

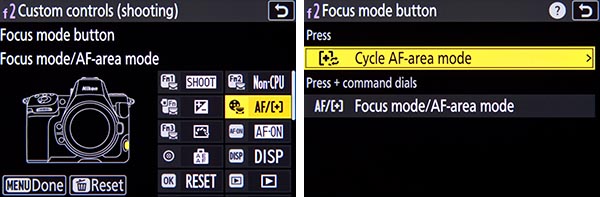
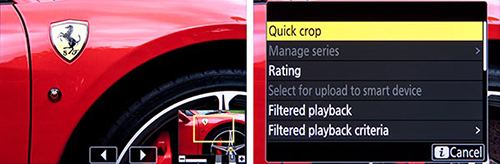
Left: Additional buttons can now be customized, including the Focus Mode Button, Playback Button, and BKT Button. Right: The new Cycle AF-Area Mode option, which can be assigned to the Focus Mode Button or various other buttons.

The Playback Button, BKT Button, WB Button, and Focus Mode Button can now be customized for shooting, and a few new options are available for the customizable controls including Switch Eyes, Cycle AF-Area Mode, Pixel Shift Shooting, Power Zoom, and Exposure Delay Mode. The Cycle AF-Area Mode option can be used to select, for example, three of your most commonly used AF-Area Modes, and then quickly cycle through them with the press of a button. For image playback, several controls can now be customized including the Playback Button, ISO Button, Exposure Compensation Button, BKT Button, WB Button, and Lens Fn and Fn2 Buttons. Some new roles are available for playback controls, including Frame Advance Zoom Position and Playback Zoom Face Selection. If a button has been customized for shooting, video, or playback, you can now reset it back to the default setting by pressing the delete button.

When formatting a CFexpress memory card using the Format Memory Card item of the Setup Menu, the procedure has changed for selecting a Quick Format or Full Format, with the Delete Button now used for a full format. The Non-CPU Lens Data menu item now allows you to add a name to a registered lens, as well as manually enter in a specific focal length and maximum aperture. When entering IPTC information, the character limit for the Category entry is increased to 256 characters, and new options have been added to the Setup Menu > Camera Sounds item, including 5 types of shutter sounds.

Displays: Previously the shooting display could be magnified up to 200%, and that has been increased to 400%. The Finder Display Size (Photo LV) menu item has been changed to Viewfinder Display Size, and applies to photo and video shooting. A Distance Units item has been added to the Setup Menu, to select Meters or Feet for the manual focus distance display.

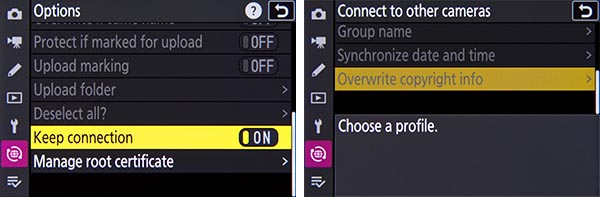
Left: The new Keep Connection option for the Connect to FTP Server function. Right: The new Overwrite Copyright Info option for the Connect to Other Cameras function.

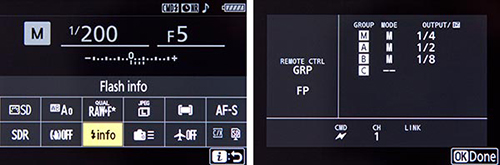
Networks: Changes have been made to the Connect to FTP Server item of the Network Menu, including the number of available network profiles and an auto reconnect Keep Connection option. Changes have also been made to the Connect to Other Cameras item of the Network Menu, used for synchronized release of multiple Z 8 cameras, including the procedure to set up synchronized release and the ability to group cameras. Up to 16 other Z 8 cameras can be remotely controlled using the Nikon NX Field remote capture software. When connecting to other cameras, the Overwrite Copyright Info option has been added, so that the copyright info from the master camera can be applied to the images from the remote cameras. And when using an MC-N10 remote grip and AirGlu accessories, Bluetooth will no longer be disabled.

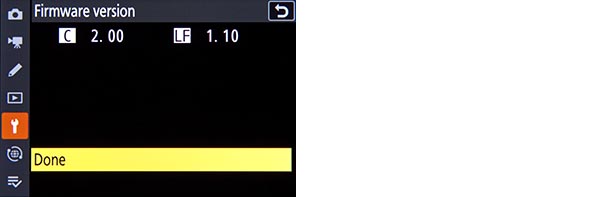
In addition, various issues have been corrected and performance improvements have been made to the Z 8, as listed on the firmware update page. The firmware update page on the Nikon website includes instructions for updating the firmware. You will download the new firmware file, and copy it to the root folder of a memory card that has been formatted in the camera. Insert the memory card with the new firmware into Slot 1, turn on the camera, and make sure the Photo Shooting Menu > Primary Slot Selection menu item is assigned to Slot 1, and that the other memory card slot is empty. Access Setup Menu > Firmware Version, and follow the instructions on the screen.

Learn more about Nikon Z 8 Experience, view a preview, and purchase it on my Full Stop website here:

www.fullstopbooks.com/nikon-z-8-experience

Take control of your camera and the images you create!

Hidden Features of the Nikon Z8

Camera users are often curious about “hidden” features that their camera may have, though typically most advanced models really don’t have many, as long as one carefully goes through all of the Menu and Custom Settings items, and reads through the manual or a guide.

However, with so many options and functions, there are a few items that are actually a bit hidden away on the Nikon Z8. It’s not that the Z 8 manual doesn’t mention them, or that they can’t be found with careful investigation of the camera, but you may need to have them called to your attention to learn how to locate them and how to take advantage of them. And there are a few button shortcuts to access features and settings that you simply need to learn if you wish to take advantage of, because once you are using your camera, they are not indicated in any menus or button icons.

These article is adapted from a section in my comprehensive Nikon Z 8 Experience user guide to the Nikon Z8. All of these “hidden” features, as well as all of the other features, functions, settings, and controls of the Z 8 are discussed in detail, in the guide. Many of these features were included in previous Nikon Z models, but they may still be new for those coming from older dSLR models.

Nikon Z8 Experience book manual guide how to tips tricks field guide quick start controls sttings

Figure 1 – Detail of the controls of the Nikon Z8

Several of these features are accessed with the i Button when working in the appropriate mode, or by assigning the function to a button. Others are accessible in the menus but may require an understanding of the options as they are listed, or might require additional steps of sub-menu navigation to locate them.

Displays and Button Settings – When the Information Display or the Live View scene is active on the rear Monitor, you can press some of the camera buttons to change the corresponding settings as you view them on the rear Monitor, including the top buttons, Fn Buttons, and the Focus Mode Button. Or you can also view and change them in the electronic Viewfinder, while shooting. For example, by default, the Fn1 Button is assigned to Shooting Menu Banks and the Fn2 Button is assigned to Choose Image Area. When you press the buttons, you can view and change those settings, and the screen will even indicate which Command Dial to use for each setting (see Figure 2 – left). If you customize buttons for another setting such as Multiple Exposure or HDR Overlay, you will be able to view and change those settings on the displays, as you press the assigned button and turn the Command Dials. If you would like to view the scene that you are shooting on the rear display without any shooting information or icons, you will need to assign one of the buttons to the Live view info display off setting. By default the Video Record Button is set to this option.

Nikon Z8 Experience book manual guide how to tips tricks field guide quick start controls sttings

Figure 2 – Left: Using the WB Button and the Command Dials to change the White Balance setting on the rear Monitor. Right: Changing the AF Area Mode and Subject Detection Options via the Photo Shooting i Menu.

i Button Features – As noted above, you can press the i Button to access different contextual i Menus during photo shooting, video shooting, and image playback. The Z 8 also adds the ability to change additional sub-options of various settings, via the i Menu, without having to dig into the menus to set those options. For example, when using the WB item on the Photo-Mode i Menu to select Auto White Balance, you will also be able to select which of the three AutoWhite Balance sub-options you would like. And you will be able to directly fine-tune a White Balance setting using the adjustment grid. If you replace some of the default i Menu items with options such as HDR, Auto Bracketing, or Multiple Exposure, you will be able to directly access and change the various settings for those features (see Figure 2 – right).

In some situations, the i Menu it is the only way to access and change certain of these “hidden” features. For example, the Photo Shooting i Menu will allow you to access the Split-screen display zoom feature. You will first need to use Custom Setting f1 – Customize i Menu and assign Split-screen display zoom to the Photo Shooting i Menu. Then when you are composing an image, you can access this feature which allows you to simultaneously zoom-in at two different areas of the scene, to help verify focus and to ensure that the composition is level across the scene (see Figure 3). This can come in handy for landscape and architectural photographers.

Nikon Z8 Experience book manual guide how to tips tricks field guide quick start controls sttings

Figure 3 – Left: Press the i Button to access the i Menu screen with various shooting settings. You can use Custom Setting f1 to customize this menu, and add items such as Split-Screen Display Zoom. Right: Split-Screen Display Zoom shown in use, to compare two areas of the same scene to help determine if the framing is level.

The Playback i Menu will allow you to access the Quick Crop feature. When you zoom-in on an image during playback, you can press the i Button to access the Playback i Menu, and select the Quick Crop option. This option will automatically crop the image and save a new image with the crop and framing that is currently seen on the display (see Figure 4).

Nikon Z8 Experience book manual guide how to tips tricks field guide quick start controls sttings

Figure 4 – Quick Crop feature – Zoom in on an image during playback and frame as desired (left), then press the i Button to view the Playback i Menu and access the Quick Crop feature (right).

The Setup Menu contains a new Auto Rotate Info Display item. When the camera is rotated, the shooting and playback displays on the rear screen and in the Viewfinder can also rotate. This was not a feature of most previous Nikon models. It means that the text and icons on the display will rotate, so that they are in the same orientation of the camera, making them easier to read.

There is no longer a Retouch Menu tab, though Retouch can be accessed via the image playback i Menu. And as mentioned above, when a Multiple Exposure series is in progress, you can press the Playback Button to view the last image. If you then press the i Button, you will access a menu that allows you to view the Multiple Exposure progress, as well as edit the series by retaking or discarding the last exposure if desired. 

Live View Exposure Preview – An important function to make note of is that you need to set Custom Setting d8 – View mode (Photo LV) to Show effects of settings in order to view the scene, in the Viewfinder and on the rear Monitor, with the current camera and exposure settings applied. This will allow you to better preview the resulting image and make exposure adjustments, and will also enable you to access the Live View Histogram of the scene by pressing the DISP Button.

Custom Control Assignments – A few other “hidden” features of the Nikon Z 8 can only be accessed by customizing one of the camera buttons to assign it to that function, using Custom Setting f2. As mentioned above, you can assign a button to the Live view info display off option, for the uncluttered view of your scene on the rear Monitor display. The Recall shooting functions customization will allow you to press a hold one of the Fn Buttons to temporarily switch to different shooting settings, such as a different Metering Mode, AF Area Mode, and exposure settings (see Figure 5 – left). If you will be using non-CPU, F-mount lenses with the Z 8, you can register the lens to the camera in the Non-CPU lens data menu, and thus gain additional functions such as in-camera Vibration Reduction. You will need to use f2 to assign the Choose non-CPU lens number option to one of the buttons, so that you can tell the camera which registered lens is in use.

If you are making use of an optional wireless remote to trigger multiple cameras, there is also a “hidden” setting for this in the Custom Setting f2 button assignments. You can choose to assign a button such as the Fn1 Button, Fn2 Button, or Sub-Selector Center press to the Sync. Release selection option, which is used in conjunction with Custom Setting d4 – Sync. Release Mode Options. You can set up the camera so that, for example, when using the Z 8 as a master camera to remotely trigger other cameras, you can press the Fn1 (or Fn2) Button while taking the shot, and then just the master camera will shoot, or just the remote cameras and not the master, based on your settings.

Nikon Z8 Experience book manual guide how to tips tricks field guide quick start controls sttings

Figure 5 – Custom Control Assignments – Left: Assigning the Fn1 Button to the Recall Shooting Functions option, to temporarily switch to different shooting settings with the press of the button. Right: The Customize Command Dials, Sub-Dial Frame Advance options, to use a dial to jump ahead 10 images during image playback.

Sub-Dial Frame Advance during Playback – If you wish to quickly scroll through your images as you view them on the rear Monitor during playback, you can use the rear Main Dial to advance one image at a time, and use the front Sub-Command Dial to advance 10 or 50 images. To set this up, access Custom Setting f3 – Custom Controls (Playback) > Sub-Command Dial. The Sub-Command Dial can be used to jump 10 or 50 images at a time, based on the Frame advance setting, or you can also choose to jump to protected images, rated images, still images or movies only, or to a different folder (see Figure 5 – right).

One Button Playback Zoom / Histogram – Using Custom Setting f3 – Custom Controls (Playback) > OK Button, you can assign the OK Button so that during image playback it will immediately zoom-in, at the magnification level of your choice, centered at the area of the active focus point so that you can closely inspect your image. Or you can instead assign the button press to display a large histogram with the image, so that you can evaluate your exposure (see Figure 6 – left).

Nikon Z8 Experience book manual guide how to tips tricks field guide quick start controls sttings

Figure 6 – Left: Use Custom Setting f3 – Custom Controls (Playback) > OK Button to set the OK Button to show a magnified view or to show a large histogram. Right: Touch the bottom of the screen during full-image playback to access the “Frame Advance Bar” touch screen feature.

Frame Advance Bar – This image playback feature enables you to use the touch screen to quickly scroll through images without having to swipe one-by-one (see Figure 6 – right). And when viewing a magnified detail of an image, use the touch screen arrows to view the same magnified area of other images, so that you can compare details of similar images.

Flash Information Screen – You can use Custom Setting f1 to customize the i Menu and add the Flash info item. With a compatible optional Speedlight flash attached and turned on, such as the SB-5000, use the i Button to access this menu and view the current flash settings such as the Group Flash setting (see Figure 7).

Nikon Z8 Experience book manual guide how to tips tricks field guide quick start controls sttings

Figure 7 – Left: Customize the i Menu for Flash Info (left), then access it to view the current flash settings such as the Group Flash setting (right).

Voice Memo – You can add a voice memo to an image. In order to do this, you will first need to use Custom Setting f2 to assign a button such as the Video Record Button to the Voice Memo option. Then during image playback, select the desired image, and press and hold the assigned button to record the voice memo. The voice memo can be played back when viewing the image by accessing the Voice Memo item of the Playback i Menu (see Figure 8 – left). When deleting an image, you can delete just the voice memo (see Figure 8 – right). Voice Memos will be saved as a WAV files to the memory card.

Nikon Z8 Experience book manual guide how to tips tricks field guide quick start controls sttings

Figure 8 – Left: Access the Playback i Menu to Play Voice Memo. Right: When deleting an image with a Voice Memo, choose what to delete.

Nikon Z8 Menu Setup Guide

In addition to my comprehensive Nikon Z 8 Experience user guide, I also offer a Z8 Menu Setup Spreadsheet, with suggested settings and starting points for most all of the camera menu settings and Custom Settings. The Excel spreadsheet includes separate listings for different shooting situations including Landscape, Studio, Action, etc. You can download the spreadsheet here:

http://www.fullstopbooks.com/setup-guides/

Again, all of these hidden features and settings, and other unique features, as well as all of the other features, functions, settings, and controls of the Z8 are discussed in detail, in my comprehensive Nikon Z 8 Experience user guide.

Nikon Z8 Experience book manual guide how to tips tricks field guide quick start

Be sure to share your portraits and other photos on my Nikon Z Experience Facebook page, covering all the Nikon Z models:

https://www.facebook.com/groups/nikonz7z6z5

Nikon Z8 Experience User Guide Now Available!

My latest Full Stop e-book, Nikon Z 8 Experience  user guide to the Nikon Z8 mirrorless camera is now available!

And it has been updated for Firmware 2.0!

This e-book goes beyond the manual to help you learn the features, settings, and controls of the powerful and highly customizable Nikon Z 8. Plus most importantly it explains how, when, and why to use the functions, settings, menu options, and controls in your photography.

Written in the clear, concise, and comprehensive style of all Full Stop guides, Nikon Z 8 Experience will help you learn to use your Nikon Z8 quickly and competently, to consistently make the types of images you desire. This e-book is available in either PDF or EPUB format for reading on your computer, tablet, iPad, e-reader, etc.

Nikon Z8 Experience book manual guide how to tips tricks field guide quick start Firmware 2 2.0 2.00

Learn more about this Nikon Z8 guide, view a preview, and purchase it here:

www.fullstopbooks.com/nikon-z-8-experience/

As one reader has said about Full Stop guides:

I don’t know how I could fully take advantage of all the features the camera has to offer without this publication! It’s well-organized, easy to understand, and succinct enough to keep your attention while still containing a wealth of information to get the most out of your camera.”

Nikon Z8 Experience book manual guide how to tips tricks field guide quick start controls sttings

Nikon Z 8 Experience is designed for users ranging from enthusiasts to experienced:

For Intermediate and Enthusiast Photographers: This instant download Nikon Z8 e-book is designed for enthusiast dSLR photographers who wish to take fuller advantage of the capabilities of their camera:

-Go beyond Program mode and shoot competently in A, S, and M modes.

-Take full control of the powerful autofocus system to capture sharp images of still and moving subjects. Learn to take advantage of the face, eye, and subject detection, plus subject tracking features.

-Set up your camera with clear explanations and recommended settings for the numerous Menu options and Custom Settings of the Nikon Z8. Includes a free download of my comprehensive Nikon Z8 Menu Setup Spreadsheet.

-Learn how, when, and why to use and customize the various controls, buttons, and features of the Z8.

-Understand the various metering modes, exposure compensation, and exposure lock for correct exposure of every image, even in challenging lighting situations.

Nikon Z8 Experience book manual guide how to tips tricks field guide quick start controls sttings

For Experienced Photographers coming to the Z8 from previous models, this guide explains the new and advanced features in order to quickly have you taking advantage of these capabilities, including the AF System and its Focus Modes, AF-Area Modes, eye detection, subject detection / tracking, and Custom Settings. Attention is given to the new features including the customizable controls, Focus Shift Shooting, in-camera image stabilization, new menu items and options, 8K and 4K video, Time-Lapse and Interval Timer, plus using F-mount lenses with the FTZ II Adapter. And it covers using the Wi-Fi and Bluetooth capabilities with SnapBridge.

This 480 page digital guide to the Nikon Z8 is an illustrated e-book that goes beyond the Z8 manual to explain how, when, and why to use the features, settings, and controls of the Z8 to help you take control of your camera and the images you create.

Learn more about Nikon Z 8 Experience, view a preview, and purchase it on my Full Stop website here:

www.fullstopbooks.com/nikon-z-8-experience

Take control of your camera and the images you create!