The autofocus systems of the Canon 5D Mark III and Canon 5D Mark IV are incredibly powerful and versatile, with their 61 AF Points, various pre-set AF “Cases,” and its Custom Function settings and redesigned menus to help photographers take advantage of its features. The AF systems are designed to better enable you to lock onto and track moving subjects, so that when you take the shot the subject is ideally in focus, even when using Continuous Shooting to capture multiple shots.
For the basics of the Canon AF system, including the AF Modes, please see this other post first: Taking Control of Your Canon Autofocus System. This post here will then address the additional features and options of the 5D3 and 5D4 AF system. Most of the text below is excerpted from my e-book guides Canon 5D Mark III Experience and Canon 5D Mark IV Experience, where I write extensively about the 5D3 and 5D4 autofocus systems, including the numerous and important Auto Area Selection Modes.
Please note that some of the menu numbers, names, and options may vary slightly between the two cameras.
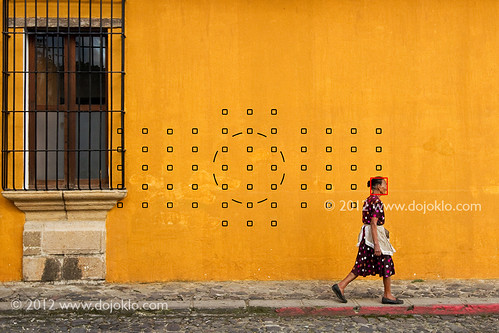
Antigua, Guatemala – simulated view of Canon 5D Mark III viewfinder and AF Points
All of these settings will apply when working in AI Servo Autofocus Mode.
First you will need to set the Autofocus (AF) Menu AF2: AI Servo settings to match your priorities:
AI Servo 1st Image Priority and AI Servo 1st Image Priority:
Setting for Release priority will prioritize shutter release, or immediately capturing the initial shot and subsequent shots at the possible expense of exact focus. Generally when taking a photo, you are supposed to half-press the Shutter Button, allow the camera to focus, then continue the full-press of the Shutter Button to take the image. If you simply “mash” down the Shutter Button, this setting will cause the camera to take the photo without bothering to focus first. Sometimes when photographing sports, news, or events, capturing the “decisive moment” may take priority over exact focus.
Setting for Focus priority will prioritize focus for the first shot and subsequent shots, ensuring that the subject is in focus before the picture is taken. So when you fully press (or hold) the Shutter Button, this setting may cause a brief, perhaps micro-seconds delay while the camera confirms focus before actually releasing the shutter.
Equal priority is a slight compromise between Release and Focus priorities. It allows a brief (perhaps micro-seconds) pause for the camera to possibly find focus before releasing the shutter. It does not guarantee that the image will be in focus, but merely gives it more of a chance to find focus. It generally seems to make more sense to choose Release or Focus based on your priority.
Then choose the AF Area Selection Mode that will best enable you to keep track of your subject. Choose the some that is most accurate yet allows for the proper amount of lee-way if you are unable to keep the subject under your selected initial point at all times. These settings include Single Point AF, AF Point Expansion 4 or 8 surrounding points, etc. I will not go into detail about them here, but they are fully discussed in my guide.
Then find a “Case” setting which closely matches your needs
Case 1 – Versatile multi purpose setting
Tracking sensitivity: 0
Acceleration/deceleration tracking: 0
AF point auto switching: 0
Case 2 – Continue to track subjects, ignoring possible obstacles
Tracking sensitivity: -1
Acceleration/deceleration tracking: 0
AF point auto switching: 0
Case 3 – Instantly focus on subjects suddenly entering AF points
Tracking sensitivity: +1
Acceleration/deceleration tracking: 1
AF point auto switching: 0
Case 4 – For subjects that accelerate or decelerate quickly
Tracking sensitivity: 0
Acceleration/deceleration tracking: 1
AF point auto switching: 0
Case 5 – For erratic subjects moving quickly in any direction
Tracking sensitivity: 0
Acceleration/deceleration tracking: 0
AF point auto switching: 1
Case 6 – For subjects that change speed and move erratically
Tracking sensitivity: 0
Acceleration/deceleration tracking: 1
AF point auto switching: 1
These are the various options of these Cases which you can tweak for your specific needs:
Tracking sensitivity – This is the speed at which the AF system will switch from the initial subject to another subject when a new subject enters the focusing field of view or passes in front of the initial subject, or if you momentarily lose the subject that you are trying to keep positioned under a selected AF point. If you wish for it to quickly lock onto a new subject that enters the area you are focusing on, or rapidly switch intentionally between subjects at various distances, set for +2. If you wish to retain focus tracking on the same subject and ignore new or obstructing subjects set for -2. If your objective is somewhere in between, set accordingly at +1, 0, or -1.
Acceleration/deceleration tracking – AI Servo Autofocus Mode works in part by predicting the potential location of a subject based on the subject’s current speed and direction. In order to make these predictions more accurate, use this setting to tell the camera if the subject is accelerating/ decelerating at a steady pace, or if it is changing its speed more erratically. For subjects that move smoothly set for 0. If the subject moves erratically and may very suddenly speed up, slow down, start, or stop set for 2. Or set for 1 if the subject’s movements are somewhere in between these other options.
AF point auto switching – When you are using Auto Selection – 61 AF Point, Zone AF, or AF Point Expansion Autofocus Area Selection Modes this setting will adjust the speed at which the AF Points change to track a moving subject as it travels across the frame. Setting 0 is for a slow, gradual speed at which the surrounding AF Points will pick up and start tracking the subject if it moves away from the initially selected AF Point. Setting 1 will somewhat rapidly switch to a different AF Point, and setting 2 will most rapidly switch to a different AF Point. So for example, if you began tracking a subject with a selected point and the subject was quickly moving between it and the surrounding eight points, setting 0 would retain focus at the initial point expecting the subject to soon return to that primary point. Setting 2 would mean the surrounding points would immediately activate, pick up the moving subject as it entered their area of focus, and be used to focus on it.
Again, there is much more to the AF System and its Autofocus Modes, Autofocus Area Selection Modes, and Menu and Custom Function settings. Please have a look at my e-book guides Canon 5D Mark III Experience and Canon 5D Mark IV Experience to learn more!