Cyber Monday Camera Guide Sale!

SALE OVER :(

On Cyber Monday, November 28, 2011 only, I will be offering a coupon code for $5 off the price of most of my PDF camera guides.  Any guide on the Full Stop website with the current price of $10.99 will be available for $5.99 (with the coupon code).  That’s almost 50% off!

Plus $5 off The E-Book Handbook too!  (only $4.99 with coupon code!)

This sale includes the following PDF e-book camera guides:

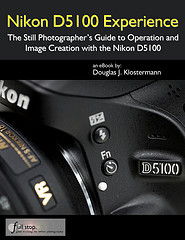
Nikon D5100 Experience

Nikon D7000 Experience

Canon 7D Experience

Your World 60D

Canon T3i Experience

In order to get the savings, use coupon code fsmonday5 when making your purchase.  Click on the “Check out with PayPal” button in order to enter the coupon code.  Don’t worry, you can check out with either a credit card or PayPal when using that button.

The coupon code will be valid all day Monday Nov. 28, 2011, until 11:59pm Eastern Time.


Black Friday Deals on Canon dSLR Cameras

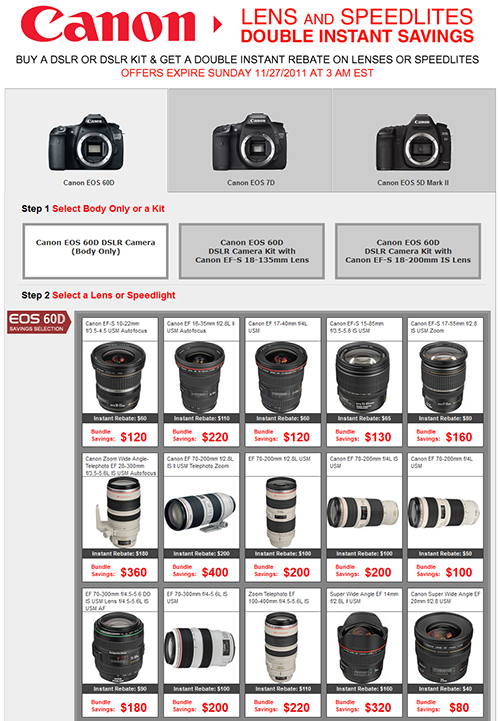
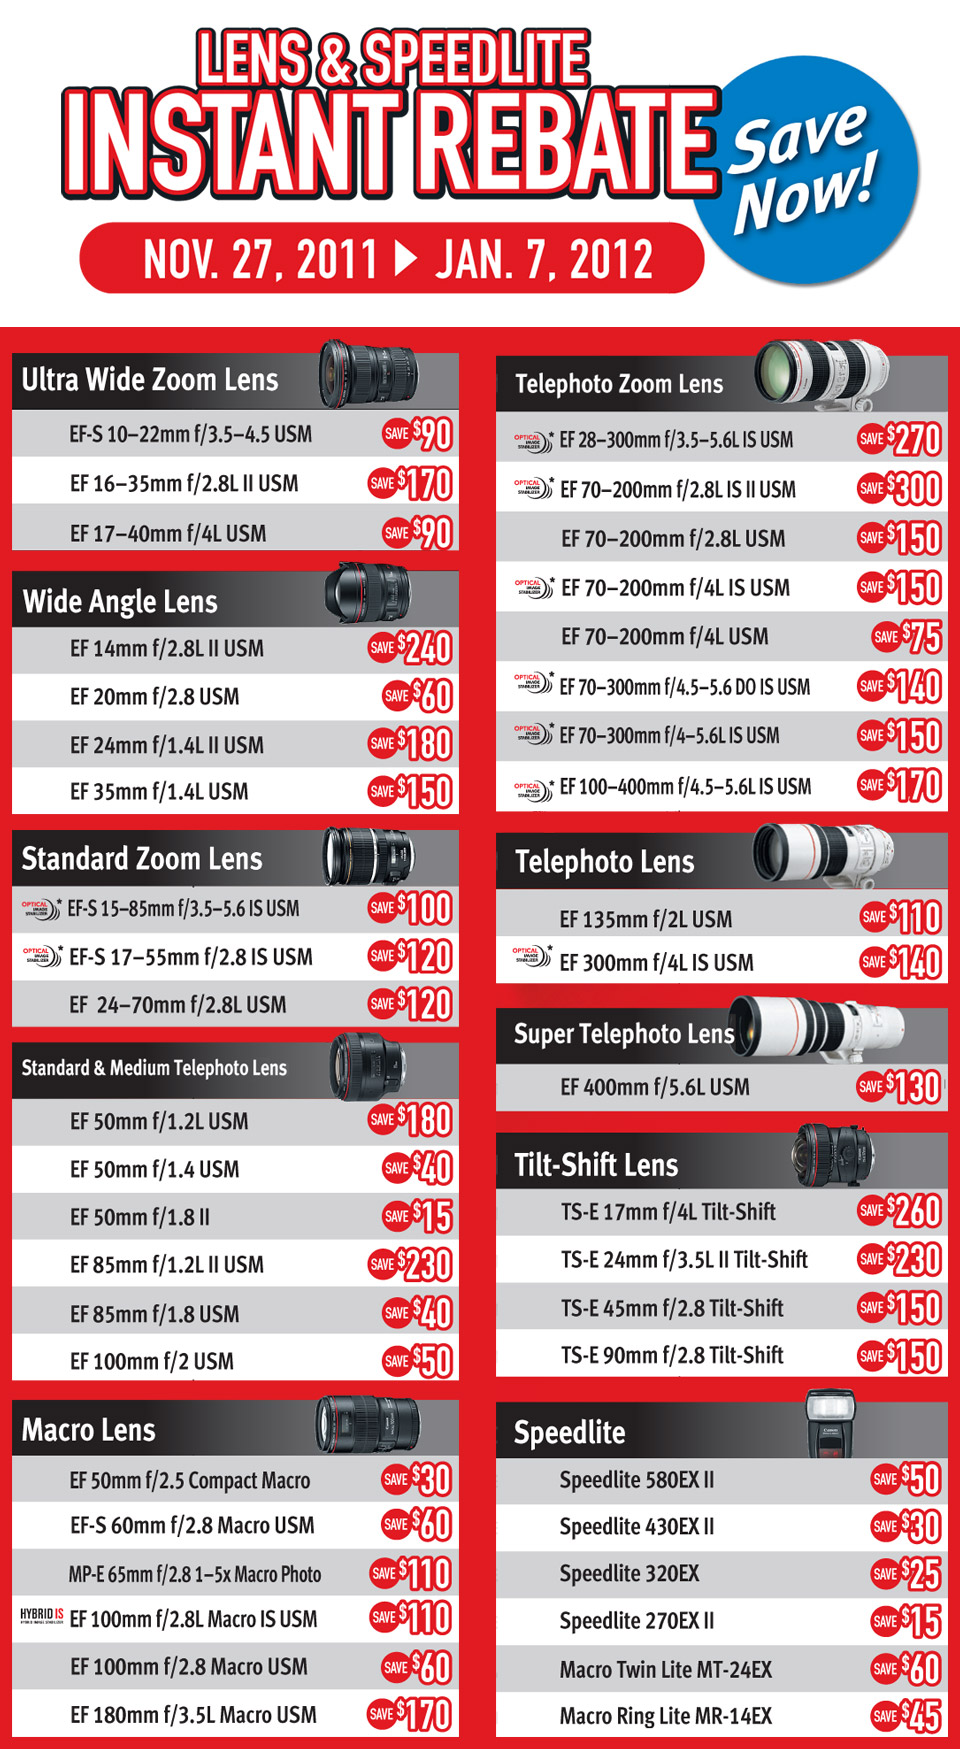
B&H is having some great Black Friday deals on dSLR cameras and accessories, including some Double Instant Rebates on Canon bodies and lenses including the EOS 60D, 7D, and 5D MkII.  If you are looking to pair a new body with a great lens or Speedlite, such as one of the 70-200mm telephoto zooms, one of the high-quality wide angle lenses like the 17-55mm f/2.8, the 580 EXII flash, or a number of macro and specialty lenses like a tilt-shift, this is the time to do it!

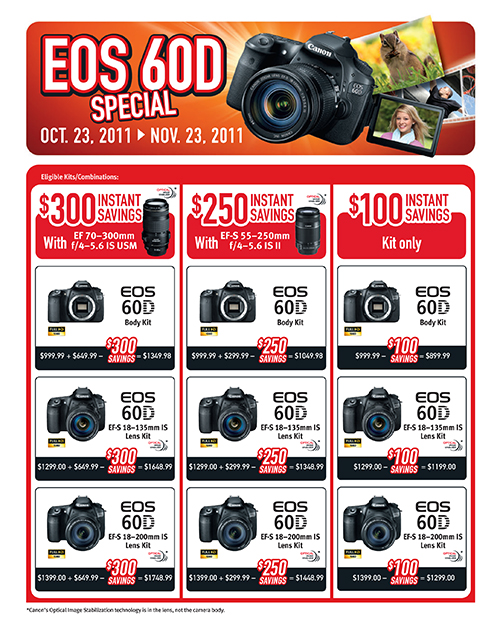
Note that B&H will be closed and not be taking orders between Friday evening and Saturday evening.  Below is a sample of the savings you can get with the 60D. Click here for the B&H Canon Savings or on the image to go to B&H and see the entire offer.  They also have a number of other Black Friday and holiday specials.

Amazon also of course has many Black Friday deals in everything including cameras and accessories, including several Canon point and shoot cameras such as the very high quality Canon Powershot SX230HSClick here to view Amazon Black Friday camera specials.

B&H Black Friday and Holiday Specials

Black Friday Canon dslr camera 60D 7D 5D speedlite flash lens rebate sale

black friday camera dslr canon deal sale bargain

Gloves for Photography

As winter is rapidly approaching in New England, I decided it was time to solve a perpetual annual problem: photographing in the cold. I went to EMS and had a look at the various gloves available that would allow me to wear them and photograph at the same time.

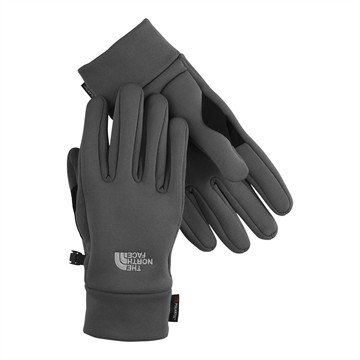
The obvious choice first appeared to be the North Face Etip glove.  They fit snugly on the hand and fingers, potentially allowing good control of the lens and the camera dials and buttons.  In preparation I had brought my camera along to test them out.  The silicone grippies of the palm and finger help hold the camera in place, but I soon discovered that these weren’t going to be the best choice.  Although they are designed to use with a smart phone, tablet, mouse touchpad, or similar device, the smooth silver material on the index finger and thumb proved to be too slippery for turning the camera dials, particularly the rear dial on a Canon 50D, 60D, 7D, or 5D type of camera.


North Face Etip Gloves

The next pair was the North Face Powerstretch glove.  The four-way stretch material allows the gloves to fit closely and comfortably around the fingers.  I decided that since the size of neither the L or M wasn’t quite perfect for my hands, the smaller of these two sizes would be best since it would stretch a bit to fit and wouldn’t leave extra material at the fingertips that would impede camera control.


North Face Powerstretch Gloves

This choice, the Powerstretch, worked very well and was a strong contender.

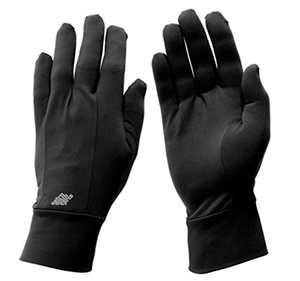
EMS also offers their own thin, stretchy gloves called EMS Axial Glove Liners.  They are thin, allowing good camera control, but intended as liners they possibly aren’t as warm as the North Face Powerstretch.


EMS Axial Glove Liners

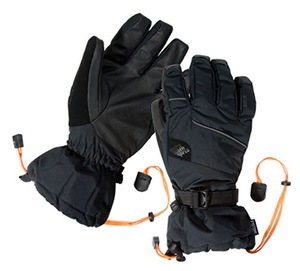
The gloves that I finally settled on, after trying on all these options in a variety of sizes, was the EMS Altitude 3-in-1 Gloves.  For myself, this pair solved two problems:  I wanted the thin gloves for working with the camera, plus I needed heavier gloves for the upcoming New England winter.  The 3-in-1 gloves provide removable thinner gloves, appearing similar to the liners above, inside a heavier and bulkier insulated shell.


EMS Altitude 3-in-1 Gloves

However, the inner gloves aren’t just thin and stretchy liners as above but are fleece lined inside and around the wrist – a very thin but hopefully effective fleece layer.  So hopefully they will prove to be warmer than simple liners, and I can slip on the heavier shells when not shooting.

I am sure that there are many other options to choose from when it comes to gloves for cold weather photography.  I know there are fingerless gloves, with or without removable mittens or fingers for full protection.  Perhaps one of the liners combined with a knit fingerless glove will work well.  You can also have a look at gloves intended for cold weather running or exercise, which may prove to work well.

Nikon Manual Viewer App

I just learned over on the Nikon Rumors website that there is an app for downloading and viewing your Nikon camera manual on your iPad or iPhone.  The app, called Nikon Manual Viewer, can be downloaded for free.  Once you have downloaded the manual, you can then view it offline at anytime.  It does not appear that Canon has a similar app yet.

Nikon Manual Viewer app ipad iphone guide book tutorial instruction

Be sure to also consider my dSLR camera guides, which can also be downloaded and carried with you on your iPad or computer, including Nikon D7000 Experience and Nikon D5100 Experience.  These guides go beyond the manuals to help you learn not only how, but more importantly when and why to use the features and functions of these versatile cameras.


Choosing Your First dSLR for the Future Pro on a Budget

I spend a lot of time on photography forums, trying to stay on top of the latest news and equipment as well as to better learn about the concerns and difficulties of those trying to choose or to learn to use their new dSLR.  This always helps me in writing my dSLR camera guides, such as learning which functions and concepts users have trouble with, and figuring out how to best explain them.

tips tricks photography dslr learn use manual instruction tutorial for dummies guide

Unfortunately one begins to see the same posts again and again:

“I want to get my first dSLR.  Which one should I get?”

often supplemented with

“I hear/ read/ am told that Canon is better at XX but Nikon is better at XX.  Which one should I choose?”

and then

“I want to start taking wedding and portrait photos.”

typically qualified with

“I only want to spend $500.”

So to be honest, it is pretty simple:

If you are truly on a budget and don’t want to spend a lot on a dSLR, then get the entry level Canon T3 or Nikon D3100.

But, if you really intend to grow and learn and develop as a photographer, and don’t want to quickly reach the limits of your camera and have to spend more money and buy another one, start out with the advanced-entry-level Canon T3i (also called the 600D) or the Nikon D5100.  These cameras will give you a bit more room to grow with their additional features, capabilities, and image quality.

If you plan to be really dedicated to photography, to pursue it as a serious hobby or even as a semi-pro, and intend to read every book you can find about your equipment, photography, exposure, composition, and Photoshop, and be out there using your camera all the time, then it may be worth your while to start off with a mid-level or pro-sumer camera such as the Canon 60D, Canon 7D, or Nikon D7000.  That way you won’t find yourself reaching the limits of your first camera within a year and having to upgrade so soon.

But know that starting out with a 7D or D7000 is jumping in near the deep end of the pool.  You will have a steep learning curve in order to get to the point where you can take control of your camera and take full advantage of all those features and capabilities you paid for.  As can be witnessed on the forum posts where the new user says

“I just got my ($1500 camera), set it on Auto and took some photos, and they don’t look anything like (pro photographer’s) photos.  What is wrong with my camera?  I guess I should start reading the manual, but what settings should I use to take better photos?”

…spending a lot of money on a “better” camera does not automatically, instantly lead to great images.

If you wish to become serious about photography, you need to understand that “photography” and “budget” do not belong in the same sentence!  If you want to do wedding and portrait/ child/ pet photography eventually, and want to be paid for it, then you need to change your mindset about the cost of the equipment required by a professional photographer.  The camera is a tool required to do the job right, and a professional needs professional equipment.  Not just because it is expected or is the price of admission, but because professional tools are needed to do professional work.  While one can get away with using a mid-level or pro-sumer camera for weddings or when starting out as a portrait or pet photographer, you will find that you really need the quality and capabilities of a pro camera to properly do the job. You need equipment that can perform in all situations (in conjunction with your skills).

I’ve written some much more detailed posts about comparing a choosing a dSLR camera, including:

Choosing Between the Canon 7D vs 60D vs T3i (600D)

Choosing Between the Nikon D7000 vs D5100 vs D3100

These posts go into detail about their features and differences, and why you may or may not need to additional features of the advanced cameras for your photography.

Nikon D5100 Autofocus System Video

I’ve written a detailed article about Taking Advantage of the Nikon D5100 Autofocus System, but I decided to make a video as well, to introduce and explain the Focus Modes, Autofocus Area Modes, and the AF Custom Settings of the D5100, in order to help one use their camera to its full capabilities:

Change the viewer settings to 720p to watch in HD

To learn more about about the Nikon D5100 autofocus system as well as how to fully take control of your camera in order to consistently capture better images, please have a look at my e-book user’s guide Nikon D5100 Experience.  It not only explains all the features and controls but also when and why to use them in real life photography.

New Firmware for the Nikon D7000 and D5100

New firmware has been released for the Nikon D7000, version 1.03.  Be sure to update your camera, as it will fix several minor bugs including some settings and displays that have mysteriously changed on their own previously.

Update information on the Nikon site here:

http://downloadcenter.nikonimglib.com/en/download/fw/22.html

The Nikon D5100 firmware has also been updated for the first time, v 1.01, with fixes including:

  • An error recognizing some memory cards has been addressed.
  • When Selective color from the retouch menu is performed on a picture taken with the image quality set to NEF (RAW)+JPEG and an image size of M or S, the edges of the image may not have changed color. This issue has been resolved.
  • When Metering was set to Matrix metering, the exposure mode set to M (Manual), and the HDR exposure differential set to Auto, the exposure differential was fixed at a value equivalent to 2 EV. This has been changed to enable automatic adjustment of exposure differential so that it is appropriate for the scene.

D5100 firmware upgrade available here:

https://www.nikonusa.com/en/index.page

Nikon D7000 D5100 firmware update upgrade

New Canon Autofocus System

I wrote about the introduction of the new Canon flagship EOS 1D X digital SLR a couple weeks ago.  As I mentioned, I don’t typically discuss $6,000 professional cameras on this site – if someone is trying to decide if they need a 1D, well, they probably don’t need a 1D!  If you need one, you already know that you need one…

Anyway, I think it is well worth looking at the new autofocus system that the 1D X introduces as it will eventually find its way, in some form, into the pr0-sumer cameras such as the Canon 7D Mark II and hopefully the 5D Mk III.  While those cameras won’t offer the 61 AF points and huge variety of customization options, they may incorporated the increased precision, low light sensitivity, better tracking speed, and the new algorithms that coordinate with the exposure system to detect and better track a subject by brightness, color, and even facial recognition (yes, even pros can use face-detection now!).

canon autofocus af system
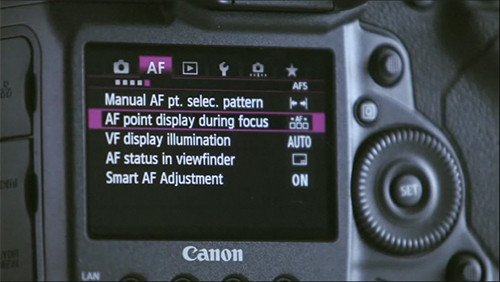
Screenshot from Canon 1D X video (link below) explaining new autofocus system – image by Canon Europe

What will will certainly see in the newer cameras is the redesign of the menus, incorporating an Autofocus tab and AF tracking presets!  These are highly desirable features, as anyone who has attempted to fully take advantage of the 7D AF system knows how challenging it is to go between the AF menus and the Custom Functions to change to the desired settings while trying to decipher the cryptic C.Fn option names.

The EOS 1D X has a single AF tab in the menu, containing 5 AF sub-menus.  One of the most helpful sub-menus is going to be the AF Config Tool menu that contains the “Case Study” AF presets.  Instead of trying to recall how to set each Custom Function such as AI Servo Tracking Sensitivity and AI Servo AF Tracking Method to best track a subject and respond to loss of the subject or interference of an object between the camera and subject, one can now choose from preset options with helpful descriptions such as “Continuous shooting, ignore obstructions,” “Subjects that accelerate or decelerate quickly,” and “Instantly refocus suddenly with obstructions.”

The 1D X offers six AF “Case studies” presets, and there is no reason not to include all of these with the 7D replacement, since it too is a camera designed for sports and motion.

If you intend to purchase the 7D Mk II or whatever it will be called, it is worth your time to have a look at this page and video from Canon and begin to become familiar with what you will want to learn and take advantage of in the near future with the likely-to-be-improved 7D AF system and menus:

Nov. Canon Rebate on Lenses, 60D, Flashes

Canon is running more Instant Savings Rebates on the EOS 60D, body only or with a variety of different lenses or lens combinations.  There are also rebates on several desirable lenses – including great wide angle, telephoto, and macro lenses, the nifty 50, and even tilt-shift lenses.  Plus Speedlite flashes.

It’s a great time to get a pre-holiday gift for yourself or those on your list!

Have a look at the options below, and head over to Amazon, B&H, or Adorama to start shopping – click these store links, or the logos at the left of the page, to shop at these stores and help support this blog!. Thanks!

Have a look at the Canon rebate site to see the details of the offer.

Rare Leica Auction

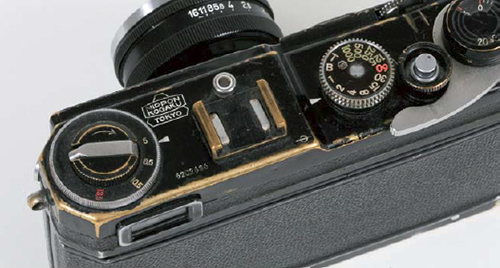
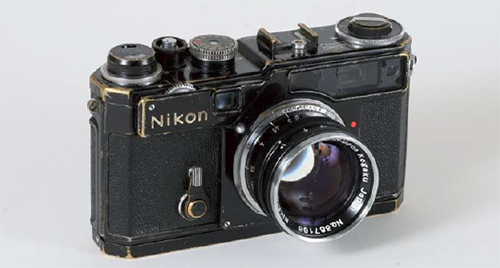
Those who appreciate old, rare cameras, especially those with Leica fetishes, should have a look at this catalog for an upcoming Leica auction by Tamarkin Photographica.  The auction takes place October 29 and 30, 2011 in Woodbridge, CT.  There are even a couple Nikon rangefinders available, with gorgeous brassing.


Photo from Tamarkin Photographica Fall 2011 Auction Catalog – Nikon SP with Nikkor 50mm f/1.4 – estimate of $4,000-$6,000


Photo from Tamarkin Photographica Fall 2011 Auction Catalog – Nikon SP with Nikkor 50mm f/1.4 – estimate of $4,000-$6,000

New Canon EOS 1D X Announced

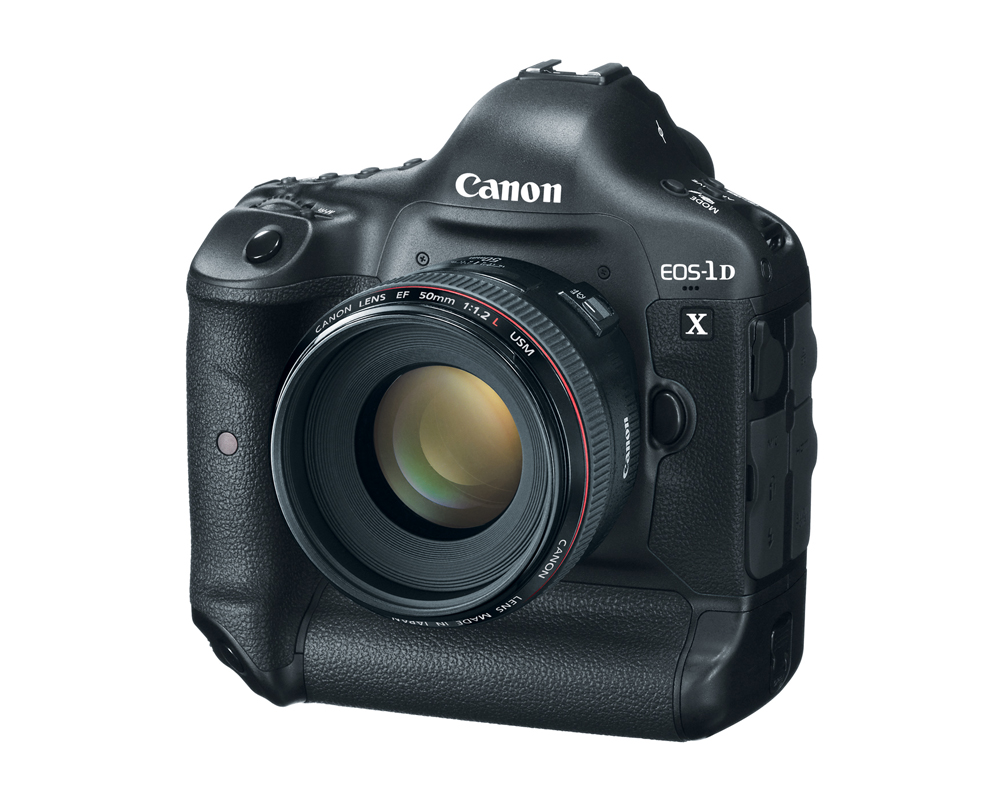
Canon has just announced their latest, high-end professional model, the EOS 1D X.  I don’t normally discuss the top of the line pro models (as this one is listed at $6,800) but instead concentrate on the consumer and pro-sumer level dSLR cameras.  However I would like to look at some of the new feature of the flagship Canon 1D X that will – sooner or later – make their way down to the more affordable models.

Canon EOS 1D X
Canon EOS 1D X – image courtesy of Canon USA
(If you do plan to purchase a 1D X, please use one of my referral links to Amazon, B and H, Canon,or Adorama!!)

In the past we have seen some of the advanced features of the high end cameras later introduced into the consumer models in one form or another, including faster processors and shooting speeds, more sophisticated autofocus system features, and advanced custom functions that allow the user to modify the functions and controls to operate in a specific desired manner.  And since the replacement for the 5D Mk II is imminent (Mk III? 6D?), and the 7D Mk II probably around the same time (Feb 2012?) we are likely to see variations of some of these refinements soon in the consumer and pro-sumer models.

Some of the new advanced features of the Canon 1D X that we will eventually see in the replacements to the 5D Mk II, 7D, 60D, and perhaps even the Rebel line:

  • 18 Megapixel full frame CMOS sensor.  The high-end cameras have less megapixel than the consumer cameras because they are extremely high quality sensors and can deliver high image quality with a lower number of larger pixels.  The 7D and 5D replacements, however, are bound to boast 21 to 26 MP or so.
  • Refinements to the controls and their layout.  This includes user-configurable buttons on the front of the camera, which has already been seen with the 7D to an extent, but will definitely be incorporated into the 5D Mk III (or 6D or whatever it may be called).
  • A 61 point AF system with 41 cross-type AF points and five dual cross-type points for extra precision.  The 7D and 5D replacements won’t have this many AF points, but perhaps will increase upon the 19 AF points of the current 7D.
  • Zone, Spot, and AF Expansion autofocus Area Modes including 4 point and 8 point expansion.  The 7D currently offers these as well (4 point expansion only, not 8), and the new 5D is certain to have these capabilities.  Perhaps the 8 point expansion will be added to the 7D replacement.
  • Refinements to the autofocus system, including a simplification of the complex AF related Custom Functions that are so difficult to explain and differentiate even with the 7D.  With the new 1D X the changes include a new AF menu tab to easily access and change the AF options, and presets such as “Continuous shooting, ignore obstructions,” “Subjects that accelerate or decelerate quickly,” and “Instantly refocus suddenly with obstructions.”  While specific combinations of the AF Mode, AF Area Mode and AF related Custom Function settings of the 7D already allows for these types of settings, these new, easy to access presents are a welcome change from the previous difficult-to-decipher (much less remember) Custom Functions such as AI Servo Tracking Sensitivity and AI Servo AF Tracking Method.
  • Additional changes to the AF system include “Intelligent Tracking and Recognition” which incorporates color and face detection in order to more easily assist the photographer on focusing on a subject’s face when tracking a moving subject, such as a dancer or sports player, rather than perhaps focusing on a closer hand, racquet, or jersey.  Now even the pros will be using face detection!  And focusing is improved in even very low light.
  • 12 frames per second continuous shooting speed with full autofocus and metering, plus up to 14fps possible with the mirror locked up when shooting JPEGs.  While the 1D X offers 12 and 14 frames per second shooting, it is unlikely that the 7D and 5D replacements will be capable of more than 8 or 10fps, though any increase is sorely needed for the 5D.
  • Higher ISO capability.  The ISO performance increases with just about every new sensor, so any of the new cameras are bound to have improved high ISO performance – probably not as incredible as the 1D X, but improved from the current models.
  • Faster start-up time and shutter lag.  This is always a welcome improvement.
  • Easy one-touch 100% zoom during image playback to the area of the image where the active autofocus point is located, in order to quickly check for sharp focus in the area of the image that should display the sharpest focus.
  • Dual DIGIC 5+ image / data processors.  The 7D has dual Digic 4 processors, and the new 7D and 5D are certain to have improved processors, which assist with overall camera speed including continuous shooting speeds, multiple exposures, and writing files to the CF memory card.  A processor also assists with metering and autofocus.
  • Multiple exposures between two and nine shots with various options for combining the frames, plus chromatic aberration correction and peripheral illumination correction.  HDR shooters and those wanting to shoot multiple exposures will appreciate a new 7D or 5D with these in-camera capabilities, and the chromatic aberration correction may also find its way to the lower level cameras.
  • The 1D X “deploys a 100,000-pixel RGB metering sensor and a new metering algorithm. The sensor is used to detect a subject’s brightness, color and face and based on this evaluative metering or evaluative flash metering is executed. This data is also communicated to the AF system to assist with subject tracking.”  New models typically bring an improvement in the metering system, and while the new 5D and 7D won’t have this level system with 253 zones over the previous 63, they will certainly have these same types of improvements made to their current systems.
  • Plus / minus 5 stops of exposure compensation.  This is already a feature of the 7D and will be a welcome addition to the 5D replacement, especially for those shooting HDR.
  • Various video improvements, including longer shooting times, manual audio level control and adjustable live level meters, some compression and timecode features.  There are several features that videographers will appreciate and many will definitely find their way into the new 7D and 5D, which are already extremely popular cameras for dedicated videographers.
  • 3.2-inch (diagonal), 1,040,000-dot rear LCD screen with “ClearView II” technology and extremely durable glass screen.  This is slightly lager than the 3″ screen of most of Canon’s dSLRs, but I’m not sure if a new 7D or 5D will see much of a size increase here.
  • Built in LAN Ethernet port.  This is a new feature for a Canon.  While most of them allow for an optional wireless transmitter, this wired version is built right in.  I don’t see this being added to other cameras quite yet.
  • Twin CF memory card slots, which can be used in various configurations.  Some heavy shooters and videographers might like to see this on a new 7D or 5D, to (I’m speculating here) separately save stills and video, or JPEG and RAW, or use the second card for overflow, or save dual copies of all files.
  • Canon’s second generation self-cleaning sensor unit, which uses “carrier wave technology” to better coax the small dust particles gently down the surface of the (filter in front of the) sensor to the collecting adhesive strip at the base.
  • New EOS System Monitor screen showing total shutter actuations, serial number, and firmware version.  This would be a welcomed addition to the 7D and 5D, though it always seems Canon is hesitant to make it easy to see shutter actuations on a consumer camera.

There are a variety of other additions and improvements to the EOS 1D X, but these are the features that are likely to be incorporated into the more affordable consumer and pro-sumer models.  Some I am certain we will see in the following months when the new versions of the 7D and 5D are released, and some will eventually make their way into the 60D replacement and perhaps, in time, even into the Rebel models.

Which Canon dSLR is Right for You?

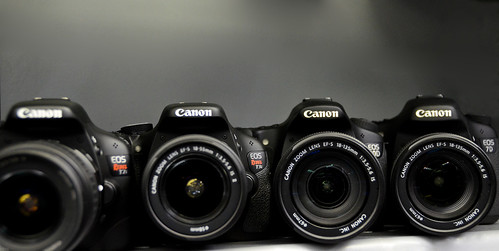
In a previous post I wrote an in-depth comparison of the dSLR cameras in the current Canon line-up, the Canon 7D vs 60D vs T3i / 600D.  To sum up that practical, subjective comparison, here is a brief and somewhat serious synopsis to help you make your camera decision based on your photography experience and needs:

Canon Rebel T3i EOS 600D vs 60D vs 7D vs T2i
Canon Rebel T2i, T3i, 60D, and 7D – photo by author at Newtonville Camera

Get a Canon 600D / Rebel T3i (or older Canon 550D / Rebel T2i) if you are new to photography or to digital SLR photography, or want to upgrade from an older Rebel because you want higher image quality and more mega-pixels (or HD video). If you have been happy with the features and controls of your previous dSLR camera and have not discovered the need, in your extensive use of it, for any specific additional features, there is no need to look beyond the T3i / 600D. See the T3i on Amazon.

Get a Canon 60D if you have outgrown the capabilities of an older Rebel like an XTi or T1i due to your greater experience and more demanding shooting needs which require more direct or sophisticated controls, faster shooting speed, more precise autofocus system, and more complex customization options. Or you have been pretty pleased with your 20D or 40D and its features but wish to upgrade for the increased image quality and megapixels (or HD video). And/ or you need a more rugged camera for your frequent and demanding shooting and off-the-beaten-path traveling needs. Or if you need the increased 5.3 frames per second continuous rate to shoot sports or action. Or you really like swiveling LCD screens (the T3i has this too). If you typically shoot on Auto or Program mode, you probably do not need a 60D. If you do not manually select your own focus point and have never used exposure compensation you probably do not need a 60D. If you have never used the AE-Lock [*] button to lock exposure you most likely do not need a 60D. If you don’t understand the relationship between aperture, shutter speed and ISO you may not really need a 60D. Or unless you plan to dedicate yourself to learning this camera and the principles of SLR photography and grow into this more advanced camera, consider saving the money or using it towards a better lens. See the 60D on Amazon.

Get a Canon 7D if you have extensive experience with a Rebel like an XTi or T1i (also called the xxxD series like the 350D or 500D) or with an older xxD series (20D, 40D) camera, and you know and understand most of the 7D’s controls and advanced custom features, and you specifically need some of them for your demanding shooting needs. If you haven’t passed the above “criteria” for a 60D, you most likely really don’t need a 7D. If you have never used Av aperture priority mode or M manual mode, you should probably gain more dSLR experience before investing in a 7D. If you have never used autofocus tracking settings to track a moving subject across your frame and worried how an interfering object would affect your focus you don’t need the sophisticated AF system of the 7D. If you have never used spot metering to determine a critical exposure level or experimented with back-button focusing you probably will do just fine with a camera less advanced and less expensive than the 7D. Or unless you plan to dedicate yourself to learning this camera and the principles of SLR photography and grow into this very advanced camera, consider saving the money or using it towards a better lens. However, if you often need to take 126 consecutive photos at the rate of 8 frames per second, you do need the 7D. Immediately. Even if you just sometimes need that. Totally worth it. That’s 15.75 seconds of continuous shooting. Who doesn’t need that? You’d make Eadweard Muybridge proud. See the 7D on Amazon.

(Please note, the T3i/600D, T2i/550D, 60D and 7D all have most of these advanced features I just listed: manually selected focus points, exposure compensation, AE-Lock, auto-focus tracking, spot metering, and back-button focusing. All of these cameras are fully capable of advanced dSLR shooting techniques and are capable of shooting professional quality images. I’m just using the above features as a determination of your experience level and equipment needs.)

The Canon 5D Mark II is in a separate league than the other cameras, being a full frame professional camera, and thus I’m not going to compare it to the others in this context. As I said in a previous post:

If the 5D Mk II fits your expanding and demanding needs as a photographer, you would already pretty much know that you needed a 5D after your extensive time using a Rebel or a 20D, 40D, etc. Otherwise, getting a 5D means most likely you’d be investing in far more camera than you will actually need or use.

If you truly need a 5D MkII, you are most likely already in that phase where you are fully aware that you need it and you are merely saving up and/ or agonizing over when to go ahead and spend (or inform the spouse that you need to spend) that $2500.

If you don’t already know that you need a 5D Mk II and specifically why you need it, you probably don’t need a 5D. Plus, as is often the case, many of those who could really take full advantage of a 5D Mk II are those who can’t afford one. (I’m thinking about the talented photographers I come across on Flickr, etc. who are making amazing images with entry-level Rebels.) Feel free to spend $2,500 on a 5D Mk II if you want, but unless you have extensive experience with photography and with a digital SLR, using a 5D is completely unnecessary and is unlikely to help you take “better” pictures than you will be able to with a T3i/600D. If you don’t already know how to use an advanced dSLR camera and why a photographer needs one, buying a 5D Mk II is sort of like buying a washing machine with the buttons, dials, and writing all in Swahili. You know what a washing machine can do and is supposed to do, and you can sort of figure out the Swahili one. But until you properly learn how to use it, if you start turning the dials and pressing some buttons you could really screw things up. And even though the Swahili buttons all look really cool and impress your friends and the other clothes-washers who see it, and the salesman told you it is a “better” washing machine and has a bigger drum, it probably won’t help you clean your clothes better, especially if you don’t know how to use it. Until you learn how, when, and why to use the controls, features, menus, and custom functions of a 5D Mk II or even a 7D, you may be taking worse pictures! At best you won’t be taking advantage of most of the features and capabilities you paid a lot more for. And besides, the 5D Mk II is becoming old technology. You should wait for the 5D Mark III :) Plus, the large, high resolution sensor of the 5D Mk II pretty much requires that you use Canon’s best L-series lenses, so be sure to take that into account. See the Canon 5D Mk II on Amazon.

Whichever Canon you choose, learn to take control of your camera and the images you create with one of my Full Stop e-book guides!

full stop dslr photo photography camera manual guide for dummies canon nikon


Was this post helpful?  Please let others know about it by clicking the Facebook or Twitter sharing buttons below, linking to it from your blog or website, or mentioning it on a forum.  Thanks! 

Want to help support this blog with no cost or effort?  Simply click on the Amazon and B&H Photo logos on the left side of this page to go to those sites and make your purchases.  They will then give me a little referral bonus!

A Brief Introduction to Exposure Bracketing

If you have begun to take control of your camera’s functions and settings and are understanding the basics of exposure, and perhaps are working in Aperture Priority or Shutter Priority Mode, you may still find that sometimes your images are coming out lighter or darker than you desire.  This could be due to an unusual lighting situation, a scene that contains a wide range of bright and dark areas, a subject that is back-lit, the camera metering from the “wrong” area of the scene, or a number of other reasons.

In this situation hopefully you have begun experimenting with exposure compensation.  If not, exposure compensation can be the solution to these types of problems by enabling you to “over-ride” the camera’s exposure decision and making the next image lighter or darker as desired.  And since most all the functions and settings of a dSLR are inter-related, the use of other metering modes such as Center-Weighted or Spot metering can also be part of the solution (or part of the problem) – but those are topics for other posts!  I’ve written one about Exploring Metering Modes, and should probably tackle some exposure issues soon.

exposure compensation auto exposure bracketing aeb canon nikon dslr
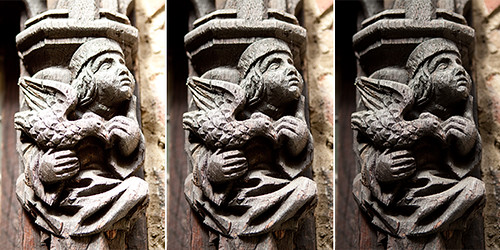
Figure 1 – French Medieval Storefront Carving, Gloucester, Mass. – Three bracketed exposures of the same scene:  the “proper” exposure as determined by the camera (Center-Weighted Average Metering Mode) in the center; over-exposed +1 stop on the left; under-exposed -1 stop on the right.  The desired exposure, for my eye, lies somewhere between the “proper” exposure and the darker under-exposure, where some highlights on the figure remain but the color and detail of the wood can be seen in those areas.  Center exposure:  Shutter speed 1/60 aperture f/2.8, ISO 200

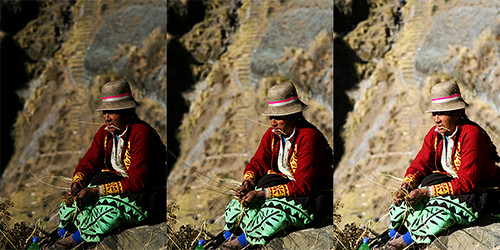
If you have begun to make use of Exposure Compensation, or wish to start, a technique called exposure bracketing can expand upon that or perhaps help you to learn and understand over- and under-exposures.  Exposure bracketing is when you take at least three photos of the same scene, one at the “proper” or desired exposure, one under-exposed, and one over-exposed (see Figure 1).  For example you may take the second and third shot with the exposure compensation set at +1 and then -1.  This is done to ensure that you capture exactly the right exposure you desire or to experiment and see the results of varying your exposure settings.  A common feature of dSLR cameras called Auto Exposure Bracketing (AEB) can even automate this process for you.

In the days of film, exposure bracketing was a helpful technique – especially for critical situations – since one didn’t have the immediate feedback of the image on an LCD screen and a histogram.  It can still be used today for critical situations or for test shots when determining the right exposure settings.  The Auto Exposure Bracketing feature of digital SLRs automates this process by automatically changing the exposure settings between shots.  You set the amount of under- and over-exposure desired (such as +1, -1 or +2/3, -2/3) and then take three images in a row.  The camera automatically adjusts the exposure for each shot so that one is taken at the “proper” or baseline exposure, another shot is under-exposed, and the other is over-exposed.  If your camera is set on continuous drive mode, you can just hold down the shutter button and the camera will take the three shots in a row.  Or if you have it set on single shooting, you click the shutter three times in a row, ideally of the same scene.  Many cameras even allow you to dictate the order that the images are taken, and whether or not AEB cancels itself after one use or when the camera is turned off.

Or you can perform this process yourself, by either using exposure compensation between shots or by working in Manual Mode and adjusting the aperture or shutter speed setting between shots.

auto exposure bracketing canon nikon dslr aeb
Figure 2 – Weaver Constructing the Keshwa Chaca, Huinchiri, Peru – Three bracketed exposures of the same scene:  the “proper” exposure as determined by the camera (Evaluative metering mode) in the center, under-exposed -2/3 stop on the left, over-exposed +2/3 stop on the right.  The desired exposure in this case, for my eye, lies somewhere between the “proper” exposure and the over-exposure.  With auto exposure bracketing you can often customize the order that the bracketed images are taken, for example proper/under/over or under/proper/over.  In this example they were taken proper/under/over, so they are displayed here in a different order than actually captured.  Center exposure:  Shutter speed 1/1000, aperture f/5.0, ISO 100

Exposure compensation and bracketing are also used in HDR (high dynamic range) photography to take three or five or more photos of the same scene at various exposures.  All the images are then combined by the photographer, using HDR software, into a single image which will contain a much broader dynamic range of light and dark than is possible with a single image.

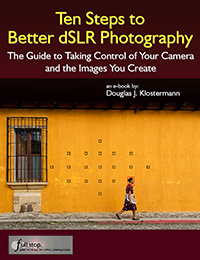
The basic principles of exposure as well as all of the other important functions and controls of a dSLR, such as Metering Modes and the Autofocus System, are explained in my e-book Ten Steps to Better dSLR Photography, as well as in all my other dSLR camera guides to specific cameras such as Nikon D5100 Experience and Canon T3i Experience.  Click on the titles or the cover below to learn more!

dslr learn improve autofocus exposure aperture shutter priority for dummies


Interesting vs. Intriguing

I recently took this photo in Gloucester, MA.  As I was working on the RAW file and zooming in, I discovered that I liked the cropped version, perhaps more than the original.  It seems to me that while the original version (shown second, and which is actually slightly straightened and cropped itself) is interesting, the extreme crop (shown immediately below) makes it intriguing.  (I think I’m beginning to sound like Rick Sammon here!)  It imagine that upon looking at it, it may take a second to become oriented but then, following Gestalt principles, the eye figures it out.  Anyway, have a look for yourself:

Gloucester MA Mass Massachusetts reflection boat water harbor
Gloucester, Mass – extreme crop of original


Gloucester, Mass – minor crop of original

The interesting and impressionistic grey, black, and white reflections in the water – best seen in the top picture –  are shown as they were captured, with just a standard amount of Clarity and Sharpening done to the image.


Independent E-Book Publisher Full Stop Celebrates Successful First Year

Online and PDF versions of this press release available here:
http://www.dojoklo.com/writing/PressReleases/2011-09-29-Press_Release.htm

Full Stop Publishing
good writing for better photography
www.dojoklo.com/Full_Stop

PRESS RELEASE

FOR IMMEDIATE RELEASE

Contact:  Douglas Klostermann
E Mail – doug@dojoklo.com

Independent E-Book Publishing Company Celebrates Successful First Year

Independent E-Book Publisher Takes Advantage of Newly Leveled Playing Field to Successfully Compete with Traditional Publishers

September 29, 2011 – Cambridge, Mass. – Independent e-book publisher Full Stop marks its successful first year of creating, publishing, and selling digital SLR camera guides and photography e-books.

Begun in September 2010 with the publication of its first camera user’s guide Your World 60D, the independent publisher currently offers nine titles and has sold over 6,000 e-books.  The majority of the titles are user’s guides aimed at Canon and Nikon digital SLR camera owners, including Amazon Kindle best-sellers Canon T3i Experience and Nikon D5100 Experience.  Taking advantage of readers’ growing preference for e-books and the increasing popularity of e-reader devices and tablets, as well as the digital publishing opportunities offered by major online retailers such as Amazon and Barnes and Noble, author and photographer and head of Full Stop Douglas Klostermann is able to reach a wide audience of readers interested in learning how to use their equipment and improve their photography.  As Douglas noted in a recent interview, “E-books and e-publishing have completely leveled the playing field for independent publishers, allowing us to successfully compete with major publishers and even to beat them to the market by taking advantage of the available technology and sales channels.”

Inspired by his experiences with e-publishing as well as the rapidly expanding popularity of e-books Douglas has also written an e-book guide to help others create, publish, and sell e-books, called The E-Book Handbook.  All of his guides are available for sale on the Full Stop website as well as on Amazon.com, BarnesandNoble.com, and through Apple iBooks and iTunes.  As with all e-books, Full Stop guides are read on a computer, e-reader device such as the Kindle or Nook, or tablet such as the iPad.

Additional camera guides and photography books are planned, and Full Stop is looking forward to further success with independent e-book publishing and the continued growth of e-books, e-reader devices, and digital publishing.  For further information contact Douglas Klostermann at doug@dojoklo.com.

###

Online and PDF versions of this press release available here:
http://www.dojoklo.com/writing/PressReleases/2011-09-29-Press_Release.htm

Don’t Let the Locations of the AF Points Dictate Your Composition

I began to discuss the autofocus modes of various dSLR cameras in previous posts including Taking Control of Your Canon Autofocus System and Taking Advantage of the Autofocus Systems of the Nikon D5100 and the Nikon D7000

In this post I wish to go into more detail about one of the reasons it is important to take control of your autofocus system, namely not allowing the locations of the AF Points in your viewfinder to dictate your final composition.

As I mentioned in previous autofocus posts, one of the essential steps in taking a successful photo is controlling where the camera focuses.  If you allow the camera to auto focus by choosing its own focus point(s), it typically focuses on the closest object.  This may or may not be what you want to focus on, so you should select where the camera focuses using the Auto Focus Points.  For example, you often want to focus on a subject’s eyes, but if you allow the camera to choose the autofocus point itself, it may select another part of the face, or somewhere else on the body, or even a raised hand that is nearer to the camera than the face to focus most sharply on.

In addition, there are reasons to use the outer focus points and not just focusing with the center AF point and then recomposing.  First, if you are taking several shots of the same subject and framing, you will not have to re-focus with the center point and recompose between each shot.  And by controlling exactly where you focus, you then have greater, more precise control over the use of dramatic depth of field.  Also, if you use the center point and recompose, you have swept the camera in an arc to recompose, and are thus always focusing at a distance behind the subject.  This may not be as noticeable when the subject is further away, but for a close subject – especially when using shallow depth of field – the difference is critical.

One of the additional critical reasons to take control of your autofocus system is so that you don’t let the location of the AF Points dictate your composition. What happens when the subject you want to focus on is not located exactly under one of the AF Points? Even with 9 or 19 or more AF Points to choose from, they will not always be located exactly at or near where you need them to be.  Recomposing or re-framing your shot is often necessary so that you can capture exactly the image you wish to and not one dictated by the locations of the AF Points as you see them in the viewfinder.

Canon 7D 5D mark II 60D T3i 600D autofocus system AF point choose select set setting
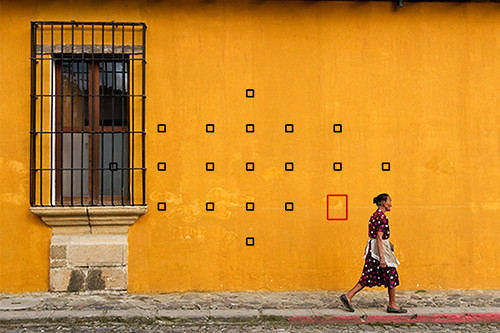
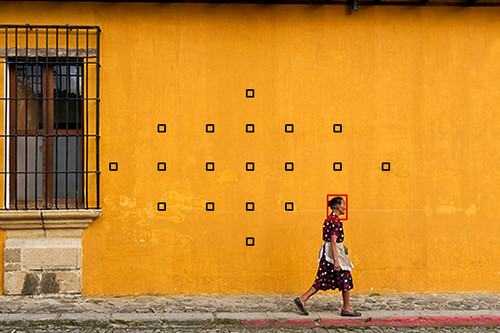
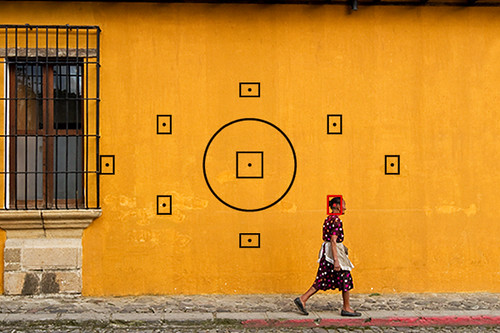
Figure 1 – The desired framing and composition of the shot I wish to take, yet no AF Point, including the selected lower right point (the larger point shown in red here) is located exactly at the woman’s head where I wish to focus. (Canon 7D viewfinder shown)

Canon 7D 5D mark II 60D T3i 600D autofocus system AF point choose select set setting
Figure 2 – Image is temporarily framed to place the selected AF Point over the woman’s head, Shutter Button is pressed half-way and held to lock focus at that distance, image is recomposed to the desired framing of previous Figure 1, and Shutter Button is fully pressed to capture the image.

Figure 1 shows the desired framing and composition of the shot I want to take, but the woman is not located under an AF Point. This composition is desired for me because it captures the entire window along with some space around it, as well as some space in front of the woman for her to “walk into” – but not an excessive amount of space. So I manually select the lower right AF Point (using Single-Point AF Mode), temporarily frame the image to place the selected AF Point over her face or head, press and hold the Shutter Button half-way to lock focus at that distance (Figure 2), and see the Focus Confirmation Light illuminate in the viewfinder. I then recompose back to the final framing I want (Figure 1) and press the Shutter Button fully to take the image. Even though the subject is moving, I do not need the sophisticated tracking of AI Servo (Canon) or Continuous Servo (Nikon) Focus Mode to keep her in focus. I can quickly lock focus using One Shot (Canon) or Single Servo (Nikon) Focus Mode, recompose, and take the image without the camera-to-subject focus distance changing significantly.

With the example images above (Figures 1, 2), focusing on the wall would not have been tragic because the distance between the subject and the background is small, and if a medium or narrow aperture such as f/8 or f/16 is used both the wall and the subject may be in acceptable focus. If the background was further away, and/ or a wide aperture such as f/2.8 was used – especially with a telephoto lens, and if the image was enlarged, you would clearly see that the camera focused on the wall and not the woman. Not to mention the fact that the wall is a somewhat consistent area of color and the AF system may have difficulty properly focusing on it. So it is best not to take shortcuts such as focusing on the wall and hoping the subject will also be in focus, because in many other situations you will not have this option. It is best to take the photo properly and to learn and practice the habit of working in the more rigorous manner if you want all your photos to be sharp.

If you would like to learn more about the autofocus systems of your Canon or Nikon dSLR camera, as well as learn to use the other features of your camera including metering modes, Aperture and Shutter priority modes, all the menus and Custom Function settings, and more, have a look at my Full Stop e-book camera guides. In addition to explaining the features and settings, the guides clearly explain when and why to use them in order to capture the images you desire.

Take control of your camera and the images you create!

Learn more about the e-books by clicking on their titles or on the banner below:
Canon 7D Experience
Canon T3i Experience
Your World 60D
T2i Experience.

Nikon D7000 Experience
Nikon D5100 Experience.

full stop dslr photo photography camera manual guide for dummies canon nikon

For those with other cameras, check out my Ten Steps to Better dSLR Photography which also discusses taking advantage of any dSLR camera’s autofocus system.

Was this post helpful?  Please let others know about it by clicking the Facebook or Twitter sharing buttons below, linking to it from your blog or website, or mentioning it on a forum.  Thanks!  Want to help support this blog with no cost or effort?  Simply click on the Amazon, B&H Photo, or Adorama logos on the left side of this page to go to those sites and make your purchases.  They will then give me a little referral bonus!

Taking Control of Your Canon Autofocus System

This article mostly applies to the 9 point autofocus system of the Canon 60D and the Rebels including the T5i / 700D and T4i / EOS 650D (and their predecessors), as well as to the new Canon 6D and its 11 AF points.  The Canon EOS 7D also shares the same Autofocus Modes discussed below, but it adds Autofocus Area Modes to the mix as well as additional Custom Functions affecting the AF system, so I will have to address those additional capabilities in the future (or you can learn all about them now in my Canon 7D Experience e-book).  I have written a separate post that addresses the AF system of the Canon 5D Mark III.

You can learn much more about using these cameras with my Full Stop e-book camera guides for Canon dSLR cameras.

Using Auto Focus
One of the essential steps in taking a successful photo is controlling where the camera focuses.  If you allow the camera to auto focus by choosing its own focus point(s), it typically focuses on the closest object.  This may or may not be what you want to focus on, so you should select where the camera focuses using the Auto Focus Points.  This does not mean you have to manually focus the camera, it means you tell the camera exactly where to autofocus.  For example, you often want to focus on a subject’s eyes, but if you allow the camera to choose the autofocus point itself, it may select another part of the face, or somewhere else on the body, or even a raised hand that is nearer to the camera than the face to focus most sharply on.  If you are capturing an image of a bird in a tree, the camera has no idea you want the autofocus system to zero-in on the bird so that it is in sharp focus and not the branches or leaves near it, or the leaves closest to you.

Autofocus works by looking for contrast, so try to focus (place your AF Point) on a detail with a strong line or strong contrast between light and dark.  It may not be able to focus on a large area of consistent color – such as a white wall or blue sky or even an evenly colored and lit shirt – or on a subject that is too dark.  It can be disrupted by regular patterns or confused when looking through close objects to objects farther away, such as looking through a fence.  And it sometimes fails to work as well in dim light, though the AF-Assist Beam can assist in this situation.  When photographing people, always try to focus somewhere on the face, ideally on the eyes or eyebrows, then recompose the framing of your image if necessary.

Select an Auto Focus Point, or AF Point, using the Multi-Controller or using the AF Point Selection Button and the Cross Keys (depending on your camera).  If you have a model with the Multi-Controller (such as the 60D with the thumb-pad or the 7D or 5DII with the thumb-joystick), be sure to set the Custom Function setting for AF Point Selection Method so that you can directly change the AF Point without pressing the AF Button first.
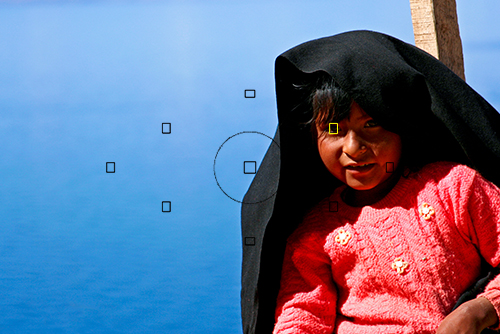
Canon 60D T3i 600D autofocus system AF point select choose set setting
Figure 1 – The selected AF Point is located over the subject’s eye in order to ensure the camera autofocuses where desired.  (Canon 60D viewfinder shown, T3i/600D viewfinder similar)

To see how autofocus point selection works, make sure the switch on your lens it set to AF and your Autofocus Mode, as seen on the top LCD Panel or rear LCD screen, is set to One Shot, then:

•    Tap the Shutter Button with a half-press to wake up the camera.
•    Looking through the viewfinder, use the Multi-Controller or Cross Keys to select the focus point that is nearest to where you want to focus.
•    Place that point over your intended subject.
•    Press and hold the Shutter Button halfway down and see that point blink red.  The Focus Confirmation Light should light up in your viewfinder.  You have locked the focus.
•    Keeping the Shutter Button pressed halfway, recompose if necessary, and take the shot by fully pressing the Shutter Button.

There are reasons to use the outer focus points and not just the center one all the time.  First, if you are taking several shots of the same subject and framing, you will not have to re-focus with the center point and recompose between each shot.  And by controlling exactly where you focus, you then have greater, more precise control over the use of dramatic depth of field.  Also, if you use the center point and recompose, you have swept the camera in an arc to recompose, and are thus always focusing at a distance behind the subject (think of an arc that is your focus distance, and the tangent line off that arc that is the focus plane which now runs behind the subject after re-composing).  This may not be as noticeable when the subject is further away, but for a close subject – especially when using shallow depth of field – the difference is critical.

It may sound difficult to select the focus point each time, but it is actually very quickly done and should become instinctive.  You may even start to set your focus point as you approach a scene before even bringing your camera to your eye.

Focus Modes
The 60D and T3i (and 5D/ 5DII and 7D) have different focus modes to choose from, typically depending if your subject is still or moving, or if you wish to track its movement.

One-Shot AF
Use this mode when your subject is still and not going to move, or if your subject is not going to move very much, or if the distance between you and the subject is not going to change between the time you lock focus, recompose, and take the shot.  Lock focus on the subject and recompose if necessary.  This mode can even be used for moving people or objects if you quickly take the shot after establishing or locking focus.

Focus on your subject by pressing the Shutter Button halfway.  The active or selected AF Point will be displayed or will illuminate, and the Focus Confirmation Light at the lower right in the Viewfinder will illuminate as well.  Continue to press the Shutter Button all the way to take the shot.  If you half-press the Shutter Button to lock focus on your subject, the camera will remain focused at that distance as long as you keep half-pressing the Shutter Button.  You can recompose the shot as you wish and then full press the Shutter Button to take the photo.

As just noted, if the Focus Confirmation Light does not light up and the camera does not take the photo, the camera may not be finding enough contrast to focus on, you may be too close to your subject for the lens to focus, or the lighting may be too dim for the AF system to work properly.

However, if you are photographing a subject that is approaching or receding from view at a relatively constant rate, or photographing fast or erratic or unpredictably moving subjects, or photographing sports, action, or wildlife you will usually want to use AI Servo Focus Mode.
Canon 7D 5D mark II 60D T3i 600D autofocus system AF point choose select set setting
Figure 2 – Use One-Shot AF mode and select your desired AF Point to capture still or moderately moving subjects.  (Canon T3i viewfinder shown – 60D similar)

AI Servo
AI Servo mode is used for tracking and focusing on moving subjects, and is ideal for capturing sports and wildlife including birds.  If the subject is moving towards you or away from you the camera will keep evaluating the focus distance as long as the subject remains under the focus point that was originally active and the Shutter Button is kept half-pressed, and if the subject is moving from side to side or throughout the frame the camera will track it as it passes from one AF Point or Zone to the other ones (if you started tracking with the center AF point on the 60D and T3i or any selected AF point with the 7D).

If the subject is going to be moving across your field of view, set the camera to automatically select the focus point using all the AF points (this is one of the few times you will not be manually selecting the auto focus point), focus on the moving subject with the center focus point, and then as long as the Shutter Button remains half-pressed the camera will track the subject to the other focus points if it moves to them.  Thus when the image is taken, the subject is in focus.  This will even work in conjunction with continuous shooting.  If you keep the Shutter Button fully pressed and continue to take photos, the camera will keep focusing on the moving subject.  As you can imagine, this is ideal for tracking a player running across a field, a dog running toward you, or a bird moving across the fame.  Note that when shooting with Continuous Shooting Drive Mode not every shot may be in sharp focus as the camera sometimes can’t keep up and accurately predict the subject’s speed or location.  But you should be able to capture many sharp images with this technique.  The more sophisticated Canon 7D will allow you to start tracking moving subjects with any selected AF Point and not just the center AF Point.  These are the types of advanced capabilities you are paying for (and should take advantage of!) with a more expensive dSLR.

As you will see, when using AI Servo mode your compositions will be partially dictated by the positions of the autofocus points in your Viewfinder.  The subject needs to be at one of these AF Points in order for the camera to maintain focus on it.  This is why in some situations becoming skilled at quickly using One-Shot AF – even for action scenes – will give you much more ability to control your compositions.

AI Focus
This mode is a hybrid of the two other focus modes.  It starts in One-Shot AF mode then changes to AI Servo mode if your subject starts moving.  Why shouldn’t you use this all the time, then?  Well, it is typically not the best of both worlds.  If you are focusing and then recomposing, as you may often be doing, your movement of the camera may fool it into thinking that the subject is moving and then activate subject tracking AI Servo Mode, and your resulting focus may not be where you intend it to be or may not be as accurate as it could have been with One-Shot AF.  And in AI Focus Mode it may not be as quick to respond to a moving subject as it would in AI Servo Mode.  Typically you know if your subject is still or moving so it is better to select one of the other two AF Modes.  Plus that way you always know which AF Mode you are working in and can either lock focus where you want it or begin tracking a subject without wondering what mode the camera is in and if it will suddenly change.  But there may be situations that call for this combination mode such as a still bird or animal that may start moving unexpectedly, so keep it in mind.

How do you remember which mode is which since the terms “AI Servo” and “AI Focus” tell you nothing that makes sense?  Although I listed them in a different order above to explain them more easily, on your camera they are listed:

ONE SHOT
AI FOCUS
AI SERVO

Remember that One-Shot AF just focuses once and doesn’t change once you lock it in, and AI Servo AF is the other extreme – continuous focus used for moving objects. And AI Focus AF is listed in the middle, between the two, because it is the hybrid, combination of the two.

Checking Focus
You can review your images on the rear LCD Monitor of your camera to try to determine if they are in focus, especially by zooming in as close as possible.  But be aware that this screen has only about one million dots or pixels, while your actual image has about 18 million pixels.  That means that many images will appear to be in proper focus on your LCD screen, but you might discover that the actual images are not really so sharply in focus.

Before continuing, I want to mention that much of this text is excerpted from my dSLR guides for the Canon EOS 6D, Canon 70D, Rebel T5i / EOS 700D, Rebel T4i / EOS 650D, and the Canon EOS 7D. If you would like to learn more about the autofocus systems as well as all the other features of your camera including metering modes, Aperture and Shutter priority modes (Av and Tv), all the menus and Custom Function settings, and more, have a look at my Full Stop e-book camera guides. In addition to explaining the features and settings, the guides clearly explain when and why to use them in order to capture the images you desire.

Take control of your camera and the images you create!

Learn more about the e-books by clicking on the banner below:

full stop dslr photo photography camera manual guide for dummies canon nikon


To learn about another important reason why you need to take control of your autofocus system, and why the two example photos above actually weren’t my final compositions, see the next post:

Don’t Let the Locations of the AF Points Dictate Your Composition

What do you do when, with your desired framing, your subject is not located exactly under or near an AF point?  Even with the 19 or 39 points of an advanced Canon 7D or Nikon D7000, this will often be an issue.  For example in Figure 2 above, I actually wish to capture the entire window and more space around it within the image frame, but moving the camera and framing for that composition leaves me with no AF Point at the woman where I wish to focus.  Have a look at the above post to learn why this is an issue and how to resolve it.

Focus and Depth of Field

Many functions of dSLR cameras are related to some degree or another, and Focus and Depth of Field are two of these.  The depth of field, based on your aperture setting (and thus related to exposure…) expands forward and back from your point of focus.  Thus, one important aspect of controlling your depth of field begins with focusing exactly where you want to.  To begin learning more about depth of field, have a look at my post Depth of Field Simplified.

Was this post helpful?  Please let others know about it by clicking the Facebook or Twitter sharing buttons below, linking to it from your blog or website, or mentioning it on a forum.  Thanks!  Want to help support this blog with no cost or effort?  Simply click on the Amazon, B&H Photo, or Adorama logos on the left side of this page to go to those sites and make your purchases.  They will then give me a little referral bonus!
Why “How it Feels” is not a Valid Criterion for Choosing a dSLR

Despite what you may read on countless forums, the “feel” of a dSLR camera is not a valid criterion for selecting one model over another.  At least not without some further explanation of what “feel” and dSLR camera ergonomics entails.

canon nikon ergonomics feel dslr digital slr camera photography

I myself have been guilty of taking the easy road and suggesting to someone, who is trying to decide between a couple models, to go to a camera store and “see how they feel in your hands.”  However, I’ve recently concluded that this statement alone is vague and imprecise at best and more likely potentially dangerously misleading.  And I’ve always contended that this “feel” criterion is secondary to much more important factors. 

First when choosing a camera, one must determine their current and projected needs.  I go into much more detail about this in my earlier post How to Choose a New dSLR Camera (which is thankfully free of the term “feel”).  This involves not just looking at all the new and exciting features and trying to guess if you will need and use them, but rather evaluating what and how you photograph, what features and capabilities you thus need in your camera, then finding the models that fit these needs.  Since cameras boast more advanced controls, features, and capabilities as they move up the line-up (Canon T3i vs Canon 60D vs Canon 7D or Nikon D7000 vs D5100 vs D3100) this will help you narrow down the decision.  The “feel” or ergonomics should definitely not be a deciding factor at this stage.

There are many important differences between an entry level camera and a mid-level camera as far as controls, features, more sophisticated autofocus system, weather proofing, durability, etc., and the fact that one is smaller and lighter than the other is a result of these differences, NOT a feature to be compared.  To take “feel” into account at this point is like someone buying a truck who needs a full-size bed to haul the maximum amount of mulch, but then says, “yeah, but the light-duty truck is smaller so I can park it easier, so I think it ‘drives’ better.”  They wanted a truck to fulfill their needs, yet they decided on another based on the wrong criteria.  No one who needs the full frame sensor, high ISO capabilities, and durability of a Canon 5D Mk II decides instead to get a T3i just because the T3i is lighter to carry around their neck at a wedding all day and “feels” 10x more comfortable in their small hands.

Once you have successfully determined which level camera fits your needs, then you may have narrowed your choices down to the comparable Canon and Nikon models that likely share similar features, such as the Nikon D5100 vs the Canon T3i.  This is where the “feel” argument often comes in.  At this point I will grudgingly allow ergonomics into the picture as one of the deciding factors – but not without further explanation.  What is the difference between “feel” and actual ergonomics?  And what exactly does that mean, the “feel of the camera in your hands?”  For me, initially, before I actually put some thought into it, and for many other people I image, it means just that.  You pick up a D5100 and check out the weight, balance (with the kit lens attached), size of the grip (does your pinky fall off the bottom?), texture of the grip materials (ohh, bumpy!), put it up to your eye and perhaps take a shot.  Then you pick up a T3i (600D) and follow the same procedure.  Some people may prefer the body that is slightly smaller, or the one that is larger – depending on their hand size, and many would prefer a body that was lighter if there was a noticeable difference in weight.  But picking a camera up and holding it in the store is not the same as using it. How it initially feels will likely not be a true indication of how it feels when operating it and using its controls.  It is not a meaningful test of “feel” or ergonomics.

This is especially true for a new dSLR user who has never actually used one for real life shooting.  They don’t yet know how it will feel when using a dSLR because they have yet to do that.  “Feel” needs to take into account more than picking up the camera with the kit lens and holding it to the eye:

  • Ergonomics involves the placements of the buttons and controls that you will access constantly while shooting – the location of the autofocus point selection arrows or thumb joystick, the location and orientation of the main dial that will be used constantly to set aperture or shutter speed.  This is actually a significant ergonomic difference between a Canon and a Nikon that I have never once seen mentioned in a forum about “feel” and if any ergonomic criterion is truly important, I would say it is this one.  I find the top location/ orientation of the Canon dial coupled with the large rear dial a natural, ergonomic joy.  I find the horizontally orientated front and rear dials of Nikons uncomfortable and aggravating to my tenosynovitis.  So until a dSLR user knows where their fingers will be moving and what controls they will want to access with the camera held to their eye, then how can they fully judge “feel?”
  • The ergonomics of a camera body changes, sometimes dramatically, depending on which lens is attached and used.  Most demo cameras in the shop have the small, lightweight 18-55mm kit lens attached.  If this is the lens you will use all the time for the remainder of your dSLR shooting life, then this can be a valid test (see Why You Shouldn’t Buy the Kit Lens).  If not, you should definitely try it out with a couple additional lenses such as a larger telephoto.  Not only will most other lenses be larger and heavier than the kit lens, but the camera will likely be held differently when using them.  If you are a new user, then you may not yet know which lenses you will want and use in the future.  While a small, light, entry-level dSLR body feels great with the kits lens, it can become nearly unusable with a high quality, large, heavy lens.  As one forum contributor said,

“…my 450D felt great with the kit lens, but almost unholdable with a 100-400 and ultimately I got a battery grip for it which helped a lot with that lens. I will add that at the time I bought my 450D I felt it against a 40D and preferred the lightness and size of the 450D.  Had I known then what lie ahead I would have got the 40D.”

Although the 100-400 is a huge lens that many will never buy, the same weight, size, and balance issues hold true for other more “basic” high-quality lenses such as the Canon 24-105mm f/4L or the Canon 24-70mm f/2.8L, or even many non-L larger telephoto lenses.  Plus what about putting an optional external flash on top?  That will completely change the balance of any camera.

  • While everyone’s hands are different, etc, I find it hard to believe that Canon and Nikon or the other major manufacturers make a completely un-ergonomic camera for the average range of hands.  I mean other than that Nikon model with the glass shards embedded in the grip and the Canon with the 15 kilo battery.  Sure some can complain about little quirks and button placements, and some cameras are smaller and some are larger and thus feel different to different sized hands.  But remember a dSLR camera is a tool, and I refer you back up to the “full-size bed truck” analogy.
  • When you get new glasses or have dental work done, it always feels funny for a couple days. Then you get used to it and don’t notice. When you work with a camera after a bit, I would bet most would experience the same.  As another forum participant noted,

“When I was buying my first DSLR, the 450D felt weird in my hand, exactly the same as every other DSLR in the shop. The reason?  I did not know what’s what, what will I use and have never hold DSLR in my hand before. It was just a foreign object and felt weird. Got used to the DSLR and after a while it felt like an extension of my hand.”

There are good reasons why cameras and controls are designed with their specific curves, button placements, and materials. And even then, some are more careful, precise, and pleasing to the touch because they are on a pro camera catering to exacting needs.  Some are less rigorously-designed compromises to provide functionality at a lower price-point.  The user just may have to adapt a bit to their tool as they learn these reasons through use and experience.

I agree that in the end, some people just find certain cameras too big, too small, too uncomfortable, etc. for their hands.  But I just don’t think “feel” should continue to be Criteria Number One on every “which camera should I get” forum I read.  I personally have used dozens of different dSLRs, I have handled them extensively as a photographer, salesperson, reviewer, and camera guide author. I have yet to find one I can’t or won’t use due to ergonomics.  They are tools, there are reasons each is designed the way it is, and despite any design/ cost compromises each is fully functional.  In my humble opinion, I believe that ergonomics, and especially “feel,” are over-emphasized in these conversations regarding beginners – or anyone – choosing a camera.

Now don’t get me started on the related issue of “which menu system works best for you.” :)  (Come on, you’ve learned to use dozens of different menu systems with your countless software programs, point-and-shoot cameras, DVD player, TV set-up, Tivo, GPS, etc.  I think you can figure out a well designed Canon or Nikon menu.)

But all of this is moot.  In reality, people should choose a camera based on the brand that their brother-in-law once told them was really good because his father’s friend had one back in ’86 and he took really good pictures with it at a wedding once and he had a really big lens so he totally knew everything about cameras.

Understanding and Using Exposure Compensation and Bracketing

One of the key elements for obtaining the proper exposure of your images when working in Aperture Priority or Shutter Priority modes is making use of Exposure Compensation.  Although all the exposure related settings of a dSLR are intimately intertwined (such as aperture, shutter speed, ISO setting plus the exposure metering mode you are using, etc.) and it is challenging to speak of one without addressing the others, I will focus here on exposure compensation and when and how to use it.

The following text is excerpted from my e-book guide Ten Steps to Better dSLR Photography, where you can learn more about exposure compensation plus apertures, shutter speeds, exposure metering modes, composition and more.  Click on the cover at the end of the post to learn more about the guide, preview it, or purchase it.

Why Exposure Compensation is Needed

If you take an image that turns out to be darker or lighter than you desire, based on reviewing the image and/ or its histogram on your rear LCD screen, you can use exposure compensation in the non-Auto shooting modes to “override” the exposure that the camera is selecting, in order to brighten or darken the next image’s exposure.  You may want to do this if you have seen that your highlights have run off the right side of the histogram and been blown-out, resulting in complete loss of detail in those areas of the image.  Consult your manual to determine how to adjust exposure compensation on your specific camera.  With some Canon models, you press the Exposure Compensation [+/-] button and turn the Main Dial.  With other Canon models you use the Quick Control Dial to adjust this setting.  With Nikon, Sony, Pentax, and Olympus models you typically press the Exposure Compensation [+/-] button and turn a dial.  You will then see the exposure compensation amount change in your viewfinder and/ or on the top or rear LCD screen.  If the exposure level indicator in one of these places is not changing, press the shutter button half-way to first wake up the camera, or move/ press the Lock switch/ button near the rear dial on a Canon.

Putting Exposure Compensation to Use

If you have taken a photo that is too dark and you wish to retake the image and make the next exposure of the scene lighter, adjust exposure compensation in the positive (+) direction.  To make the next exposure darker, adjust exposure compensation in the negative (-) direction.  Try changing the Exposure Compensation by perhaps 1/3, 1/2, or 2/3 in the direction you desire, retake the shot, and see if your exposure problem is solved.  Increase or decrease the exposure compensation as needed.  Remember to set the exposure compensation back to zero when you are done with that situation and move on to take different images!  This is one reason why you should check your camera’s settings often – to make sure you haven’t left the camera on the settings from a previous situation.  This can often happen with the ISO setting and exposure compensation setting.  Check your current settings on the top or rear LCD display or in the viewfinder.

To remember how to compensate – which direction to turn the dial – think of the histogram peaks on the graph.  If you wish to shift the peaks to the left, to the darker side, to make the image darker, turn the dial so that the exposure compensation level moves to the negative side (-1, -2, etc.).  If you wish to shift the peaks to the right, to the lighter side, to make the image lighter, turn the dial so that the exposure compensation level moves to the positive side (+1, +2, etc).  Curiously, some cameras put the negative side of the exposure level indicator on the left, and others put it on the right, so look in the manual or viewfinder to see how yours operates.

Bracketing

Exposure compensation can also be used to “bracket” an exposure.  Bracketing is when you take at least three photos of the same scene, one at the “proper” exposure, one under-exposed, and one over-exposed (see the image below).  For example you may take the second and third shot with the exposure compensation set at +1 and then -1.  This is done to ensure that you capture exactly the right exposure you desire.  In the days of film this was a helpful technique, especially for critical situations, since one didn’t have the immediate feedback of the image on an LCD screen and a histogram.  It can still be used today for critical situations or for test shots when determining the right exposure settings.  Digital SLR cameras typically have an auto exposure compensation feature so that this process is more automated.  You set the amount of under- and over-exposure desired (such as +1, -1 or +1 2/3, -1 2/3) and then take three images in a row.  The camera automatically adjusts the exposures for each shot in order to bracket the second and third shots.  If your camera is set on continuous drive mode, you can just hold down the shutter button and the camera will take the three shots in a row.


Weaver Constructing the Keshwa Chaca, Huinchiri, Peru – Three bracketed exposures of the same scene:  the “proper” exposure as determined by the camera (Evaluative metering mode) in the center, under-exposed -2/3 stop on the left, over-exposed +2/3 stop on the right.  The desired exposure, for my eye, lies somewhere between the “proper” exposure and the over-exposure.  With auto exposure bracketing you can often customize the order that the bracketed images are taken, for example proper/under/over or under/proper/over.  In this example they were taken proper/under/over, so they are displayed here in a different order than actually captured.  Center exposure:  Shutter speed 1/1000, aperture f/5.0, ISO 100, focal length 105mm.

Exposure compensation and bracketing are also used in HDR (high dynamic range) photography to take three or five or more photos of the same scene at various exposures.  All the images are then combined by the photographer, using HDR software, into a single image which will contain a much broader dynamic range of light and dark than is possible with a single image.

Beyond Exposure Compensation

As I mentioned at the start, exposure is determined by a number of controls and settings on your dSLR.  If you are consistently taking images that are under- or over-exposed, you may wish to explore the other metering modes, to ensure that the camera is metering your exposures exactly where and how you want.  Have a look at my previous post on Exploring Metering Modes to learn more about this, or have a look at my e-book guide Ten Steps to Better dSLR Photography to learn about all the aspects of exposure and how they relate.


Awesome Apple Icon Photoshop Tutorial

apple icloud icon button dslr tutorial aluminum metal metallic iphoto icamera camera photo

I used this great video tutorial from PhotoGuides (dot) Net to create my shamelessly derivative, Apple-style, aluminum-appearing camera icon/ button, based on the profile of the Canon 7D.  I tweaked several of the numbers and settings shown in the tutorial, and I will include those details here soon…

There are several other Photoshop tutorials on the PhotoGuides site (and on its YouTube channel) that look really good, such as the “glass” app buttons, plus some non-video tutorials such as how to create the Apple-type reflection seen under my camera button.

Below my icon is the real, original Apple iCloud icon, so you can see how accurate this tutorial can be.  But you really have to fiddle with the bevel and embossing settings, and adjust your gradients settings to align the reflective light rays.  I tried to make my light rays relatively close to the original, but you can create any number of rays and align them as desired.

Now if I only had a photography iPhone/ iPad App to go along with my icon… perhaps one based on my Ten Step to Better dSLR Photography e-book!