One of the most powerful features of the Canon EOS 70D is the ability to customize the functions of various buttons and controls on the camera body. Taking advantage of this will allow you to set up the camera specifically for you and your shooting style and needs, and thus enable you to work more smoothly, quickly, and efficiently. Having the ability to easily and intuitively change the camera settings on the fly will also allow you to focus on the more important aspects of capturing the framing, moment, or composition you are after.
These settings are found in the III-4: Custom Controls menu (see Figure 1). At first you may wish to leave many of these on the default settings or set them to match your previous camera settings. Then after working with the camera awhile, you will begin to know how you work and how you wish to work faster or more conveniently through customizing some controls. Pages 384-385 of the Canon 70D manual show all the possible options, and you might consider printing these manual pages to carefully study and consider your potential configurations.
These explanations are excerpted from my e-book guide to the EOS 70D called Canon 70D Experience. As with all my dSLR guides, Canon 70D Experience will help you to learn not only how but more importantly when and why to use the features, functions, and controls of the 70D. Learn more about the guide on my Full Stop website here.
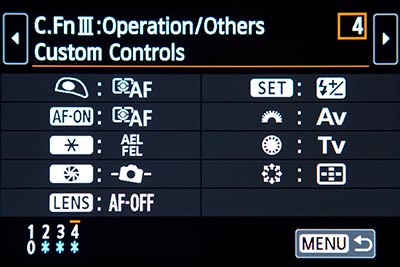
Figure 1 – Custom Controls menu to customize the buttons and controls of the camera to function exactly how you need, to fit your working methods and shooting style.
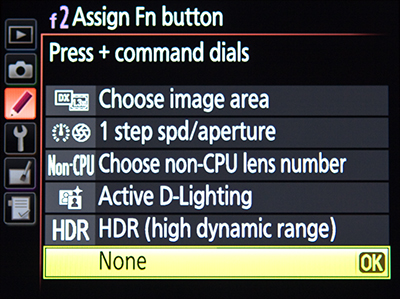
Some custom controls that you may consider experimenting with are the assigned settings of the Shutter Button (when it is pressed halfway), the AF Start Button (AF-ON), and the AE Lock Button (the one with the [*] symbol). You can customize them so that they initiate and/ or lock focus and exposure separately or in a variety of different button combinations. When working in Evaluative Metering Mode and One-Shot AF, the default setting is that exposure metering is locked and focus is locked at your active AF Point when you press the Shutter Button halfway. You then recompose if necessary and fully press the Shutter Button to take your photo. But the exposure settings were locked on a different framing than your final framing! So you may wish to lock focus with a different button than you lock exposure, or else re-determine the exposure metering settings for the final framing before taking the shot (which is typically done with the AE Lock [*] Button).
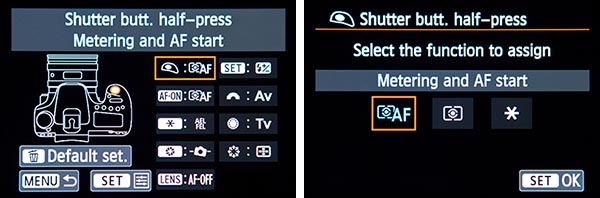
Figure 2 – Custom Controls options – Selecting the Shutter Button (left), and choosing which function(s) it will perform when pressed half-way (right).
When working in One-Shot AF with one of the Metering Modes other than Evaluative Metering (Spot, Partial, or Center-Weighted), the default setting is that exposure metering is begun (not locked) and focus is locked when you press the Shutter Button halfway. You then recompose if necessary and fully press the Shutter Button to take your photo, and exposure is determined at that moment. But with these other Metering Modes it is likely that you will want to lock exposure on a certain area before framing for the final shot and taking the photo.
Either of these above default settings may cause you to meter for a scene or area that is different from what you intend, and thus result in a slight or profound under- or over-exposed shot. With the default button settings and the above scenarios, you can always use the AE Lock Button (exposure lock button with the [*] symbol) to lock in the exposure of your desired framing. But you may find that after working awhile, you would like to start or stop exposure metering and/ or focusing in a different manner than the default settings, and then you can reconfigure the functions of these buttons (See Figure 2).
To test how your camera functions before or after changing these settings, set it on One-Shot AF Mode, Tv or Av Shooting Mode, and Evaluative Metering Mode, hold the camera to your eye, aim it at a bright area, and half-press the Shutter Button. While keeping the Shutter Button half-pressed, move the camera and aim it at a dark area. Keep your eye on the aperture and shutter speed settings in the viewfinder and watch if they change or if they remain locked. Change the metering mode (Spot, Partial, or Center-Weighted) and do this again. Then repeat the process by first pressing the Shutter Button half-way and then pressing (and releasing) the AE Lock [*] Button. You can repeat a similar process to see focus lock in action or to test your custom focus lock button settings.
Note that there are multiple Auto Exposure Lock (AE Lock) options, such as when setting the function of the AE Lock [*] Button (see Figure 3). The AE Lock option will lock the exposure for the current scene when you press and release it. If you reframe the shot and want the camera to re-evaluate and re-lock the exposure, just press the [*] Button again. The AE Lock (while button pressed) option only applies to the Shutter Button, and will lock the exposure as long as the Shutter Button remains half-pressed, similar to how the camera works with the One-Shot / Evaluative Metering default settings, as described above. This differs from assigning the Shutter Button to Metering start because with Metering start, the camera will start evaluating for exposure, but the exposure values will not be locked but will continue to change until you take the photo or press the AE Lock [*] button (when you are working in Partial, Spot, or Center-Weighted Metering Modes). Again, you can see this in action by half-pressing the Shutter Button to start metering, look in the viewfinder (or on the LCD Panel) at the exposure settings, move the camera around, and see the settings change. The AE Lock (hold) option (indicated with “*H”) will lock the exposure and maintain that lock with those exposure settings for all subsequent shots, until you press the AE Lock [*] Button again. The AE Lock option without the (hold) option (indicated in the menu options with “*”) will only lock the exposure settings until the metering timer ends (the exposure numbers disappear in the viewfinder and on the top LCD Panel).
The AE Lock/FE Lock option will lock both the exposure settings as well as the flash output setting when using a flash. If a button is set for this option, pressing the button will fire a pre-flash from the built-in flash or a Speedlite to determine and then lock the proper flash output.
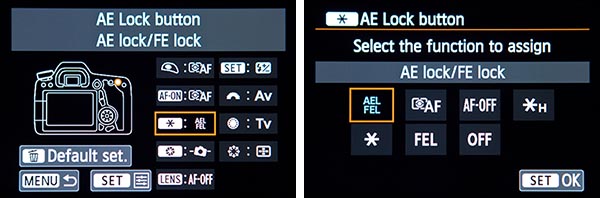
Figure 3 – Custom Controls options for customizing the functions of the AE Lock Button.
Some options will allow you to perform what is called “back button focusing,” which is further explained in the Back Button Focusing section of Canon 70D Experience. This technique allows you to start and/ or stop (lock) the autofocusing using the AF-ON button, in conjunction with or instead of the Shutter Button. Taking advantage of these options can help you to fully utilize the autofocus system of the 70D as well as modify it for your personal shooting style.
While you may wish to work with your camera before considering changing most of these settings, I strongly encourage you to immediately change the function of the thumb-pad Multi-Controller to AF Point direct selection so that you don’t have to press the AF Point Selection Button first every time before you select your autofocus point (see Figure 4). Instead you can just press the thumb-pad Multi-Controller to choose your desired AF Point (once you have tapped the Shutter Button to wake up the camera and begin metering).
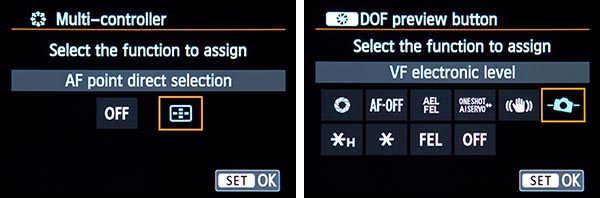
Figure 4 – Left: Custom Controls options for the Multi-Controller (thumb pad) to set for AF Point Direct Selection so that your desired AF Point can be quickly selected with the Multi-Controller alone. Right: Custom Controls options for customizing the functions of the Depth-of-Field Preview Button, including the Electronic Level.
You may also want to consider assigning the Depth of Field Preview Button to one of the other available functions if you don’t typically use it for its depth of field preview function (see Figure 5). For example, you can use it for FE Lock (flash exposure lock) or to quickly switch between One-Shot focus mode and AI Servo focus mode. The switch only occurs as you hold the button, so for example if you are shooting a still subject using One-Shot focus mode but suddenly wish to start tracking a moving subject, press and hold this button to temporarily work in AI Servo mode. Or if the camera is set for AI Servo mode, holding this button will temporarily switch the camera to One-Shot mode.
70D “Hidden” Feature: You can also set the Depth of Field Button as the Viewfinder’s VF Electronic Level, which is sort of a “hidden” feature of the 70D. This is different than the Viewfinder Level icon of the Shooting 1 menu, and instead uses the AF Points displayed in the Viewfinder as a one-axis level. This level will function in either camera orientation (see Figure 4). If this option is selected, when you are shooting simply press the Depth of Field Preview button for this Viewfinder Level to appear, then tap the Shutter Button to resume shooting.
And you may want to assign the SET Button to the function of your choice for quick access, such as perhaps Flash Exposure Compensation since there is not a dedicated button for this. Or you might set it for Image Quality. This can be a helpful setting because certain camera functions such as HDR Mode are only accessible when capturing JPEG images, so you may need to quickly change from RAW or RAW+JPEG image quality to JPEG only. Another interesting setting for the SET Button is Set ISO speed (hold button, turn Main Dial). What this customization does is allow you to change the ISO setting by pressing and holding the SET Button and turning the top Main Dial (see Figure 5). While this may seem unnecessary as there is a dedicated ISO Button on the top of the camera that allows you to quickly change the ISO, it can come in handy during shooting. For example if your camera is on a tripod and you are positioned behind it using the Live View screen, it may easier to use this SET Button and Main Dial arrangement to change the ISO than it is for you to look or feel around the top of the camera to determine which button is the ISO Button. Or you may find that this method is just a really quick way to change the ISO during Viewfinder shooting. Of course you can always use the [Q] Button or icon and Touch Screen to change the ISO setting as well. So, as with many other settings, determine which camera set-up and method works best for you and your shooting situation.
Unfortunately, if you set the Multi-Controller to AF Point direct selection, the SET Button will not directly select the center AF Point, as you may be used to. You will still have to press the AF Point Selection Button first and then press the SET Button to directly choose the center AF Point. This issue may cause you a bit of trouble if you have assigned the SET Button to another function, as that function screen will suddenly appear on the rear LCD Monitor if you press the SET Button while you are shooting, and you may accidentally change that setting. If this becomes an issue, assign the SET Button to OFF.
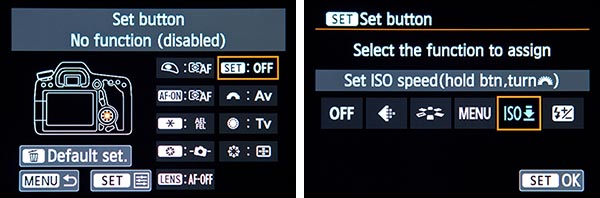
Figure 5 – Custom Controls options for customizing the functions of the SET Button.
Finally, if you often work in Aperture Priority (Av) mode but then sometimes work in Manual (M) shooting mode I suggest you swap the functions of the Main Dial and the Quick Control Dial in Manual Mode (see Figure 6). Access the Main Dial option (the half-circle icon) and assign it to the Av option (Aperture setting in M mode). Then access the Quick Control Dial (the full-circle icon) and assign it to the Tv option (Shutter speed setting in M mode). By doing this the Main Dial controls the aperture setting in M mode just as it does in Aperture Priority Mode, and the Quick Control Dial controls the shutter speed setting when working in Manual (M) mode. If you typically work in Av Mode and then switch over to M mode, the muscle memory of your index finger will thank you as it will instinctively turn the Main Dial to adjust the aperture setting, and this was not the default setting of the camera. If you typically work in Tv Mode and sometimes switch to M Mode, leave these buttons on the default settings.
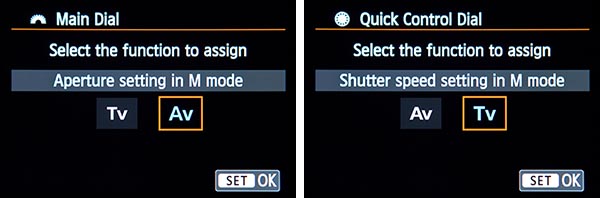
Figure 6 – Custom Controls options for customizing the functions of the Main Dial (left) and Quick Control Dial (right) when working in Manual (M) Shooting Mode.
To learn more about using your Canon 70D and how to take full advantage of all its features, functions and controls – including back-button focusing, plus taking control of the autofocus system, making use of the various metering modes, and understanding the elements of exposure – have a look at my e-book guide called Canon 70D Experience. As with all my dSLR guides, Canon 70D Experience will help you to learn not only how but more importantly when and why to use the features, functions, and controls of the 70D. Learn more about the guide on my Full Stop website here.
Read my hands-on preview of the 70D with some sample images at my Canon 70D Unboxing and Hands-On Preview post.
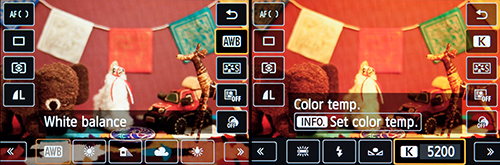
Live View – White Balance: I ran across a question online about setting a Kelvin white balance in Live View, so I will add this info here with some screen shots below. To change the WB in Live View, press the Q Button to access the Quick Control Screen, then select the White Balance icon, either by navigating to it by pressing up or down on the Multi-Controller, or simply using the Touch Screen. If you have navigated to it, you can then press left and right on the Multi-Controller to make your selection at the bottom of the screen. If you select the K option, press the INFO Button to select your desired temperature.
And if you are planning to purchase your Canon 70D online, please consider using my affiliate links and help support this blog – thanks!
Order your Canon EOS 70D from Amazon or B and H Photo:
Amazon:
Canon 70D – Body or with choice of kit lenses – $1,199 to $1,549
B and H Photo:
Canon 70D – Body only – $1,199