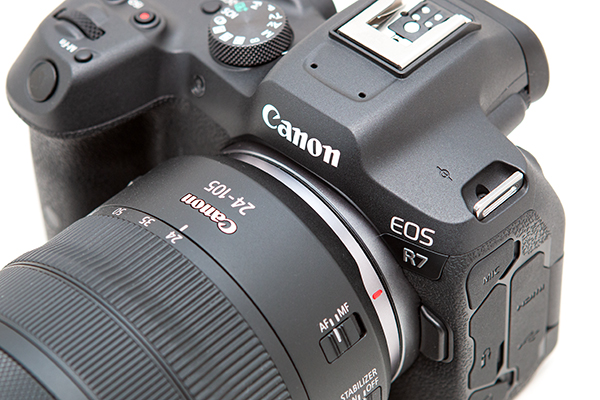
The Canon EOS R7 mirrorless camera offers numerous menu items and customization options. In order to take full advantage of this camera, you are going to need to dig into the Menus and Custom Functions, and set up the camera to work best for how you shoot and for the type of situations you are shooting. To assist you with this, I have created a detailed and comprehensive Canon EOS R7 Menu Setup Spreadsheet, which lists suggested settings and starting points for the various Menus and the Custom Functions. It has complete and separate camera setup recommendations for different types of shooting, including:
General / Travel / Street Landscape / Architecture Action / Sports Moving Wildlife / Birds Studio / Portraits Concert / Performance
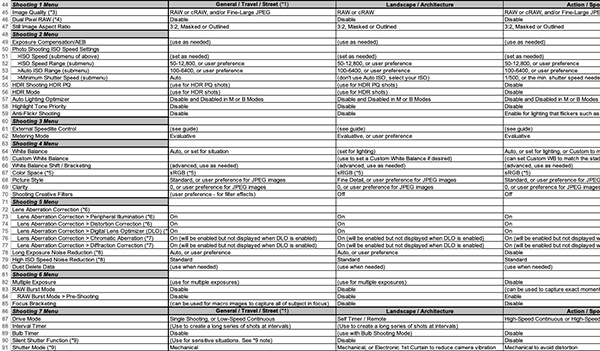
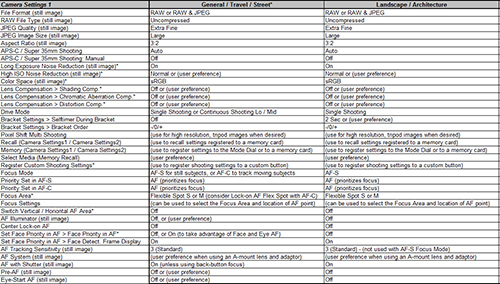
A detail of the comprehensive EOS R7 Menu Setup Spreadsheet
The Canon EOS R7 MenuSetup Spreadsheet can be downloaded from my website here. Printing instructions are also included on that page.
I have also created a Canon EOS R7 Menu Setup video, which walks through all the items and settings of the Photo Menu, with explanations and suggested settings. Watch it on YouTube here, and be sure to subscribe to my channel to be notified when additional EOS R7 Menu Setup videos are posted.
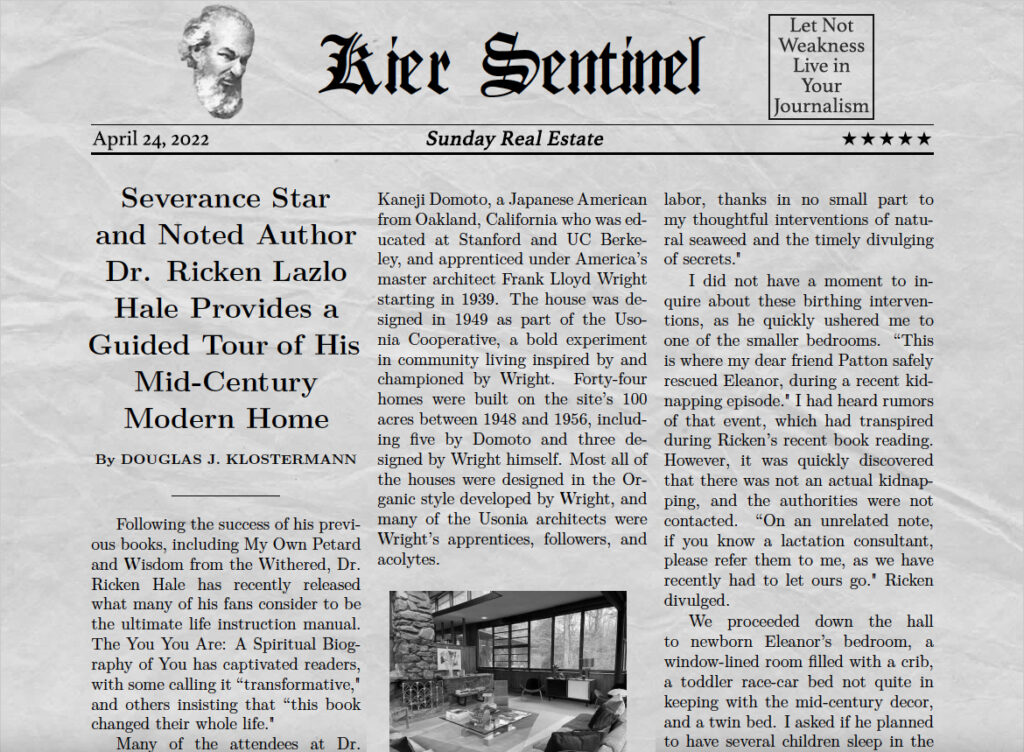
A visit with author Dr. Ricken Lazlo Hale, wherein he talks about his life living in a ‘living’ machine-for-living
By Douglas J. Klostermann
This article originally appeared in the Sunday Real Estate supplement of the Kier Sentinel.
Following the success of his previous books, including My Own Petard and Wisdom from the Withered, Dr. Ricken Hale has recently released what many of his fans consider to be the ultimate life instruction manual. The You You Are: A Spiritual Biography of You has captivated readers, with some calling it “transformative,” and others insisting that “this book changed [their] whole life.”
Dr. Ricken Hale’s book, The You You Are, often found left behind on chairs in airports, waiting rooms, conference rooms, and coffeeshops (photo by Seth Milchick).
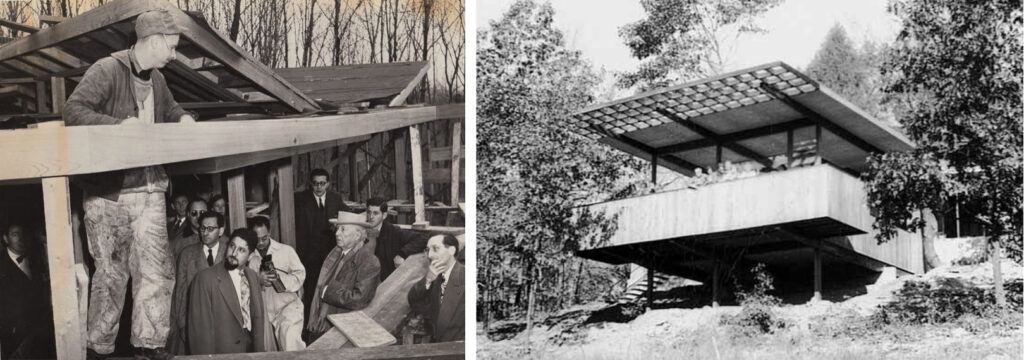
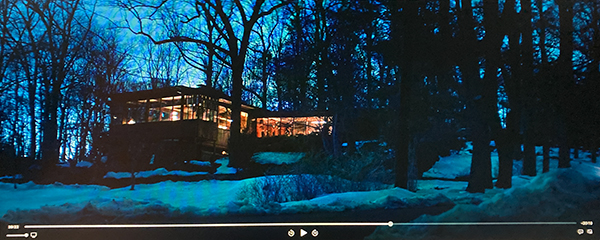
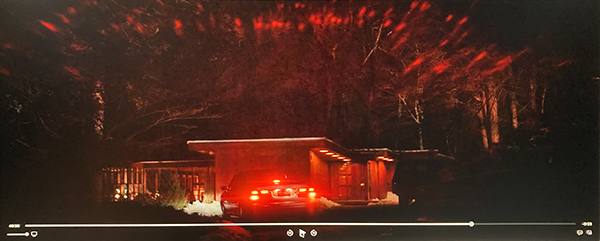
Many of the attendees at Dr. Hale’s initial reading of this latest book were not only awed by his profound words, illuminating ideas, and wavering voice, but also by his warm and welcoming Mid-Century Modern home, nestled in the woods in the winter landscape of Kier, PE. As an aficionado of Mid-Century architecture and design, I asked to meet up with Dr. Hale to learn more about this special house that he shares with his wife and newborn daughter.
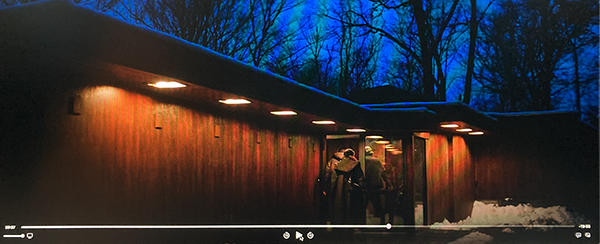
“Welcome, welcome. Please, call me Ricken,” the author proclaimed as he greeted me at the glass-paned front door of his home, and ushered me into the foyer. “The space before you was originally the consultation room of the original owner, a certain Dr. Arthur Bier, who lived here with his wife Gertrude, and their two daughters,” Ricken knowingly informed me.
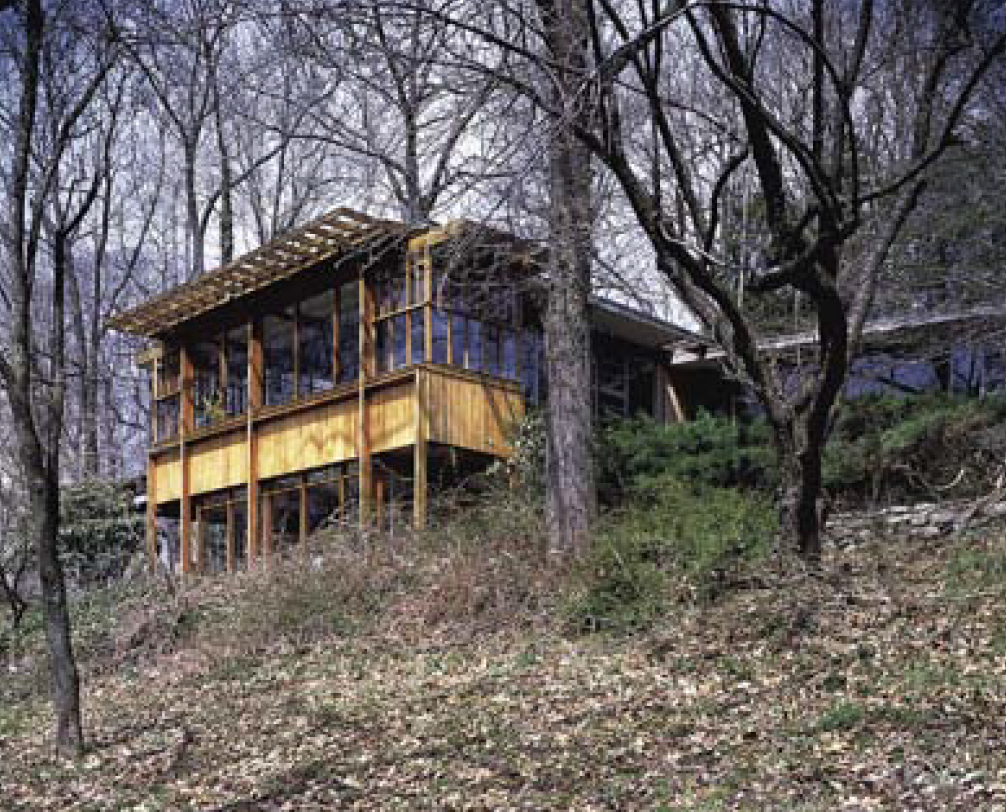
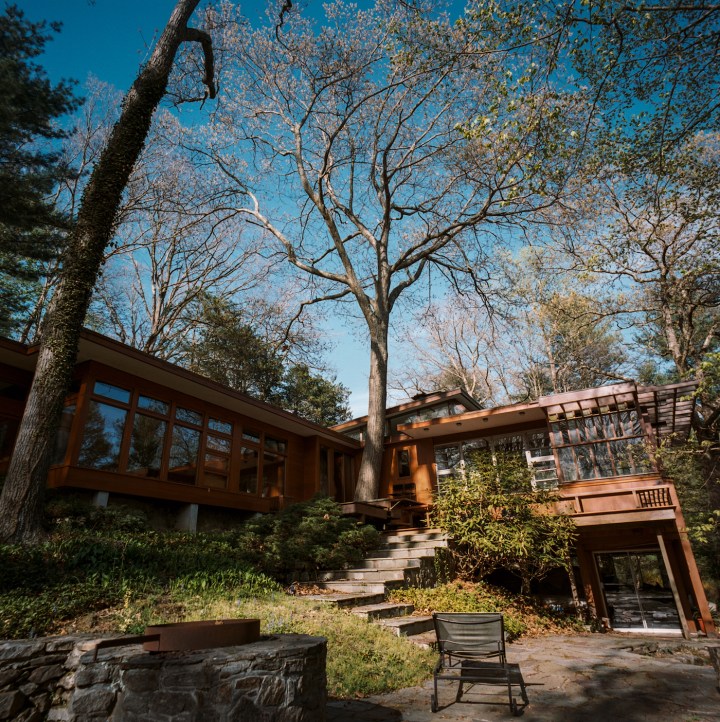
The view approaching the Bier House, currently the home of Dr. Ricken Lazlo Hale and his family (photo by Roland Reisley).
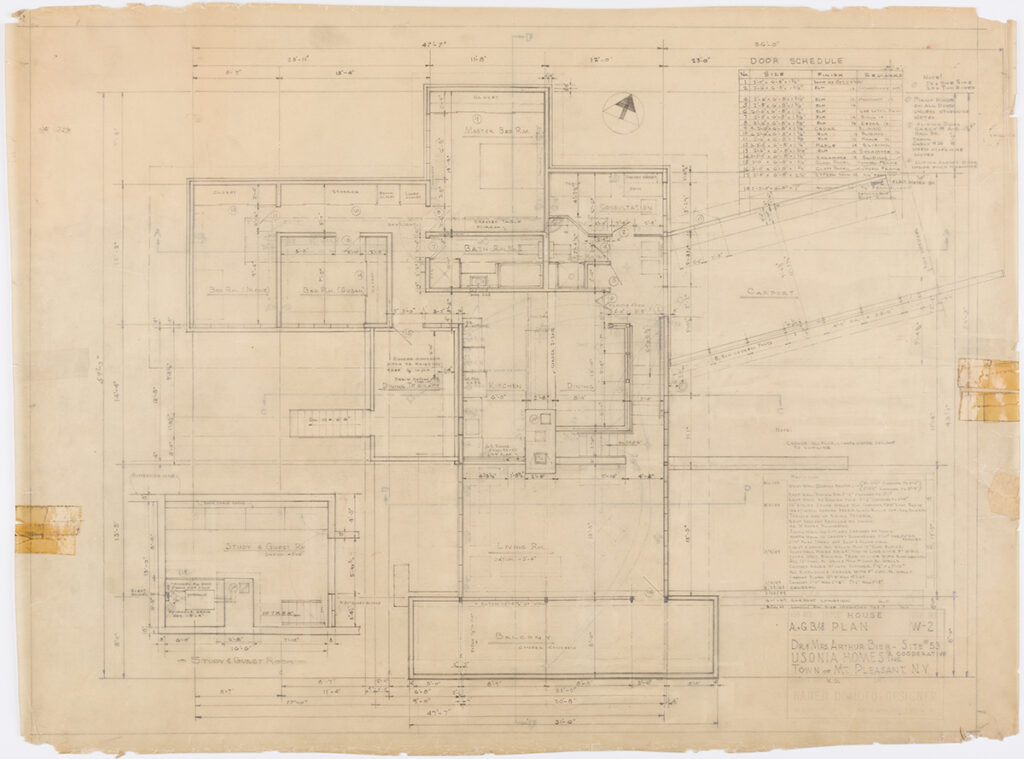
I had recently learned this information myself, as I had dutifully studied the original plans for the house, hand-drawn by the designer Kaneji Domoto, a Japanese American from Oakland, California who was educated at Stanford and UC Berkeley, and apprenticed under America’s master architect Frank Lloyd Wright starting in 1939. The house was designed in 1949 as part of the Usonia Cooperative, a bold experiment in community living inspired by and championed by Wright. Forty-four homes were built on the site’s 100 acres between 1948 and 1956, including five by Domoto and three designed by Wright himself. Most all of the houses were designed in the Organic style developed by Wright, and many of the Usonia architects were Wright’s apprentices, followers, and acolytes.
“Let the tour commence,” Ricken announced, as he shepherded me past the breakfast room and galley kitchen, and down a winding hall toward the bedroom wing. I asked him how he came about living in this house, and Ricken began to explain, “Once I had broke the world of literature, I desired to live in a house that broke the world of architecture.”
Indeed, Wright’s designs and those directly inspired by him had a tremendous influence on architecture, far beyond the exceptional collection of homes in the Usonia community. Countless architects and designers adopted Wright’s Organic philosophy of using natural materials such as wood and stone, integrating the building into the surrounding landscape, bringing the natural world into the house through abundant windows and intentional vistas, and creating open spaces that flowed into each other.
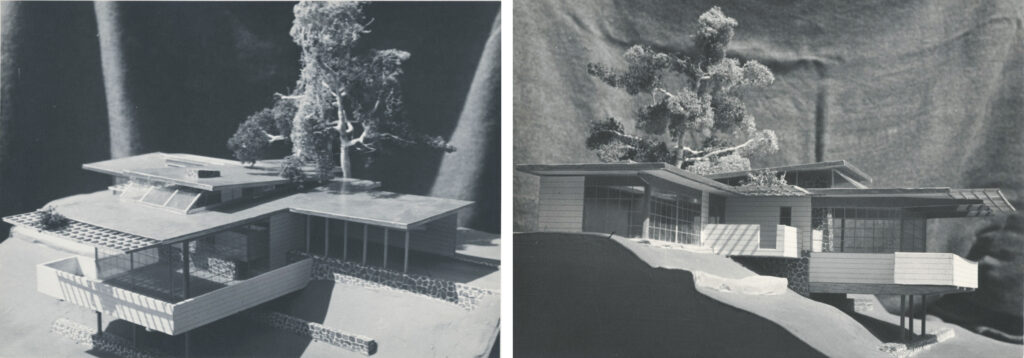
An early model of the Bier House by Kaneji Domoto, circa 1949 – Left image: The living room is at the left with its original balcony, and the open car port is at the right. Right image: The rear of the house, with the living room and its original balcony at the right, and the bedroom wing at the left.
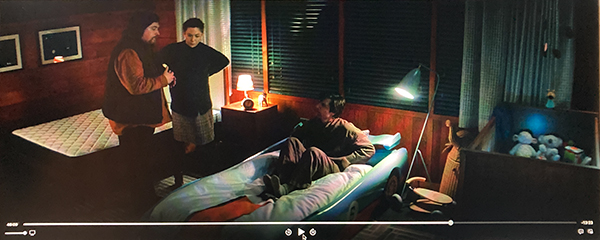
We rounded a corner and entered the master bedroom, where we encountered Ricken’s wife Devon Scout-Hale, who was in the process of expressing milk for the couple’s newborn daughter. “We have recently given birth to the new love of my life, my daughter Eleanor Ricken Scout-Hale Hale,” the proud father declared. “My wife and I joyfully survived the labor, thanks in no small part to my thoughtful interventions of natural seaweed and the timely divulging of secrets.”
I did not have a moment to inquire about these birthing interventions, as he quickly ushered me to one of the smaller bedrooms. “This is where my dear friend Patton safely rescued Eleanor, during a recent kidnapping episode.” I had heard rumors of that event, which had transpired during Ricken’s recent book reading. However, it was quickly discovered that there was not an actual kidnapping, and the authorities were not contacted. “On an unrelated note, if you know a lactation consultant, please refer them to me, as we have recently had to let ours go.” Ricken divulged.
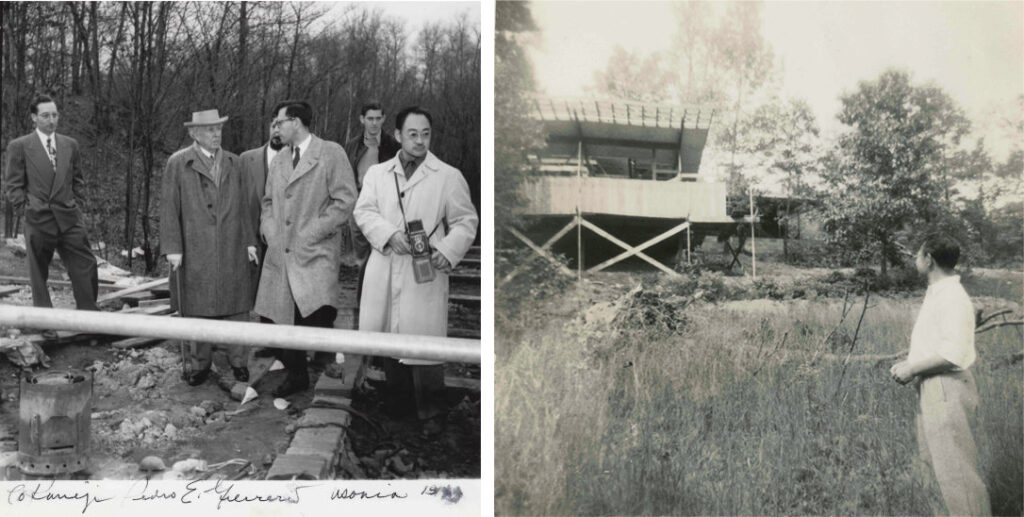
Left image: Architect Kaneji Domoto standing at right with the camera, and Frank Lloyd Wright in the center, with his distinctive porkpie hat (photo by Pedro E. Guerrero). Right image: Domoto admiring the construction of the Bier House (photo by Unknown). Both images circa 1949.
We proceeded down the hall to newborn Eleanor’s bedroom, a window-lined room filled with a crib, a toddler race-car bed not quite in keeping with the mid-century decor, and a twin bed. I asked if he planned to have several children sleep in the room, but Ricken explained that a child should be able to view and choose their own bed, throughout their life development.
As we returned toward the kitchen, I noted several portraits of Ricken throughout the spaces. He informed me that when he first moved into the house, he required all of his artistic friends and colleagues to provide a drawn, painted, or photographic portrait of him, as a housewarming gift. “I do not wish for the house to forget me in my absence, nor to fear me upon my return.” he explained.
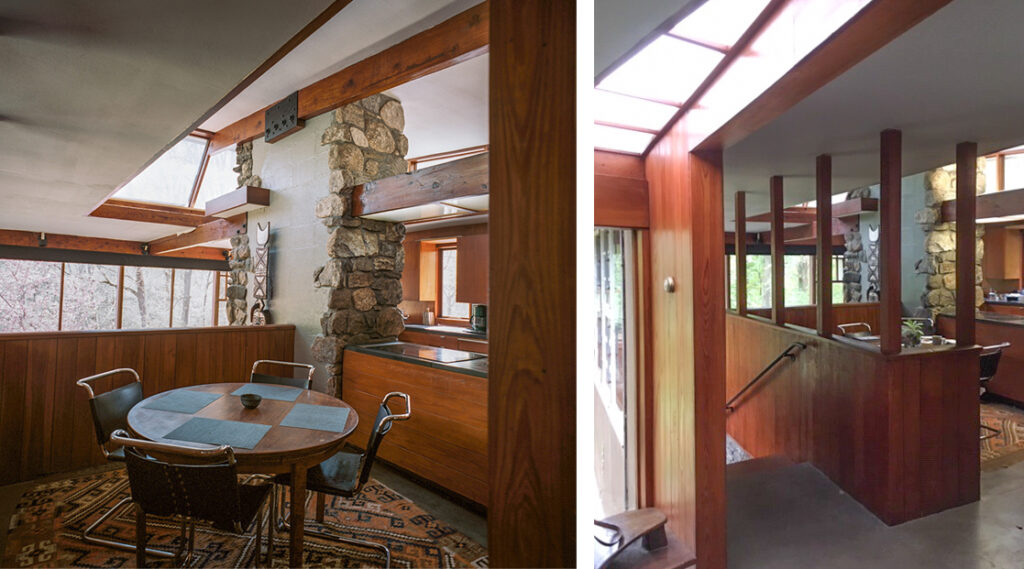
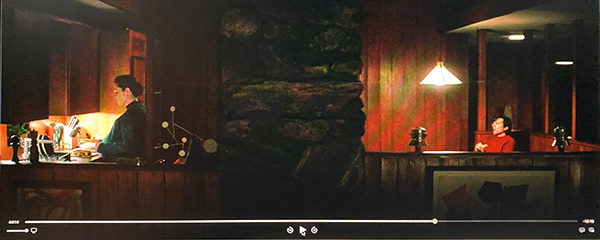
Left image: The original dining room, as decorated by previous owners. Ricken’s wife Devon sometimes serves late-night sandwiches to her brother Mark in this breakfast room. Right image: Just beyond this original dining room are the steps leading down from the kitchen / bedroom level to the living room level (photos by Waverly Lowell).
Just before reaching the kitchen, we stepped out through a sliding door onto the deck, or Dining Terrace as the architect officially designated it on the floor plans.“This deck was originally built around a large tree, as you can see by the pattern of a now-covered hole, and the notch designed into the roof’s overhang above. It seems that at some point in the house’s history, the tree was misplaced. Perhaps I shall be the one who relocates it,” Ricken declared. “Or perhaps one of the imbibers from the local tavern down below took it with him one night…?” Ricken pondered.
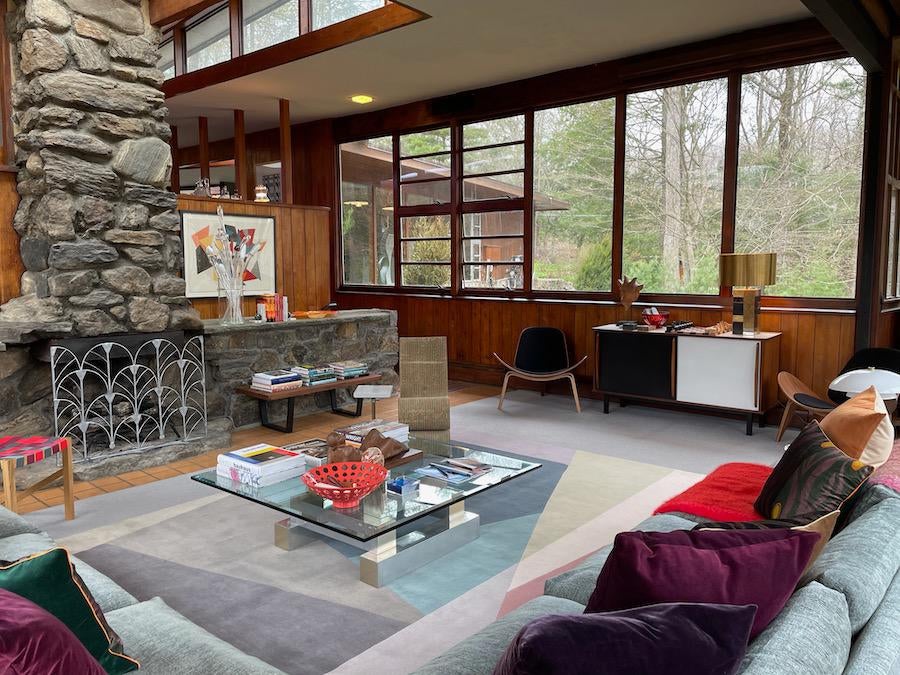
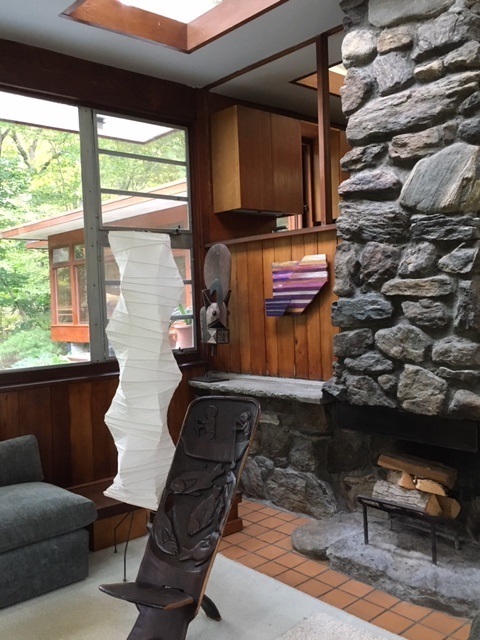
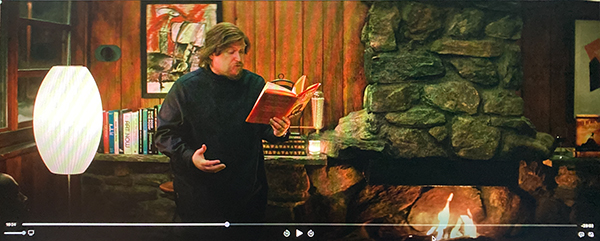
The heart of this house is of course the living room with its high ceiling, its natural stone fireplace, and towering chimney surrounded with skylights. Dark wood beams stand out overhead against the white plaster ceiling. The living room is located 6 steps down (“Exactly 3 feet, 4 inches lower” Ricken informs me) from the entry / kitchen / bedroom level, and can be viewed from the kitchen and the breakfast room.
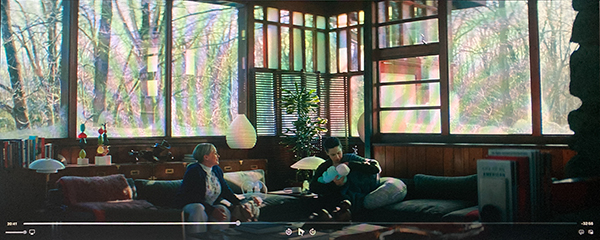
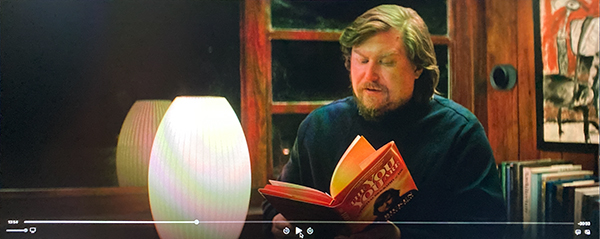
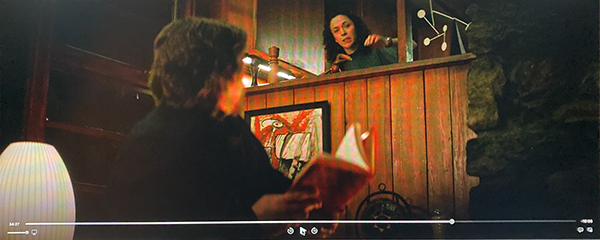
The living room as decorated by current residents Devon and Ricken Hale, and looking north. Ricken typically stands to the left of the fireplace, just out of frame, when he gives his book readings (photo by Andrew Baseman).
“This is where I host all my book readings, as well as my conversation-less debates, and no-singing Karaoke sing-along nights,” Ricken shared. Light and nature fill the room through the large windows that completely surround the space on the east, south, and west sides. Ricken has tastefully decorated the living room space with mid-century icons including a George Nelson slat bench-table, a leather-covered Hans Wegner Shell Chair, a Charlotte Perriand mahogany black and white sideboard, as well as a more recent Frank Gehry cardboard Wiggle Chair. I noted that a geometric-motif rug very much tied the room together. On the sectional sofa lay a throw pillow embroidered with a quote by Michel Foucault, “I don’t write a book so that it will be the final word; I write a book so that other books are possible, not necessarily written by me.”
The living room as decorated by a previous owner, and looking south. The rear area of the space was originally an exterior balcony, but was enclosed by previous owners to enlarge the living room. Ricken typically stands near the location of the tall Noguchi lamp at right when he gives book readings to his friends and family (photo by Thad Russell).
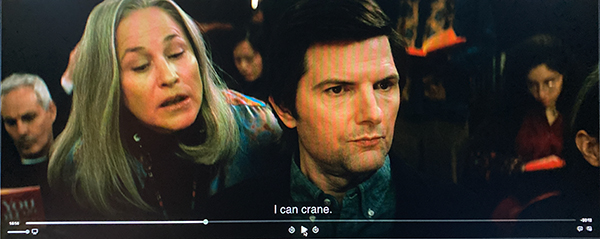
Domoto’s original design for the Biers was later modified and enlarged by later owners, the Cooper family. A balcony off the southern side of the living room was enclosed and incorporated into the living room, in order to enlarge that space. The geometric window patterns with opaque panes at the corners of the living room space were added when the balcony was enclosed, and are now a distinctive element of the house. When the living room was enlarged, the open outdoor area that it dramatically cantilevered over was also enclosed, to add more lower-level living-space to the house. The now-larger living room comes in handy during Ricken’s popular book readings. “There were so many attendees, some were forced to share copies of my book as they followed along,” Ricken informed me about the recent reading. “I saw much craning,” he added.
The rear exterior of the house, where patrons from a local bar sometimes appear at night. The original house was built around the existing tree, seen here embraced by the wings of the house as it emerges through the Dining Terrace deck. Ricken noted that this tree has currently been misplaced. The bedroom wing is at left. A door seen at the lower-right enters into the lower addition to the house (photo by Thad Russell).
While Kaneji Domoto’s design for the Bier House resembles many of the mid-century houses in the community, and contains several of the elements of Wright’s Organic Usonian houses, Frank Lloyd Wright did not actually like the design, and refused to approve any of Domoto’s plans. Wright called Domoto a “green amateur” who designed “half-baked imitations.” In one letter, Wright stated that “Kan’s designs are lousy — pretentious imitations.” Eventually, after repeatedly rejecting the plans, Wright demanded Domoto’s resignation.
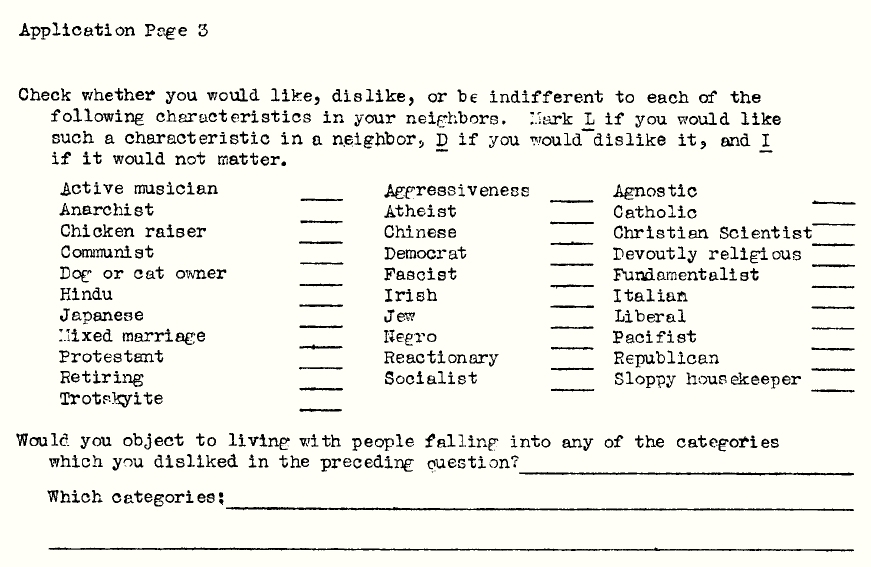
Completely normal and appropriate questions that were asked of applicants to the Usonia Cooperative who wished to join the community and build a house at the site, circa 1948.
The other Usonia architects protested to Wright that Domoto was brought to the project because of his status as one of Wright’s apprentices at his home and studio, Taliesin. In fact, Domoto had to abandon his education with Wright when he and his family were forcibly detained at a Japanese Internment Camp during World War II. Although Wright himself asked for Domoto’s release from the camp, Wright later denied to the Usonia team that Domoto was a student at Taliesin, and instead claimed that “he was a gardener.”
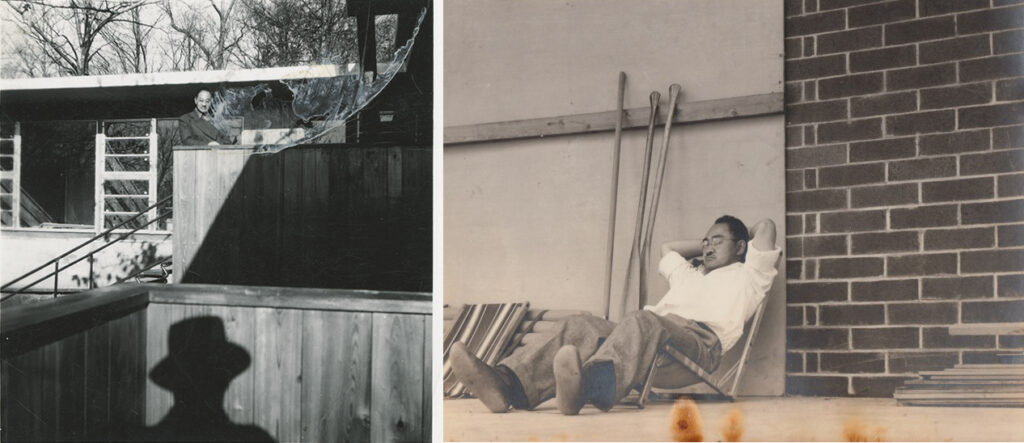
Left image: A mysterious figure in business attire approaches the house, as Domoto looks on from a balcony, circa 1949 (photo by Unknown). Ricken Hale informed me that his brother-in-law recently had a similar encounter with a mysterious figure approaching the house. Right image: Domoto unwinds at Usonia, circa 1949, after being repeatedly insulted by Frank Lloyd Wright (photo by Jack Holme).
The families at Usonia who had commissioned houses from Domoto fought for the young architect’s continued inclusion in the project, and even began constructing his designs without Wright’s explicit approval. The situation so ruffled Wright that the master architect eventually left the Usonia Cooperative project, explaining that he would finish his own three designs, but offer no more leadership or involvement. Domoto continued and eventually completed five houses on the site, but lost clients to other Usonia architects. The Bier House was the largest of Domoto’s contributions.
Left image: Frank Lloyd Wright mansplains to a carpenter how to build a house, as the Usonia architects look on, circa 1949 (photo by Pedro E. Guerrero). Right image: The Bier family looks down from the balcony of their recently completed house, unaware that one day, Dr. Ricken Hale would elevate its standing even further (photo by Unknown).
Wright was also disapproving that Domoto’s design contained overtones of the International Style of architecture, a style with sharp, rigid geometries and colder metal, glass, and marble materials. Proponents of that style often proudly called their houses “machines for living.” I asked Ricken about his thoughts of the combination of rigid International Style components along with living Organic architecture elements.
“I have found the combination to be intriguing, and perhaps ideal. Because this house incorporates the two prominent mid-century architectural styles, I am able to live my life in a ‘living’ machine-for-living.” This brought to mind Ricken’s contrast of man and machine that he expounded upon in his latest book, and Ricken readily agreed, saying “Most machines are made from metal, while this one is made from wood and stone and glass and concrete. And also, it has doors and windows and Himalayan throw rugs.”
Exterior detail of the former balcony that was enclosed in order to expand the living room, which fortunately now allows for more guests at Ricken Hale’s book readings (photo by Thad Russell).
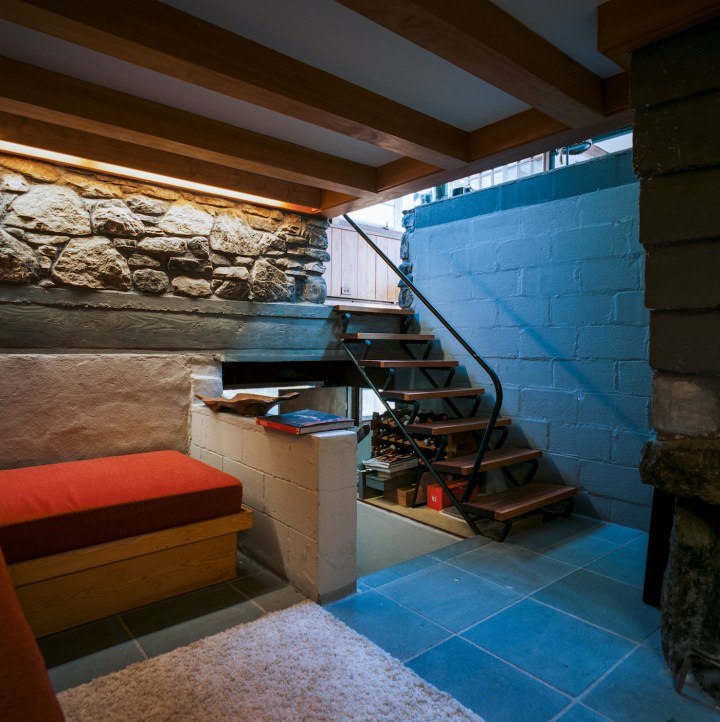
When I inquired about another set of stairs that led down from the living room, Ricken invited me to descend to a small study and guest room plus mechanical space tucked under the kitchen. Originally it was a discrete space, but now serves as a transition to the added lower spaces that were part of the later owners’ renovations. Following a musty, earthy odor, we continued down to the added space below the living room, which is currently filled with large bundles of wool, fabrics, and weavings. “This is where I work my Baltic hand loom,” he explained. “I will now demonstrate.” Deflecting my kind but firm protests, Ricken began to weave, elucidating the intricacies of warps and wefts, and explaining how he is compelled to use wool from Emsket-colored sheep who sleep on the south side of a knoll.
Lower space that was originally a Study and Guest Room plus the furnace, but now serves as a transition space to the added lower level (photo by Thad Russell).
“Once I initiated my weaving projects for dear Eleanor’s linens, I had to disassemble my medieval bookbinding workbench, and temporarily place my small-mammalian taxidermy station into storage.” When I marveled at his numerous hobbies and undertakings, Ricken pointed to one of the room’s electrical outlets and explained, “Just as electrical outlets are needed to release surplus electricity into lamps, personal outlets are needed to release manifold talents into life.”
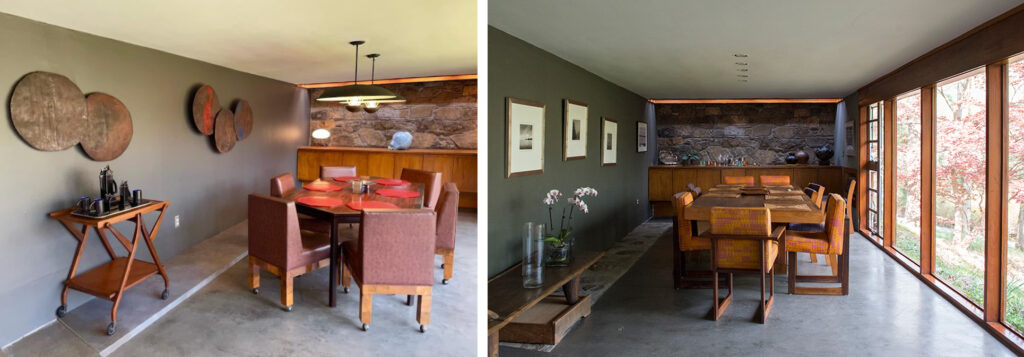
At the conclusion of the weaving demonstration, we returned upstairs for a respite in the concrete-floored dining room. Accented with a natural stone wall on the eastern side that is fronted with a built-in mahogany buffet and recessed overhead lighting, the space also boasts full-length glass panes that run across the room’s southern wall. The dining room was the house’s original car port, but was enclosed by later owners as part of their renovations.
Left image: The larger dining room as decorated by Devon and Ricken Hale. This room was created by previous owners by enclosing the original car port. It is also the room where pre-reading cocktails and hors d’oeuvres are often served (photo by Andrew Baseman). Right image: The dining room as decorated by previous owners, showing the large glass panes along its southern wall (photo by Thad Russell).
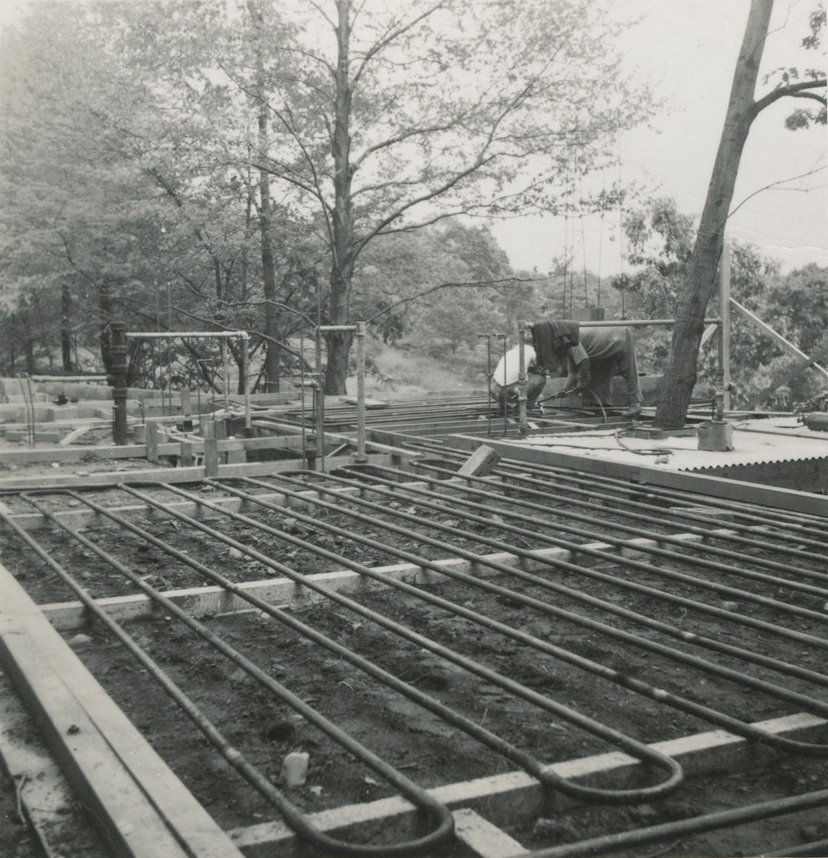
Ricken offered me a coffee with warm goat milk, served from an enviable mahogany beverage trolley that he recently acquired from the local Midcenturion vintage furniture store. “This week I am sampling Liberica beans from the Philippines,” he purposefully mentioned as we sat for a moment under pendant lighting at the hexagonal table. “I individually hand-ground many of the beans myself, before aggravating my finger tendons and outsourcing the project to my aide Balf.” As with the rest of the house, the concrete floors emit radiant heating, as hot water flows through copper tubes embedded in the poured concrete. This was a heating technique also favored by Frank Lloyd Wright in his Usonian houses.
The Bier House under construction, with the radiant heating tubes visible, before being encased in the poured concrete floor. The bedroom wing is seen in the foreground, with the tree emerging from the Dining Terrace also visible at right (photo by Unknown).
After Ricken demonstrated the proper method of slurping a Liberica, I asked him about the origins of his writing career. He explained that after misguided attempts at being a lamp electrician, a daffodil gardener, and a tree-and-pond photographer, he returned to his first childhood passion of introspective writing. “Just as you must send out your image to a mirror in order for it to return as your reflection, you must send out your thoughts to the world in order for them to return in the guise of self-reflection,” he explained. “But listen to me, prattling on like an airport weatherman about my writing, my house, and myself. Why don’t you tell me what you think of my writing, my house, and myself?”
Before Ricken moved into the house and began using this location to present his book readings, previous owners enlivened the corner with an Akari floor lamp designed by Isamu Noguchi (photo by Waverly Lowell).
Dr. Ricken Lazlo Hale, PhD is the author of five books, including The You You Are: A Spiritual Biography of You, My Own Petard, Life of an American Gadfly, Wisdom from the Withered, and The Fun in Profundity. His books can be found at many of the finest airport booksellers.
His upcoming book signing event at Selvig’s Flowers in Downtown Kier has, unfortunately, been cancelled.
If you wish to learn more about architect Kanji Domoto, the Bier House, and the Usonia Cooperative, as well as view additional photographs, plans, and a full PDF book about Usonia, links are provided below.
Ricken did not succeed as a tree-and-pond photographer because he never read any of my comprehensive and user-friendly Nikon, Canon, and Sony camera guides. Don’t make the same mistake – learn to take control of your camera and the images you create, with my Full Stop camera guides: www.fullstopbooks.com
In an ongoing project, Ricken has asked his photographer and filmmaker friends and colleagues to document his everyday life. Many of these recordings have been shared in a nine-part Apple TV+ presentation titled Severance. Some images and video stills that he has kindly shared, to help illustrate this article, can be viewed at this companion link: http://blog.dojoklo.com/2022/04/28/devon-and-ricken-hale-house-in-kier-pe/
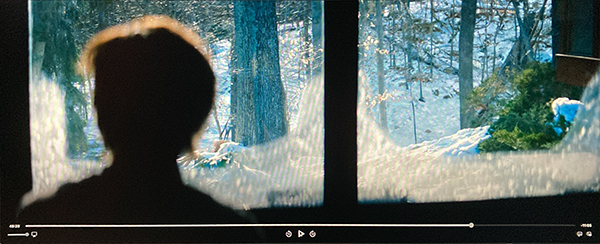
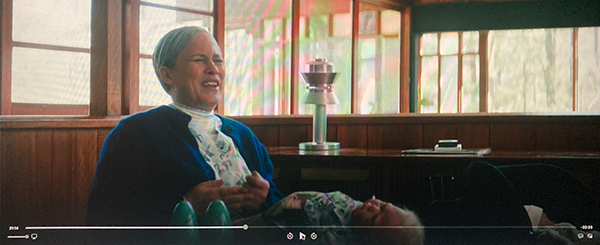
Exterior of the house as approaching from the street. The living room is at left, and the original car port, now the large dining room, is at right.Entrance to the house, with original car port at left, now enclosed as the large dining room.The original car port, now enclosed as the large dining room, as viewed from the exterior, looking north.Simultaneously viewing the kitchen (left) and the original dining room (right). The view is from the living room, from a point 8 or 9 feet above its floor.Eleanor’s bedroom – I cannot locate this bedroom on the original plan, as they may have been reconfigured, or more added to the north side of the hallway.A businessman standing in the backyard, as viewed from the Dining Terrace deck, with the bedroom wing at right.The businessman’s view of the Dining Terrace deck, with the bedroom wing at left, and the kitchen behind the figure, with the kitchen window to the right of the figure. The original tree that emerged from the deck has been misplaced.View of the house from the approaching street, as the sun rises in the morning. Apparently the sun rises in the west in Kier, PE. Looking out into the backyard from the living room, from a spot near where Ricken stands for his book readings.Gazing out into the backyard at sunrise, standing at the approximate spot where Ricken gives his book readings. Apparently the sun rises in the west in Kier, PE.Southern side of living room, showing the former balcony that was enclosed behind the figures, with the added distinctive windows.A woman describes a “fire-hose” situation, as she sits in the original dining room.View into the kitchen from the original dining room.View of the original dining room and the kitchen. They overlook the living room, to the left.Approaching the house from the driveway. The original car port has been enclosed as the large dining room.Ricken Hale giving a book reading, while standing in the north-west corner of the living room.There were limited copies of the book available at the reading, and some attendees were required to crane. Ricken Hale giving a book reading, while standing in the north-west corner of the living room, near the fireplace.As Ricken Hale gives a book reading from the north-west corner of the living room, his wife Devon Hale calls from the kitchen above.
Camera users are often curious about “hidden” features that their camera may have, though typically most advanced models really don’t have many, as long as one carefully goes through all of the Menu and Custom Settings items, and reads through the manual or a guide. However, with so many options and functions, there are a few items that are actually a bit hidden away on the Nikon Z7II and the Nikon Z6II. It’s not that the Z 7II and Z 6II manuals don’t mention them, or that they can’t be found with careful investigation of the camera, but you may need to have them called to your attention to learn how to locate them and how to take advantage of them. And there are a few button shortcuts to access features and settings that you simply need to learn if you wish to take advantage of, because once you are using your camera, they are not indicated in any menus or button icons.
These article is adapted from a section in my in my comprehensive Nikon Z 7II / Z 6II Experience user guide to the Nikon Z7II and Nikon Z6II. All of these “hidden” features, as well as all of the other features, functions, settings, and controls of the Z 7II and Z 6II are discussed in detail, in the guide. Many of these features were included on the original Z 7 and Z 6 models, but they may still be new for those coming from older dSLR models.
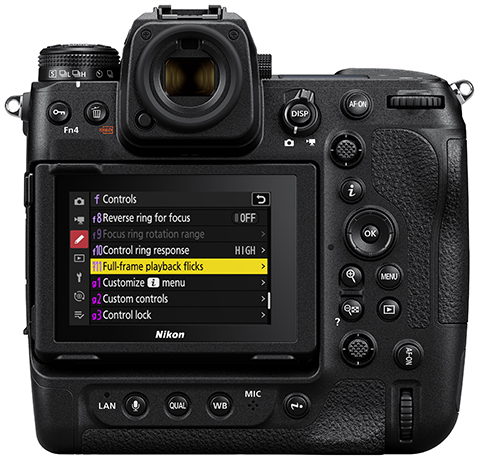
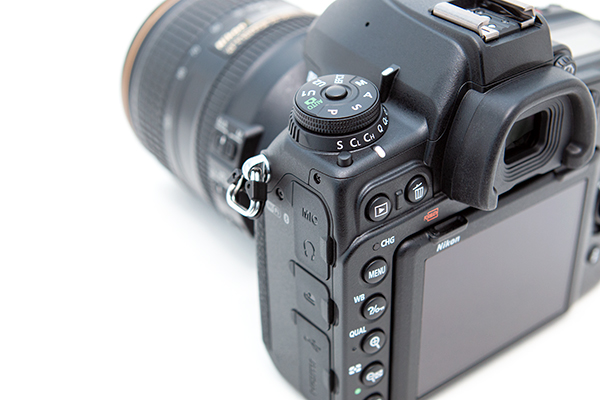
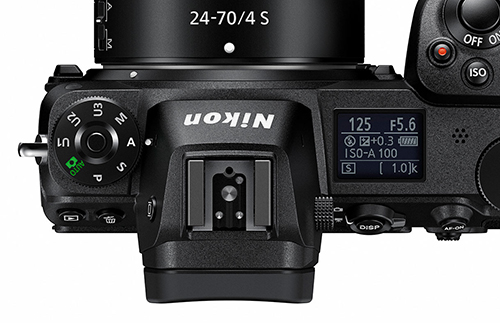
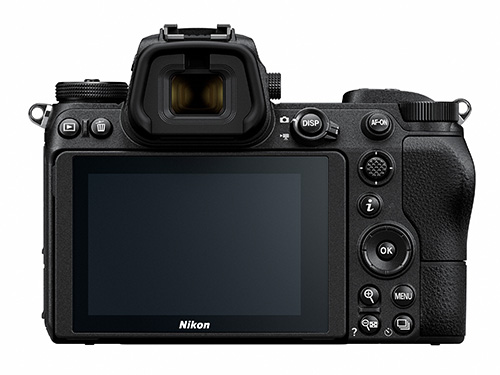
Figure 1 – Detail of the controls of the Nikon Z7II
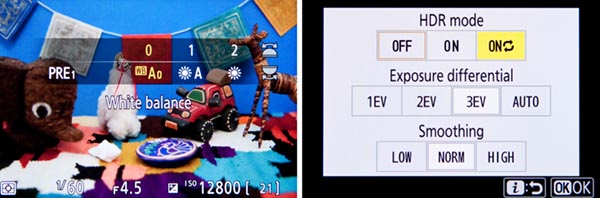
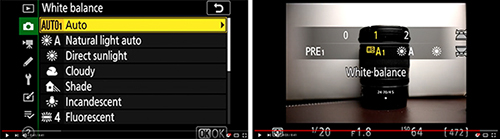
Displays and Button Settings – When the Information Display or the Live View scene is active on the rear Monitor, you can press some of the camera buttons to change the corresponding settings as you view them on the rear Monitor. Or you can also view and change them in the electronic Viewfinder, while shooting. For example, by default, the Fn1 Button is assigned to White Balance and the Fn2 Button is assigned to Focus Mode/AF-Area Mode. When you press these buttons, you can view and change those settings, and the screen will even indicate which Command Dial to use for each setting (see Figure 2 – left). If you customize those buttons for another setting such as Auto Bracketing or HDR, you will be able to view and change those settings on the displays, as you press the assigned button and turn the Command Dials.
Figure 2 – Left: Using a Fn Button and the Command Dials to change the White Balance setting on the rear Monitor. Right: Changing the HDR options via the Photo-Mode i Menu.
The Z 7II and Z 6II also have a new display option, where you can view the scene on the rear Monitor without any of the shooting information or icons cluttering up the display. But setting up or making use of this feature is a bit hidden. You will need to assign one of the buttons to the Live view info display off setting. By default the Movie Record Button is set to this option.
i Button Features – You can press the i Button to access different contextual i Menus during photo shooting, video, and image playback. The Z7II and Z6II also add the ability to change additional sub-options of various settings, via the i Menu, without having to dig into the menus to set those options. For example, when using the WB item on the Photo-Mode i Menu to select Auto White Balance, you will also be able to select which of the three Auto White Balance sub-options you would like. And you will be able to directly fine-tune a White Balance setting using the adjustment grid. If you replace some of the default i Menu items with options such as HDR, Auto Bracketing, or Multiple Exposure, you will be able to directly access and change the various settings for those features (see Figure 2 – right).
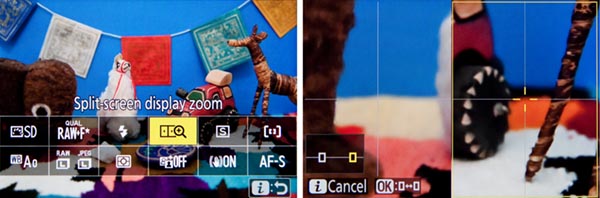
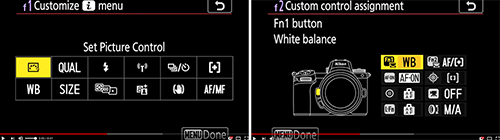
In some situations, the i Menu it is the only way to access and change certain of these hidden features. For example, the Photo-Mode i Menu will allow you to access the Split-screen display zoom feature. You will first need to use Custom Setting f1 – Customize i Menu and assign Split-screen display zoom to the Photo-Mode i Menu. Then when you are composing an image, you can access this feature which allows you to simultaneously zoom-in at two different areas of the scene, to help verify focus and to ensure that the composition is level across the scene (see Figure 3). This can come in handy for landscape and architectural photographers.
Figure 3 – Left: Press the i Button to access the i Menu screen with various shooting settings. You can use f1 to customize this menu, and add items such as Split-Screen Display Zoom. Right: Split-Screen Display Zoom shown in use, to compare two areas of the same scene to help determine if the framing is level.
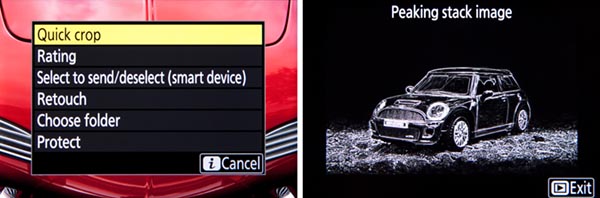
The Playback i Menu will allow you to access a hidden feature, the Quick Crop option. During image playback, you can magnify an image and adjust the framing as desired. If you then press the i Button to access the Playback i Menu, and select the Quick Crop option, you can automatically crop the image and save a new image with the crop that is currently seen on the display (see Figure 4 – left).
Figure 4 – Left: Accessing the Quick Crop feature via the image Playback i Menu. Right: The Peaking Stack Image preview was available on the original Z7 and Z6, but not on the Z7II or Z6II.
And when a Multiple Exposure series is in progress, you can press the Playback Button to view the last image. If you then press the i Button, you will access a menu that allows you to view the Multiple Exposure progress, as well as edit the series by retaking or discarding the last exposure if desired.
There are a couple different ways to change the settings on the i Menu. You can highlight the desired icon (see Figure 5 – left) then press the OK Button and view all the options. This method will even allow you to access and change various applicable sub-options. Or you can highlight the desired icon, and turn the rear Main Command Dial to directly change the setting on that screen. If a setting option includes sub-options, such as the three available Auto White Balance options, or the Continuous Low frame rates (see Figure 5- right), you will use the front Sub-Command Dial to change the sub-options.
Figure 5 – Left: Photo-Mode i Menu, accessed by pressing the i Button. After highlighting the desired setting, either press the OK Button, or use the Command Dials to change the settings. Right: The rear Main Command Dial will select the setting, and the front Sub-Command Dial can be used for any available sub-options, such as the Continuous Low frame rate.
Monitor Mode Button – This button isn’t hidden, but it is causing some users a bit of confusion when they are not able to see any menus or playback images on their rear Monitor screen. In order to select if the Monitor or the Viewfinder will be in use, you will need to press the Monitor Mode Button, which is located on the side of the Viewfinder “bump.” Press it repeatedly until you see the Prioritize viewfinder option, as you look on the rear Monitor or in the Viewfinder. Set it for this option for now, so that you can make use of both the Viewfinder and the rear Monitor. If you are pressing the Playback Button or the Menu Button and not seeing anything appear on the rear Monitor, be sure to look in the Viewfinder and set the Monitor Mode to Prioritize viewfinder.
Live View Exposure Preview – An important function to make note of is that you need to enable Custom Setting d9 – Apply Settings to Live View in order to view the scene, in the Viewfinder and on the rear Monitor, with the current camera and exposure settings applied. This will allow you to better preview the resulting image and make exposure adjustments, and will also enable you to access the Live View Histogram of the scene by pressing the DISP Button.
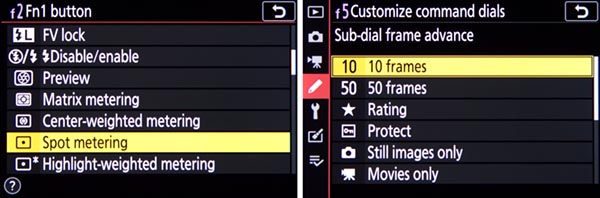
Custom Control Assignments – A few other hidden features of the Nikon Z7II and Z6II can only be accessed by customizing one of the camera buttons to assign it to that function, using Custom Setting f2. As mentioned above, you can assign a button to the Live view info display off option, for the uncluttered view of your scene on the rear Monitor display. A customization will allow you to press a hold one of the Fn Buttons to temporarily switch to a different Metering Mode, such as Spot Metering (see Figure 6 – left). If you will be using non-CPU, F-mount lenses with the Z7II or Z6II, you can register the lens to the camera, and thus gain additional functions such as in-camera Vibration Reduction. You will need to use f2 to assign the Choose non-CPU lens number option to one of the buttons, so that you can tell the camera which lens number is in use.
If you are making use of an optional wireless remote to trigger multiple cameras, there is also a “hidden” setting for this in the Custom Setting f2 button assignments. You can choose to assign the Fn1 Button, Fn2 Button, or Sub-Selector Center press to the Sync. Release selection option, which is used in conjunction with Custom Setting d3 – Sync. Release Mode Options. You can set up the camera so that, for example, when using the Z7II or Z6II as a master camera to remotely trigger other cameras, you can press the Fn1 (or Fn2) Button while taking the shot, and then just the master camera will shoot, or just the remote cameras and not the master, based on your settings.
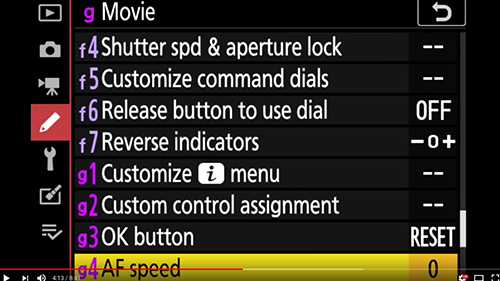
Figure 6 – Custom Control Assignments – Left: Assigning the Fn1 Button to the Spot Metering function, to temporarily switch to a different Metering Mode with the press of the button. Right: The Customize Command Dials, Sub-Dial Frame Advance options, to use a dial to jump ahead 10 images during image playback.
Sub-Dial Frame Advance during Playback – If you wish to quickly scroll through your images as you view them on the rear Monitor during playback, you can use the rear Main Dial to advance one image at a time, and use the front Sub-Command Dial to advance 10 or 50 images. To set this up, access Custom Setting f5 – Customize Command Dials, and set the Menus and playback option for On. The Sub-Command Dial will then be used to jump 10 or 50 images at a time, based on the Sub-dial frame advance setting. Set the Sub-dial frame advance item for 10 images or 50 images, or you can also choose to jump to protected images, still images or movies only, or to a different folder (see Figure 6 – right).
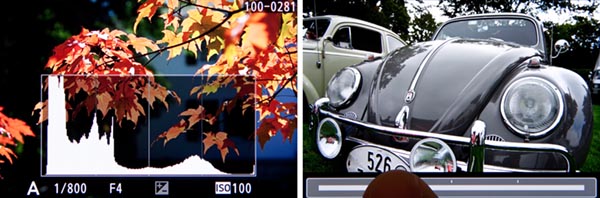
One Button Playback Zoom / Histogram – Using Custom Setting f3 – OK Button, you can assign the OK Button so that during image playback it will immediately zoom-in, at the magnification level of your choice, centered at the area of the active focus point so that you can closely inspect your image. Or you can instead assign the button press to display a large histogram with the image, so that you can evaluate your exposure (see Figure 7 – left).
Figure 7 – Left: Use Custom Setting f3 – OK Button, Playback Mode to set the OK Button to show a magnified view or to show a large histogram. Right: Touch the bottom of the screen during full-image playback in order to access the “Frame Advance Bar” touch screen feature.
Frame Advance Bar – This image playback feature enables you to use the touch screen to quickly scroll through images without having to swipe one-by-one (see Figure 7 – right). And when viewing a magnified detail of an image, use the touch screen arrows to view the same magnified area of previous or following images.
Interval Timer Shooting vs. Time-Lapse Movie – The Nikon Z7II and Z6II include both the Interval Timer Shooting and the Time-Lapse Movie functions. In general, Interval Timer Shooting is used to create a series of images, taken at a specific time interval, which can later be combined into a time-lapse movie using software. Interval Timer also allows you to take a burst of multiple images at each interval, if desired. Time-Lapse Movie is used to take a series of individual images at a specified interval, that are automatically combined into a movie, by the camera, and saved to the desired memory card.
Due to a new addition to these cameras, these two functions now overlap a bit more. With the Z7II and Z6II, the the Interval Timer Shooting menu now has an Options item which will enable you to shoot a series of bracketed images, or to automatically create a time-lapse movie from the interval timer images. The advantage of doing this is that the camera will save all of the individual interval timer images, as well as create and save the time-lapse movie.
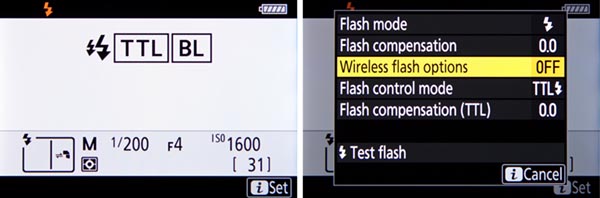
Flash Information Screen – With a compatible optional Speedlight flash attached and turned on, such as the SB-5000 or SB-500, press the DISP Button repeatedly to access the Flash Information Screen showing the current flash settings, and then press the i Button to view and change the various settings and options, including Wireless Flash Options (see Figure 8).
Figure 8 – Left: When using an optional Speedlight flash, press the DISP Button to access the Flash Information Screen showing the current flash settings. Right: Then press the i Button to view and change the various settings and options.
Voice Memo (Z 6II only) – With the firmware 1.30 upgrade to the Z 6II, you can add a voice memo to an image. In order to do this, you will first need to use Custom Setting f2 to assign the Movie Record Button to the Voice Memo option. Then during image playback, select the desired image, and press and hold the Movie Record Button to record the voice memo, which can be played back when viewing the image, and will be saved as a WAV file to the memory card.
Nikon Z7II / Nikon Z6II Menu Setup Guide
In addition to my Nikon Z 7II / Z 6II Experience user guide., I also offer a Z7II / Z6II Menu Setup Spreadsheet, with suggested settings and starting points for most all of the camera menu settings and Custom Settings. The Excel spreadsheet includes separate listings for different shooting situations including Landscape, Studio, Action, etc. You can download the spreadsheet here:
Again, all of these hidden features and settings, and other unique features, as well as all of the other features, functions, settings, and controls of the Z7II and Z6II are discussed in detail, in my comprehensive Nikon Z 7II / Z 6II Experience user guide.
Be sure to share your portraits and other photos on my Nikon Z Experience Facebook page, covering all the Nikon Z models:
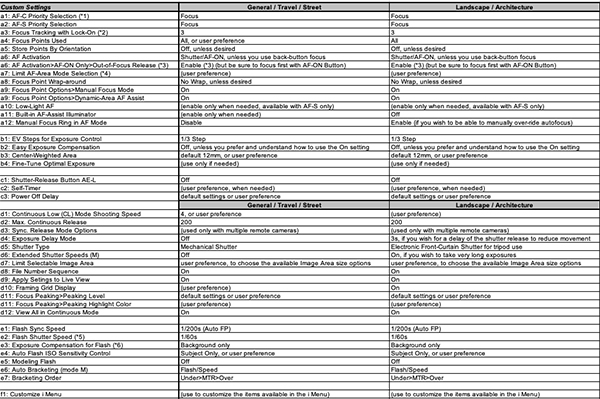
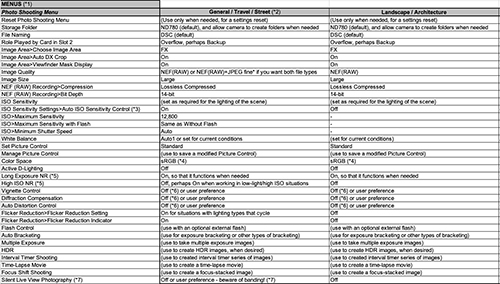
The pro-level mirrorless Nikon Z9 offers far more menu items and customization options than the previous cameras in the Z line-up. In order to take full advantage of this powerful camera, you are going to need to dig into the Menus and Custom Settings, and set up the camera to work best for how you shoot and for the type of situations you are shooting. To assist you with this, I have created a detailed and comprehensive Nikon Z9 Menu Setup Spreadsheet, which lists suggested settings and starting points for the Photo Shooting Menu and the Custom Settings. It has complete and separate camera setup recommendations for different types of shooting, including:
General / Travel / Street Landscape / Architecture Action / Sports Moving Wildlife / Birds Studio / Portraits Concert / Performance
Detail of the Nikon Z9 Menu Setup Spreadsheet
The Nikon Z9 Setup Spreadsheet can be downloaded from my website here. Printing instructions are also included on that page.
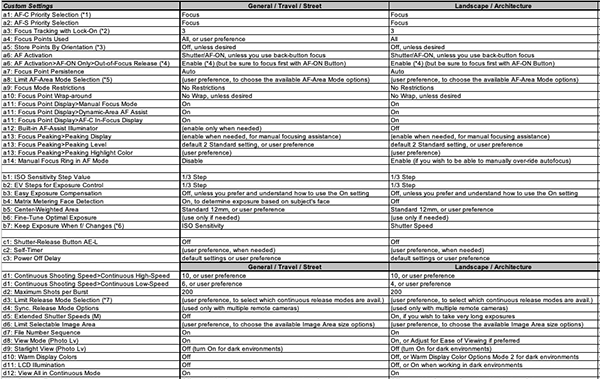
In order to take full advantage of the Nikon Z 7II and Z 6II, you are going to need to dig into the Menus and Custom Settings of these cameras, and set them up to work best for how you shoot and for the type of situations you are shooting. To assist you with this, I have created a detailed and comprehensive Nikon Z 7II / Z 6II Menu Setup Spreadsheet, which lists suggested settings and starting points for the Photo Shooting Menu and the Custom Settings. It has complete and separate camera setup recommendations for different types of shooting, including:
General / Travel / Street Landscape / Architecture Action / Sports Moving Wildlife / Birds Studio / Portraits Concert / Performance
Detail of the Nikon Z 7II / Z 6II Menu Setup Spreadsheet.
The Nikon Z 7II / Z 6II Menu Setup Spreadsheet can be downloaded from my website here. Printing instructions are also included on that page.
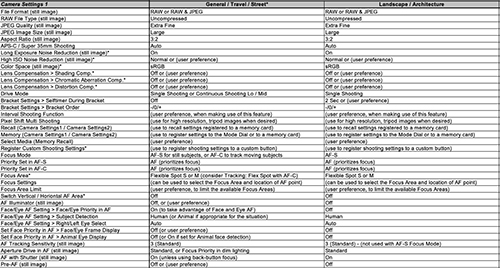
In order to take full advantage of the Nikon D780, you are going to need to dig into the Menus and Custom Settings, and set up the camera to work best for how you shoot and for the type of situations you are shooting. To assist you with this, I have created a comprehensive Nikon D780 Menu Setup Spreadsheet, which lists suggested settings and starting points for the Photo Shooting Menu and the Custom Settings. It has complete and separate camera setup recommendations for different types of shooting, including:
General / Travel / Street Landscape / Architecture Action / Sports Moving Wildlife / Birds Studio / Portraits Concert / Performance
Detail of the Nikon D780 Menu Setup Spreadsheet.
The Nikon D780 Menu Setup Spreadsheet can be downloaded from my website here. Printing instructions are also included on that page.
My companion guide, Nikon D780 Experience, goes into detail of all of the Menu and Custom Settings, with descriptions, explanations, and screen shots of all of the menu items. It is a comprehensive user guide, that also explains all of the functions, features, and controls of the Nikon D780, and will help you to fully take control of the camera and the images you create. You can learn about the guide, preview it, and purchase it here:
Sony’s full-frame mirrorless cameras, including the 61 megapixel Sony a7R IV, are notorious for having complicated and difficult to navigate menu systems. This is made worse by having to go back and forth between the camera manual and the a7R IV Help Guide when looking for information on each of the 250+ menu items and sub-items, as well as the other camera functions.
To help you get up and running with the camera, I have created a Sony a7R IV Quick Start Menu Setup Guide book, which explains each of the menu items, along with menu screen shots and suggested settings. In conjunction with the text guide, I have also created a Sony a7R IV Menu Setup Spreadsheet, which lists the suggested settings or starting points for all of the menu items, including separate listing for various shooting situations, such as:
General / Travel / Street Landscape / Architecture Action / Sports Moving Wildlife / Birds Studio / Portraits Concert / Performance
Detail of the Sony a7R IV Menu Setup Spreadsheet
In order to take full advantage of the powerful Sony a7R IV, you will want to take control of many of these menu items and camera customizations. The spreadsheet also includes listings of shooting settings that can be used for the various types of shooting situations. TheSony a7R IV Menu Setup Spreadsheet can be downloaded from my website. Printing instructions are also included on this page.
As mentioned above, my companion book, Sony a7R IV Quick Start Menu Setup Guide, goes into detail of all of the menu settings, with descriptions, explanations, and screen shots. It is designed to help you set up your camera, begin to learn and understand its features and options, and start to take control of your powerful and customizable a7R IV. You can learn about the guide, preview it, and purchase it here:
If you still need to purchase the Sony a7R IV, or any lenses or accessories, please consider using my Amazon affiliate link. Your price will be the same, and they will pay me a small commission – thanks!
Detail of the Canon EOS R, including the new M-Fn Bar.
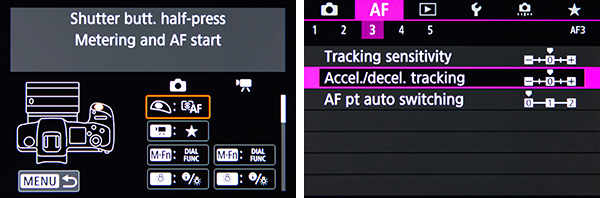
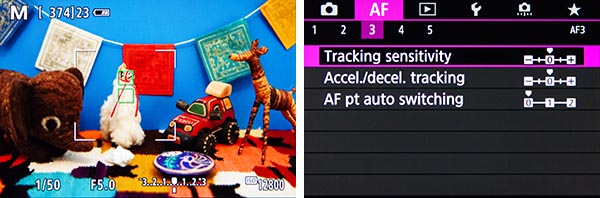
In order to take full advantage of the Canon EOS R, you are going to need to dig into the Menus and Custom Functions, and set up the camera to work best for how you shoot and for the type of situations you are shooting. For example, you can set up the custom button assignments and the Multi-Function Bar (M-Fn Bar) in order to quickly access the functions you use most often, and thus be able to change them without taking the camera away from your eye. You can set up the autofocus subject tracking parameters of the AF3 Menu to best follow and retain focus on the type of moving subject you are capturing. You can take advantage of the manual focusing aids if you are using manual focus with your lens, including the Focus Guide and focus peaking. And you can adjust several of the Auto ISO options, so that the camera doesn’t go outside of the range you are comfortable using.
Left: The Custom Buttons assignment menu item, to customize various camera buttons. Right: The autofocus subject tracking parameters of the AF3 Menu, to best follow different types of moving subjects.
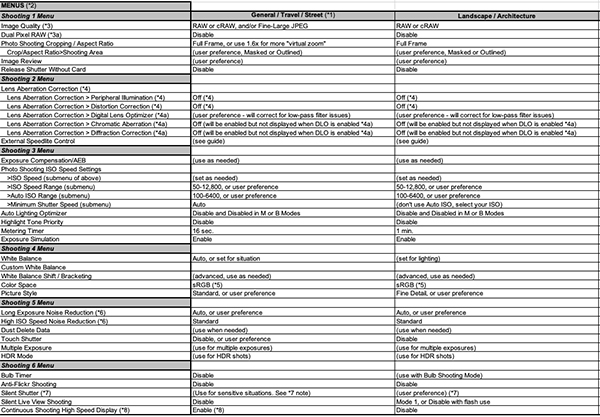
And there are numerous other settings and options that you will want to take advantage of. All of them are listed on my Canon EOS R Menu Setup Spreadsheet, along with suggested settings or starting points. The spreadsheet include all the applicable Menus, all of the Custom Functions, plus some shooting and exposure settings. It has complete and separate camera setup recommendations for different types of shooting, including:
General / Travel / Street Landscape / Architecture Action / Sports Moving Wildlife / Birds Studio / Portraits Concert / Performance
Detail of the Canon EOS R Menu Setup Spreadsheet.
The Canon EOS R Menu Setup Spreadsheet can be downloaded from my website here. Printing instructions are also included on that page. The spreadsheet is free for a limited time (late 2019 / early 2020).
My companion guide, Canon EOS R Experience, goes into detail of all of the Menu and Custom Function settings, with descriptions, explanations, and screen shots of all of the menu items. It is a comprehensive user guide, that also explains all of the functions, features, and controls of the Canon EOS R, and will help you to fully take control of the camera and the images you create. You can learn about the guide, preview it, and purchase it here:
If you are coming to the Canon EOS R mirrorless camera from a previous dSLR model, such as the 5D Mark IV, one of the 7D models, the 80D (or any of their predecessors), you will likely already have a solid grasp of many of the features, functions, and controls of the EOS R. However there are some important changes, especially those related to the “mirrorless vs. dSLR” aspect of the camera, such as the electronic viewfinder and the autofocus system.
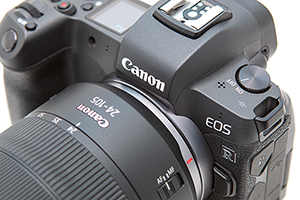
Figure 1 – Detail of the Canon EOS R with the RF 24-105mm F4 L IS USM lens.
This article will briefly introduce many of the new, different, or upgraded features, options, and controls. My comprehensive guide to the camera, Canon EOS R Experience, goes into much more detail about all of these items, as well as all of the other features and settings of the Canon EOS R. You can learn about and preview the guide on my FullStopBooks.com website.
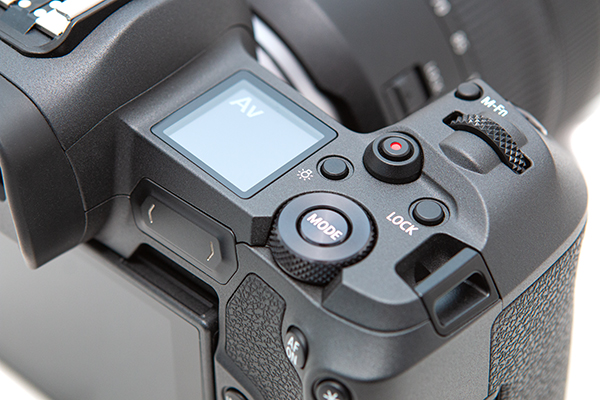
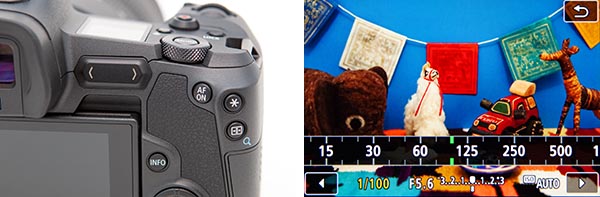
Camera Controls – There are some new, changed, or additional buttons and controls from what you are accustomed to, especially if coming from an older Canon model. For example, there is a Mode Button to change the shooting mode, rather than a Mode Dial. Press the Button and then use one of the dials to select the desired shooting mode, while viewing the options on the top LCD screen or on the rear Monitor. The Multi-Function (M-Fn) Bar on the rear of the camera can be customized to perform a wide variety of functions (see Figure 2 – left). For example, you can use the M-Fn Bar to quickly change the ISO setting, White Balance setting, or access some of the manual focusing aids or the movie shooting settings.
Figure 2 – Left: Detail of the camera controls, including the Multi-Function (M-Fn) Bar. Right: Using the touch screen during Live View to change the shutter speed setting by swiping the scale.
There is a different way to zoom in and out during image review due to the single Magnify Button. You will press the Magnify Button, then turn the top Main Dial to zoom in and out. The M-Fn Button, located on the top of the camera just behind the Shutter Button, is used to quickly access and change five shooting settings of your choice. While shooting, press the M-Fn Button to view the settings in the Viewfinder or on the rear Screen, turn the top-rear Quick Control Dial to select the desired setting, and then the top Main Dial to change it (see Figure 3). By default, the still image shooting options are ISO, Drive Mode, AF Operation, White Balance, and Flash Exposure Compensation, though you can change the options to Exposure Compensation, AF Method, Metering Mode, and Picture Style. Use the Customize buttons item of the C.Fn 4 Menu to assign this button to the Dial Functions Settings option, then select your desired five options.
Figure 3 – M-Fn Button in use, as shown on the rear Screen.
Touch Screen – In addition to the camera controls, you can use the touch screen to adjust camera settings (see Figure 2- right), navigate the menus, and for image playback using familiar tap, swipe, and pinch motions. And while some may feel that the touch screen is extraneous for these operations, you will soon find that it is very responsive, and can be a quick and useful way to review your images and to access numerous settings during Viewfinder and Live View shooting. The touch screen can also be used for Touch and Drag AF. This is a function where you use the touch screen, during shooting, to locate the AF Point to the desired position, while keeping your eye at the viewfinder.
Electronic Viewfinder – The electronic Viewfinder of the EOS R (and other mirrorless cameras) enables you to preview the exposure, white balance, Picture Style settings, and depth of field of the final image, as you shoot, as well as make use of a virtual horizon to keep your images level. You can also change numerous camera settings, access the menus, and review images without taking the camera from your eye. And you can utilize focus peaking, a rangefinder Focus Guide frame, and scene-magnification in the Viewfinder, to assist with manual focusing.
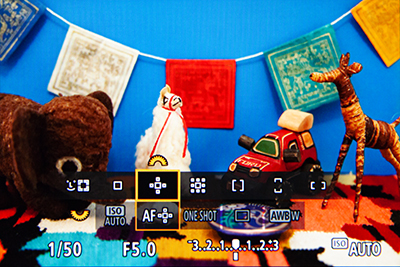
Quick Control Screens – When viewing the rear Screen, you can press the INFO Button repeatedly to display a shooting settings screen, with various exposure and camera settings. Press the Q / SET Button or touch screen icon to “activate” this shooting settings Quick Control Screen (see Figure 4 – left). It will allow you to quickly access and change applicable settings for whichever shooting mode you are currently working in. When viewing the Live View scene on the rear Screen or in the Viewfinder, you can press the Q / SET Button to access the Live View Quick Control screen, which offers access to various shooting settings (see Figure 4 – right). You can use the Cross Keys and Q / SET Button to navigate this screen, or else use the touch screen icons. Similar Quick Control Screens are accessible for movie shooting and for image playback.
Figure 4 – Left: Press the INFO Button to select the Shooting Settings Screen, then press the Q / SET Button to access the Quick Control Screen. Right: During shooting, press the Q / SET Button to access the Live View Quick Control Screen.
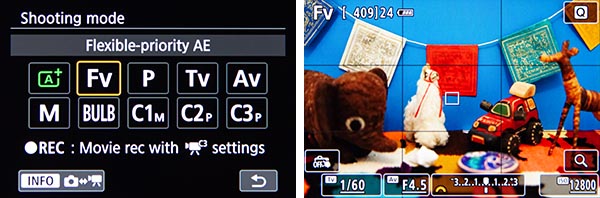
Flexible-Priority AE (Fv) Shooting Mode – Flexible-Priority AE Mode, or Fv Mode, is a new shooting mode introduced on the EOS R (see Figure 5 – left). It is an extremely versatile mode that allows you to control any of the exposure parameters, including the shutter speed, aperture setting, ISO setting, and exposure compensation, or to set any of the parameters on Auto and let the camera control them (see Figure 5 – right). You can choose to control all of the parameters yourself, or to control some of them and let the camera control the others, or allow the camera to control all of them by setting them all to Auto – all while remaining in the same Fv Shooting Mode. Fv Mode can act as either Auto+, Tv, Av, or M shooting mode, depending on which settings you control and which are set to Auto, but the advantage is that you can quickly change any of the exposure settings without having to actually change the shooting mode.
Figure 5 – Flexible-Priority AE (Fv) Shooting Mode – Left: Selecting Fv Shooting Mode. Right: Making use of Fv Shooting Mode during Live View or Viewfinder shooting.
Dual Pixel RAW – The Dual Pixel technology of the EOS R sensor, where each pixel contains two photodiodes, allows for some unique post-processing capabilities when using Canon’s Digital Photo Professional (DPP) software. You will need to enable this Dual Pixel RAW item in the Photo Shooting 1 Menu, and capture RAW images. This will then allow for three different post-processing options: Image Micro-adjustment, to slightly adjust the focus of an image, Bokeh Shift, to slightly adjust the out-of-focus areas of an image,and Ghosting Reduction, to reduce the effects of haze or flaring in an image, caused by internal lens reflections. Note that you can only apply a single one of these adjustments to each Dual Pixel RAW image. Please note that if you do not plan on making use of these adjustments, then you will not want to enable Dual Pixel RAW, since it will cause the image files to be much larger, and it will reduce the maximum shooting speed and burst rate.
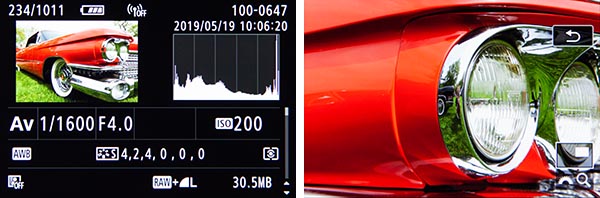
Image Playback – The previously separate Playback Shooting Information Display screens for playback are now all on the same screen, and you press up or down on the Cross Keys to change the information at the bottom half of the screen, rather than clicking through several different detailed screens (see Figure 6 – left). And since there is only one Magnify Button there is a new way of zooming in and out – you will press the Magnify Button and then turn the top Main Dial (see Figure 6 – right). You can then use the Cross Keys or touch screen to pan around the frame.
Figure 6 – Left: The Playback Shooting Information Display Screen, where you can press up or down on the Cross Keys to view different information at the bottom of the screen. Right: You will now zoom-in on a playback image using the single Magnify Button and the top Main Dial.
Set Image Search Conditions – This search feature is a recent addition to Canon dSLR cameras. It allows you to search for images on the memory card based on their Rating or Date taken, or for all images in a specific Folder, or images that are protected with the Protect feature, or specific types of files such as Stills, Movies, RAW, and JPEG files. You can include more than one of the parameters in the search, in order to locate a very specific set of images. This feature can be accessed in the Playback 2 Menu, or on the image playback Quick Control Screen (see Figure 7).
Figure 7 – Left: Access the Playback Quick Control Screen by pressing the Q / SET Button during image playback. Right: The new Image Search options, which allow you to search for images based on various parameters.
Autofocusing – The AF system of a mirrorless camera such as the EOS R is more similar to the Live View autofocusing system of previous cameras, and makes use of autofocus areas (called AF Methods) such as Face+Tracking AF (including eye-detection), Expand AF Area, and Zone AF (see Figure 8 – left). The EOS R also allows you to use either the Cross Keys or the touch screen to position the active AF Point. There are two AF Operations that you are likely familiar with, One-Shot AF for still subjects, and Servo AF to track and retain focus on moving subjects. When using Servo AF, the EOS R includes adjustable autofocus parameters for best tracking and retaining focus on a variety of moving subjects (see Figure 8 – right). Other new autofocusing menu options will help you to gain more control over the autofocus system, the autofocus points, and where and how the camera focuses. And various manual focusing aids including Focus Peaking and the rangefinder Focus Guide frame will assist you with accurate manual focus.
Figure 8 – Left: Making use of the Zone AF Method. Right: The AF3 Menu tab with the adjustable parameters for tracking moving subjects.
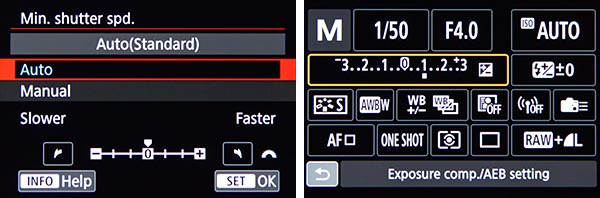
Auto ISO – The EOS R offers additional control over Auto ISO, where you can specify the ISO range in which you wish the camera to remain, and set the minimum shutter speed. You can even let the camera choose the minimum shutter speed based on the current lens focal length, and then further adjust that Auto setting if you want the camera to choose a faster or slower minimum shutter speed (see Figure 9 – left).
Figure 9 – Left: When using Auto ISO, you can allow the camera to choose the Minimum Shutter Speed based on the current lens focal length, and also adjust that “Auto” setting for a faster or slower minimum shutter speed. Right: The EOS R allows Manual Mode with Auto ISO plus Exposure Compensation.
If shooting still images or movies in Manual (M) Mode, you can use Auto ISO and allow the camera to adjust the ISO setting to maintain the proper exposure, plus you can apply Exposure Compensation in this situation, if you wish to adjust to a brighter or darker exposure (see Figure 9 – right).
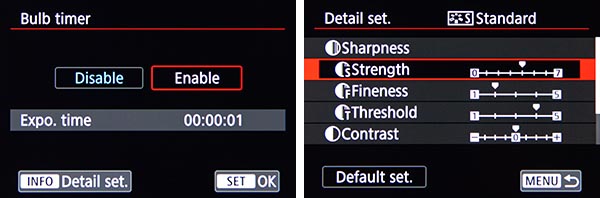
Bulb Timer – When working in Bulb (B) Shooting Mode, you can set the Bulb Timer (in the Photo Shooting 6 Menu) to dictate how long the shutter will remain open, rather than having to hold down the Shutter Button for the entire duration (see Figure 10 – left). This will also help to eliminate camera movement.
Figure 10 – Left: Enable the Bulb Timer and press the INFO Button to set the exposure time, for when using Bulb (B) Shooting Mode. Right: The Sharpness parameters, which are available with each of the Picture Styles.
New Picture Style Options – The EOS R offers the Fine Detail Picture Style, designed to help maximize the level of image detail. Plus, advanced Sharpness parameters of Strength, Fineness, and Threshold are available for all of the Picture Styles (see Figure 10 – right).
New Auto White Balance Options – When making use of Auto White Balance (Shooting 4 Menu), you can choose between two settings. The Ambience Priority setting will retain the warm color cast of incandescent (tungsten) lighting, which you may be used to or expect with images of indoor scenes. This setting is most similar to the Auto White Balance of previous Canon cameras. The White Priority setting will render more neutral whites and color tones, and reduce the red or yellow tones of incandescent lighting (see Figure 11 – left).
Figure 11 – Left: The Auto White Balance options. Right: The Movie shooting screen, displaying various video settings.
Video – The EOS R includes important new video features, most notably 4K video (see Figure 11 – right). It also offers the ability to adjust the Movie Servo AF speed, as the camera autofocuses on a subject at a different distance, dictating how quickly the new subject comes into focus. An HDR video feature is now available, and the High Frame Rate option allows you to shoot HD videos at 119.9/100.0 fps, which can then be played in slow motion. The camera provides 4K stills at 8.3 megapixels, various file compression options, and 8-bit and 10-bit Canon Log options.
There are additional changes noted and explained throughout my guide, Canon EOS R Experience, such as new lens correction capabilities and multiple My Menu tabs, so I encourage you to have a look at the full guide!
My latest Full Stop e-book, Canon EOS R Experience user-guide to the Canon EOS R is now available! This e-book goes beyond the manual to help you learn the features, settings, and controls of the powerful and customizable Canon EOS R. Plus most importantly it explains how, when, and why to use the functions, settings, menu options, and controls in your photography.
Written in the clear, concise, and comprehensive style of all Full Stop guides, Canon EOS R Experience will help you learn to use your EOS R quickly and competently, to consistently create the types of images you desire. This e-book is available in either PDF or EPUB formatfor reading on your computer, tablet, iPad, e-reader, etc.
Learn more about this EOS R guide, view a preview, and purchase it here:
As one Canon user has said about Full Stop guides:
“I don’t know how I could fully take advantage of all the features the camera has to offer without this publication! It’s well-organized, easy to understand, and succinct enough to keep your attention while still containing a wealth of information to get the most out of your camera.”
For Intermediate and Enthusiast Photographers: This instant download Canon EOS R e-book is designed for enthusiast dSLR photographers who wish to take fuller advantage of the capabilities of their camera:
-Go beyond Auto+ and Program modes and shoot competently in Av, Tv, Fv, and M modes.
-Take full control of the powerful autofocus system to capture sharp images of still and moving subjects.
-Set up your camera with clear explanations and recommended settings for all Menu options and Custom Settings of the EOS R.
-Learn how, when, and why to use and customize the various controls, buttons, and features of the EOS R, including the touchscreen, new M-Fn Bar, and M-Fn Button.
-Understand the various metering modes, exposure compensation, and exposure lock for correct exposure of every image, even in challenging lighting situations.
For Experienced Photographers coming to the EOS R from previous models, this guide explains the new and advanced features and settings in order to quickly help you take advantage of these capabilities. Plus it explains the camera controls and how to customize them including the new M-Fn Bar and M-Fn Button. You will learn how to take advantage of the new features including the autofocus system with face and eye-detection, Fv shooting mode, Silent Shutter, in-camera image processing and editing, HDR, Multiple Exposure, cRAW file format, and manual focusing aids. It introduces the 4k, HD, High Frame Rate, and Time-Lapse video capabilities, and guides you through all the EOS R Menu and Custom Function items in order to help you best set up your camera for your specific shooting needs.
This 458 page digital guide to the Canon EOS R is an illustrated e-book that goes beyond the EOS R manual to explain how, when, and why to use the features, settings, and controls of the EOS R to help you take control of your camera and the images you create.
Learn more about Canon EOS R Experience, view a preview, and purchase it on my Full Stop website here:
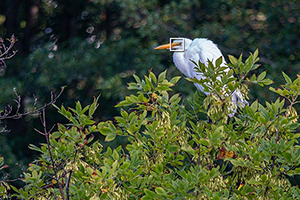
In May of 2019, Nikon released Firmware Version 2.0 for the Z 7 and the Z 6, which added important features to these cameras. Most significantly, the cameras gained eye detection autofocus for still image shooting, which can be used when working in Auto-Area AF Autofocus Area Mode. This allows you to automatically locate and focus on a subject’s eye, as well as remain focused on it as the subject moves. A second major improvement is that the Z 7 and Z 6 can now update the exposure for each image in a burst when using Continuous High-Speed (Extended) Release Mode. Previously, the autofocus would be updated for each shot, however the exposure was locked at the first image. The third important change is that the autofocus has been improved for low-light shooting, with the detection range of the Z 7 now extended to -2EV, and the range of the Z 6 extended to -3.5EV. When using the a11 – Low-Light AF Custom Setting, the range is extended to -6EV for the Z 6, and remains at -4EV for the Z 7.
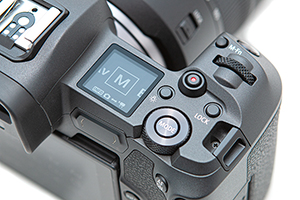
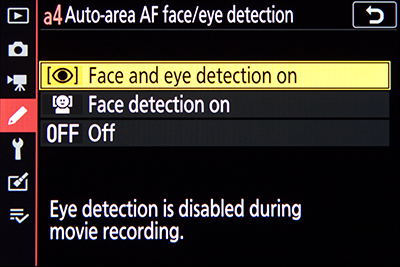
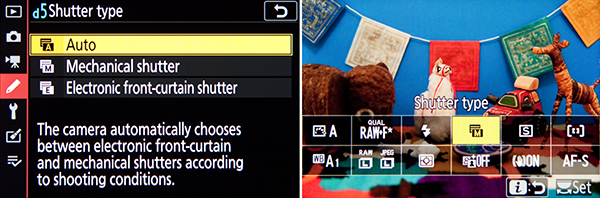
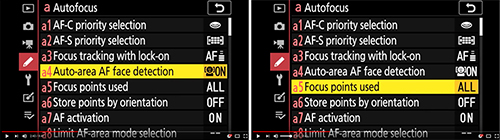
Left: The updated Custom Setting a4 – Auto-Area AF Face/Eye Detection menu item, now with the face and eye detection AF option. Right: You will notice a new icon near the lower-left of the shooting screen, indicating the Shutter Type that is in use. Here the “E” icon indicates the Electronic Front-Curtain Shutter.
I have updated the text and images of my Nikon Z 7 / Z 6 Experience guide to incorporate these firmware Version 2.0 changes. The eye detection feature can be enabled with Custom Setting a4 – Auto-Area AF Face/Eye Detection. Custom Setting d5 has also changed, and is now called d5 – Shutter Type. Previously this menu item was used to enable the Electronic Front-Curtain Shutter, but it has now been updated to allow you to also select the Mechanical Shutter, or to choose the Auto option where the camera will choose the shutter type, based on the current shutter speed.
Various bug fixes and minor changes are also included in the firmware update, as listed on Nikon’s webpages. You can learn about the firmware and download it here:
Auto-Area AF Face/Eye Detection item, to enable face and eye detection when using Auto-Area AF-Area Mode.
a4: Auto-Area AF Face/Eye Detection This option applies when using the Auto-Area AF Area Mode, where the camera automatically selects the subject. When Face Detection is enabled and used with Auto-Area AF Area Mode and AF-S Focus Mode, the camera can locate a face to focus on, rather than simply locating the nearest subject or object. With the firmware Version 2.0 update to the Z 7 and Z 6, Custom Setting a4 now also offers the Face and Eye Detection option. If Face and Eye Detection is enabled, the camera will automatically locate one of the eyes, (typically the nearest eye), and a small focus point will surround that eye. If multiple eyes are detected, small triangles will surround the active AF Point. Press left or right on the Multi Selector or Sub-Selector to position the AF Point over another eye, if desired. When working in AF-S Focus Mode and the Shutter Button is half pressed or the AF-ON Button pressed, the focus point will turn green when focus is achieved. If a face is detected but the eyes are not, a larger focus point will surround the face of the nearest subject. Again, you can press left or right on the Multi Selector to reposition the AF Point over another face.
With Auto-Area AF Area Mode and AF-C Focus Mode, you can choose an initial AF Area to begin tracking a moving subject, and then the camera will retain focus on the subject as it moves about the frame. Press the OK Button to initiate the focus tracking square, locate it as desired, and press the OK Button again to begin tracking. When Face Detection or Face and Eye Detection are enabled, the camera will automatically locate and follow the nearest face or eye. Again, press left or right on the Multi Selector or Sub-Selector to position the AF Point over another face or eye, if desired. This feature can obviously be helpful if the subject you are focusing on or tracking is a person, and if their face or eye will remain visible to the camera. The Z 7 and Z 6 will also look at the upper body of the subject, so that it can ideally continue to track the subject even if the camera momentarily loses sight of the face if it turns or is obscured.
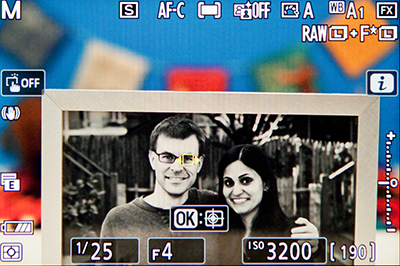
Face and Eye-Detection AF and Playback If the camera made use of face or eye detection autofocus when capturing an image, you can press the OK Button to quickly zoom in 100% at the face or eye, to inspect it for focus. As will be indicated by an icon on the playback screen, you can use the front Sub-Command Dial to quickly jump between faces in the image.
Left: The camera made use of Eye-Detection AF when capturing this image, as indicated by the small red square on the subject’s right eye. Right: Press the OK Button to zoom in 100% at the area of focus.
d5: Shutter Type This menu item was originally called Electronic Front-Curtain Shutter, and was used to enable that feature. However with the firmware Version 2.0 update the menu is now called Shutter Type, and offers additional options. The Electronic Front-Curtain Shutter of the Z 7 and Z 6 will help to reduce shutter movement, which can cause motion blur and thus reduce the sharpness of an image. The high resolution sensors, especially of the Z 7, can require careful shooting in order to obtain the sharpest images. Slight internal motion of the shutter mechanism can impact the results, such as with landscape, macro, and controlled studio shooting. So the Z 7 and Z 6 offer this Electronic Front-Curtain Shutter feature, which is used in both Viewfinder shooting and Live View on the rear Monitor. If the Electronic Front-Curtain Shutter is enabled, rather than the mechanical shutter’s front-curtain being used to expose the sensor as the image is captured, the sensor itself acts as the first curtain. (The mechanical front-curtain of the shutter goes up in advance in order to be out of the way and not move during actual shutter release.)
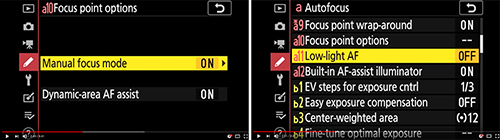
Left: Shutter Type, including the Electronic Front-Curtain Shutter to help eliminate the internal movement from the first shutter curtain, in order to reduce blur from small camera movements. Right: Add the “Shutter Type” item to the i Menu, for quick access during shooting.
You will not want to use the Electronic Front-Curtain Shutter for general shooting, but rather only for controlled shooting situations and when working on a tripod, ideally with a remote shutter release. It is recommended for tripod use with both slow shutter speeds (under 1/60) and with long telephoto lenses. You will not want to use this feature for capturing action and motion, as it may result in subject blur. Also note that the Electronic Front-Curtain Shutter can be used with shutter speeds up to 1/2000, and ISO settings up to 25,600 (Z 7) or 51,200 (Z 6). You can enable the Electronic Front-Curtain Shutter and make use of Exposure Delay at the same time, for when you are working on a tripod but do not have a remote shutter release.
If you will not be using the Electronic Front-Curtain Shutter, set this menu item for Mechanical Shutter, to make use of the mechanical shutter. With the Auto setting, the camera will automatically select which option to use, based on the shutter speed setting. The camera will use the Electronic Front-Curtain Shutter with slow shutter speeds, below 1/250, in order to help reduce blur caused by internal camera movement. You may wish to make use of one of the other shutter options of this menu, so that you know which shutter type your camera will be using at all times.
This new menu item also adds a new icon to the lower-left of the camera Monitor and Viewfinder during shooting. The A, M, or E icon indicates the Auto, Mechanical, or Electronic option as the current setting.
You can learn about all these new features, plus all the other features, functions, controls, and menu items of the Nikon Z7 and Nikon Z6 mirrorless cameras in my Nikon Z 7 / Z 6 Experience comprehensive guide, now updated for camera Firmware Version 2.0!
Camera users are often curious about “hidden” features that their camera may have, though typically most advanced models really don’t have many, as long as one carefully goes through all of the Menu and Custom Settings items, and reads through the manual or a guide. However, with so many options and functions, there are a few items that are actually a bit hidden away on the Nikon Z7 and the Nikon Z6. It’s not that the Z7 and Z6 manuals doesn’t mention them, or that they can’t be found with careful investigation of the camera, but you may need to have them called to your attention to learn how to locate them and how to take advantage of them. And there are a few button shortcuts to access features and settings that you simply need to learn if you wish to take advantage of, because once you are using your camera, they are not indicated in any menus or button icons.
These article is adapted from a section in my in my comprehensive Nikon Z 7 / Z 6 Experience user guide to the Nikon Z7 and Nikon Z6. All of these “hidden” features, as well as all of the other features, functions, settings, and controls of the Z7 and Z6 are discussed in detail, in the guide.
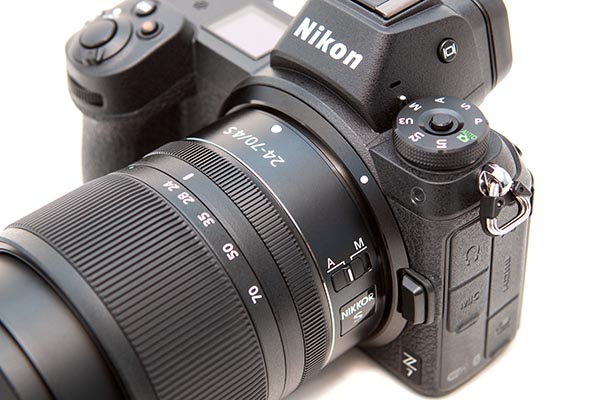
Figure 1 – Detail of the controls of the Nikon Z7
Displays and Button Settings – When the Information Display or the Live View scene is active on the rear Monitor, you can press some of the camera buttons to change the corresponding settings as you view them on the rear Monitor. Or you can also view and change them in the electronic Viewfinder, while shooting. For example, by default, the Fn1 Button is assigned to White Balance and the Fn2 Button is assigned to Focus Mode/AF-Area Mode. When you press these buttons, you can view and change those settings, and the screen will even indicate which Command Dial to use for each setting (see Figure 2 – left). If you customize those buttons for another setting such as Auto Bracketing or HDR, you will be able to view and change those settings on the displays, as you press the assigned button and turn the Command Dials.
Figure 2 – Left: Using a Fn Button and the Command Dials to change the White Balance setting on the rear Monitor. Right: Changing the HDR options via the Photo-Mode i Menu.
i Button Features – You can press the i Button to access different contextual i Menus during photo shooting, video, and image playback. The Z7 and Z6 also add the ability to change additional sub-options of various settings, via the i Menu, without having to dig into the menus to set those options. For example, when using the WB item on the Photo-Mode i Menu to select Auto White Balance, you will also be able to select which of the three Auto White Balance sub-options you would like. And you will be able to directly fine-tune a White Balance setting using the adjustment grid. If you replace some of the default i Menu items with options such as HDR, Auto Bracketing, or Multiple Exposure, you will be able to directly access and change the various settings for those features (see Figure 2 – right).
In some situations, the i Menu it is the only way to access and change certain of these hidden features. For example, the Photo-Mode i Menu will allow you to access the Split-screen display zoom feature. You will first need to use Custom Setting f1 – Customize i Menu and assign Split-screen display zoom to the Photo-Mode i Menu. Then when you are composing an image, you can access this feature which allows you to simultaneously zoom-in at two different areas of the scene, to help verify focus and to ensure that the composition is level across the scene (see Figure 3). This can come in handy for landscape and architectural photographers.
Figure 3 – Left: Press the i Button to access the i Menu screen with various shooting settings. You can use f1 to customize this menu, and add items such as Split-Screen Display Zoom. Right: Split-Screen Display Zoom shown in use, to compare two areas of the same scene to help determine if the framing is level.
The Playback i Menu will allow you to access two hidden features, the Quick Crop option and the Peaking Stack Image preview. During image playback, you can magnify an image and adjust the framing as desired. If you then press the i Button to access the Playback i Menu, and select the Quick Crop option, you can automatically crop the image and save a new image with the crop that is currently seen on the display (see Figure 4 – left). If you have used the Focus Shift Shooting feature to create a series of images that will later be combined into a focus-stacked image, you can view a monochrome preview of the final, stacked image. To view this preview, first use image playback to view any of the images from the Focus Shift Shooting series. Then press the i Button and select the Display peaking stack image option to view the preview image. Note that this preview image is only available when using certain lenses (see Figure 4 – right).
Figure 4 – Left: Accessing the Quick Crop feature via the image Playback i Menu. Right: The Peaking Stack Image preview, accessed with the Playback i Menu when viewing one of the images from a Focus Shift Shooting series.
And when a Multiple Exposure series is in progress, you can press the Playback Button to view the last image. If you then press the i Button, you will access a menu that allows you to view the Multiple Exposure progress, as well as edit the series by retaking or discarding the last exposure if desired.
There are a couple different ways to change the settings on the i Menu. You can highlight the desired icon (see Figure 5 – left) then press the OK Button and view all the options. This method will even allow you to access and change various applicable sub-options. Or you can highlight the desired icon, and turn the rear Main Command Dial to directly change the setting on that screen. If a setting option includes sub-options, such as the three available Auto White Balance options, or the Continuous Low frame rates (see Figure 5- right), you will use the front Sub-Command Dial to change the sub-options.
Figure 5 – Left: Photo-Mode i Menu, accessed by pressing the i Button. After highlighting the desired setting, either press the OK Button, or use the Command Dials to change the settings. Right: The rear Main Command Dial will select the setting, and the front Sub-Command Dial can be used for any available sub-options, such as the Continuous Low frame rate.
Monitor Mode Button – This button isn’t hidden, but it is causing some users a bit of confusion when they are not able to see any menus or playback images on their rear Monitor screen. In order to select if the Monitor or the Viewfinder will be in use, you will need to press the Monitor Mode Button, which is located on the side of the Viewfinder “bump.” Press it repeatedly until you see the Prioritize viewfinder option, as you look on the rear Monitor or in the Viewfinder. Set it for this option for now, so that you can make use of both the Viewfinder and the rear Monitor. If you are pressing the Playback Button or the Menu Button and not seeing anything appear on the rear Monitor, be sure to look in the Viewfinder and set the Monitor Mode to Prioritize viewfinder.
Live View Exposure Preview – An important function to make note of is that you need to enable Custom Setting d8 – Apply Settings to Live View in order to view the scene, in the Viewfinder and on the rear Monitor, with the current camera and exposure settings applied. This will allow you to better preview the resulting image and make exposure adjustments, and will also enable you to access the Live View Histogram of the scene by pressing the DISP Button.
Custom Control Assignments – A few other hidden features of the Nikon Z7 and Z6 can only be accessed by customizing one of the camera buttons to assign it to that function, using Custom Setting f2. For example, a customization will allow you to press a hold one of the Fn Buttons to temporarily switch to a different Metering Mode, such as Spot Metering (see Figure 6 – left). If you will be using non-CPU, F-mount lenses with the Z7 or Z6, you can register the lens to the camera, and thus gain additional functions such as in-camera Vibration Reduction. You will need to use f2 to assign the Choose non-CPU lens number option to one of the buttons, so that you can tell the camera which lens number is in use.
If you are making use of an optional wireless remote to trigger multiple cameras, there is also a “hidden” setting for this in the Custom Setting f2 button assignments. You can choose to assign the Fn1 Button, Fn2 Button, or Sub-Selector Center press to the Sync. Release selection option, which is used in conjunction with Custom Setting d3 – Sync. Release Mode Options. You can set up the camera so that, for example, when using the Z7 or Z6 as a master camera to remotely trigger other cameras, you can press the Fn1 (or Fn2) Button while taking the shot, and then just the master camera will shoot, or just the remote cameras and not the master, based on your settings.
Figure 6 – Custom Control Assignments – Left: Assigning the Fn1 Button to the Spot Metering function, to temporarily switch to a different Metering Mode with the press of the button. Right: The Customize Command Dials, Sub-Dial Frame Advance options, to use a dial to jump ahead 10 images during image playback.
Sub-Dial Frame Advance during Playback – If you wish to quickly scroll through your images as you view them on the rear Monitor during playback, you can use the rear Main Dial to advance one image at a time, and use the front Sub-Command Dial to advance 10 or 50 images. To set this up, access Custom Setting f5 – Customize Command Dials, and set the Menus and playback option for On. The Sub-Command Dial will then be used to jump 10 or 50 images at a time, based on the Sub-dial frame advance setting. Set the Sub-dial frame advance item for 10 images or 50 images, or you can also choose to jump to protected images, still images or movies only, or to a different folder (see Figure 6 – right).
One Button Playback Zoom / Histogram – Using Custom Setting f3 – OK Button, you can assign the OK Button so that during image playback it will immediately zoom-in, at the magnification level of your choice, centered at the area of the active focus point so that you can closely inspect your image. Or you can instead assign the button press to display a large histogram with the image, so that you can evaluate your exposure (see Figure 7 – left).
Figure 7 – Left: Use Custom Setting f3 – OK Button, Playback Mode to set the OK Button to show a magnified view or to show a large histogram. Right: Touch the bottom of the screen during full-image playback in order to access the “Frame Advance Bar” touch screen feature.
Frame Advance Bar – This image playback feature enables you to use the touch screen to quickly scroll through images without having to swipe one-by-one (see Figure 7 – right). And when viewing a magnified detail of an image, use the touch screen arrows to view the same magnified area of previous or following images.
Flash Information Screen – With a compatible optional Speedlight flash attached and turned on, such as the SB-5000 or SB-500, press the DISP Button repeatedly to access the Flash Information Screen showing the current flash settings, and then press the i Button to view and change the various settings and options, including Wireless Flash Options (see Figure 8).
Figure 8 – Left: When using an optional Speedlight flash, press the DISP Button to access the Flash Information Screen showing the current flash settings. Right: Then press the i Button to view and change the various settings and options.
Nikon Z7 / Nikon Z6 Menu Setup Guide
In addition to my Nikon Z 7 / Z 6 Experience user guide, I also offer a Z7 / Z6 Menu Setup Guide, with suggested settings and starting points for most all of the camera menu settings and Custom Settings. The Excel spreadsheet includes separate listings for different shooting situations including Landscape, Studio, Action, etc. You can download the spreadsheet here:
Again, all of these hidden features and settings, and other unique features, as well as all of the other features, functions, settings, and controls of the Z7 and Z6 are discussed in detail, in my comprehensive Nikon Z 7 / Z 6 Experience user guide.
And for any portrait photographers using the Nikon Z7 / Z6, here is an interesting article I recently came across at the Pixpa.com blog, which discusses all the numerous aspects to consider when creating a portrait, including lighting, background, angles, and making the subject relaxed and natural. It is a helpful tutorial for new portrait photographers, and a nice refresher for those already making portraits.
As with all new mirrorless and dSLR cameras, the lists of specifications don’t tell the entire story. Many of the important functions, options, and additions of a new camera can be found in the menus and Custom Settings. These are the types of options that can really differentiate a camera, from a user-experience perspective, and yet these options are often over-looked by reviewers and spec comparison posts. For example, two cameras may share the same autofocus AF Modes and AF Area Modes, and thus look equal on a spec comparison sheet. But one will be much better suited for photographing action and movement because it has additional menu options and Custom Settings which allow the user to tweak and customize the AF system for their specific needs and shooting style.
Some of the Custom Settings options of the Nikon Z 7
A video of all the Nikon Z 7 menu items has been posted on YouTube by Jeff Curtner. You can find the video here. It is simply a video of someone navigating all the Z 7 menu items, the i Menu, and the Live View display, but lots of information can be gathered from this, including a few menu options that have not been mentioned in Nikon’s materials or by other reviews of the Nikon Z 7 and Nikon Z 6. All of the screenshots in this post have been taken from this video.
Despite being a mirrorless camera, and thus differing from a Nikon dSLR, a large number of the menu items and options are similar to the Nikon D850 and other recent Nikon models. I will not go into detail about any of those items, since if you are currently using a D850, D500, D7500, D750, etc, you will already be familiar with those menu items and their options. You can consult one of my Menu Setup Spreadsheets to learn about suggested settings for those menu items, or have a look at my comprehensive user-guides for these cameras, such as Nikon D850 Experience. A comprehensive user-guide for the Z 7 and Z 6, Nikon Z 7 / Z 6 Experience, will be available in November or December 2018. You can learn more about it here:
And now a look at some of the Menu and Custom Setting options of the Nikon Z 7 and Nikon Z 6 that have not been discussed in many recent Z 7 and Z 6 camera reviews. Some of the most important ones are in the Custom Settings items, but we will start at the top of the Menu tabs, with the Photo Shooting Menu:
Photo Shooting Menu
The Expeed 6 processor of the Nikon Z 7 and Z 6 offers processing speed that allows for some new features, including Diffraction Compensation, a Mid-Range Sharpening Picture Control parameter in addition to the Sharpening and Clarity parameters, and the new Creative Picture Controls. As an in-camera processing feature, Diffraction Compensation may potentially slow down the maximum continuous frame rate a tiny bit, though perhaps not – we will have to read the fine-print of the Nikon Z 7 User’s Manual when it is available. The Creative Picture Controls are found in the Set Picture Control menu, and listed after all the typical Picture Controls. If you don’t wish to separately set the three Picture Control sharpening parameters, you can use the new Quick Sharp option to adjust these sharpening-related parameters together.
Diffraction Compensation menu item (left), and the Creative Picture Controls as found in the Set Picture Control menu (right). The Movie Picture Control option is shown here, but a similar menu is also found in the Photo Shooting Menu, for still image shooting.
The White Balance menu item is located in the Photo Shooting Menu, though for quick access it can also be assigned to one of the Function Buttons, or changed via the i Button Menu on the rear Monitor or in the Viewfinder. As with recent Nikon models, the Z 7 and Z 6 offer three different Auto White Balance options, Keep White, Normal, and Keep Warm Lighting Colors. The cameras also offer the recently added Natural Light Auto option, designed to reproduce colors as the eye sees them in natural light. And there are the other standard Nikon WB options, including multiple Fluorescent sub-options such as Day White and Cool-White. To access these options quickly while shooting, you can assign WB to one of the customizable buttons, and then press that button and change the WB setting as you view it in the electronic Viewfinder or on the rear Monitor, as shown in the figure below.
Left: Photo Shooting Menu – White Balance options, including three Auto WB options, and the Natural Light Auto option. Right: If WB is assigned to one of the camera buttons, you can also quickly access and change this setting in the Viewfinder or on the rear Monitor.
The Z 7 and Z 6 offer in-camera, 5-axis Vibration Reduction, for both still image and video shooting. This image stabilization also works with F-mount lenses, including non-VR lenses, via the Nikon FTZ Adapter. (Image stabilization will be limited to 3-axis VR with non-VR lenses.) I’m not sure if this menu item shown below is for enabling the in-body electronic image stabilization, or if it is an option that is used with newer Nikon lenses that have VR, but don’t have the VR and VR Mode switches on the lens itself. I will update when more information is known.
Left: Vibration Reduction menu item, to enable VR and to set the VR Mode. It is possible that this is not the in-camera Electronic Vibration Reduction menu item, but rather it is possibly for enabling VR on newer lenses that don’t have the VR and VR Mode switches on the lens itself. Right: Focus Shift Shooting options (Focus stacking), including the Peaking Stack Image preview image option.
The focus stacking feature of the Z 7 and Z 6 is called Focus Shift Shooting, and is accessed in the Photo Shooting Menu. You will use this menu to set the Number of Shots, Focus Step Width, and Interval between shots. It will also allow you to lock the exposure on the first frame, enable completely Silent Photography for the process, and create a new storage folder to save the focus stack images where you can quickly locate them. The new Peaking Stack Image option will display a monochrome preview of the final focus-stacked images, which can be viewed after the focus stacking function is performed. Beware that the Silent Photography option can result in banding in the images, particularly under artificial lighting that cycles. So if you are using this option, it is best to verify that your images are clean before initiating the Focus Shift process.
Custom Settings Menu
Many of the importation functions, options, and customizations for the Z 7 and Z 6 can be found in the Custom Settings Menu. These menu items are often where the important, powerful functions of a Nikon camera are found. For example, the on-camera, phase-detection aspect of the hybrid autofocus system of the Z 7 and Z 6 allows for Face-Detection autofocusing, with both Viewfinder shooting and Live View shooting. This feature can only be used with the Auto-Area AF area mode, and is enabled with Custom Setting a4. The Custom Setting a5 – Focus Points Used, can be used to limit the number of selectable focus points. The Z 7 has 493 AF Points, and the the Z 6 has 273 AF Points, so that is a ridiculous number of focus points to have to click across in order to locate the active AF Point where you want it to be. I will have to confirm this, but I believe that this menu item will be used to limit the number of selectable points, so that you can more quickly and easily select the AF Point you desire. I am going to speculate that all the the AF Points will actually be used by the camera when automatically tracking a moving subject.
Left: Custom Setting a4, to enable AF Face Detection when working in Auto-Area AF area mode. Right: Custom Setting a5, to limit the number of selectable AF Points.
The Z 7 and Z 6 also offer a Dynamic Area AF area mode, where the selected AF Point is used to focus on the subject, but the immediate surrounding points will help retain focus on the subject if it momentarily strays from the initial point. This is similar to the 9-Point Dynamic-Area AF of previous Nikon dSLR models. The Custom Setting a10 – Focus Point Options offers the Dynamic-Area AF Assist item, which applies to this area mode. If enabled, you will be able to also view the active surrounding AF Points, in the Viewfinder when shooting, and not just see the single selected AF Point. The Custom Setting a11 – Low-Light AF is a new option for the Z 7 and Z 6, and is used to make the autofocusing system even more sensitive when working in low light. However, enabling this option may cause a slight lag in autofocusing.
Left: Custom Setting a10, to enable the Dynamic-Area AF Assist option in order to view all the active AF Points when using that AF Area Mode. Right: Low-Light AF, to assist with focusing in low light situations.
The Z 7 and Z 6 offer an Electronic Front-Curtain Shutter option, found in Custom Setting d5. This feature makes use of an electronic shutter, using the sensor itself as the shutter, and thus eliminates the sound and the motion of the first curtain of the mechanical shutter. This can help to eliminate slight internal camera movements and vibrations when capturing an image, and is useful for tripod shooting such as landscape and macro shots. The cameras also offer a Silent Shutter option, which will be completely silent. However, that can cause banding when used with artificial lighting that cycles. When Custom Setting d8 – Apply Settings to Live View is enabled, all of the various camera settings and exposure settings will be applied to the scene as viewed on the rear Monitor during Live View. This will include the White Balance setting, Picture Control, and Exposure Compensation amount. Thus you will better be able to preview the appearance of the final image.
Left: Custom Setting d5, to enable the Electronic Front-Curtain Shutter. Right: Custom Setting d8 – Apply Settings to Live View, where the scene on the rear Monitor will reflect the current camera settings and exposure settings.
The cameras offer a newly designed i Menu, which will allow you to quickly access and change various settings. This menu can be accessed on the rear Monitor, and also in the electronic Viewfinder. This offers the advantage of changing various camera settings, while shooting, without taking the camera down from your eye. Custom Setting f1 enables you to Customize i Menu, so that you will be able to access the settings and functions you use most frequently. For example, if you often use the in-camera HDR or Bracketing features, you can add them to this menu. Custom Setting f2 – Custom Control Assignment allows you to customize various buttons and controls on the camera, including the Fn1 and Fn2 Button, and the Movie-Record Button. For example, you can assign WB or AF Modes to the Fn Buttons, and then press the button and turn the dials to quickly adjust those settings. The Multi-Selector Center Press can be assigned to a function such as AE/AF Lock, or I believe it will be able to be used to quickly, temporarily switch to a different AF Mode / AF Area Mode. This is useful if you need to quickly switch between shooting a still subject and a moving subject, while shooting.
Left: Custom Setting f1, used to customize the functions available on the i Menu. Right: Custom Setting f2 – Custom Control Assignment, to customize the various camera buttons.
Setup Menu
There are a few additional notable new features located in the Setup Menu, including the ability to adjust the Brightness and the Color Balance of both the rear Monitor and the electronic Viewfinder. The HDMI menu item allows you to adjust the video settings when recording to an optional external device, including 8-bit or 10-bit, and enabling N-Log, and View Assist to preview the appearance of the final image.
Setup Menu options for adjusting Monitor Color Balance (left), and the advanced HDMI settings for recording video to an optional external device (right).
Of course there are additional menu items and functions that have not been discussed here, including many of the features found on previous models such as the D850. You can learn more about many of the new features and functions of the Nikon Z 7 and Nikon Z 6 in my previous blog post Nikon Z 7 and Z 6 – Beyond the Specifications:
To learn about all the features, functions, controls, and customizations of the Nikon Z 7 and Nikon Z 6, be sure to have a look at my Nikon Z 7 / Z 6 Experience user guide, to be available in November or December 2018. It is a comprehensive 350+ page guide, to help you take control of your camera, and the images you create.
My Nikon Z 7 / Z 6 Menu Setup Spreadsheet Excel document will be available in October 2018. It will be free for a limited time after the introduction of the camera, and will be available for download here:
If you want to pre-order or order the Nikon Z 7 or Nikon Z 6, please consider using my affiliate links below. Your price will be the same, but they will give me a small commission – thanks!
Nikon Z 7 at B and H:
https://www.bhphotovideo.com/c/buy/Mirrorless_System_Cameras/ci/16158/N/4288586281/BI/7364/KBID/7886/kwid/000/DFF/d10-v1-t3-z4288586281
Nikon Z 6 at B and H:
https://www.bhphotovideo.com/c/buy/Mirrorless_System_Cameras/ci/16158/N/4288586281/BI/7364/KBID/7886/kwid/000/DFF/d10-v1-t3-z4288586281
After years of speculation and anticipation, Nikon has finally introduced the new Nikon Z 7 and Nikon Z 6 full-frame mirrorless cameras. Initial reactions have been heated and emotional, as people debate whether or not the single XQD memory card slot will be its downfall, or whether the autofocusing system will be up to the needs and expectations of Nikon dSLR users. And of course there are endless comparisons of whether they live up to the offerings of the comparable Sony a7R III and a7 III full-frame mirrorless models.
Comparing the specifications, the two sets of cameras are similar on many points. The Z 7 and the a7R III are the high resolution models, while the Z 6 and the a7 III are the little brothers, with most all of the same features as their big brothers, but with a lower mega-pixel count. With some features, such as eye-detection autofocus, burst rates, and buffer rates, the Sonys appear to come out ahead, and with many other features the Nikons seem equal or better.
Detail of an official Nikon Press Photo of the Nikon Z7 body.
But I contend that, while Nikon certainly considered the Sony models when designing the new Z series, this Nikon vs. Sony comparison is not their primary concern. Nikon put that aside, and concentrated on Nikon. They designed a “future-proof” lens system with the new Z-mount, which will begin to make a large difference with the introduction of future wide-angle and fast lenses. There is already an f/0.95 lens that has been announced, the 58mm f/ 0.95 S Noct Lens. Most importantly, they designed a mirrorless camera that looks like a Nikon, feels like a Nikon, and functions like a Nikon. The camera buttons will all be familiar to a Nikon dSLR user, and just as important, the camera menus and navigation will be the same.
As anyone who has used a Sony a7 model will tell you, navigating the menus, finding the setting you are seeking, then interpreting a setting and its options can be painful. I can attest to that, I wrote the book on it! (Sony a7R III Menu Setup Guide and Sony a7 III Menu Setup Guide). It is a very different experience from using a Nikon or Canon menu, and it takes a bit of getting used to. Some of the Sony buttons, controls, and functions offer the same issue, and are not necessarily intuitive to either a new user or to a user coming from Nikon. And that is where Nikon wins… with existing Nikon users.
The Z cameras are not necessarily designed for camera users trying to decide between the Sony a7 and the Nikon Z. If a dedicated Nikon user wanted to try out or to jump to a mirrorless system, a Nikon user would have already bought a Sony a7 camera (or a Fuji or one of the other offerings). Instead, the Z cameras are designed for Nikon users trying to decide between buying a mirrorless camera or not buying a mirrorless camera. If they are going to buy a mirrorless camera, there is a high likelihood they will now be buying a Z 7 or Z 6. Nikon has greatly reduced the friction of converting to mirrorless, by offering a familiar camera. And in addition to the camera body, buttons, menus, options, functions, and features being similar to their current Nikon dSLR, Nikon users can painlessly bring along all their F-mount lenses, with the simple addition of the FTZ Lens Adapter. And Nikon users can expect that the image quality is going to be there.
Beyond the hype and chatter, the pre-orders for the Z cameras appear to be happening, and I believe that these cameras are going to be a success. Nikon has finally entered the full-frame mirrorless camera market, and they are here to stay.
If you want help setting up the Menus and Custom Settings of the Nikon Z 7, Nikon Z 6, Sony a7R III, or Sony a7 III, have a look at my comprehensive Menu Setup Spreadsheets, which are all free for a limited time after the introduction of each of the cameras. Or they are always free with a link included within the text guides for each of the cameras, which can be found at my FullStopBookswebsite, including the new Nikon Z 7 / Z 6 Experience comprehensive user guide to the Nikon Z 7 and Nikon Z 6.
And if you want to continue to learn, discuss, and ask questions about the settings, features, and functions of the Z 7 and Z 6 from a user-standpoint, please join the Nikon Z 7 / Z 6 Setup and User Tips Facebook group!
If you want to pre-order or order the Nikon Z 7 or Nikon Z 6, please consider using my affiliate links below. Your price will be the same, but they will give me a small commission – thanks!
Nikon Z 7 at B and H:
https://www.bhphotovideo.com/c/buy/Mirrorless_System_Cameras/ci/16158/N/4288586281/BI/7364/KBID/7886/kwid/000/DFF/d10-v1-t3-z4288586281
Nikon Z 6 at B and H:
https://www.bhphotovideo.com/c/buy/Mirrorless_System_Cameras/ci/16158/N/4288586281/BI/7364/KBID/7886/kwid/000/DFF/d10-v1-t3-z4288586281
After several years of speculation and anticipation, Nikon has just introduced their first full-frame mirrorless cameras, the Nikon Z 7 and the Nikon Z 6. The Z 7 is a high-resolution model boasting 45.7 MP, and the Z 6 is nearly the same camera, but has 24.5 MP, and costs $1996 vs. $3396 for the Z 7. There are some additional differences such as the number of autofocus points, and the ISO ranges.
Detail of the Nikon Z 7 full-frame mirrorless camera, including the 3.2″ tilting touch-screen monitor. Official Nikon image.
If you have been reading about these models, you have likely found numerous comparison posts between the two cameras, the Nikon D850 dSLR, plus the competing Sony a7R III and Sony a7 III mirrorless models. Simply comparing the specifications on the surface can be a helpful starting point, but we need to dig a little deeper in order to make true, user experience comparisons.
Continuous Frame Rate and Buffer
For example, the Nikon D850 dSLR lists a 9fps maximum burst rate, but users quickly discovered that this was based on the use of the optional MB-D18 battery grip and EN-EL18a/b battery. The maximum frame rate without the battery grip is 7 fps, and even then that rate is not achievable without the use of specific settings including AF-S, M or S shooting mode with a 1/250 or faster shutter speed, and various settings like VR and auto ISO turned off.
The Nikon Z 7 has a similar situation, with the maximum frame rate listed as 9 fps. However, this is rate can only be attained when capturing JPEG or 12-bit RAW files, and the exposure will be locked at the first frame of the burst. The camera will continue to update focus for each shot, when using AF-C focus mode, but not the exposure settings. When using Silent Mode, where shutter sound is completely eliminated, the maximum fps will be 8 fps. When capturing 14-bit RAW files, the maximum frame rate is reduced to 5.5 fps, however this will enable continuous focus, and exposure will be determined for each shot in the burst, and not just locked at the first shot. The maximum rate can be maintained for up to 18 continuous 14-bit compressed RAW images,or 23 12-bit lossless compressed images. Note that the Sony a7R III achieves up to 10 fps (with viewfinder blackout), or 8 fps without blackout, and exposure is not locked on the first exposure with either frame rate, unless desired. The Sony maximum rate can be attained for 40 RAW images, or 89 compressed RAW images. That is a significant difference, which Nikon will need to improve in future models.
Detail of the Nikon Z 7 full-frame mirrorless camera, including the new Z-mount lens mount. Official Nikon image.
Electronic Viewfinder and Touch Screen
Compared to a dSLR, mirrorless cameras such as the Z 7 and Z 6 make use of an electronic viewfinder (3690K dots) rather than an optical viewfinder. An electronic viewfinder can take a little bit to get accustomed to if you are used to working with the optical viewfinder of a dSLR, as there can be a little lag, the brightness changes with the scene and exposure, and it consumes battery life. However it has its advantages. An electronic viewfinder will reflect many of the actual camera settings, such as exposure, white balance, and Picture Control. This not only helps you envision the final image, but can save you in situations where you may have the wrong WB set. It also allows you to see and change certain camera settings, such as metering mode and autofocus modes, while looking through the viewfinder (by pressing the i Button to access a customizable settings screen). It also allows you to review images and movies in the viewfinder, without taking your eye away to view the rear screen.
The Z 7 and Z 6 provide a couple different ways to confirm focus, when manual focusing through the Viewfinder or on the rear Monitor. There is a Rangefinder feature, as found on many Nikon dSLR models, where you place the AF Point on your desired subject or detail, and as you manually focus, the AF Point will illuminate when that detail comes into focus. You can also enable Focus Peaking, where high-contrast edges of the actual subject or detail in the scene will illuminate when that distance is in focus. You can select which color is used to indicate focus. Focus Peaking is often used when manually focusing when shooting video, and still photographers have adapted the use of the feature as well.
The 3.2″ rear monitor has touch-screen capabilities for Live View, navigating menus, changing settings, and for locating your AF Point and autofocusing. This differs from the Sony a7R III, where the touch-screen is only used for Live View and for autofocusing.
Detail of the Nikon Z 7 full-frame mirrorless camera, including the rear monitor and controls. Official Nikon image.
Autofocus System
The AF system of the Z 7 and Z 6 is going to be slightly different than you may be used to with a Nikon dSLR. The hybrid AF system (phase-detection and contrast-detection) of the Z 7 has 493 AF points, and the Z 6 has 273 points, both covering 90% of the frame. That means you will be able to focus on and track subjects throughout almost the entire frame, without necessarily having to lock focus and recompose. The on-sensor phase-detection AF system is similar to Live View autofocusing, and thus should be spot-on without having to calibrate lenses (except for lenses that can’t take full advantage of the hybrid AF system, and instead rely on the contrast-detection system).
You will be able to use AF-S Focus Mode for still subjects, and AF-C for tracking moving subjects. The AF Area Modes differ slightly from a Nikon dSLR. You will be able to choose from Pinpoint AF for very precise AF Point positioning (in AF-S mode only), Single-Point AF, 9-point Dynamic-Area AF (in AF-C mode), Wide-Area AF, and Auto-Area AF. If you wish to take advantage of face detection, you will have to set for Auto-Area AF, and enable the Auto-Area AF Face Detection item of the menu. Nikon says that the face-detection will also look at the upper body of the subject, and thus will continue to track it even if the face is momentarily out of view.
Tracking a subject throughout the frame, similar to Nikon’s 3D-Tracking on a dSLR, will be done in Auto-Area AF and AF-C. The implementation of it is a bit different, however, and DP Review goes into detail about the new process. It is a bit more cumbersome than how it is done on a dSLR:
The 493 AF Points of the Nikon Z 7, covering 90% of the frame. Official Nikon image.
Other Features and Functions
The ISO range of the Z 7 is 64 – 25,600, expandable to 32 – 102,400. With its different sensor, the Z 6 has a wider ISO range on the high end, of 100 – 51,200, expandable to 50 – 204,800.
New Z-mount lens mount – Wider, which will allow for lenses such as the 52mm f/0.9 NOCT lens, coming from Nikon. Three lenses will be available at first, along with a Z to F ZTF Adapter to use Nikon F-mount lenses.
EXPEED 6 processor, new mid-range sharpening parameter, new Creative Picture Controls to create dramatically processed images, such as Dream, Bleached, and Graphite.
5-axis in-camera image stabilization, which will work with both lenses without VR, and lenses with VR.
~ ~ ~
To learn about all the features, functions, controls, and customizations of the Nikon Z 7 and Nikon Z 6, be sure to have a look at my Nikon Z 7 / Z 6 Experience. user guide, to be available in November or December 2018. It is a comprehensive 350+ page guide, to help you take control of your camera, and the images you create.
If you want to pre-order or order the Nikon Z 7 or Nikon Z 6, please consider using my affiliate links below. Your price will be the same, but they will give me a small commission – thanks!
Nikon Z 7 at B and H:
https://www.bhphotovideo.com/c/buy/Mirrorless_System_Cameras/ci/16158/N/4288586281/BI/7364/KBID/7886/kwid/000/DFF/d10-v1-t3-z4288586281
Nikon Z 6 at B and H:
https://www.bhphotovideo.com/c/buy/Mirrorless_System_Cameras/ci/16158/N/4288586281/BI/7364/KBID/7886/kwid/000/DFF/d10-v1-t3-z4288586281
Both the Sony a7R III and the Sony a7 III mirrorless cameras have provided exciting upgrades to their predecessors. Important improvements and new features included improved hybrid autofocus systems with AF points positioned widely across the entire frame, faster continuous shooting frame rates, and the addition of the Multi Selector joystick to quickly select the desired AF Point while shooting.
Detail of the Sony a7R III Mirrorless Camera
However, they both make use of a complex menu system that can be a challenge to navigate. While the numerous menu options allow for a tremendous amount of control and customization of the cameras, they can also cause confusion with similarly named items, or with items whose functions are unclear at first. To help you better understand all of the menu items and functions of the camera, I have created quick-start Menu Setup Guides, which explain every menu item along with suggested starting points. There are the two separate books, Sony Alpha a7R III Menu Setup Guide and Sony Alpha a7 III Menu Setup Guide, both of which can be purchased at my FullStopBooks.com website. I have also created a Menu Setup Spreadsheet for these cameras, which list suggested settings for each menu item, with different listing for various shooting situations such as Landscape, Portrait, Action, Studio, Birds, etc. The spreadsheets can be downloaded from my website here: www.fullstopbooks.com/setup-guides/.
Information from these guides is excerpted here, to explain some of the tips, tricks, and “hidden” features of the cameras. While none of the camera features are actually hidden if you read through the manual or help guide, or explore the menu items, some of them can be a bit challenging to find or to make use of if you don’t know they exist, and so I will explain them here.
Attach the Spot Metering Point to the Active AF Point
When making use of Spot Metering Mode, the actual spot that is used to determine the exposure settings can either be located in the center of the frame, or it can surround the active AF Point. Often it is more useful to have this point surround the active AF Point, because for example, you may be focusing on a specific face, and you would also like that face to be used to determine the exposure settings. If the Spot Metering circle is located in the center of the frame, you would have to first meter on the face using the center of the frame, lock the exposure settings (AEL), and then recompose, focus, and capture the image. If the Spot Metering circle is located surrounding the active AF Point, then you simply need to autofocus and capture the image, and the camera will simultaneously use the area of the active AF Point to also determine the exposure.
If this is how you wish to work, I suggest setting the Spot Metering Point item of the Camera Settings 1 Menu to “Focus Point Link” in order to have the spot metering point surround the active AF Point.
Know that you can also select the size of the Spot Metering point. When selecting Spot Metering in the Metering Mode menu item of the Camera Settings 1 Menu, or via the Fn Button and Function Menu, be sure to press left or right to choose Spot Large, Medium, or Small.
You can also use the Custom Key settings of the Camera Settings 2 Menu to assign a button to temporarily make use of Spot Metering when that button is pressed, so that you can quickly meter for a precise or specific area without having to take your eye from the Viewfinder as you change the Metering Mode.
Take Advantage of Face Priority and Eye Priority Autofocus
The a7R III and the a7 III both have excellent autofocus systems, which are able to identify and lock onto faces and subject’s eyes found in the scene. In the Camera Settings 1 Menu, you will want to access the Set Face Priority in AF menu item, where you will enable the Face Priority in AF sub-option, in order to take advantage of the autofocusing face detection feature. If the camera detects a face at or near the area of the active AF Point or Zone, the camera will automatically detect, track, and focus on the face. You will still need to use the Multi-Selector to position the active AF Point or Zone at the desired face before focusing, so that the camera knows which part of the scene to look at and locate your desired subject. Then half-press the Shutter Button, and the active face detection frame will turn white.
When working in Single-shot AF (AF-S) Focus Mode, the camera will also automatically detect and focus on the subject’s eyes. When working in Continuous AF (AF-C) Focus Mode, the camera will only detect, focus, and track faces unless you press the center button of the Control Wheel, and then eye detection and tracking will become active as well.
This Face Priority and eye detection feature works extremely well, and thus you may wish to take advantage of it for various shooting situations that involve faces, whether for still subjects or moving subjects. You are even able to register and rank specific faces (in the Face Registration setting later in the Camera Settings 1 Menu), so that the camera will prioritize them in a scene with multiple faces.
Detail of the Sony a7R III Mirrorless Camera
Quickly Switch to a Different Group of Shooting Settings with the Press of a Button
The Register Custom Shooting Settings of the Camera Settings 1 Menu is a powerful option that will let you assign a group of exposure, shooting, and autofocus settings to one of the camera’s custom buttons (C1, C2, or C3 Button). You can then press and hold that button while shooting to temporarily switch to an entirely different group of camera settings.
To make use of this feature, access this menu item, then select which button you wish to register (such as Recall Custom hold 1), then go through the next menu screen and select and set all of the available settings, such as Shooting Mode, Aperture, Drive Mode, Metering Mode, Focus Mode, and Focus Area. Then select Register. Or if you wish, you can set your camera in advance to all of your desired settings, access this menu, and then select Import Current Setting.
In this menu, you can enable or disable the check-mark next to the settings to choose if they will be registered or not. For example, you may wish to register various autofocus and camera settings, but not register specific exposure settings. Then when you make use of this feature during shooting by pressing and holding the C1, C2, or C3 Button, the enabled settings will temporarily change, but the camera’s exposure settings will remain as you currently have them set.
This customization might be used if you are shooting a still situation that might suddenly change to an action situation, such as a standing bird suddenly taking flight. Or it can be used in an action type of situation where you immediately wish to switch to different shooting parameters for a completely different type of action, such as a baseball batting situation vs. a running situation. Or if you are shooting a subject that is actively moving between sun and shade, the various shooting settings (such as the ISO, Metering Mode, and White Balance) can be set up to instantly accommodate the shade situation.
Use the Focus Magnifier to Zoom in on the Live View Scene
The Sony a7 cameras don’t have the same zoom-in and zoom-out buttons for viewing the Live View scene that you may be used to with a Canon or Nikon camera. Instead you will need to make use of the Focus Magnifier of the Camera Settings 1 Menu. You can also assign the Focus Magnifier to a button of your choice, such as the down button on the Control Wheel. The menu items that come after Focus Magnifier are used to customize exactly how the feature will work.
Focus Magnifier – Access this menu item, then press the center of the Multi-Selector to zoom-in on the scene while viewing either the rear Monitor or the Viewfinder. Use the Multi-Selector to move the magnified area about the screen, or press the Delete Button to move it to the center of the screen. You can continue to press the Multi-Selector Center to zoom-in closer. If using manual focus, this can assist you in focusing more precisely on the desired detail. Turn the manual focus ring on the lens to focus. If Touch Operation is set for On, then you can double-tap on the rear Monitor to magnify the desired area. Note that you cannot access this function when using AF-C Focus Mode.
If set for autofocus, you will need to set the AF in Focus Magnification item, just below, to determine how autofocus works with focus magnification. If set for On, the camera will autofocus when half-pressing the Shutter Button. If set for Off, the Focus Magnifier is cancelled and the view returns to the full scene, when the Shutter Button is half-pressed. The next two menu items will determine the time that the Focus Magnifier remains active, and the amount of magnification of the focus magnifier.
Focus Magnifier Time – When making use of the Focus Magnifier, this setting will determine how long the magnification remains active, so that you can view and focus on the desired detail. You can select 2 seconds, 5 seconds, or No Limit. With the No Limit setting, magnification will end when you half-press or fully-press the Shutter Button (based on the AF in Focus Magnification setting below). I suggest you set this for No Limit, so that you can examine the area and make your manual focus or autofocus adjustments.
Initial Focus Magnification (still image) – When making use of the Focus Magnifier, this setting will specify the initial amount of magnification. The x1.0 setting will activate the Focus Magnifier, but you will still view the entire scene. Continue to press the Multi-Selector Center to zoom-in closer. The x6.2 (a7R III) or x5.9 (a7 III) setting will immediately enlarge the image by about 6 times, when Focus Magnifier is used. I suggest you set if for x1.0, then activate the Focus Magnifier, adjust the area of focus with the Multi-Selector, then continue to zoom, by pressing the Multi-Selector Center or the Control Wheel Center Button.
AF in Focus Magnification (still image) – This setting determines how autofocus works with the Focus Magnifier. If set for On, the camera will retain the magnification of the screen and autofocus when half-pressing the Shutter Button. The camera will focus at the “+” symbol seen in the center of the screen. The camera will return to the full view of the scene once the image is captured. If set for Off, the Focus Magnifier is cancelled and the view returns to the full scene, when the Shutter Button is half-pressed. I suggest setting this for On so that you can make use of the magnified view to precisely autofocus.
Know the Difference Between AEL Hold and AEL Toggle
When using the Custom Key options of the Camera Settings 2 Menu to customize the function of various camera buttons, you can choose to assign Auto Exposure Lock (AEL) to the button of your choice. Typically you will assign the AEL Button to be used to lock the current exposure settings. For example, if you are using Center Metering or Spot Metering, you would half-press the Shutter Button to begin metering, aim the camera to position the metering area over the desired part of the scene, then press the AEL Button to lock the exposure settings that the camera determined. You will see an asterisk icon (*) on the screen to indicate that exposure lock is active. You can then recompose and fully press the Shutter Button to capture the image.
There are a few different Auto Exposure Lock options. The AEL hold option means that exposure is locked only as you hold down the button. The AEL toggle options means that you can press and release the button to activate exposure lock. The options with the Spot Metering icon, [.] AEL hold and [.] AEL toggle means that Spot Metering will temporarily be activated to determine the exposure settings, and those settings will simultaneously be locked, with either the “hold” option or the “toggle” option that was just explained. This can be a very useful option if you are shooting in a situation where you are not using Spot Metering, but you may temporarily wish to use Spot Metering to determine the exposure settings such as for a portrait.
Choose the Best Refresh Rate for the Electronic Viewfinder
The a7R III offers the Finder Frame Rate option in the Camera Settings 2 Menu. This adjusts the frame rate of the electronic Viewfinder display. The High setting will display moving subjects more smoothly, however the Viewfinder resolution will be reduced. The Standard setting will make use of the normal frame rate, and will be used automatically when the camera’s internal temperature becomes high. However with its higher resolution, you will want to use the Standard setting for situations such as still subjects, studio use, macro, and landscapes. It is recommended that you set for High for general use and moving subjects, and Standard for still subjects.
Assign the C3 Button to Rating or Protect
The Custom C3 Button, located at the upper-left on the rear of the camera, is labeled for the Protect function. This will protect an image from accidental deletion. However, know that reformatting a memory card will delete all images, including protected images. You can also use the Custom Key options of the Camera Setting 2 Menu to assign this button to another function, such as Rating. This may be a more useful feature, as you can mark an image with 1 to 5 stars. This can be used to quickly locate specific images when you later view them on your computer.
The Rating Set item of the Playback Menu can be used in conjunction with this button assignment. If you assign a Custom Button to the Rating feature, then you can select which rating amounts are available to choose from, with each subsequent button press. For example, you may only wish to make use of the 1, 3, and 5 star ratings, and thus you can disable the other rating values so that you don’t have to click through them every time. Then you would press the button one time for 1-star, two times for 3-stars, and three times for 5-stars.
There are numerous other menu options, features, and functions that are discussed in my quick-start menu guides for these cameras, Sony Alpha a7R III Menu Setup Guide and Sony Alpha a7 III Menu Setup Guide, both of which can be purchased at my FullStopBooks.com website. I have also created a Menu Setup Spreadsheet for these cameras, which list suggested settings for each menu item, with different listing for various shooting situations such as Landscape, Portrait, Action, Studio, Birds, etc. The spreadsheets can be downloaded from my website here: www.fullstopbooks.com/setup-guides/.
2018-05-24 – Version 1.0 published in PDF, EPUB, and MOBI formats – No updates
2018-06-01 – Version 1.1b published in PDF, EPUB, and MOBI (Amazon Kindle) formats, including FullStopBooks, Kobo, iTunes, Amazon, Apple, Barnes and Noble.
There were a few mentions of “dSLR” or “digital SLR” in the guide. As the a7R III is a mirrorless camera and not an SLR, there errors have been corrected to say “mirrorless” camera.
“Future Updates to the Text” chapter, information, and links added to the guide.
2018-06-04 – Version 1.2 published in PDF, EPUB, and MOBI (Amazon Kindle) formats, including FullStopBooks, Kobo, iTunes, Amazon, Apple, Barnes and Noble.
To my great embarrassment, there was a typo (extra word) on the very first page of the text. That has been corrected.
Firmware Update: A Firmware update was made available for the a7R III, Firmware Version 1.10. You can download the firmware at the Sony Support site, under the Drivers and Software tab:
The firmware update provides the following benefits:
-Adds the menu option to select Pixel Shift Multi Shooting (On: Shooting Interval 0.5sec)
Notes:
When using an A-mount lens via an adaptor (LA-EA1/ LA-EA2/ LA-EA3/ LA-EA4), the interval might be slightly longer
When the camera is connected to PC, please use the latest version of the Imaging Edge software
-Adds support for bracketing during silent shooting with uncompressed RAW
-Adds support for tuning of the peaking display level for S-Log shooting
-Makes improvements for a condition where the Eye AF does not work with certain camera settings
-Makes improvements for a condition where Viewfinder Brightness is not reflected correctly in the Manualsetting
-Improves overall stability of camera
~ ~ ~
Sign up to receive notices of updates to the text of Sony Alpha a7R III Menu Setup Guide, as well as to be eligible to receive free copies of the updated e-book file (for major updates):
The Sony Alpha a7R III mirrorless camera offers numerous improved features and updates from previous versions of the camera, including an improved autofocus system with more effective eye-detection, faster continuous shooting at up to 10 frames per second, better in-camera stabilization, and a faster processor. Boasting 42.2 megapixels, the image resolution is excellent enough to meet most any photographer’s needs.
The a7R III offers numerous menu options, features, and customizations, and you may have found that the menus can be challenging to navigate, and some options are confusing or difficult to understand. In fact there are over 180 menu items, spread across 35 menu pages, and organized under 5 separate tabs. However, it is important to properly set up the options to match your shooting needs, and essential to understand what the features are doing and how the camera is operating, so that you can take full advantage of all that that a7R III offers.
I have put together a comprehensive Sony a7R III Menu Setup Guide Spreadsheet to help walk you through all the Camera Settings and Setup Menus. The spreadsheet contains separate listings of suggested settings and starting points for various types of shooting situations, including:
General / Travel / Street Landscape / Architecture Action / Sports Moving Wildlife / Birds Studio / Portraits Concert / Performance
Below is a small detail of the setup guide. You can download the Sony a7R III Menu Setup Guide Spreadsheet at the link below, where you will also find instructions for printing the spreadsheet. This spreadsheet is available for free for a limited time!
I also offer a companion text guide, which provides more detailed explanations of all the Sony a7R III menu items, recommendations for setting them up, and for making use of the various camera features and functions, along with some a7R III tips and tricks. This more detailed text guide, Sony a7R III Menu Setup Guide, will be available in May 2018. The text guide and the setup guide spreadsheet work hand-in-hand, to help you set up and get the most from your camera.
Take control of your a7R III and the images you create!