Lots of rebates going on over at Canon, including on the 7D, 5D Mark II, some of the Rebels, and several lenses.

Plum Island – Newburyport, MA

Lots of rebates going on over at Canon, including on the 7D, 5D Mark II, some of the Rebels, and several lenses.
Plum Island – Newburyport, MA
NOTE: Some of the information in this post has been updated to include the current Canon dSLR models, the 60D and the Rebel T3i / 600D. Please check out my blog post at the following link to read the most current information:
http://blog.dojoklo.com/2011/02/20/canon-t3i-600d-vs-t2i-550d-vs-60d-vs-7d-etc/
Original Post: I’ve had a lot of visits to my previous post comparing these cameras – the Canon 7D, Canon 5D Mark II, and the Canon 50D – and since that really wasn’t much of a comparison post, but rather just a link to an impartial, technically based testing site, I’ll try to give a little more insight into helping you make this decision. Please note, this is aimed towards still photographers and not videographers. I know that videographers have different priorities when making this selection, and I am not knowledgeable enough to address them. I have written some updated comparison posts which also address the Canon 60D here and here.
I’ve used the 50D and the 7D pretty extensively, so I can speak with a bit of confidence about them. I’m very familiar with the features of the 5D Mk II and how they compare to the other cameras, so I will discuss them too. I’ll address the 550D (Rebel T2i) at the end of this post. Also, all the precise specifications of these cameras can be researched online and compared, so I will discuss them on a user-experience level, but I encourage you to decide which factors are most important to you for further research. I know it is a long post with a lot to read, but if you are investing several hundred or thousands of dollars in a dSLR and lenses, you should be thorough! On a final note before I begin, you may have been convinced by forums, reviews, or online comments to question and compare image quality, auto-focus speed, ISO and noise, etc., but those factors are all nearly completely irrelevant. Each of these cameras has more than enough quality in all of those areas. Your choice should instead be based on your level and needs as a photographer, and on which camera best serves the way you work. If you wish to see this complicated choice summarized in an easy to read format, view this post (it is a bit tongue-in-cheek, but mostly accurate). And when you are done selecting a camera body, you can learn more about lenses here.
While I have your attention, I want to mention that I have written eBook tutorials for the Canon 60D and for the Canon T2i, which cover ALL the Menu settings and Custom Function settings, with recommended settings, plus in-depth descriptions of how and and why to use the cameras’ settings and features in everyday use – Your World 60D and T2i Experience. Learn more about the eBooks by clicking on their titles.
Also, please let me know about broken links in my posts, as they seem to mysteriously happen from time to time.

Hudson River – Cold Spring, NY (this image is entirely in color – look at the plants!)
Sensor Size: If you are, or plan to be a professional photographer, and you’ve limited your selection down to two or three of these cameras, you are going to want to seriously consider the 5D MkII. This is due primarily to the fact that it has a full frame sensor (a sensor approximately the size of a frame of 35mm film), which is pretty much expected for you to have as a professional. (Note that whenever I say 5D in this post, I am referring to the 5D Mark II). The 7D and the 50D have smaller sensors, with a 1.6 crop factor. This means that their sensors are a bit smaller than a frame of traditional 35mm film. A wide angle lens will not produce as wide of a field of view on a cropped sensor as on the 5D: a 16mm will give the field of view of a 16 x 1.6 = 25mm lens, but a telephoto on a cropped sensor will appear to zoom closer, thus making a 200mm lens appear to be a 200 x 1.6 = 320mm lens. You can begin down the professional path with a 50D or 7D, but you are eventually going to experience the limitations of the smaller sensors and start to understand the need for full frame. BUT…there are a few problems with this choice…
Price and Obsolescence: First, you probably haven’t run out to get a 5D MkII because of its cost. As of 5/2010, the price is $2,500. AND, the 5D MkII dates from 9/2008, and is due for an upgrade, likely in 2012, maybe as soon as later in 2011. In some respects, the 7D – being newer – has better features than the 5D, such as the advanced auto focus and metering systems and faster frame rate. Not to mention the fact that if you wait around long enough, a 7D type camera WITH a full frame sensor but a lower price than the 5D is bound to come out! But you need a camera now, so let’s continue. The 7D is $1,600 or $1,700 depending on current promotions, and the 50D is about $1,000. The 50D however, is also the closest one to being replaced (by the 60D or whatever it may be called). This doesn’t mean that it isn’t still a very capable and feasible camera – people are still happily using 20D and 30D cameras, just that it is reaching the end of its production life. So as far as the newest model, that is the 7D (and the 550d/ T2i).
Megapixels / Image Quality: Regarding megapixels, it really isn’t much of an issue unless you plan on printing out billboard size prints. All of these cameras have more than enough megapixels and image quality for most photographers’ needs. The 7D is at 18mp, the 5D Mk II at 21mp, and the 50D at 15mp. I have found that more megapixels give you more lee-way to push and pull the image around in Photoshop before it starts to fall apart and look over manipulated. In this respect there is a significant difference between 8 megapixels of a Rebel XT and 15 or 18 mp. The 8mp barely allow you to do a regular amount of exposure, contrast, and color correction before it starts to really show, but there is little to be concerned about between the 15mp of the 50D and 18mp of the 7D (unless you are a hard-core pixel peeper, in which case you will be deeply offended by these kinds of statements). Be aware that sensors with more megapixels more readily show the shortcomings of cheaper lenses, and thus demand higher quality lenses, like the Canon L series, for the sharpest, most detailed image across the entire frame. From experience, I can tell you there is a huge improvement in clarity, color, and overall image quality when using an L lens with a 50D or 7D.

Marquee – Tarrytown, NY
HD Video: If you are concerned about HD video, then you choice is narrowed down to the 7D and the 5D Mk II. With firmware updates and 3rd party Magic Lantern firmware, they are about on par as far as frame rates etc., so cost and sensor size is again the differing factor here. If you are not going to need or use video, it is definitely worth considering the 50D, which will give you 85-90% of the still photography features and performance of the 7D at a much lower price.
ISO, Frame Rate, File Size: For ISO performance, you can look at the testing site mentioned above to see that they are incredibly similar. Being a professional camera, the 5D has a broader ISO range on both ends, lower noise at higher ISOs, and a better dynamic/ tonal range. This is a large factor in why you pay $2400 for this camera. But for the non-pro, in general you hardly ever want to go above ISO 1,600, so unless you have a specific reason for needing really high ISO and photos with the lowest possible noise at high ISOs (for example shooting lots of indoor or dark events like concerts, weddings and receptions), then this isn’t much of a deciding factor. And if you are concerned about dynamic range, well, don’t be. Anyone who actually needs to be concerned about dynamic range is a commercial photographer who is not reading this post because they are busy choosing between a $7,000 camera and a $10,000 camera. The frame rate performance, however, may be an important factor depending on how you work and what you take photos of. The 7D has a continuous rate of 3fps and a high speed continuous rate of 8fps. Personally, I’m unhappy with this choice of rates. The 3fps is too slow for action situation, and the 8fps is ridiculously high, giving me far too many unwanted photos that quickly fill up the memory card. I wish for a rate closer to 5 or 6 fps. The 5D has one rate of 3.9fps, which again seems a bit too slow for action situations, and limits its use for capturing sports action. The 50D offers 3fps and 6.3fps, which I find ideal. Oh, also, the file size of the 7D images are much larger than the files of the 50D and somewhat larger than the files of the 5D. While this indicates that the files contain more information and detail, this affects size and number of memory cards you will need, plus size and expense of storage on your hard drive and external hard drives, PLUS the time it takes to download, transfer, copy, open, save, and upload files. It is a significant hidden cost in storage dollars and time of the 7D that should not be ignored. (Is this apparent difference of the 7D and 50D images visible to the naked eye of anyone other than pixel peepers and people making jumbo prints? Not necessarily. The image quality you need is available from any of these cameras, so it is more productive as a photographer to focus on image content!)

St. Patrick’s Day Parade – Brooklyn, NY
Features, Customization: Being the newest camera, the 7D has the most advanced features. As I mentioned above, it has an advanced auto focus system, providing more focus points, more focus modes (single point, spot, zone, expansion, etc.) and numerous options for how the focus points perform and select and track a subject. I’ve written a bit more about these features here, along with links to additional resources. There are advanced custom functions for auto focusing and tracking, flash control (the 7D is the only one which offers remote flash capabilities, which will save you a couple hundred dollars on Pocket Wizards if you are going to use this), and customization of buttons and displays. Again, I’ve explained a lot of these features in this post. Read through them. Do you understand them? Are you going to learn them? Are you going to need and use them? Probably not. They are nice to have, make you feel like you have a really powerful camera you are in control of if you learn how to choose, set and use them, but in everyday shooting I rarely, if ever, make use of them. The live view (which the 50D has as well) and the built in level are cool, but will you ever use them? I don’t. (The built in level will be most useful to landscape photographers). Of all the features and customizations of the 7D that are not on the older 50D, the only ones I miss are the remote flash capability, the grid overlay in the viewfinder, the larger more inclusive viewfinder, the spring loaded doors of the 7D, and the ability to switch functions of the top dial and back dial in Manual mode. (It is such a nice feature on the 7D – since I use Av mode most of the time, the top dial controls aperture. But when I switch to M mode, the top dial now controls shutter speed. So with the 50D I have to overcome muscle memory and use the back dial for aperture. But with the 7D, one can switch the dials’ functions.) Unless you are an intense sports or animal shooter who needs to customize how the camera selects and auto focuses on a moving object, how it addresses an object that moves in front of your subject, and how fast it responds to this new object before it addresses or ignores it, then you don’t need these features. And when you compare the features of the 7D to the 5D or 50D, you find that the older cameras are not outdated dinosaurs as forums will lead you to believe – but rather they also have many of these features and customizations as well. As far as all the new auto focus features of the 7D, it turns out they barely mattered to me because I manually select my auto focus point 99% of the time. I don’t want the camera necessarily focusing on the closest object, and it certainly does not know what I wish to focus on, so I don’t leave it up to chance, and I select the point myself. Therefore I rarely use any of these advanced auto-focus modes. In addition, it is much easier and quicker to manually select an auto focus point on the 5D and the 50D when you are selecting from 9 focus points rather than the 19 focus points of the 7D! However, if you photograph fast moving objects that you would prefer the camera to locate, track, and properly focus on, most of the time, all by itself, then the 7D is the camera for you. Also, note that due to the fact that the 5D is a professional body and not a consumer level camera, it does not have a built in pop-up flash. If you plan to use a flash with it, you will need to buy the Canon 580EX II flash (which you should do with any of these camera anyway).

San Miguel Dueñas, Guatemala
It is expected that the 5D Mk III and possibly the 60D (or whatever it may be called) will also incorporate this new 7D type focusing system when they come out. The 5D, 7D, and 50D all have AF microadjustment capability, which means that you can adjust the auto-focusing of each lens individually, in the camera, if they happen to front- or back-focus a little bit. The problem is that it is a maddening procedure, and you can never get it quite right because the focusing typically varies slightly for each focus point, as well as for different distances and apertures. (You may get it exactly sharp for the center focus point at 15 feet at f/4, yet find that it is still off for the upper left focus point when you shoot under real life conditions that vary from those settings.) I feel that if you need an excessive amount of AF microadjustment, you should probably send the camera or lens back for repair, calibration, or replacement. Personally, if I were using a non-L-series lens, I wouldn’t worry about a few mm of front- or back-focusing. And if I were using an L-series lens that didn’t focus dead on, I would send it back to Canon for recalibration – which in fact is something I have done. (I don’t understand people’s celebration of AF microadjustment – isn’t it a built in admission of poor manufacturing quality control, especially when pairing a Canon lens with a Canon body?) Finally, be aware that the mode dials of the 7D and 5D do not have most of the “basic zone” mode settings such as sports, portrait, and landscape. As the user of such an advanced camera, you are expected to know how to change the camera’s settings (aperture, shutter speed, ISO, etc.) yourself for these types of situations. If you don’t, and/ or if you plan on keeping your camera set on Auto (so called “green box mode”) or Program (P) mode, you probably shouldn’t be considering a 5D, 7D or 50D anyway, because you’ll be paying for far more camera than you will be using! Start with the 550D or one of the other Rebels for now and upgrade later if you feel you have outgrown its capabilities. If you are concerned about the best image quality, your image quality difference between a 7D on Auto and a 550D on Auto will be negligible. (Note that these cameras also have a Creative Auto mode, which is a weird “transitional” mode between Auto and actually learning how to make use of aperture settings and exposure compensation in Av, Tv or M mode. Since using aperture settings to dictate desired depth of field is essential to photographic composition, it is best you actually learn it directly.)
Metering: The 7D has an advanced metering system compared to the 5D Mk II and the 50D, and this is actually one very important advantage. The 7D has a more precise 63 zone metering system vs. the 35 zone system of the 5D and 50D. With the 7D, I can confidently leave it on evaluative metering 97% of the time, and it meters the subject exceptionally well 98% of those times. Canon claims that it will meter properly for a wide variety of subjects, including back lit and extreme contrast subjects. I have found this to be true. Compared to the 50D, this is significant. I have found that the 50D regularly overexposes by about 1/3 or 1/2 a stop, and I have exposure compensation on -1/3 all the time to avoid blown out highlights (except in dark situations, where it tends to under-expose). Also, the 50D just does not always correctly expose in unusual or difficult lighting situations. And for dramatic and powerful photos, you want unusual or difficult lighting situations, so I have found that I am using exposure compensation, or having to change to center weighted, partial, or spot metering often. While this is sharpening my metering eye and skills, it is a pain and it leads to the risk of lost shots. I would prefer that it just got the exposure right the majority of the time, as the 7D does. (I have subsequently found that using center-weighted averaging mode on the 50D all the time results in more consistent exposures than evaluative metering mode). You can learn more about the various metering modes, and when to use them, in this post.

Vinnie – Brooklyn, NY
550D / Rebel T2i: The Canon 550D or Rebel T2i has some impressive specs, and shares many features of the 50D and the 7D, and it is actually the newest model of all of them. It has 18mp and HD video like the 7D, but only 3.7fps continuous shooting mode frame rate. And it has 9 AF points and less complex auto focus options, like the 50D. It is fully capable of taking photos that are virtually the same quality as the 7D and the 50D, and if you don’t have intensive shooting and ego demands (ie, wanting the biggest, most expensive body whether or not you actually understand, need, or use its advanced features), it is worth seriously considering. But the 550D can’t have every feature and custom function of the higher level cameras, otherwise it would just be a 7D! If you are concerned about comparing image quality, ISO performance, auto-focusing speed, etc, all of these cameras have more than enough of what you need. You should instead be comparing the features and advanced options of the cameras which are most important to how you work. The top of the line camera won’t help you take better photos. But mastery of the tool that best fits your need just might (when combined with good knowledge of composition and lighting). I encourage you look at Flickr users’ photos taken with an “old,” 8MP Rebel XT to confirm this. Also, don’t rule out the Canon Rebel XSi if you are just starting out with digital SLRs.
If you are comparing a 5D Mk II vs. 550D (5D vs. T2i) you are looking at a professional full frame camera vs. a consumer, entry level dSLR, and skipping 2 pro-sumer cameras in between. So while the features of the 550D are nearly on par with the 7D in many ways, the 550D vs. 5D MkII is an odd comparison that quite frankly confuses me. Are you new to digital SLRs? Get a 550D (or a 50D/ 60D if you wish to spend more money or need the higher frame rate for sports or photojournalism). Have you outgrown all the features, capabilities, or limitations after extensive use of a 20D, 40D or 50D? Get a 5D MkII. (Note that whenever I say 5D, I am referring to the 5D Mark II, the current model at this time). Are the images you’ve been taking with your Rebel or 40D no longer living up to your professional level needs in terms of dynamic range and noise at high ISOs? Get a 5D. Want to spend $2,400 on a camera body? Get a 5D. Want to spend $800 and still have a tool that is fully capable of taking professional quality images? Get the 550D.
There are a few reasons why you would need a 7D or a 50D over a 550D / T2i. A major one is the advanced controls over camera settings. The more expensive models have additional buttons, controls, and displays on the exterior of the camera to enable quicker changes of important settings and easier viewing of what the current settings are. The 550D is capable of changing all these settings too, it is just done in a different way. For example, the 7D and 50D have the big dial on the back for quickly scrolling through menus, images, and for quick exposure compensation changes and changes of other settings. They also have the little toggle joystick on the back, primarily for quickly changing focus points. These 2 cameras also have the additional display screen and buttons on the top to easily view and change a number of settings such as ISO, drive mode, white balance, and metering mode – among others. These cameras are designed for a professional or advanced user who makes use of all these settings and needs to quickly change them while working. However, with a little practice, these settings can also be quickly changed using the buttons and big screen on the back of the 550D. The 7D and 50D also have advanced menus which give the user more customization options, like those discussed above (27 custom functions on the 7D vs. 12 on the 550D), and additional features desired by advanced users or pros, such as 1/3 ISO increments where the 550D has full increments (100-200-400 etc.).
What you are also paying for with the 7D and the 50D are stronger, better constructed metal bodies to handle daily use and abuse as well as some weatherproofing of the buttons and doors. (However, Canon cameras have fallen from elephants and airplanes and have survived, so they are all generally pretty rugged. At pitcher of water was thrown on the back of my Rebel XT and it was fine.) All these features give the 7D and 50D a bigger and heavier body than the smaller, lighter 550D, which may be an important consideration for some users. Also, the 7D, and 50D have AF microadjustment capability, but the 550D does not. AF Microadjustment means that you can adjust the auto-focusing for each lens, in the camera menu, if they happen to front- or back-focus a little bit. I don’t think this is a very important feature, as I discuss above in Features. (The problem is that it is a maddening procedure, and you may get the focus exactly sharp for the center focus point at 15 feet at f/4, yet find that it is still off for the upper left focus point when you shoot under real life conditions that vary from those settings.) As I said above, if you need an excessive amount of AF microadjustment, you should probably send the camera or lens back for repair, calibration, or replacement. Or if you are that obsessed about pixels, you should be looking at a pro-sumer or pro camera and L series lenses. Finally, the 550D also uses SD type memory cards, while the other cameras all use CF, and the smaller battery of the 550D will not last for as many shots as the other cameras.
Also, as I discussed above, be aware that the mode dials of the 7D and 5D MkII do not have most of the “basic zone” mode settings such as sports, portrait, and landscape. If you are starting to learn dSLR photography, these modes are helpful for seeing the results from different camera settings, and are good shortcuts until you have learned more about apertures and shutter speeds. Or if you never intend to use or learn more about the advance settings, the basic modes are good for helping you get better looking results than Auto or Program modes. So if you plan on keeping your camera set on Auto, Program, or the basic modes (sports, landscape, etc.), start with the 550D or one of the other Rebels for now and upgrade later if you feel you have outgrown its capabilities. Your image quality difference between a 7D on Auto and a 550D on Auto will be negligible.
So there you have it. You can read great, in depth reviews of each of these cameras on DPreview.com. There are probably numerous features and points that I forgot to mention, but hopefully this will give you a starting point in determining which features are important to you, and what warrants further research to help you in making your decision. The important thing is to choose one that fits your needs and budget, then stop comparing and get out and shoot! As I said above, your camera choice should be based on your level and needs as a photographer, and on which camera best serves the way you work. Whichever one you choose, I highly encourage you to get the the applicable Canon Guide to Digital SLR Photography from David Busch, or a similar book like the Magic Lantern Guides. They are much more user friendly versions of the camera’s manual, and will get you up and running quickly and assist you in fully understanding the settings, controls, and functions of your dSLR.
Need a lens to go with your new camera? Read about choosing a lens other than the kit lens in this post Why You Shouldn’t Buy the Kit Lens, and learn about the Best Lenses for Travel Photography here.
Please leave a comment, ask a question. Let me know what has been helpful, and what you’d like to read more about.
If you plan to purchase any of this equipment or books, I encourage you to do so through the site I’ve set up with Amazon, Doug’s Picturing Change Digital Photography Equipment and Books. Purchasing through this site or one of the direct-to-Amazon.com links below will help support my blog and my work. Thanks! And for those of you across the pond, click here for my referral link to Amazon UK. If you are in another country, click on one of my Amazon links, scroll to the bottom of the page, and click on your country for your local Amazon.
See the T2i on Amazon.
See the 60D on Amazon.
See the 7D on Amazon.
See the Canon 5D MkII on Amazon.
It is one thing to know that your cool new Canon or Nikon digital SLR provides you with 3 or 4 different metering modes. It’s another thing to know how and when to actually use them in the field or in different real life situations. The Canon 5D, 7D, 60D, 50D and T3i all offer four different metering modes – Evaluative, Center-Weighted, Partial, and Spot – as I’m sure you have thoroughly read about in your manual, right? Nikons, like the D7000, D51000, and D3100 generally have three different modes: Matrix, Center-Weighted, and Spot. I’ll try to cut to the chase and simplify the explanations and their uses. Note that there are some important differences between how they work for Canon and Nikon cameras, particularly the Spot mode.
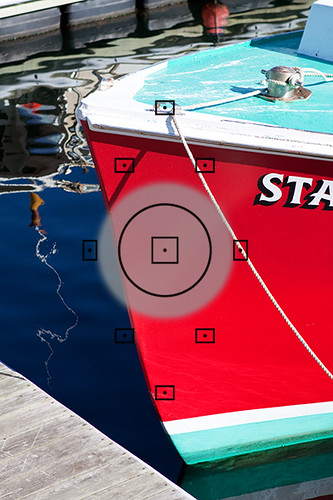
The viewfinder of the Canon T3i (T2i and 60D similar) showing the areas evaluated for Partial Metering (superimposed grey area) and Spot Metering (black circle in center).
Evaluative (Canon) or Matrix (Nikon): This is the default mode for your camera, and it can be used for almost every situation you shoot. Yes, maybe 90% of the time, maybe more. The camera evaluates the entire scene, as divided into several zones, and chooses the best exposure based on its knowledge of thousands of potential image situations. The current metering systems are so good, they can even be relied on for backlit or other challenging lighting situations. An important feature of this mode is that advanced cameras such as the Canon 7D, Canon 60D or Nikon D7000, D5100 take into account the selected focus point in its determination of exposure settings. It is assuming your focus point is on your most important subject, so under challenging and critical situations, it is wise to confirm that the camera has chosen the focus point you want (well, this is always wise). Even better, you should typically manually choose the focus point or cluster of focus points, as the camera has no idea what your intended image is. So in special situations, such as dramatically back-lit scenes or a situation with bright light plus deep shadows, make sure you are not using the center point to focus and meter, and then recomposing to take the shot – because some of the zones that the camera evaluated are now no longer in your shot after recomposing, and other new areas are, so the camera has set exposure for an image other than the one you are taking.

San Miguel Duenas, Guatemala
Partial (Canon only): This mode meters a smaller area, about 9.4%, in the center of the scene on the 7D and 6.5% with the 60D. Nikons do not have this mode, though some Nikons such as the D7000 offer the ability to change the size of the Center-Weighted Metering circle (see Center-Weighted Metering below), so it makes up for this. The area is approximately a circle that reaches to the top and bottom focus points, and the metering system ignores the rest of the frame. This mode is useful where there is a dramatic difference in lighting between the foreground or subject and the background. For example, when your subject is backlit – maybe standing in front of a bright window or the sun – and consequently their face is in shadow. I know I said evaluative mode can often handle this type of situation, but if you want the face or subject to be properly exposed and not risk blowing the shot, it is worth it to quickly switch to Partial metering mode. Again, another time to use this is when there is a wide range of light in your scene, from bright sunlight to deep shadows. Remember, this mode is not linked to your focus point. The partial area that is metered is always in the center, so meter on the part of the scene that is most critical and that you want properly exposed, using the central area of the viewfinder, lock in that exposure, then recompose and take the shot.

Campo Nuevo, Guatemala
Important Note about Locking In the Metered Exposure: The metered exposure setting is sometimes locked in by pressing the shutter button half-way down or sometimes not “locked” until the image is taken (depending on your camera, or current shooting mode, or how you set it up – read your manual!). The shutter button also typically locks focus (unless you have changed that setting). If you wish to lock in focus and exposure separately, which you often will need to do, on a Canon use the AF-Lock (for focus) button and/ or the AE-Lock (for exposure) button – which looks like this: * – to lock in one of them before locking in the other with the half-press or full press of the shutter button. On the Nikons, you have to set one of your buttons to be the exposure lock button, either the AE-L/AF-L Button or the Fn Button on some cameras like the D7000. I suggest first metering on the subject and locking in that exposure by pressing the appropriate button, then recomposing and locking in focus right before or as you take the photo. Or else learning the advanced methods of back button focusing. Get in the habit of knowing how to do this instinctively, and if you need to hold or just press the particular button, so that it comes naturally during critical situations. On the 7D and D7000 and other cameras you can also customize how these buttons perform or set other buttons to do these tasks. You can see in the viewfinder that you have locked focus when the focus dot is lit. You can see that exposure is locked with the AE-L indication in the Nikon viewfinder or the * symbol in the Canon viewfinder.
Locking exposure and focus, independently, each in the brief seconds before you take a shot? Confusing? A little, but not impossible to figure out with some experimentation and practice. Remember, this is why you bought the fancy dSLR, so that you could make use of all these advanced features and take your photos to another level!
Center-Weighted Average: This metering mode is sort of a cross between Evaluative and Partial metering. It acknowledges that the subject is in the center and requires special metering attention, but it also takes into account all the other zones. Again, this is not linked to the focus point, but always to the center, so if your subject is off center – which it typically should be for a more dynamic image – you need to lock in exposure on your subject and then recompose. I have found that with the Canon 50D, this mode is actually more consistent than Evaluative metering, which often over exposes by 1/3 or 1/2 a stop. Note that you can use the Custom Settings of the D7000 to change the size of the center area being weighted.
This mode can be used when you want to ensure that the subject is properly exposed, but you also want the camera to consider the background. However, if the background is much darker or lighter than the subject, and you want the camera to expose only for the subject and ignore the background, use Spot Metering…

San Miguel Duenas, Guatemala
Spot: This mode meters a small center area, 2.3% of the frame with the 7D, 2.8% with the 60D, and 2.5% with the D5100 and D7000. This area is indicated by the small circle in the center of the viewfinder of the 7D and 60D. There is no center circle in the Nikon viewfinder and you will soon find out why. So when do you want to use Spot metering? This, again, is useful for scenes with great variation in light and shadow, or in very critical situations. One of the most common ways to use it is when metering for proper exposure on a dramatically lit face or subject, but the exposure of the rest of the scene is unimportant. Or perhaps your subject is set against a plain but consistent background, like a bird against a large blue sky. It is also used to determine proper exposure of a subject before switching the camera to manual for a controlled studio shot, or a critical shot or series of shots where the lighting is not going to change. If your background is completely dark or extremely bright, and you don’t want the exposure system to consider it at all when determining the exposure of you subject, use Spot rather than Center-Weighted or Partial. With Canon cameras, the Spot that is used to evaluate the exposure is in the center of the frame, and is often indicated by a small circle. However, with Nikon cameras like the D5100 and D7000, the Spot surrounds the active focus point and is not necessarily in the center of the frame unless you are using the center AF point. So it is wise to become familiar with how your camera operates.
A fifth metering mode is Manual metering, which isn’t actually a mode in your camera, but is a method of metering. This is where you use a light meter or use your camera as a light meter (such as described at the end in the Spot section above) and then manually set your exposure based on the meter readings. This is used when you want ultimate control of the metering and exposure.
You can learn much more about the Exposure modes of specific cameras, including the 60D, T3i, D7000 and D5100, in my e-book users guide. See my e-book website, Full Stop to learn more about them or click the banner below! The guides also go into much more detail about setting up the related metering mode Custom Functions/Custom Settings and camera controls.

I recently ran across an interesting article which takes this discussion to another level by addressing the use of different metering modes in the very specific situation of a wedding. Since one of the main subjects in typically all in white, and the other in black, the metering mode you select and where you meter can make a dramatic difference in the exposure. While that article is specific to weddings, it is useful and helpful to read to further understand how the different modes work, and how special situations might call for some extra thought.
I’ve noticed that a lot of searches regarding depth of field (and how to use your aperture to create a blurred or blurry background in your photos, or what is called bokeh) have led to my blog. I’ve also received some good follow up questions from my previous post about depth of field. Unfortunately, my post on Mastering Depth of Field may be a bit advanced for those who are still learning about how to use their digital SLR, as it is intended for more experienced photographers.
As I explained in that post:
“depth of field is…the range of distances in which the objects in the photograph will be acceptably sharp. For example, if I am using a 100mm lens, set my aperture at f/5.6, and focus on a subject 10 feet away, everything from 9.69′ to 10.3′ away from me will be acceptably sharp or in focus in the resulting image.”

Open Windows, San Miguel Duenas, Guatemala
Depth of field, then, can mean that everything is in focus from a few feet away to infinity (deep depth of field), or it can mean that a person’s eyes and nose are in focus, but their ears and hair and everything behind (and in front) of them is blurry (shallow depth of field). One of the best ways to make use of depth of field is to create dramatic, shallow depth of field – the subject is in focus, but the background is blurry. This technique helps to call attention to your intended subject and minimize distracting background elements, and to make your photos look much, much more like those of the pros.
All of the numbers and fractions and settings and seemingly reverse logic are intimidating at first, and most books add to the complication and confusion. But it is really quite simple. Depth of field is controlled by the aperture. A small aperture size (which is an aperture number like f/16 or f/22) will create deep depth of field, with everything in focus. A large aperture size (which is an aperture number like f/2.8 or f/4) will create a shallow, dramatic depth of field. (Since “f/number” is a fraction, f/16 is a smaller number and size than f/4, so I’m avoiding using small number vs. large number terminology, as I said I would try to keep this from becoming too confusing…) So here is the quick and simple way to create dramatic depth of field:

Open Windows, San Miguel Duenas, Guatemala
Set your camera on Aperture Priority Mode. On a Canon, rotate the mode dial to Av, on Nikon set the dial to A.
Set your camera to Auto ISO. Or else if you wish to control the ISO, if you are indoors or in dim light without a flash, set it to 800 or 1600 ISO. If you are outside in bright sun, set it to 100 or 200 ISO. If it is a bit cloudy or you are in the shade set it to 200 or 400 ISO.
Look in you manual for how to change the aperture setting of the lens. For a Canon dSLR in Av mode, that means rotate the little finger dial up there by the shutter button. On a Nikon it means rotate one of the dials at the top right front or back of the camera, depending on your camera and settings.) Turn the dial until you see f/2.8 or f/4 or f/5.6 on your screen or in the viewfinder. Since you are in Aperture Priority Mode, the camera automatically selects an appropriate shutter speed. If you’ve selected the ISO yourself, or even if you are using Auto ISO, you may want to verify that an appropriate shutter speed is being selected. For example, I found that with the Canon 7D, Auto ISO often selects a much slower shutter speed than what is best for a situation. Press the shutter button half way down and check the shutter speed. If it is anywhere from 1/100 to 1/250 or higher, you are fine if your subject isn’t moving. If the subject is moving, make sure the shutter speed is 1/250 to 1/1000. If it is any higher or lower than the range you want, you should adjust the ISO until the shutter speed it falls into that range (raise the ISO, keep the aperture the same, and this should result in the camera selecting a faster shutter speed setting).
Focus on your subject using the focus mode of your choice, and take the photo. Preferably, use single point focus mode and select the focus point you want, so that you have complete control over where the camera focuses. If the subject is a person or animal, focus on the eyes or eyebrows. If it is something else, focus on what you want to be sharpest in the photo.
A good book to read to continue learning about this is Understanding Exposure by Bryan Peterson (Third Edition). Click on the link to see it on Amazon. It is geared towards photographers just learning about apertures, shutter speeds, and ISO, and helps to explain the concepts better than most other guides.
Let me know how the photos come out! Note in the first photo above that dramatic depth of field can be used to make the foreground blurry as well, not just the background.
Continue reading Mastering Depth of Field.
(for a related post, see Depth of Field Simplified)
I recently came across an excellent website regarding depth of field (dof), including a handy online calculator for determining dof based on the focal length of the lens, the aperture, and distance from the subject. It even takes into account different sensor sizes, including the APS-C size sensor of the Canon 7D. You can also view and print dof tables as well as create, print, and assemble a field dof calculator based on focal lengths of your choosing. And if you have an iPhone, there is an app for that! Have a look at the DOFMaster depth of field app.

Chichicastenango Market, Guatemala – 200mm, f/4, subject distance 2.7m
One figurine in focus, surrounding figurines dramatically out of focus – achieved by standing close, zooming way in and choosing wide aperture
Why is this all important? Well first, if you aren’t familiar with what depth of field is, it is the range of distances in which the objects in the photograph will be acceptably sharp. For example, if I am using a 100mm lens, set my aperture at f/5.6, and focus on a subject 10 feet away, everything from 9.69′ to 10.3′ away from me will be acceptably sharp or in focus in the resulting image. If none of this is clear to you, or only partially understood, then go out and read Bryan Peterson’s Understanding Exposure first, and then come back to rejoin us. It is a bit complicated and difficult at first, but if explained properly – as he will do better than I could – it will soon click. Also, I have posted a simplified explanation and quick and easy lesson for using dramatic depth of field here.
So, according to George Schaub in Using Your Digital Camera (I have no idea who this is, but borrowed the quote from the above website) “(Depth of field) is one of the most creative and profound effects available to photographers.” I absolutely agree with this. My photography improved 2000%, virtually overnight, when I understood and began to use the creative and visual power of dof. And this is why I shoot on Aperture Priority Mode (Av) 98.5% of the time.
I don’t want to go into the technical aspects of dof, and it can get extremely technical, but I will touch on some of the practical aspects of it. The ability to control dof is one of the many advantages of a digital SLR vs. a digital compact camera. Due to the small focal length, small sensor, and limited aperture sizes, a compact can typically not create the dramatic dof available to a dSLR user. And if one has a super-zoom type camera that will allow better use of dof, the controls to utilize it may be more cumbersome that with a dSLR.

Chichicastenango Market, Guatemala – 200mm, f/4, subject distance 7.4m (image cropped)
Man in focus, surrounding people slightly out of focus – achieved by being a few dozen feet away, zooming all the way in with 200mm, wide aperture
So why does one utilize dof? One reason is to better call attention to, or even isolate the intended subject of your photograph. When looking at an image, the eye tends to first go to what is sharply in focus as well as to what is lighter. If it is a busy scene with lots of possible subjects, the eye wanders aimlessly around all parts of the photo, and won’t necessarily focus on the subject you intended them to look at. By placing your intended subject in sharp focus, and the background and other elements out of focus to a lesser or greater degree, the viewer zeros in on what you intended them to. It can also be used to create various relationships between your subject and their environment or between your subject and other subjects in the frame. For example, a person who is your subject could be in sharp focus, while the background or elements around them are very much out of focus. This visually draws the subject out and leads the viewer to see this person as the sole subject of the photo. However, if the background or surrounding elements were just slightly out of focus, the viewer then sees the person as well as their surroundings, and starts to consider the relationships between them. By manipulating dof, you can work towards suggesting, defining and creating these types of relationships in your compositions.

San Miguel Duenas, Guatemala – 97mm, f/4, subject distance 3.3m
Girl in focus, boy and background environment (their home) slightly out of focus – achieved by standing a dozen feet away or so, zooming in to 97mm, wide aperture
And why does one need the dof calculators? Since dof varies so widely depending on the lens being used, the distance to the subject, and the aperture, it is difficult to know precisely what distance range is going to be in focus. One can use the dof preview button on the camera, but it is often difficult to determine through the viewfinder what the dof will be. So with the dof calculator, you can plug in various numbers and learn how a certain lens is going to act in a particular situation. Then, by using your lenses often, and experimenting with various apertures and various camera-to-subject distances, one can begin to get an intuitive feel for how each lens works, and how dramatically different a 16mm at f/4 aperture is from a 200mm at f/4 aperture. And when you are in a situation that allows it, you can pull out your iPhone or your field calculator, and determine a precise dof in advance.

Antigua, Guatemala – 127mm, f/5, subject distance 5.3m
Woman in focus, statue on distant church facade out of focus yet recognizable – achieved by standing a few dozen feet away, zooming in to 127mm, wide but not widest aperture
I like using a very wide aperture (like f/4 or f/5.6) to create very shallow, dramatic dof in many of my images. However, I typically don’t want it to be so shallow that a person’s nose is in focus and their ear is out of focus (though this is a dramatic and sometimes desired portrait “trick”). Also, when photographing action, such as dance, I want a little leeway so that if I focus on a hat instead of a face, or if the person moves forward a bit, there is a enough dof that their face will still be in focus. And this is why I originally began to search for depth of field tables, so I could better understand how my lenses were going to respond in certain situations.
Now, as a little, technical side note, I was always taught in school to be aware of the 1/3 – 2/3 rule which says that 1/3 of the in-focus area will be in front of the spot where you focus, and 2/3 will be behind it. So if you were standing at the front of a row of people, and turned back around to look down the line and take a photo, and focused on the 8th guy in line, this rule says that perhaps (due to your particular lens/ aperture/ distance choice) one person in front of him will be in focus too, and 2 people behind him will be. It turns out, this really isn’t accurate at all. Most often it is closer to 1/2 the distance in front of the focus spot and 1/2 behind it. I have no idea why they taught us 1/3 – 2/3.
I’ve run across a nice set of video tutorials (link below) for using the Canon 7D. You can watch them online, or even download them to your camera for viewing. The one on AF Custom Functions is especially helpful at clarifying those setting. Be sure to look around on the Canon Digital Learning Center to find all kinds of other cool stuff about using your camera plus useful tips and instructions from pros who use them. Also, be sure to have a look at my tutorial for the Canon 7D, Assignment Guatemala: Canon 7D, which discusses many of the custom functions and settings of the 7D, and how and when to use them in real world situations.
link to Canon 7D Video Tutorials
Also I’ve written an e-book user’s guide for the Canon 7D called Canon 7D Experience. It not only explains all the features, functions, and controls of this powerful, sophisticated, and highly customizable camera, but also when and why to use them in your photography. You can learn more about the guide, preview it, and purchase it here.


San Juan del Obisbo, Guatemala – photo by dojoklo
The distinctive voice you hear in the 7D tutorial videos is Canon guru Rudy Winston, and the photo samples are his images as well. If you are in NYC, you can often find him leading workshops and presentations at places like B+H and Adorama. I went to a wonderfully informative introduction to the 7D that he gave a B+H a month or 2 ago, and these videos are pretty much the same presentation.
I read a lot of arguing back and forth on forums regarding one camera vs. another in terms of their capabilities and performance such as high ISO performance, low light capabilities, etc, etc, etc. Well, here’s an actual test site that may shed some real, fact-based light into these arguments. It is interesting to see that in actual tests, the 50D consistently outperforms the newer and much pricier 7D in most areas, only falling short by negligible amounts in ISO sensitivity and dynamic range at lower ISOs.
And here is a post I wrote that goes into more detail in comparing the features of the Canon 7D, 5D Mark II, and the 50D. Plus a little bit about the 550d (T2i) as well.

Roosevelt Island, NYC
My recent trip to Guatemala to photograph for an NGO gave me an opportunity to field test a bunch of new gear under real working conditions – jumping on and off chicken buses, crammed into the seat of a van for hours with all of it on my lap, roaming around the streets of Antigua trying to be discreet as possible carrying a 70-200mm lens and a backpack full of equipment, and photographing for long hours at a time. I had done a bunch of Internet research to choose the best and the most appropriate gear, made a couple trips to B+H to look at it all, and it all worked out as good, or often better than expected. I’m not sponsored or compensated by any of these companies (but wouldn’t be opposed to it if they happen to be reading…), but I do recommend all of this gear without reservation. (Update: I’ve now been using all of this equipment constantly for the past 11 months, and still recommend it all!) I discuss the camera I used on the trip, the Canon 7D, in this previous post.
Most all of this equipment will be equally essential for day-to-day photography, culture and travel photography, humanitarian photography, and photojournalism. And the equipment will be useful with any dSLR, Canon or Nikon.
If you plan to purchase any of this equipment, I encourage you to do so through the links I’ve created below which will take you directly to Amazon.com. Your price will be the same as always, and I will get a small referral fee. Or you can go directly to Amazon.com here. I appreciate your support! If you are in the UK, or wish to purchase from B+H Photo, see the end of this post for information on those links.

Antigua, Guatemala
Camera Backpack: I use the Lowepro Compu Trekker AW as both my carry-on and my working bag during the day. The current version of this is the Lowepro Pro Runner 350 AW. The size works perfectly for both needs. It easily fits the airline carry-on size, including smaller international requirements in some regions, yet fits more that it would first appear. With careful configuration of the interior dividers, I can fit 2 Canon bodies (a Rebel XT and a Canon 7D or 50D), a 70-200mm f/4L IS, a 16-35mm f/2.8L II wide angle zoom, a 28-105mm standard zoom (an older lens, here is a link to the better 24-105mm f/4L), all lenses stored with their hoods turned backwards, a 580EX II flash, its diffuser, 2 external hard drives in cases, a couple memory card cases, and some filters. In the outside pocket, I have a couple battery chargers, extra batteries, medium Rocket Blower, miscellaneous cords, caps, and accessories. In the rear pocket designed for a laptop, I easily fit a 32″ 5 in 1 reflector. Once I am in the field, I play around with the dividers until I have a set-up that best fits my flexible daily needs, and allows quick preparations or lens changes. The pack is extremely comfortable, has tons of padding on the straps and the back so that its weight never bothers me and I don’t feel the reflector in my back. I often wear it for hours a day while working, and it is never a problem. In fact, on my final night in Guatemala when I went out to dinner in Antigua without it on my back for the first time in 2 weeks, I commented that I felt a bit naked. The top handle is strong enough to grab and carry with, as is often necessary while jumping in and out of cars or putting it down and picking it up. There is also a waist belt that I use when I have it fully loaded, like going to the airport, to relieve my shoulders of some of the weight. And it comes with a built in rain cover that stows away at the base of the bag that has done its job on a couple occasions. The Compu Trekker Plus (now the Pro Runner 450 AW) might be a better carry on size so that you could carry more gear on the plane with you (if it fits the airline’s requirements) but it would be too big for daily use. There are also rolling versions of these, with an “x” in the name, thought the retractable handles and wheels add weight and size to the bags. The Compu Trekker has a tripod strap system that I don’t use, and another outside pocket that is, conveniently, exactly the size of a Lonely Planet guidebook. Here are some photos of the backpack in action at the Chichicastenango Market, taken by my travel companion Elizabeth Jimenez:


If you just need a holster style bag to carry one body and one lens, I highly recommend the M Rock Holster Bags. I used the Yellowstone model for months while traveling in South America, and I love its durability, pockets, and built-in rain cover, plus it comes with extra back-up straps. Make sure you get the right bag for your body/ lens combination – you will need a longer bag for a telephoto zoom lens. As far as a satchel bag to carry a body or two plus two or three lenses and/ or a flash as you set out for the day but don’t want a backpack type bag, have a look at the Think Tank Retrospective line (there are a few sizes, the 10, 20 and 30, etc.) or the Crumpler Million Dollar Homes. Again, there are several sizes to choose from, called the 5 Million, 6 Million, etc. The 7 Million Dollar Home is my satchel of choice for carrying my gear about town while working. It holds a large dSLR (5D line, 6D, 60D, etc.) with a mid-range telephoto attached (24-105mm), plus a 70-200mm, and another lens or a flash, all in the inside compartments. There is then some extra space and a couple front/ flap pockets to hold chargers, memory cards, batteries, etc. To keep moisture from accumulating in your equipment and bag, throw in a durable desiccant pack like this one. Just be sure that it isn’t loose in your bag and scratching against your equipment.
Security: A couple great additions to the bag are Eagle Creek combo locks and Eagle Creek Pack It Sacs in the small size to hold batteries, memory cards in cases, LensPen, camera and lens body caps, and various wires and cables. The medium size Pack It Sacs are great for medicines bottles and other loose stuff in your luggage. The backpack’s zippers are rugged enough to handle constant abuse from the combo locks, which although they are weighty, are far better than keyed locks in the field so that you don’t need to go digging for the key when you are in a hurry. You just have to be a little careful when opening and closing the bag – the locks dangle and flip around, and could easily bang into something fragile in the backpack. With the Pack It Sacs, I clipped some rubber bands to the key clip within the outside pocket of the backpack and then attached them to the clips on the Sacs, so that way the Sacs won’t accidentally fall out if I flip the bag open and close while the outer pocket is open. There’s enough play to access them and then shove them back into the bag.
Another great accessory for this backpack is the PacSafe 55 wire mesh security system. It fits perfectly around this size bag, and secures your bag and your gear in a hotel room or wherever. It has a long cable that you loop around something secure and lock in place. It also comes with a small, compact storage case for when not in use.

Chichicastenango, Guatemala
SanDisk Extreme 16GB CF Memory Cards – I talked about these in the previous post. Once again, no particular reason why I use these rather than Lexar or Delkin…maybe a sponsorship would help seal my loyalties… :). Be sure to get the Sandisk Extreme 16 GB SD version if you are using the 60D or Rebel T2i. I use a Sandisk card reader to upload the images to my laptop, rather than from the camera directly, in order to save the camera batteries. This Sandisk Card Reader is for the CF cards, and the 5 in 1 reads SD cards.
Spare Batteries – I always have 3 batteries for each camera body. The Canon 60D, 7D and 5D use the Canon LP-E6 Battery. Stick with the Canon brand batteries rather than the unpredictable third-party brands.
BlackRapid RS-4 Camera Strap – The R-Strap is wonderful, and I highly recommend it. I was hesitant and suspicious at first, but I quickly adored it and will always use it. I had even emailed BlackRapid before purchasing to ask about shortcomings of earlier models, and they addressed my concerns thoroughly and completely. I was very impressed with the time and personal attention they paid to my questions. The strap is comfortable, easy to use, quick, strong, and rugged. I often use it in conjunction with wearing the backpack, and although the straps fight for space against each other on my shoulder, it still works fine. I’m a bit envious of the RS-7 that just came out, since it has a curved, ergonomic shoulder pad that will work better by itself on your shoulder and next to a backpack strap. There is also now a version designed for women, the RS-W1. Watch some of the videos out there as to how to use it, and be sure to moisten the rubber gasket before attaching it to your camera – this will make a firm seal that will never budge. The big pain is that the part attached to your camera body is best left in place, yet that makes it less easy to place the camera down on a table or in your bag, and will have to be removed to use a tripod. Also, the textured tightening screw part of the connector may rub up against your camera body in various situations, so I put some black duct tape on the bottom edges of the camera to protect it.
B+W brand UV Filters – clear, protective filters for the lenses, slim for the wide angle. The slim is probably not needed with a crop sensor camera, but is recommended for a full frame camera. The slim comes with a lens cap that does not stay on well after a little bit of use, as there are no front threads for the Canon cap to fit on. If I had to do it over, I would probably get the regular filter so that I could use the Canon lens cap.
B+W brand Circular Polarizer Filter – a polarizer serves to darken skies, boost contrast, cut through haze and reflections in water and glass, and block out a stop or two of light in bright situations. I keep it on my lens much of the time when doing outside work. Polarizing filters work to their maximum degree when the sun is to your right or left, but not when it is directly in front or behind you. Be sure to turn the moving part of the filter to dial in the degree of polarizing that you desire. They are typically not used on wide angle lenses because the darkening effect would vary across a wide swath of sky, and usually look strange.
Sto-Fen Omni Bounce Diffuser – works great on the Canon 580EX II flash, although very snug and is always difficult to get on and off in a hurry. Squeeze it and stretch it first to help it go on easier. Please don’t use the diffuser outside! Even if you see “pros” doing it. It doesn’t do anything outside but make your flash work harder. You can’t bounce light off the clouds.
Honl Color Correction Filters and Speed Strap – These are essential for using with flash to balance the white balance of the scene – to make the color of the flash the same as the color of the ambient light. This way when you correct the WB of your subject your backgrounds won’t be vivid orange (incandescent ambient lighting) or sickly green (fluorescent). You can’t use them in conjunction with the diffuser – the Omni-Bounce can’t fit over the Speed Strap, but that had not occurred to me when I bought them – so I’m going to have to figure out a solution to that. And I’m going to continue experimenting with the full or 1/2 CTO to add warmth to outside fill flash, as recommended by Nevada Wier (actually she uses a Kodak Wratten 81A gel, but I think they are similar). The kit is very slim and fits perfectly in one of the inside pockets of the backpack.

Antigua, Guatemala
Giottos Medium Rocket Blower – I initially used the small size in order to save a bit of space, but it didn’t have the power I wanted, so I sprung for the medium. Always have it handy for getting dust off lenses in a hurry, because blowing on them – no matter how careful – leads to spittle on the lenses 5% of the time when it doesn’t matter and 95% of the time when you are in the most critical situations. The large size may be a good choice as well.
Pearstone LP-1 Lens Pen – Works great for cleaning off mysterious spots, smudges, and fingerprints that always appear on the lens (this is why I always use UV filters) as well as that a-fore-mentioned spittle. There is a retractable brush on one end and a cleaning head on the other end. Twist the cap to load the cleaning tip with the carbon based cleaning material, then remove the cap and use. Please read the instructions and visit the LensPen website to fully learn how to use it properly.
32″ 5 in 1 Reflector – This size is perfect for travel and fits in the backpack, however I never actually used it during the trip so I don’t know if the size is useful in the field. It is best suited for set-up situations and portraits, which I didn’t have the opportunity to do on this assignment. I could have used it once to block some stray sunlight falling into a very dark room and potentially messing up the exposure, but I didn’t think about it until later. I did, however, carry it around a lot and never noticed because it is lightweight and very durable.
External Hard Drives – I use a Iomega Ego 500GB and a Lacie Rugged USB 500GB when traveling. I’ve used the Iomega on extended trips before, and love it. I’ve never had any problems with it, and it is solid and sturdy. I also decided to try out the Lacie Rugged USB for this trip. It is lighter than the Iomega, and doesn’t feel as solid and sturdy, but it worked just fine. They both fit perfectly in the Case Logic Portable Hard Drive Case made for these types of drives, which I recommend getting in different colors so you can quickly differentiate your different drives. I leave them in the cases at all times, but you have to pull the Ego slightly out to plug in the cord, and place the Lacie upside down in the case for the cord to fit without removing the drive each time. For storage at home, I use the Western Digital My Book 1TB External Hard Drives.
Hakuba Digital Media Storage Wallet – These are great, soft sided, thin memory card cases that hold 6 CF memory cards each. I picked up this recommendation from Karl Grobl’s website. There are a lot of bulky, hard-sided cases out there, which make you feel like your memory cards need excessive protection. I’m sure there has been a situation where an elephant stepped on a memory card case and all photos were miraculously saved by a hard sided case, but as far as my needs, the soft ones work just fine. Get into the habit of inserting blank cards face up and used cards face down into the cases’ pockets. Since this is the size for CF cards, have a look at this one if you use SD cards.
‘da Products Screen Protector – (product no longer available) – This is the second camera I have used this product with, and I am once again very happy with it. It is a very inexpensive yet high quality screen protector for your LCD, made with acrylic. Get ‘da40D Protector for the 7D – it is the perfect size. It is a slow, careful, time consuming process to attach the adhesive strips, get it clean, dust and fingerprint free, and perfectly centered, but once it’s on, its there to stay (unless you want to remove it – in that case, to remove the ‘da screen protector use dental floss to break the seal at the bottom corners, then slowly peel off.) I know that today’s LCD screens are durable, but I feel more comfortable and carefree about constantly wiping off my protector with my fingers or shirt than I would directly on the built in screen. This is also why I use B+W UV filters on the lenses. However, if you have a camera with a rotating screen such as a 60D, T3i, or D5100, this type of screen protector won’t work. You will need to use a thin adhesive film protector like this one.
Calumet micro fiber lens cloth – Stores perfectly in another slim inside pocket of the backpack, and always handy to have.

Chichicastenango, Guatemala
Insurance – Although I am a member of NPPA – National Press Photographers Association, I also joined NANPA – North American Nature Photography Association, in order to get their equipment insurance, which is much cheaper and has a much lower deductible than NPPA’s, even including the extra $100 to join NANPA. The insurance is primarily for the equipment only, so you are not paying for liability coverage geared toward a business as you are with every other photo equipment insurance plan I researched. Please note that the NANPA membership fee covers you from June to June or something like that – they don’t pro-rate, so you will not get a full year if you join at any other time. The insurance covers photo and computer equipment at home and while traveling. (If you happen to join NANPA to get their insurance, be sure to mention my name as a referrer, and I get $20 NANPA Bucks and save on my next renewal!)
Skooba Satchel 2.0 Laptop Bag – This is typically my second carry on, in which I carry my laptop, some books, misc. charging cords, some toiletries. This is a wonderful laptop bag, and you won’t believe how much will fit in it! As they say themselves, it is deceptively slim looking and incredibly light. It has these great little air squares for cushion everywhere – like bubble wrap made from durable rubber, and has an extremely comfortable and ergonomic strap.
Lowa Tempest Lo Hiking Shoes – I’ve worn these shoes, this same pair, nearly everyday, for almost 4 years straight now, and they still have a little life left in them. I wore them every single day for a total of 7 months in Peru, walking the cobbled streets of Cusco, and traveling the country. And I wore them nearly every day for 3 years walking the streets of Brooklyn and Manhattan, and now Cambridge. (I don’t have a car, so I actually walk, a lot.) They are so comfortable I never notice them. They are light, durable, and somewhat waterproof if treated regularly. I recently bought a backup pair for the inevitable day that I have to give them up. After 3.5 years one one them developed a tear at the front-side where they crease when crouching to take photos, but they are still fine except in the rain.
Post-Production – Once you get back you are going to need to organize, edit, and work on all your photos. And for that, of course you are going to need
Adobe Photoshop and/ or Adobe Lightroom 3. You can start off with the trial versions that you can download from the Adobe site, but sooner or later you are going to have to get the real versions. Use that student discount while you still can!
Purchasing: If you plan to purchase any of this equipment, accessories, or anything else from Amazon.com I encourage you to do so through the links I set up throughout this post. Just click on the equipment above and you will be taken directly to that Amazon page. Your purchasing price will be the same, and they will give me a little something for referring you, which will help support my blog. Thanks! Or click on the Amazon.com logo below to enter Amazon and start shopping. I appreciate your support!

If you are in the UK or Canada, please use these Amazon links:
Canada: my Amazon.ca link
For those interested in purchasing through B&H Photo I have set up affiliate links with them as well – find it on the left side of this page.
I recently returned from a trip to Guatemala, where I was taking photos for an NGO that works with children, literacy, and education. It gave me the perfect opportunity to try out a bunch of new equipment and really put it to the test in the field.

San Miguel Duenas, Guatemala – Canon 7D, 70-200mm f/4L IS lens at 78mm, 1600 ISO, 1/100, f/5.6
Jump to the Custom Function section
First and foremost, it was the first time I really had the opportunity to use the Canon 7D body (I discuss the additional gear in this related post). The camera performed wonderfully in many ways, however, I did have autofocus related problems – namely a serious front focus issue. With both wide angle and telephoto L-series lenses, the camera was consistently focusing several inches or more in front of the subjects. I played around briefly with the AF Microadjustments, with the intention of taking a closer look at the situation when I returned home. (Body was later exchanged for another that focuses properly.)
I had another, odd and unexpected complaint in the field, and that is with the high speed shooting modes. One has the choice of 3fps or 8fps, yet I needed something more like 5fps! I’ve included some images throughout the post that are straight from the camera (I merely converted from RAW to JPEG). Anyway, on to the review and instructions for many of the camera’s settings, and how and when to use them in real world situations. And at the end there is some info about video tutorials available for downloading and watching.
If any of the digital photography terms you come across in this post are unfamiliar, be sure to refer to this great glossary for assistance.
Design – The camera is extremely comfortable to hold and use, especially due to the size, shape, and material of the grip, and it felt to be designed perfectly for my hands. It is nicely weighted with both a 16-35 f/2.8L II and a 70-200 f/4, and carries well with an R-Strap attached to the camera body (the 70-200 f/4 doesn’t come with a collar). Due to its similar design and button placement as previous Canon models, it was easy to get used to changing various settings on the fly – everything from ISO right up on top to Flash Control in the menus. There are a few settings that I quickly fell into, but that I would like to experiment with a little more with before I settle permanently into. Here are a few notes, in no particular order of importance:
Av Mode – I set the camera to Av mode for 99% of the time, as that is how I typically work (because I always want to control the depth of field). About the only time I took it out was when I was experimenting in an HDR type situation where I was in Manual and bracketing, trying to properly expose both a dark colonnade I was under and the cathedral in bright sunlight beyond. I haven’t yet worked on combining the exposures, but here is a nice shot that came from that situation:

Antigua, Guatemala – Canon 7D, 16-35 f/2.8L lens at 16mm, 1600 ISO, 1/500, f/16
(edit – I added the camera and lens information to these images. Please note that the camera settings used for these various images may not necessarily be the “best” or “ideal” settings to use in the specific situations, but camera settings are always the result of changing situations and lighting, coming from another scene, going back and forth between action and still subjects, adapting, experimenting, and sometime just plain not paying attention!)
ISO – I had high hopes for Auto ISO, thinking I would finally be given the freedom to stop worrying where I left it set, but I quickly found that in Av, I didn’t like the slow shutter speeds that were resulting when I selected the aperture and the camera selected the ISO. So I ended up never using it. I would like to experiment with it some more, and figure out if there is something I can do to keep the shutter speeds in a better range. It is wonderful to have the versatility to change ISO on the fly, but one often gets caught up in shooting, and forgets to change it to an appropriate setting, and thus sometimes the shutter speed isn’t the most ideal. So, I just have to stay in the habit of paying attention to where all three settings are as I go from indoor to out or change lenses, etc. This is aided by these settings being visible in the 7D viewfinder.
High Speed Continuous Shooting – many people marvel at the 7D’s ability to shoot 8fps in High Speed Continuous Mode. However, for my purposes on this trip, that proved far too excessive. I often shoot a burst of photos when someone or something is in motion and I want to capture the peak of action or a flattering pose, or when a gesture or facial expression might change rapidly. Unfortunately, 8fps results in a lot of unwanted files, and as I will soon address, these files are HUGE and rapidly fill up a hard drive. But sadly, the Low Speed Continuous drive setting is only 3fps, which is too slow to capture the rapid changes in a scene. The 3fps speed was one of the main drawbacks of my previous body, and a major reason for upgrading. What I need is something in between, maybe 5fps! Perhaps Canon or someone will tweek the firmware to allow this…

San Miguel Duenas, Guatemala – Canon 7D, 16-35 f/2.8L lens at 35mm, 800 ISO, 1/500, f/3.5
Custom Functions – In order for you to get the most out of the 7D, and to set it to function best how you work, you need to dig into the Custom Functions. One of the settings I use is customizing My Menu, and then having My Menu always appear first when I hit the Menu button. (My Menu Settings / Display from My Menu=enable) I played around with different items on My Menu, but have settled for now on the ones that I use most often or that I may quickly need and want to access without digging into the menus. They are:
Flash Control – you can quickly adjust all the settings for the built in flash, external flash, wireless flash. You can even control all the setting of the 580EX II remotely – when it is not attached to your camera. Very cool.
Exposure Compensation/ AEB – exposure compensation is easy to change at any time with the big dial, so this shortcut is for using when I want to bracket (AEB).
Review Time – I found that I was often shooting away without chimping (looking at the LCD), so I often just turn off the LCD review altogether. Other times, however, I want to review.
ISO Expansion – I haven’t used this yet, but I wanted it handy in case I want to use the high ISO. I typically have this turned off because I didn’t want the camera to default to High ISO during any situations. But considering I wasn’t using Auto ISO, this all seems unnecessary, and now that I realize this, I will have to replace this with something else on the menu! I never went above 1600 ISO, which I did have to use sometimes in very dark classroom settings along with the flash. Upon quick review of those images, the lack of noise in these files is really good.
Format – this is to format the memory card in preparation for use the next day. Always reformat the card, never simply erase them or use the Erase All option if your camera had that (the 7D does not). However, after formatting, turn the dial to select another menu item so that next time you hit Menu, Format isn’t still selected and you quickly make a grave mistake of pressing it.
Highlight Tone Priority (II-3) – this is a great setting to use in a high key situation, or with a bright subject or scene. It helps to retain detail in the highlights so they don’t get blown out, such as a white wedding dress, or a snow or beach scene. I never did use it, but I keep it in this menu to remind me it is there for the day when I do need it!

Chichicastenango, Guatemala – Canon 7D, 70-200mm f/4L IS lens at 155mm, 200 ISO, 1/80, f/4
Other important Custom Function Settings
(please note, this post was initially written to explain how I used these settings in a specific travel situation. I go into more detail about each of the Custom Function settings, with clear explanations of what they are and when and why to use them, in my e-book Canon 7D Experience, which is discussed below.)
Safety Shift (I-6) – I sometimes enable this setting. It allows the camera to shift the shutter speed or aperture automatically, without your expressed permission, in order to get the shot. This is great for situations where the light suddenly and dramatically changes, such as at a concert. However if you are carefully choosing your settings, or working with a flash, you will want to disable this so that the camera isn’t overriding your careful settings.
AI Servo Tracking Sensitivity (III-1) – This dictates how quickly focus tracking switches to another subject when it momentarily loses the initial subject, such as when another subject passes in front of it. You can choose to have it stay focused on the initial subject (Slow), or focus quickly on a new subject that moves in front of your initial subject (Fast). Typically I want to stay focused on my selected subject, and ignore someone or something that momentarily passes between us. If you want to quickly focus on different subjects at different distances, put it on fast.
AI Servo 1st/2nd (III-2) – Is your priority focusing on the subject, tracking the subject, firing off rapid shots? Look at the manual to see which situation works best for how you shoot.Personally I think 0 or 1, with the autofocus (AF) Priority, is best. (The camera makes sure it focuses first before taking the shot. It may cost you a microsecond of time however.) Regarding tracking vs. drive, I keep it at 0. Setting 0 continues to prioritize focusing possibly at the expense of speed, while setting 1 will prioritize the speed of subsequent shutter releases at the expense of focus.
AI Servo AF Tracking Method (III-3) – This works with autofocus modes where more than one AF point is active. The names of the choices are a little confusing but what they do is Setting 0 will focus on a closer subject that enters into your view, not necessarily in front of your subject. while setting 1 will remain focused on the initial subject. I keep mine on 1, since I want to stay focused on my initial subject.
San Juan del Obisbo, Guatemala – Canon 7D, 70-200mm f/4L IS lens at 200mm, 100 ISO, 1/1000, f/4
AF Focus Mode (III-6) – I enabled all the AF modes in the Custom Functions – by default, several of them are not available to you unless you change that setting. I started out using Single Point, but sometimes changed to Spot for more precision. The cost of using Spot is that it may not focus as quickly or as well when hand held or with a moving subject, and is generally not necessary unless you are trying to focus on a very small, precise area, such as through a fence to a subject beyond. I occasionally used AF Point Expansion when photographing rapidly moving children. I don’t know how other photographers work (according to a Canon rep who gave a 7D presentation at B+H, there are big name professionals who still just focus with the center point and recompose), but I always choose the focus point I want manually, using the Multi-Controller button. This takes a little longer, now that I am dealing with 19 focus points, but that enables me to quickly get the composition I want, makes sure the camera focuses on what I want it to, and to get subsequent shots without too much reframing. There is an important menu setting so that you can use the Multi-Controller directly to change the AF point without having to press the AF thumb button first – I believe it is on the screen where you can customize all the camera’s buttons. Oh, and I changed the custom settings so that all the focus points always show, and that they light up upon achieving focus, even in bright sunlight (which they would not do if you had this setting on Auto or Disable). That way I always know when it has focused. And I set Custom Function III-7 to stop focus point selection when I reach the edge and not loop around to the other side. I’m also thrilled that the 7D has a grid display that you can turn on in the viewfinder, which helps me keep my horizons and compositions straight. The viewfinder looks pretty busy, filled up with AF points and the grid, but when you are shooting away and focusing on your subject, you don’t even notice they are there.
Single Point Focus vs. Spot Focus Size – This controls the size of the area being looked at for focusing purposes on the 7D. With Single Point AF Area Mode, the camera is actually looking at a cross shape area (all focus points are cross type, center point is dual diagonal as well at certain apertures) that extends about 2x as big as the actual square you see in the viewfinder. With Spot AF Area Mode, the size of the cross is about the size of the square you see, I think perhaps slightly larger. Now you might think that using Spot AF will be more accurate all the time and sounds like a great idea and will get you sharper pictures, but this is not necessarily the case. Since Spot AF is so precise, and since autofocus works by looking for an area of contrast, Spot AF may not focus as well or as quickly in many general situations (because it may be looking at such a precise area that is all one color or tone).
Spot AF is for when you need a really precise “focus beam” to pinpoint, for example a bird in a tree, and not the branches and leaves surrounding it and all around it, which may be closer to you and the camera. Or if, say, you are shooting through a chain link fence and you want the camera to focus on the animal beyond and not on the fence. If you were to use Spot AF all the time, you would have to continue to act in a slower and more precise manner, so that you ensure you are focusing on an area of contrast or a nice line. For example, if you capture a shot of a person, you want to focus on the eye typically. If you do this quickly with Single Point AF, you can aim at the general area of the eye and you will likely include it in the area being looked at by the camera. However if you grab a quick shot with Spot AF, you may be a little off and the camera is looking at an area of cheek to focus on, which will be difficult since there isn’t much contrast there.
Orientation Linked AF Point – This setting allows you to choose your favorite AF points, and when you are hold the camera horizontally or vertically, those points are automatically selected. However, it is very complicated to set, so much so that is would seem Canon doesn’t even understand it. The Canon rep did not fully explain it properly at the B+H presentation, the instructions in the manual do not work, and after 3 different instructions by email from Canon, I may finally have the correct way. I still have to try their latest directions. (note- nope, latest instructions still don’t work properly) **12/17/2009** AHA!! Here it is, finally explained in its entirety.
I also changed the button/ dial function settings so that in Manual mode, the big dial controls shutter speed and the top dial controls aperture. The default is the opposite. I changed this because I almost always shoot in Av mode, where the top dial controls aperture, so when I switch to Manual mode, I want that to remain the same.
Additional edit – August 2011:
I have written a popular e-book user’s guide for the Canon 7D called Canon 7D Experience. It not only explains all of the features, functions, and controls of this powerful, sophisticated, and highly customizable camera, but also when and why to use them in your photography – including EVERY Menu item and Custom Function setting, with explanations and recommended settings for real-life use. You can learn more about the guide, preview it, and purchase it here.
AF Microadjustments – This is a setting on the 7D which enables you to tweak the auto-focusing to your different lenses. A site about AF micro adjustments that look to be helpful is below:
Here is a micro-adjustment focus test chart you can use.
Viewfinder – The viewfinder on the 7D is big and bright and wonderful. It is nearly 100% view of the image you will capture. The aperture and shutter speed info is of course displayed below, along with the current ISO setting, which one should get in the habit of glancing at often. See the AF Focus Mode category above for more info on what you can view in the viewfinder to assist with focusing and composition.
Picture Style – I had this on Standard, since I shoot in RAW and intend to post-process, however, I would like to do a comparison of the styles to see which one best matches my visual preferences – although the Picture Styles will only affect JPEGs and, it is important to know, the image you see on your rear LCD screen when shooting RAW.

Jalapa, Guatemala – Canon 7D, 16-35 f/2.8L lens at 35mm, 800 ISO, 1/2000, f/8
File Size – I shot RAW for almost the entire trip, and quickly discovered that these files are HUGE. The files range from about 21MB to around 31MB each. I used SanDisk Extreme III 16GB cards, which worked great, and one card often lasted much of the day. I have no good reason for using SanDisk over Lexar, other than the fact that the Lexar people haven’t approached me about sponsorship… :) The Extreme III cards have been replaced by the new Extreme and Extreme Pro cards, and are thus the old ones are much cheaper at the moment, especially with current rebates. At 30MB/s, they were fast enough for the types of shooting and short bursts I was doing. However, downloading them to my computer and external HD were pretty slow using the SanDisk ImageMate CF card reader. Eventually I’m going to have to spring for a card reader that goes right into the PC slot. I used Adobe Bridge to simultaneously save the day’s files to 2 external hard drives. The 160GB Iomega Ego filled up before the trip was over, but fortunately I also had a Lacie 500GB. I am dreading the number of external hard drives I am going to have to buy for travel and for home storage, but once you go RAW, it’s hard to go back to shooting just JPEG. I’m going to have to look into the Drobo system that many rave about.
Battery Life – The battery life of the 7D is excellent. When you get new batteries, first charge them all the way. Do not recharge until they are completely drained. Do this one or two cycles. I know they say you no longer have to do this, but some claim that seasoning the batteries like this will maximize their charge life. Anyway, one battery lasted well into 2 days of shooting, maybe longer, I didn’t keep track. They just keep going, even with heavy use, chimping (LCD reviewing), frequent use of an external Speedlite flash, and use of image stabilization (IS) on the 70-200 lens. I carried 3 batteries, but probably could have gotten away with 2. The spring-loaded battery door that pops right open for quick battery changes is a nice touch.

Antigua, Guatemala – Canon 7D, 70-200mm f/4L IS lens at 78mm, 100 ISO, 1/250, f/4
Automatic Sensor Cleaning – Like most good dSLRs these days, the 7D automatically cleans the sensor at start up and shut down. Since the dust that is shaken off is collected on a tiny sticky strip at the base of the sensor, it seems to me that you should hold the camera straight as this happens. I’m not sure if this is actually true, but I think I read in the manual that it even says to place the camera flat on a table as you use this, so I have gotten in the habit of holding it straight and still as I turn it off and on. Yeah! No more having to clean the sensor manually with a Rocket Blower!
Video – I did not have a chance to even experiment with the HD video on the 7D yet…so much to learn, so little time…
The next post will review all the other gear I used on the trip – the camera backpack, R-strap, accessories, etc. – and perhaps some of the other lessons learned. Read it here.
Purchasing: If you plan to buy the Canon 7D or any other camera or equipment from Amazon.com, I would appreciate it if you use my referral link by clicking on the text or logo below. Your price will be the same, and they will give me a little something for referring you, which will help support this blog. Thanks!
See and buy the Canon 7D on Amazon
And due to popular request, if you are in the UK, here is my referral link to Amazon UK.
And for those wishing to purchase from B&H Photo, Adorama, or directly from Canon just click their logos on the left side of the page.

Jalapa, Guatemala – Canon 7D, 70-200mm f/4L IS lens at 200mm, 200 ISO, 1/1600, f/4
Again, be sure to check out my e-book user’s guide for the Canon 7D called Canon 7D Experience. It not only explains all the features, functions, and controls of this powerful, sophisticated, and highly customizable camera, but also when and why to use them in your photography. You can learn more about the guide, preview it, and purchase it here.
I’ve run across a nice set of video tutorials (link below) for using the Canon 7D. You can watch them online, or even download them to your camera for viewing. The one on AF Custom Fuctions is especially helpful at clarifying those setting. Be sure to look around on the Canon Digital Learning Center to find all kinds of other cool stuff about using your camera plus useful tips and instructions from pros who use them.
link to Canon 7D Video Tutorials
The distinctive voice you hear in the 7D tutorial videos is Canon guru Rudy Winston, and the photo samples are his images as well. If you are in NYC, you can often find him leading workshops and presentations at places like B+H and Adorama. I went to a wonderfully informative introduction to the 7D that he gave a B+H a month or 2 ago, and these videos are pretty much the same presentation.
Here is additional information from Canon Europe about custom functions of the 7D: