By now you may have read several of the reviews and “hands-on” articles about the long-awaited Canon 7D Mark II. The camera’s 65-point autofocus system, combined with its customizable controls and blazingly fast 10 frames per second continuous shooting speed, make it an ideal camera for sports, action, and wildlife. At the same time its Its 20.2 megapixel sensor and high image quality enable it to work great for portraits, landscapes, and more static subjects.
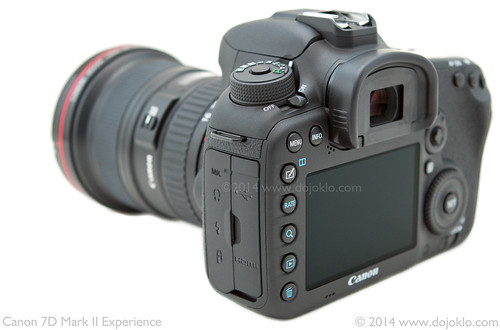
Figure 1. Detail of the body and controls of the Canon 7D Mark II.
However, what many reviews and hands-on articles and videos about the 7D Mark II seem to miss is the incredible level of customization one can apply to the controls and features of the camera, in order to have it perform exactly how a user needs or desires, to better accommodate a specific shooting situation or a personal shooting style. These are the kinds of features that really differentiate a pro-sumer camera from a mid-level camera, yet are often overlooked in reviews and comparisons.
And while the original 7D and the full-frame 5D Mark III both offer a high level of customization, the 7DII takes it to an even higher level, adding options and button-combinations not available on previous models. This can allow the user an even more seamless photography experience, enabling you to concentrate on the scene and the subject while quickly changing to the desired settings or making use of certain features, with just a few button taps or dial turns, and often without your eye leaving the Viewfinder.

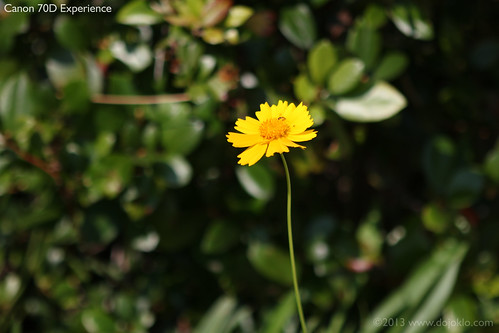
Figure 2. Fall Foliage at Whipple Hill, Lexington, Mass. with the Canon 7D Mark II.
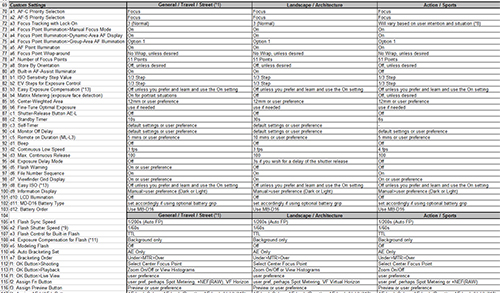
Complete explanation for all of these tips and tricks, and well as clear, comprehensive instruction for the camera, plus descriptions and recommendations for all of the Menu and Custom Function settings, will be found in my camera guide Canon 7D Mark II Experience, which you can learn about and purchase on my Full Stop website. Learn to take control of your 7DII and the images you create with this helpful guide! I have also put together a free, comprehensive Canon 7DII Setup Guide Spreadsheet, which gives recommended settings for all of the Custom Functions and shooting-related Menu items.
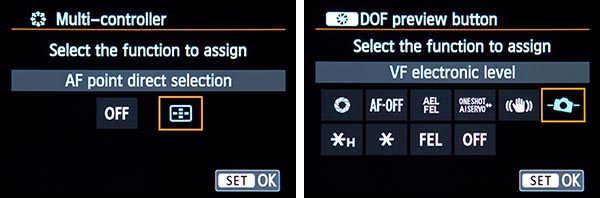
1. Make Use of the New AF Area Selection Lever: One of the notable additions to the 7DII is the new AF Area Selection Lever, which surrounds the Multi-Controller thumb-joystick. This lever can be used to quickly change the AF Area Selection mode, such as Single Point, AF Point Expansion, or Zone AF. Do this by first pressing the AF Point Selection Button (at the upper-right on the rear of the camera), then flipping the lever repeatedly as you view the different AF Area configurations in the Viewfinder. Or since you can easily change the AF Area by pressing the AF Point Selection Button then the M-Fn Button, you may wish to customize the new lever to quickly change the ISO setting or the Exposure Compensation amount. In that case, you would turn and hold the lever with your thumb, then turn the top Main Dial to change the assigned setting. Generally you may wish to set it for the ISO option, but when shooting in Manual (M) Mode, for either stills of video, while also making use of Auto ISO, you may wish to set this for the Exposure Compensation option. This configuration will enable you to easily access this new capability of the 7DII, which I will explain below.
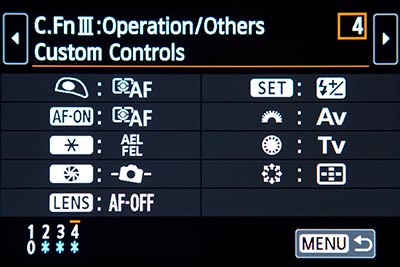
2. Take Advantage of Various Autofocus-Related Custom Controls Options: Many of the customization options of the Canon 7D Mark II revolve around the Custom Controls, which can be accessed with the Custom Controls item of the C.Fn3 Menu.
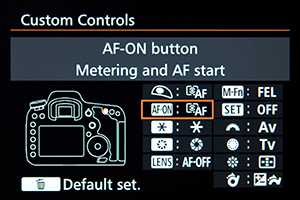
Figure 3. Custom Controls menu item of the Canon 7D Mark II
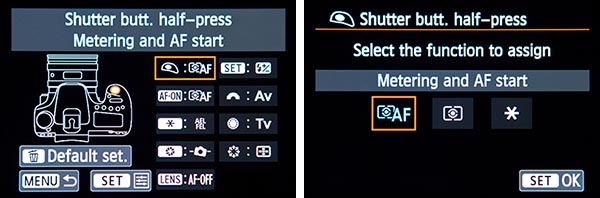
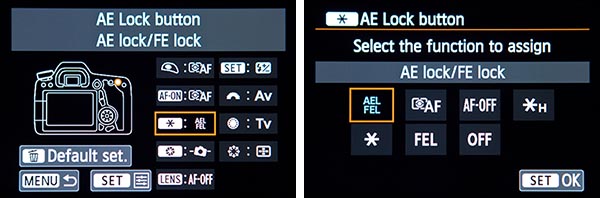
While previous Canon dSLR models allowed you to assign various exposure and focusing functions to some of the back buttons, or perhaps to quickly switch between One-Shot and AI Servo with the push of a button, the 7DII will allow you to use various buttons to temporarily change the current AF Mode, Area Mode, and AF Case. For example, if you are taking images of a motionless bird using One Shot AF Mode and Single Point AF Area Selection mode, but then the bird takes flight, you can press and hold a button (that you have pre-assigned) and temporarily make use of AI Servo, with 8-Point AF-Point Expansion, and Case 2 AF Configuration for tracking the subject.
Or making use of another option, you can assign a button to temporarily change many of the subject-tracking settings (as you press and hold the button), such as the Tracking sensitivity, the AF point auto-switching setting, and the AI-Servo 2nd image priority. These changes are made, for example, by accessing the AF-ON Button option in the Custom Controls menu, selecting Metering and AF Start, and then pressing the INFO Button to make these further customizations (see Figure 4 – left). Or you can access the DOF Preview Button, select the Switch to registered AF function option, and press the INFO Button to set the desired AF tracking parameters (see Figure 4 – right).
While many users may not generally have the need for a sudden switch of autofocusing parameters, it can be incredibly useful for dedicated wildlife or sports photographers who can encounter dramatic changes in a scene or in the subject movement.
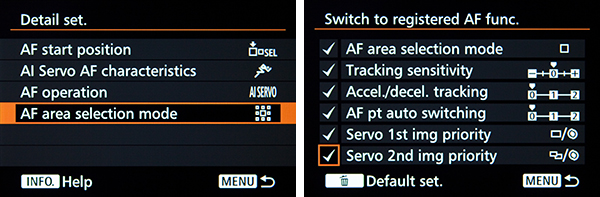
Figure 4. Two of the different Custom Controls options for assigning various AF settings and operations to one of the camera buttons. Left: Details for the “Metering and AF Start” option of the AF-ON Button. Right: Details of the “Switch to registered AF function” option of the DOF Preview Button.
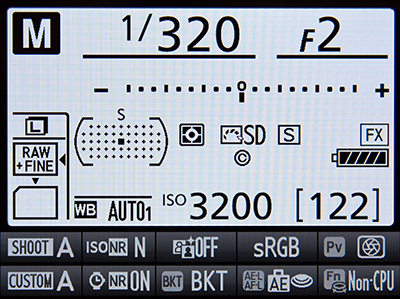
There is also the option to use a button to immediately switch to a different set of shooting settings in addition to the AF settings, including the shutter speed, aperture, ISO, white balance, metering mode, exposure compensation. This is shown in Figure 5, where the AF-ON Button is set to the Register/recall shooting function option, and then the INFO Button is pressed to set the specific parameters. As you can see, you can select which shooting settings will be included by adding the check-mark, and then you can set the desired setting or amount for each item, such as 3200 for the ISO Speed. Then when shooting, you can press and hold the AF-ON Button to immediately recall all those settings.

Figure 5. Assigning the AF-ON Button to the Register/recall shooting function option, then pressing the INFO Button to set the desired parameters.
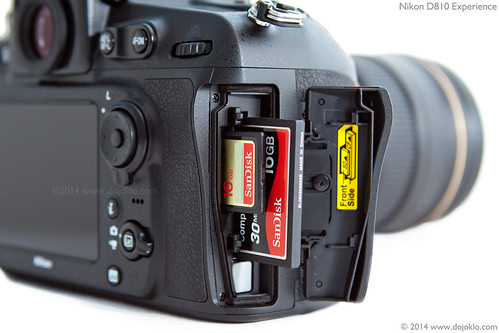
3. Make Use of the Q Button and INFO Button to Quickly Change Shooting Settings: These buttons will also allow you to quickly access and change various camera settings and functions, rather than having to dig into the menus to find what you are looking for. The Q Button will access the Quick Control Screen (Figure 6 – left), which you can navigate using the Multi-Controller, and then either change the settings directly on the screen by turning one of the dials, or press the SET Button to view all the options and to select your desired setting. One handy new addition to this screen is the memory card selection icons. While you can press the SET Button here (or use the menus) to specify how the two cards are used (for example overflow, JPEG/RAW, or backup), you can highlight these icons and then turn one of the dials to directly and immediately choose which card is the the current primary card being used for recording and playback. This is especially handy during playback when you are looking for a specific image on one of the inserted memory cards, but then realize it is on the other inserted card, yet the 7DII will only playback the images from one card at a time.
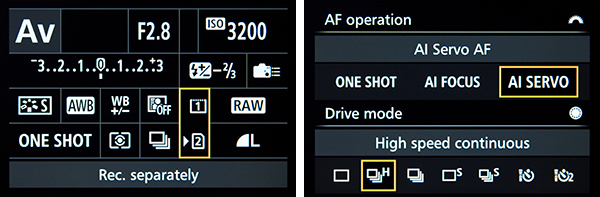
Figure 6. Left: The Quick Control Screen, accessed with the Q Button, for quickly changing settings. Right: If you press the INFO Button and access the Shooting Function screen, and then press any of the top camera buttons, you can quickly view and change those settings using the rear LCD monitor.
If you first press the INFO Button a couple times and and access the Shooting Function Settings screen (which resembles the Q screen of Figure 6 – left), you can press any of the top camera buttons and quickly view and change those settings on the rear LCD Monitor. This will allow you to more easily view the settings than the smaller top screen, while also allowing you to see all the available options. For example, Figure 6 – right shows the INFO screen for the AF/Drive button, which allows you to see all the available options in both word and icon format, and also indicates which dial to turn to change which setting (the top Main Dial indicated by the half-circle, or the rear Quick Control Dial).
4. Take Advantage of the Creative Photo, Rate, and M-Fn Buttons: The Creative Photo Button, located at the upper-left of the rear of the camera, will allow you to quickly access the Picture Style settings, Multiple Exposure, and HDR Shooting, rather than having to go into the menus to find those features. The Rate Button, also on the left side of the rear of the camera, will enable you to quickly rate an image during image playback. You can choose from one to five stars, or if you find that you typically only use 1 star, 3 star, and 5 star ratings, a menu item will allow you to limit the selection to just those options (Setup 3 > Rate Button Function, then press Q to limit the ratings). So, for example, you would only need to press the button 3 times to cycle from 1 star, to 3 star, to 5 star, without wasting those precious seconds and button pushes for the 2 star and 4 star ratings you never use! If you prefer the Rate Button to act as the Protect Button, you can use the Rate Button Function menu item to instead assign it to that function.
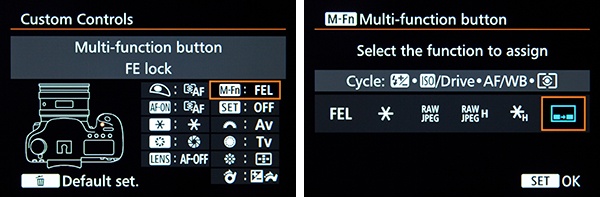
Figure 7. Customize the M-Fn Button to shoot simultaneous RAW plus JPEG, or to cycle through the top button settings.
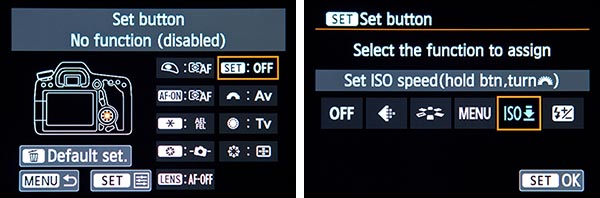
The M-Fn (Multi-Function) Button, located on the top of the camera near the Shutter Button, is used in conjunction with first pressing the AF Point Selection Button in order to select the desired AF Area Selection Mode. However, when simply pressed by itself, if is used for Flash Exposure Lock. If you don’t need it for that function, you can perhaps change it to one of the RAW+JPEG settings, so that you can temporarily or permanently switch to capturing images in both file formats. Or a handy option is to set it for the Cycle option, which allows you to cycle through the various top button settings such as White Balance, ISO, and Drive Mode, as you view the settings on the top LCD screen (see Figure 7). This can perhaps be quicker and easier than slowing down to first look and see which tiny button is used to access which setting. Press it one time and the WB/ Metering Mode options will be active on the top screen and available for you to change, as if you pressed the WB/Meter Button. Press it again and the Drive Mode/ AF Modes will be active, etc.
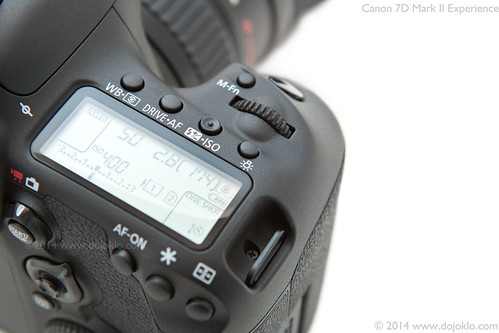
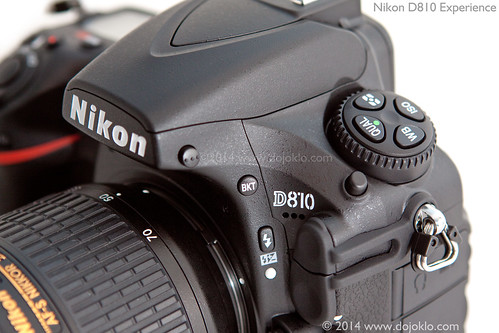
Figure 8. Detail of the top controls of the Canon 7D Mark II.
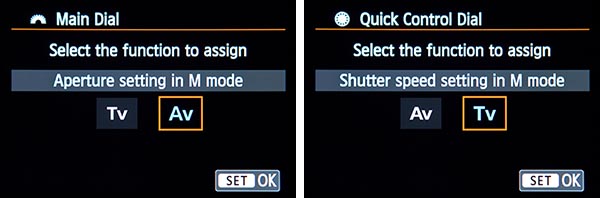
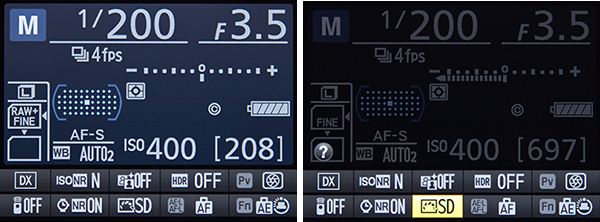
5. Use Manual (M) Shooting Mode with Auto ISO plus Exposure Compensation: The Canon 7D Mark II allows you to perform a function which, if I recall correctly, cannot be done with the original 7D, 5DIII, or 70D – which is to simultaneously use M shooting mode (for either still photography or movie shooting) along with Auto ISO, while also making use of Exposure Compensation. This is a very powerful option for those shooting in Manual. Using Auto ISO with Manual Mode allows you to set your desired shutter speed and aperture settings, and the camera will then select the appropriate ISO setting in order to obtain the proper exposure. If you suddenly move to a brighter or darker settings, you can retain the same exposure settings, and the camera will automatically adjust the ISO setting to maintain the proper exposure. This allows you to concentrate on your subject and composition without having to worry about or adjust the exposure settings. It can also be incredibly useful during movie shooting in order to maintain a consistent exposure even if the scene or lighting levels change. However, if you are unhappy with the exposure results that the camera has determined, the 7DII now allows you to also apply Exposure Compensation in this situation, in order to make the subsequent images darker or lighter, to better suit your intentions or desires.
Since the dials are being used for the shutter speed and aperture settings when working in M shooting mode, they cannot be used for Exposure Compensation (EC), so you will need to access the Quick Control Screen to change the EC setting. However, as mentioned above, you can assign the AF Area Selection Lever to the Exposure Compensation option, and then you will simply need to hold the lever and turn the top Main Dial to change the EC amount, while viewing the setting in the Viewfinder or top Control Panel.
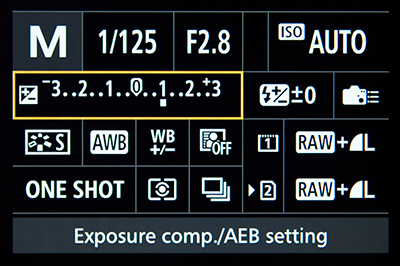
Figure 9. Making use of Manual (M) Mode with Auto ISO and Exposure Compensation.
These tips will be continued in Part 2, coming soon!
Don’t forget about my free, comprehensive Canon 7D Mark II Setup Guide Spreadsheet, which provides recommended settings for all of the Custom Functions and shooting-related Menu items of the 7DII!
To learn more about using and taking control of your Canon 7D Mark II, please have a look at Canon 7D Mark II Experience, which you can learn about and purchase on my Full Stop website here. It not only covers the buttons, controls, menus, features, and functions of the camera, but more importantly explains when, why, and how to make use of them in your photography!
And if you have enjoyed this post but have not yet purchased your 7DII, please use my affiliate links to make your purchase. Your price will be the same, and they will give me a small referral bonus – thanks! You can use the links below to go to Amazon, or the links at the side of the page for Amazon UK or Amazon Canada, or for B and H Photo.