Here is the second part of my Nikon D810 Tips and Tricks article. You can find the first part here:
http://blog.dojoklo.com/2014/07/28/nikon-d810-tips-and-tricks-part-1/
~
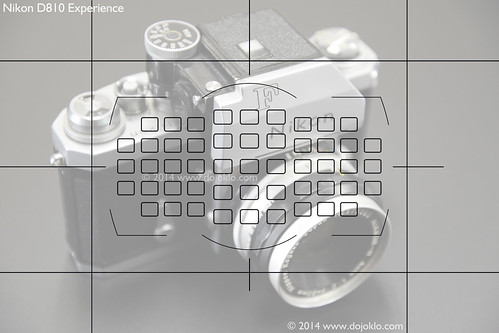
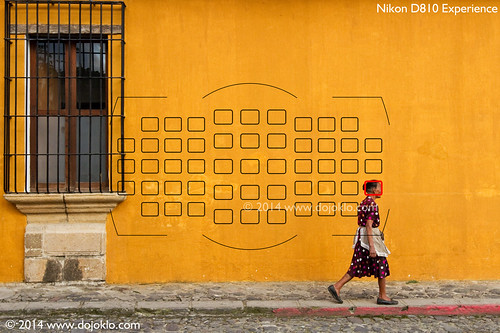
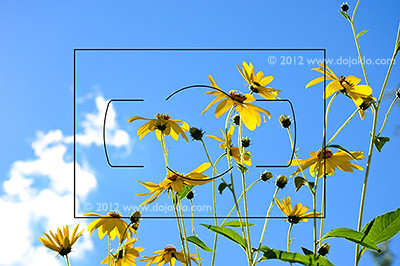
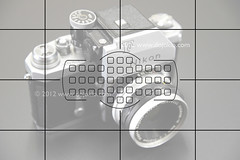
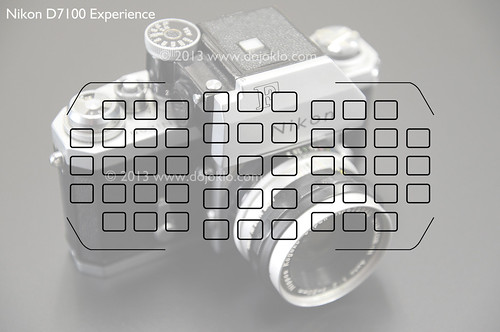
6. Extend Your Telephoto Reach with the DX, 1.2x, and 5:4 Image Area “Crop” Modes: The Image Area menu item of the D810 can be used to capture images of smaller dimensions and different image area ratios, such as having your full-frame FX format sensor act as an APS-C sized DX format sensor. You can choose full-frame FX (36×24), 1.2x (30×20), DX (1.5x, 24×16) or 5:4 (30×24). You can see which portion of the sensor each setting will use in the image below, and the Viewfinder of the D810 will also display the crop lines to show you the active area. By enabling the 1.2x, DX, or 5:4 image areas, it will change the aspect ratio (very slightly for 1.2x and DX) and angle of view (somewhat with 1.2x or 5:4, dramatically with DX) of your resulting images. The camera is basically cropping your photos from full-frame images to smaller sized images, so note that rather than capturing 36.3 MP full-frame FX images, you will be capturing 15.4 MP images with DX crop, and 25.1 MP images with 1.2x crop.

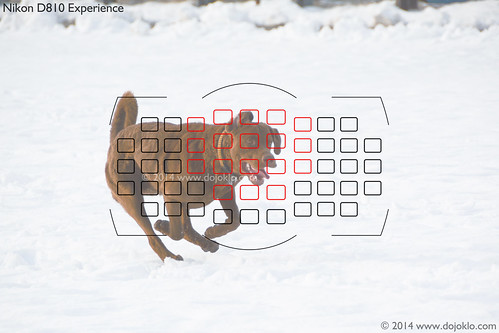
D810 Image Areas – Simulated view of the D810 Viewfinder, showing the full size FX image area, the location of all AF Points, the Grid, and superimposed sizes of the Image Area options. Note that the DX area approximately aligns with the Grid. The cropped Image Areas will, in effect, allow you to “virtually” extend the reach of your lens and get closer to the action, but you will not be using the full 36.3 MP resolution of your camera, so it is basically like cropping your full-frame images in Photoshop.
The first advantage of DX and 1.2x crop is that they will allow you to “get closer” to the action by virtually extending the reach of your lenses. This can be particularly helpful when using a telephoto lens to capture sports, wildlife, or bird images where the subject is at a significant distance from you. DX image area will allow, for example, your 200mm focal length lens to act as a 300mm focal length. (Since the DX frame provides a 1.5x crop factor in relation to a full-frame FX sized sensor)
The second advantage is that with the DX crop, the area of the autofocus points as seen in the Viewfinder reaches much closer to the sides of the effective frame. This will allow you to track and capture a moving subject throughout almost the entire width of the active frame (when using continuous AF-C Focus Mode), or enable you to focus on and capture a still subject most anywhere in the frame without having to lock focus and reframe (when using single-shot AF-S Focus Mode).
A third advantage of working in the DX and 1.2x crop modes is that the Continuous High shooting speed goes from 5 fps to 6 fps, allowing you to capture slightly more images in a quick burst.
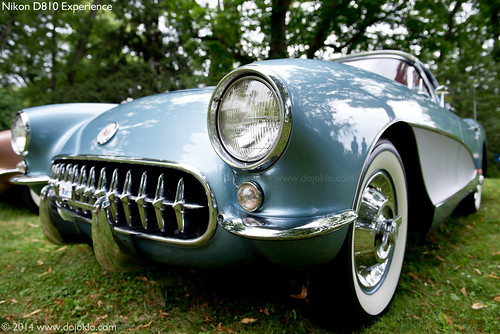
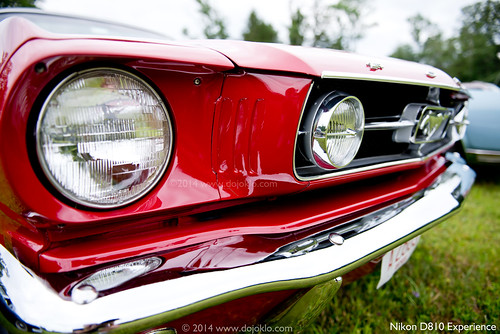
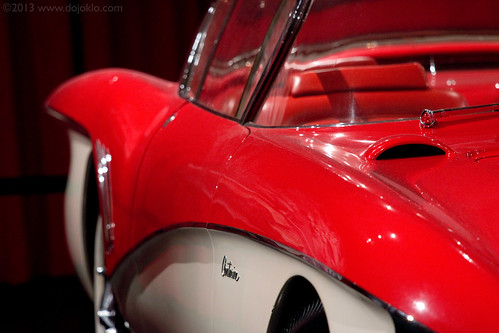
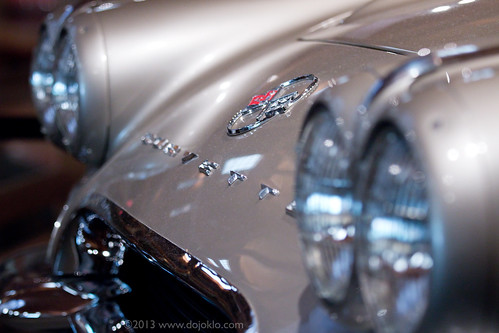
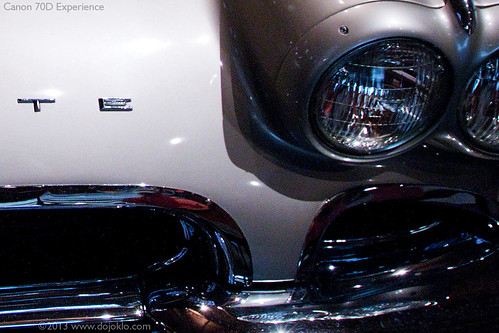
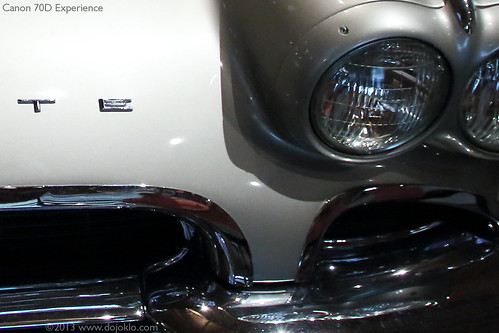
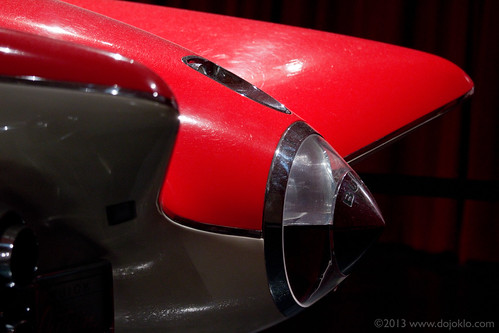
Nikon D810 – 1957 Chevrolet Corvette – 2014 Annual Antique Auto Show – Codman Estate, Lincoln, Mass.
As mentioned above, the disadvantage of the smaller Image Area crops is that you will be using a smaller area of your sensor, and thus capturing images with reduced resolution and not the full 36.3 MP. The end result will be as if you cropped the image in post-processing. However, 15 MP and 25 MP are still very high resolutions, and for some shooting situations and image needs this may be more than sufficient.
You can set the Depth-of-Field Preview Button, Fn Button, or AE-L/AF-L Button to quickly change the Image Area. If any of these buttons are assigned this function, you can press the button and turn the Main Command Dial to change the Image Area while viewing the setting on the top Control Panel, in the Viewfinder, or on the rear Information Display.
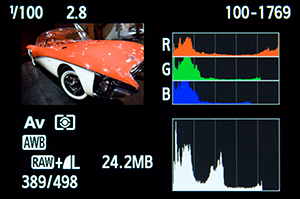
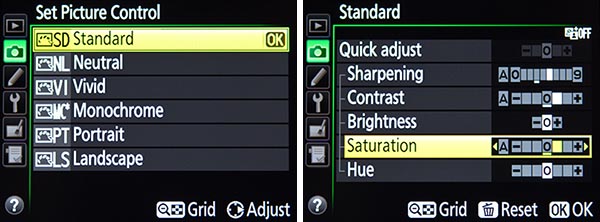
7. Take Advantage of New Features for Videographers: While the predecessors to the D810, the D800/800E, are great cameras for HD video, this new model adds even more helpful features. The D810 can record full HD 1080 video at 60p/30p/24p, including simultaneous recording to a memory card and an external recorder, and outputting 60p video to an external recorder under certain conditions. The D810 has also added “zebra stripes” which enable you to preview potentially overexposed areas of the scene, and a Flat Picture Control which is a setting preferred by videographers because it helps to preserve details in the shadow and highlight areas of a scene, and allows one to capture videos (or images) with the widest tonal range. This can help to provide the greatest amount of flexibility for making adjustments in post-processing. Not to mention that, for both video and still photography, there is a new Clarity adjustment for Picture Controls, a broader Brightness range, and increased control over the Picture Control adjustments with more precise 0.25 EV increments.
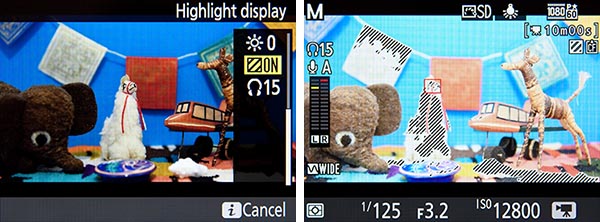
D810 and Zebra Stripes – The Highlight Display feature will show zebra stripes, to indicate potentially overexposed areas of the scene.
The D810 now also allows you to set the frequency range for audio recording, either Wide to capture all sounds, or Voice to capture a more limited range and thus reduce unwanted sounds. And the Power Aperture setting found on the D800/D800E can now be used not only when recording video to an external recorder, but also when recording to a memory card. Power Aperture is a feature that allows you to more smoothly and continuously change the aperture opening while recording a video, rather than change it step-by-step where you might see the depth of field change as you jump from f/4 to f/ 4.5 to f/5 to f/5.6 for example. This feature, available in A or M shooting mode, actually changes the aperture in 1/8 EV steps, rather than the 1/3 EV steps you can choose with the command dial, so it gives the appearance of a smooth transition. Power Aperture can thus allow dramatic visual changes in the depth of field of a scene, or allow you to smoothly adjust the exposure settings to accommodate changing lighting levels.
8. Set up your Dual SD / CF Memory Card Slots: The two memory card slots of the D810 – the SD slot and the CF slot – can function in a couple different ways, including using one for saving RAW files and the other for JPEG files, saving all your images to both cards simultaneously, using the second card as overflow when the first one fills up, or saving still images to one and movies to the other. You can set this up in the Shooting Menu under Primary Slot Selection to choose which is the primary card, and Secondary Slot Function to determine the role played by the second slot. To set how the cards function for saving videos, use the Shooting Menu > Movie Settings > Destination.
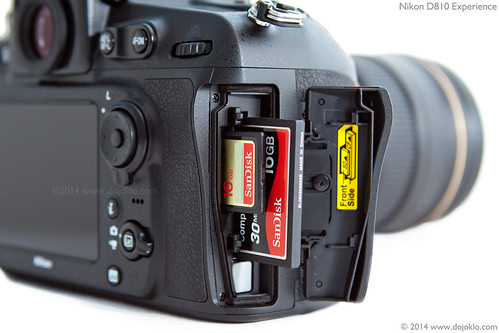
Detail of the Nikon D810, showing the SD and CF card slots.
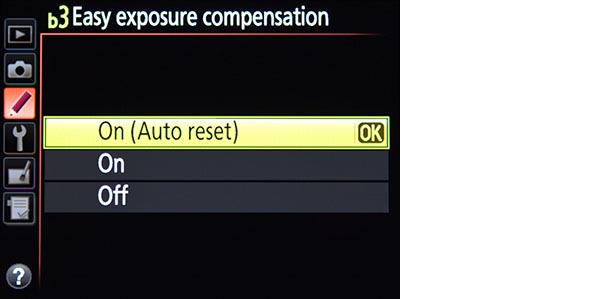
9. Customize the Exposure Compensation Controls: Exposure Compensation can be used to adjust the camera’s exposure settings in order to achieve the final exposure that you desire. Explore the various options of Custom Setting b4: Easy Exposure Compensation to customize exactly how the exposure compensation (EC) controls works. You can set it so that you press the Exposure Compensation Button first before turning a dial to change EC, or have it set so that you can just turn a dial to quickly and directly change EC. You can even select which dial you use with Custom Setting f9: Customize Control Dials. And you can set it so that the EC amount that you dialed in stays set for the subsequent shots, or that it is automatically reset to zero, depending on which controls you choose to use to set EC. This last option is the most sophisticated and most flexible, and may be the best one to learn and take advantage of. Using this option, On (Auto reset), you can choose to turn a dial to directly adjust EC, but your EC setting will be reset when the camera or exposure meter turns off. This is because you can still continue to use the Exposure Compensation Button with a Command Dial to set EC, but by setting it this way, EC will not be reset when the camera or meter turns off. Exposure Compensation will only be automatically reset if you set it directly using the dial without the button. So if you wish to use EC for just one shot, you can adjust EC with just the dial. But if you wish to take a series of shots with the same adjusted EC, you can use the button/ dial combination to set it more “permanently.” Pretty powerful stuff! This is why you got the D810, right? So that you can take advantage of these sophisticated controls!
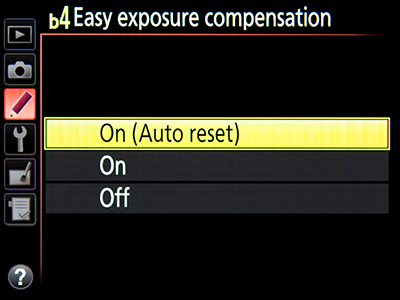
Making use of Easy Exposure Compensation to configure how the controls can be used to change exposure compensation
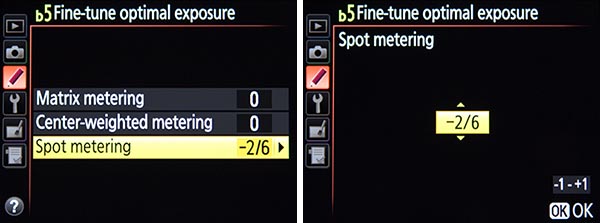
10. Matrix Metering Face Detect, and Fine-Tune the Exposure Metering Modes: Using Custom Setting b5, you can enable a face detection feature of Matrix Metering. This means that the exposure metering system will take faces into account when determining the exposure settings, to ensure that portrait subjects are better exposed. This can be an extremely useful setting to use when taking images of people where they may be moving to different lighting, or moving in and out of the shade – especially in a fast moving session where you don’t have time to inspect all your images and adjust the settings. For example, if you are taking wedding portraits in lighting that varies.
While the Matrix Metering Mode will do an excellent job of determining the proper exposure for your images the majority of the time, there are some situations where you may wish to use the other exposure modes – Center-Weighted Metering, Spot Metering, and Highlight Weighted Metering. This includes dramatically backlit situations, subjects with a dramatically dark background, scenes that contain a wide range of highlights and shadow areas, or other dramatic lighting situations.
If you find that you are consistently not quite happy with how the camera’s meter is determining the exposure settings when making use of any of these modes, you can make fine-tune adjustments to the metering system using Custom Setting b7: Fine-tune optimal exposure. This is not an exposure compensation adjustment, but rather a “behind the scenes” fine-tuning of how the camera’s meter will determine the exposure settings, independently for each of the different Exposure Metering Modes (Matrix, Center-Weighted Average, Spot, Highlight Weighted). If you find that your images are always typically being slightly underexposed or overexposed when using a specific metering mode, adjust this accordingly so that you don’t have to use exposure compensation every time you use that metering mode. For example, you may find that Center-Weighted Metering delivers great exposures, but you would prefer that the images taken with Spot Metering were 1/3 EV (1/3 step) underexposed all the time. If that is the case, you would adjust Spot metering to -2/6 using this menu. If you make use of this fine-tune adjustment, you can still use exposure compensation in any situation in addition to this fine-tune adjustment.
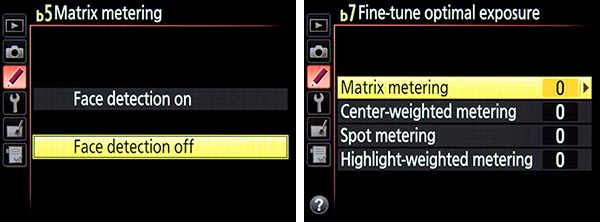
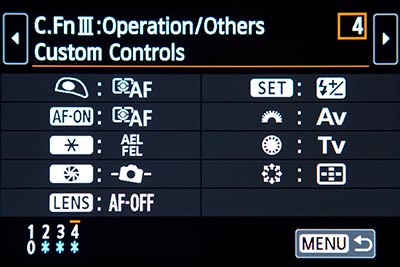
Left: Custom Setting b5: Matrix Metering face detection for exposure. Right – Custom Setting b7: Fine-Tune Optimal Exposure, used to adjust the exposures of each metering mode to your preference, “behind the scenes,” so that exposure compensation is not needed each time you use that metering mode.
~
I have previously written articles with tips and tricks for the Nikon D7100, and most all of those items will also apply to the D810. Some of the tips overlap, but many of them are different that the ones explained here. You can read the D7100 Tips and Tricks part 1 and 2 here:
http://blog.dojoklo.com/2013/05/06/top-ten-tips-and-tricks-for-the-nikon-d7100-part-1/
http://blog.dojoklo.com/2013/06/27/tips-and-tricks-for-the-nikon-d7100-part-2/
~
Remember, I also explain these features and functions in even more detail, as well as explain all the other aspects of the D810 in my e-book guide Nikon D810 Experience, available on my Full Stop website. The guide not only explains the features, functions, and controls of the camera, but more importantly explains when and why you will want to use them in your photography. Take control of your D810 and the images you create! Click the cover below to learn more, preview, and purchase the guide.
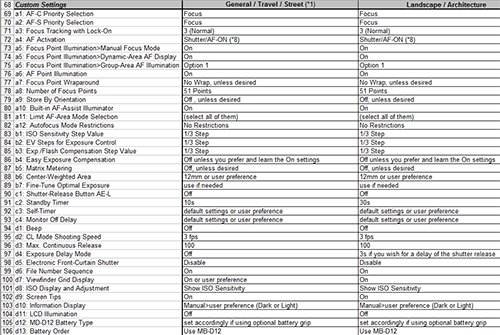
And, in conjunction with the book, I have created a detailed and comprehensive Nikon D810 Setup Guide spreadsheet, which has recommended Menu settings, Custom Settings, and exposure settings for various shooting situations such as Landscape, Performance, Sports, and Travel, in order to help you set up your camera. You can learn about and download this free “cheat sheet” spreadsheet here:
http://blog.dojoklo.com/2014/06/30/nikon-d800800e-nikon-d810-setup-guide-with-recommended-settings/
Still looking to purchase your Nikon D810 or some lenses or accessories for it? Please consider using my affiliate links for Amazon or for B and H, found at the left side of this page – thanks! And please feel free to spread the word if this blog has been helpful.