Interesting vs. Intriguing

I recently took this photo in Gloucester, MA.  As I was working on the RAW file and zooming in, I discovered that I liked the cropped version, perhaps more than the original.  It seems to me that while the original version (shown second, and which is actually slightly straightened and cropped itself) is interesting, the extreme crop (shown immediately below) makes it intriguing.  (I think I’m beginning to sound like Rick Sammon here!)  It imagine that upon looking at it, it may take a second to become oriented but then, following Gestalt principles, the eye figures it out.  Anyway, have a look for yourself:

Gloucester MA Mass Massachusetts reflection boat water harbor
Gloucester, Mass – extreme crop of original


Gloucester, Mass – minor crop of original

The interesting and impressionistic grey, black, and white reflections in the water – best seen in the top picture –  are shown as they were captured, with just a standard amount of Clarity and Sharpening done to the image.


Independent E-Book Publisher Full Stop Celebrates Successful First Year

Online and PDF versions of this press release available here:
http://www.dojoklo.com/writing/PressReleases/2011-09-29-Press_Release.htm

Full Stop Publishing
good writing for better photography
www.dojoklo.com/Full_Stop

PRESS RELEASE

FOR IMMEDIATE RELEASE

Contact:  Douglas Klostermann
E Mail – doug@dojoklo.com

Independent E-Book Publishing Company Celebrates Successful First Year

Independent E-Book Publisher Takes Advantage of Newly Leveled Playing Field to Successfully Compete with Traditional Publishers

September 29, 2011 – Cambridge, Mass. – Independent e-book publisher Full Stop marks its successful first year of creating, publishing, and selling digital SLR camera guides and photography e-books.

Begun in September 2010 with the publication of its first camera user’s guide Your World 60D, the independent publisher currently offers nine titles and has sold over 6,000 e-books.  The majority of the titles are user’s guides aimed at Canon and Nikon digital SLR camera owners, including Amazon Kindle best-sellers Canon T3i Experience and Nikon D5100 Experience.  Taking advantage of readers’ growing preference for e-books and the increasing popularity of e-reader devices and tablets, as well as the digital publishing opportunities offered by major online retailers such as Amazon and Barnes and Noble, author and photographer and head of Full Stop Douglas Klostermann is able to reach a wide audience of readers interested in learning how to use their equipment and improve their photography.  As Douglas noted in a recent interview, “E-books and e-publishing have completely leveled the playing field for independent publishers, allowing us to successfully compete with major publishers and even to beat them to the market by taking advantage of the available technology and sales channels.”

Inspired by his experiences with e-publishing as well as the rapidly expanding popularity of e-books Douglas has also written an e-book guide to help others create, publish, and sell e-books, called The E-Book Handbook.  All of his guides are available for sale on the Full Stop website as well as on Amazon.com, BarnesandNoble.com, and through Apple iBooks and iTunes.  As with all e-books, Full Stop guides are read on a computer, e-reader device such as the Kindle or Nook, or tablet such as the iPad.

Additional camera guides and photography books are planned, and Full Stop is looking forward to further success with independent e-book publishing and the continued growth of e-books, e-reader devices, and digital publishing.  For further information contact Douglas Klostermann at doug@dojoklo.com.

###

Online and PDF versions of this press release available here:
http://www.dojoklo.com/writing/PressReleases/2011-09-29-Press_Release.htm

An Open Letter to Magazine Publishers

I’ve just viewed one of the more frustrating and disappointing videos that I’ve seen in awhile.

You know all those magazine ads lately about the importance of magazines and “the Power of Print?”  The ones with all the different fonts and you get to try to guess which letter came from which magazine?

the power of print magazines iPad e-magazine ebook ebook publishers

I just watched the video companion to this campaign, with several major publishers – the brightest minds in the publishing business – arguing about the importance of print magazines, and how the history of technology has shown that print magazines will not be displaced.

http://www.youtube.com/watch?v=aGVniqgWSc0

Perhaps they are too busy trying to come up with lame and misguided arguments that they don’t realize print magazines have already been displaced!

It is called an e-magazine.  Or perhaps an iPad magazine.  And if you’ve seen one, you will likely agree that it is the most amazing thing to come to magazines since the invention of “glossy.”  If you haven’t, then download a free app and sample edition of your favorite magazine:  Wired, Martha Stewart, Spin, or even Scott Kelby’s Light It.

E-magazines on the iPad are going to be huge.  HUGE.  They are going to sell 10 times better than print magazines and make some people a lot of money, yet the most prominent publishers of magazines are busy arguing how print is important and lasting.

Everyone loves the warm, full sound of The Beatles on vinyl.  It is widely agreed that vinyl sounds way better than mp3’s.  Yet how many songs on vinyl did you listen to while working out at this gym today?

While the music honchos were busy making the anti-mp3 argument, people started digesting music in unprecedented quantities, but the music industry kept fighting the wrong fight.  Then Steve Jobs came along and provided a commercially viable way to feed all those hungry ears, and now Apple is the largest music retailer in the world, selling another 283 songs every nano-second (or something like that).

The EXACT SAME THING is now happening with both e-books and now e-magazines, yet those in charge are busy focusing on the wrong fights.  Publishers aren’t printers.  Printers are printers.  The printing industry should be making full page ads, websites, and videos trying to protect their buggy whips industry.  The publishing industry should have realized months, years, decades ago that they are in the information and content delivery business.  We don’t care how we digest our content.  Just make it easy and we will digest even more!  AND we’ll pay for it!

Everyone loves the feel of books.  Browsing down an aisle.  No one needs to keep making that argument.  (Seriously, you can stop now.  We understand you love smelling your books.)  But reading a book isn’t about holding (or smelling) a book, its about reading a story.  A story that takes your beyond your physical book, not to mention beyond your couch at the same time.  Ask a Kindle owner, they will tell you they’ve read more stories since they’ve started using their Kindle, just like everyone rediscovered their music collection after they got their iPod and are listening to more music than ever before.  Browsing down an aisle or through a magazine rack is about discovery and serendipity, and Amazon has some pretty great algorithms that makes this process much more efficient, helping us find the perfect book we may have never found on our own, and helping us know instantly through countless reviews if it is worth reading.  And the iPad makes browsing quicker, easier, and more colorful than ever before.  Yes, just like the warm sound of a vinyl LP, the book aisle will inevitably be lost.  (Don’t worry, after all the bookstores are gone, you will still be able to browse down the aisles of the library for another 12 years until they finally realize no one is coming in the door and its time to give up the “feel of books” argument.)  But you may find that what we are left with is both more convenient and more effective at providing you with what you are actually seeking – good content, good stories that strongly appeal to you.  If you want to “browse,” to occupy your time, eyes, and mind, perhaps try a gallery or art museum instead.

Can you think of a better way to pass spare moments than a magazine?  We already do it at the doctor’s office, the airport, the DMV.  But what if you are in a place without magazines and/ or forgot to bring yours along, or already finished the one you are carrying?  Do you see how easy it will be when EVERYONE has their iPad or Kindle Fire (immediately after Holidays 2011 when everyone gets one or the other), pulls it out, and skims through the latest editions of their favorite magazine.  We can all can carry 26 issues of 6 different magazines with us everywhere we go so that we can catch up on them.  Have you seen the iCloud?  It will automatically push you the latest issue – no effort!

Magazine vendors at airports realize something:  put the magazines where the bored readers are.  Now we have our magazine stand with us everywhere we go, and can buy a magazine at the slightest whim.  Why is it so hard for the publisher of Time to figure out?  And the publishers of Esquire, Rolling Stone, People, Car and Driver, Glamour, Architectural Digest, Vanity Fair, The New Yorker…?  Aren’t these people more insightful than that?  Shouldn’t it be the airport magazine kiosk owners running ad campaigns and making videos imploring us to keep buying print magazines?

Publishers, do you see that this all means $$$?  $$$ for you unless you keep wasting your time making videos about “the Power of Print” while the bright minds at Apple figure out how to make all the e-magazine revenue for themselves through iBooks and iTunes.

It wouldn’t be such a big deal if the top publishers’ near-sightedness only hurt themselves.  We all love schadenfreude.  But rather than taking the opportunity dropped in their lap by the iPad, and focusing on the path to iPad e-publishing prosperity, their misguided fight may end up hurting many, many others – damaging the careers of reporters, writers, editors, and countless staff.  And yes, photographers too.  The iPad is the savior of publishing, and they are busy arguing that those noisy, smelly Model T’s the Internet isn’t going to kill their reliable and useful buggy whips colorful stacks of paper held together with a staple.

Almost 12 years ago I wrote a similar letter about how retailers were building a wall of sand in a vain attempt to hold back the rush of progress, change, disruption, and opportunity brought on by the Internet.  It is disappointing that so many years and lessons later, some are still trying to build these walls of sand.

Sigh.

Don’t Let the Locations of the AF Points Dictate Your Composition

I began to discuss the autofocus modes of various dSLR cameras in previous posts including Taking Control of Your Canon Autofocus System and Taking Advantage of the Autofocus Systems of the Nikon D5100 and the Nikon D7000

In this post I wish to go into more detail about one of the reasons it is important to take control of your autofocus system, namely not allowing the locations of the AF Points in your viewfinder to dictate your final composition.

As I mentioned in previous autofocus posts, one of the essential steps in taking a successful photo is controlling where the camera focuses.  If you allow the camera to auto focus by choosing its own focus point(s), it typically focuses on the closest object.  This may or may not be what you want to focus on, so you should select where the camera focuses using the Auto Focus Points.  For example, you often want to focus on a subject’s eyes, but if you allow the camera to choose the autofocus point itself, it may select another part of the face, or somewhere else on the body, or even a raised hand that is nearer to the camera than the face to focus most sharply on.

In addition, there are reasons to use the outer focus points and not just focusing with the center AF point and then recomposing.  First, if you are taking several shots of the same subject and framing, you will not have to re-focus with the center point and recompose between each shot.  And by controlling exactly where you focus, you then have greater, more precise control over the use of dramatic depth of field.  Also, if you use the center point and recompose, you have swept the camera in an arc to recompose, and are thus always focusing at a distance behind the subject.  This may not be as noticeable when the subject is further away, but for a close subject – especially when using shallow depth of field – the difference is critical.

One of the additional critical reasons to take control of your autofocus system is so that you don’t let the location of the AF Points dictate your composition. What happens when the subject you want to focus on is not located exactly under one of the AF Points? Even with 9 or 19 or more AF Points to choose from, they will not always be located exactly at or near where you need them to be.  Recomposing or re-framing your shot is often necessary so that you can capture exactly the image you wish to and not one dictated by the locations of the AF Points as you see them in the viewfinder.

Canon 7D 5D mark II 60D T3i 600D autofocus system AF point choose select set setting
Figure 1 – The desired framing and composition of the shot I wish to take, yet no AF Point, including the selected lower right point (the larger point shown in red here) is located exactly at the woman’s head where I wish to focus. (Canon 7D viewfinder shown)

Canon 7D 5D mark II 60D T3i 600D autofocus system AF point choose select set setting
Figure 2 – Image is temporarily framed to place the selected AF Point over the woman’s head, Shutter Button is pressed half-way and held to lock focus at that distance, image is recomposed to the desired framing of previous Figure 1, and Shutter Button is fully pressed to capture the image.

Figure 1 shows the desired framing and composition of the shot I want to take, but the woman is not located under an AF Point. This composition is desired for me because it captures the entire window along with some space around it, as well as some space in front of the woman for her to “walk into” – but not an excessive amount of space. So I manually select the lower right AF Point (using Single-Point AF Mode), temporarily frame the image to place the selected AF Point over her face or head, press and hold the Shutter Button half-way to lock focus at that distance (Figure 2), and see the Focus Confirmation Light illuminate in the viewfinder. I then recompose back to the final framing I want (Figure 1) and press the Shutter Button fully to take the image. Even though the subject is moving, I do not need the sophisticated tracking of AI Servo (Canon) or Continuous Servo (Nikon) Focus Mode to keep her in focus. I can quickly lock focus using One Shot (Canon) or Single Servo (Nikon) Focus Mode, recompose, and take the image without the camera-to-subject focus distance changing significantly.

With the example images above (Figures 1, 2), focusing on the wall would not have been tragic because the distance between the subject and the background is small, and if a medium or narrow aperture such as f/8 or f/16 is used both the wall and the subject may be in acceptable focus. If the background was further away, and/ or a wide aperture such as f/2.8 was used – especially with a telephoto lens, and if the image was enlarged, you would clearly see that the camera focused on the wall and not the woman. Not to mention the fact that the wall is a somewhat consistent area of color and the AF system may have difficulty properly focusing on it. So it is best not to take shortcuts such as focusing on the wall and hoping the subject will also be in focus, because in many other situations you will not have this option. It is best to take the photo properly and to learn and practice the habit of working in the more rigorous manner if you want all your photos to be sharp.

If you would like to learn more about the autofocus systems of your Canon or Nikon dSLR camera, as well as learn to use the other features of your camera including metering modes, Aperture and Shutter priority modes, all the menus and Custom Function settings, and more, have a look at my Full Stop e-book camera guides. In addition to explaining the features and settings, the guides clearly explain when and why to use them in order to capture the images you desire.

Take control of your camera and the images you create!

Learn more about the e-books by clicking on their titles or on the banner below:
Canon 7D Experience
Canon T3i Experience
Your World 60D
T2i Experience.

Nikon D7000 Experience
Nikon D5100 Experience.

full stop dslr photo photography camera manual guide for dummies canon nikon

For those with other cameras, check out my Ten Steps to Better dSLR Photography which also discusses taking advantage of any dSLR camera’s autofocus system.

Was this post helpful?  Please let others know about it by clicking the Facebook or Twitter sharing buttons below, linking to it from your blog or website, or mentioning it on a forum.  Thanks!  Want to help support this blog with no cost or effort?  Simply click on the Amazon, B&H Photo, or Adorama logos on the left side of this page to go to those sites and make your purchases.  They will then give me a little referral bonus!

Taking Control of Your Canon Autofocus System

This article mostly applies to the 9 point autofocus system of the Canon 60D and the Rebels including the T5i / 700D and T4i / EOS 650D (and their predecessors), as well as to the new Canon 6D and its 11 AF points.  The Canon EOS 7D also shares the same Autofocus Modes discussed below, but it adds Autofocus Area Modes to the mix as well as additional Custom Functions affecting the AF system, so I will have to address those additional capabilities in the future (or you can learn all about them now in my Canon 7D Experience e-book).  I have written a separate post that addresses the AF system of the Canon 5D Mark III.

You can learn much more about using these cameras with my Full Stop e-book camera guides for Canon dSLR cameras.

Using Auto Focus
One of the essential steps in taking a successful photo is controlling where the camera focuses.  If you allow the camera to auto focus by choosing its own focus point(s), it typically focuses on the closest object.  This may or may not be what you want to focus on, so you should select where the camera focuses using the Auto Focus Points.  This does not mean you have to manually focus the camera, it means you tell the camera exactly where to autofocus.  For example, you often want to focus on a subject’s eyes, but if you allow the camera to choose the autofocus point itself, it may select another part of the face, or somewhere else on the body, or even a raised hand that is nearer to the camera than the face to focus most sharply on.  If you are capturing an image of a bird in a tree, the camera has no idea you want the autofocus system to zero-in on the bird so that it is in sharp focus and not the branches or leaves near it, or the leaves closest to you.

Autofocus works by looking for contrast, so try to focus (place your AF Point) on a detail with a strong line or strong contrast between light and dark.  It may not be able to focus on a large area of consistent color – such as a white wall or blue sky or even an evenly colored and lit shirt – or on a subject that is too dark.  It can be disrupted by regular patterns or confused when looking through close objects to objects farther away, such as looking through a fence.  And it sometimes fails to work as well in dim light, though the AF-Assist Beam can assist in this situation.  When photographing people, always try to focus somewhere on the face, ideally on the eyes or eyebrows, then recompose the framing of your image if necessary.

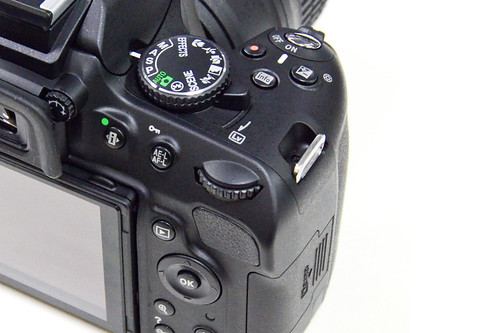
Select an Auto Focus Point, or AF Point, using the Multi-Controller or using the AF Point Selection Button and the Cross Keys (depending on your camera).  If you have a model with the Multi-Controller (such as the 60D with the thumb-pad or the 7D or 5DII with the thumb-joystick), be sure to set the Custom Function setting for AF Point Selection Method so that you can directly change the AF Point without pressing the AF Button first.

Canon 60D T3i 600D autofocus system AF point select choose set setting
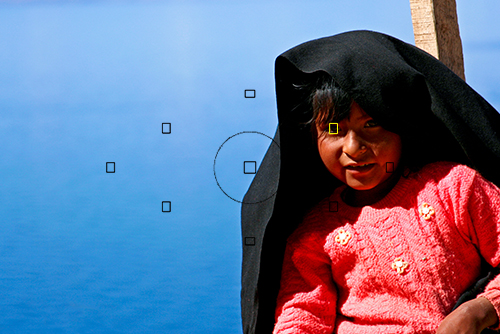
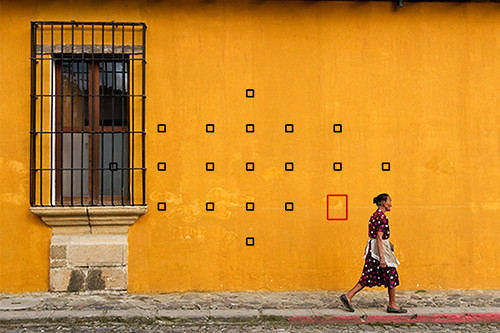
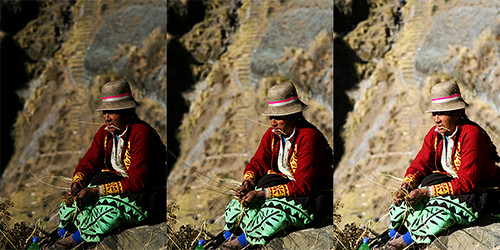
Figure 1 – The selected AF Point is located over the subject’s eye in order to ensure the camera autofocuses where desired.  (Canon 60D viewfinder shown, T3i/600D viewfinder similar)

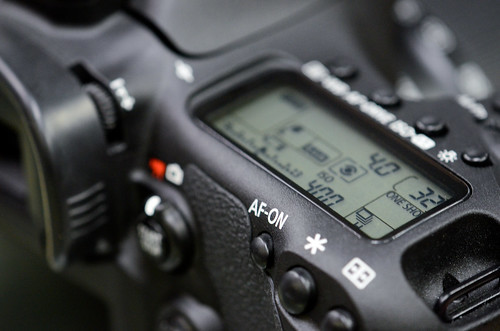
To see how autofocus point selection works, make sure the switch on your lens it set to AF and your Autofocus Mode, as seen on the top LCD Panel or rear LCD screen, is set to One Shot, then:

•    Tap the Shutter Button with a half-press to wake up the camera.
•    Looking through the viewfinder, use the Multi-Controller or Cross Keys to select the focus point that is nearest to where you want to focus.
•    Place that point over your intended subject.
•    Press and hold the Shutter Button halfway down and see that point blink red.  The Focus Confirmation Light should light up in your viewfinder.  You have locked the focus.
•    Keeping the Shutter Button pressed halfway, recompose if necessary, and take the shot by fully pressing the Shutter Button.

There are reasons to use the outer focus points and not just the center one all the time.  First, if you are taking several shots of the same subject and framing, you will not have to re-focus with the center point and recompose between each shot.  And by controlling exactly where you focus, you then have greater, more precise control over the use of dramatic depth of field.  Also, if you use the center point and recompose, you have swept the camera in an arc to recompose, and are thus always focusing at a distance behind the subject (think of an arc that is your focus distance, and the tangent line off that arc that is the focus plane which now runs behind the subject after re-composing).  This may not be as noticeable when the subject is further away, but for a close subject – especially when using shallow depth of field – the difference is critical.

It may sound difficult to select the focus point each time, but it is actually very quickly done and should become instinctive.  You may even start to set your focus point as you approach a scene before even bringing your camera to your eye.

Focus Modes
The 60D and T3i (and 5D/ 5DII and 7D) have different focus modes to choose from, typically depending if your subject is still or moving, or if you wish to track its movement.

One-Shot AF
Use this mode when your subject is still and not going to move, or if your subject is not going to move very much, or if the distance between you and the subject is not going to change between the time you lock focus, recompose, and take the shot.  Lock focus on the subject and recompose if necessary.  This mode can even be used for moving people or objects if you quickly take the shot after establishing or locking focus.

Focus on your subject by pressing the Shutter Button halfway.  The active or selected AF Point will be displayed or will illuminate, and the Focus Confirmation Light at the lower right in the Viewfinder will illuminate as well.  Continue to press the Shutter Button all the way to take the shot.  If you half-press the Shutter Button to lock focus on your subject, the camera will remain focused at that distance as long as you keep half-pressing the Shutter Button.  You can recompose the shot as you wish and then full press the Shutter Button to take the photo.

As just noted, if the Focus Confirmation Light does not light up and the camera does not take the photo, the camera may not be finding enough contrast to focus on, you may be too close to your subject for the lens to focus, or the lighting may be too dim for the AF system to work properly.

However, if you are photographing a subject that is approaching or receding from view at a relatively constant rate, or photographing fast or erratic or unpredictably moving subjects, or photographing sports, action, or wildlife you will usually want to use AI Servo Focus Mode.

Canon 7D 5D mark II 60D T3i 600D autofocus system AF point choose select set setting
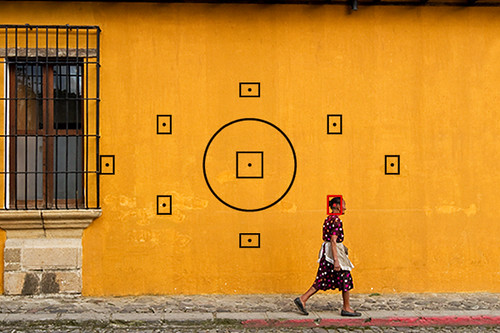
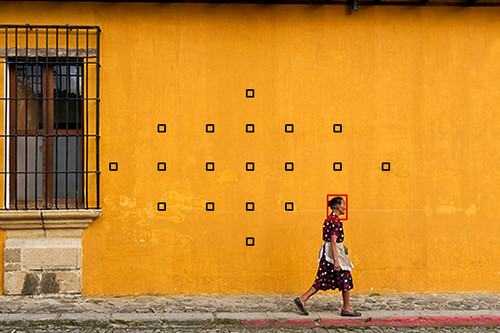
Figure 2 – Use One-Shot AF mode and select your desired AF Point to capture still or moderately moving subjects.  (Canon T3i viewfinder shown – 60D similar)

AI Servo
AI Servo mode is used for tracking and focusing on moving subjects, and is ideal for capturing sports and wildlife including birds.  If the subject is moving towards you or away from you the camera will keep evaluating the focus distance as long as the subject remains under the focus point that was originally active and the Shutter Button is kept half-pressed, and if the subject is moving from side to side or throughout the frame the camera will track it as it passes from one AF Point or Zone to the other ones (if you started tracking with the center AF point on the 60D and T3i or any selected AF point with the 7D).

If the subject is going to be moving across your field of view, set the camera to automatically select the focus point using all the AF points (this is one of the few times you will not be manually selecting the auto focus point), focus on the moving subject with the center focus point, and then as long as the Shutter Button remains half-pressed the camera will track the subject to the other focus points if it moves to them.  Thus when the image is taken, the subject is in focus.  This will even work in conjunction with continuous shooting.  If you keep the Shutter Button fully pressed and continue to take photos, the camera will keep focusing on the moving subject.  As you can imagine, this is ideal for tracking a player running across a field, a dog running toward you, or a bird moving across the fame.  Note that when shooting with Continuous Shooting Drive Mode not every shot may be in sharp focus as the camera sometimes can’t keep up and accurately predict the subject’s speed or location.  But you should be able to capture many sharp images with this technique.  The more sophisticated Canon 7D will allow you to start tracking moving subjects with any selected AF Point and not just the center AF Point.  These are the types of advanced capabilities you are paying for (and should take advantage of!) with a more expensive dSLR.

As you will see, when using AI Servo mode your compositions will be partially dictated by the positions of the autofocus points in your Viewfinder.  The subject needs to be at one of these AF Points in order for the camera to maintain focus on it.  This is why in some situations becoming skilled at quickly using One-Shot AF – even for action scenes – will give you much more ability to control your compositions.

AI Focus
This mode is a hybrid of the two other focus modes.  It starts in One-Shot AF mode then changes to AI Servo mode if your subject starts moving.  Why shouldn’t you use this all the time, then?  Well, it is typically not the best of both worlds.  If you are focusing and then recomposing, as you may often be doing, your movement of the camera may fool it into thinking that the subject is moving and then activate subject tracking AI Servo Mode, and your resulting focus may not be where you intend it to be or may not be as accurate as it could have been with One-Shot AF.  And in AI Focus Mode it may not be as quick to respond to a moving subject as it would in AI Servo Mode.  Typically you know if your subject is still or moving so it is better to select one of the other two AF Modes.  Plus that way you always know which AF Mode you are working in and can either lock focus where you want it or begin tracking a subject without wondering what mode the camera is in and if it will suddenly change.  But there may be situations that call for this combination mode such as a still bird or animal that may start moving unexpectedly, so keep it in mind.

How do you remember which mode is which since the terms “AI Servo” and “AI Focus” tell you nothing that makes sense?  Although I listed them in a different order above to explain them more easily, on your camera they are listed:

ONE SHOT
AI FOCUS
AI SERVO

Remember that One-Shot AF just focuses once and doesn’t change once you lock it in, and AI Servo AF is the other extreme – continuous focus used for moving objects. And AI Focus AF is listed in the middle, between the two, because it is the hybrid, combination of the two.

Checking Focus
You can review your images on the rear LCD Monitor of your camera to try to determine if they are in focus, especially by zooming in as close as possible.  But be aware that this screen has only about one million dots or pixels, while your actual image has about 18 million pixels.  That means that many images will appear to be in proper focus on your LCD screen, but you might discover that the actual images are not really so sharply in focus.

Before continuing, I want to mention that much of this text is excerpted from my dSLR guides for the Canon EOS 6D, Canon 70D, Rebel T5i / EOS 700D, Rebel T4i / EOS 650D, and the Canon EOS 7D. If you would like to learn more about the autofocus systems as well as all the other features of your camera including metering modes, Aperture and Shutter priority modes (Av and Tv), all the menus and Custom Function settings, and more, have a look at my Full Stop e-book camera guides. In addition to explaining the features and settings, the guides clearly explain when and why to use them in order to capture the images you desire.

Take control of your camera and the images you create!

Learn more about the e-books by clicking on the banner below:

full stop dslr photo photography camera manual guide for dummies canon nikon


To learn about another important reason why you need to take control of your autofocus system, and why the two example photos above actually weren’t my final compositions, see the next post:

Don’t Let the Locations of the AF Points Dictate Your Composition

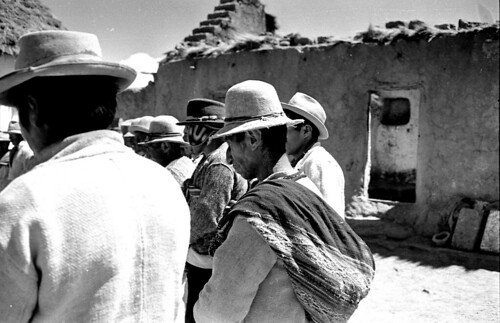
What do you do when, with your desired framing, your subject is not located exactly under or near an AF point?  Even with the 19 or 39 points of an advanced Canon 7D or Nikon D7000, this will often be an issue.  For example in Figure 2 above, I actually wish to capture the entire window and more space around it within the image frame, but moving the camera and framing for that composition leaves me with no AF Point at the woman where I wish to focus.  Have a look at the above post to learn why this is an issue and how to resolve it.

Focus and Depth of Field

Many functions of dSLR cameras are related to some degree or another, and Focus and Depth of Field are two of these.  The depth of field, based on your aperture setting (and thus related to exposure…) expands forward and back from your point of focus.  Thus, one important aspect of controlling your depth of field begins with focusing exactly where you want to.  To begin learning more about depth of field, have a look at my post Depth of Field Simplified.

Was this post helpful?  Please let others know about it by clicking the Facebook or Twitter sharing buttons below, linking to it from your blog or website, or mentioning it on a forum.  Thanks!  Want to help support this blog with no cost or effort?  Simply click on the Amazon, B&H Photo, or Adorama logos on the left side of this page to go to those sites and make your purchases.  They will then give me a little referral bonus!

Ten Top Things to do in Cusco that are Not on Your Itinerary…Yet!

Cusco cuzco peru plaza night fountain
Cusco’s Plaza de Armas at night – all photos by the author – www.dojoklo.com

Every visitor to Cusco is likely to tour the Cathedral and a couple major museums, relax in the Plaza de Armas, and marvel at the exotic offerings in the San Pedro food market.  However there are additional essential sites and experiences that you may not find in your guidebook or that your tour guide might not take you to, which you don’t want to miss.  Most of these lie along or mere steps off the tourist trail, and with a little planning and effort can be fit into any itinerary.

EATING

All the guide books lists the popular restaurants in Cusco, and there are many worth eating at including Pachapapa for its distinct Peruvian dishes with international flair or the MAP Cafe for its creative Andean cuisine in a unique museum setting.  But the real local food is found with the local shops and vendors.

1. Picarones – An incredibly tasty snack that is a favorite among locals are Picarones, deep-fried pumpkin or squash donuts.  Although delicious by themselves, they are irresistible when covered with the syrup or molasses they are always paired with.  Shops and vendors selling picarones can be found throughout Cusco, so ask your hotel desk clerk for their favorite nearby spot.  Be sure to bring your own handi-wipes along because after eating a couple your fingers will be hopelessly sticky, and the damp cloths they provide are already too well used to work very well!

cusco cuzco peru picarones
Deep-fried and delicious Picarones

2. Tamales – As with picarones, the best tamales are found at the local shops and vendors.  As you walk around the city keep your ears open to the cry of “Tamales, Tamales!” and look for a woman with a large basket in her arms or at her feet.  There was one very popular vendor often under the colonnade at the north corner of the main Palza near Gatos market, though I don’t know if she is still there.  Be sure to try the “dulces” or sweet ones as well as the “pollo” variety that holds a tiny bit of chicken and an olive in the center.

3.  Cafe Restaurant Aldea Yanapay – Although there are many good restaurants to choose from in town, only a couple help to support social programs such as disadvantage children or orphan girls.  And only one is decorated like the inside of a dreaming child’s head!  This wonderful café-restaurant is run by the founder of Aldea Yanapay, a volunteer organization with various programs for the underprivileged children of Cusco, and all proceeds from the café benefit these programs.  Sit on pillows, play games, hold a stuffed animal, wear a silly hat, take in a playful performance, or just sit at a table and enjoy the delicious French toast, lunch and dinner entrees, or the best giant hot chocolate in town.  Ruinas 415, second floor

Aldea Yanapay Cafe Restaurant Cusco Cuzco Peru
Interior of Cafe Yanapay

Another restaurant associated with a non-profit is the Panaderia El Buen Pastor bakery and coffeeshop.  Enjoy a morning coffee while watching the racks emerge from the ovens with delicious pastries, sweets, and empanadas.  You will have to keep coming back each morning in order to try all the appetizing looking offerings.  Proceeds from this cafe benefit a home for orphan girls.  Cuesta San Blas 579 – San Blas

4. Brick Oven Pizza – While you’ve probably had great brick oven pizza, you’ve likely never watched it being made with such flair, while listening to reggae, and being warmed by the brick oven on a chilly Cusco evening.  Toss on a couple spoonfuls of the spicy aji sauce, and you won’t be able to understand how you ever ate pizza without it.  Maruri near San Agustin

CULTURE

After being fortified with Cusco’s great food, venture off to explore its cultural offerings.  Of course there are the Cathedral and Compañia facing the Plaza, the Inca walls and Coricancha Temple of the Sun, and the art and history museums.  But there are lesser known and equally as fascinating museums.

5. Andean Children’s Art Museum – Museo de Arte de Ninos Andinos, Irq’i Yachay – This unique museum displays the artwork of Quechua children from remote Andean communities.  A non-profit organization traveled to these communities to introduce the children to art and materials they had never had the opportunity to use, and the children responded with incredible creations portraying their lives, myths, dreams, and themselves.  An introductory short movie of the project and a free guided tour are provided in Spanish, and donations are encouraged.  Calle Teatro 344

Cusco Cuzco Peru Andean Children's Art Museum Museo de Arte de Ninos Andinos Irq’i Yachay Quechua Andes Andean museum kids children
Detail of a child’s painting in the Andean Children’s Art Museum

A similarly interesting local museum is the Taki Andean Music Museum, which not only exhibits Andean and Amazonian musical instruments, but is also a cultural center that organizes musical and cultural events, gatherings, workshops, sessions, lectures, concerts, teaches children to play, as well as promotes and supports traditional music groups.  Calle Hatunrumiyoc 487 #5

SHOPPING

Of course you are going to want to bring home souvenirs to remember your experiences and unique gifts for your friends and family.  Instead of grabbing the mass produced trinkets sold by every vendor and every shop, why not seek out quality handicrafts that better represents the local culture while also directly supporting local artisans and their cultural traditions.

6. Center for Traditional Textiles – A non-profit organization founded this center to preserve and continue traditional weaving, and to teach and support this work in numerous communities around Cusco.  There is a very nice museum of the history and traditions of Andean textiles, and always a live weaving demonstration in the store.  The beautiful items are more pricey than the tourist versions at stores and markets, but are truly hand crafted and naturally dyed.  Avenida el Sol 603

7.  Museo Taller Hilario Mendivil – This museum, workshop, and shop of the notable local artisan Mendivil family is famous for the unique long-necked religious figures, dressed with indigenous influences.  The space also contains a small museum of historic pieces, and the proprietress may give you a tour (in Spanish).  Numerous beautiful works of of both the “long-neck” style as well as several other styles are available for purchase.  Plazoleta San Blas (along the right side as you stand in the plaza and face the fountain)

Cusco Suzco Mendivil sargento Peru dance
My Sargento figure from the Mendivil Workshop

8. Local Food Markets – Venture beyond the covered San Pedro market to the open street markets and local covered food markets in the areas behind the main market.  Ask the vendors about exotic fruits or animal parts that you can’t quite identify, and try some such as the delicious cherimoya (or custard apple) and the maracuya (or passion fruit).  In all markets, be aware for pick-pockets and be very careful with all belongings – carry your bags in front and go with empty pockets.

Cusco Cuzco Peru market meat cow beef tongue
Various tasty cow parts at a Cusco market

EXPERIENCES

Travel isn’t just about seeing sights and eating food.  Some of your strongest and fondest memories may come from the unique experiences you can only undertake in a foreign place.  Strolling through a local market, looking behind the scenes to gain more insight into daily life, and interacting with vendors and shopkeepers can all provide these types of experiences.  There are other opportunities to take advantage of in Cusco:

9. Volunteering – It sometimes seems that Cusco may have more NGO’s per capita than any other other city, particularly any tourist-oriented city.  But this is due to real needs brought about by the inequities and social conditions that are common to many areas of Peru.  Find an NGO (non-profit organization) that serves a need which interests you.  This might include orphans, underprivileged children, single mothers, the environment, disabled children, cultural heritage, or countless other areas and needs.  The South American Explorer’s Club has extensive resources on local volunteer opportunities, and there is also a helpful list of organizations here: http://www.volunteersouthamerica.net/

volunteer aldea yanapay cusco cuzco peru
A student at Aldea Yanapay

I have volunteered for several weeks at Aldea Yanapay, mentioned in the Eating section above.  They run an after-school program and cultural center for the disadvantaged children of Cusco, as well as other projects.  You can take Spanish classes at FairPlay which in itself is an NGO that helps single mothers, and who will also assist you with volunteer placement.

10. Inti Raymi…Up Close – While many visitors to Cusco in June have the opportunity to experience the Inti Raymi Inca sun festival, those who make an extra effort can see more of the events from close-up.  The festival starts at Coricancha, the original Inca temple of the sun.  Arrive several hours early and you can grab a front-row spot near where the Inca King – Sapa Inca – greets the morning sun.  Locate your self at the top of the hill near the curving Inca wall that now forms the base of the Santo Domingo church, so that you can view the Sapa Inca atop that location and the royal court as they stand among the terraces.  Immediately after the ceremony, run just up the street to near the entrance of the church, where the procession will emerge, so that you have an up-close view of the Inca, his court, and the entire procession as they start to make their way to the Plaza de Armas.  Be sure to orient yourself so that you are in the best position for photos, where the light hits the subjects and you are not facing into the sun if possible.

Inti Raymi Inca king Sapa Inca sun festival Coricancha
The Sapa Inca greeting the sun at Coricancha

Inti Raymi Cusco Cuzco Peru Coricancha
A Ñusta (Inca Princess) in the procession leaving Coricancha

I have put together a list of some of my favorite additional places to visit in Cusco, including restaurants, shops, and practical resources such as banks.  You can view this list of Cusco Places to Visit here:  http://www.dojoklo.com/writing/cuscoplacestovisit.pdf  Be sure to do your research and plan your visit to Cusco so that you can fully take advantage of all that it offers.

Want to learn how to take better travel photos on your trip to Peru, such as the ones highlighted in my Peru and Dance photo galleries shown here?  Have a look at my blog posts about Photography Technique or my latest e-book Ten Steps to Better dSLR Photography:

Why “How it Feels” is not a Valid Criterion for Choosing a dSLR

Despite what you may read on countless forums, the “feel” of a dSLR camera is not a valid criterion for selecting one model over another.  At least not without some further explanation of what “feel” and dSLR camera ergonomics entails.

canon nikon ergonomics feel dslr digital slr camera photography

I myself have been guilty of taking the easy road and suggesting to someone, who is trying to decide between a couple models, to go to a camera store and “see how they feel in your hands.”  However, I’ve recently concluded that this statement alone is vague and imprecise at best and more likely potentially dangerously misleading.  And I’ve always contended that this “feel” criterion is secondary to much more important factors. 

First when choosing a camera, one must determine their current and projected needs.  I go into much more detail about this in my earlier post How to Choose a New dSLR Camera (which is thankfully free of the term “feel”).  This involves not just looking at all the new and exciting features and trying to guess if you will need and use them, but rather evaluating what and how you photograph, what features and capabilities you thus need in your camera, then finding the models that fit these needs.  Since cameras boast more advanced controls, features, and capabilities as they move up the line-up (Canon T3i vs Canon 60D vs Canon 7D or Nikon D7000 vs D5100 vs D3100) this will help you narrow down the decision.  The “feel” or ergonomics should definitely not be a deciding factor at this stage.

There are many important differences between an entry level camera and a mid-level camera as far as controls, features, more sophisticated autofocus system, weather proofing, durability, etc., and the fact that one is smaller and lighter than the other is a result of these differences, NOT a feature to be compared.  To take “feel” into account at this point is like someone buying a truck who needs a full-size bed to haul the maximum amount of mulch, but then says, “yeah, but the light-duty truck is smaller so I can park it easier, so I think it ‘drives’ better.”  They wanted a truck to fulfill their needs, yet they decided on another based on the wrong criteria.  No one who needs the full frame sensor, high ISO capabilities, and durability of a Canon 5D Mk II decides instead to get a T3i just because the T3i is lighter to carry around their neck at a wedding all day and “feels” 10x more comfortable in their small hands.

Once you have successfully determined which level camera fits your needs, then you may have narrowed your choices down to the comparable Canon and Nikon models that likely share similar features, such as the Nikon D5100 vs the Canon T3i.  This is where the “feel” argument often comes in.  At this point I will grudgingly allow ergonomics into the picture as one of the deciding factors – but not without further explanation.  What is the difference between “feel” and actual ergonomics?  And what exactly does that mean, the “feel of the camera in your hands?”  For me, initially, before I actually put some thought into it, and for many other people I image, it means just that.  You pick up a D5100 and check out the weight, balance (with the kit lens attached), size of the grip (does your pinky fall off the bottom?), texture of the grip materials (ohh, bumpy!), put it up to your eye and perhaps take a shot.  Then you pick up a T3i (600D) and follow the same procedure.  Some people may prefer the body that is slightly smaller, or the one that is larger – depending on their hand size, and many would prefer a body that was lighter if there was a noticeable difference in weight.  But picking a camera up and holding it in the store is not the same as using it. How it initially feels will likely not be a true indication of how it feels when operating it and using its controls.  It is not a meaningful test of “feel” or ergonomics.

This is especially true for a new dSLR user who has never actually used one for real life shooting.  They don’t yet know how it will feel when using a dSLR because they have yet to do that.  “Feel” needs to take into account more than picking up the camera with the kit lens and holding it to the eye:

  • Ergonomics involves the placements of the buttons and controls that you will access constantly while shooting – the location of the autofocus point selection arrows or thumb joystick, the location and orientation of the main dial that will be used constantly to set aperture or shutter speed.  This is actually a significant ergonomic difference between a Canon and a Nikon that I have never once seen mentioned in a forum about “feel” and if any ergonomic criterion is truly important, I would say it is this one.  I find the top location/ orientation of the Canon dial coupled with the large rear dial a natural, ergonomic joy.  I find the horizontally orientated front and rear dials of Nikons uncomfortable and aggravating to my tenosynovitis.  So until a dSLR user knows where their fingers will be moving and what controls they will want to access with the camera held to their eye, then how can they fully judge “feel?”
  • The ergonomics of a camera body changes, sometimes dramatically, depending on which lens is attached and used.  Most demo cameras in the shop have the small, lightweight 18-55mm kit lens attached.  If this is the lens you will use all the time for the remainder of your dSLR shooting life, then this can be a valid test (see Why You Shouldn’t Buy the Kit Lens).  If not, you should definitely try it out with a couple additional lenses such as a larger telephoto.  Not only will most other lenses be larger and heavier than the kit lens, but the camera will likely be held differently when using them.  If you are a new user, then you may not yet know which lenses you will want and use in the future.  While a small, light, entry-level dSLR body feels great with the kits lens, it can become nearly unusable with a high quality, large, heavy lens.  As one forum contributor said,

“…my 450D felt great with the kit lens, but almost unholdable with a 100-400 and ultimately I got a battery grip for it which helped a lot with that lens. I will add that at the time I bought my 450D I felt it against a 40D and preferred the lightness and size of the 450D.  Had I known then what lie ahead I would have got the 40D.”

Although the 100-400 is a huge lens that many will never buy, the same weight, size, and balance issues hold true for other more “basic” high-quality lenses such as the Canon 24-105mm f/4L or the Canon 24-70mm f/2.8L, or even many non-L larger telephoto lenses.  Plus what about putting an optional external flash on top?  That will completely change the balance of any camera.

  • While everyone’s hands are different, etc, I find it hard to believe that Canon and Nikon or the other major manufacturers make a completely un-ergonomic camera for the average range of hands.  I mean other than that Nikon model with the glass shards embedded in the grip and the Canon with the 15 kilo battery.  Sure some can complain about little quirks and button placements, and some cameras are smaller and some are larger and thus feel different to different sized hands.  But remember a dSLR camera is a tool, and I refer you back up to the “full-size bed truck” analogy.
  • When you get new glasses or have dental work done, it always feels funny for a couple days. Then you get used to it and don’t notice. When you work with a camera after a bit, I would bet most would experience the same.  As another forum participant noted,

“When I was buying my first DSLR, the 450D felt weird in my hand, exactly the same as every other DSLR in the shop. The reason?  I did not know what’s what, what will I use and have never hold DSLR in my hand before. It was just a foreign object and felt weird. Got used to the DSLR and after a while it felt like an extension of my hand.”

There are good reasons why cameras and controls are designed with their specific curves, button placements, and materials. And even then, some are more careful, precise, and pleasing to the touch because they are on a pro camera catering to exacting needs.  Some are less rigorously-designed compromises to provide functionality at a lower price-point.  The user just may have to adapt a bit to their tool as they learn these reasons through use and experience.

I agree that in the end, some people just find certain cameras too big, too small, too uncomfortable, etc. for their hands.  But I just don’t think “feel” should continue to be Criteria Number One on every “which camera should I get” forum I read.  I personally have used dozens of different dSLRs, I have handled them extensively as a photographer, salesperson, reviewer, and camera guide author. I have yet to find one I can’t or won’t use due to ergonomics.  They are tools, there are reasons each is designed the way it is, and despite any design/ cost compromises each is fully functional.  In my humble opinion, I believe that ergonomics, and especially “feel,” are over-emphasized in these conversations regarding beginners – or anyone – choosing a camera.

Now don’t get me started on the related issue of “which menu system works best for you.” :)  (Come on, you’ve learned to use dozens of different menu systems with your countless software programs, point-and-shoot cameras, DVD player, TV set-up, Tivo, GPS, etc.  I think you can figure out a well designed Canon or Nikon menu.)

But all of this is moot.  In reality, people should choose a camera based on the brand that their brother-in-law once told them was really good because his father’s friend had one back in ’86 and he took really good pictures with it at a wedding once and he had a really big lens so he totally knew everything about cameras.

Understanding and Using Exposure Compensation and Bracketing

One of the key elements for obtaining the proper exposure of your images when working in Aperture Priority or Shutter Priority modes is making use of Exposure Compensation.  Although all the exposure related settings of a dSLR are intimately intertwined (such as aperture, shutter speed, ISO setting plus the exposure metering mode you are using, etc.) and it is challenging to speak of one without addressing the others, I will focus here on exposure compensation and when and how to use it.

The following text is excerpted from my e-book guide Ten Steps to Better dSLR Photography, where you can learn more about exposure compensation plus apertures, shutter speeds, exposure metering modes, composition and more.  Click on the cover at the end of the post to learn more about the guide, preview it, or purchase it.

Why Exposure Compensation is Needed

If you take an image that turns out to be darker or lighter than you desire, based on reviewing the image and/ or its histogram on your rear LCD screen, you can use exposure compensation in the non-Auto shooting modes to “override” the exposure that the camera is selecting, in order to brighten or darken the next image’s exposure.  You may want to do this if you have seen that your highlights have run off the right side of the histogram and been blown-out, resulting in complete loss of detail in those areas of the image.  Consult your manual to determine how to adjust exposure compensation on your specific camera.  With some Canon models, you press the Exposure Compensation [+/-] button and turn the Main Dial.  With other Canon models you use the Quick Control Dial to adjust this setting.  With Nikon, Sony, Pentax, and Olympus models you typically press the Exposure Compensation [+/-] button and turn a dial.  You will then see the exposure compensation amount change in your viewfinder and/ or on the top or rear LCD screen.  If the exposure level indicator in one of these places is not changing, press the shutter button half-way to first wake up the camera, or move/ press the Lock switch/ button near the rear dial on a Canon.

Putting Exposure Compensation to Use

If you have taken a photo that is too dark and you wish to retake the image and make the next exposure of the scene lighter, adjust exposure compensation in the positive (+) direction.  To make the next exposure darker, adjust exposure compensation in the negative (-) direction.  Try changing the Exposure Compensation by perhaps 1/3, 1/2, or 2/3 in the direction you desire, retake the shot, and see if your exposure problem is solved.  Increase or decrease the exposure compensation as needed.  Remember to set the exposure compensation back to zero when you are done with that situation and move on to take different images!  This is one reason why you should check your camera’s settings often – to make sure you haven’t left the camera on the settings from a previous situation.  This can often happen with the ISO setting and exposure compensation setting.  Check your current settings on the top or rear LCD display or in the viewfinder.

To remember how to compensate – which direction to turn the dial – think of the histogram peaks on the graph.  If you wish to shift the peaks to the left, to the darker side, to make the image darker, turn the dial so that the exposure compensation level moves to the negative side (-1, -2, etc.).  If you wish to shift the peaks to the right, to the lighter side, to make the image lighter, turn the dial so that the exposure compensation level moves to the positive side (+1, +2, etc).  Curiously, some cameras put the negative side of the exposure level indicator on the left, and others put it on the right, so look in the manual or viewfinder to see how yours operates.

Bracketing

Exposure compensation can also be used to “bracket” an exposure.  Bracketing is when you take at least three photos of the same scene, one at the “proper” exposure, one under-exposed, and one over-exposed (see the image below).  For example you may take the second and third shot with the exposure compensation set at +1 and then -1.  This is done to ensure that you capture exactly the right exposure you desire.  In the days of film this was a helpful technique, especially for critical situations, since one didn’t have the immediate feedback of the image on an LCD screen and a histogram.  It can still be used today for critical situations or for test shots when determining the right exposure settings.  Digital SLR cameras typically have an auto exposure compensation feature so that this process is more automated.  You set the amount of under- and over-exposure desired (such as +1, -1 or +1 2/3, -1 2/3) and then take three images in a row.  The camera automatically adjusts the exposures for each shot in order to bracket the second and third shots.  If your camera is set on continuous drive mode, you can just hold down the shutter button and the camera will take the three shots in a row.


Weaver Constructing the Keshwa Chaca, Huinchiri, Peru – Three bracketed exposures of the same scene:  the “proper” exposure as determined by the camera (Evaluative metering mode) in the center, under-exposed -2/3 stop on the left, over-exposed +2/3 stop on the right.  The desired exposure, for my eye, lies somewhere between the “proper” exposure and the over-exposure.  With auto exposure bracketing you can often customize the order that the bracketed images are taken, for example proper/under/over or under/proper/over.  In this example they were taken proper/under/over, so they are displayed here in a different order than actually captured.  Center exposure:  Shutter speed 1/1000, aperture f/5.0, ISO 100, focal length 105mm.

Exposure compensation and bracketing are also used in HDR (high dynamic range) photography to take three or five or more photos of the same scene at various exposures.  All the images are then combined by the photographer, using HDR software, into a single image which will contain a much broader dynamic range of light and dark than is possible with a single image.

Beyond Exposure Compensation

As I mentioned at the start, exposure is determined by a number of controls and settings on your dSLR.  If you are consistently taking images that are under- or over-exposed, you may wish to explore the other metering modes, to ensure that the camera is metering your exposures exactly where and how you want.  Have a look at my previous post on Exploring Metering Modes to learn more about this, or have a look at my e-book guide Ten Steps to Better dSLR Photography to learn about all the aspects of exposure and how they relate.


Awesome Apple Icon Photoshop Tutorial

apple icloud icon button dslr tutorial aluminum metal metallic iphoto icamera camera photo

I used this great video tutorial from PhotoGuides (dot) Net to create my shamelessly derivative, Apple-style, aluminum-appearing camera icon/ button, based on the profile of the Canon 7D.  I tweaked several of the numbers and settings shown in the tutorial, and I will include those details here soon…

There are several other Photoshop tutorials on the PhotoGuides site (and on its YouTube channel) that look really good, such as the “glass” app buttons, plus some non-video tutorials such as how to create the Apple-type reflection seen under my camera button.

Below my icon is the real, original Apple iCloud icon, so you can see how accurate this tutorial can be.  But you really have to fiddle with the bevel and embossing settings, and adjust your gradients settings to align the reflective light rays.  I tried to make my light rays relatively close to the original, but you can create any number of rays and align them as desired.

Now if I only had a photography iPhone/ iPad App to go along with my icon… perhaps one based on my Ten Step to Better dSLR Photography e-book!


Two Hot New Releases!

My two latest photography e-book guides, Canon 7D Experience and Ten Steps to Better dSLR Photography are both “Hot New Releases” in the Amazon Kindle Photography Equipment category!

book photography dslr learn guide manual digital slr camera for dummies

Of course, I’m always second fiddle to Bryan Peterson…

Each of these guides can help you to learn more about the functions, settings, and features of your camera and assist you in improving your photography.

Take control of your camera and the images you create!

Please visit my Full Stop e-book site to learn more about my guides, preview them, and purchase them.

Ten Steps to Better dSLR Photography

Ten Steps to Better dSLR Photography is an e-book guide to help digital SLR photographers take control of their camera and the images they create.

tips tricks photography dslr learn use manual instruction tutorial for dummies guide

Capturing great images with your dSLR should not be the occasional result of chance and luck.  By taking control of your camera, its functions, and its settings you can begin to work with consistency and intention and take the photos you desire.

Readers of my popular dSLR camera guides such as Nikon D5100 Experience and Your World 60D have benefited from the clear and concise explanations of digital SLR photography functions and concepts. With Ten Steps to Better dSLR Photography all photographers can learn these essential elements necessary for taking full advantage of a dSLR including how, when and why to use the camera’s various functions and settings.

With this guide you will learn:

  • Controlling Your Autofocus System – focus where you want for sharp photos of still and moving subjects.
  • Understanding Apertures and using Aperture Priority Mode to capture dramatic depth of field.
  • Understanding Shutter Speed and using Shutter Priority Mode to freeze or express action.
  • Choosing the Metering Mode, Adjusting Exposure Compensation, and Using the Histogram for proper exposure in all lighting situations.
  • Determining proper ISO Settings and White Balance Settings.
  • Selecting JPEG or RAW image file format to save your images.
  • Improving Image Composition.
  • The Image Taking Process – a tutorial making use of all the steps learned.
  • …and more!

These are not simply photography “tips and tricks” but rather clear, concise, and useful explanations and examples of the fundamental functions, settings, and concepts of digital SLR photography. This 54 page illustrated PDF guide can help the novice or intermediate photographer better understand their camera and how to use it to its full capabilities to consistently capture better images, whether you shoot with a Canon, Nikon, Pentax, Sony, or Olympus dSLR camera.

Author:  Douglas Klostermann
Format:  PDF – Instant Download
Page Count:  54 pages, illustrated
ISBN:  978-1-4524-4764-3
Price: $8.99 new release sale!  $6.99
secure payment with PayPal or Credit card (via PayPal)
(plus 6.25% sales tax for residents of Massachusetts)

Buy Now with PayPal  or  Buy Now with your Visa/MC


Other versions of Ten Steps to Better dSLR Photography are available:

The Kindle edition is available on Amazon
The Nook version is available at BarnesandNoble.com
The iPad and iBooks version is available through iTunes or through the iBooks App on your iPhone/iPad

Take control of your dSLR camera and the images you create!

.

.

Go Beyond the Manual with my Canon 7D User’s Guide

I have completed a Canon 7D e book user’s guide, Canon 7D Experience – The Still Photographer’s Guide to Operation and Image Creation that goes beyond the EOS 7D manual to help you learn when and why to use the various controls, features, and custom settings of this powerful camera, including the advanced and sophisticated autofocus system and Custom Function settings. Written in the clear and concise manner of all Full Stop guides, Canon 7D Experience can help you learn to use your Canon 7D quickly and competently, to consistently create the types of images you want to capture.

Take control of your camera, the image taking process, and the photos you create!

Canon 7d book manual user guide instruction tutorial firmware 2 v 2.0 for dummies mark mk i ii 1 2 EOS experience

As one Canon user has said about the previous guide:

I don’t know how I could fully take advantage of all the features the camera has to offer without this publication! It’s well-organized, easy to understand, and succinct enough to keep your attention while still containing a wealth of information to get the most out of your camera.”

Price: $12.99 secure payment with PayPal or Credit card (via PayPal)
(plus 6.25% sales tax for residents of Massachusetts)

Buy Now with PayPal or    Buy Now with your Visa/MC

This instant download Canon 7D book is for those who wish to take fuller advantage of the capabilities of their camera and to go beyond Auto and Program modes and shoot competently in Av and Tv modes. To get you started, it includes explanations and recommended settings for all Custom Functions, Menu settings, and Movie Mode settings of the 7D. Aimed towards intermediate photographers, it also covers basic dSLR camera functions and exposure concepts for those new to digital SLR photography, and explains more advanced camera controls and operation, such as taking control of the powerful autofocus system for sharp focus of still or moving subjects, using the various metering modes and exposure compensation for correct exposure of every image, and utilizing dramatic depth of field. This guide builds upon the information provided in the manual and explains essential settings and information to help you get out there shooting in the real world.

This PDF e book can be read on your computer and printed on your printer, or transferred and read on an iPad, Android, or other tablet, Kindle, Nook, or other eReader. You can preview Canon 7D Experience at the following link. The preview shows the Table of Contents and Introduction, a sample 7D Menu Settings page, a sample Custom Functions page, and sample text pages.

http://www.dojoklo.com/Full_Stop/previews/Canon_7D_Experience-Preview.pdf

Canon 7D Experience not only covers the various settings, functions and controls of the Canon 7D, but it also explains when and why to use them for your photography. The guide focuses on still-photography with a brief introduction to the movie menus and settings to get you up and running with video. You will learn:

  • Setting Up Your 7D – All of the EOS 7D Custom Function settings and Menu settings, including movie mode menus, with brief descriptions and recommended settings for practical, everyday use. These settings are a significant part of what makes the 7D such a unique and powerful camera. Set up and customize the advanced features to work best for the way you photograph.
  • Aperture Priority Mode (Av) and Shutter Priority Mode (Tv) – How and when to use them to create dramatic depth of field or to freeze or express motion.
  • Auto Focusing Modes and Drive Modes – The 7D autofocus system is a revolutionary upgrade for Canon dSLR cameras, and taking control of it will enable you to successfully capture more action images. Learn the AF Modes and AF Area Modes, how they differ, how and when to use them to capture sharp images of both still and moving subjects. Also how and when to use focus lock and back-button focusing.
  • Exposure Metering Modes of the Canon 7D – How they differ, how and when to use them for correct exposures in every situation. Also how to make use of exposure lock.
  • Histograms, Exposure Compensation, Bracketing, and White Balance – Understanding and using these features for adjusting to the proper exposure in challenging lighting situations.
  • The Image Taking Process – A descriptive tutorial for using the settings and controls you just learned to take photos.
  • Composition – Brief tips, techniques, and explanations, including the creative use of depth of field.
  • Lenses – Explanation of Canon lenses and notations, and choosing your next lens.
  • Photography Accessories – The most useful accessories for day-to-day and travel photography.
  • Introduction to Video Settings – Some basic settings to get you started.

This digital guide to the Canon 7D is an 80 page, illustrated PDF document that expands upon the information found in the 7D manual, to help one begin to master their dSLR and learn to use the Canon 7D to its full capabilities. It is packed with helpful information applicable to the new and intermediate dSLR photographer – to begin to turn you into an advanced digital photographer!

Author: Douglas Klostermann
Format:
PDF – Instant Download
Page Count:
80 pages, illustrated
ISBN #:  978-1-4524-6479-4
Price: $12.99 secure payment with PayPal or Credit card (via PayPal)
(plus 6.25% sales tax for residents of Massachusetts)

Buy Now with PayPal or Buy Now with your Visa/MC

This PDF version can be:
-Read on your computer
-Printed from your printer
-Read on your Kindle, Nook, or other e-reader
-Read on any tablet, including iPad or iPhone following these instructions on the FAQ page


Other versions of Canon 7D Experience e-book are available:

The Kindle edition is available on Amazon
The Nook edition is available on BarnesandNoble.com
The iPad and iPhone version is available through iTunes or through the iBooks App on your iPhone/iPad.


What Readers Had to Say about Doug’s Previous Canon Guides Your World 60D and T2i Experience:

Essential Companion – Alas, a comprehensive and concise guide for hobbyists who desire to enhance their photography experiences. I highly recommend this guide to anyone who wants to get out of auto mode and learn how to take high-quality photos. It brilliantly explains how to apply advanced techniques and tips, walks you through the daunting task of menu settings, and smoothly guides you through the image-taking process. The instructions and explanations are easy to follow and well organized. The guide is a portable class on digital photography! A must-have if you want to learn how to use your camera to its fullest advantage.
Elizabeth J.

Best Guide to Using a T2i – I don’t know how I could fully take advantage of all the features the T2i has to offer without this publication! It’s well-organized, easy to understand, and succinct enough to keep your attention while still containing a wealth of information, tips and tricks to get the most out of your camera. I’m very happy that I found this guide.
-Nathan K.

A very helpful and clear step-by-step guide: This e-book is a low cost worthwhile investment thanks to your expertise.
-John T.

New E-Book Camera Guide for the Canon 7D

I have completed an e-book camera user’s guide for the Canon EOS 7D called Canon 7D Experience.

Like all my previous Full Stop camera guides, Canon 7D Experience explains not only the features, functions, settings, and controls of the camera, but also – and more importantly – when and why to use them in your photography.  This includes metering modes, aperture and shutter priority modes (Av and Tv), advanced autofocus use, and more.  It also describes all the Menu settings and Custom Function settings – with recommended settings.  The guide also thoroughly explains the versatile and sophisticated autofocus system, which helps to make this such a unique and powerful camera.

Take control of your camera and the images you create!

Click on the cover image below or click here to learn more, preview, and purchase Canon 7D Experience.

Canon 7D EOS firmware 2 v 2.0 book ebook e-book manual how to instruction learn tutorial use tips tricks for dummies

Canon Instant Savings on L Lenses and Speedlites

Are you ready to purchase a nice new Canon L series lens or a Speedlight flash?  Now is the time with their instant savings until Sept. 3, 2011!

Click here to visit Amazon and have a look at these lenses/ Speedlites.  Or please consider using my affiliate links for B&H or Adorama by clicking the icons on the left side of the page.

canon rebate instant save savings l lens speedlite flash speedlight


Canon 5D Mark II vs 5D Mk III

As I recently noted in my post about the eventual release of the 7D Mk II, as an e-book camera guide author, I have to attempt to plan my life and writing schedule around the release of the latest dSLR cameras. And since major camera companies typically give little-to-no advance notice for the announcement then release of a new model, this involves lots of speculation and following of online rumors. And then I subject myself to a few weeks of intense, non-stop research and writing when it is finally announced.

The Canon 5D Mark III has been rumored for imminent release numerous times, including most recently Feb 2011, November 2011, first quarter of 2012, and “any minute now.”  This speculation occurs with every expected new model, so as you can see, there is no telling when it will suddenly be announced.  But based on Canon’s history of model releases, it is sometimes pretty easy to narrow the range down.  For example, the original 5D reigned for 3 years, and then was replaced by the 5D Mark II, which was announced on September 17, 2008.  Add three years to that, and you get an announcement of the Canon 5D Mk III expected in September 2011.  Not so difficult, really.  Except one has to take into account the disruptions to manufacturing and supply caused by the earthquake in Japan, so that could cause a delay of a month or three.  As equally fascinating is the speculation for what features the 5D Mark III will have. Most interestingly, some have wildly suggested that the line will be split in two with a stills version and a video version.  Not likely.  So what is there to improve on this amazing camera?  Well, several of its features can easily be improved, and hopefully there will be a few surprises added.

canon 6d canon 5d mk iii mkiii mk 3 mark 3 mark ii vs compare which one
The Canon 5D Mk II, patiently awaiting its successor, the Canon 5D Mk III – or is it the Canon 6D…

Currently the Canon 5D Mk II offers:

  • 21 MP Full Frame sensor
  • DIGIC 4 processor
  • Full HD video
  • 3.9 frames per second continuous shooting
  • ISO 100 to 6400 (expandable to 25,600)
  • 3” high resolution LCD screen – non-articulating
  • 9 point autofocus system, all cross-type plus 6 assist points
  • 35 zone exposure metering system
  • Magnesium alloy body with weather sealing

Much of this can easily be improved upon, and in fact the current 7D already boasts several upgrades to these features.  The 5D Mark III will obviously take the best of the 7D and improve upon it in some areas.

Canon EOS 5D Mk III predictions:

  • 26 to 28 MP Full Frame sensor
  • Single or Dual DIGIC 5 processors
  • Full HD video at all the frame rates – plus many additional video features and options that videographers have been waiting for or use 3rd party firmware to obtain, but that I don’t know much about since I have yet to enter the video world.  But I can assure you that the 5D Mk III is going to be a videographers dream, perhaps with RAW video.  Perhaps it will even be able to autofocus full time in video mode.
  • 7 frames per second high speed continuous shooting.  I’m not sure of the mechanics of it but it seems that the large mirror flipping up and down is an impediment to a super fast fps, but Canon has done it both on previous film cameras and in the 1D line.  So hopefully it will be significantly higher than the current 3.9fps.  It will definitely boast an improved maximum burst rate (more JPEG or RAW frames captured before the camera pauses to digest them).
  • Ability to customize Continuous Low and High settings so that you can choose your own rates. Please, please, please.
  • ISO 100 to 12,800 or more, and then expandable – while the ISO performance of the 5D MkII is already stellar, the new one will boast even more improved high ISO performance (less noise at high ISOs)
  • 3” very-high resolution LCD screen – Non-articulating?  Articulating?  Touch screen?  It seems that an articulating screen is the way to go for any camera now, but will Canon hold off with putting this on their higher end models?  Touch screen is definitely coming to dSLRs, but will it be on this one?  …maybe, probably not.
  • 19 point (or more) autofocus system, all cross-type, with numerous configurations and customization options, as taken from the 7D – this desperately needs to be improved in the 5D, and the technology is already there in the 7D.  Canon will definitely add the new Autofocus menu system of the new 1D X to make configuring and taking full advantage of the AF system much easier – as opposed to the autofocus menu and C.Fn options on the 7D which make it a bit complicated.
  • Improved 63 zone+ exposure metering system – it will definitely boast an upgraded exposure metering system, perhaps the current 63 zone system, but probably even a bit improved.
  • Magnesium allow body with weather sealing – already has this, not much improvement required.

Additional features:

It will certainly have a several new menu and custom function settings, hopefully including some additional control over Spot, Center-weighted, and Partial metering, like the ability to change the size of the area metered and the ability to link it to the active AF point.  Plus the new Autofocus menu system similar to the 1D X.

Oh yes, and the HDR fans would appreciate more latitude in auto exposure bracketing, such as perhaps 5 exposures over 5 to 9 stops. And maybe some more fluorescent white balance options like Nikon offers.

It will likely and hopefully retain the CF card and the LP-E6 battery.

Built-in GPS or wi-fi?  This will eventually be in all cameras, and maybe this one will have these features.

So, there are my best guesses. Be sure to follow the rumors at Canon Rumors to find out when the 5D Mk III may come out, particularly the 5D Mk III category. And learn about my Canon 7D Mk II predictions in this previous post.

Canon EOS 7D vs. Canon 7D Mk II

As an e-book camera guide author, I have to attempt to plan my life and writing schedule around the release of the latest dSLR cameras.  And since major camera companies typically give little-to-no advance notice for the announcement then release of a new model, this involves lots of speculation and following of online rumors.   And then a few weeks of intense, non-stop research and writing when it is finally announced.

The Canon 7D Mark II has been rumored for imminent release numerous times including Feb 2011, May 2011, November 2011, early 2012, etc.  So as you can see, there is no telling when it will suddenly appear.  The camera was originally announced September 2009, so Sept. 2011 is my best current guess.  Except one has to take into account the disruptions to manufacturing and supply caused by the earthquake in Japan, so that could cause a delay of a month or three.  As equally annoying but fascinating is the speculation for what features the 7D Mark II will have.  Most amusingly, some have wildly suggested that it will be a full frame camera (not likely…but then again, full frame is bound to creep down into the the pro-sumer line at some point, so why not now, why not with the 7D Mk II?).  So what is there to improve on this amazing camera?  (Why is it so amazing?  See my previous post of Why the Canon 7D is a Super Awesome Camera.)

canon 7d mk ii mkii mk 2 mark 2 mark ii vs compare which one
The Canon 7D, patiently awaiting its replacement the EOS 7D Mark II

Currently the Canon 7D offers:

  • 18 MP APS-C sensor
  • Dual DIGIC 4 processors
  • Full HD video at all the frame rates
  • 8 frames per second and 3fps continuous shooting
  • ISO 100 to 6400 (plus 12,800)
  • 3” high resolution LCD screen – non-articulating
  • 19 point autofocus system, all cross-type, with numerous configurations and customization options
  • 63 zone exposure metering system
  • Built in remote flash triggering
  • Magnesium alloy body with weather sealing

While little of this actually needs improvement, Canon is not going to release an new model without some significant improvements (though they have done that before…).  I predict many of the above features will have a small to significant upgrade.

Canon EOS 7D Mk II predictions:

  • 21 to 24 MP APS-C sensor – I’m not sure if Canon can affordably bring together 8fps and a full frame sensor at the same time yet, and if they did, wouldn’t that be the 5D Mk III?
  • Dual DIGIC 5 processors – or perhaps a single powerful processor
  • Full HD video at all the frame rates – plus many additional video features, menus, and options like those currently offered in the 60D, plus some other stuff that videographers like but I don’t know much about since I haven’t entered the video world yet.  Perhaps it will even be able to competently autofocus full time in video mode.
  • 8 frames per second and 3 fps continuous shooting with slightly improved maximum burst rate (more JPEG or RAW frames captured before the camera pauses to digest them) – the high speed of 8fps really doesn’t need to be improved, but the problem is 8fps is often overkill and 3 fps is too slow.  What is needed is a 5 fps option, or better yet, the ability to customize Continuous Low and High settings so that you can choose your own rates.  Please, please, please.
  • ISO 100 to 12,800 or more, and then some – and improved high ISO performance (less noise at high ISOs)
  • 3” high resolution LCD screen – non-articulating – touch screen? While many might want an articulating screen, it would really mess up the great button layout on the rear of the camera.  Maybe they will come up with a new type of articulation that maintains the basic button layout.  Touch screen is definitely coming to dSLRs, but will it be on this one…maybe, but Canon barely uses touch screens with its point and shoots yet so they may hold off for a bit and introduce it in their T3i successor.
  • 19 point autofocus system, all cross-type, with numerous configurations and customization options – this doesn’t really need to be improved, though they could always add a few more AF points and perhaps some additional manners of customizing their use.
  • Improved exposure metering system – it will likely boast an upgraded exposure metering system from the current 63 zone system
  • Built in remote flash triggering – already pretty full-featured
  • Magnesium allow body with weather sealing – already about the best it could be

Additional features:

It will certainly have a couple new menu and custom function settings, hopefully including some additional control over Spot, Center-weighted, and Partial metering, like the ability to change the size of the area metered and the ability to link it to the active AF point.

Oh yes, and the HDR fans would appreciate more latitude in auto exposure bracketing, such as perhaps 5 exposures over 5 to 7 stops.  And maybe some more fluorescent white balance options like Nikon offers.

It will likely and hopefully retain the CF card and the LP-E6 battery.

So, there are my best guesses.  Have a look at the Canon 7D on Amazon here.

As mentioned above, I have written an e-book user’s guide to the 7D called Canon 7D Experience.  It will help you take control of this powerful and customizable camera and the images you create!  You can learn much more about it here.
Canon 7D EOS book e book ebook guide manual tutorial how to instruction for dummies 7d mark i mk i

Be sure to follow the rumors at Canon Rumors to find out when the 7D Mk II may come out, particularly the 7D Mk II and 5D Mk III categories (where some of the 7D MkII news is hidden).  And learn about my Canon 5D Mk III predictions in this post.

Exploring the Andes

My lists of Peru and Cusco resources later in the post, click here: Peru – Cusco Resources

There are a couple Peruvian / Andean related books that have recently been published and which I both just finished reading:  the wonderfully woven travel stories, characters, and histories of Turn Right at Machu Picchu by Mark Adams, and a new print and process photography e-book from Craft and Vision called Andes by Andrew S. Gibson.

In the introduction to Andes, author Andrew Gibson shares that “Travel for many people is an unrealised dream. Things like the business of making a living, relationships and other constraints on finances and time can prevent people from turning dreams into reality. This eBook is for the dreamers, and I hope it inspires you to pick up your camera and go live out a dream or two.”  If after viewing his photographs of the people and places of Peru, Argentina, and Bolivia you aren’t yet fully motivated to undertake a similar journey, then reading Mark Adams’ Turn Right at Machu Picchu might just make up your mind.

A couple years ago I myself “picked up my camera to live out a dream” of exploring and photographing Peru, and to be honest, my life hasn’t been the same since.  The combination of volunteering, traveling, and photographing in Peru was a turning point that led me to seriously pursue photography as a profession, leave the 9 to 5 office life behind, discover the existence of an area of the craft called humanitarian photography, and to recognize and pursue many important but dormant goals in life.  If you read through the history of this blog, you should see that journey unfold.  Both Gibson and Adams pursued their dreams and goals, one through photography and the other through exploring the Inca ruins and history of Peru, and each came out of it with a book full of experiences worth sharing.

In Andes, Andrew Gibson presents the images he created, with both film and digital, on several trips to the Andes regions of Argentina, Peru, and Bolivia over a span of 6 years.  If you are familiar with his previous e-books such as The Magic of Black and White parts 1 to 3, you know he is a master of black and white, and all of the photos in this new book are black and white or toned monochome images.  The images capture the people, places, events, and sweeping landscapes of these regions, and the monochrome helps to express both the timeless nature or appearance of some of these places and their inhabitants, as well as the unique high altitude light of the mountains and altiplano.  At the end of the text, he includes the lens and camera settings details and short descriptions of the circumstances of each (see image below), as well as more detailed stories of his travels.  And for those interested in following in his footsteps, he includes practical advice for traveling and photographing in these countries.

For the first five days only, if you use the promotional code ANDES4 when you checkout, you can get the PDF version of ANDES, The Print & The Process Series for only $4 (or use the code ANDES20 to get 20% off when you buy 5 or more PDF ebooks from the Craft & Vision collection).  These codes are good until 11:59pm PST August 6th, 2011.  Learn more about Andes, Gibson’s other books, and all the Craft and Vision e-books on their website.

Back in 2008 when I was in Cusco, I met a real life explorer named Paolo Greer hanging out in the South American Explorers clubhouse.  He was preparing to publish an important article showing that Hiram Bingham was not the first outsider to “discover” Machu Picchu, and Greer was eager to tell any listener about the maps he uncovered in dusty archives that proved this.  I wrote a blog post about it at the time called The Real Story.  I didn’t think too much of it at the time, and people in Cusco aren’t too interested in Hiram Bingham so it wasn’t a big deal there – as they all know that Machu Picchu was never actually lost (Bingham himself met the farmers who lived ON the site).  But at the same time as I was running into Greer everywhere I went in Cusco, Mark Adams sat in his New York office and read about his findings, and it helped to stir his long-held desire to explore the Inca sites of Peru and re-trace Bingham’s footsteps, which eventually led to his marvelous book Turn Right at Machu Picchu.

Adams proceeded to travel to Cusco, find a dedicated and fascinating but somewhat extreme Aussie guide, and hike to the lesser known but important Inca sites that Bingham sought out as he searched for the last Inca stronghold Vilcabamba – sites like Espiritu Pampa, Choquequirao, and Llactapata.  Even though at first glance this book appears to be of the “desk-jockey heads into the wild, completely unprepared, with a crazy guide…mishaps ensue” genre, I quickly and pleasantly discovered it wasn’t. Adams expertly weaves several related stories together including a history of Hiram Bingham and his expeditions in Peru, the author’s own treks following Bingham’s footsteps, tales of his fascinating and capable Aussie guide, information about his Quechua guides and porters, a bit of Inca history, theories related to Machu Picchu and related sites and those who pursue the theories, and of course some self-depreciating travelogue humor.

After having spent time in and around Cusco and having read countless books on Incas and Machu Picchu, I still came away from this book learning much and having lots to ponder. It is a must-read for anyone who has visited or plans to visit Machu Picchu or hike the Inca Trail (or alternative trails). You will have a much greater appreciation of the Incas’ accomplishments, the hike, and the sites and people you encounter after digesting the information, experiences, and theories in the book.

Since either of these books by themselves should inspire you to want to immediately start packing and head to South America, and since they’ve cause me some intense nostalgia for my trips there, I’d like to also share some photographs from other talented photographers who have visited Peru either recently or decades ago, some of my Peru photos, and a couple of my resources for visiting Peru such as my recommended sites, stores, and restaurants in Cusco and my exhaustive list of Peru related books, movies, and resources.

When I was in Cusco in 2008 I met a young student and photographer named Peter Martin.  When I returned home and viewed his photos, I was fascinated at how we viewed and photographed the same country in such different ways.  I always zoomed in on the people, dances, and details while he captured more of the experience of “being there” in the moment or in a specific place.  Here are a couple examples, plus a link to more of them:


Peter Martin


Peter Martin

More Peru photos by Peter Martin: http://www.flickr.com/photos/peterfmartin/sets/72157606934173170/detail/

A couple years ago I also came across an amazing collection of photos taken by John Tucker when he was a Peace Corp volunteer in Peru in the late 1960’s.  His photos capture the out of the way places and people that most tourists to Peru still never get a chance to see, and some of these places and outfits would appear unchanged in those remote places today.  Tucker has a photographic sensibility that reminds me of Robert Frank and his powerful and somewhat similar images of Peru from the late 1940’s, as seen in his book Peru:  Photographs.

Like the Robert Frank photos, Tucker’s photos capture the indigenous people plus a strong sense of the communities, land, and environment where they lived and worked. Both photographers create a true connection to the place for the viewer.


John Tucker


John Tucker

More Peru photos by John Tucker:  http://www.flickr.com/photos/30427909@N04/sets/72157608888125285/detail/

Peru – Cusco Resources

Here are my Cusco / Peru resources I referred to:  my list of Cusco Places to Visit and the Fruits of My Labor of all the research and reading I have done on Peru including books, movies, and more.  Both are Word documents that will open up when clicked.  And then some of my Peru images from 2008.

http://www.dojoklo.com/FruitsofMyLabor.doc

http://www.dojoklo.com/CuscoPlacesToVisit.doc

Canon 60D Firmware Update 1.1.0

A firmware update for the Canon 60D has been released, version 1.1.0.  You can download and learn how to install it here:

According to Canon, Firmware Version 1.1.0 incorporates the following fixes and improvements:
1. Fixes a phenomenon where the wireless built-in flash settings are reset to defaults when the battery is removed from the camera.
2. Fixes an intermittent phenomenon where image-rotation information is not recognized correctly when shooting with the camera in the vertical position depending on the timing of the shutter release.

Why You Shouldn’t E-Publish on Google Books

It was recently announced that the Harry Potter books will finally be made available in e-book versions, and offered in an arrangement with Google Books.

While this option will provide e-book formats for virtually every e-reader out there, I find this choice for the e-book platform incredibly disappointing due to Google’s unfavorable treatment of all other, independent e-book publishers.  Google Books has, by far, the worse royalty rates of any major site.  They assure you the author receives the majority of revenues.  Yes:  52% and a whopping $100 minimum payout.  Amazon and Barnes and Noble offer 70% and 65% royalties respectively, and a small minimum payout amount, if any.

Google also gives authors no control over previews and by default display an excessive 20% of your content.   The 20% will be the first 20% (plus front and back covers).  For some e-books, it may serve to get the reader interested and they will be compelled to purchase the entire book.  But for other types, this may show too much important content that you don’t wish to share for free.

And the real kicker:  although Google Previews provides purchasing links to your e-book listing on your website, Amazon, Barnes and Noble, and others, you have no control over these links other than your own, and unfortunately they probably won’t work.  As Google explains, they convert your 13 digit ISBN to a 10 digit ISBN, and then use that to locate your book on the retail sites.  But Amazon and Barnes and Noble use unique identifiers anyway and not either ISBN, so your book is not correctly linked to.  Although the issue is known by Google, they choose to not fix it nor manually correct the links.

With other cooperative and responsive major retailers available, this is one more reason that I choose not to use Google Previews and Google eBooks (beyond research purposes for writing my latest e-book).

Learn more about how to create, publish, market and sell an e-book with my e-book about e-books, called The E-Book Handbook.

The E-Book Handbook e book ebook how to create format publish market sell Amazon Kindle Nook iPad for dummies


Publish Your E-Book at Over 20 Sites and Publishers

I came across an e-book service that promises to distribute your e-book to 25 stores, all for a reasonable price of under $50.  While that is a great price for that service due to the time and careful effort that must be put into the process of uploading and entering information to several sites, you should also know that you can do it yourself, in an evening, for free.  My new e-book guide to creating, publishing, marketing, and selling e-books called The E-Book Handbook explains exactly how to publish yourself to all the same sites.

The E-Book Handbook e book ebook how to create format publish market sell Amazon Kindle Nook iPad for dummies

One doesn’t actually have to individually upload the text and info to 25 sites, but rather to just a few and then they distribute your e-book to the other sites.  Once your e-book is complete and properly formatted for the various sites and e-readers like the Kindle and Nook, this publishing process merely involves typing in all your info, adding a description that you will use for all the sites, and uploading your cover and e-book document.  It is a simple step-by-step process that the publishing sites all walk you through pretty well, especially Amazon’s KDP and Barnes and Noble’s PubIt (now Nook Press).  But there are a few additional steps and some follow through, such as getting into Smashword’s Premium Catalog, that you need to be aware of.  And knowing to use Amazon’s Author Central to turn your unformatted e-book description into a nicer formatted description is an example of one of the important tips you might not realize (and that you can learn about in my e-book!).

But don’t be mislead into thinking that getting into 25 stores will exponentially increase your sales and you will become an instant e-book success.  Your goal may be to sell a reasonable 5 books per month at most of the sites for a total of over 100 a month, but the reality is:  all your sales are likely to come from 3 sites, and most of them in the US.  While Smashwords distributes your book to Diesel and Sony, plus to several sites for Kobo and Apple in multiple countries, you will likely achieve few-to-no sales on 80% of those sites.  Hey look, its the 80-20 rule!  The Pareto principle – 80% of your results come from 20% of your effort.  This turns out to be exactly true with e-book sales, according to my experience.

I have sold over 4,500 e-book camera guides in less than 9 months so far, and the combined number of sales from Sony, Diesel, Kobo’s US and 7 international stores: ZERO.  (2013 edit – Kobo sales have increased to about the same level as B&N sales each month. That being said, B&N sales have steadily dropped over the past year, as I suppose people are hesitant to invest in the Nook reader). Sales from Smashwords: not enough to make it worthwhile (4 per month) to undergo their stringent formatting rules and fickle conversion meatgrinder – except that they distribute to Apple.  And due to the iPad and iPhone I believe selling through Apple is a major part of the future of e-books and thus critical.  But as soon as I can distribute to Apple on my own or through someone else, it’s good-bye Smashwords. And come to think of it, it’s been months since I submitted some of the books to Smashwords and they are still nowhere to be found on Sony or Kobo. (2013 edit – You can now easily publish directly to Apple and Kobo, so I stopped publishing on Smashwords and never looked back.)   Submit directly to Amazon or Barnes and Noble (2013-and now Kobo) and your e-books are up for sale in 1 to 3 days. (2013-With Apple, it takes a week or more for the book to be approved and up for sale)

So you really just need to focus on Amazon, Barnes and Noble, (2013: and Kobo, and Apple) and then Smashwords for getting to Apple (plus your own website and blog) to make 100% of your sales.  Mostly really just Amazon and Apple.  I would barely lose any sales if I just used these four sites plus my sites.  Here is a handy chart from my e-book guide The E-Book Handbook to demonstrate this fact:

ebook e book sales distribution apple amazon barnes and noble smashwords nook kindle ipad e-reader
My e-book sales, in terms of percentage of “units” sold, at each of the sites where they are available. (2013-Apple sales have increased to perhaps 3x the B&N sales shown here, and Kobo sales are similar to the B&N level.)