Which Canon dSLR is Right for You?

In a previous post I wrote an in-depth comparison of the dSLR cameras in the current Canon line-up, the Canon 7D vs 60D vs T3i / 600D.  To sum up that practical, subjective comparison, here is a brief and somewhat serious synopsis to help you make your camera decision based on your photography experience and needs:

Canon Rebel T3i EOS 600D vs 60D vs 7D vs T2i
Canon Rebel T2i, T3i, 60D, and 7D – photo by author at Newtonville Camera

Get a Canon 600D / Rebel T3i (or older Canon 550D / Rebel T2i) if you are new to photography or to digital SLR photography, or want to upgrade from an older Rebel because you want higher image quality and more mega-pixels (or HD video). If you have been happy with the features and controls of your previous dSLR camera and have not discovered the need, in your extensive use of it, for any specific additional features, there is no need to look beyond the T3i / 600D. See the T3i on Amazon.

Get a Canon 60D if you have outgrown the capabilities of an older Rebel like an XTi or T1i due to your greater experience and more demanding shooting needs which require more direct or sophisticated controls, faster shooting speed, more precise autofocus system, and more complex customization options. Or you have been pretty pleased with your 20D or 40D and its features but wish to upgrade for the increased image quality and megapixels (or HD video). And/ or you need a more rugged camera for your frequent and demanding shooting and off-the-beaten-path traveling needs. Or if you need the increased 5.3 frames per second continuous rate to shoot sports or action. Or you really like swiveling LCD screens (the T3i has this too). If you typically shoot on Auto or Program mode, you probably do not need a 60D. If you do not manually select your own focus point and have never used exposure compensation you probably do not need a 60D. If you have never used the AE-Lock [*] button to lock exposure you most likely do not need a 60D. If you don’t understand the relationship between aperture, shutter speed and ISO you may not really need a 60D. Or unless you plan to dedicate yourself to learning this camera and the principles of SLR photography and grow into this more advanced camera, consider saving the money or using it towards a better lens. See the 60D on Amazon.

Get a Canon 7D if you have extensive experience with a Rebel like an XTi or T1i (also called the xxxD series like the 350D or 500D) or with an older xxD series (20D, 40D) camera, and you know and understand most of the 7D’s controls and advanced custom features, and you specifically need some of them for your demanding shooting needs. If you haven’t passed the above “criteria” for a 60D, you most likely really don’t need a 7D. If you have never used Av aperture priority mode or M manual mode, you should probably gain more dSLR experience before investing in a 7D. If you have never used autofocus tracking settings to track a moving subject across your frame and worried how an interfering object would affect your focus you don’t need the sophisticated AF system of the 7D. If you have never used spot metering to determine a critical exposure level or experimented with back-button focusing you probably will do just fine with a camera less advanced and less expensive than the 7D. Or unless you plan to dedicate yourself to learning this camera and the principles of SLR photography and grow into this very advanced camera, consider saving the money or using it towards a better lens. However, if you often need to take 126 consecutive photos at the rate of 8 frames per second, you do need the 7D. Immediately. Even if you just sometimes need that. Totally worth it. That’s 15.75 seconds of continuous shooting. Who doesn’t need that? You’d make Eadweard Muybridge proud. See the 7D on Amazon.

(Please note, the T3i/600D, T2i/550D, 60D and 7D all have most of these advanced features I just listed: manually selected focus points, exposure compensation, AE-Lock, auto-focus tracking, spot metering, and back-button focusing. All of these cameras are fully capable of advanced dSLR shooting techniques and are capable of shooting professional quality images. I’m just using the above features as a determination of your experience level and equipment needs.)

The Canon 5D Mark II is in a separate league than the other cameras, being a full frame professional camera, and thus I’m not going to compare it to the others in this context. As I said in a previous post:

If the 5D Mk II fits your expanding and demanding needs as a photographer, you would already pretty much know that you needed a 5D after your extensive time using a Rebel or a 20D, 40D, etc. Otherwise, getting a 5D means most likely you’d be investing in far more camera than you will actually need or use.

If you truly need a 5D MkII, you are most likely already in that phase where you are fully aware that you need it and you are merely saving up and/ or agonizing over when to go ahead and spend (or inform the spouse that you need to spend) that $2500.

If you don’t already know that you need a 5D Mk II and specifically why you need it, you probably don’t need a 5D. Plus, as is often the case, many of those who could really take full advantage of a 5D Mk II are those who can’t afford one. (I’m thinking about the talented photographers I come across on Flickr, etc. who are making amazing images with entry-level Rebels.) Feel free to spend $2,500 on a 5D Mk II if you want, but unless you have extensive experience with photography and with a digital SLR, using a 5D is completely unnecessary and is unlikely to help you take “better” pictures than you will be able to with a T3i/600D. If you don’t already know how to use an advanced dSLR camera and why a photographer needs one, buying a 5D Mk II is sort of like buying a washing machine with the buttons, dials, and writing all in Swahili. You know what a washing machine can do and is supposed to do, and you can sort of figure out the Swahili one. But until you properly learn how to use it, if you start turning the dials and pressing some buttons you could really screw things up. And even though the Swahili buttons all look really cool and impress your friends and the other clothes-washers who see it, and the salesman told you it is a “better” washing machine and has a bigger drum, it probably won’t help you clean your clothes better, especially if you don’t know how to use it. Until you learn how, when, and why to use the controls, features, menus, and custom functions of a 5D Mk II or even a 7D, you may be taking worse pictures! At best you won’t be taking advantage of most of the features and capabilities you paid a lot more for. And besides, the 5D Mk II is becoming old technology. You should wait for the 5D Mark III :) Plus, the large, high resolution sensor of the 5D Mk II pretty much requires that you use Canon’s best L-series lenses, so be sure to take that into account. See the Canon 5D Mk II on Amazon.

Whichever Canon you choose, learn to take control of your camera and the images you create with one of my Full Stop e-book guides!

full stop dslr photo photography camera manual guide for dummies canon nikon


Was this post helpful?  Please let others know about it by clicking the Facebook or Twitter sharing buttons below, linking to it from your blog or website, or mentioning it on a forum.  Thanks! 

Want to help support this blog with no cost or effort?  Simply click on the Amazon and B&H Photo logos on the left side of this page to go to those sites and make your purchases.  They will then give me a little referral bonus!

Why “How it Feels” is not a Valid Criterion for Choosing a dSLR

Despite what you may read on countless forums, the “feel” of a dSLR camera is not a valid criterion for selecting one model over another.  At least not without some further explanation of what “feel” and dSLR camera ergonomics entails.

canon nikon ergonomics feel dslr digital slr camera photography

I myself have been guilty of taking the easy road and suggesting to someone, who is trying to decide between a couple models, to go to a camera store and “see how they feel in your hands.”  However, I’ve recently concluded that this statement alone is vague and imprecise at best and more likely potentially dangerously misleading.  And I’ve always contended that this “feel” criterion is secondary to much more important factors. 

First when choosing a camera, one must determine their current and projected needs.  I go into much more detail about this in my earlier post How to Choose a New dSLR Camera (which is thankfully free of the term “feel”).  This involves not just looking at all the new and exciting features and trying to guess if you will need and use them, but rather evaluating what and how you photograph, what features and capabilities you thus need in your camera, then finding the models that fit these needs.  Since cameras boast more advanced controls, features, and capabilities as they move up the line-up (Canon T3i vs Canon 60D vs Canon 7D or Nikon D7000 vs D5100 vs D3100) this will help you narrow down the decision.  The “feel” or ergonomics should definitely not be a deciding factor at this stage.

There are many important differences between an entry level camera and a mid-level camera as far as controls, features, more sophisticated autofocus system, weather proofing, durability, etc., and the fact that one is smaller and lighter than the other is a result of these differences, NOT a feature to be compared.  To take “feel” into account at this point is like someone buying a truck who needs a full-size bed to haul the maximum amount of mulch, but then says, “yeah, but the light-duty truck is smaller so I can park it easier, so I think it ‘drives’ better.”  They wanted a truck to fulfill their needs, yet they decided on another based on the wrong criteria.  No one who needs the full frame sensor, high ISO capabilities, and durability of a Canon 5D Mk II decides instead to get a T3i just because the T3i is lighter to carry around their neck at a wedding all day and “feels” 10x more comfortable in their small hands.

Once you have successfully determined which level camera fits your needs, then you may have narrowed your choices down to the comparable Canon and Nikon models that likely share similar features, such as the Nikon D5100 vs the Canon T3i.  This is where the “feel” argument often comes in.  At this point I will grudgingly allow ergonomics into the picture as one of the deciding factors – but not without further explanation.  What is the difference between “feel” and actual ergonomics?  And what exactly does that mean, the “feel of the camera in your hands?”  For me, initially, before I actually put some thought into it, and for many other people I image, it means just that.  You pick up a D5100 and check out the weight, balance (with the kit lens attached), size of the grip (does your pinky fall off the bottom?), texture of the grip materials (ohh, bumpy!), put it up to your eye and perhaps take a shot.  Then you pick up a T3i (600D) and follow the same procedure.  Some people may prefer the body that is slightly smaller, or the one that is larger – depending on their hand size, and many would prefer a body that was lighter if there was a noticeable difference in weight.  But picking a camera up and holding it in the store is not the same as using it. How it initially feels will likely not be a true indication of how it feels when operating it and using its controls.  It is not a meaningful test of “feel” or ergonomics.

This is especially true for a new dSLR user who has never actually used one for real life shooting.  They don’t yet know how it will feel when using a dSLR because they have yet to do that.  “Feel” needs to take into account more than picking up the camera with the kit lens and holding it to the eye:

  • Ergonomics involves the placements of the buttons and controls that you will access constantly while shooting – the location of the autofocus point selection arrows or thumb joystick, the location and orientation of the main dial that will be used constantly to set aperture or shutter speed.  This is actually a significant ergonomic difference between a Canon and a Nikon that I have never once seen mentioned in a forum about “feel” and if any ergonomic criterion is truly important, I would say it is this one.  I find the top location/ orientation of the Canon dial coupled with the large rear dial a natural, ergonomic joy.  I find the horizontally orientated front and rear dials of Nikons uncomfortable and aggravating to my tenosynovitis.  So until a dSLR user knows where their fingers will be moving and what controls they will want to access with the camera held to their eye, then how can they fully judge “feel?”
  • The ergonomics of a camera body changes, sometimes dramatically, depending on which lens is attached and used.  Most demo cameras in the shop have the small, lightweight 18-55mm kit lens attached.  If this is the lens you will use all the time for the remainder of your dSLR shooting life, then this can be a valid test (see Why You Shouldn’t Buy the Kit Lens).  If not, you should definitely try it out with a couple additional lenses such as a larger telephoto.  Not only will most other lenses be larger and heavier than the kit lens, but the camera will likely be held differently when using them.  If you are a new user, then you may not yet know which lenses you will want and use in the future.  While a small, light, entry-level dSLR body feels great with the kits lens, it can become nearly unusable with a high quality, large, heavy lens.  As one forum contributor said,

“…my 450D felt great with the kit lens, but almost unholdable with a 100-400 and ultimately I got a battery grip for it which helped a lot with that lens. I will add that at the time I bought my 450D I felt it against a 40D and preferred the lightness and size of the 450D.  Had I known then what lie ahead I would have got the 40D.”

Although the 100-400 is a huge lens that many will never buy, the same weight, size, and balance issues hold true for other more “basic” high-quality lenses such as the Canon 24-105mm f/4L or the Canon 24-70mm f/2.8L, or even many non-L larger telephoto lenses.  Plus what about putting an optional external flash on top?  That will completely change the balance of any camera.

  • While everyone’s hands are different, etc, I find it hard to believe that Canon and Nikon or the other major manufacturers make a completely un-ergonomic camera for the average range of hands.  I mean other than that Nikon model with the glass shards embedded in the grip and the Canon with the 15 kilo battery.  Sure some can complain about little quirks and button placements, and some cameras are smaller and some are larger and thus feel different to different sized hands.  But remember a dSLR camera is a tool, and I refer you back up to the “full-size bed truck” analogy.
  • When you get new glasses or have dental work done, it always feels funny for a couple days. Then you get used to it and don’t notice. When you work with a camera after a bit, I would bet most would experience the same.  As another forum participant noted,

“When I was buying my first DSLR, the 450D felt weird in my hand, exactly the same as every other DSLR in the shop. The reason?  I did not know what’s what, what will I use and have never hold DSLR in my hand before. It was just a foreign object and felt weird. Got used to the DSLR and after a while it felt like an extension of my hand.”

There are good reasons why cameras and controls are designed with their specific curves, button placements, and materials. And even then, some are more careful, precise, and pleasing to the touch because they are on a pro camera catering to exacting needs.  Some are less rigorously-designed compromises to provide functionality at a lower price-point.  The user just may have to adapt a bit to their tool as they learn these reasons through use and experience.

I agree that in the end, some people just find certain cameras too big, too small, too uncomfortable, etc. for their hands.  But I just don’t think “feel” should continue to be Criteria Number One on every “which camera should I get” forum I read.  I personally have used dozens of different dSLRs, I have handled them extensively as a photographer, salesperson, reviewer, and camera guide author. I have yet to find one I can’t or won’t use due to ergonomics.  They are tools, there are reasons each is designed the way it is, and despite any design/ cost compromises each is fully functional.  In my humble opinion, I believe that ergonomics, and especially “feel,” are over-emphasized in these conversations regarding beginners – or anyone – choosing a camera.

Now don’t get me started on the related issue of “which menu system works best for you.” :)  (Come on, you’ve learned to use dozens of different menu systems with your countless software programs, point-and-shoot cameras, DVD player, TV set-up, Tivo, GPS, etc.  I think you can figure out a well designed Canon or Nikon menu.)

But all of this is moot.  In reality, people should choose a camera based on the brand that their brother-in-law once told them was really good because his father’s friend had one back in ’86 and he took really good pictures with it at a wedding once and he had a really big lens so he totally knew everything about cameras.

Canon Instant Savings on L Lenses and Speedlites

Are you ready to purchase a nice new Canon L series lens or a Speedlight flash?  Now is the time with their instant savings until Sept. 3, 2011!

Click here to visit Amazon and have a look at these lenses/ Speedlites.  Or please consider using my affiliate links for B&H or Adorama by clicking the icons on the left side of the page.

canon rebate instant save savings l lens speedlite flash speedlight


Canon 5D Mark II vs 5D Mk III

As I recently noted in my post about the eventual release of the 7D Mk II, as an e-book camera guide author, I have to attempt to plan my life and writing schedule around the release of the latest dSLR cameras. And since major camera companies typically give little-to-no advance notice for the announcement then release of a new model, this involves lots of speculation and following of online rumors. And then I subject myself to a few weeks of intense, non-stop research and writing when it is finally announced.

The Canon 5D Mark III has been rumored for imminent release numerous times, including most recently Feb 2011, November 2011, first quarter of 2012, and “any minute now.”  This speculation occurs with every expected new model, so as you can see, there is no telling when it will suddenly be announced.  But based on Canon’s history of model releases, it is sometimes pretty easy to narrow the range down.  For example, the original 5D reigned for 3 years, and then was replaced by the 5D Mark II, which was announced on September 17, 2008.  Add three years to that, and you get an announcement of the Canon 5D Mk III expected in September 2011.  Not so difficult, really.  Except one has to take into account the disruptions to manufacturing and supply caused by the earthquake in Japan, so that could cause a delay of a month or three.  As equally fascinating is the speculation for what features the 5D Mark III will have. Most interestingly, some have wildly suggested that the line will be split in two with a stills version and a video version.  Not likely.  So what is there to improve on this amazing camera?  Well, several of its features can easily be improved, and hopefully there will be a few surprises added.

canon 6d canon 5d mk iii mkiii mk 3 mark 3 mark ii vs compare which one
The Canon 5D Mk II, patiently awaiting its successor, the Canon 5D Mk III – or is it the Canon 6D…

Currently the Canon 5D Mk II offers:

  • 21 MP Full Frame sensor
  • DIGIC 4 processor
  • Full HD video
  • 3.9 frames per second continuous shooting
  • ISO 100 to 6400 (expandable to 25,600)
  • 3” high resolution LCD screen – non-articulating
  • 9 point autofocus system, all cross-type plus 6 assist points
  • 35 zone exposure metering system
  • Magnesium alloy body with weather sealing

Much of this can easily be improved upon, and in fact the current 7D already boasts several upgrades to these features.  The 5D Mark III will obviously take the best of the 7D and improve upon it in some areas.

Canon EOS 5D Mk III predictions:

  • 26 to 28 MP Full Frame sensor
  • Single or Dual DIGIC 5 processors
  • Full HD video at all the frame rates – plus many additional video features and options that videographers have been waiting for or use 3rd party firmware to obtain, but that I don’t know much about since I have yet to enter the video world.  But I can assure you that the 5D Mk III is going to be a videographers dream, perhaps with RAW video.  Perhaps it will even be able to autofocus full time in video mode.
  • 7 frames per second high speed continuous shooting.  I’m not sure of the mechanics of it but it seems that the large mirror flipping up and down is an impediment to a super fast fps, but Canon has done it both on previous film cameras and in the 1D line.  So hopefully it will be significantly higher than the current 3.9fps.  It will definitely boast an improved maximum burst rate (more JPEG or RAW frames captured before the camera pauses to digest them).
  • Ability to customize Continuous Low and High settings so that you can choose your own rates. Please, please, please.
  • ISO 100 to 12,800 or more, and then expandable – while the ISO performance of the 5D MkII is already stellar, the new one will boast even more improved high ISO performance (less noise at high ISOs)
  • 3” very-high resolution LCD screen – Non-articulating?  Articulating?  Touch screen?  It seems that an articulating screen is the way to go for any camera now, but will Canon hold off with putting this on their higher end models?  Touch screen is definitely coming to dSLRs, but will it be on this one?  …maybe, probably not.
  • 19 point (or more) autofocus system, all cross-type, with numerous configurations and customization options, as taken from the 7D – this desperately needs to be improved in the 5D, and the technology is already there in the 7D.  Canon will definitely add the new Autofocus menu system of the new 1D X to make configuring and taking full advantage of the AF system much easier – as opposed to the autofocus menu and C.Fn options on the 7D which make it a bit complicated.
  • Improved 63 zone+ exposure metering system – it will definitely boast an upgraded exposure metering system, perhaps the current 63 zone system, but probably even a bit improved.
  • Magnesium allow body with weather sealing – already has this, not much improvement required.

Additional features:

It will certainly have a several new menu and custom function settings, hopefully including some additional control over Spot, Center-weighted, and Partial metering, like the ability to change the size of the area metered and the ability to link it to the active AF point.  Plus the new Autofocus menu system similar to the 1D X.

Oh yes, and the HDR fans would appreciate more latitude in auto exposure bracketing, such as perhaps 5 exposures over 5 to 9 stops. And maybe some more fluorescent white balance options like Nikon offers.

It will likely and hopefully retain the CF card and the LP-E6 battery.

Built-in GPS or wi-fi?  This will eventually be in all cameras, and maybe this one will have these features.

So, there are my best guesses. Be sure to follow the rumors at Canon Rumors to find out when the 5D Mk III may come out, particularly the 5D Mk III category. And learn about my Canon 7D Mk II predictions in this previous post.

Canon EOS 7D vs. Canon 7D Mk II

As an e-book camera guide author, I have to attempt to plan my life and writing schedule around the release of the latest dSLR cameras.  And since major camera companies typically give little-to-no advance notice for the announcement then release of a new model, this involves lots of speculation and following of online rumors.   And then a few weeks of intense, non-stop research and writing when it is finally announced.

The Canon 7D Mark II has been rumored for imminent release numerous times including Feb 2011, May 2011, November 2011, early 2012, etc.  So as you can see, there is no telling when it will suddenly appear.  The camera was originally announced September 2009, so Sept. 2011 is my best current guess.  Except one has to take into account the disruptions to manufacturing and supply caused by the earthquake in Japan, so that could cause a delay of a month or three.  As equally annoying but fascinating is the speculation for what features the 7D Mark II will have.  Most amusingly, some have wildly suggested that it will be a full frame camera (not likely…but then again, full frame is bound to creep down into the the pro-sumer line at some point, so why not now, why not with the 7D Mk II?).  So what is there to improve on this amazing camera?  (Why is it so amazing?  See my previous post of Why the Canon 7D is a Super Awesome Camera.)

canon 7d mk ii mkii mk 2 mark 2 mark ii vs compare which one
The Canon 7D, patiently awaiting its replacement the EOS 7D Mark II

Currently the Canon 7D offers:

  • 18 MP APS-C sensor
  • Dual DIGIC 4 processors
  • Full HD video at all the frame rates
  • 8 frames per second and 3fps continuous shooting
  • ISO 100 to 6400 (plus 12,800)
  • 3” high resolution LCD screen – non-articulating
  • 19 point autofocus system, all cross-type, with numerous configurations and customization options
  • 63 zone exposure metering system
  • Built in remote flash triggering
  • Magnesium alloy body with weather sealing

While little of this actually needs improvement, Canon is not going to release an new model without some significant improvements (though they have done that before…).  I predict many of the above features will have a small to significant upgrade.

Canon EOS 7D Mk II predictions:

  • 21 to 24 MP APS-C sensor – I’m not sure if Canon can affordably bring together 8fps and a full frame sensor at the same time yet, and if they did, wouldn’t that be the 5D Mk III?
  • Dual DIGIC 5 processors – or perhaps a single powerful processor
  • Full HD video at all the frame rates – plus many additional video features, menus, and options like those currently offered in the 60D, plus some other stuff that videographers like but I don’t know much about since I haven’t entered the video world yet.  Perhaps it will even be able to competently autofocus full time in video mode.
  • 8 frames per second and 3 fps continuous shooting with slightly improved maximum burst rate (more JPEG or RAW frames captured before the camera pauses to digest them) – the high speed of 8fps really doesn’t need to be improved, but the problem is 8fps is often overkill and 3 fps is too slow.  What is needed is a 5 fps option, or better yet, the ability to customize Continuous Low and High settings so that you can choose your own rates.  Please, please, please.
  • ISO 100 to 12,800 or more, and then some – and improved high ISO performance (less noise at high ISOs)
  • 3” high resolution LCD screen – non-articulating – touch screen? While many might want an articulating screen, it would really mess up the great button layout on the rear of the camera.  Maybe they will come up with a new type of articulation that maintains the basic button layout.  Touch screen is definitely coming to dSLRs, but will it be on this one…maybe, but Canon barely uses touch screens with its point and shoots yet so they may hold off for a bit and introduce it in their T3i successor.
  • 19 point autofocus system, all cross-type, with numerous configurations and customization options – this doesn’t really need to be improved, though they could always add a few more AF points and perhaps some additional manners of customizing their use.
  • Improved exposure metering system – it will likely boast an upgraded exposure metering system from the current 63 zone system
  • Built in remote flash triggering – already pretty full-featured
  • Magnesium allow body with weather sealing – already about the best it could be

Additional features:

It will certainly have a couple new menu and custom function settings, hopefully including some additional control over Spot, Center-weighted, and Partial metering, like the ability to change the size of the area metered and the ability to link it to the active AF point.

Oh yes, and the HDR fans would appreciate more latitude in auto exposure bracketing, such as perhaps 5 exposures over 5 to 7 stops.  And maybe some more fluorescent white balance options like Nikon offers.

It will likely and hopefully retain the CF card and the LP-E6 battery.

So, there are my best guesses.  Have a look at the Canon 7D on Amazon here.

As mentioned above, I have written an e-book user’s guide to the 7D called Canon 7D Experience.  It will help you take control of this powerful and customizable camera and the images you create!  You can learn much more about it here.
Canon 7D EOS book e book ebook guide manual tutorial how to instruction for dummies 7d mark i mk i

Be sure to follow the rumors at Canon Rumors to find out when the 7D Mk II may come out, particularly the 7D Mk II and 5D Mk III categories (where some of the 7D MkII news is hidden).  And learn about my Canon 5D Mk III predictions in this post.

Filter Stacking

If you hang around photography forums for long enough, you will inevitably come across the debate of whether or not to use a UV filter at all times on each of your lenses. I even accidentally initiated this argument once when I offhandedly mentioned filters in a forum post.

Some people claim they degrade image quality and thus passionately detest them.  (However, why is it that when you look at their sample images, you often discover that image quality is the least of their photographic issues?).  Others, like myself, recommend them for protecting lenses and offering a surface that one can quickly clean without worrying about creating a scratch across an actual lens element.  You know what degrades image quality?  A scratch or crack across the front element of your lens!

photo photography filter uv broken cracked
Oops.

My opinion is that one should always use a high quality, multi-coated UV filter at all times on each lens, for protection against scratches and impact dents and dings (plus a lens hood to assist with both flare and bumps of the front of your lens against hard objects). No one intends to drop or bang their lens, but it can happen – when traveling, working in a hurry, falling from a not-fully-zipped bag, or an accidental loss of grip at anytime. When I worked in a camera store, people came in weekly with busted filters from dropped lenses, but the lenses themselves were nearly always fine. And in fact, it recently happened to me. As I was picking up my camera with a big heavy lens, the strap got caught on a low table corner and the camera was yanked from my hand. It crashed to the floor with a thud. I quickly inspected it and found the filter glass had broken but the ring was not dented (it was a pretty high quality filter). The filter apparently took the brunt of the impact and thus saved the front of the lens from damage, denting, and glass breakage. It stinks to have to replace an expensive filter, but that is cheaper and quicker than having a lens repaired or replaced.

The higher-quality the lens, the better the filter should be.  A $50-60 coated or multi-coated filter may be sufficient for $300-$400 lens, but the highest quality B+W MRC filter should be used on a professional quality lens, like a Canon L lens.  Some lenses, such as the Canon 16-35 f/2.8L II, even require a filter to complete their weather-proofing.

Anyway, I bring this up because there is a funny article about UV filters, cheap filters, good filters, stacking 50 filters, and the benefits of using high quality UV filters – here at lensrentals.com

Find a high quality B+W UV filter for your lens here.

Nikon Instant Savings on Cameras and Lenses

Buy a Nikon dSLR including the D5100, D7000 or D3100, with one of the selected lenses, and save up to $250 on the purchase!  Here is a page on Amazon with the complete instructions.  It involves putting both items in your cart – camera and lens – and then using the proper coupon code:

Instant Savings Amount by Lens
$250 off Nikon 18-200mm f/3.5-5.6G AF-S ED VR II Nikkor Telephoto Zoom Lens. Enter code 33YES67Y at checkout.
$200 off Nikon 70-300mm f/4.5-5.6G ED IF AF-S VR Nikkor Zoom Lens. Enter code JSZW7NC9 at checkout.
$100 off Nikon 85mm f/3.5G AF-S DX ED VR Micro Nikkor Lens. Enter code TG5D8MXL at checkout.
$100 off Nikon 55-300mm f/4.5-5.6G ED VR AF-S DX Nikkor Zoom Lens. Enter code V8DLU4TK at checkout.
$100 off Nikon 55-200mm f/4-5.6G ED IF AF-S DX VR Nikkor Zoom Lens. Enter code ESZBSIIK at checkout.
$100 off Nikon 55-200mm f4-5.6G ED AF-S DX Nikkor Zoom Lens. Enter code ZRB9VW8Y at checkout.

Head over to Amazon by clicking here, and save!


The instant rebate is also going on with other retailers such as B&H.  B&H has an informative page with visually spells it all out nicely (click the link or the image):

Nikon dslr camera sale savings rebate b and h B&H


Taking Advantage of the Nikon D810/ D610 / D7100 / D5300 Autofocus System

This was originally written for the Nikon D7000, but as the Nikon D7100, the Nikon D7000, the Nikon D610 / D600, the Nikon D810 / D800, and the Nikon D5200 / D5300 all share a similar Autofocus system, most of this information will apply to all of them.  And even though some of the models have 51 AF Points instead of the 39 AF Points of the other cameras, all the same settings and actions apply.

The Nikon D7100, the Nikon D7000, the Nikon D610 / D600, the Nikon D810 / D800, and the Nikon D5200 / D5200 dSLRs all share very similar, and quite sophisticated autofocus systems – especially if you are coming from a D90, D5100, or earlier camera.  With their 39 AF points or 51 AF points that can be used independently or together in a variety of ways, its Autofocus Custom Settings that affect many of the functions of the AF system, and the three different Autofocus Modes that are used in various combinations with the four different Autofocus AF-Area Modes, it is no wonder that users are having difficulty figuring it all out. (Plus the D810 offers an additional Group Area AF Area Mode!)

Nikon D600 D7000 autofocus af system 39 point auto focus control learn use how to dummie book guide manual
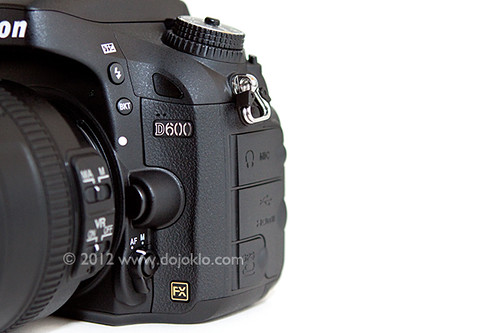
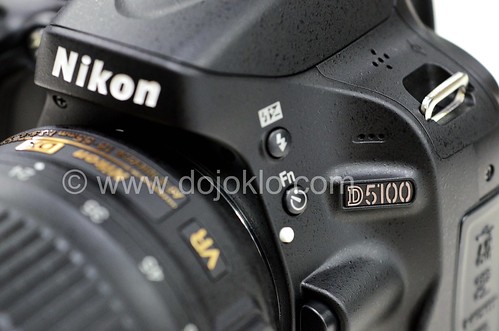
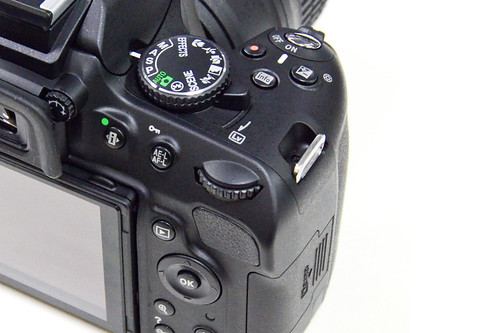
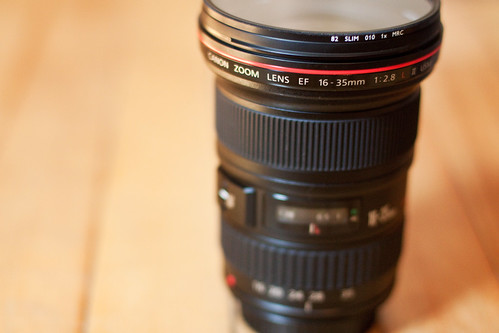
Some of the Autofocus controls of the Nikon D600, located near the base of the lens (to the left of the FX badge and below the Lens Release Button).

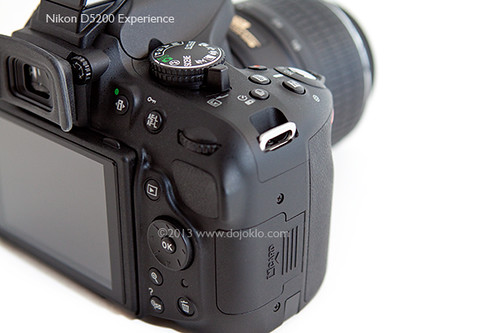
First, the Autofocus Controls on the D810/ D800, D610/ D600, D7100, and D7000 are a bit different than previous cameras.  You can change the Autofocus Mode and AF Area Mode by pressing the AF Mode Button (located inside the Focus Mode Selector switch) and then use the Command Dials to adjust the settings as you view them on the top LCD Control Panel or in the Viewfinder.

Focus Mode Selector – This switch is used to turn on or off autofocus. Set to AF for autofocus and M for manual focus. Be sure to set the similar switch on the lens as well. If your camera does not seem to be autofocusing, be sure to check this switch and the one on your lens.

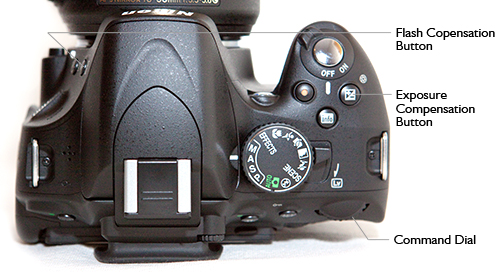
AF Mode Button – This button, located inside the Focus Mode Selector switch, may be confusing at first to those who have not previously seen or used it on the Nikon D7000 or D600, though you should quickly find that it is a convenient design. It is used to select the Focus Mode as well as the autofocus AF-Area Mode. Press this button and turn the rear Main Command Dial to select the Focus Mode, such as AF-A or AF-C, while viewing the setting on the top Control Panel or in the Viewfinder. Press this button and turn the front Sub-Command Dial to set the AF-Area Mode, such as Single-Point AF or 39-Point Dynamic-Area AF. Again, you can view the selected setting on the top Control Panel or in the Viewfinder. The autofocus system including the Focus Modes and AF-Area Modes will be explained below.

Next you will need to set up some of the autofocus Custom Settings to begin to customize how the AF system functions for your needs (Some of these options may not be available with the D5200):

AF-C priority selection – This setting determines if attaining focus is top priority when you are in Continuous-servo AF (Auto-Focus) Mode (AF-C), or if you just want the shots to be taken even if exact focus is not attained for each shot.  If exact focus is your priority, set on Focus.  If getting the shots at all costs is the priority, set for Release.

AF-S priority selection – This is similar to above, except that this setting is for when you are working in Single-servo AF Mode (AF-S), typically used when your subject is not moving.  Since AF-S is typically used with subjects that are not moving, it makes more sense to make sure focus is attained, thus you should typically select Focus for this setting.

Focus tracking with lock-on – This setting determines how the autofocus system reacts to sudden, dramatic changes in the distance of the subject when you are working in AF-C or AF-A modes.  Decide if you wish to have the camera quickly refocus on a new or closer subject (1-Short), wait awhile until it ideally picks up the intended subject again (5-Long), somewhere in between, or immediately refocus on a new subject at a large distance from the initial subject (Off).  Keep this option in mind with the various AF-C and AF Area Mode configurations, as it may change depending on your subject and situation.  Sometimes you don’t want the camera to quickly refocus on a closer or more distant subject, while other times you do.

AF point illumination – This is used to set whether or not the selected autofocus point (AF Point) is illuminated in the viewfinder.  Since you pretty much always want to know where your camera is focusing, this should be set for On.

Focus point wrap-around – This determines if the AF Point selection will “wrap around” to the other side of the screen when you reach an edge.  In other words, if you are selecting your AF Point (as you should be doing at almost all times) and you reach an AF Point on the far right, when you click right again, do you want to “wrap around” to a focus point on the far left, or do you wish to stop at the edge and not continue to the other side?

Number of focus points – This setting determines the number of autofocus points that are available for selection in your viewfinder.  If you are always selecting your AF Point (as you typically should) you may find that it is quicker and easier, at least at first, to limit the number of AF Points to 11 – AF11.  If you prefer to have all the AF Points available for your selection, set this at AF39 (or AF51 with the D7100).  If you set to 11 AF points your selection will be limited to those 11 AF points, but the additional surrounding AF points will still be active to be used by the camera in the AF-Area Modes and in subject tracking, so the camera is still taking advantage of all the AF points of the autofocus system.

Built-in AF-assist illuminator – This is used to enable or disable the autofocus assist light.  Turn this On to assist you in autofocusing in low light, but be sure to turn it Off if you are working in situations where it will be distracting, unwanted, or unnecessary.

and

Assign AE-L/AF-L button (f4 on the D600 and D7100) – This is to assign the function of the AE-L/AF-L Button.  You may want to use this in conjunction with the Function or Fn Button and use one to lock exposure and the other to lock focus.  In that case, you would typically set this to AF lock only to use this button to lock focus.

I go into much more detail about each these Custom Settings, how you may wish to set them up, and recommended settings in my e-book guides for all the current and previous cameras including Nikon D600 Experience, Nikon D7100 Experience, and Nikon D5200 Experience – but this should get you started.

Nikon D600 book ebook camera guide download manual how to dummies field instruction tutorial     Nikon D7100 book ebook manual tutorial field guide how to learn use dummies


Using Autofocus
Now on to using the AF system.  (All of the information below is also adapted from my e-book user’s guides, so I hope you will have a look at them to learn more.)

One of the essential steps in taking a successful photo is controlling where the camera focuses.  If you allow the camera to autofocus by choosing its own Focus Point(s), it typically focuses on the closest object or a person in the scene.  This may or may not be what you want to focus on.  So you should choose where the camera focuses using the autofocus Focus Points.  But first you will need to select an appropriate Autofocus Mode and an Autofocus Area Mode, based on your subject and situation.

Autofocus Modes
The D7100, D7000, D600, and D5200 each have three different Autofocus Modes to choose from, typically depending if your subject is still or moving.  They also have four different Autofocus Area Modes (see below) to specify how many of the AF points are active and how they track a moving object.  You can set these two functions in various combinations.  First the Autofocus Modes:

Single-Servo AF (AF-S)
Use this mode when your subject is stationary, or still and not going to move, or if your subject is not going to move very much, or if the distance between you and the subject is not going to change between the time you lock focus, recompose, and take the shot.  Lock focus on the subject and recompose if necessary.  When using AF-S, you can select from two Autofocus Area Modes, either Single-Point AF where you select the AF point, or Auto-Area AF, where the camera selects the AF point(s) for you.  I suggest you nearly always select your own desired AF point.

Continuous-Servo AF (AF-C)
Use this mode when your subject is moving.  If the subject is moving towards you or away from you, the camera will keep evaluating the focus distance, as long as the Shutter Button is kept half-pressed.  You will need to use this in conjunction with the Autofocus Area Modes to determine if and how the camera tracks the subject laterally to the surrounding AF points, or if it will only track the subject if it remains at the initially selected AF point.  If the subject is going to be difficult to follow or is moving across your field of view, set the AF-Area Mode to one of the Dynamic-Area AF modes or to the 3D-Tracking mode.  Focus on the moving subject with the selected point if using Single-Point, one of the Dynamic Area Modes, or 3D-Tracking, or let the camera select the AF point in Auto-Area AF, and then as long as the Shutter Button remains half-pressed the camera will track the subject as it moves closer or farther in distance.  Depending which AF Area Mode you are using, the camera may also maintain focus or track the subject to some or all of the surrounding focus points if it moves away from the initially selected point.  More about this in the Autofocus Area Modes section just below.

Auto-Servo AF (AF-A)
This mode is a hybrid of the two other focus modes.  It starts in Single-Servo AF (AF-S) mode then changes to Continuous-Servo AF (AF-C) mode if your subject starts moving.  Why shouldn’t you use this all the time, then?  Well, if you are focusing and then recomposing, as you may often be doing, your movement of the camera may fool it into thinking that the subject is moving and your resulting focus may not be where you want it to be, or may not be as accurate as it might be if you are using Single-Servo AF.

Nikon D600 autofocus 39 point af system use learn tutorial how to auto focus mode area
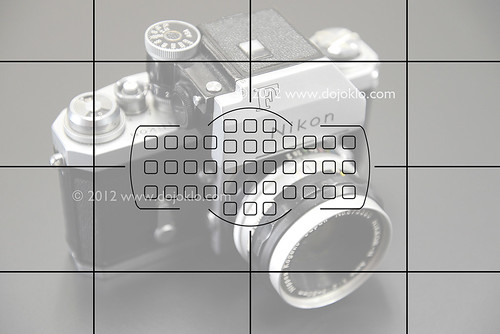
The arrangement and position of the 39 AF points of the Nikon D600, shown with the optional viewfinder grid display.

Manual Focus
Sometimes you may be taking several photos of the same subject from the same distance, or for some other reason want to keep the same focus distance and not have to keep re-focusing and re-composing.  Or you may be taking multiple photos for a panorama.  In these situations, turn off the auto-focus on your lens by switching from AF to M with the camera’s Focus Mode Selector switch and with the A/M switch on the lens itself.  Just remember to switch them back when you are finished.  You may also wish to do this if you want to precisely manually focus with the focus ring on your lens.  For lenses with “full time manual focus” however, you don’t need to switch to M in order to manually override the autofocus with the lens focus ring.  These lenses will have M/A and M on the lens focus mode switch instead of A and M.

Autofocus Area Modes
The Autofocus Area Modes are used to set if just a single AF point is active or else how many AF points surrounding your selected AF point will be used to maintain focus or to track a moving subject if you are using AF-C or AF-A Autofocus Modes.

Single-Point AF
Only one AF point will be active, and surrounding AF points will not become active to maintain focus or to track a subject that moves away from the one selected point.  This is typically used along with Single-Servo AF (AF-S) to focus on a stationary or still subject, or in a situation where you will be reframing the shot after you lock focus at a specific distance.  It can also be used with accuracy with AF-S mode for moving subjects if you take the photo quickly or if you recompose and take the shot quickly after locking in focus, especially if the camera-to-subject distance does not change at all or very much in that period between locking focus and taking the photo.  Use the Multi Selector to choose your active AF point as you look through the viewfinder and use the OK Button to quickly select the center AF point.  Also, remember that Custom Setting a6 allowed you to choose between having all 39 AF points available or to limit the camera to 11 AF points.  If you are just starting out with manually selecting a single Focus Point, you may wish to limit them to 11 now, and when you get the hang of it or when you are using one of the other AF Area Modes described below, increase it to 39 to take full advantage of all the AF points of the D7000 autofocus system.  If you choose Single-Point AF with Continuous-Servo AF (AF-C) or Auto-Servo AF (AF-A) for tracking moving subjects, it will only track the subject as long as it is positioned at the selected AF point, and it will not be tracked laterally to the other, surrounding points.  In other words, the single AF point you select will track a subject if it moves closer or farther away, but the AF system will not follow or track the subject if it moves left, right, up, or down and away from your selected AF point.  To do this, you use Dynamic-Area AF Mode or 3D-Tracking.

Dynamic-Area AF
With the Dynamic-Area AF Modes, you select an AF point to tell the camera where to autofocus, and if your subject briefly moves away from that point to a neighboring point or if you lose the subject from your AF point while panning, the camera will use the surrounding AF points to help maintain focus on it.  Select one of the Dynamic-Area AF options (below) when you are photographing moving or potentially moving subjects using Continuous-Servo AF (AF-C) or Auto-Servo AF (AF-A).  These modes are ideal for a subject moving closer or further from the camera but which may also move laterally away from the selected AF point faster than you can react in order to keep it located at that point, or for when you are panning and following the subject and attempting to keep it located at the selected AF point, but may have a little or a lot of difficulty doing so.  Remember that you need to keep the Shutter Button half-pressed in order for the continuous focusing at the initial point or the surrounding points to occur.  Note that the camera may pick up and start tracking a new subject that falls under the selected AF point if you lose your initial subject, in part determined by your setting for Custom Setting a3.

9-Point Dynamic-Area AF will use the immediate surrounding AF points to help maintain focus on a subject that briefly leaves the selected AF point.  This can be used with predictably moving subjects, like a runner or vehicle moving towards you or one that you can easily follow laterally by panning.

21-Point Dynamic-Area AF will use even more of the surrounding AF Points, more than half the total AF Points, to help maintain focus on a subject that briefly leaves the selected AF point.  This should be used for more unpredictably moving objects, like sports players on a field, which may quickly move further away from your selected AF point before you have a chance to realign that point over the subject.

39-Point Dynamic-Area AF (or 51-Point Dynamic-Area AF with the D7100) will use all of the 39 AF points (or 51 points) to help maintain focus on a subject that briefly leaves the selected AF point.  It can be used for very quick and unpredictably moving subjects, like pets, birds or other wildlife, and all 39 AF points will be used to maintain focus on the subject as you attempt to realign the selected AF point with the subject.

The Dynamic-Area AF Modes are not used to track and maintain focus on a subject that is moving across the various AF points in the frame, but rather are used to stay focused on a moving subject that you attempt to keep located at your selected AF Point.  To track a subject that is moving across the frame, intentionally passing from one AF point to the next, use 3D-Tracking.

Nikon D5200 autofocus af system viewfinder 39 point how to use learn manual guide book instruction dummies tutorial area mode dynamic
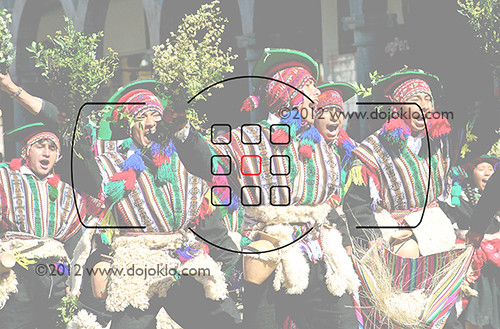
A simulated image of the Nikon D5200 viewfinder, showing the autofocus focus points active with 9-Point Dynamic Area AF area mode, when the center AF point is selected. (Image shown at 50% opacity to better view AF points.)

3D-Tracking
This mode is used for subjects moving across the frame in any direction, or subjects moving erratically from side-to-side in the frame, and they are tracked by areas of color.  This is used when you don’t wish to necessarily pan or follow the subject to keep it located in the same part of the frame, but rather when you wish to keep the camera relatively still as the subject moves across the frame.  You may select this option when you are tracking and photographing moving subjects using Continuous-Servo AF (AF-C) or Auto-Servo AF (AF-A).  Again, you choose the initial AF point to locate the subject and begin the tracking.  If the area of color you wish to track is too small or if it blends into the background, this mode might not be very effective.

Auto-Area AF
The camera uses all 39 AF points to detect what it thinks is the subject and automatically choose the appropriate AF point(s).  Typically, the camera will select the nearest subject or a human in the frame, so it may not focus on exactly what you wish to focus on.  That is why it is best to use one of the other modes and select the AF point yourself.

Group Area AF
The Nikon D810 and D4s include the Group Area AF autofocus area mode, which makes use of a group of 5 AF Points arranged in a cross-shaped pattern. And instead of selecting a primary point with the surrounding points being “helper points,” you will actually be selecting the group of five points, which will all be used to attempt to focus on the subject. Unlike the other AF Area Modes with multiple points, the Viewfinder will actually display the four outer points of the group, but for some reason not the central point – perhaps so that you can better view the subject.

Keep in mind that with the other somewhat similar Dynamic Area AF modes, you choose a primary point and attempt to keep the subject located at that point, and the surrounding points act as “helper” points if the subject happens to move away from the primary point. But with Group Area AF you select the entire group of AF Points, and they all work equally to focus on the subject. This mode can be used similar to Single Point AF but when it might be challenging to locate the subject under an individual point. When working in AF-S Focus Mode and using Group Area AF, the selected AF points will give priority to faces if they are present, otherwise they will focus on the closest subject.


The next step is to learn to lock focus independent of locking exposure, and customize the camera’s controls to perform these functions how you wish.  But you are going to have to have a look at my e-book guides Nikon D7100 Experience, Nikon D7000 Experience, Nikon D600 Experience and Nikon D5200 Experience to learn about this and many other important functions of your sophisticated Nikon D600, D5200, or D7000!

Nikon D600 book ebook camera guide download manual how to dummies field instruction tutorial      Nikon D7100 book ebook manual tutorial field guide how to learn use dummies


To learn about another important reason why you need to take control of your autofocus system, see the related post:

Don’t Let the Locations of the AF Points Dictate Your Composition

What do you do when, with your desired framing, your subject is not located exactly under or near an AF point? Even with all the AF points of an advanced Nikon D7000 and D600, this will often be an issue. Have a look at the above post to learn why this is an issue and how to resolve it.

Still need to purchase your D7100, D7000, D5200 or D600.  Please use my links to have a look at them on Amazon:

Nikon D7100 24.1 megapixel DX format dSLR camera

Nikon D7000 16.2 megapixel DX format dSLR camera

Nikon D600 24.3 megapixel full-frame FX format dSLR camera

Nikon D5200 24.2 megapixel DX format dSLR camera

Was this post helpful?  Please let others know about it by clicking the Facebook or Twitter sharing buttons below, linking to it from your blog or website, or mentioning it on a forum.  Thanks!  Want to help support this blog with no cost or effort?  Simply click on the Amazon, B&H Photo, or Adorama logos on the left side of this page to go to those sites and make your purchases.  They will then give me a little referral bonus!

Making Sense of Canon and Nikon Lens Notations

Click here to jump down to Nikon (Nikkor) Lens Notations

Canon Lens Notations

You have probably noticed that Canon lens descriptions have numerous notations, and may be wondering what some of those letters and numbers mean.  For example EF-S 18-135mm f/3.5-5.6 IS is the full name of the kit lens that you may have purchased with the camera.  A lens with a somewhat similar focal length, but which is much more expensive, is the EF 24-105mm f/4L IS USM lens.  Each of those notations is significant, and all are important to know and understand when you are researching additional lenses to buy for your camera.  And since I have a hard time remembering them all, I have also added a quick reference to the end for Nikon lenses and a link to a more thorough site.

Canon lens notation letter number mean meaning
Canon EF 16-35mm f/2.8L II

EF and EF-S are two different Canon lens mounts.  EF lenses can be used on any Canon dSLR, while EF-S lenses are designed for, and can only be used on Canon dSLRs with 1.6x cropped sensors, including the 60D, all Rebels such as the T3i, plus the 7D, 50D and others, but not the full frame 5D or 5D Mk II.  The rear of EF-S lenses reaches further into the camera body, and thus will damage the mirror of the 5D cameras if you attempt to attach it.  These lenses are optimized for the 1.6X cropped sensor cameras, and have a shorter back-focus distance which gives them the ability to be more effective as wide-angle lenses on the cameras with smaller sensors.  EF-S lenses are mounted by lining-up the white square on the lens with the white square on the camera.  EF lenses match red dot to red dot.  If you someday plan to upgrade to a full-frame camera, such as a 5D Mk II or its eventual replacement, or if you suspect that in the future full-frame cameras will become much more affordable and replace most cropped frame cameras, you shouldn’t invest in too many EF-S lenses.

18-135mm or 24-105mm is the focal length of the lens.  These are both zoom lenses, which cover a range of focal lengths.  There are wide-angle zooms – typically within the 10-40mm range, standard zooms – typically within the 17-135mm range, and telephoto zooms – typically within the 70-300mm range.  See this page for all of Canon’s lens offerings:

A Prime lens has only a single focal length, such as 50mm or 85mm.  It will not zoom in and out, and thus you have to “zoom with your feet” as they say.  However, without the additional mechanisms required by zooms, you generally get more quality for the price with a prime lens, plus typically very wide apertures for great low light use and blurry backgrounds.

f/3.5-5.6 or f/4 indicates the largest maximum aperture.  See my post Fixed Maximum Aperture vs. Variable Maximum Aperture for more information on what this means and why one lens has a range of numbers and the other lens just has one.

L lenses are Canon’s top of the line lenses, identifiable by the red band around the front end of the lens.  L lenses are generally higher quality lenses than the standard lenses in just about every way possible.  They typically offer:

  • Better sharpness throughout the full range of focal lengths and apertures, as well as better sharpness, color, contrast, and image quality across the image frame from the center to the corners.  They accomplish this in part by precisely and accurately resolving all the light wavelengths (colors) on the sensor plane.  (Think of a cheap printing job you’ve seen where the colors don’t all align and thus the words or images always look out of focus.  This is an exaggerated example of what a lower quality lens might do.)
  • Higher quality and stronger construction, durability, and seals for increased dust, water, and weather resistance.
  • Higher quality glass (or even fluorite crystal) and coatings to prevent flare and internal reflections.
  • Larger maximum apertures and fixed maximum apertures.
  • Image stabilization.
  • Higher quality, quieter, and faster auto focus mechanisms and full time manual focus (ability to override auto-focus for manually tweaking focus while remaining in AF).
  • Internal zoom mechanisms, meaning the lens does not extend when you zoom, which also allows for better weather sealing.
  • Metal lens mounts (the part that attaches onto the camera) for better durability, sealing, and electrical connections (less expensive lenses sometimes have plastic mounts that wear and then the lens wobbles and loses electrical connection).

However, several non-L lenses, including some EF-S lenses, have many of these features and characteristics too, and some approach the L lenses in terms of quality.  One thing to keep in mind with lenses is that you almost always get what you pay for.  More expensive lenses offer higher image quality, construction quality, and features.

IS means image stabilization, and allows you to hand-hold your camera at slower shutter speeds and still obtain an in-focus image.  The IS system in the lens monitors vibration and moves the internal lens elements to counteract camera movement, which might normally cause camera-shake to blur the resulting image.  A lens with IS allows you to use a shutter speed up to 4 stops slower than normally possible when taking an image while hand holding the camera.  Image stabilization isn’t critical to have for wide-angle and standard focal length lenses, but becomes pretty important when working in the 150mm, 200mm or 300mm focal lengths.  This is because those lenses are typically longer and heavier, and because you are often zooming in on something further away and a slight movement of the lens translates to a large movement over that distance (think of trying to hold your view of a distant bird steady while looking through binoculars).  Image stabilization does not correct for subject movement, but rather for camera movement, such as from an unsteady hand.  You need to use a fast shutter speed to freeze subject movement.

USM stands for ultrasonic motor, and means the lens has a high quality, precise, rapid, and quiet motor for auto focusing.

II means it is the second version of that lens.  For example the 70-200mm f/2.8L IS USM lens was recently replaced with a new version which now has a II in its name.  Most often, the second version of a lens boasts improvements in quality and construction.

Have a look that this other post to learn the difference between Fixed Maximum Aperture vs. Variable Maximum Aperture.

And the little “circle with a line through it,” found on the front of the lens, indicates the filter size that will fit on the lens, such as a protective UV filter or a circular polarizing filter.

Purchasing: If you plan to purchase a new lens from Amazon, or any other equipment, I encourage you to do so by clicking on the Amazon logo below (or on the links of the lenses mentioned above). If you purchase through this link, Amazon will give me a little something for the referral, which will help support my blog. Thanks, I appreciate your support!
Amazon.com

If you are in the UK, you can click here for the UK Amazon referral link.

For those interested in purchasing through B&H Photo, Adorama, or directly from Canon, I have set up affiliate links with them as well – find them on the left side of this page.

Renting Lenses: If you wish to first try out a lens before buying it, check out LensProToGo, where you can get great prices on short-term rentals of any lens as well as the latest Canon and Nikon dSLR bodies.


Nikon (Nikkor) Lens Notations

Here are some the most common Nikon (Nikkor) lens notations of current lenses that you will run across, many of which deal with a lens’s ability for metering, aperture control, and autofocus:

F-Mount – This is the Nikon bayonet-type lens mount that was introduced in 1959 and is still in use on Nikon dSLR cameras today.

AF – Auto-focus:   Although these lenses are capable of autofocusing, they do not have a built-in autofocus motor in the lens.  They require a camera body with a built-in autofocus motor in order to fully function, such as a Nikon D7100 or D610.  These lenses will not autofocus with Nikon dSLRs that do not have an internal autofocus motor, such as the D5200, D3200, and D40. You will need to use and AF-S lens with those cameras if you wish to autofocus.

AF-S – Auto-focus with an integrated silent wave motor:  The autofocus motor is in the lens and thus not required to be in the camera body.  You can use these lenses with any Nikon dSLR, but know that you need AF-S lenses in order to autofocus with a camera that lacks an AF motor in the body, such as the D5200 or D3200.

CPU – CPU lenses are autofocus lenses that can communicate information with the camera, such as the aperture setting, via electronic contacts.

AI – These lenses have an Ai coupling system that makes use of a small lever on the camera’s lens mount to communicate the aperture setting between camera and lens.

AI-S

Non-AI (also called A or Pre-AI) –

D – Distance:  The lens communicated the focus distance to the camera, so for example that info will be part of your image metadata and assists, I believe, with the flash metering.

DC – Defocus Control:  Allows the photographer to change the degree of spherical aberration in the out-of-focus areas to provide for better bokeh (background blurring).

DX – Made for non-full-frame (crop sensor) cameras, such as the D7000, D5100, D3100.

ED – Contains extra low dispersion glass elements, which helps to reduce various optical aberrations.

G – No aperture ring on the lens.  Since an aperture ring is no longer required with a dSLR, most common current lenses, with the exception of a 50mm for one, are G lenses.

IF – Internal Focusing:  Focusing movement occurs inside the lens and so no external lens elements are moving during focusing (well, other than the focusing ring of course).

N – Nano coating:  A crystalline coating on the lens elements eliminates internal lens element reflections, helping to reduce ghosting and flare.

PC – Perspective control:  Used to correct perspective (converging horizontals) such as for an architectural photographer.

VR or VR II– Vibration Reduction:  Image stabilization incorporated into the lens, which corrects for camera movement (but not subject movement!).

A more thorough list of notations, including older ones, and detailed explanation can be found here: http://www.bythom.com/

Ten Tips and Tricks for the Nikon D5100 / D5200

edit 3012-05-07: While this post was originally written for the Nikon D5100, all of these tips also apply to the D5200.  So while I work on an updated Nikon D5200 Tips and Tricks post, start out by making use of these tips.  And of course, they all still apply to the D5100.

nikon d5100 autofocus af system use learn tips tricks how to
Detail of the Nikon D5100

nikon d5200 autofocus af system use learn tips tricks how to dummies guide manual instruction tips tricks
Detail of the Nikon D5200

I’ve spent quite a bit of time with the Nikon D5100 as I researched and wrote my eBook user’s guide Nikon D5100 Experience (and now Nikon D5200 Experience also!), and here are some of the handy “tips and tricks” I’ve learned that may prove useful for you as you set up and use your D5100.  This camera has many features, Menu settings and Custom Settings you can use to make it operate how you want it to and to match your needs and shooting style, so it is worth-while to learn them and/ or to set them up according to your preferences.  For example, in no particular order:

1. Change the Flash Mode and Flash Exposure Compensation Quickly: You can quickly set your desired Flash Mode and then adjust the amount of Flash Exposure Compensation with the press of a button or two and the Command Dial.  Press the Flash Mode Button to raise the flash in P, A, S, or M mode, then press and hold it and turn the Command Dial to change the Flash Mode (Fill Flash, Red-Eye Reduction, Rear-Curtain Sync, etc.).  Press the Flash Mode Button (also the Flash Compensation Button) and the Exposure Compensation Button and turn the Command Dial, and you can quickly change the Flash Compensation as you view it on the Information Display Screen.

Nikon D5100 tips tricks book guide manual instruction user guide for dummies experience
Top of the Nikon D5100 with flash settings controls

2. Assign the Function (Fn) Button: You can use Custom Setting f2 to assign a different function to the Function (Fn) Button than the default Self-Timer setting.  Figure out which setting you change most often or need handy at your fingertips.  Some that I think are most useful are ISO Sensitivity, White Balance, or Auto Bracketing. You can also assign it to +RAW so that if you are shooting in JPEG but have a great image you want an NEF(RAW) copy of also, press the Fn Button first then take the photo, and you will save a copy of the image in both formats.

3. Adjust the Auto Off Timers: Use Custom Setting c2 to set how long the various displays stay visible on the rear LCD Monitor.  Though it may be convenient for them to stay on a long while, that will drain your battery more quickly.  But if they turn off too soon, it is annoying and could affect your shooting in a demanding situation.  So find a happy compromise.  You can set them all to stay on for a reasonable length by setting for NORM, or you can adjust them individually.  My preference is Playback/ menus 20s or 1min; Image review 4s or 8s; Live View 3 min or 5 min; Auto meter-off 20s or 1 min.  The first person to leave a comment on this post correctly telling the difference between Playback and Image Review will get a FREE copy of my latest eBook user’s guide for the Nikon D5100 called Nikon D5100 Experience! See later in this post for more info on this user’s guide – the only guide currently available for the Nikon D5100!

Custom Setting c2 – Auto-off timers

4. See if You Have Over-Exposed Your Highlights: You have to tell the camera which playback views you would like the option of seeing when you look at your images on the rear LCD Monitor, and thus be able to view your histograms and over-exposed highlights.  In the Playback Menu under Playback Display Options, check the ones you want to be able to view.  Two of the most important ones are Highlights and Overview.  These two will let you know if you’ve blown-out (over-exposed) your highlights.  The Highlights view will do this by having those areas of your image blink.  The Overview view will show you by displaying the histogram, which will show you if your highlights or shadows have run off the graph, indicating that those areas of the image contain no detail in the highlights or shadows other than pure white or pure black.

Overview playback view showing the histogram – (note you should set your JPEGs for FINE not NORMAL as I realized the camera default is set at)

5. Set a Precise Fluorescent White Balance: When you change the White Balance (WB) setting using the i Button and Information Display Screen, you can choose from several white balance options including Fluorescent White Balance.  However, there are several types of fluorescent light bulbs ranging in temperature from perhaps 3,000K to 6,5000K.  To tell the camera which one to adjust for, you have to go behind the scenes to the WB options in the Shooting Menu.  There you can set which fluorescent option to use, such as Warm-white or Cool-white.  You can also access this menu item to set your own custom Preset White Balance using a couple different methods.

6. Put Your Most Used Settings in My Menu: Instead of digging into the menus and Custom Settings all the time to find your most used settings, such as the White Balance settings just described, you can create your own custom menu called My Menu, which is then quickly and easily accessed with the Menu Button.  You can even decide what order to list the items in.  Some possible items to add could be perhaps auto bracketing or HDR if you often make use of those.

Brief Commercial Interruption: How did I learn all these useful and convenient settings?  I just completed an eBook user’s guide for the Nikon D5100 called Nikon D5100 Experience. (and now Nikon D5200 Experience also). Following in the footsteps of my bestselling Nikon D7000 Experience, these guides cover all the Menus, Custom  Settings, functions and controls of the Nikon D5100 and D5200, focusing modes, exposure modes, shooting modes, white balance, etc., PLUS when and why you want to use them when shooting.  As one reader has said of my previous D7000 guide, “This book, together with the manual, is all you need to start discovering all the camera’s potential.” It will help you to take control of your camera and the images you create!  Learn more about the features and settings discussed in the tips and tricks here and much more.  To read more about them, preview them, and purchase, see my Full Stop bookstore website here!

Nikon D5100 tips tricks book guide manual instruction "for dummies" Experience Douglas Klostermann     Nikon D5200 tips tricks book guide manual instruction dummies Experience Douglas Klostermann
Nikon D5100 Experience eBook user’s guide

7. Lock Your Focus and/ or Your Exposure Settings Before Recomposing Your Shot: When you press and hold the Shutter-Release Button, the focus distance is locked (or you start tracking the subject in AF-C and AF-A modes), but the exposure is determined when the photo is taken. You can customize how this button and the AE-L/AF-L button function so that you can do back-button focusing, lock the exposure, swap the function of the two buttons, or several other options dealing with focus and exposure.

8. Create Images with More Impact Without Photoshop, Using Picture Controls: If you are not going to be processing all your images in Photoshop, Lightroom, Aperture, etc, you can set or create a Picture Control so that your JPEG images (and videos) have the look you want.  Boost the contrast and saturation, or sharpen them a bit.  You can even shoot in black and white or sepia (though it is best to shoot in color and capture an image with all the original information first).  You can save your custom Picture Controls, create your own with the included software, or find ones online then load them on your camera.  Some available online include Picture Controls that mimic the look of roll films such as Kodachrome or Velvia.  But be careful with setting or adjusting Picture Controls if shooting in RAW.  Find out why in my user’s guide!

Adjusting the Picture Control settings

9. Set the ISO Sensitivity Control to Help you out in Difficult Situations: Of course you can adjust the ISO setting on the fly, but you can also set up the camera to automatically adjust some settings if you are in a situation where the lighting changes and the camera determines you will not be able to get the shot without some adjustments to the ISO and/ or shutter speed.   You can set this in the Shooting Menu under ISO Sensitivity Settings, where you can turn this option on, then tell the camera the maximum ISO and minimum shutter speed to use in these situations.  I suggest you set the ISO no higher than 3200 or 6400 if you are willing to accept some noise, and the minimum shutter speed for around 1/30, which you can still hand-hold if careful.  However, if you are carefully metering and adjusting your settings and you don’t like the camera making these types of settings changes without your expressed permission, be sure to turn this setting off.

Setting the ISO Sensitivity Settings

10. Have the Camera Assist You with Manual Focusing: Although digital SLR cameras are designed to be used with their sophisticated autofocus systems, some users prefer to manually focus or are using older manual focus lenses.  And situations such as close up and macro photography sometimes require precise manual focusing.  If you are going to be turning off the autofocus on your camera and lens, you can have the camera assist you in focusing with the Rangefinder.  The camera uses the exposure indicator in the viewfinder to tell you if you are focusing in front of or behind your subject, or if you are in focus.

There are numerous other cool settings you can take advantage of with your D5100 or D5200, including things like Auto Bracketing for Exposure, in-camera HDR, reversing the direction of your Command Dial or exposure indicator, changing the format and color of your Information Display, adjusting your file sizes and types to maximize your maximum continuous burst rate, and determining your best settings for video shooting.  All of these and more are discussed in my e-book user’s guides, Nikon D5100 Experience and Nikon D5200 Experience, both available now.  Learn more about the books, preview them, and purchase at my Full Stop website here. Learn to take control of your camera and the images you create!

Also, please know that there aren’t really any tips or tricks for better photography.  To improve your photography, simply learn your camera inside and out and learn the techniques of dSLR photography (with my e-book!) and then practice, practice, practice taking images, study the results, and look at and learn from the work of talented photographers.

I put together a video and a more in-depth article to introduce and further explain the D5100 autofocus system:

For more detailed information read the article Taking Advantage of the Nikon D5100 Autofocus System.

Still haven’t purchased your Nikon D5100, or need a better lens? Check them out on Amazon below.  I appreciate it if you use these referral links to make your purchase – Amazon will give me a small referral bonus which helps support this blog!  Or use the other camera store links on the left side of this page.  Thanks!

See and buy the Nikon D5100 with 18-55mm Lens on Amazon

See and buy the Nikon D5100 – Body Only on Amazon

Look for a new Nikon Lens on Amazon – I suggest considering the high quality, versatile, all-purpose
Nikon 18-200mm f/3.5-5.6G VR

Was this post helpful?  Please let others know about it by clicking the Facebook or Twitter sharing buttons below, linking to it from your blog or website, or mentioning it on a forum.  Thanks!

Nikon Announces AF-S 50mm f/1.8 Lens

It’s finally here!  Well, not here yet, but it’s been announced:  the Nikon (Nikkor) AF-S 50mm f/1.8 G lens – the nifty fifty WITH an autofocusing motor built into the lens!

This means, unlike the previous version of the Nikon 50mm f/1.8, you can use it with the D5100, D3100, and older versions of those models that don’t have the autofocusing motor built into the lens.

Nikon AF-S 50mm f/1.8 nifty fifity 50
Product image from Nikon


Sample image from Nikon using the new AF-S 50mm f/1.8 G

This fixed focal length (prime) normal lens will give you those dreamy out-of-focus backgrounds and great low light performance that will make it wonderful for portraits, indoor use, and as a walk-around lens that will challenge you to really develop your eye and compose your frames since you won’t be able to zoom in and out.

It should be available in mid-June 2011 for about $220, and is already available for pre-order on Amazon right here.  Here is the press announcement, and here it is on the Nikon website.

See the Nikkor AF-S 50mm f/1.8 G on Amazon

Compare Nikon D5100 vs D7000 vs D90 vs D3100

Choosing between the Nikon D5100, D7000, D90, and D3100:

A few months ago I wrote a post comparing the Nikon D90 vs D7000 vs D300s. Now that the D5100 is available, I am updating the comparison and include this new model, the highly competent successor to the Nikon D5000.

Nikon D5100 vs d7000 vs d3100 manual book compare choose
Detail of the Nikon D5100 – photo by author – copyright 2011 – please do not use without permission!

In the Nikon lineup, the D5100 sits just above the D3100, a bit below the aging D90, and a few steps below the highly capable and immensely popular Nikon D7000. You may see some comparison charts that make the cameras appear somewhat (or very) similar at first, but those charts don’t tell the whole story.  They can even be deceptive.  You really need to take a closer look at not just the specifications, but the features and how they are used in real life, and determine which camera is the right tool for your photography.

The D5100 boasts a 16 megapixel image sensor just like the D7000, shoots 4 frames per second in continuous mode, has HD video capability at 24, 25, and 30 fps, and includes a fully adjustable side-mounted rotating screen more similar to the Canon T3i and 60D than to the bottom mounted limited angle screen on the D5000. It is closer in specifications and price to the Canon T3i than the entry level D3100 and should prove to be an excellent option for new dSLR users plus those experienced enthusiasts wishing to upgrade their D50, D60, or even their D3000 to gain additional megapixels, video, and an improved rear LCD screen.

side by side review compare Nikon D5100 vs D7000 vs D3100 vs D90
Nikon 3100, D90, D7000 (D5100, not shown, is virtually the same size as the D3100) – photo by author at Newtonville Camera

Below I will spell out some of the differences in specifications and features, as well as what these differences mean and why they may or may not be important to you and your photography. Generally as the cameras increase in price and capability from the entry level model to the enthusiast pro-sumer model they gain more sophisticated autofocus and exposure metering systems, shoot faster (more frames per second) in continuous shooting mode, have more controls on the camera body for changing settings, have sturdier construction, and offer more menu and custom function options. As I always like to point out, when you are trying to determine which camera to purchase or upgrade to, you need to first consider and determine your needs, and then see which camera fills those needs. Not the other way around where you look at the new features and speculate if you really need or will use them. The latest cameras almost always have more impressive features and specifications than the preceding models, and the more expensive, higher-end models will offer more features and options than the lower-end models, but if your needs and shooting style don’t required those additional features and functions then it is possible that you can save some money and be completely happy with a less expensive model.

Sensor and Image Quality: The sensors of the D7000 and D5100 are greatly improved over the older D90 in a couple of ways (it is the same sensor in both cameras). The D7000 and D5100 have 16.2 megapixel sensors, where the D90 has 12.3 megapixels. The relatively new D3100 has a 14.2 MP sensor. This increase in resolution allows for more intrusive editing of the files in Photoshop, the ability to crop a picture and still obtain an image with high enough resolution for printing or display, and allows for larger prints. In addition, the improved sensor results in better performance at high ISO settings and in low light, better dynamic range, tonal range, and color sensitivity. Have a look at dxomark.com to compare the sensors – run your mouse along the red-to-green color bar to the right some of the graphs, such as Dynamic Range, to see how these differences affect images.

Exposure Metering: The D5100, while sharing a similar sensor to the D7000, does not have the same advanced metering system. It shares the less sophisticated 420 pixel RGB metering sensor of the D3100 and offers matrix metering, non-adjustable center-weighted, and spot metering modes. This system may be more than sufficient for many users, especially those not intending to adjust their exposure settings and dig into their menus in reaction to complex lighting situations. But if your shooting demands require more precise exposure metering and control over the size of the areas being metered, you need to consider the D90 or D7000. The 2016 pixel RGB metering sensor of the D7000 is also improved compared to the D90, and will result in more accurate metering performance of straightforward and complex lighting scenes and situations. Both these cameras offer matrix metering, center-weighted, and spot metering modes. With center-weighted metering on the D90, you can select the size of the center-weighted area to be a 6, 8, or 10mm center circle, and the D7000 adds a 13mm circle option to those.  (If you don’t understand what this means or why you may need it, you probably don’t need it!)

Autofocus: The autofocus systems of the D3100, D5100, and D90 all have 11 autofocus (AF) points with the center one being a more accurate cross-type. These AF systems may be more than sufficient for most users, and they can successfully track moving objects in the frame such as athletes, performers, or animals. However, if you specialize in sports, action, wildlife, or bird photography, you are going to want to consider the much more sophisticated, accurate, and customizable AF system of the D7000. The D7000 boasts a significantly improved AF system of 39 AF points with 9 of them (in the center) being cross type. The AF system of the D7000 allows for you to use these points in various ways including automatic AF point selection, single point AF, and dynamic area AF using your choice of 9 points, 21 points, all points, or all points with 3D-tracking. With the D7000 you can also use a custom function to limit the AF system to 11 points, which may be more manageable for someone who wishes to manually select their AF points.  (Have a look at this article for an in-depth explanation of the D7000 AF system and its capabilities)

review compare Nikon D5100 vs D3100 vs D7000 vs D90 side by side
Nikon 3100, D90, D7000 (D5100, not shown, is virtually the same size as the D3100) – photo by author at Newtonville Camera

Body, Construction and Size/ Weight: The D5100 is just slightly larger and a tiny bit heavier than the D3100, both weighing just over one pound. Both have plastic bodies and more limited buttons and controls that the higher end models. The D90 and D7000 appear very similar at first glance, but the plastic body of the D90 has been upgraded to the partially magnesium alloy body (top and rear) of the D7000. This adds slightly to the weight: 1.5 lbs for the D90 vs. 1.7 lbs for the D7000. The sturdier construction of the D7000 versus the D90 – including its nicer rubber gripping surfaces – creates the impression and feel of a more professional body. The D7000 also has weather sealing at the memory card and battery doors.

The higher end D7000 includes not only the 3″ rear LCD screen but also a top LCD panel for viewing and changing your settings. This is essential for photographers who are constantly changing their settings to deal with various shooting situations. It is worth noting that the magnesium alloy body of the D7000 does not fully extend around the front, and thus the area surrounding the lens mount is plastic. See this image of a D7000 skeleton next to one of a 7D for details. For most users, including even those using the camera daily or in rugged travel situations, the non-magnesium construction of the D5100 should be far more than good enough, strong enough, and durable enough.

Please know that the size and weight of these bodies is a result of their build, features, and capabilities.  Those are the criteria that should be compared first, not the resulting size and weight.  (Also be sure to read this post of Why How it “Feels” is not a valid Criterion for Choosing an dSLR.)

ISO: As mentioned in the Sensor and Image Quality section above, the high ISO performance of the D7000 is greatly improved over the D90. The tests at dxomark.com tell this story, along with the fact that the native ISO range of the D7000 is 100-6400 expandable up to 25,600. The D5100 shares these specifications, and should offer similar results. The D3100 has a native ISO range of 100-3200 expandable to 12800, and the range of the D90 is 200-3200. This means that with the D7000 and D5100 you can use higher ISO settings when required, such as in low light situations, and not have as much difficulty with digital noise, particularly in the shadow areas of images.

Controls: As with construction, the buttons and controls vary with these cameras. The D3100 and D5100 offer limited, basic controls on the exterior of the camera. However you can use the rear LCD screen to quickly change many settings, or else go into the menus. The D7000 offers an extensive array of controls on the camera body, allowing one to quickly change a large number of settings as they work, including focus mode and focus area settings, shooting mode, and exposure mode. The controls of the D7000 are similar to the D90 with some changes including the addition of the shooting mode ring under the mode dial (to change from single shot to high speed continuous to self timer, etc.), and the live-view switch with movie record button inside it. The top AF button of the D90 is incorporated into the AF switch and button at the base of the lens on the D7000. The D7000 also offers more white balance options than the other cameras, plus 2 customizable user settings (U1, U2) on the mode dial, and you can assign functions of your choice to buttons such as the Fn Button.

Menus and Custom Settings: These allow for greater control over customizing how the camera functions. The D5100 has less Menu and Custom Settings options than the D90 and the highly customizable D7000, and more than the D3100 (which offers no custom settings). These settings enable you to customize the operation, function, and controls to work how you want them to, including things like exposure increments, Live View options, tweaking how the autofocus system operates, setting more precise white balance settings, and customizing which button does what. There are ebooks such as my Nikon D7000 Experience and Nikon D5100 Experience which walk you through all of the Menu settings and Custom Settings so that you can set up your camera to work best for how you photograph, and also begin to learn to master all the advanced features, settings, and controls of these powerful dSLR cameras.


Brief commercial interruption: I would like to mention that I have written an eBook user’s guide for the Nikon D7000, and one for the Nikon D5100. After spending so much time studying, experimenting, writing about, comparing, and discussing these cameras, I decided to put some that knowledge into eBook form! The guides covers all the Shooting, Setup, and Playback Menu settings and every Custom Function setting – with recommended settings – plus discussions of how, when, and why to use the cameras’ settings and features, (metering modes, aperture and shutter priority modes, advanced autofocus use, focus lock, exposure lock, and more) for everyday and travel use, to help you take better photos.

Click HERE to learn more about Nikon D7000 Experience – and to view a preview, or purchase it!

And see HERE to learn about, preview, and purchase my ebook guide Nikon D5100 Experience.

Wireless Flash: The D7000 includes the feature of advanced wireless lighting using the built in flash as a commander for off-camera Nikon Speedlights. However, the D5100 and D3100 do not have this capability. With the D7000, you can set up one or more Speedlights in remote mode, then trigger them wirelessly with the built in flash of the camera.

Viewfinder: The D5100 has a pentamirror viewfinder with approximately 95% coverage of the actual resulting image, just like the D3100. The higher quality pentaprism viewfinder of the D90 gives 96% coverage of the actual resulting image, while the D7000 has a larger, brighter pentaprism viewfinder with 100% coverage. While in-and-of-itself, a 95% viewfinder works just fine, when you compare it side-by-side with the large, clear view of the D7000, you can see and understand the advantages of a clearer view of your entire scene with a 100% view, pentaprism viewfinder.

Processor: The Nikon D5100 and D3100 use the fast Expeed 2 image processor just like the D7000. This allows for more video options including full 1080p HD at 24fps, overall faster processing of stills and video files, and the ability to maintain fast continuous speed shooting for numerous frames. The D90 has the older Nikon Expeed processor, which is also fast enough to handle its processing needs.

review compare D7000 vs Nikon D5100 vs D3100 vs D90 size
Nikon 3100, D90, D7000 (D5100, not shown, is virtually the same size as the D3100) – photo by author at Newtonville Camera

Continuous Shooting Speed: As you work your way up the Nikon dSLR line-up the cameras’ continuous shooting speed and maximum shots at that rate increases. The D3100 shoots 3 frames per second (fps) in continuous shooting mode, the D5100 shoots 4 fps, and the D7000 shoots 6 fps for up to 100 shots. The D90 can shoot 4.5 fps up to 100 images. If you often capture action and really need the higher frame rate, such as for sports, action, or wildlife shooting, you are going to have to seriously consider the D7000 over the other cameras. Paired with its advanced autofocus system, this fast frame rate can sharply capture moving objects is all types of situations. A nice feature of the D7000 is that you can adjust the low speed continuous mode to shoot anywhere from 1 to 5 fps, using the custom settings.

Memory Card: The D5100, D3100, and D90 all use a single SD memory card. The D7000 accepts 2 SD cards, where the second card can be used in a variety of ways: overflow when the first card fills up, JPEG on one / RAW on the other, or mirrored backup of the first card. The second card can come in handy as well if one is shooting video files, and one card can be designated for stills and the other video.

Battery and Battery Grip: The D5100 and D3100 both use the EN-EL14 battery, and the D7000 uses the new, higher capacity EN-EL15 battery, which will last for over 1000 shots. The D7000 accepts the optional MB-D11 battery pack/ vertical grip which is constructed of magnesium alloy. The D90 uses the EN-EL3e battery and its optional battery pack/ vertical grip is the MB-D80. The D5100 and D3100 don’t accept a battery grip. The battery pack /grip is handy for providing the ability to use a second battery and thus prolonging shooting time, and also creates a larger camera body which some users find more comfortable, especially when shooting in portrait orientation.

Full HD video: The D5100 shoots 1080p and 720p video at 24, 25, and 30 fps. The D3100 shoots 1080p at 24 fps and 720p at 24, 25, and 30 fps. The D7000 also shoots 1080p at 24 fps only and 720p at 24, 25, and 30 fps, up to 20 minutes with full-time continuous autofocus. The D90 offers 720p video at 24 fps, with a 5 minute shooting time.

Ease of Operation: While beginners may find all the buttons, controls, and menus of any dSLR difficult and confusing at first, the menus and controls of the D5100 and D3100 are pretty basic and simple to learn for a dedicated user. The additional controls and menus of the D7000 and D90 are all quite intelligently designed and will become intuitive and straightforward for the more advanced user once they are learned and understood. Again, have a look at helpful guides such as my Nikon D7000 Experience and Nikon D5100 Experience to begin to learn to master all the advanced features, settings, and controls of these powerful dSLR cameras.

If you are interested in comparing the D5100 or D7000 to the comparable Canon models, have a look at these articles:

Nikon D5100 vs. Canon T3i

Nikon D7000 vs. Canon 60D (and 7D)

Purchasing these cameras: If you plan to buy any of these cameras, accessories, or anything else through Amazon.com or Amazon.com UK, I would appreciate it if you use my referral links. Your price will be the same, and they will give me a little something for referring you, which will help support my blog. Thanks! In the USA, use the links throughout this post or use this referral link to Amazon. And for those of you across the pond, click here for my referral link to Amazon UK. Thank you for supporting my efforts!

See the Nikon D5100 with 18-55mm Lens on Amazon $899

See the Nikon D5100 – Body Only on Amazon $799

See the Nikon D7000 – Body Only on Amazon $1199

See the Nikon D7000 and 18-105mm Lens on Amazon $1499

See the Nikon D3100 with 18-55mm Lens on Amazon

See the D90 on Amazon $739 body only or $1049 with 18-105mm lens

Purchasing from the UK? Use my Amazon UK referral link here. If you wish to purchase from B&H Photo, Adorama, or direct from Canon, please click on their logos on the left side of this page or on the Gear page. Thanks!

Accessories and Books: Now that you are on your way to deciding on a camera, you should also start looking into photography gear, accessories, and books. Check out these links, dSLR Photography Gear, Accessories, and Books, which discusses essential gear plus accessories specific to Nikon cameras; Equipment for Travel Photography, which discusses useful and practical photo accessories and equipment for both everyday and travel photography.

And to sum it all up, here is a brief, mostly serious synopsis to help you make the camera decision:

Get a Nikon D3100 if you are new to photography or to digital SLR photography and don’t want to spend a lot of money on a camera because you might only be using it on Auto mode, or if you don’t plan to really “get into” photography beyond taking better photos than you are able to with your compact point-and-shoot and having the ability to use various lenses.  The D3100 is a camera one could outgrow in time if they work at their photography and advance. See the Nikon D3100 on Amazon.

Get a Nikon D5100 if you are new to photography or to digital SLR photography and think you will want to experiment beyond Auto mode, or want to upgrade from an older entry level model because you want higher image quality and more mega-pixels, or HD video. If you have been happy with the features and controls of your previous basic dSLR camera and have not discovered the need, in your use of it, for any specific additional advanced features, there may be no need to look beyond the D5100.  The D5100 is a camera one can grow with, but it is also one a user could outgrow if they are dedicated to their photography and start to require more advanced capabilities. See the Nikon D5100 on Amazon.

Get a Nikon D90 if you have outgrown the capabilities of an older Nikon like a D3000 or D40 through D60 due to your greater experience and more demanding shooting needs which require more direct or sophisticated controls and customization options. Or you have been pretty pleased with your D70 or D80 and its features but wish to upgrade for the increased image quality and mega pixels (or HD video). And/ or you need a more rugged camera for your frequent and demanding shooting and off-the-beaten-path traveling needs. Or if you need the increased 4.5 frames per second continuous rate to shoot sports or action. If you typically shoot on Auto or Program mode, you may not need a D90. If you do not manually select your own focus point and have never used exposure compensation you may not need a D90. If you have never used the AE-Lock [AE-L] button to lock exposure you may not need a D90. If you don’t understand the relationship between aperture, shutter speed and ISO and don’t intend to learn more about it, you may not need a D90. Or unless you plan to dedicate yourself to learning this camera and the principles of SLR photography and grow into this more advanced camera, consider saving the money or using it towards a better lens.  The D90 is a camera one would not outgrow as it has advanced features and capabilities, but its drawback is that it is now outdated. See the Nikon D90 on Amazon.

Get a Nikon D7000 if you have extensive experience with a D3000, D40 through 60, or D70 through D90 camera, and you know and understand most of the D7000’s advanced features and customization options, and you specifically need some of them for your demanding shooting needs. If you haven’t passed the above “criteria” for a D90, you probably don’t need a D7000. If you have never used A aperture priority mode or M manual mode, you probably don’t need a D7000. If you have never used autofocus tracking settings to track a moving subject across your frame and worried how an interfering object would affect your focus you might not need a D7000. If you have never used spot metering to determine a critical exposure level you may not need a D7000. Or unless you plan to dedicate yourself to learning this camera and the principles of SLR photography and grow into this very advanced camera, consider saving the money or using it towards a better lens. However, if you often need to take 100 consecutive photos at the rate of 6 frames per second, you do need the D7000. Immediately. Even if you just sometimes need that. Totally worth it. That’s 16.67 seconds of continuous shooting. Who doesn’t need that? You’d make Eadweard Muybridge proud.  The D7000 is not a camera one would outgrow for a long time, and in fact will meet many of the demands of a professional.  See the Nikon D7000 on Amazon.

(Please note, the D3100, D5100, D90, and D7000 all have these features and capabilities I just listed: manually selected focus points, exposure compensation, AE-Lock, auto-focus tracking, and spot metering. I’m just using them as a determination of your experience level and needs.)

Was this post helpful?  Please let others know about it by clicking the Facebook, Twitter, or Google+ sharing buttons below, or linking to it from your blog or website, or mentioning it on a forum.  Thanks!  Want to help support this blog with no cost or effort?  Simply click on the Amazon and B&H Photo logos on the left side of this page to go to those sites and make your purchases.  They will then give me a little referral bonus!

Camera Equipment Shortages Expected

As I expressed in a previous post, camera equipment might be of little concern to victims of the natural disasters and their ongoing effects in Japan. For someone planning on purchasing equipment for an upcoming assignment or trip, however, it is important to know that camera equipment shortages of dSLR cameras and lenses are already being reported and is evident by the stock listed on major retailers’ websites. The earthquakes and tsunami in Japan have affected manufacturing and the supply chain of products or parts needed to assemble the products, and these effects could continue for months.

If you are planning to make a camera purchase in the near future, or if you need certain equipment for an assignment or trip you have planned in the upcoming months, it might be wise to go ahead and make those purchases now.

the Nikon D5100 and the Canon T3i

The latest addition to the Nikon dSLR line-up is the versatile Nikon D5100, which replaces the D5000. It sits just above the D3100 in the Nikon consumer offerings, and a bit below the D90 and D7000 – both sturdier and more sophisticated cameras. The D5100 boasts a 16 megapixel sensor (like the D7000), and a swivel screen more like the one on the Canon T3i and 60D, attached at the left side, rather than the less convenient bottom swivel of the previous D5000. (see my post comparing several of the latest Canon dSLR cameras here, and one comparing the Nikons here.)

Nikon D5100 book manual how to instruction download vs Canon T3i
Nikon D5100 – photo by author – copyright 2011 – please do not use without permission!

The D5100 shoots 4 frames per second, faster than the 3 fps of the D3100, and of course has 1080p HD video with all the frame rate options. The D5100 now has in-camera processing filters like those of the 60D and T3i (including miniature, high or low key, and selective color in the Nikon). And it has the 11 point AF system, with one cross type sensor, like the D3100.

Canon T3i vs Nikon D5100 compare side by side
Canon Rebel T3i on left, Nikon D5100 on right

First, a Comparison of the Nikon D5100 vs. the Canon Rebel T3i specs, to see how they stack up “on paper”:

Canon Rebel T3i / EOS 600D

  • 18 megapixels
  • Articulating rear LCD screen
  • 1080p HD video with all the frame rate options
  • 9 point autofocus system with 1 cross-type sensor
  • 3.7 frames per second continuous shooting for a maximum 34 JPEG burst
  • 63 zone dual layer exposure metering system – the same as the one in the 60D and 7D
  • In-camera image processing filters plus RAW to JPEG, cropping, and other options
  • Some scene modes
  • ISO range 100-6400
  • 95% viewfinder with .85 magnification
  • 1.26 lbs with battery
  • Accepts optional battery pack / vertical grip – the Canon BG-E8
  • Wireless flash control of external Speedlites with built-in flash
  • Compatible with and autofocuses with all Canon EF and EF-S lenses
  • Depth of Field preview button
  • Full manual video exposure control
  • Exposure Simulation of approximate image exposure and histogram in all Live View shooting modes

Canon T3i vs Nikon D5100 compare side by side
Canon Rebel T3i on left, Nikon D5100 on right

Nikon D5100

  • 16 megapixels
  • Articulating rear LCD screen
  • 1080p HD video with all the frame rate options
  • 11 point autofocus system with 1 cross-type sensor
  • 4 frames per second continuous shooting for a maximum 100 JPEG burst
  • 420 pixel RGB metering sensor like the one in the D3100, not the 2016 pixel RGB metering sensor found in the D7000.
  • In-camera image processing filters
  • A lot of scene modes
  • ISO range 100-6400
  • 95% viewfinder with .78 magnification
  • 1.2 lbs with battery
  • Does not offer an official Nikon optional battery pack-vertical grip (3rd party grip now available)
  • No wireless flash control of external Speedlights with the built-in flash
  • No autofocus motor in body, and will not autofocus with non-AF-S lenses, such as the 50mm f/1.8
  • No Depth of Field preview button
  • Also an auto HDR feature where the camera combines 2 images to create an image with extended tonal range.
  • NO full manual video exposure control
  • Exposure Simulation of approximate exposure in P, A, S Live View shooting modes.  NO Exposure Simulation in M mode.  NO histogram in any Live View mode.

Canon T3i vs Nikon D5100 compare side by side
Canon Rebel T3i on left, Nikon D5100 on right

As you can see, both cameras are incredibly similar as far as specifications, and it looks as if the price may even be nearly the same.  The wireless flash capability, better exposure metering system, and ability to autofocus with all compatible lenses are all definite advantages for the Canon T3i.  But the D5100 offers in-camera Auto Distortion Correction (such as when using a wide-angle lens) and a faster rate and higher number of continuous shots in a single burst.  (But with any camera, consider if you ever really need to take a 100 shot burst, much less a 34 shot burst.  If you shoot like that, you should probably be looking at a Canon 7D or Nikon D7000!)  Another deciding factor may be which camera feels more comfortable in your hands as you are using it and accessing the typical buttons and controls (not simply holding it and and checking its weight and general “feel”), which controls and menus seem better placed and easier to navigate for you (though either are equally easy to learn and to become used to using), and which system you want to invest in for the long term (lenses, flashes, etc.).  The Canon T3i is a slightly larger camera, plus allows for the optional battery grip.  The D5100 is not compatible with an optional Nikon vertical grip (edit:  a 3rd party has now made an optional battery grip for the D5100).  A look at the image quality here seems to show that the Canon’s JPEG images straight out of the camera are sharper, have more clarity, and more color “punch,” but these types of settings are widely adjustable with the Picture Settings or Picture Controls.

Also, while the specs look similar on paper, there are numerous small differences that are encountered in actual use, which begin to add up and become significant if they affect the features and controls you will be using.  For example, one important one is how the settings are changed using the “i” or “Q” buttons and the rear LCD screen. If you change your settings often, you will see on the D5100 Information Display Screen how you have to navigate down the line through each setting to get to the one you want then enter a second menu to change it.  On the T3i Quick Control screen, you can jump quickly to the setting you want then simply turn the Main Dial to quickly change it without opening up a second menu.  So that is a speed and convenience issue that would be noticeable if you are one to change your settings often, on the fly.  And while the rear LCD screens appear nearly similar, the 3:2 aspect ration of the screen on the T3i matches its sensor ratio, so images viewed during playback are seen larger on the Canon screen than on the Nikon Screen, possibly allowing you to inspect the focus and details slightly better.

There are other small but potentially important differences between the two cameras that are worth considering if you have specific needs (especially full manual control of exposure in video mode – see below).  For example, while in Live View, both cameras have Exposure Simulation so that as you change your exposure or exposure compensation settings, you will see the approximate resulting exposure on the image on your rear LCD screen.  However, with the D5100, Exposure Simulation does not function while in Manual M shooting mode.  This could be a deal-breaker if you use and need that feature.  Using the T3i in Live View you can optionally view the histogram to help determine proper exposure, however the histogram is not available on the D5100 when using Live View in any shooting mode.

Also, do you make use of Spot Metering mode?  You may prefer the viewfinder of the T3i, as it indicates the Spot Metering area with a circle, while the D5100 does not.  But, there is a very good reason the D5100 doesn’t have the center spot, and that is because in the Nikon, Spot Metering is linked to the selected AF point, and so not necessarily to the center AF point and center of the frame.  This is obviously a very useful feature and maybe you’d prefer that your camera’s Spot Metering works that way.


Canon Rebel T3i viewfinder with 9 autofocus points and Spot Metering area indicated in center


Nikon D5100 viewfinder with 11 autofocus points but Spot Metering area not visually indicated because it is linked to the active AF point

As mentioned, it is not possible to see actual exposure simulation with the Nikon D5100 in Live View while in Manual M shooting mode. However, in the P, A, or S shooting modes, the live view image will lighten or darken to simulate the exposure settings or the exp. compensation that you set. And to add insult to injury, there is no exposure meter displayed on the Live View screen, so to check your exposure you will need to temporarily leave Live View and switch to the control panel view by pressing the [i] Button.  The Canon 60D and Canon Rebel T3i both have Exposure Simulation in all modes during Live View. On the 60D you can turn this feature off and on. On the T3i it is on automatically while in Live View.

Manual Control of Exposure in Video Mode: It was quickly discovered by D5100 users that the camera does not offer full manual control of exposure in video mode.  The T3i offers this ability.  This is pretty important if you are serious about shooting video.  However, there is a “work-around” for this deficiency.  To manually set your shutter speed, you must set the camera on Shutter-Priority Auto Mode (S) and set your desired shutter speed before going into Live View mode, use exposure compensation to obtain the aperture setting you want, and use the AE-L/AF-L Button to lock that exposure (set Custom Setting f2 for AE-Lock Hold).  If you wish to first set the aperture setting, you must set the camera on Aperture-Priority Auto Mode (A) and set your desired aperture before going into Live View mode, use exposure compensation to obtain the shutter speed setting you want, and use the AE-L/AF-L Button to lock that exposure (set Custom Setting f2 for AE-Lock Hold).

The Canon T3i comes with a much more comprehensive and user friendly user’s manual than the small brochure size user’s manual of the Nikon D5100, although the more detailed D5100 Reference Manual is available as a file on the included Reference CD.

To gain further understanding of what the specs, features, controls, and functions of these cameras mean in relation to real life shooting and camera use, have a look at the articles that compare the various current Canon dSLR models and Nikon dSLR models.

If you decide on the Canon T3i, please be sure to check out my ebook, Canon T3i Experience, and if you choose the Nikon D5100, have a look at my ebook Nikon D5100 Experience.  Each of these guides will help you to take control of your camera in order to consistently capture better images!

See and purchase the Canon T3i with 18-55mm lens on Amazon

See and purchase the Nikon D5100 with 18-55mm lens on Amazon

Was this post helpful?  Please let others know about it by clicking the Facebook or Twitter sharing buttons below, linking to it from your blog or website, or mentioning it on a forum.  Thanks! 

Want to help support this blog with no cost or effort?  Simply click on the Amazon and B&H Photo logos on the left side of this page to purchase from their sites, or click on the links throughout this post to view and purchase those products on Amazon.  They will then give me a little referral bonus!

Top 10 Accessories for Your Canon Rebel T3i / EOS 600D

I have updated this post for the Canon Rebel T5i / EOS 700D and the Rebel T4i / EOS 650D, which you can now view on this blog here:

Top Ten Accessories for the Canon T5i / EOS 700D

All of the accessories still apply to the T3i and the T2i (EOS 600D, 550D).


Black and White Challenge Addendum

The Nikon P300 has been released, and since it joins the same class of cameras as the ones I used in the Grainy Black and White Challenge, I’ll add an image from the Nikon P300 using its High-Contrast Monochrome setting.

The previous cameras that I used to compare their grainy black and white settings included the Olympus XZ-1, the Canon S95, and the Panasonic Lumix DMC-LX5.

Here is the entry from the P300.  To get to this setting, you set the mode dial to Scene Mode, go to Special Effects, and set it for High-Contrast Monochrome.

Nikon P300 High Contrast Monochrome black and white
Nikon P300 – High-Contrast Monochrome

See the the Grainy Black and White Challenge post for more info, and have a look at a larger version of the image on Flickr.

The Canon 70-300mm DO Travel Companion

In some of my posts, such as the one about the Best Lenses for Travel and Humanitarian Photography, I venture to suggest a good single lens for travel. My recommendations have typically been the Canon 18-200mm f/3.5-5.6 or the more expensive Canon 24-105 f/4L. Both offer a useful focal length range for travel, image stabilization, and excellent image quality (relative to their price, of course – the professional L lens is of much higher quality). The 24-104mm also boasts the fast and quiet USM focusing motor.

One lens that I have previously failed to mention is the unique Canon 70-300mm f/4.5-5.6 DO IS USM lens. Its broad focal length range, image stabilization, and USM focusing motor with full-time manual focus* are all appealing features. (*you can over-ride or tweak the autofocus with a twist of the focus ring without switching to MF.) But what makes it a potentially great travel companion is its size and appearance. Due to its use of Diffractive Optics (the DO in its name) the lens is relatively small and light. And in addition, its exterior is black rather than the white of the L lenses. Thus it becomes a much more portable and much less obtrusive lens than the big, white 70-200mm and 70-300mm L lenses.

Canon 70-300mm DO lens diffractive optics
The unique green band of the Canon 70-33mm DO lens

The 70-300mm DO declares its uniqueness with a green band around the front of the barrel, where the red band of the L lenses sits. Diffractive Optics is a technology developed by Canon to reduce lens size while maintaining image quality and eliminating chromatic aberrations, and currently only two Canon lenses use DO. This lens has been around since 2004, and has overall received excellent reviews. For a professional photographer it will never quite replace a 70-200mm or 70-300mm L lens due to its slightly lower image quality and sharpness, and lack of the f/2.8 or f/4 maximum aperture throughout its full range, but for those just a little less demanding it could be the perfect travel companion for photographers not wishing to carry around a larger and more noticeable white lens.

Canon 70-300mm DO lens diffractive optics

There are mixed reviews on its sharpness. Some users claim it is sharp as can be, some say it loses sharpness at certain focal lengths and apertures, and other say with standard post-process sharpening there is virtually no difference between it and an L lens. One complaint that can’t be denied is its propensity for lens creep. Due to the weight of the lens elements and the fact that it zooms externally (unlike the internal zoom of the 24-105mm or the 70-200mm lenses) the zooming barrel will move on its own when pointed up or down. The lens has a locking switch for storage or for walking around, but otherwise it is going to creep. This DO lens also does not have a rubber weather-sealing ring at its mounting base, which is disappointing for a lens in this price range.

Optically the 70-300mm DO displays a couple unique characteristics as well. At certain apertures a hazy, often described as dreamy, outline will appear around bright out-of-focus areas. And due to the concentric circles of the DO optics (visible in the lens just by looking at the glass at an angle) out-of-focus spots of light also contain concentric circles, or “targets,” as shown in the image below. These rings also appear in areas of flare, so it is best not to use this lens if you are a fan of shooting into the sun to achieve purposeful lens flare.

Canon 70-300mm DO lens diffractive optics bokeh target bullseye
The interesting bullseye/ target bokeh of the 70-300mm DO lens, pronounced when at narrow apertures (f/16 here) – click image to view larger on Flickr.

The above image is a crop from the one below. Notice that in addition to the concentric circles, the bokeh of bright light spots becomes hexagonal at narrower apertures (like f/10 or f/16) as shown below, but it is nice and circular starting at f/8, without the targets being so pronounced at wider apertures (like f/5.6).

Canon 70-300mm DO lens diffractive optics bokeh
Canon 70-300mm DO lens – hexagonal bokeh with bullseye targets seen at f/16 – click image to view larger on Flickr.

So if you are looking for a high quality lens for travel with an exceptional telephoto zoom range, you may wish to consider the 70-300mm DO. It is not everyone’s ideal single lens for travel because its focal length starts at 70mm and thus lacks the wide angle range, but for those who like to zoom in close and capture faces and details, it could be a lens that stays on your camera much of the time. And even for those who already have a big, white 70-200mm lens, this could come in handy in many situations which you wish to be a little more discreet or even appear less intimidating to your subjects. Go to the store and play with one, and I think you may find that you love the size and feel of this lens, and can envision its great travel potential.

See and purchase the 70-300mm DO lens at Amazon.com

Have a look at some other reviewers’ posts to learn more about this lens, its technical specs, and its performance, as well as see images comparing its size to other lenses:

Review and description with size/ weight comparisons at The-Digital-Picture.com

Review focusing on image quality at Photo.net

Field test and very technical review at Luminous-Landscape.com

Canon’s explanation of Diffractive Optics

Grainy Black and White Challenge: XZ-1, LX5, S95, P300

I’m not usually a big fan of the “creative fun filters” that are included as in-camera processing options for many of the current dSLR and compact point-and-shoot cameras.  I prefer to do my processing in Photoshop, where I can see the full quality version of the image, and have more control over the editing.  However, I was playing around with the “Grainy Film” mode of the new Olympus XZ-1, and I was quite impressed with how cool, fun, and easy it is.  Perhaps I should reevaluate their usefulness!

Olympus XZ-1 grainy film black and white
Olympus XZ-1 – Grainy Film

So I decided to have a look at some of the other cameras’ black and white grainy film options and see how they all compare.  This is a pretty informal comparison without too much strict effort put into the “test” other than putting the subject camera in about the same place, zooming in all the way and using the maximum aperture if possible, and loosely trying to frame the images all about the same.

Since the Olympus XZ-1 inspired this experiment, I will cover that one first.  The Olympus XZ-1 is a new competitor to the high end compact point-and-shoot class of cameras which includes the Canon S95 and the Panasonic Lumix DMC-LX5 – as well as the upcoming newly released Nikon P300.  They are all roughly about the same size, and have excellent image quality and low light performance.  Their features and maximum apertures vary, and there are other site, such as DPReview, that do full reviews of these models if you are more interested in learning about them.

For the Olympus XZ-1, you turn the Mode Dial to “Art.”  How cool is that?!  All you have to do is turn the dial and you can make art!  Other cameras merely have “Scene Modes,” while the Olympus offers “Art!”  In Art Mode choose Art 3, which is Grainy Film. While in Art Mode, as in most of its other modes, you can easily change the exposure compensation by pressing up on the rear dial and dialing in a (+) or (-) compensation amount, and immediately see what you will get.  I kept it at 0 for this test.

The image from the Olympus, seen at the top of this post, is nice and contrasty.  It has a bit of grain, but actually isn’t really very grainy.  The large aperture does blur out the background nicely.  Have a look at the larger version on Flickr to see it better.

Next up is the Panasonic Lumix DMC-LX5, another one of the high end point-and-shoots.  For this camera you go into the My Color Mode and choose Film Grain.

Panasonic Lumix DMC-LX5 film grain black and white
Panasonic Lumix DMC-LX5 – Film Grain

Compared to the Olympus, it appears to have created more of a dark monochrome image, without the high amount of dramatic contrast.  There is a bit of grain, perhaps a little more than the Olympus, but I really wouldn’t call it grainy.  The background blurring isn’t nearly as dramatic as the Olympus.   See larger image on Flickr.

The Canon S95 is quite a popular camera for those seeking great image quality in a compact point-and-shoot.  After David Pogue wrote an ode to it in the New York Times, they really started to move off the shelves.  For the S95, you use one of the Scene Modes called the Nostalgic Mode.  You have a few degrees of  exposure to choose from as you turn the front lens dial, which first start to affect image color, then go to sepia, and then to contrasty black and white.  I choose the highest setting to get the grainy black and white look.

Canon S95 Nostalgic Scene mode black and white
Canon S95 – Nostalgic Scene Mode

The contrast of the S95 image is between the other two – more than the Panasonic but less that the highly contrasty Olympus.  The background really shows the grain, but is not very dramatically blurred out.  Have a look at the larger version on Flickr to see it better.

Here is the entry from the Nikon P300. To get to this setting, you set the mode dial to Scene Mode, go to Special Effects, and set it for High-Contrast Monochrome.

Nikon P300 High Contrast Monochrome black and white
Nikon P300 – High-Contrast Monochrome

Like the Panasonic, the contrast isn’t actually that dramatic.  And I did not find any way to adjust the aperture setting while in this mode so as to take advantage of its fast lens (including the inability to change the ISO in this mode), so it used f/5.5 and thus the background blurring really isn’t very dramatic either.  And this setting does not introduce any grain into the image.  Have a look at a larger version of the image on Flickr.

The final camera is the Canon 60D, used here with its 18-135mm kit lens.  This is a digital SLR, not a compact point-and-shoot like the others, but I knew it offers a grainy black and white option in its Creative Filters, so I added it to the mix.  To use this feature, you take an image in color, then access the Creative Filters to apply the affect, and then save the new copy along with the original image.  You can quickly access the Creative Filters during playback by pressing the Q Button.  This one is called Grainy B/W, and is offered in three levels of contrast: Low, Standard, and Strong.  I chose Standard to demonstrate the middle ground.  Standard appears to be pretty contrasty, and is closer to the highly contrasty Strong setting than it is to the not-as-contrasty Low setting.

Canon 60D Grainy B/W creative filter
Canon 60D – Grainy B/W Creative Filter

As you can see, even on the Standard level of contrast it is quite contrasty.  And you can definitely see the grain in the background of this image, which is nicely out of focus because I was able to use a long lens and a wide aperture.  The Strong setting increases the contrast to a level very similar to the Olympus.  See larger image on Flickr.

With the compact cameras, you can see on the rear LCD screen what you are going to get in advance, while with the Canon 60D, you can see how your original color image will be affected by the different levels of contrast.

So there you have it – the grainy black and white in-camera processing of these camera.  Of the compacts, my favorite is the very dramatic look of the Olympus XZ-1, due to both its contrast and its more out-of-focus background.  Thanks to my patient subject, the classic Nikon F3 with the stunning 50mm f/1.2 lens.  Have a look at some real black and white grain on some of my earliest SLR photos from Rome, 1991.

Canon T3i / 600D vs T2i vs 60D vs 7D vs 5D MkII

Since several of the current Canon dSLR cameras – such as the T4i/650D (and T3i/600D), 60D, and 7D – share similar features and an 18 megapixel sensor, it can make it difficult and confusing to decide which one is best for you.  But each one is designed for different levels of photographers with specific needs, and there are significant differences that may or may not be important to how and what you photograph.

Obviously as you pay more, you get more, and this article will explain what that “more” is and help you decide if you need it.  If you are new to dSLR cameras, know that things like 9 cross-type AF points and dual Digic IV processors aren’t feature-bloated “bells and whistles” or marketing hype, but are important features for how advanced photographers work and they provide the capabilities that some demand from their equipment.  If your needs don’t demand them, don’t be swayed to invest more in a camera that provides far more than you require.  It won’t help you take better photos, and in fact may cause you to take worse photos until you figure out how to properly take control of a more advanced camera!

This comparison post has grown organically as new models have been released, so please be sure to look through the entire post to find the section that best applies to you, such as T2i vs T3i, or 60D vs 50D, the Canon 5D Mk II, or the overall Canon EOS 7D vs. 60D vs. 600D / Rebel T3i comparison which is the main point of this post.  Don’t miss the Which Canon dSLR is Right for You summary at the end of this article!

Rather than add the T4i into this post, I have written a new post to introduce and explain the features of the latest Rebel, the T4i – Introduction to the Canon Rebel T4i / EOS 650D. The additional features of the T4i make the decision between the T4i vs. 60D more challenging than ever, and so I wrote more about that in Canon Rebel T4i vs EOS 60D.

I know there is a lot to read, but you are preparing to spend a lot of money, and this post will thoroughly explain the differences of these cameras and help you decide which one if right for you! Even if some of these models become outdated, the majority of the information and comparison factors remain similar, and it is still worthwhile to read this article before heading over to the T4i articles.

If you haven’t yet committed to Canon and are interested in comparing the Canon 60D vs. Nikon D7000 , or the Canon T3i vs Nikon D5100, or the entire Nikon line-up, have a look at those posts next.

Canon Rebel T3i EOS 600D book guide manual tutorial how to instruction
The new Canon Rebel T3i / 600D (all photos by the author, some equipment courtesy of Newtonville Camera)

Review / Comparison of Canon EOS 7D vs. 60D vs. 600D / Rebel T3i:

Sensor and Image Quality: As I said above, all three cameras share a very similar sensor with 18 megapixels, and so their image quality and low light performance will be virtually the same. All are capable of taking professional quality images.

Exposure Metering: The threecameras all share the latest 63-zone, dual-layer exposure metering system and 4 metering modes. That means they will all determine the exposure virtually identically and enable you to take properly exposed photos in most every situation, including difficult back-lit scenes. The size of the areas metered for Partial and Spot metering vary slightly between the cameras, but that isn’t anything critical.

Autofocus: The 60D shares a similar autofocus system to the T3i and the previous 50D, with 9 focus points and three auto focusing modes. However the 9 AF points of the 60D are more sensitive/ accurate than those of the T3i: all are cross-type in the 60D, only the center is cross-type in the T3i. This means that the outer focus points of the 60D will do a better job, in difficult focusing situations, of quickly and accurately focusing on the subject.  This may include, for example, lower light situations or tracking moving subjects.  The T3i does a stellar job of focusing, but if you are highly demanding or are going to be primarily shooting action and motion, this is an important difference to consider.

The 60D autofocus system in turn is much less complex than the sophisticated AF system of the 7D with its 19 AF point system and its additional Zone, Spot, and Expansion area modes.  If you shoot serious sports, action, birds, wildlife, etc., then you are going to want to consider the highly capable autofocus system of the 7D.  With its additional AF points and the ability to group them in various ways (Autofocus Area Modes), as well as the multiple Custom Functions that allow you to customize exactly how the AF system works, it is ideal for sports and action.  These Custom Functions can dictate how it tracks subjects, how it deals with objects that come between you and your initial subject, how quickly it responds to these changes of possible subjects that are at different distances from you, etc.   The entire AF system of the 7D is a bit complex, and will take some studying and experimentation if you wish to fully understand and take advantage of it.  However, if you are not an avid sports photographer, a wildlife shooter, or someone who understands, needs, and will use the elaborate features of the 7D AF system, then this shouldn’t dissuade you from the 60D.

I have written an additional post about Taking Control of Your Canon Autofocus System.

Canon EOS 7D compare 60D T3i
Detail of the Canon 7D

Construction: As you can probably figure out from the prices, each camera is not built the same. The 60D has relatively strong construction of an aluminum frame and polycarbonate body. It is better built than the stainless steel frame with polycarbonate body of the T3i/ 600D but not as strong as the 7D’s magnesium alloy construction. The 60D also has some amount of weather sealing – more than the 600D/T3i, less than the 7D. But for most users, including even those using the camera daily or in travel situations, the construction of any of these cameras is far more than good enough, strong enough, and durable enough.  But if you are going to be working extensively in dusty or moisture-heavy areas or situations, you will want to seriously consider the extensive weather sealing of the 7D.  While the strong magnesium construction of the 7D is impressive, that is not really needed by many people other than pros who intensively use their cameras in photo-journalist or constant-travel type situations.

ISO: Since they all share a very similar sensor, the ISO sensitivity and performance at high ISO settings is virtually the same for these three cameras. But don’t take my word for it, don’t be swayed by pixel peepers on forums, instead check out the camera sensor tests at dxomark to verify this. As you can see, they all share the exact same overall score, and show very similar performance.

Controls: As with construction, the buttons and controls vary significantly with these cameras. Unlike the T3i, the more advanced 60D and 7D have nearly every control an advanced photographer needs on the exterior of the camera and they also have the top LCD panel and rear Quick Control Dial that are not on the 600D/T3i. Do you find yourself constantly changing the ISO, the metering mode, or the autofocus mode to adapt to changing situations?  Then you will want direct access to these controls and the ability to more easily monitor them on the top LCD panel.  Or do you generally work in one of the more automatic modes and not need to deal with these settings?  With all the cameras, any controls can also be easily accessed with the Q button and Q menu or in the other menus on the rear LCD monitor. The top buttons of the 60D set only one setting each, so this is less complicated (but thus less versatile) than the multiple-setting buttons of the 7D. Canon has removed the white balance (WB) button on the 60D that the 7D and 50D have, but that isn’t a big deal – use the Q Menu. Another change on the 60D is that the Multi-controller has been moved from the thumb joystick like the 7D and 50D and placed in the middle of the rear Quick-control dial. This doesn’t change how it functions, and should just be a matter of getting used to the difference. (Unfortunately, I still really do prefer the old design and location, though I find it is easier to quickly and accurately click on the diagonal directions with the new 60D Multi-controller design).  If you plan on using your camera on Auto or Program most of the time, then the controls of the T3i are more than sufficient for your needs. If you work in Av, Tv, or M modes and need quicker and more direct access to your controls and the additional top LCD screen to view and change your current settings, then you need to look at the 60D or 7D over the T3i.

Brief commercial interruption:  I want to mention that I have written e-book user’s guides for the Canon 7D, Canon 60D, Canon Rebel T3i, and Rebel T2i. After spending so much time studying, experimenting, writing about, comparing, and discussing these cameras, I decided to put all that knowledge into e-book form! Each of these user’s guides cover all the features, settings, and controls – but more importantly when and why to use them in your photography.  This includes metering modes, aperture and shutter priority modes (Av and Tv), advanced autofocus use, and more.  They also describe all the Menu settings and Custom Function settings – with recommended settings.  Take control of your camera and the images you create!  Canon 7D Experience, Canon T3i Experience, Your World 60D and T2i Experience. Learn more about the e-books by clicking on their titles or on the covers below.

canon eos 7d book ebook firmware 2 2.0 how to manual dummies field guide instruction Canon T3i book Canon 600D book Canon T3i Experience book guide manual tutorial how to instruction by Douglas Klostermann

Canon 60D book Your World 60D by Douglas Klostermann Canon T2i book Canon 550D book T2i Experience by Douglas Klostermann

Menus and Custom Functions: These allow for greater control over customizing how the camera functions. The 60D has many more Menu and Custom Function options than the 600D/T3i and nearly as many as the 7D. These settings enable you to customize the operation, function, and controls to work how you want them to, including things like exposure increments, peripheral illuminations correction for lenses (fixes dark corners), tweaking how the autofocus system operates, setting more precise white balance settings, and customizing which button does what. These settings are very important to advanced users who wish to customize their camera to work exactly how they need it too, but aren’t nearly as critical to others who don’t have such intensive demands.  (Since many of the Menu and Custom Function settings can be complicated and confusing, my e-books on the 60D, the 7D, and on the T3i/600D cover all of these options along with my recommended settings to get you up and running quickly!)

Wireless Flash: Like the 7D, the 60D and the T3i both incorporate wireless flash triggering. It allows you to trigger multiple off camera flashes at different output levels. The  older 550D/T2i does not have this feature.

Articulating LCD Screen: The big new feature that the 60D and T3i have that the 7D and T2i do not is the articulating rear LCD screen. This may prove useful for videographers, as well as for setting up compositions while the camera is on a tripod, for macro use, or for using it from unusually low or high vantage points. Some users will be able to avoid buying an expensive angle finder because of this feature. There is also an electronic level in the 7D and 60D, visible in the viewfinder, rear LCD, or top LCD.

Viewfinder: The 60D has a large, bright pentaprism viewfinder with 96% coverage of the actual resulting image, better than the pentamirror and 95% coverage of the 600D/T3i, but not quite as nice as the nearly 100% view of the 7D pentaprism.

Processor:
The 60D shares the same Digic 4 processor as the 600D/T3i. The 7D has dual Digic 4 processors. However, if you don’t need to shoot dozens of continuous images, you probably won’t notice any processing speed issues.

Continuous Shooting Speed: The 7D can shoot a blazing 8 frames per second, in which the photos barely change from frame to frame. The 60D can shoot a respectable 5.3 fps which is actually a more useful rate, and is a higher rate than the 600D/T3i rate of 3.7 fps. If you need the extremely high fps for sports, wildlife, or other action shooting, consider the 7D. If not, don’t be swayed by this excessive feature that is designed for people like pro sports or dedicated wildlife shooters.  However, if you are shooting any type of sports, action, birds, dance, etc., the 5.3 fps of the 60D is much more useful than the slower T3i.

Canon EOS 7D compare vs 60D T3i
Detail of the Canon 7D

Memory Card: The 60D uses the SD memory card like the 600D/T3i, not the CF card of the 7D and 50D.  This doesn’t really mean too much other than the CF cards are larger and more rugged, yet prone to bending the camera’s internal connection pins.  Handle either of them with care and it shouldn’t make much of a difference.

Battery: The 60D uses the LP-E6 battery like the 7D and 5D, which is a nice feature as this battery can often last through a full day of shooting. The T3i and T2i use the smaller LP-E8 battery with less capacity.  In any case you should have an extra battery or two.

Size and Weight:
The T3i is smaller and lighter (18.2 oz/515 g) than the 60D (23.8 oz/675 g), which in turn is smaller and lighter than the 7D (28.9 oz/820 g). Go to the store and hold them to get a better feel for their size and weight. HOWEVER, please know that the size and weight of these bodies is a result of their build, features, and capabilities.  Those are the criteria that should be compared first, not the resulting size and weight.  (Also be sure to read this post of Why How it “Feels” is not a valid Criterion for Choosing an dSLR.)  But, I do realize that size and weight is important to some, perhaps many, due to physical limitations or just simple comfort and enjoyment.  So take my dramatic proclamation with a grain of salt!  The 60D and 7D “feel” like the more substantial cameras that they are. A nice improvement of the T3i is that its hand grip area has been modified, and has a different feel than that of the T2i – the area where the thumb rests is contoured differently and has a nice channel for the thumb, which allows for a much more secure one-hand-grip of the camera.

AF Microadjustment: The 7D has this feature, the 60D and T3i and T2i do not. Many are disappointed that the 60D does not include the ability to micro-adjust the focus so that each of your lenses focuses extremely accurately. However, if you have a major focus issue, send your camera and/ or lenses to Canon while under warranty and ask them to calibrate them. Bad bodies and lenses are rare, but they do exist.  Doing AF microadjustment yourself is often a maddening undertaking. You may make a good calibration under controlled conditions, but this really doesn’t replicate real life shooting.  And due to manufacturing tolerances of both cameras and lenses, there is a relatively wide range of what is considered acceptable.  If you need your camera and lens to be perfectly sharp, you are going to need to buy a $6000 pro body and a $1500 lens.  See this article This Lens is Soft and Other Myths, its follow up article, and the follow up controlled tests to learn more about this.

Locking Mode Dial: This is a new feature for a Canon dSLR, only on the 60D, that keeps the Mode dial from accidentally rotating. A nice touch, and not at all difficult to change quickly with one hand, as some people have claimed: just push the center button with your left index finger, rotate dial with thumb and middle finger.  I actually wish my 50D had this. If you wish to retrofit your 7D or 5D Mk II with this feature, Canon will do it for $100.

Full HD video: Of course they all offer this capability. Note that this is not video for your kids’ parties and soccer games. It does not have continuous autofocus while shooting, as a camcorder does. It is not designed for that kind of use, but rather for serious videographers who typically manually focus. You can adjust autofocus while shooting by pressing the shutter button or the AF button, but it may have a less than desired looking result and unless you are using an external microphone, the autofocusing sound will be picked up. The T3i has the digital zoom feature in video, which allows for nice smooth zooms while filming.

Flash Sync: A Note to Strobists -the 60D and T3i do not have a PC sync flash socket to plug in PC sync cords. The 7D has this.

Ease of operation: While beginners may find all the buttons, controls, and menus of any dSLR difficult and confusing at first, the additional controls and menus of the 7D and 60D are all quite intelligently designed, intuitive, and straightforward for the more advanced user. The menus and controls of the T3i and T2i are also pretty basic and simple to learn.  There is certainly a “price of admission” to learning and getting the most from any dSLR, and you will need to invest time and effort into both reading and using/ experimenting with your camera.  Start with the manual, then perhaps have a look at my e-book camera guides, then practice, practice, practice!

Remember that all of these comparisons and features are relative. Of course the fact that the 7D can take 126 consecutive photos at the rate of 8 frames per second makes it “better” than the other models.  Advanced features like that differentiate it from the other cameras and are also why it costs more. But is it actually “better” for you and how you plan to photograph?  Do you ever need to take 15.75 seconds of continuous photos? Ever? (Look at your watch for 15.75 seconds right now and act like you are taking continuous photos. Now what are you going to do with all those nearly identical 126 imaginary photos?!)

Purchasing:  If you plan to purchase any of these cameras, please see the Purchasing section below.

*****

Canon Rebel T3i EOS 600D book guide manual tutorial how to instruction
Mode dial of the Canon Rebel T3i

T3i vs T2i

Review / Comparison of Canon Rebel T3i vs T2i (600D vs 550D):  If you are trying to decide between the Canon T2i or T3i, the previous model, the T2i, already shared many important features with the 60D (and even features of the semi-pro 7D) including the 18 MP sensor, 63-zone exposure metering system, high ISO performance, HD movie capabilities, and Digic 4 image processor. Now with the addition of the vari-angle articulating rear LCD screen (aka rotating screen), remote flash capabilities, creative filters, additional movie options, and in-camera image processing features, the new Canon T3i is even closer in specifications to the 60D, which may make your choice harder. But there are some important differences, and this post will hopefully help you decide which features are important to you and the way you photograph, which ones may be unnecessary, and thus which model fits you best. As I’ve said before, you need to choose which camera is best for you based on your needs and experience as a photographer and based on how the advanced features, controls, and customization options fit those needs and serve the way you work – not the other way around where you look at the new features and speculate if you really need or will use them.

The Rebel T3i is replacing the T2i at the entry level end of the Canon line-up. (There is also the T3 in the most basic, entry level position.)  The differences are minor but possibly significant depending on your needs. Since both cameras share the same 18 megapixel sensor and Digic 4 processor, both the T2i and T3i will create images with exactly the same image quality, produce the same low light-high ISO performance, shoot at 3.7 frames per second, and have nearly the same size and build quality. They are both offered with the same 18-55mm kit lens (with some minor cosmetic differences on the new T3i kit lens). The T3i is very slightly larger and heavier due to the addition of the rotating rear LCD monitor. And that is one of the biggest differences between the two cameras: do you want and need a vari-angle rear screen or not? The other major difference is the ability of the T3i to remotely control multiple off-camera flashes. Like the 60D and 7D, you can use the built-in flash of the T3i to trigger other Canon Speedlites. This could be an important reason for choosing the T3i. However, if you don’t use or plan to use one or more off-camera flashes, this shouldn’t be important to you.

Some other minor additions to the T3i include the Scene Intelligent Auto Mode, which is a feature borrowed from point and shoot cameras. When in Auto mode, the T3i will make a determination of what type of scene you are shooting – close-up, portrait, landscape, etc. – and automatically configure the camera settings accordingly. However, if you want to use a powerful and costly digital SLR as a point and shoot, you should probably save the money and just buy a nice, high quality point and shoot like the Canon S95. Other additional but not very important upgrades include the in-camera processing Creative Filters like Grainy Black and White or Fisheye, and the ability to choose different image size ratios and to rate your images. However, this type of processing is best done on your computer with software like Photoshop or even Photoshop Elements. There is also a marginally helpful Feature Guide which gives brief descriptions of various settings and some additional video features like digital video zoom (for nice smooth zooms) and Video Snapshot, which you can use to shoot short video clips that are automatically joined together into a video, with music. Again, this is pretty easily done on your computer, and with much more control, with basic video editing software.

So if you need any of these new features, get the Canon Rebel T3i / 600D. If not, buy whichever one if offered at a cheaper price. However, if you still wish to compare the Rebel T3i to the 60D and 7D, see below. If you wish to compare the Canon T3i to the Nikon D5100, check out this post Nikon D5100 vs. Canon T3i.

see the Canon EOS Rebel T3i (Body Only) on Amazon
see the Canon EOS Rebel T3i with 18-55mm Lens on Amazon

********

Review of Canon EOS 60D vs. 50D: Since the Canon EOS 60D basically replaces the Canon 50D (well, replacement isn’t exactly the right word because the 60D doesn’t really follow the 20D to 50D progression of improvements…), the 60D or 50D decision is an easy one. The 50D shouldn’t really be considered anymore. While the Canon 50D does hold a couple interesting advantages over the 60D (faster frame per second (fps) burst rate in continuous mode, stronger construction, more comprehensive buttons and controls, complete lack of fun filters like “grainy black and white”), the sensor and exposure metering system have been greatly improved in all the newer cameras (such as the 7D or 60D or 600D/ T3i or 500D/ T2i) and I feel these features, along with the increase in megapixels, outweigh any other 50D advantages. I would definitely choose a 60D instead of a 50D. This is coming from experience, as I use a 50D professionally and on a weekly basis. Or choose a 7D instead of a 50D if your needs require it and budget allows it. (Find out below if your needs require it!) If you still wish to learn more about the differences of these two models, I write in more detail about the 50D vs. 60D comparison here from a camera features and operation point of view.

Canon Rebel T3i EOS 600D vs Canon 60D
Canon Rebel T3i / 600D and the Canon 60D


Purchasing: If you plan to purchase cameras, photo equipment, books, or anything else from the retailers below I encourage you to do so through these referral links. While your price will be the same, they will give me a little something for the referral, which helps to support my blog and my work – thanks!  I appreciate your support!

Amazon

If you are in the UK, please click here for the UK Amazon referral link.

And if you are in Canada, please click here to use my Canada Amazon.ca referral link.

For those interested in purchasing through B&H Photo, Adorama, or directly from Canon, I have set up affiliate links with them as well. Just click on the logos below to start shopping:
BandH Photo   

These are all retailers that I have purchased equipment from (excluding Amazon UK/Canada), and I recommend them based on my good experiences, their extensive selection, competitive prices, great customer service and responsiveness, and fair return policies.

or use one of these direct links to Amazon:

See and buy the Canon EOS Rebel T3i (Body Only) on Amazon
See and buy the Canon EOS Rebel T3i with 18-55mm Lens on Amazon

See and buy the T2i on Amazon.

See and buy the 60D on Amazon.
See and buy the 7D on Amazon.
See and buy the Canon 5D MkII on Amazon

Canon Rebel T3i EOS 600D vs 60D vs 7D vs T2i
Canon Rebel T2i, T3i, 60D, and 7D – photo by author at Newtonville Camera


Which Canon dSLR is Right for You?

This section of the article, which can help you decide on a camera based on your photography experience and needs (and also includes the discussion of the Canon 5D Mk II),  has been moved to its own post here:

http://blog.dojoklo.com/2011/10/14/which-canon-dslr-is-right-for-you/


*****

Related Posts:

Comparing and Choosing Canon Lenses
Equipment for Digital Photography
Essential Books for Digital Photography

As I said above, when you are trying to determine which camera to purchase or upgrade to, you need to first consider and determine your needs, and then see which camera fills those needs. Not the other way around. Here is a post I wrote which discusses this, titled

How to Choose a New dSLR Camera


Was this post helpful?  Please let others know about it by clicking the Facebook, Twitter, or Google+ sharing buttons below, or linking to it from your blog or website, or mentioning it on a forum.  Thanks! 

Want to help support this blog with no cost or effort?  Simply click on the Amazon and B&H Photo logos on the left side of this page to go to those sites and make your purchases.  They will then give me a little referral bonus!